TESTO 205 Operator's manual

Instruction Manual
testo 205
pH/Temperature Measuring Instrument
99 Washington Street
Melrose, MA 02176
Phone 781-665-1400
Toll Free 1-800-517-8431
Visit us at www.TestEquipmentDepot.com

General Information
2
General Information
Please read this document through carefully and familiarise
yourself with the operation of the product before putting it to use.
Keep this documentation to hand so that you can refer to it when
necessary.
Symbols and what they mean
Symbol Meaning Remarks
Warning text: Warning! Please read warning
Serious physical injuries could occur carefully and take the
if the precautionary measures precautionary measures
specified are not taken. specified.
Warning text: Caution! Please read warning
Light physical injuries could occur carefully and take the
if the precautionary measures precautionary measures
specified are not taken. specified.
Note Pay particular attention
to Notes.
Button name Press button.
Text, Display content Text or symbol is shown
on the display.
Taste

Contents
General Information ..........................................................2
Contents ..........................................................................3
1. Safety Information ............................................................4
2. Intended Purpose ............................................................5
3. Product Description ..........................................................6
3.1 Display and control elements ..............................................................6
3.2 Power..................................................................................................6
3.3 Storage cap ........................................................................................7
3.4 Wall / Transport bracket ......................................................................7
4. Initial Operation ................................................................7
5. Operation ........................................................................8
5.1 Switching On/Off ................................................................................8
5.2 Setting instrument ..............................................................................8
5.3 Measuring ..........................................................................................9
5.4 Calibrating instrument........................................................................10
6. Service and Maintenance................................................11
6.1 Checking electrolyte gel ....................................................................11
6.2 Cleaning housing ..............................................................................11
6.3 Changing probe ................................................................................11
6.4 Changing battery ..............................................................................11
7. Questions and Answers..................................................12
8. Technical data ................................................................13
9. Accessories and Spare parts ..........................................13
Contents 3
en

1. Safety Information
4
1. Safety Information
Avoid electrical hazards:
Do not measure on or near live parts!
Preserving product safety/warranty claims:
Operate the instrument properly and according to its intended
purpose and within the parameters specified. Do not use
force.
Do not store together with solvents (e.g. acetone).
Temperature data on probes/sensors refer only to the
measurement area of the sensors. Do not expose handles and
cables to temperatures greater than 70°C if they are not
specifically designed for higher temperatures.
Open the instrument only when this is expressly described in
the documentation for maintenance purposes.
Only the maintenance and service work described in the
documentation should be carried out. Please adhere to the
steps specified. For safety reasons, only original spare parts
from Testo should be used.
Ensure correct disposal:
Disposal of defective rechargeable batteries and spent
batteries at the collection points provided.
Send the instrument directly to us at the end of its life cycle.
We will ensure that it is disposed of in an environmentally
friendly manner.

2. Intended Purpose
testo 205 is a practical instrument for measuring pH value and
temperature.
Its appliclation areas include the measurement of semi-solid
substances in the food production and processing sector:
abattoirs, cutting plants, Incoming goods checks during
transport, cheese production and in bakeries.
testo 205 is nnot ssuitable ffor ddiagnostic mmeasurements iintthe
medical ssector.
2. Intended Purpose 5
en

3. Product Description
3.1 Display and control elements
3.2 Power
Power is via four button cells (Type LR44, included with delivery).
MMOODDEE::
change function
OONN//HHOOLLDD::
On/Off switch,
holds readings
BBaatttteerryy
ccoommppaarrmmeenntt
CCAALL::Calls up “calibration”
mode
DDiissppllaayy
3. Product Description
6
PPrroobbeessoocckkeettwwiitthh
ssccrreewwrriinngg

3.3Storage cap
The storage cap filled with electrolyte gel is
used to store the probe between
measurements.
The probe is only immediately ready to
operate if stored in electrolyte gel.
If the probe has been out of the electrolyte gel for a longer period
of time, it must be stored in the electrolyte gel for approx. 12
hours to regenerate.
The storage cap can also be attached to the wall/transport
bracket.
3.4Wall/Transport bracket
The wall/transport bracket with belt holder
and attachment unit for the storage cap is
used for the safe storage of the
measurement instrument at a fixed point or
during transport.
4. Initial Operation
Insert battery
1Remove battery compartment.
2Insert batteries (4x Type LR44). Watch
out ffor ++/-!!
3Push battery compartment back in.
4Remove protection strip on the storage cap.
3. Product Description 7
en
Test Equipment Depot - 800.517.8431
99 Washington Street,Melrose, MA 02176
TestEquipmentDepot.com

5. Operation
8
5. Operation
5.1 Switching on/off
Switch on instrument: .
-All segments light up briefly and the instrument changes to the
measurement mode.
Switch off instrument: Keep pressed.
5.2 Setting instrument
The following functions can be set:
Function Description Setting options
Temperature unit Sets unit °C or °F
Auto Hold (AUTO HOLD) Automatically holds reading, On (switched on) or
as soon as it is stable* OFF (switched off)
Gradient/ Offset Displays gradient and offset None
values stored in the instrument (Information only)
Calibration method (CAL) Sets 1, 2 or 3 point 1P,2P or 3P
calibration
Calibration points (CAL pH) Sets calibration points 1P: 4,7or 10
2P: 47or 710
Auto Off (AUTO OFF) Instrument switches off On (switched on) or
automatically after 10 minutes OFF (switched off)
if no button has been pressed
Display light (bl) Display light goes on for On (switched on) or
approx. 3 s whenever a OFF (switched off)
button is activated
Beeper (bP) Warning sound (button pressed, On (switched on) or
stable reading reached with OFF (switched off)
Auto Hold function switched on)
* Modification less than 0.02pH in 20s
The setting procedure can be interrupted by switching off the
instrument. The modifications are then not saved.
The instrument is switched off.
1Opening the setting mode: is kept pressed + .
2Select temperature unit (°C or °F): .
Confirm selection: .
3Switch Hold on (On) or off (OFF): .
Confirm selection: .
- The gradient and offset values stored in the instrument are
displayed as information.
4Change view: .
MODE
MODE
CAL
MODE
CAL
ON/HOLDMODE
ON/HOLD
ON/HOLD

5Select calibration method (1P, 2P or 3P): .
Confirm selection: .
If 1 or 2 point calibration has been set:
Select calibration points (4, 7or 10, and 477or 7110): .
Confirm selection: .
6Switch Auto Off on (On) or off (OFF): .
Confirm selection: .
7Display light on (On) or off (OFF): .
Confirm selection: .
8Switch beeper on (On) or off (OFF): .
Confirm selection and save settings: .
- All of the segments light up briefly and the instrument changes
to the measurement mode.
5.3 Measuring
Setting up the instrument
If large quantities of the electrolyte gel are stuck to the probe
when removed from the storage cap, it is a sign that the gel is
spent.
A new storage cap is needed.
Clean off the pH probe before and after each measurement
with low concentration soap water followed by tap water
(water temperature should be below 40°C). Dab dry with a
paper towel. Do not rub.
1Carefully remove storage cap.
2Switch on instrument: .
Carry out measurement
Measurement tip made of glass, risk of breakage!
Risk of injury on account of glass parts which remain in the
measurement medium.
Check measurement tip of pH probe after each
measurement for damage.
ON/HOLD
MODE
CAL
MODE
CAL
MODE
CAL
MODE
CAL
MODE
CAL
5. Operation 9
en

5. Operation
10
Immerse/penetrate probe in the medium to be measured.
- The measured pH and temperature values are displayed. The
readings are updated twice a second.
Hold readings manually: .
Restart measurement: .
- If Auto-Hold is switched on, AUTO HOLD flashes until the
instrument has found a stable pH reading. The readings are
then frozen (AUTO HOLD lights up). If no stable pH readings
have been found within 300s, the measurement is stopped
( and AUTO HOLD light up).
Restart measurement: .
Finish measurement
1Switch off instrument: Keep pressed.
2Clean off the pH probe with low concentration soap water
followed by tap water (water temperature should be below
40°C). Dab dry with a paper towel. Do not rub.
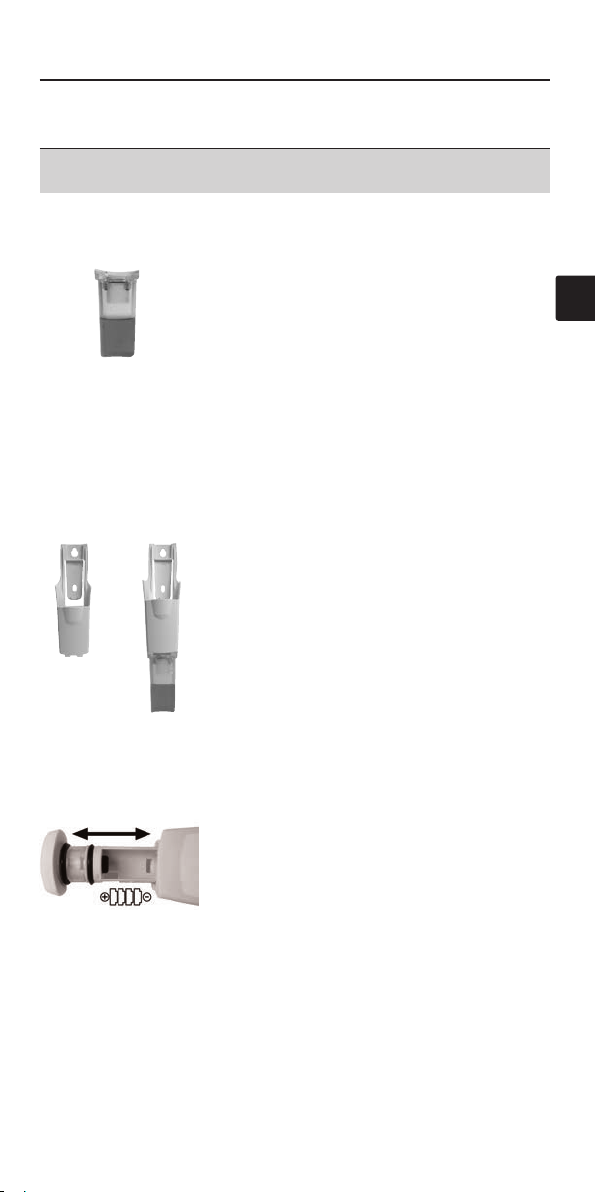
3Insert probe in the storage cap filled with electrolyte gel.
The probe tip must be immersed in the electrolyte gel. Keep
electrolyte gel clean.
5.4 Calibrating instrument
Please also adhere to the instructions supplied with the buffer
solution (Testo buffer: see label).
The instrument is switched on and is in the measurement mode.
1Open calibration mode: .
- Calibration point (4, 7or 10) is shown and CAL flashes.
2Skip calibration point: .
-oor-
Immerse probe in the buffer solution and start calibration:
.
- The instrument waites for a stable reading: AUTO flashes.
- If a stable reading is available (change less than 0.02pH in
20s), the calibration point calibrates and the instrument
changes to the next calibration point (if available) or to the
gradient and offset value display.
Carry out calibration manually: .
Repeat Step 2for additional calibration points.
CAL
CAL
MODE
CAL
ON/HOLD
ON/HOLD
ON/HOLD
ON/HOLD

- Once calibration is complete, the amount of the gradient and
offset value is shown. If the amount of the gradient value is less
than 50mV / pH or the amount of the offset value is greater
than 60mV, the pH electrode is spent and must be replaced.
3Return to measurement view: Press any button.
6. Service and Maintenance
6.1 Checking electrolyte gel
Check the electrolyte gel in the storage cap regularly for
contamination and ensure it is filled to the correct level.
Replace storage cap if necessary.
6.2 Cleaning housing
Clean housing with a damp cloth (soap water) if dirty. Do not
use abrasive cleaning agents or solutions!
6.3 Changing the probe
The instrument must be newly calibrated once a probe has
been changed (See 5.4 Calibrating instrument, P. 10)!
Instrument must be switched off. Plug contacts in the instrument
should not be touched!
1Turn screw ring anti-clockwise and remove probe.
2Attach new probe (watch for guide groove) and tighten screw
ring in a clockwise direction.
6.4 Changing battery
1Pull out battery compartment.
2Remove spent batteries and insert new
batteries (4x Type LR44). Watch oout ffor
+/-..
3Reinsert battery compartment.
5. Operation 11
en

7. Questions and Answers
12
7. Questions and Answers
Question Possible causes Possible solution
Readings instable. Static charge. Rinse off pH electrode
with tap water or
low concentration
soap water.
Air cushion from measurement Shake pH electrode in a
electrode gets into measurement downward direction like
tip. with a fever thermometer.
pH electrode has dried out. Place pH electrode for
several hours in water or
diluted hydrochloric acid.
lights up. Remaining capacity of battery Change battery (See
< 10h. 6.4 Changing battery,
P. 11)
Instrument switches Auto Off function is switched on. Auto Off.
itself off. (See 5.2 Setting
instrument, P. 8)
Er1 lights up. Invalid gradient value Recalibrate instrument,
of pH electrode. a new buffer solution
could be used.
pH electrode defective. Change probe.
Er2 lights up. Invalid offset value Recalibrate instrument,
of the pH electrode. a new buffer solution
could be used.
pH electrode defective. Change probe.
Er3 lights up. Invalid gradient value Recalibrate instrument,
of pH electrode following a new buffer solution
3 point calibration. could be used.
pH electrode defective. Change probe.
Er4 lights up. Probe not inserted correctly. Check connection.
pH electrode defective. Change probe.

8. Technical data
Feature Values
Parameters pH/°C
Sensor pH electrodes/ NTC
Measurement range 0 to 14pH / ±0 to +60 °C (short-term to +80°C, max. 5min)
Resolution 0.01pH / 0.1 °C
Accuracy ±0.02pH / ±0.4 °C
Temperature compensation Automatic
Probe Probe module
Measuring rate 2/s
Operating temperature ±0 to +50°C
Storage temperature -20 to +70°C
Power 4x button cell, Type LR44
Battery life Approx.80h
Housing ABS
Protection class IP65
CE guideline 89/336/EEC
Dimensions (lx wxh) 145 x 38 x 167
Warranty 2 years, excluding probe module
9. Accessories and Spare Parts
Name Item no.
Probe module incl storage cap with electrolyte gel 0650 2051
Storage cap 205 with electrolyte gel, 1 off 0554 2051
Storage cap 205 with electrolyte gel, 3 off 0554 2052
pH buffer solution (4.01pH), 250ml, 1 off 0554 2061
pH buffer solution (4.01pH), 250ml, 3 off 0554 2062
pH buffer solution (7.00pH), 250ml, 1 off 0554 2063
pH buffer solution (7.00pH), 250ml, 3 off 0554 2064
pH buffer solution (10.01pH), 250ml, 1 off 0554 2065
pH buffer solution (10.01pH), 250ml, 3 off 0554 2066
Aluminium case 0554 2069
8. Technical data 13
en

0973.2051/01/Sky/dr/30.03.2004
Test Equipment Depot - 800.517.8431
99 Washington Street,Melrose, MA 02176
TestEquipmentDepot.com
Other manuals for 205
1
Table of contents
Other TESTO Test Equipment manuals
Popular Test Equipment manuals by other brands

Mitsubishi MOTORS
Mitsubishi MOTORS M.U.T.-III owner's manual

Sperry instruments
Sperry instruments VD6509 operating instructions

LaMotte
LaMotte TRACER pH PockeTester Instruction

Radio Shack
Radio Shack 22-330 owner's manual

Keysight Technologies
Keysight Technologies 85059V Operating and service manual

YOKOGAWA
YOKOGAWA CA320 user manual