Texi Ziggy User manual

Operation manual
Computerized zigzag
machine
Ziggy


TEXI Ziggy operation manual
Contens
General safety precautions ………………………………………………………………………………
Safety symbols ……………………………………………………………………………………………….
1. Before starting work ……………………………………………………………………………………
2. Specifications of the machine head …………………………………………………………………
3. Stitch patterns table……………………………………………………………………………………..
4. Installation ………………………………………………………………………………………………
4.01 Installing the thread stand …………………………………………………………………………….
4.02 Installing the operation panel ………………………………………………………………………..
4.03 Test run…………………………………………………………………………………………………...
5. Preparation before sewing…….. …………………………………………………………………….
5.01 Inserting the needle …………………………………………………………………………………...
5.02 Removing the bobbin case ………………………………………………………………………….
5.03 Winding the bobbin thread …………………………………………………………………………..
5.04 Placing the bobbin case and the bobbin …………………………………………………………
6. Sewing…………………………………………………………………………………………………..
6.01 Adjusting the thread tension ……………………………………………………………………….
6.02 Adjusting the pressure of the presser foot ………………………………………………………
6.03 One-touch type reverse feed stitching mechanism……………………………………………..
6.04 Hand switch…………………………………………………………………………………………….
7. Standard adjustment………..…………………………………………………………………………
7.01 Adjusting the amount of oil in the hook ………………………………………………………….
7.02 Adjusting the amount of lubricating to face plate section…………………………………….
7.03 Adjusting the height of the presser bar ………………………………………………………….
7.04 Adjusting the micro-lifting mechanism of the presser foot ………………………………….
7.05 Height and inclination of the feed dog……………………………………………………………
7.06 Attaching/removing the hook ………………………………………………………………………
7.07 Needle height (preliminary adjustment) ………………………………………………………….
7.08 Needle rise, hook clearance and bobbin case position stop …………………………………
7.09 Adjusting the stop position of the needle ……………………………………………………… .
7.10 Adjusting the thread trimmer ………………………………………………………………………
7.11 Adjusting the needle thread feeding device ……………………………………………………..
8. Maintenance………… …………………………………………………………………………………
8.01 Maintenance intervals ……………………………………………………………………………… .
8.02 Cleaning the machine ………………………………………………………………………………..
8.03 Oiling the machine ……………………………………………………………………………………
8.04 Cleaning the cooling fan installed on the undercover ………………………………………..
8.05 Cleaning the hook section ………………………………………………………………………….
8.06 Replacing procedure of the hook shaft oil wick ………………………………………………..
8.07 Applying the exclusive grease …………………………………………………………………….
CE Declaration of conformity……………………………………………………………………………..
1
2
3
3
3
4
5
5
5
5
6
6
6
7
8
8
9
9
10
10
11
11
12
12
13
13
13
14
14
14
15
16
17
17
17
17
18
18
19
19
20

TEXI Ziggy operation manual
IMPORTANT!
This instruction manual contains important guidelines regarding correct, safe and economical method of use of the machine. Following
recommendations contained in this manual will decrease work down-time, increase machine reliability and durability, and will make work
safer.
This instruction manual must always be available at the workplace. The machine can be serviced only by an employee trained in Industrial
Safety, after reading this instruction manual.
The supplier is not responsible for damages caused by improper use or by usage of this product for functions other than those it has been
designed for.
GENERAL SAFETY PRECAUTIONS
To minimize the risk of fire, electric shock, or injury, observe the following precautions:
- Keep the workplace clean.
- Pay attention to the machine’s work environment; do not subject it to atmospheric conditions.
- Do not install the machine in rooms that are dusty, where aerosols are sprayed, or to which oxygen is supplied.
- Keep the workplace well lit.
- Be careful of danger of electric shock.
- Pay attention to clothing. Let-down hair or loose clothing can be caught by the machine’s mobile elements.
- Take care not to damage the power supply cable.
- When the machine is not in use, disconnect it from the power grid.
- Take care not to turn-on the machine accidentally.
- In case of even the slightest damage, always check if the damaged part requires replacement.
- Never install on the machine attachments and accessories other than those recommended by the manufacturer and supplier.
- Do not perform machine modifications independently.
- Do not leave near the machine unattended bystanders or children.
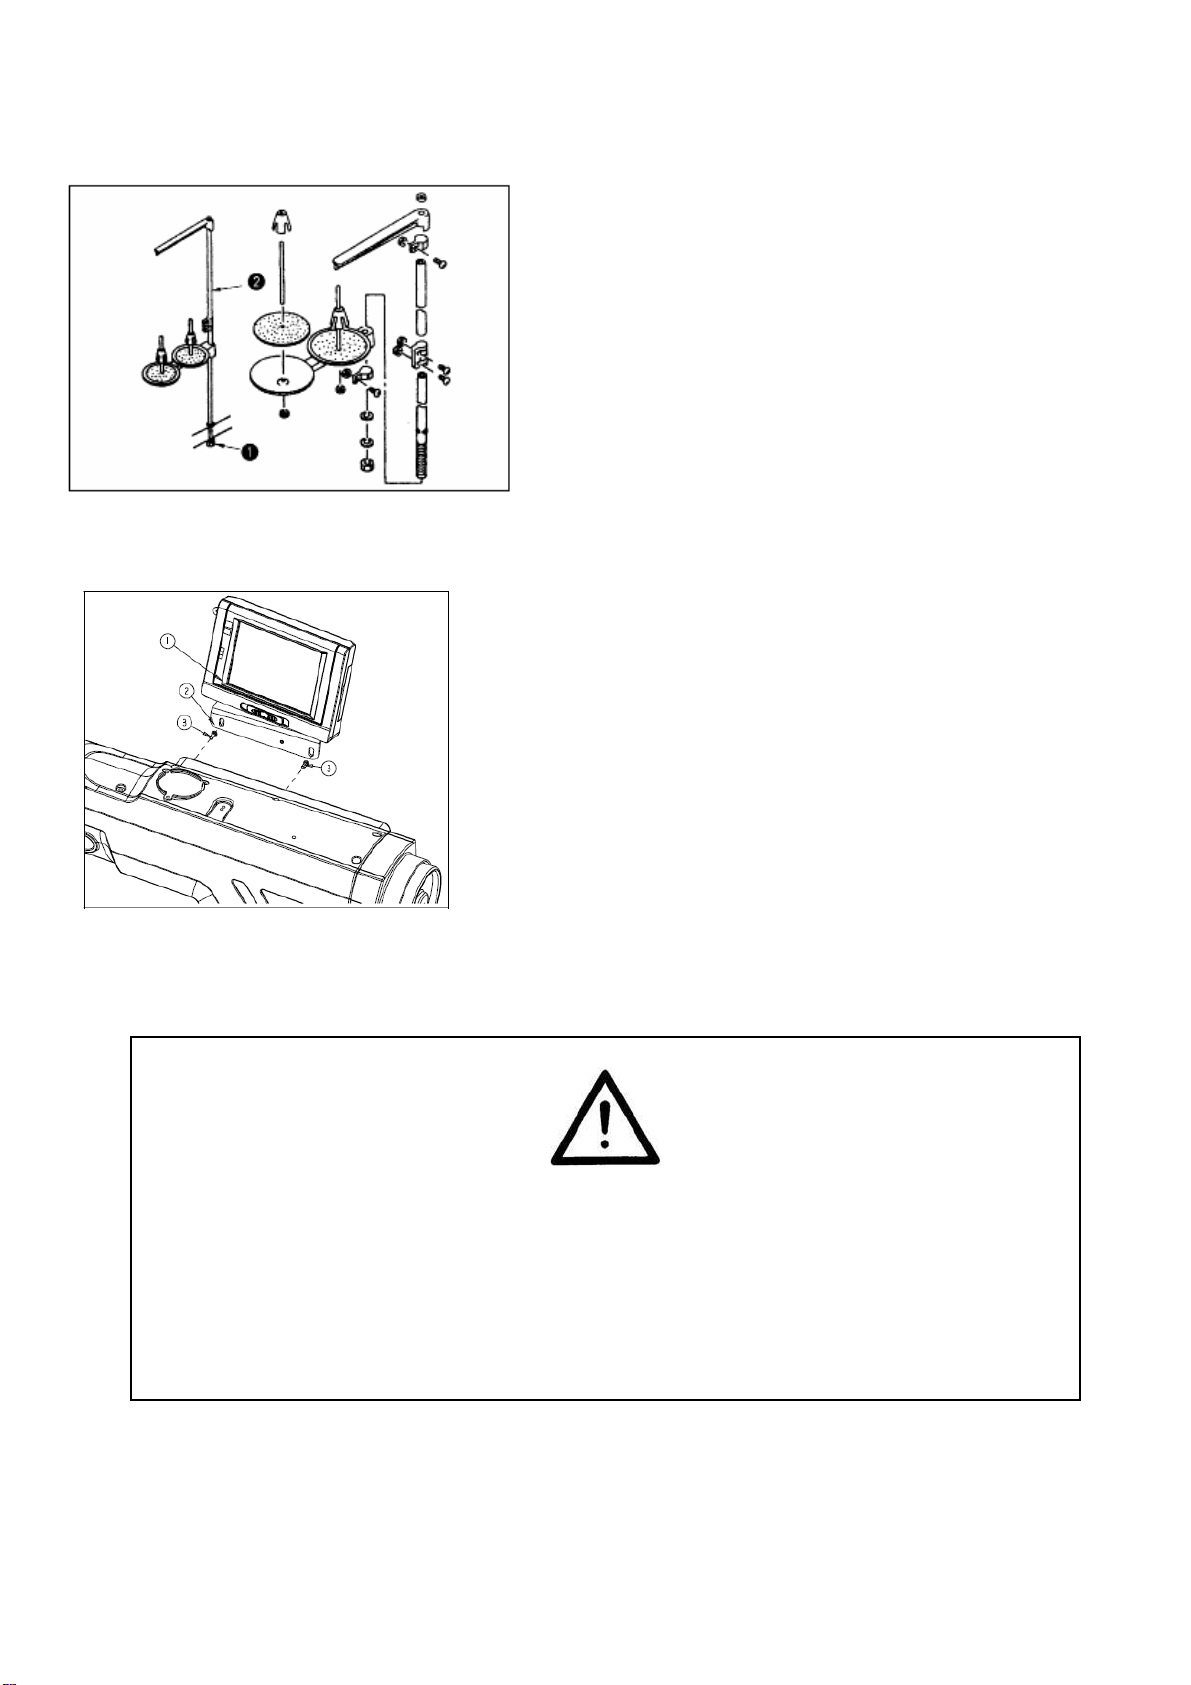
A safety shut-off switch has been installed in the machine, which protects the tilted head from accidental activation (for example, pressing
the pedal).
Electric installation
Check if the supply voltage in the electric socket corresponds to the data on the machine’s rating plate 1-phase voltage 230V 50Hz.
Check the correctness of electric connections in the plug and electric socket, observing electric shock safety countermeasures.
Do not use extension power cords.
Apply the valid electrical and Industrial Safety norms.
ATTENTION – all work related to the electrical installation must be carried out by a qualified electrician.
Before starting work
Using machine without any of the safeguarding parts (finger guard, eye guard, etc.) is dangerous to an operator.
During work, only the items necessary for sewing should be found on the machine’s work table.
Before connecting the machine to the power grid, always release the pedal and the start button.
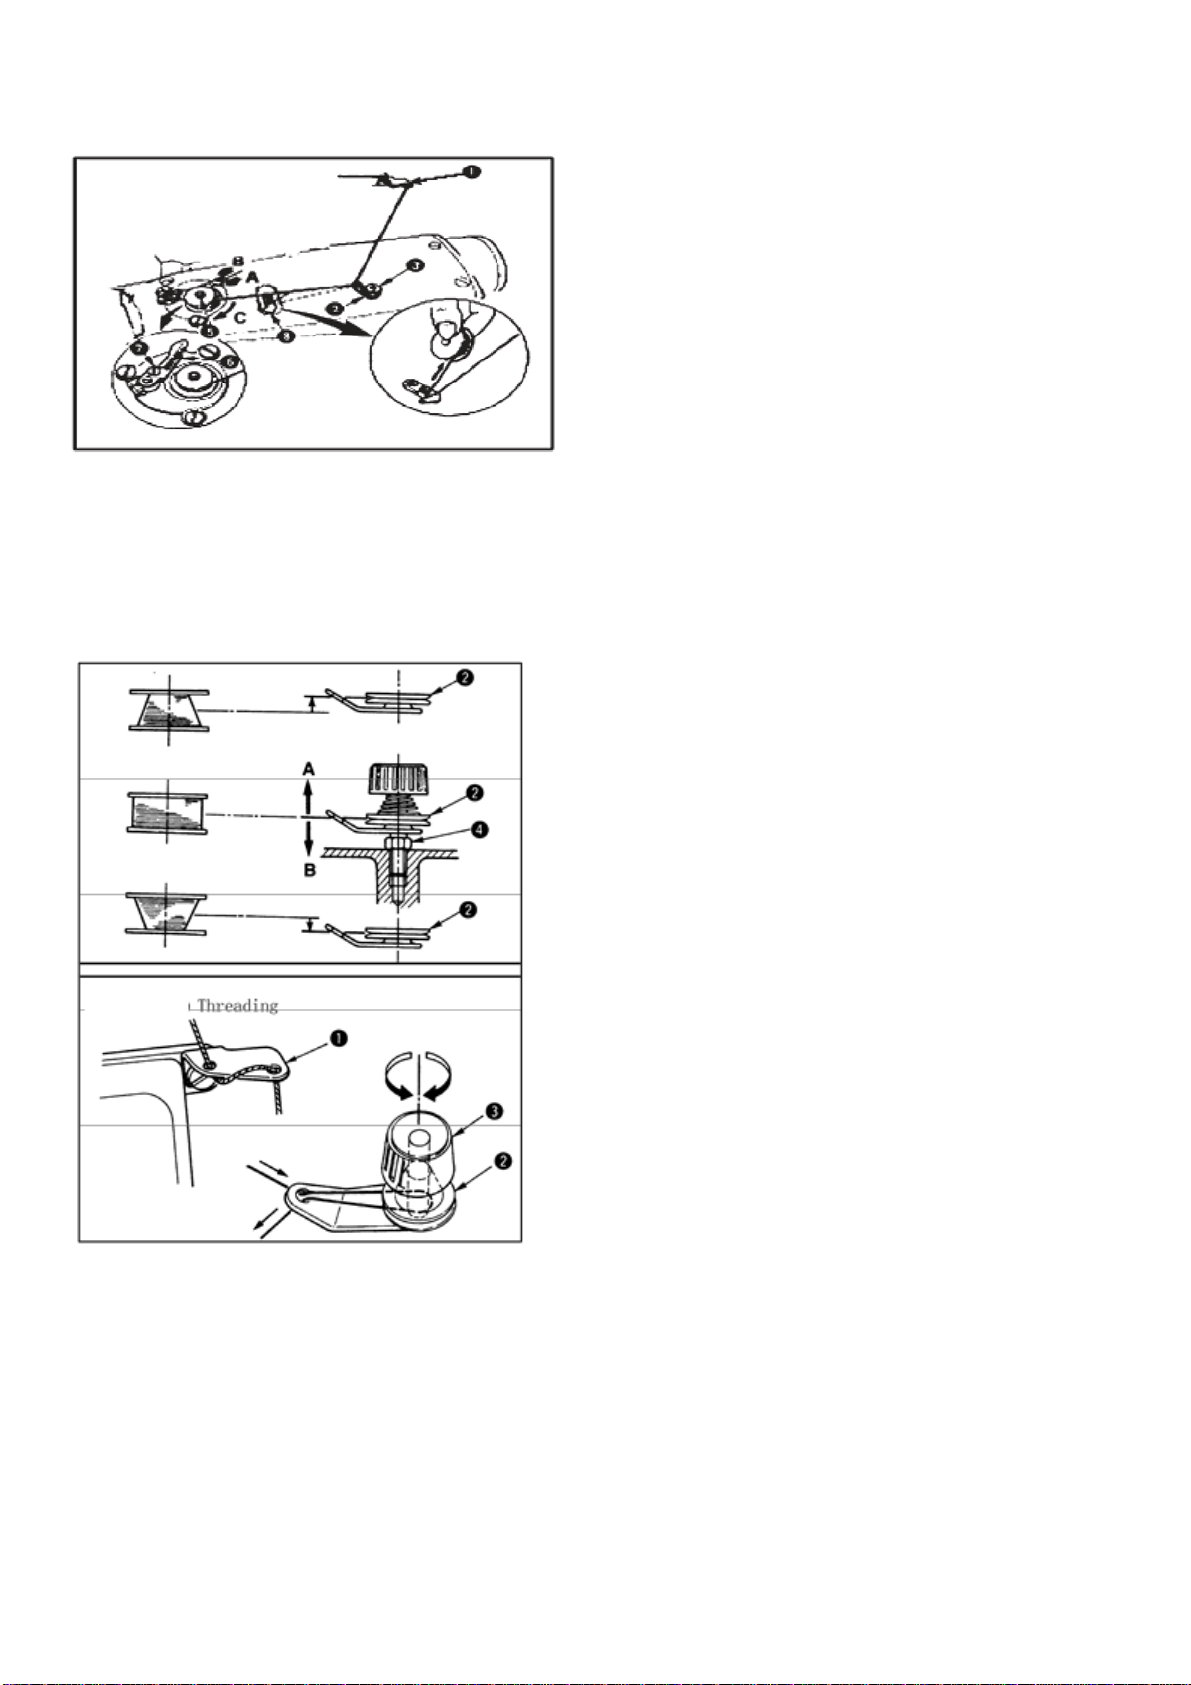
Do not use blunt or bent needles.
Do not touch any of the machine’s mobile elements, such as the needle, needle bar, thread tensioner or take-up, or hook, during its opera-
tion.
Turn machine off before: replacing needle, threading, installing attachments, changing the bobbin or bobbin case.
If you notice any abnormalities in the machine’s function, turn it off immediately and inform a mechanic or your superior. After finishing
work, turn the machine off and remove the plug from the electric socket. In case of power grid failure, disconnect the machine from the
power grid.
This machine is not a toy!
We hope that you will use this machine with pleasure for a long time.
2

TEXI Ziggy operation manual
Attention!
The machine is not to be used for other materials than those for which it has been designed.
Non-observance of this rule places the user at risk and can cause irreversible damage to the machine.
Before use, the user should become acquainted with this instruction manual, general safety precautions and maintenance instructions.
1. Before starting work
1. After turning-on the machine and during its operation, do not touch the needle or put fingers into the thread take-up guard.
2. During sewing, do not put fingers into the needle guard.
3. Before tilting the machine head or uninstalling guards, turn power off.
4. Turn machine off before leaving it unattended.
5. Do not allow hair, loose clothing, fingers or any objects to be in the vicinity of the pulley during machine run.
6. Do not clean the machine with paint thinner.
Safety symbols
Danger!
Points to be observed!
Danger of injury for operating and specialist personnel!
Caution
Do not operate without finger guard and safety devices.
Before threading, changing bobbin and needle, cleaning etc.
Switch off main switch.
Proper use
Texi Ziggy is high-speed, zigzag sewing machine with bottom feed and a large hook.
The machine is used for producing zigzag lockstitch seams in the clothing and linen industry.
Any and all uses of this machine which have not been approved of by the manufacturer are considered to be inappropriate! The manu-
facturer cannot be held liable for any damage caused by the inappropriate use of the machine! The appropriate use of the machine in-
cludes the observance of all operational, adjustment, maintenance and repair measures required by the manufacturer!
2. Specifications of the machine head
Model
Ziggy
Application
Light-weight materials to medium-weight materials
Max. sewing speed
5000rpm
Max. zigzag width
10 mm
Max. feed pitch
5mm(normal/reverse feed)
Stitch pattern
14 type 20 patterns
Needle
DPX5#10
Oil used
10#
Thread trimmer
With
Feed method
Standard feed(Computer controlled system)
The max .sewing speed is set to 3000prm at the time of delivery
Max .zigzag width is limited to 8mm at the time of standard delivery
3

TEXI Ziggy operation manual
3. Stitchpattern table
4

TEXI Ziggy operation manual
4. Installation
4.01 Installing the thread stand
1. Assemble the thread stand unit, and insert it in the hole in the ma-
chine table.
2. Tighten locknut (1) to fix the thread stand.
3. For ceiling wiring, pass the power cord through spool rest rod(2).
4.02 Installing the operation panel (WR701-02)
1) Install operation panel (1) on the machine head using screws (3) which have
been assembled to panel installing bracket (2).
4.03 Test run
1) Turn ON the power
1. Check again the power voltage before connecting the power cord.
2. Check that the power switch is turned OFF and connect the power cord to the power
receptacle.
3. Be sure to connect the earth wire.
4. Case where the buzzer keeps beeping immediately after turning ON and the power
There is a possibility of the wrong connection of cord or wrong power voltage. Turn OFF the power.
5

TEXI Ziggy operation manual
2) How to operate the pedal
The pedal is operated in four stages.
1. Lightly depress the front part of the pedal for low-speed operation B.
2. Further depress the front part of the pedal for high-will enter the high-speed
operation mode after the completion of reverse feed stitching if the automatic
reverse feed stitching function is specified with the corresponding switch.)
3. Bring the pedal back to its neutral position, and the sewing machine will stop
running C.
4. Strongly depress the back part of the pedal, and the thread trimmer will be
actuated E
Lightly depress the back part of the pedal, and the presser foot will go up
D. Further depress the back part of the pedal, and the thread trimmer will
be actuated.
5. Preparation before sewing
1) Turn the hand-wheel by hand to raise the needle to its highest posi-
tion.
2) Loose the needle clamp screw (1).Hold the needle 1so that the long
groove (2) on the needle is facing exactly toward you.
3) Insert the needle deep into the hole of the needle bar in the direction
of the arrow until
it will go no further.
4) Securely tighten the screw (2).
5) Confirm that the long groove B on the needle faces toward you.
5.02 Removing the bobbin case
Turn the hand-wheel by hand to raise the needle to its highest position.
Raise bobbin case latch (1) and remove the bobbin case.
5.01 Inserting the needle
6

TEXI Ziggy operation manual
5.03 Winding the bobbin thread
1. Insert the bobbin deep into the bobbin winder spindle (5) until it will
go no further.
2. Pass the bobbin thread pulled out from the spool rested on the right
side of the thread stand following the order from (1) as shown in the
figure on the left
.
Then, wind the end of the bobbin thread on the bob-
bin several times.
3. Press the bobbin winder adjusting plate (6) in the direction A and start
the sewing machine.
The bobbin rotates in the direction of C and the bobbin thread is wound
up. The bobbin winder spindle5,will automatically stop as soon as the
winding is finished.
4. Remove the bobbin and cut the bobbin thread, with the thread cut retainer (8).
5. To adjust the winding amount of the bobbin thread, loosen set screw (7) and move bobbin winder adjusting plate (6) to the direc-
tion of A or B .Then, tighten screw (7)
To the direction A: The amount is decreased.
To the direction B: The amount is increased
6. In case that the bobbin thread is not wound evenly on the bobbin, loosen
the nut (4) and turn the bobbin thread tension to adjust the height of the
thread tension disk (2).
•
It is the standard that the center of the bobbin is as
high as the center of the thread tension disk.
•
Move the position of the thread tension disk (2) to the direction A as
shown in the figure on the left when the winding amount of the bob-
bin thread on the lower part of the bobbin is excessive and to the
direction B as shown in the figure on the left when the winding
amount of the bobbin thread on the upper part of the bobbin is ex-
cessive. After the adjustment, tighten the nut (4)
7. Turn the thread tension nut (3) to adjust the tension of the bobbin thread
winder
7

TEXI Ziggy operation manual
5.04 Placing the bobbin case and the bobbin
1. Turn the hand-wheel by hand to raise the needle to its highest position.
2. Take a bobbin by your right hand with the thread drawn out about 5 cm
from the thread end of the bobbin and place it into the bobbin case as
illustrated.
3. Thread the bobbin case in the order of the numbers and pull it out
through the thread path as illustrated. Shown by arrow when bobbin
thread is drawn.
4. Raise bobbin case latch (1) and hold it between your two fingers as
shown in the figure on the left.
5. Insert the bobbin case into the sewing hook shaft as far as it will go by
putting your hand from the under cover of the inner hook.(Click sound )
6.Release the bobbin case latch to let it steadily rest in the closing posi-
tion.
■How to use the bobbin case thread hole
Use hole A mainly for zigzag stitches other than standard zigzag
stitch and scallop zigzag stitch .
Use hole B mainly for standard zigzag stitch and scallop zigzag
stitch .
6. Sewing
6.01 Adjusting the thread tension
In case of thread-breakage. It may occur that the thread tangles on take-up lever. In this case, remove the thread tangling around the
lever by raising the thread take-up cover
Adjusting the needle thread tension
Adjust the needle thread tension using the tension nut (1).
Turning the tension nut clockwise increases the needle thread tension,
or counter clockwise decreases it.
To change the amount of thread taken by the thread take-up spring, loosen the
clamping screw (1) of the tension post socket and turn the tension post socket (3)
Adjustable range of the amount of thread taken by the thread take-up spring: 6 to
10 mm
Adjusting the thread take-up spring
To change the tension of the thread take-up spring, firmly tighten the screw (1) which
fastens the tension post (2) to the machine arm and insert the blade of a screwdriver
into the slot in the tension post to adjust the tension of the thread take-up spring.
Turn it clockwise to increase.
Turn it counterclockwise to decrease.
8

TEXI Ziggy operation manual
Adjusting the bobbin thread tension
1) The tension of the bobbin thread is adjusted by turning the tension ad-
justing screw (1).
Turn it clockwise to increase.
Turn it counter clockwise to decrease.
6.02 Adjusting the pressure of the presser foot
1. Turn the presser spring regulator (1) clockwise A
to increase the pres-
sure given by the presser foot
2. Turn the presser spring regulator counter clockwise B to decrease it.
6.03 One-touch type reverse feed stching mechanism
How to use the reverse feed switch lever
1. Press reverse feed switch (1),and the sewing
machine will immediately
run in direction to perform the reverse feed stitching.
2. Reverse stitching is performed as long as you keep the lever held
pressed down.
3. Release the switch lever, and the machine will immediately run in the
normal direction.
Reverse feed switch (1) can be used in two the reverse positions by turn-
ing it.
9

TEXI Ziggy operation manual
6.04
Height of the switch
1. Loosen setscrew (1) and adjust up or down mirror
Switch(2).
2. Loosen setscrew (3) and move up or down reverse feed switch(4) to
adjust the height.
The position of reverse feed switch (4) and mirror switch
(2) can be reversed
3. Loosen setscrew (1) and remove mirror SW (2).
4. Slightly loosen setscrew (3),move upward reverse feed switch (4) and guide (5),and fix the switch with
guide (5) and setscrew (3).
5. Put mirror SW (2) in installing base (6) and fix it with setscrew (1).
(Put mirror SW (2) in installing base (6) so that the installing base (6) is inserted in the mirror SW (2).)
Note: Freely adjust the height of the respective switches.
The position of reverse feed switch (4) and mirror
switch(2) can be reversed.
When changing the position of the switch in case of
“A. In case of the machine with the auxiliary thread take-up lever”,
refer to the items 3) through 5).
6.05 Hand switch
1. Reverse feed switch (1)
Press reverse feed switch (1) and reverse feed is performed. When it is
released, normal feed is performed.
2. Mirror switch (2)
When scallop, custom pattern or continuous
stitching is selected, the switch becomes a
mirror switch.
10

TEXI Ziggy operation manual
Mirror inversion means the function that the reverse pattern sewing is performed after pressing the mirror inversion switch
during temporary stop of sewing. For the adjustment of the height, see p21.
Sewing procedure (Example: scallop)
1. Stop the sewing machine at the position you desire to perform mirror inversion during sewing.
2. Press the mirror inversion switch. When the mirror inversion switch is received, LED lights up.(The switch can receive only
when the sewing machine stops and dose not receive when the sewing machine is running.)
3. Perform mirror inversion sewing with the sewing machine.
4. Perform thread trimming or press again the mirror inversion switch to complete the inversion sewing
.
7. Standard adjustment
7.01 Adjusting the amount of oil in the hook
Adjustment the amount of oil in the hook
Adjustment of the amount of oil in the hook is
performed with oil amount adjustment screw (1).
Adjustment procedure
Tighten (turn clockwise) oil amount adjustment
screw (1) to increase the amount of oil in the hook , or loosen (turn coun-
ter clockwise) to decrease it
11

TEXI Ziggy operation manual
1. When adjusting the amount of oil in the hook, perform the adjustment in a way of reducing the oil amount after somewhat increas-
ing it.
2. The amount of oil in the hook has been adjusted at the max. number of revolution at the time
of delivery. When you always use the sewing machine at low speed, there is a possibility that
trouble occurs due to the lack of amount of oil in the hook. When the sewing machine is used
always at low speed, perform the adjustment of the amount of oil in the hook.
3.There is a possibility of causing oil leakage from the hook shaft section since oil does not
return to the oil tank when oil amount adjustment screw (10 is used in fully-tightened state.
Do not use the screw in fully-tightened state. In addition, when the amount of oil in the hook is not obtained unless oil amount ad-
justment screw (1) is near in fully-tightened state, it is considered that hook shaft oil wick is clogged or the like. Replace the hook
shaft oil wick.
7.02 Adjusting the amount of lubricating to face plate section
It is not necessary to adjust the amount of lubricating to face plate section since it has been factory-adjusted at the time of deliver .
(Oil amount adjustment screw in the face plate section lubricating tank is hidden with stop plug since it is not necessary to be
adjusted.)
When the adjustment is performed by mistake (mistaken as the adjustment of oil amount
in the
1. Remove stop plug (1) , and when lightly tightening the adjustment screw
(2) .return the screw by approximately 0.6 turn form the stop position.
2. In case of the normal state , the flow of oil can be confirmed(direction of the
arrow in the illustration).In case the flow is stopped , be sure to adjust . (Worn-
out of the mechanism of face plate section will be caused .)
7.03 Adjusting the height of the presser bar
1. To change the height of the presser bar or the inclination of the presser
foot. Loosen the presser bar connection screw (1) and perform the adjust-
ment properly .
2. After the adjustment securely tighten the screw .
12

TEXI Ziggy operation manual
7.04 Adjusting the micro-lifting mechanism of the presser foot
Some type of material needs to be sewn with the presser
foot slightly lifted. In this case, perform this adjustment fol-
lowing the procedure described below.
1. Loosen the setscrew (1) in the presser foot micro-lifter .
2. Turn the presser foot micro-lifting screw (2) clockwise
through the hole in the face plate until the presser foot is
raised as desired. Then, tighten the screw (1) .
If you do not use the micro-lifting mechanism of
the presser foot, fully return the presser foot
micro-lifting screwto its home position.
The standard of lifting amount of the presser foot is as thick
as a sheet of paper
7.05 Height and inclination of the feed dog
1. To adjust the height of the feed dog, loosen the screw (1) and
turn the feed driving link pin (2) using a screwdriver.
2. The standard height of the feed dog is 1.2 mm .
3. To adjust the inclination of the feed dog , loosen the two
screws (3) and turn the eccentric shaft inserting screwdriver
through the adjustment hole in the machine bed .
4. For the machine with a thread trimmer , there can be no space
between the counter knife and the underside of the feed dog
when adjusting the feed mechanism (change in height and tim-
ing) or using a commercially-available feed dog . In this case ,
place a feed bar spacer under the feed mechanism and a throat
plate spacer under the throat plate so as to secure a space be-
tween the counter knife and the underside of the dog .
The standard inclination of the feed dog is obtained by adjusting the feed dog
so that it becomes horizontal when it rises above the top surface of the throat
plate.
7.06 Attaching/removing the hook
When you replace the sewing hook , remove it in
the following procedures ;
Turn the hand wheel until the needle reaches to
its highest position .
Remove the needle, presser foot, throat plate, feed dog
and bobbin case from the machine.
Remove the setscrew (1) and take out the bobbin case
positioning finger (2) .
Loosen the two screws (4) and remove the sewing hook
(3) .
Reverse the above procedures when inserting the sewing
hook. At this time , make sure that top end A of ○the bob-
bin case positioning finger is aligned with line B. as shown
in the figure on the left . Never let A protrude form line B.
13

TEXI Ziggy operation manual
7.07 Needle height (preliminary adjustment)
When the needle bar is at b.d.cbottom dead centre,
the needle bar should be 12.3 mm
above the needle plate.
1. Set the zigzag width “0”.Bring the needle to the center of the
zigzag stroke.
2. Remove the presser foot, to which the throat plate is to be
attached, of the bed. Loosen setscrew (2). Without twisting it,
adjust needle bar (1) (screw (2)) in accordance with the
7.08 Needle rise, hook clearance and bobbin case position stop
When the zigzag stitch and the stitch position set at “0”, when the nee-
dle bar is positioned at 3.4 mm after b.d.c, the hook point should be
contacted to the needle and the needle to hook point clearance should
be 0.05 – 0.10 mm. The front edge of the bobbin case position stop 3
should be level with the edge of holder 5.
When thread breakage has occurred, there is a case where thread is caught in the hook. Be sure to perform sewing after remov-
ing the thread caught in the hook
Do not operate the sewing machine with screw 1 loosened.
Loosen the screw only, and do not removed it.
Stop position of the needle after thread trimming
1. The needle stops at the standard stop position when marker dot
Aengraved on the hand wheel cover is aligned with white marker
dot B○engraved on the hand wheel .
2. Stop the needle at the highest position of its stroke , loosen
screw (1) , and adjust the stop position of the needle by moving
screw (1) within the slot .
(1) Move the screw in the direction C to advance the timing to make the needle stop . (2) Move the screw in the direction D to retard
the timing to make the needle stop
7.09 Adjusting the stop position of the needle
14

TEXI Ziggy operation manual
When you return the pedal to its neutral position after having depressed
the front part of
it , the needle stops at the lowest stop position. As in
the case of the adjustment of the highest stop position of the needle ,
stop the screw (1) in
the lowest position of its stroke , loosen the screw
(2) , and adjust the lowest stop position of the needle by moving the
screw (2) within the slot. Move the screw in the direction ○Ato advance
the timing to make the needle stop or in the direction B to retard it .
7.10 Adjusting the thread trimmer
Initial position of the moving knife
When the moving knife is in its initial position,
the moving knife pin (1) should be aligned with
the engraved marker dot (2) as shown in the figure on the left.
If the initial position of the moving knife is
not correct
Loosen the nut (3) , and move the moving knife to the
right or left until the pin (1) meets the marker dot (2) .
Then , tighten the nut (3) .
Adjusting the thread trimming timing
Put roller (4) in the cam groove. Now, gradually turn the hand wheel in
the reverse direction.
Put roller(4) in the cam groove .Now, gradually turn the
hand wheel will go no further when marker dot (1) en-
graved on the hand wheel cover is aligned with red mark-
er dot (2) engraved on the hand wheel.
To adjust the thread trimmer cam , align the red marker
dot on the hand wheel cover with the red marker cot dot
on the hand wheel , put the roller in the groove of the
thread trimming cam , and gradually turn the hand wheel
in the direction opposite to the direction of rotation of the
hook driving shaft until it will go to further . Now , tighten
two screws (5) .
15

TEXI Ziggy operation manual
7.11 Adjusting the needle thread feeding device
Standard position of the feeding wire
1. Loosen screw (1) .
2. Turn the feeding wire together with feeding wire installing base (2) , adjust the installing position of the feeding wire so that a distance
of C (8 to 12mm) is provided between the top end of feeding wire (3) and the guide portion of thread take-up thread guide A (4) , and
tighten screw (1) .
3. Finely adjust with setscrews (5) so that the top end of the feeding wire is placed approximately in the center (A≠B) of the thread take-
up thread guide A .
When needle thread feeding amount is desired to be increased:
• Loosen setscrew and adjust the relation between A and B to A>B . • Loosen setscrew and when the whole feeding wire installing
base is adjusted to the upward direction (decrease the value , C) , the feeding amount can be increased
16

TEXI Ziggy operation manual
8. Maintance
8.01 Maintenance intervals
During all cleaning work the machine must be disconnected from the power supply by switching off the main switch or
pulling out the plug!
Danger of injury if the machine is started accidentally!
8.02 Cleaning the machine
The cleaning cycle required for the machine depends on following factors:
Single or several shift operation
Amount of dust resulting from the work-piece
It is therefore only possible to stipulate the best possible cleaning instructions for each individual case.
To avoid breakdowns, the following cleaning work is recommended for single shift operation:
To avoid breakdowns the following cleaning work is recommended for single shift operation:
Clean hook compartment and needle area of sewing head several times daily.
Clean the entire machine at least once a week.
Cleaning…………………………………..daily, several times if in continuous use
Checking the oil level………………………………………daily, before operation
8.03 Oling the machine
Switch off the machine!
1. Tilt the machine back.
2. Remove plug (1) and pour oil
into the hole until it reaches
marking (2).
3. Before commissioning the ma-
chine and after long down periods,
pour a few extra drops of oil into
the hook race, see arrow in en-
larged illustration
Only use oil with a viscosity of 10.0
mm 2/s at 40°C and a density
of 0.847 g/cm3 at 15°C.
17

TEXI Ziggy operation manual
8.04 leaning the cooling fan installed on the under cover
8.05 Cleaning the hook section
When cloth waste or the like gathers around or
adheres to the hook
section, trouble (defective sewing, seizure of hook, etc). of sewing
machine will be caused. Periodically clean the
section.
18
Table of contents
Other Texi Sewing Machine manuals