TMC Aquarium Reef BIO-Gro M User manual

FOR ADVANCED AQUARISTS
BY TMC
FOR ADVANCED AQUARISTS
B
BY
TMC
®
TMC

ENGLISH ...................................................................................................................................................................................................1
FRANÇAIS................................................................................................................................................................................................8
DEUTSCH...............................................................................................................................................................................................15
NEDERLANDS...............................................................................................................................................................................22
ITALIANO...............................................................................................................................................................................................29
ES AÑOL.................................................................................................................................................................................................36
ORTUGUÊS....................................................................................................................................................................................43
Aquarium
Typical Installation
Drip-loop

1
INSTRUCTIONS FOR INSTALLATION AND USE
Important Safety Information - lease Read Carefully
- A ways iso ate from the mains e ectricity before insta ing or carrying out any
maintenance to the REEF BIO-Gro unit.
- This product shou d on y be used with an approved power supp y unit (PSU). Fai ure to do
so may resu t in serious harm to you and damage to the unit.
- This unit is designed to be used indoors and is not suitab e for any outdoor
app ications.
- Un ess otherwise stated, the PSU is not waterproof so p ease ensure that it is mounted in a
secure, dry ocation that a ows for air circu ation. There is a risk of e ectric shock if the PSU
becomes wet, or is hand ed with wet hands.
- A ways eave a drip oop in the cab e to prevent water running down the cab e and damaging
the e ectronics (see drawing be ow).
- Ensure the REEF BIO-Gro is secure y insta ed before operating.
- Dispose of this unit responsib y. Check with your oca authority for disposa
information.
arts Required for Installation (NOT SU LIED)
1. Pump to supply water to the REEF BIO-Gro
Please Note: Always leave a drip-loop in the pump cable to prevent
water running down the cable and reaching the power source
(see drawing).
2. Additional connection fittings (depending on individual installation
requirements) e.g. flexible tubing.
Recommended Parts (NOT SUPPLIED)
1. Programmable timer or AquaBar Control
Algae Reactors
Drip Loop

2
ARTS LIST
1. Water inlet
2. id
3. id O ring – not shown
(order code 5788)
4. Water inlet 90 elbow
hosetail (order code 5789)
5. AquaBar ED installation
port
6. Water outlet
7. Water outlet fitting
(order code 5798)
8. Water outlet pipe
(order code 5791)
9. Sponge (order code 5834)
10. AquaBar ED protection
tube
11. AquaBar ED
12. Macroalgae cultivation
plates
13. Growing chamber
14. Hanging bracket
(order code 5795)
15. Hanger securing screw
(order code 5796)
16. ight Shield self-adhesive
sheet
17. AquaBar PSU
6
2
7
9
11
10
1
12
12
12
12
12
13
14 15
16
17
8
4
5

3
Step 1
Thoroughly rinse the REEF BIO-Gro with
fresh water
Step 3
Place a small
amount of
macroalgae, such as
Chaetomorpha, on
each of the
macroalgae
cultivation plates
(12)
Step 4
Ensuring that the lid ‘O’ ring (3) is correctly
positioned, replace the lid (2) and securely
hand tighten - failure to do so will result in
leaks
Step 2
ocate and correctly position the sponge (9)
on the filter lid (2)
The REEF BIO-Gro is an advanced, compact reactor specifically designed to grow macro-algae. It
incorporates a high performance ED light, using AquaRay AquaBar technology, with ED diodes
selected specifically to promote optimum algae growth inside the reactor. This macro-algae can be
used to reduce unwanted nutrients such as nitrate and phosphate in your reef aquarium and also
help improve water quality. The versatile, compact design of the REEF BIO-Gro allows it to be
installed internally in a sump or aquarium or externally as a stand-alone ‘hang-on’ unit.
ASSEMBLY AND INSTALLATION

Step 5
Install and securely tighten the water outlet
tting (7) and water outlet pipe (8) - failure
to do so will result in leaks.
Step 6
Install and securely tighten the water inlet
90° elbow hosetail (4) - failure to do so
will result in leaks.
*The REEF BIO-Gro Light Shield is a purpose-made, self-adhesive vinyl sheet that has
been developed to optimize the use of available light from the A uaBar and to help
reduce light spill into your a uarium or sump. The Light Shield can be simply cut with
scissors along the cut line if you would like a viewing strip so algae growth inside the
growing chamber can be easily monitored. When applying to the REEF BIO-Gro it may
be easier to apply the middle of the light shield first ensuring that it is straight, and then
gradually smooth each side down, being careful to eliminate any bubbles as you go.
Step 7
*
If required, gently
peel off the
backing from the
ight Shield* and
apply to the
reactor tube
Step 8
Install the hanging bracket (13) if required.
4

5
Step 9
Ensure there is adequate space in or around
the aquarium or sump to allow the reactor
to be securely installed. Make certain you
locate it in a position where it can easily be
connected to the water outlet of your pump
and so that the
water leaving
the reactor can
easily be
returned to
your aquarium
or sump and the
reactor can be
accessed for
harvesting algae,
maintenance
and cleaning
Step 10
If you are hanging the REEF BIO-Gro on
the side of your aquarium or sump, tighten
the hanger securing screw (14), turning in a
clockwise direction. Caution: Do not
over-tighten the hanger securing screw as
this could result in operating problems.
Step 12
Connect the correct plug adapter for your
region to the AquaBar PSU. Ensure that the
mains electricity supply is switched off, then
fully connect the DC connector plug on the
PSU to the socket on the AquaBar.
Connect PSU to
mains electricity.
USEFUL TIP
For optimum
results, it is
recommended
that the AquaBar
ED is set to operate
on a reverse cycle and switch on when the
main lights in your aquarium switch off.
Step 11
Using a suitable
length of 16mm
exible hosing
(not supplied)
connect your
pump to the
REEF BIO-Gro
water inlet (1).

6
MAINTENANCE
Caution: Always isolate the pump and AquaBar ED from the mains electricity
before harvesting algae or carrying out any maintenance to the REEF BIO-Gro.
The REEF BIO-Gro should need very little adjustment and maintenance once set up correctly.
However, due to factors such as organics, detritus, salt and calcium levels, it is common for
deposits to build up in and around the reactor and therefore it is recommended that it is
cleaned periodically. Please note: It is essential that the AquaBar ED protection tube is
regularly cleaned as any dirt or detritus on this part will inhibit the penetration of the light
into the growing chamber and will consequently reduce the growth rate of your macroalgae.
1. The pump to your REEF BIO-Gro must function 24 hours a day and for optimum results
we recommend that the AquaBar ED should be set to operate for up to 12 hours a day
on a reverse cycle, switching on when the main lights in your aquarium switch off.
2. Regularly check the growth of algae within the reactor and harvest accordingly.
3. Ensure the water inlet 90 elbow hosetail (4), the sponge (9) and the water outlet pipe
assembly (8) are clean and free of blockages. Failure to do so could result in operating
problems and leaks.
4. Ensure the AquaBar ED protection tube is clean and free from any dirt, detritus, salt
and/or calcium deposits.
5. Clean your pump regularly to ensure it does not become clogged with debris or detritus
(refer to your pump instructions for full maintenance instructions)
6. When carrying out routine maintenance ensure that the lid O ring (3) is correctly
positioned and free from any dirt, detritus, salt and/or calcium deposits. Failure to do so
could result in operating problems and leaks.
USEFUL TIP: During routine maintenance it is advisable to ensure that the filter lid O ring
(3) is checked for any signs of degradation and replaced accordingly. Spares are available from
your local stockist (part no 5788).
7. No user serviceable parts inside. Do not attempt to open the AquaBar or PSU.
8. If the DC cable becomes damaged the AquaBar should be disconnected immediately from
the mains electricity supply.
9. The DC cable cannot be replaced so, if damaged, the AquaBar should be returned to TMC
or disposed of responsibly. Check with your local authority for disposal information.
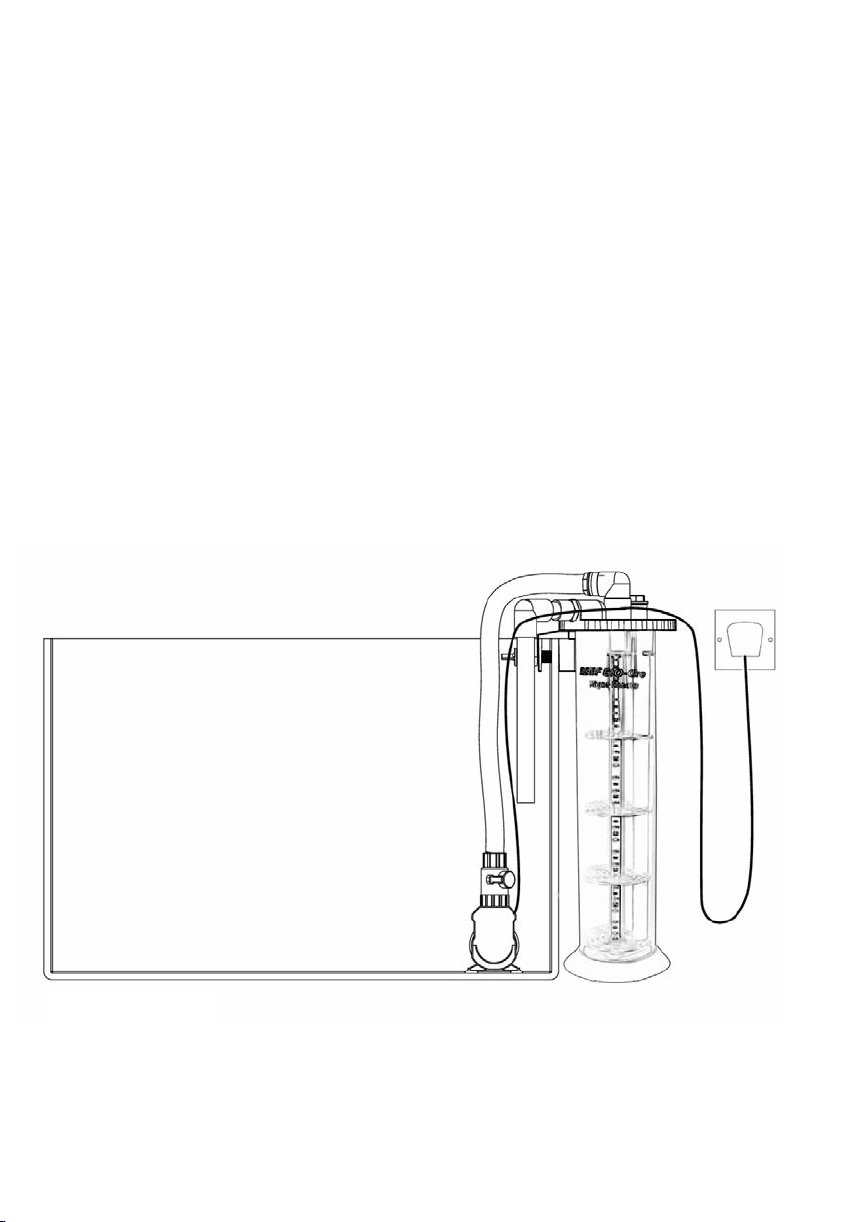
Step 13
Make sure all connections are tightly
secured. Switch on and slowly adjust the
water ow of your pump until the correct
ow is achieved.
The pump ow rate should be regulated
according to the amount of macroalgae in
the growing chamber and the speed should
be increased as the macroalgae grows.
Please note: Fluctuations in the water
level in your aquarium or sump may affect
the water level inside your reactor.
Step 14
Switch on the
AquaBar ED

.
TROUBLE SHOOTING
Problem: Water flow through the reactor is not sufficient
1. Possible Cause: Water flow rate to the reactor is incorrect.
Solution: Adjust water flow to the reactor accordingly.
2. Possible Cause: Pump is not plugged in or is not operating correctly.
Solution: Refer to the instructions supplied with your pump.
3. Possible Cause: Air is trapped inside the reactor.
Solution: Switch off your pump. Wait for a few minutes for the air to escape and then switch
the pump back on and adjust the water flow accordingly.
4. Possible Cause: Water inlet (1), water inlet 90oelbow hosetail (4), water outlet (6), water
outlet fitting (7), or water outlet pipe assembly (8) is blocked.
Solution: Check for blockage and clean accordingly.
5. Possible Cause: Sponge is blocked.
Solution: Check for blockage and clean accordingly.
Problem: The A uaBar does not switch on
1. Solution: Check cable connection between lamp unit and PSU. If the lamp unit is still not
switching on, return the PSU and lamp unit to your local stockist for further testing and
replacement if necessary.
Problem: The A uaBar starts flashing
1. Solution: Return the PSU to your local stockist for replacement with an authentic Tropical
Marine Centre part.
Problem: One or more LEDs in the A uaBar unit do not come on or cease to work
1. Solution: Return the AquaBar to your local stockist for replacement with an authentic
Tropical Marine Centre part.
Problem: The macroalgae inside my reactor doesn’t seem to be growing
1. Possible Cause: To grow, algae needs elevated levels of nutrients such as nitrate and
phosphate. If the water quality in your aquarium is good (which means it would have lower
levels of these sorts of nutrients) then algae will grow at a slower rate.
2. Possible Cause: The AquaBar ED protection tube may be dirty and inhibiting the
penetration of the light into the growing chamber.
Solution: Check for dirt or detritus and clean accordingly.
3. Possible Cause: The AquaBar ED is not switching on.
Solution: Check cable connection between lamp unit and PSU. If the lamp unit is still not
switching on, return the PSU and lamp unit to your local stockist for further testing and
replacement if necessary.
4. Possible Cause: The water flow rate through the reactor may be too fast or too slow.
Solution: Adjust the water flow accordingly and monitor results.
5. Possible Cause: Poor quality Macro algae.
Solution: Try replacing it with fresh algae.
7

.

.

Tropical Marine Centre,
Solesbridge ane,
Chorleywood,
Hertfordshire, WD3 5SX, UK
Technical Information Lines
Tel: +44 (0) 1923 284151 Fax: +44 (0) 1923 285840
Open between
9am - 5pm Monday to Thursday/9am - 12pm Friday.
www.tropicalmarinecentre.co.uk tmc@tropicalmarinecentre.co.uk
v.1/2018
®
TMC
This manual suits for next models
3
Table of contents
Other TMC Aquarium Aquarium manuals

TMC Aquarium
TMC Aquarium V2 Auto Top Up Compact User manual

TMC Aquarium
TMC Aquarium AQUARAY GroBeam 1500 Ultima CP ColourPlus UK User manual

TMC Aquarium
TMC Aquarium aquaGro CO2 Hobby Set User manual

TMC Aquarium
TMC Aquarium V2iLumenAir 900 User manual

TMC Aquarium
TMC Aquarium V2iLumenAir Compact Connect User manual

TMC Aquarium
TMC Aquarium V2ecton 200/G8T5 User manual

TMC Aquarium
TMC Aquarium AquaRay AQUA RED FLEXI-LED User manual

TMC Aquarium
TMC Aquarium AQUARAY MiniLED 500 User manual

TMC Aquarium
TMC Aquarium V2 Auto Top Up Compact User manual

TMC Aquarium
TMC Aquarium AquaGro CO2 Glass Diffuser User manual