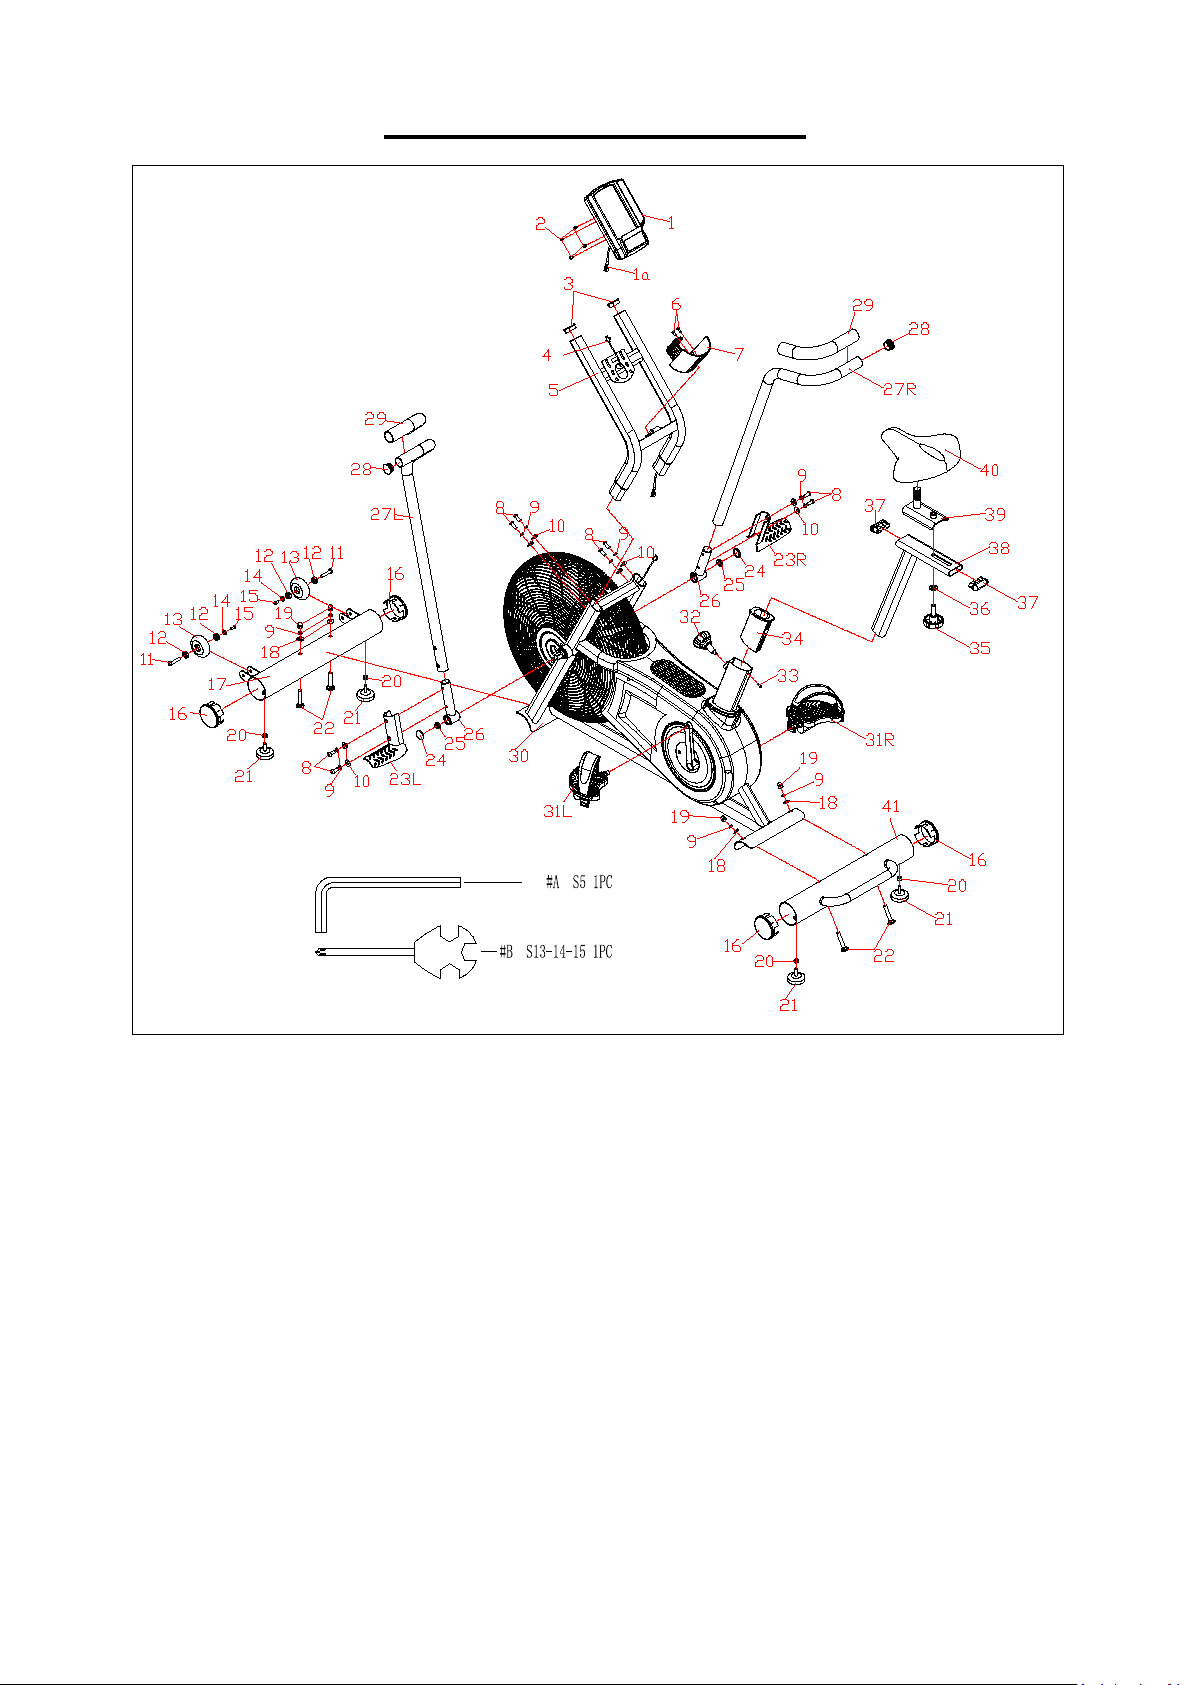
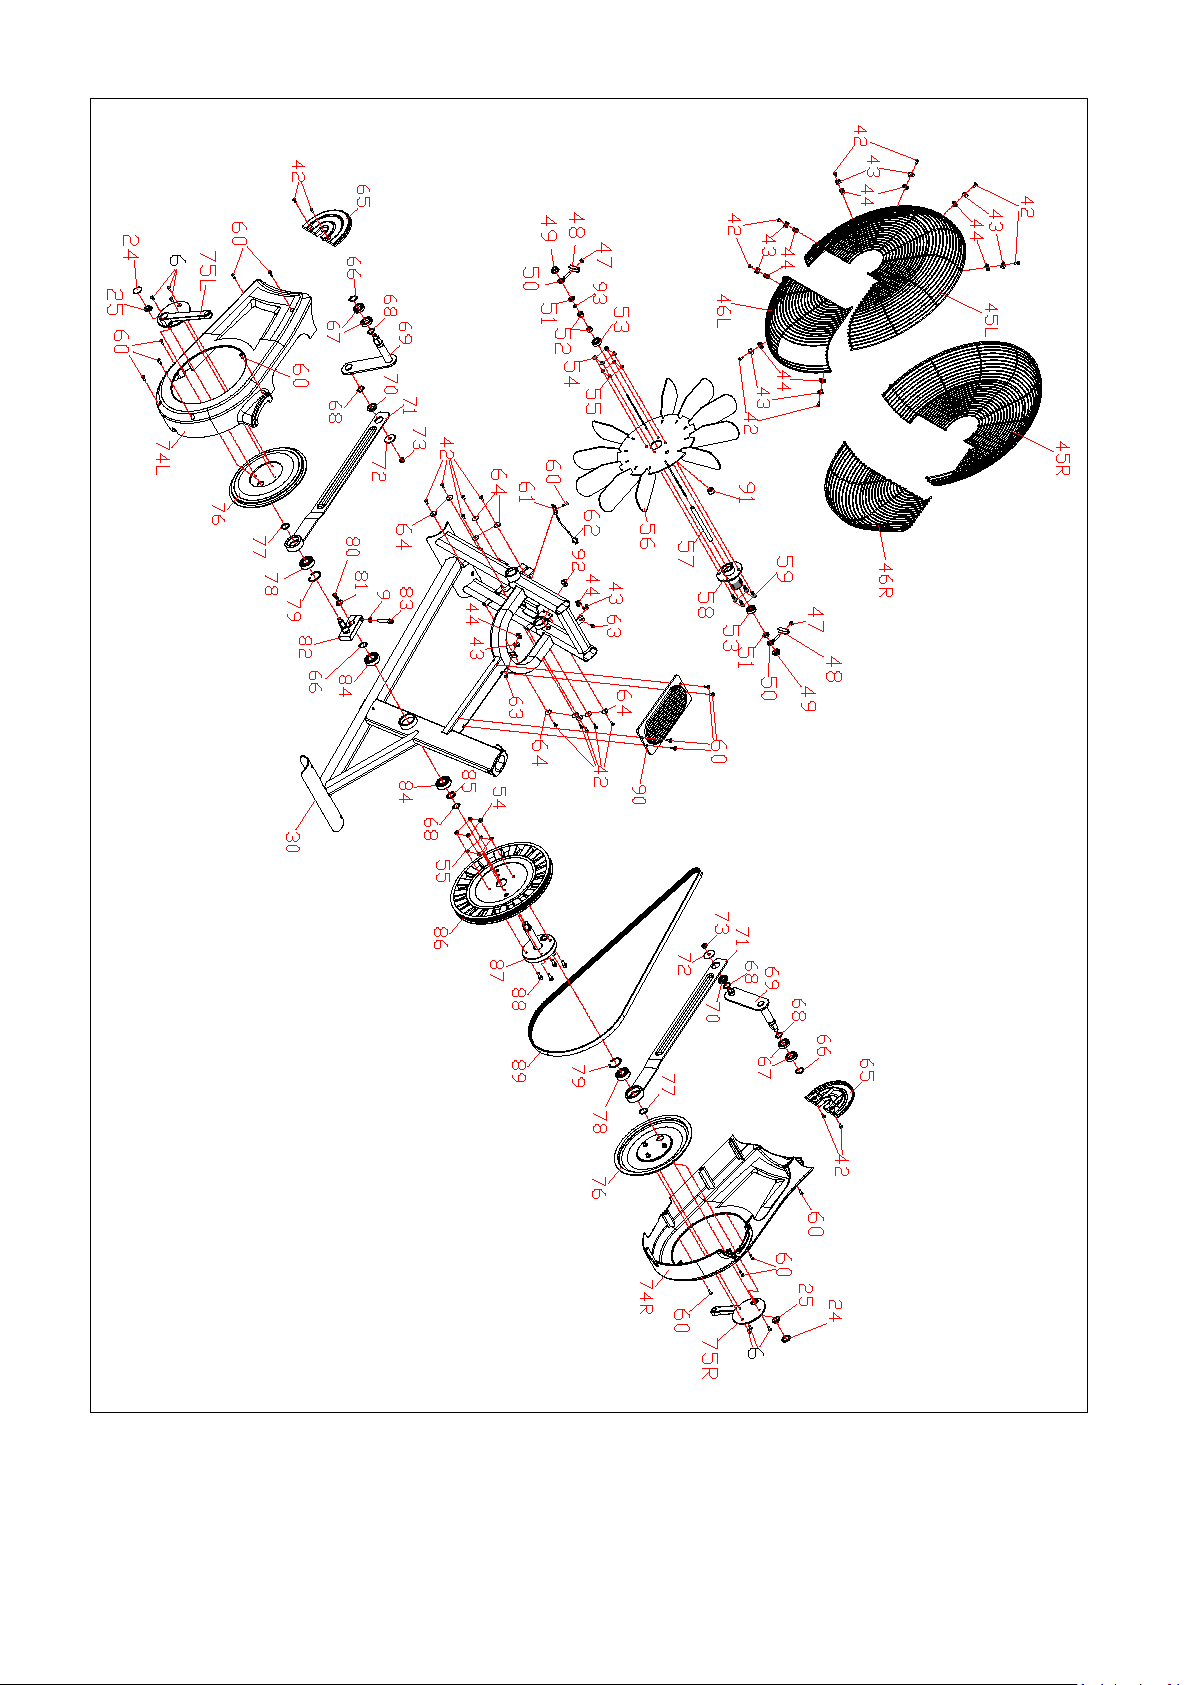
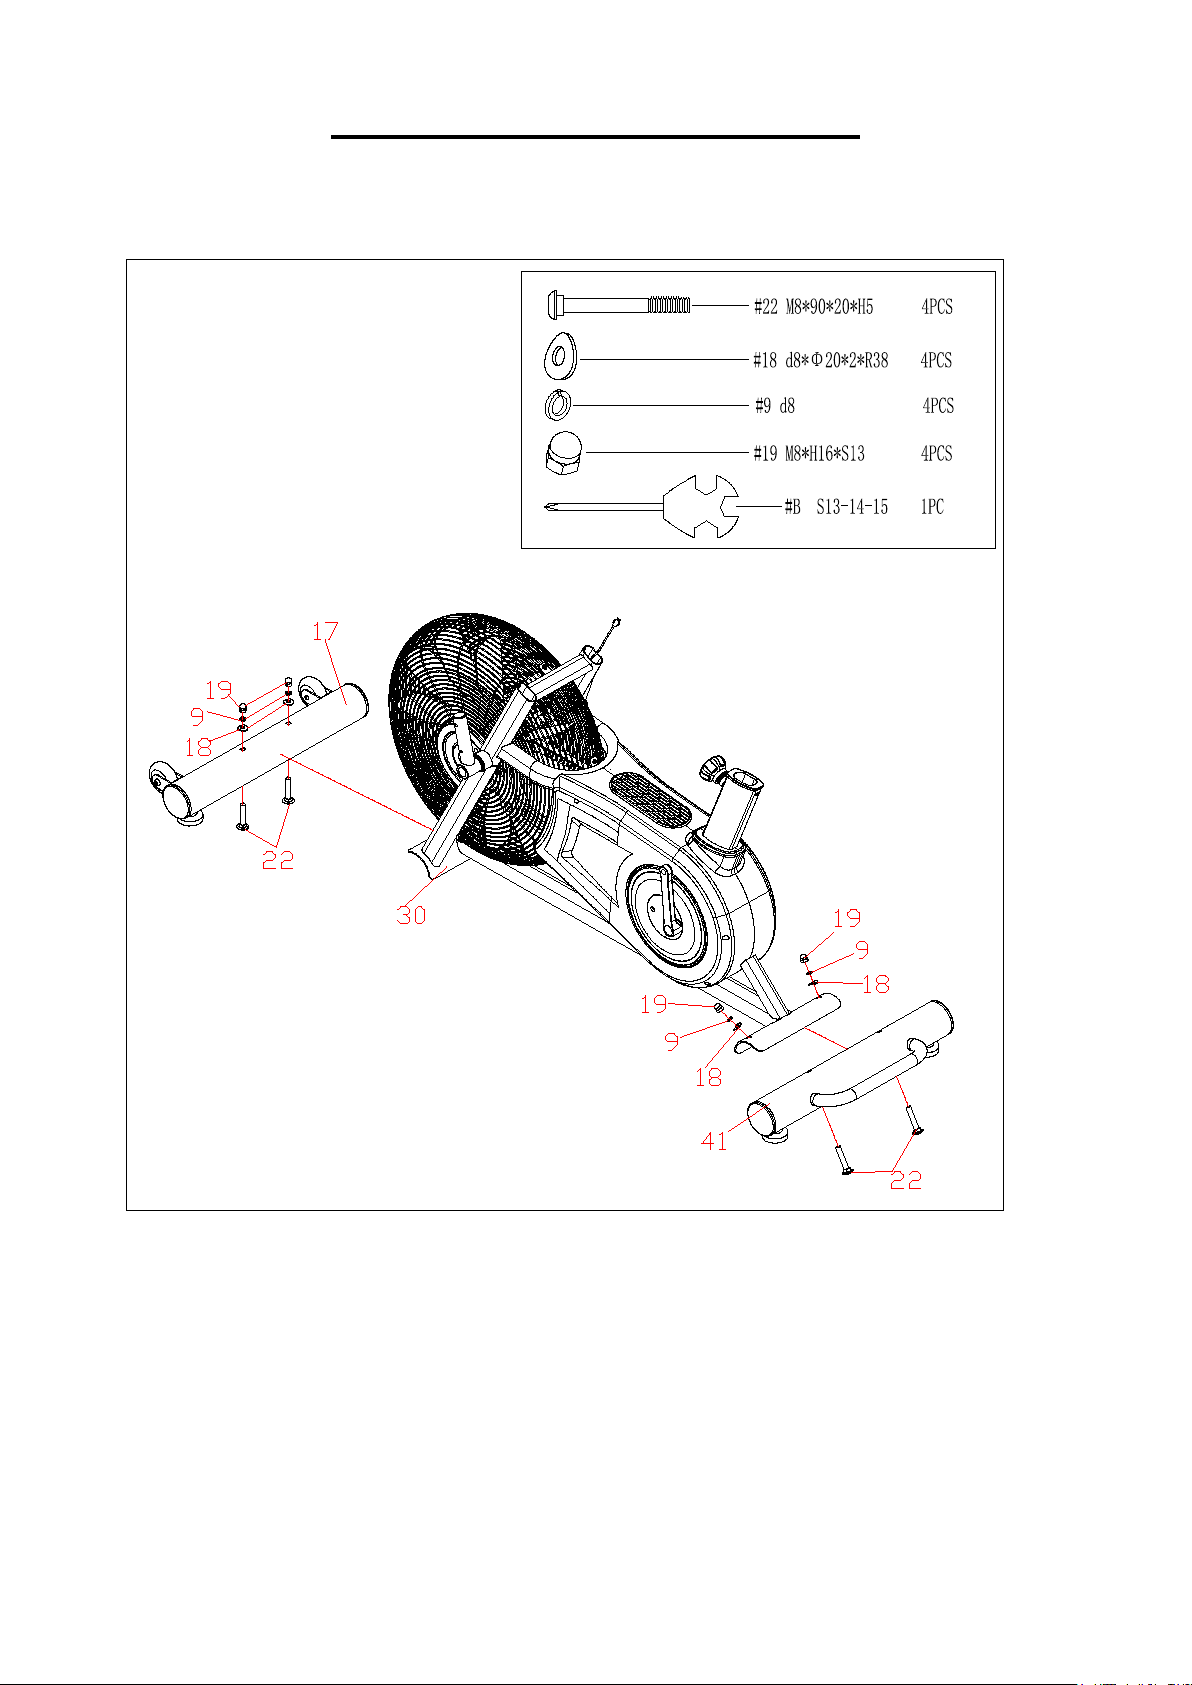
TOORX BRX AIR300 User manual

Ed : Rev : Cod :
INSTRUCTION
01/21 GRLDTOORXBRXAIR300

3
EXPLODED DIAGRAM

4

5
HARDWARE PACKAGE

6
PARTS LIST
No. Description Qty. No. Description Qty.
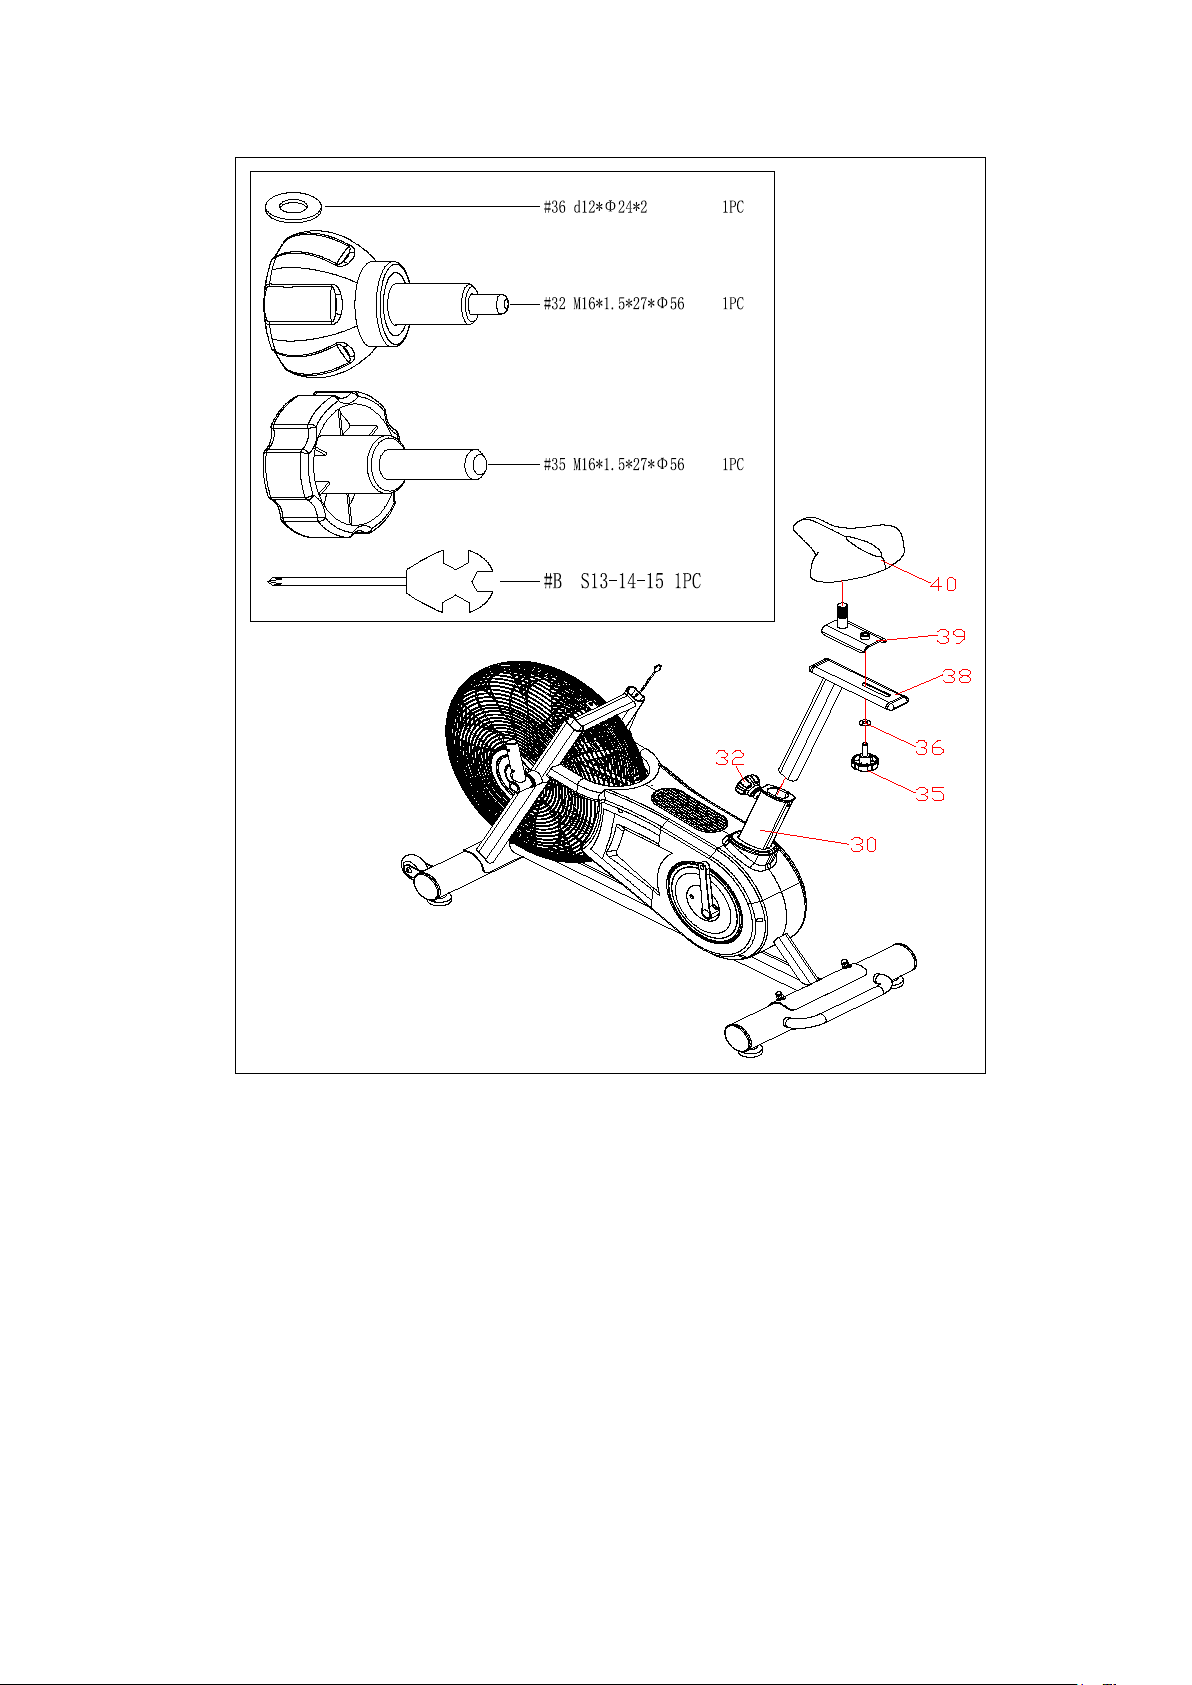
1 Computer 1 39 Saddle Fixed Plate 1
2 Bolt M5*10 4 40 Saddle 1
3 End Cap 2 41 Rear Stabilizer 1
4 Trunk Wire 1 42 Bolt M4*10*Φ8 18
5 Computer Post 1 43 Outside Button Of Net-caps 10
6 Bolt M5*15*Ф8.5 6 44 Inside Button Of Net-caps 10
7 Bottle holder 1 45L/R Front Net-caps 1set
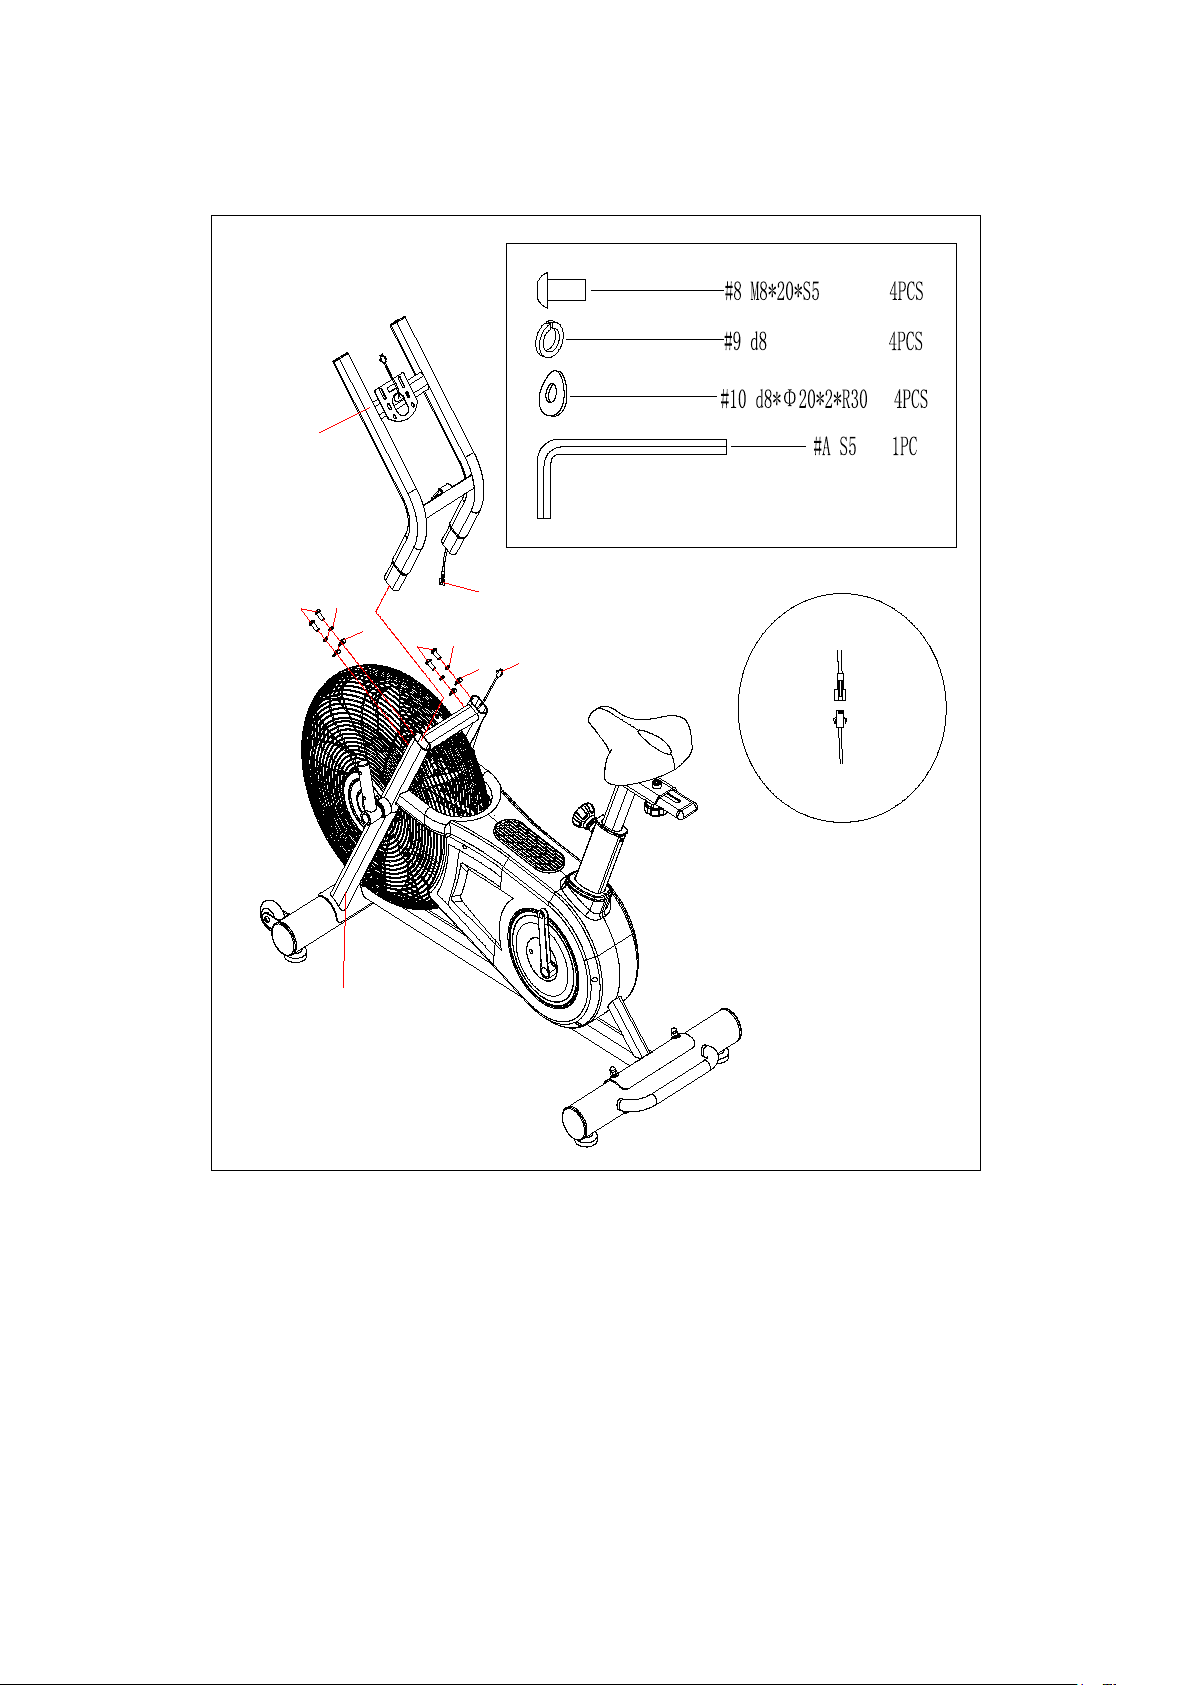
8 Bolt M8*20*S5 8 46L/R Rear Net-caps 1set
9 Spring Washer d8 13 47 NutM6*H6*S10 2
10 Arc Washer d8*Φ20*2*R16 8 48 U Seat 2
11 Bolt M8*30*M6*15*S5 2
49 Nut M10*1*H8*S15 2
12 Bearing 608Z 4 50 Chain Bolt 2
13 Transportation Wheel φ71*24 2 51 Nut M10*1*H5*S17 2
14 Washer d6*Φ12*1.5 2 52 Spacer φ10.1*φ15*9 2
15 Bolt M6*15*S5 2 53 Bearing 6000-2RS 2
16 End Cap Φ76 4 54 Nylon Nut M6*H6*S10 8
17 Front Stabilizer 1 55 Spring Washerd6 8
18 Arc Washer d8*Φ20*2*R38 8 56 Fan Wheel 1
19 Cap Nut M8*H16*S13 4 57 Shaft 1
20 Nut M8*H5.5*S14 4 58 Sleeve 1
21 Adjustable Footpad 4 59 Bolt M6*16*S10 4
22 Bolt M8*90*20*H5 4 60 Bolt ST4.2*19*Φ8 15
23L/R Pedal Plate 1set 61 Sensor Seat 1
24 Crank Cover 4 62 Sensor 1
25 Nut M10*1.25*H7.5*S14 4 63 Bolt M4*15*Φ8 2
26 Swing Bar 2 64 Washer d4*Φ18*1.5 10
27L/R Handlebar 1set 65 Front cover 2
28 End Cap ф32*17 2 66 Washer 3
29 Foam Grip Φ30*3*280 2 67 Bearing6804-2RS 4
30 Main Frame 1 68 Wave washerd20*Φ26*0.3 3
31L/R Pedal 1set 69 Connector 2
32 Knob M16*1.5*27*Φ56 1 70 Bushing φ28*6.2 2
33 Screw ST4.2*10*Φ8 1 71 Rod 2
34 Bushing 1 72 Washerd8*Φ32*2 2
35 Knob M12*37*15*Φ58 1 73 Nylon NutM8*H7.5*S13 2
36 Washer d12*Φ24*2 1 74L/R Chain Cover 1set
37 End Cap PT60*20*30 2 75L/R Crank 1set
38 Saddle Tube 1 76 Turntable 2

7
No. Description Qty. No. Description Qty.
77 Spring d17 2 87 Axle 1
78 Bearing 6203-2RS 2 88 Bolt M6*16*S5 4
79 Spring D40 2 89 Belt 1
80 Bolt M6*16*S10 1 90 Plastic Pedal 1
81 Washerd6*Φ20*2 1 91 Magnet φ15*7 1
82 Small Crank 1 92 Grommet Φ12.5 1
83 Bolt M8*40*S6 1 93 Wave washer d10*Φ15*0.3 1
84 Bearing 6004-2RS 2 A Allen Wrench S5 1
85 Spacer Φ25*Φ20.1*4 1 B Spanner S13-14-15 1
86 Belt Plate 1

8
ASSEMBLY INSTRUCTIONS
STEP 1:
Attach the front stabilizer(17) and rear stabilizer(41) to main frame(30) using 4
bolts(22), 4 arc washers(18), 4 spring washers(9) and 4 cap nuts(19) by
spanner(B).

9
STEP 2:
A. Insert saddle tube(38) into main frame(30), then secure with knob(32).
B. Secure saddle fixed plate(39) in the saddle tube(38) using knob(35) and
washer(36).
C. Attach the saddle(40) into saddle fixed plate(39), then secure them by
spanner(B).

10
STEP 3:
5
4
89
10 89
10
4
62
30
62
A. Unlock 4 bolts(8), 4 spring washers(9) and 4 arc washers(10) from main
frame(5) by allen wrench(A).
B. Connect sensor wire(62) and trunk wire(4) well.
C. Insert wire into main frame(30), then insert computer post(5) into main
frame(30), and secure them using 4 bolts(8), 4 spring washers(9) and 4 arc
washers(10) by allen wrench(A).

11
STEP 4:
A. Unlock 2 bolts(6) and 4 bolts(2) from computer post(5) by spanner(B).
B. Secure bottle holder(7) in the computer post(5) using 2 bolts(6) by spanner(B).
C. Connect trunk wire(4) and computer wire(1a) well.
D. Secure computer(1) in the computer post(5) using 4 bolts(2) by spanner(B).

12
STEP 5:
A. Unlock 4 bolts(8), 4 spring washers(9) and 4 arc washers(10) from swing
bar(26) by allen wrench(A).
B. Attach handlebar(27L/R) into swing bar(26).
C. Secure pedal plate(23L/R) and handlebar(27L/R) into swing bar(26) using 4
bolts(8), 4 spring washers(9) and 4 arc washers(10) by allen wrench(A).

13
STEP 6:
Connect the left & right pedals (31L/R) onto the left & right cranks (75L/R).
Left Pedal: Align the left pedal (31L) with the left crank (75L) at 90 degrees and
gently insert the pedal into the crank arm. Turn the pedal counter-clockwise as
tightly as you can with your hand. Secure with spanner (B).
Right Pedal: Align the right pedal (31R) with the right crank (75R) at 90 degrees
and gently insert the pedal into the crank arm. Turn the pedal clockwise as tightly
as you can with your hand. Secure with spanner (B).

14
MOVING THE MACHINE
To move the machine, lift up the handlebar of rear stabilizer(41) until the
transportation wheels on the front stabilizer(17) touch the ground. With
the wheels on the ground, you can transport the bike to the desired
location with ease.

15
Instruction Manual
DISPLAY FUNCTIONS
TIME
DESCRIPTION
RPM
·Display the rotation per minute with range from 0~ 199.
SPEED
·Display current training speed. Maximum speed is 99.9 KM/H or ML/H.
TIME ·Count up - No preset target, Time will count up from 00:00 to maximum 1:59:59
with each increment is 1 minute.
·Count down – The console will countdown from preset time to 00:00:00 and
each preset increment or decrement will be 1 minute between 00:01:00 to 1:59:00.
DISTANCE ·
Accumulates total distance from 0.0 up to 999.9 KM or ML or count down from preset value. User may preset
target distance value with UP/DOWN key. Each increment is 1.0KM or ML.
CALORIES
·Accumulates calories consumption or count down during training from 0 to
maximum 999 calories.User may preset target Calories with UP/DOWN key.
WAT T
·Display the power consumption during training.
·Display Range: 0~1999.
PULSE ·User may set uptarget pulse value from 0~30 to 230 and the console buzzer
will beep when the actual heart rate is over the target value during workout.
BUTTON FUNCTION
TIME
DESCRIPTION
START
·To start workout quickly or resume workout in Stop mode.
STOP
·
To stop/pause workout.
·To clear up all settings.
·Hold on this key for 2 seconds to reboot the console
DOWN
·
To adjust Distance, Calories, Heart-rate, Time, Age value down.
UP
·
To adjust Distance, Calories, Heart-rate, Time, Age value up.
Target Distance
·
Fast access to Target Distance training mode.
Target Calories
·
Fast access to Target Calories training mode.
Target Heart-rate ·Fast access to Target Heart Rate training
mode.
Target Time
·
Fast access to Target Time training mode.
Interval
·There are 3 programs: INTERVAL 10/20,INTERVAL 20/10, Custom.
ENTER
·
To confirm settings or enter program.
OPERATION INSTRUCTION
1. When POWER ON, LCD will full display 2s (Figure 1) with long beep sound, then display wheel
diameter 1s in DIST area (Figure 2). Then enter into AGE setting mode , the AGE flashing to be set
(Figure 3). Press the UP/DOWN to set age and press ENTER to confirm then go to Standby mode.

16
2. The window ofINTERVAL10/20、INTERVAL10/20、NTERVAL CUSTOM、READY、WORK、REST、TIME、DISTANCE、CALORIES、WAT TS 、SPEEED、RPM and
will flash by sequence in every 1s (Figure 4~Figure 16).
If no input of key operation or RPM signal or pulse input for 60s, computer will go to Sleeping mode.

17
3.Select Manual, Interval, Target Distance, Target Calories, Target HR, Target Time program:
3.1 Manual mode:
①
In Standby mode, press START tostart workout quickly, the b uzzer sound 1 s econd. TOTAL TIME/
TIME/DISTANCE/ CALORIES/ WATTS/ SPEED/ RPM s tart tocount up(Figure 17).
②
Whenever there is Pulsesignal input, will light up and
symbol will flash and display pulsevalue (Figure 18).
Without pulse
input, it will display “P” (Figure 17).
③
No signal input for 30s, buzzer sounds 1 short beep and enter toWake-up mode. Press any towake up the
console.
④
Press START key once topause training, Buzzer will sound for 0.5s in every 30s. All values are displaying onLCD and
flashing in every 4s. Ifcontinue tostop training for 5 minutes, buzzer sounds 2s and enter toWake-upmode. Press
START toresume workout.
⑤
Press STOP key, TIME will display total workout time; DISTANCE will display total workout distance; CALORIES will

18
display
total consumption during workout; WATT, SPEED and RPM will switch to display AVG. & MAX.PULSE window will
switch to display 65%, 85% MAX (Figure 21~23) each 5s.
⑥
With pulse signal i nput, PULSE window will display u ser actual pulse. Pulse window displays nothing if n o
pulse signal input (Figure 19~20).
⑦
Press any PROGRAM key then perform the program accordingly.
3.2 Interval 20/10 mode:
①
Press INIERVAL key toselect INTERVAL20/10, press ENTER then INTERVAL20/10 will light up, alongwith a long sound for
1s.
②
Cycle time counts down from 3 to0 then console start, meanwhile buzzer beeps once per second and READY flashes
once per second, counting displays ‘00/08’(Figu re 24).
③
Cycle time counts down from 20 to 0 and WORK flashes once persecond . Meantime windows displays rotation
animation and
count down from 4 minutes. Then TOTAL TIME, DISTANCE, CALORIES, WATTS, SPEED & RPM start calculating, counting
displays‘01/08’(Figure 25).
④
Cycle time counts down from 10 to 0 and REST flashes once per second along with 10 beeps(Figure 26), meanwhile
READY will flash in last 3s (Figure 27).
⑤
The above
③
&
④
continuie cycle counting and add 1 per each cycle,until displays 08/08WORK, then go to End page.
⑥
Press START button once enter into PAUSE mode, Buzzer will sound for 0.5s in every 30s. All values are displaying on
LCD and flashing in every 4s. If continue to stop training for 5 minutes, buzzer sounds 2s and enter to Wake-up mode.
Press START to resume workout.
⑦
Press STOP or end up training, buzzer beeps 1s then displays TOTAL TIME, DISTANCE,CALORIES for 30s, and WAT T, SPEED
& RPM will switch to display AVG. & MAX. PULSE window will switch to display 65%, 85% MAX (Figure 21~23) each 5s.
⑧
With pulse signal input, PULSE window will display user actual pulse and 65%, 85% MAX (Figure 21~23). Pulse window
displays nothing if no pulse signal input (Figure 19~20).
⑨
Press any PROGRAM key then perform the program accordingly.
3.3 Interval 10-20 mode:
①
Press INTERVAL to select INTERVAL10/20, press ENTER then INTERVAL10/20 will light up along with buzzer beeps 1s.
②
Cycle time counts down from 3 to 0 then console start, meanwhile buzzer beeps once per second and READY flashes
once per second, counting displays ‘00/08’(Figure 28).
③
Cycle time counts down from 10 to 0 and WORK flashes once per second . Meantime REMAINING will light up and
count down
from 4 minutes. Then TOTAL TIME, DISTANCE, CALORIES, WATTS, SPEED & RPM start calculating, counting displays
‘01/08’(Figure29).
④
Cycle time counts down from 20 to 0 and REST flashes once per second along with beeps (Figure 30), meanwhile READY
will flash in last 3s(Figure31).
⑤
The above
③
&
④
continue cycle counting and add 1 per each cycle, until displays 08/08WORK, then go to End page.
⑥
Press START button once enter into PAUSE mode, Buzzer will sound for 0.5s in every 30s. All
values are displaying on LCD and flashing in every 4s. If continue to stop training for 5
minutes, buzzer sounds 2s and enter to Wake-up mode. Press START to resume workout.
⑦
Press STOP or end up training, buzzer beeps 1s then displays TOTAL TIME, DISTANCE,CALORIES
for 30s, and WAT T, SPEED & RPM will switch to display AVG. & MAX. .PULSE window will switch

19
to
display 65%, 85% MAX (Figure 21~23) each 5s.
⑧
With pulse signal input, PULSE window will display user actual pulse. Pulse window displays nothing if no pulse
signal input (Figure19~20).
⑨
Press any PROGRAM key then perform the program accordingly.
3.4 Interval CUSTOM:
①Press INTERVAL to select INTERVAL CUSTOM, press ENTER to enter into this mode then INTERVAL CUSTOM
00/XX
flashes
to be set along with buzzer beeps 1s. Press UP/DOWN to set 00/XX within 1~99 Circularly. Press ENTER to confirm
along with buzzer beeps 1s then enter into next setting.(Figure 32)
②The TIME continues lighting up, WORK and 0:01 will flash, press UP/DOWN to set training time within 0:00~9:59
circularly
(Figure 33). Press ENTER to confirm along with buzzer beeps 1s and INTERVAL CUSTOM continues lighting up.
③The TIME continues lighting up, REST will flash, press UP/DOWN to set rest time 0:01~9:59 circularly (Figure 34).
Press
ENTER
to confirm along with buzzer beeps 1s and INTERVAL CUSTOM continues lighting up.
④Cycle time counts down from 3 to 0 then console start, meanwhile buzzer beeps once per second and READY flashes
once per
second, counting displays ‘00/XX’(Figure 35).
⑤Cycle time counts down from the preset total time and WORK flashes once per second . Then TOTAL TIME,
DISTANCE,
CALORIES, WATTS, SPEED & RPM start calculating, counting displays ‘01/XX’(Figure 36).
⑥Cycle time counts down from and REST flashes once per second along with buzzer beeps(Figure 37), meanwhile
READY will
flash
in last 3s(Figure 38).
⑦The above ③&④continue cycle counting and add 1 per each cycle, until the WORK setting value finished then go to
End page.
⑧In WORK mode, buzzer beeps 1s then enter into wake up mode if no any signal inputs within 30s.
⑨Press START button once enter into PAUSE mode, Buzzer will sound for 0.5s in every 30s. All values are displaying
on LCD and
flashing in every 4s. If continue to stop training for 5 minutes, buzzer sounds 2s and enter to Wake-up mode. Press
START to resume
workout.
⑩Press STOP or end up training, buzzer beeps 1s then displays TOTAL TIME, DISTANCE, CALORIES for 30s, and
WATT,
SPEED
& RPM will switch to display AVG. & MAX. PULSE window will switch to display 65%, 85% MAX (Figure 21~23)
each 5s.

20
⑪With pulse signal input, PULSE window will display user actual pulse. Pulse window displays
nothing if no pulse signal input (Figure 19~20).
⑫Press any PROGRAM key then perform the program accordingly.
3.5 Target TIME mode:
①In Standby mode, press Target Time key and. TIME will light up, along with a long sound for 1s.
②TIME value is flashing, press UP and DOWN to adjust value (Figure 39) and press ENTER to confirm meanwhile
buzzer beeps 1s
and TIME lasting lighting up.
③Preset TIME value counts down , DISTANCE, CALORIES, WATTS, SPEEED, RPM start to count up. (Figure 40)
④Press START button once enter into PAUSE mode,Buzzer will sound for 0.5s per second within 30s. All values are
displaying on LCD and flashing in every 2s. If continue to stop training for 5 minutes, buzzer sounds 2s and enter to
Wake-up mode. Press START to resume workout.
⑤No signal inputs for 30s, buzzer sounds 1 short beep and enter to Wake-up mode.
⑥Press STOP or end up training, TIME will display total workout time; DISTANCE will display total workout distance;
CALORIES will display total consumption during workout; WATT, SPEED and RPM will switch to display AVG. &
MAX. PULSE window will switch to display 65%, 85% MAX (Figure 21~23) each 5s.
⑦With pulse signal input, PULSE window will display user actual pulse. Pulse
window displays nothing if no pulse signal input (Figure 19~20).

21
⑧Press any PROGRAM key then perform the program accordingly.
3.6 Target Distance mode:
①In standby mode, press Target Time key and TIME will light up, along with a long sound for 1s.
②DISTANCE value is flashing, press UP and DOWN to adjust (Figure 41). Press ENTER to confirm meanwhile buzzer
beeps 1s andDISTANCE lasting lighting up.
③Preset DISTANCE value counts down , TIME, CALORIES, WATTS, SPEEED, RPM start to count up. (Figure 42)
④Press START button once enter into PAUSE mode,Buzzer will sound for 0.5s per second within 30s. All values are
displaying on LCD and flashing in every 2s. If continue to stop training for 5 minutes, buzzer sounds 2s and enter to
Wake-up mode. Press START to resume workout.
⑤No signal input for 30s, buzzer sounds 1s and enter to Wake-up mode.
⑥Press STOP key or end up training, TIME will display total workout time; DISTANCE will display total workout
distance; CALORIES will display total consumption during workout; WATT, SPEED and RPM will switch to display
AVG. & MAX. PULSE window will switch to display 65%, 85% MAX (Figure 21~23) each 5s.
⑦With pulse signal input, PULSE window will display user actual pulse. Pulse
window displays nothing if no pulse signal input (Figure 19~20).
⑧Press any PROGRAM key then perform the program accordingly.
3.7 Target Calories mode:
①In Standby mode, press Target Calories key and CALORIES will light up, along with a long sound for 1s.
②CALORIES value is flashing, press UP and DOWN to adjust (Figure 43). Press ENTER to confrim meanwhile buzzer
beeps 1s and
CALORIES lasting lighting up
③Preset CALORIES value counts down , TIME, DISTANCE, WATTS, SPEEED & RPM start to count up.(Figure 44)
④Press START button once enter into PAUSE mode,Buzzer will sound for 0.5s per second within 30s. All values are
displaying on LCD and flashing in every 2s. If continue to stop training for 5 minutes, buzzer sounds 2s and enter to
Wake-up mode. Press START to resume workout.
⑤No signal input for 30s, buzzer sounds 1s and enter to Wake-up mode.
⑥Press STOP key or end up training, TIME will display total workout time; DISTANCE will display total workout
distance; CALORIES will display total consumption during workout; WATT, SPEED and RPM will switch to display
AVG. & MAX. PULSE window will switch to display 65%, 85% MAX (Figure 21~23) in each 5s.
⑦With pulse signal input, PULSE window will display user actual pulse. Pulse window
displays nothing if no pulse signal input (Figure 19~20).
⑧Press any PROGRAM key then perform the program accordingly.
This manual suits for next models
1
Table of contents
Other TOORX Exercise Bike manuals

TOORX
TOORX SRX700 User manual

TOORX
TOORX BRX30 User manual

TOORX
TOORX SRX40S User manual

TOORX
TOORX BRXR 90 User manual

TOORX
TOORX BRX 300 User manual

TOORX
TOORX BRXR COMFORT User manual

TOORX
TOORX BRX FLEXI User manual

TOORX
TOORX BRX35 User manual

TOORX
TOORX BRX-R3000 User manual

TOORX
TOORX BRX60 User manual
Popular Exercise Bike manuals by other brands

Christopeit Sport
Christopeit Sport EM 3 Assembly and exercise instructions

Ironman Fitness
Ironman Fitness 430r owner's manual

Star Trac
Star Trac V-Bike owner's manual

Life Fitness
Life Fitness LC-5500 owner's manual

Schwinn
Schwinn 220 Recumbent Bike 2012 model Assembly manual

Weslo
Weslo Pursuit T 39 Exercise Bike user manual