Toro 79413 User manual

FormNo.3437-298RevA
60inBaggerKit
ZeroTurnRadiusRidingMower
ModelNo.79413—SerialNo.400000000andUp
Operator'sManual
Introduction
Readthisinformationcarefullytolearnhowtooperate
andmaintainyourproductproperlyandtoavoid
injuryandproductdamage.Youareresponsiblefor
operatingtheproductproperlyandsafely.
Visitwww.Toro.comforproductsafetyandoperation
trainingmaterials,accessoryinformation,helpnding
adealer,ortoregisteryourproduct.
Wheneveryouneedservice,genuineToroparts,or
additionalinformation,contactanAuthorizedService
DealerorToroCustomerServiceandhavethemodel
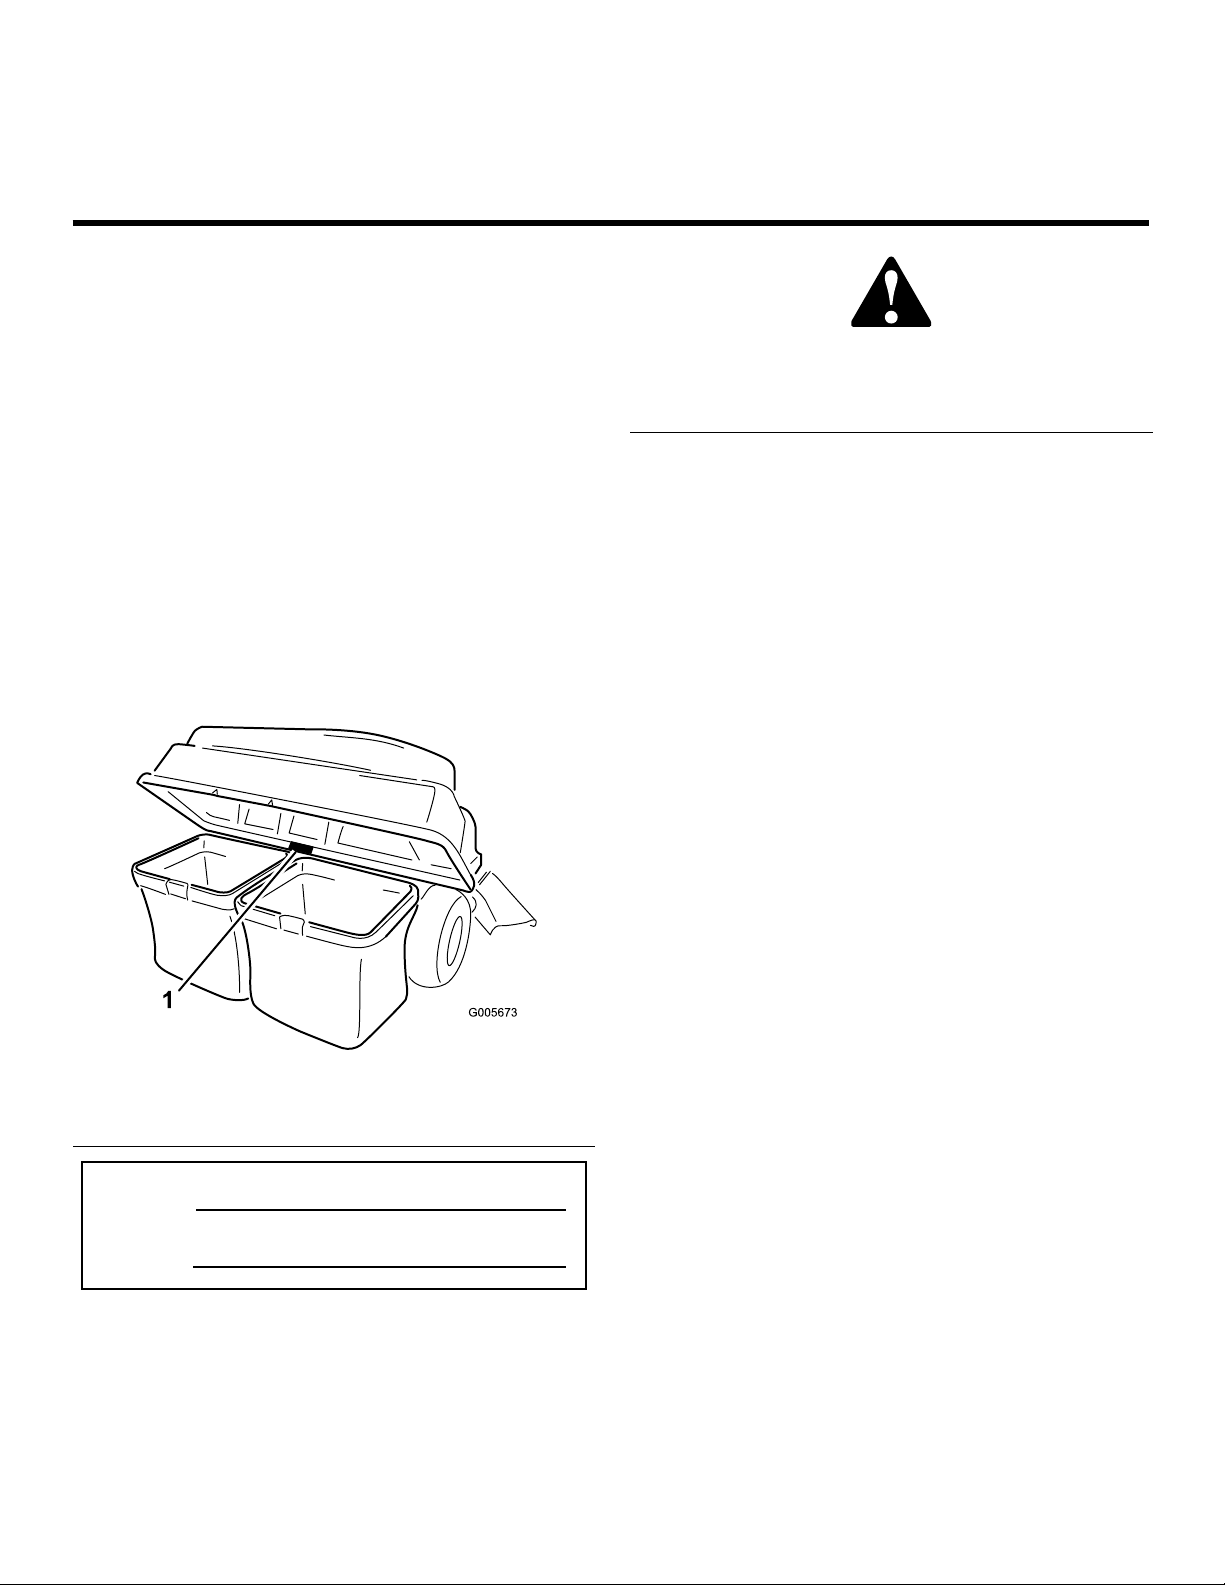
andserialnumbersofyourproductready.Figure1
identiesthelocationofthemodelandserialnumbers
ontheproduct.Writethenumbersinthespace
provided.
g005673
Figure1
1.Modelandserialnumberlocation
ModelNo.
SerialNo.
Thismanualidentiespotentialhazardsandhas
safetymessagesidentiedbythesafety-alertsymbol
(Figure2),whichsignalsahazardthatmaycause
seriousinjuryordeathifyoudonotfollowthe
recommendedprecautions.
g000502
Figure2
Safety-alertsymbol
Thismanualuses2wordstohighlightinformation.
Importantcallsattentiontospecialmechanical
informationandNoteemphasizesgeneralinformation
worthyofspecialattention.
Contents
Introduction...............................................................1
Safety.......................................................................2
TowingSafety.....................................................2
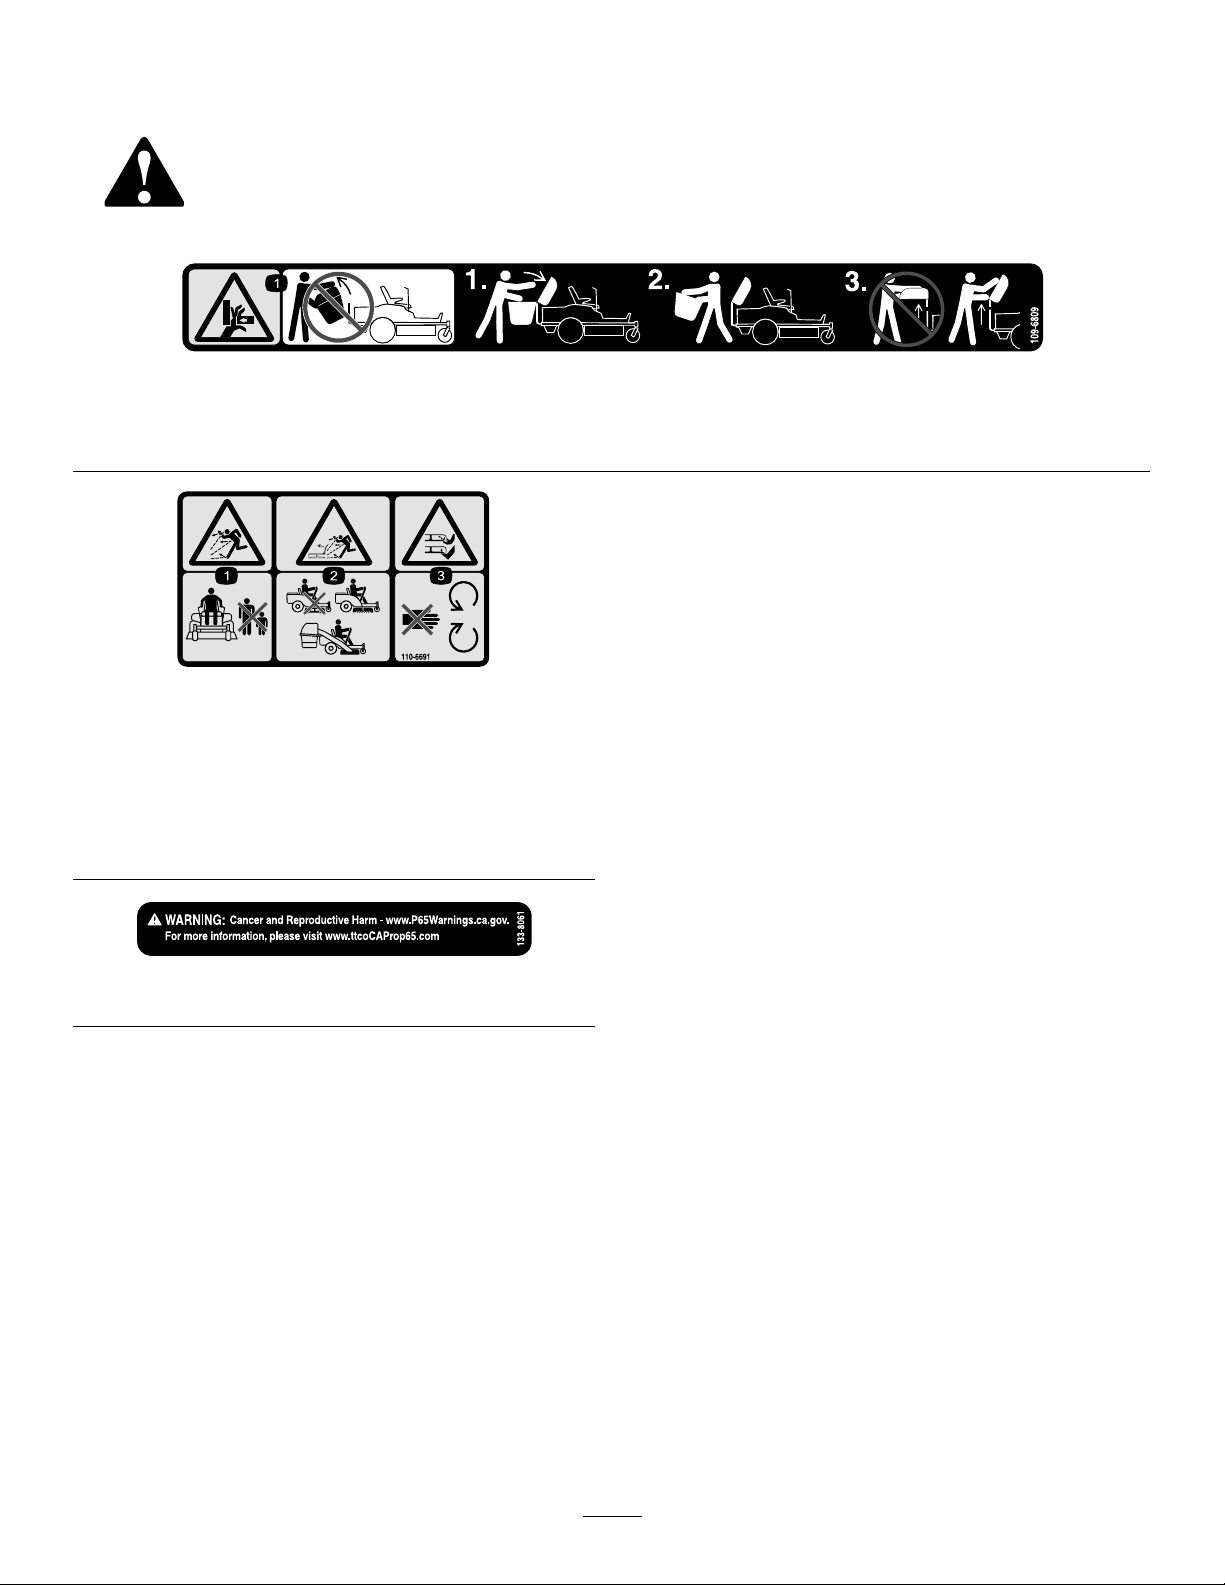
SafetyandInstructionalDecals..........................3
Setup........................................................................4
1PreparingtheMachine.....................................5
2InstallingtheWeights.......................................5
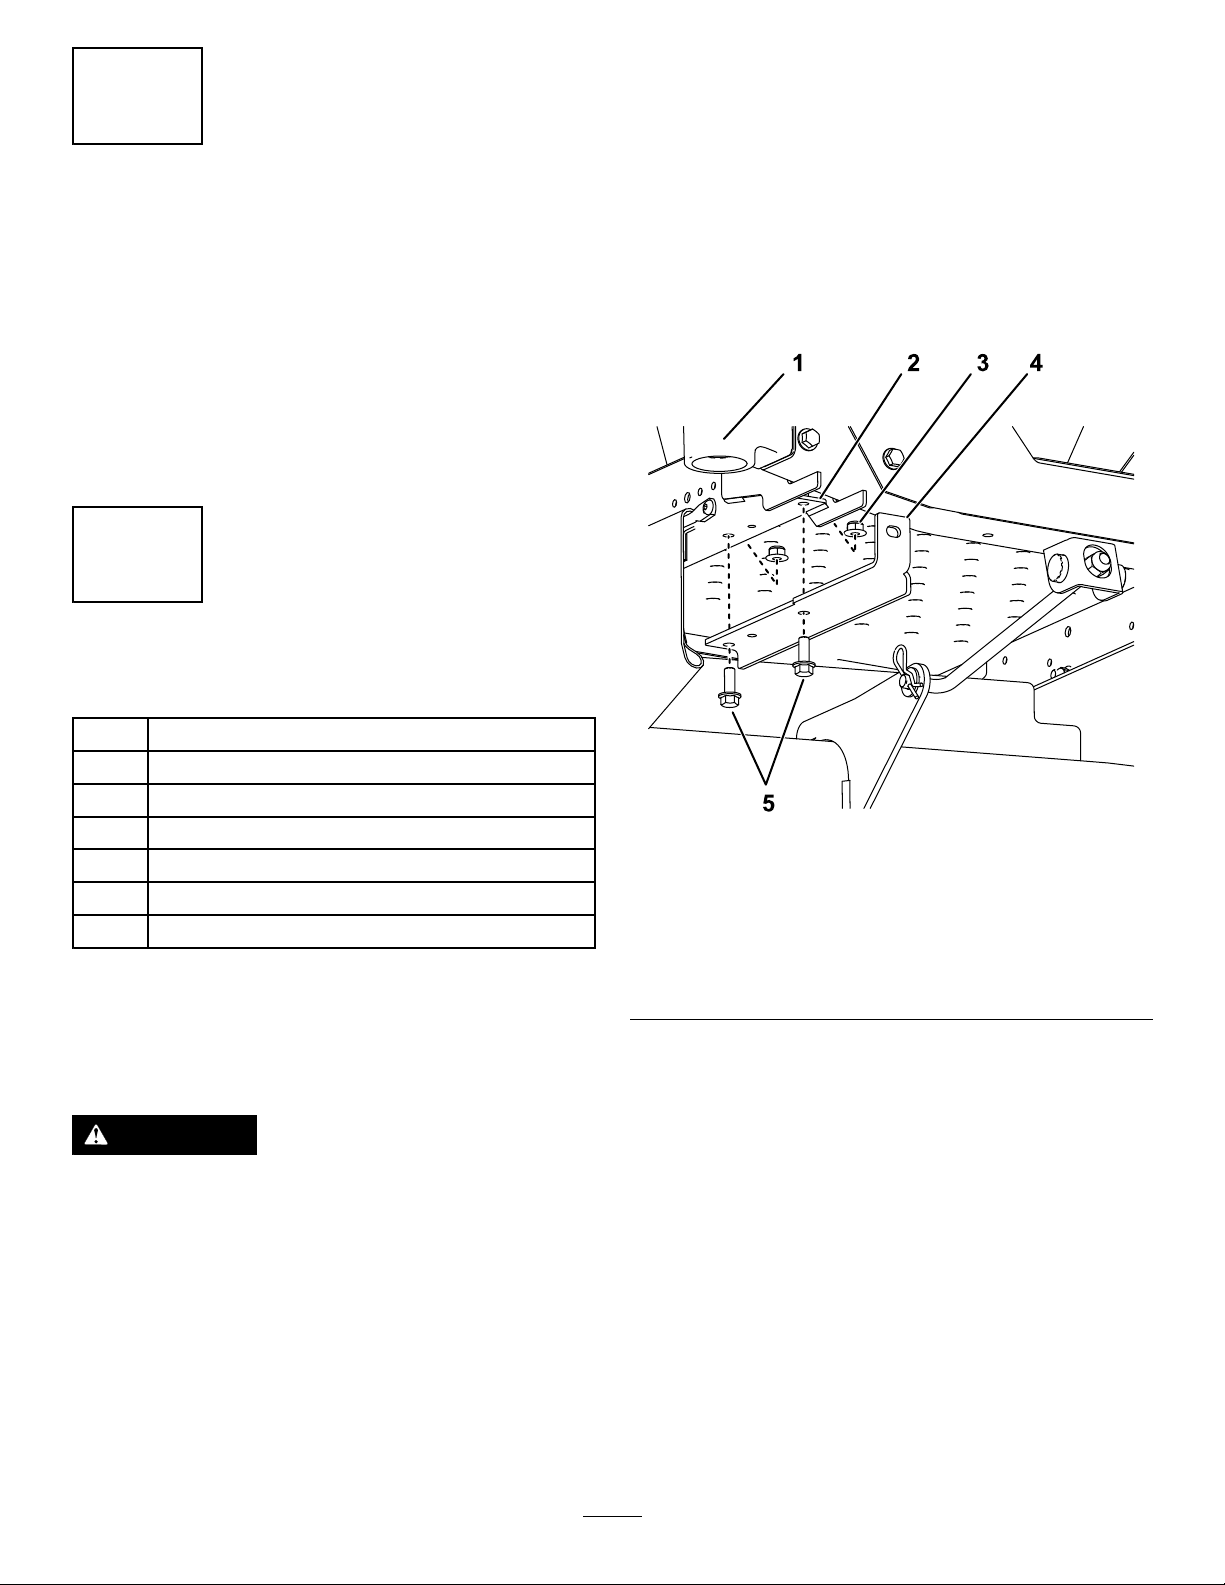
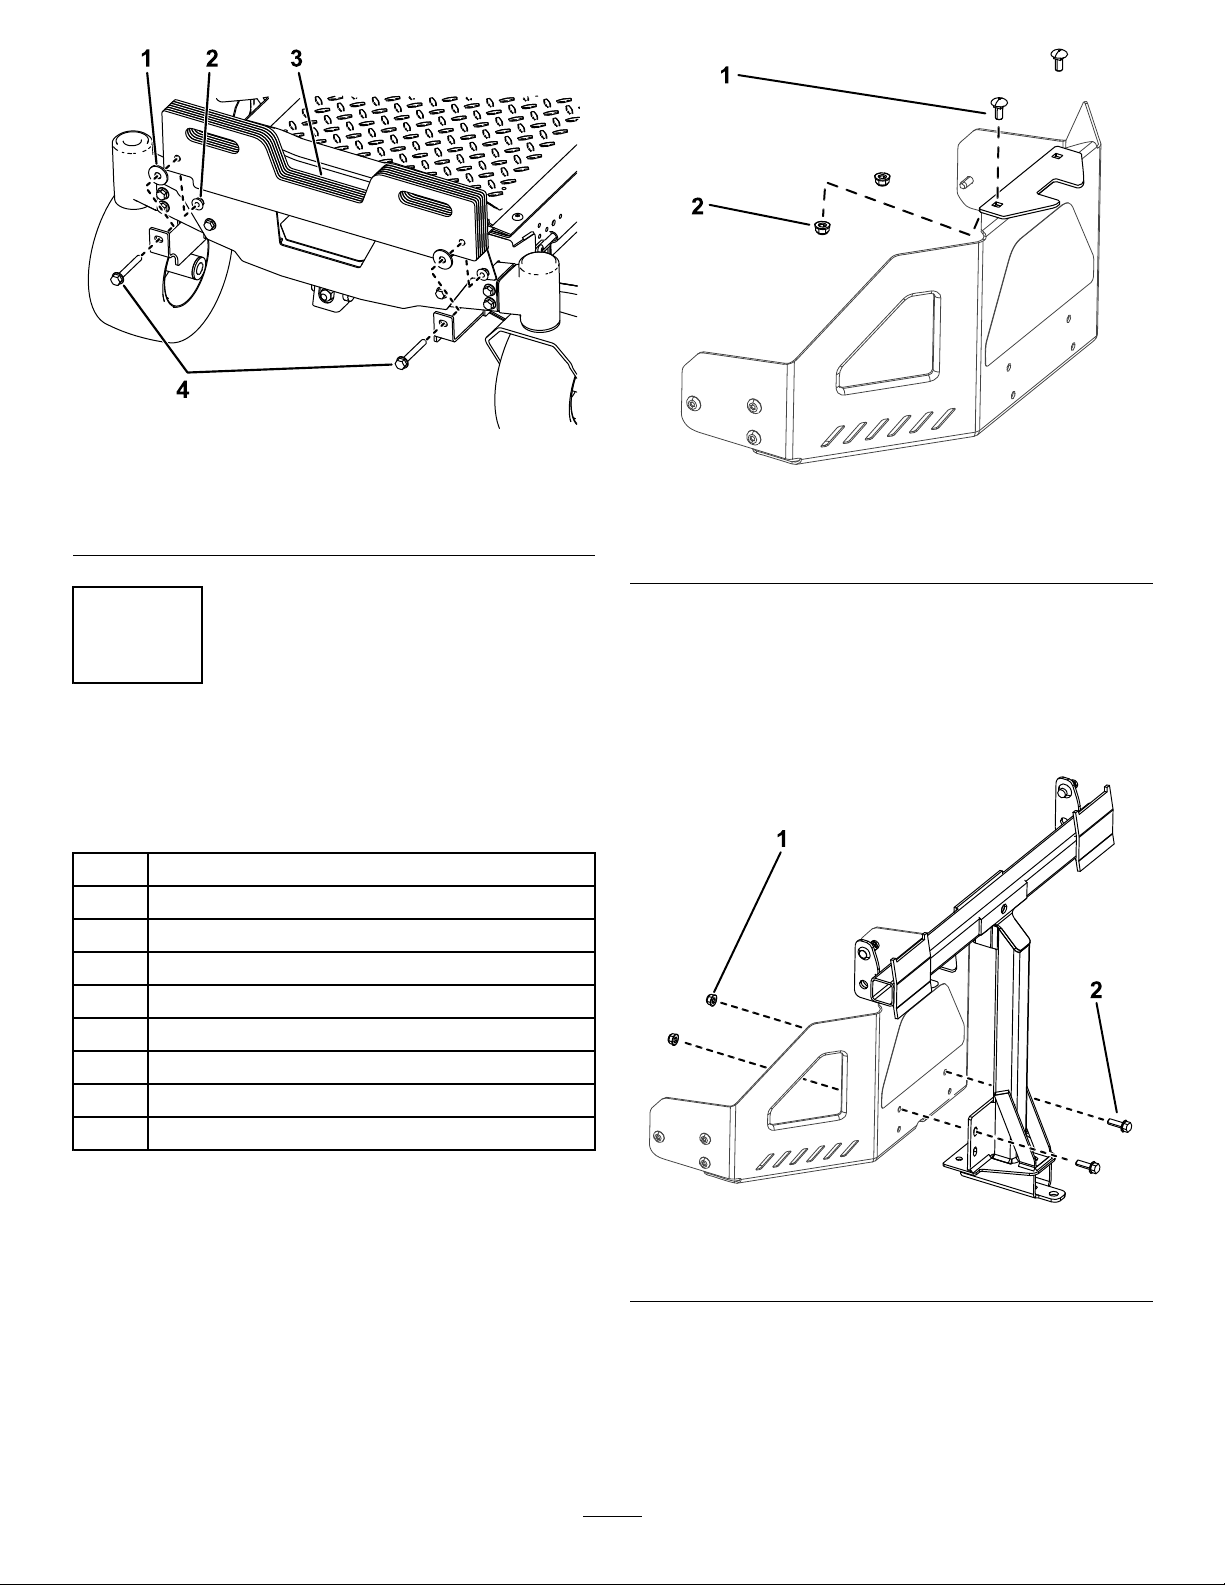
3InstallingtheAttachmentMount.......................6
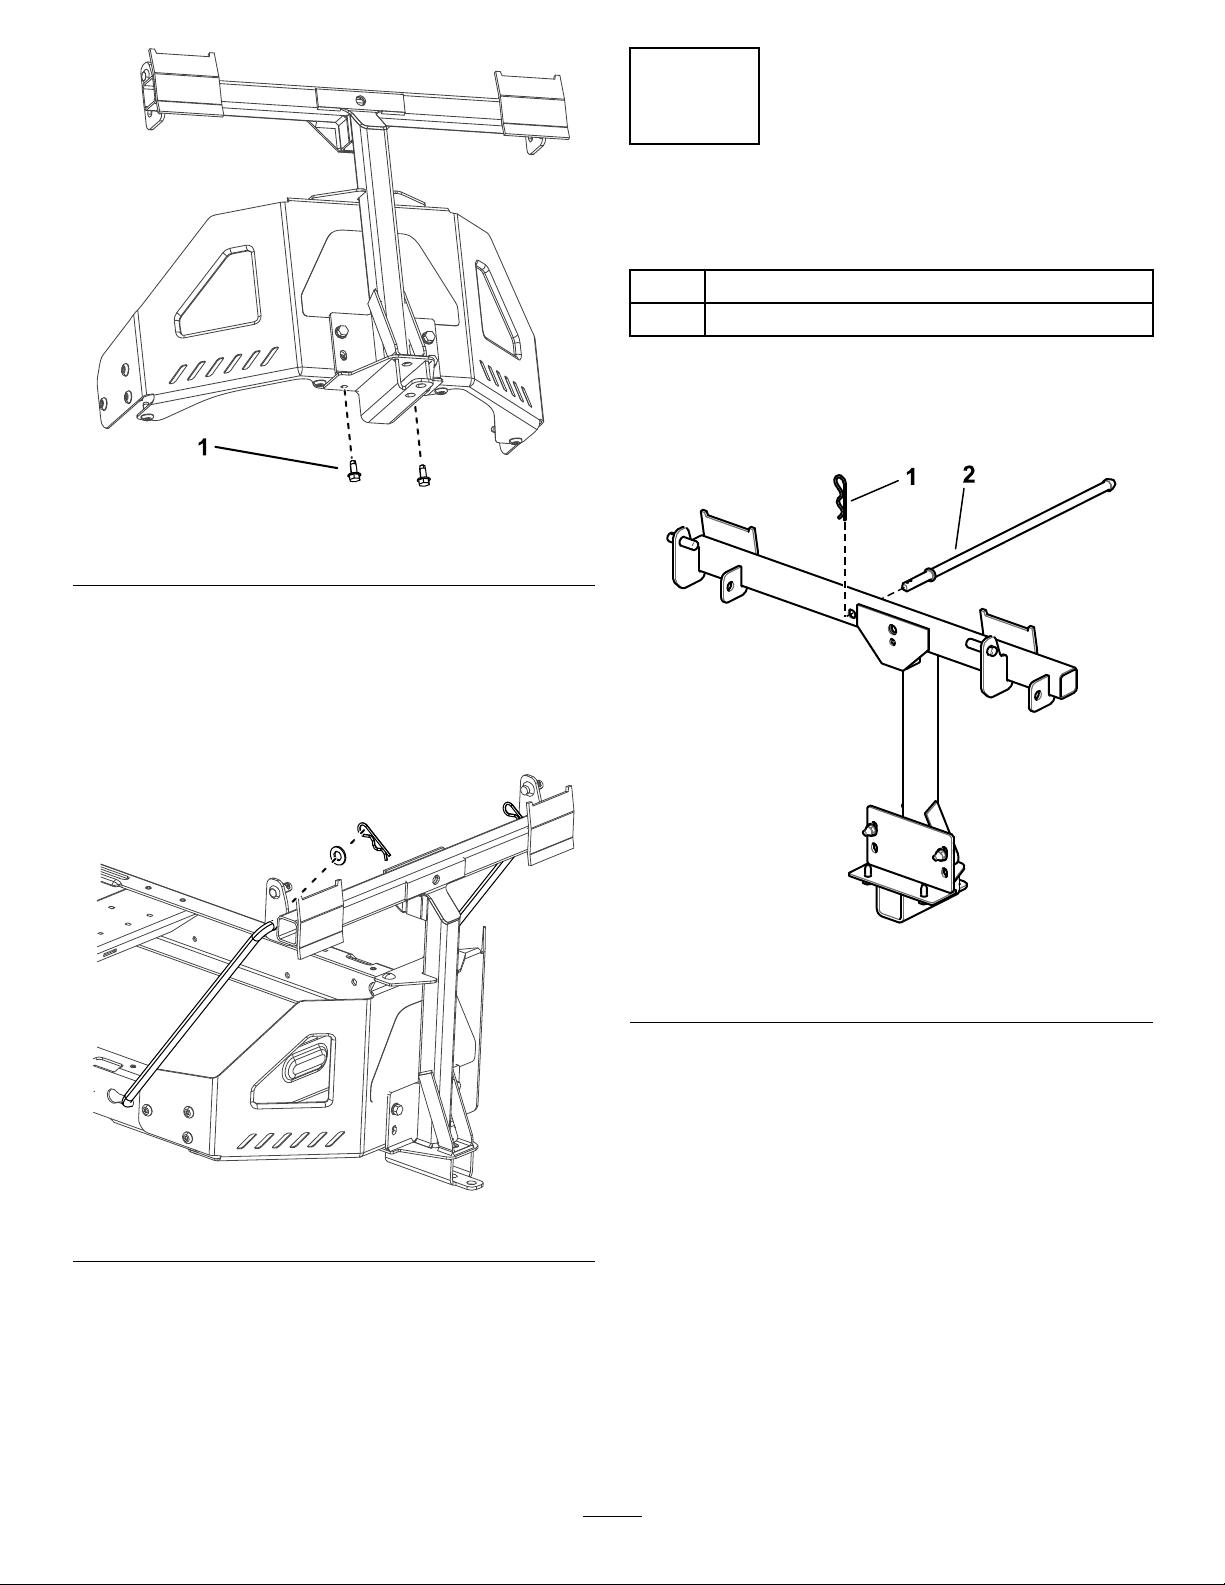
4InstallingtheLatchRod....................................7
5AssemblingtheBaggerTop.............................8
6InstallingtheBaggerT op..................................9
7InstallingtheBafesandChute........................9
8ConnectingwiththeDischargeTube...............11
Operation................................................................12
EmptyingtheGrassBags.................................13
ClearingObstructionsfromtheBagger.............14
RemovingtheBagger.......................................14
UsingtheDrawBar...........................................14
OperatingTips.................................................15
Maintenance...........................................................16
RecommendedMaintenanceSchedule(s)...........16
InspectingtheBaggerAttachment....................16
InspectingtheMowerBlades............................17
CleaningtheBaggerAttachment......................17
Storage...................................................................17
StoringtheBaggerAttachment.........................17
OriginalInstructions(EN)PrintedintheUSA
AllRightsReserved*3437-298*A

Safety
•Becomefamiliarwiththesafeoperationofthe
equipment,withtheoperatorcontrols,andsafety
signs.
•Useextracarewithgrasscatchersorother
attachments.Thesecanchangetheoperating
characteristicsandthestabilityofthemachine.
•Followthemanufacturer'srecommendations
foraddingorremovingwheelweightsor
counterweightstoimprovestability.
•Donotuseagrasscatcheronsteepslopes.A
heavygrasscatchercouldcauselossofcontrol
oroverturnthemachine.
•Slowdownanduseextracareonhillsides.Be
suretotravelintherecommendeddirectionon
hillsides.Turfconditionscanaffectthestabilityof
themachine.Useextremecautionwhileoperating
neardrop-offs.
•Keepallmovementonslopesslowandgradual.
Donotmakesuddenchangesinspeed,direction,
orturning.
•Thegrasscatchercanobstructtheviewtothe
rear.Useextracarewhenoperatinginreverse.
•Usecarewhenloadingorunloadingthemachine
intoatrailerortruck.
•Neveroperatewiththedischargedeectorraised,
removedoraltered,unlessusingagrasscatcher.
•Keephandsandfeetawayfrommovingparts.Do
notmakeadjustmentswiththeenginerunning.
•Parkthemachineonlevelground,disengage
thedrives,andshutofftheenginebeforeleaving
theoperator'spositionforanyreasonincluding
emptyingthegrasscatcheroruncloggingthe
chute.
•Ifyouremovethegrasscatcher,besuretoinstall
anydischargedeectororguardthatmighthave
beenremovedtoinstallthegrasscatcher.Donot
operatethemowerwithouteithertheentiregrass
catcherorthegrassdeectorinplace.
•Donotleavegrassinthegrasscatcherfor
extendedperiodsoftime.
•Grasscatchercomponentsaresubjecttowear,
damageanddeterioration,whichcouldexpose
youtomovingpartsorallowobjectstobethrown.
Frequentlycheckcomponentsandreplacewith
themanufacturer'srecommendedparts,when
necessary.
TowingSafety
•Donotattachtowedequipmentexceptatthehitch
point.
•Followtheattachmentmanufacturer's
recommendationforweightlimitsfortowed
equipmentandtowingonslopes.
•Neverallowchildrenorothersinorontowed
equipment.
•Onslopes,theweightofthetowedequipmentmay
causelossoftractionandlossofcontrol.Reduce
towedweightandslowdown.
•Stoppingdistanceincreaseswiththeweightofthe
towedload.Travelslowlyandallowextradistance
tostop.
•Makewideturnstokeeptheattachmentclearof
themachine.
•Donottowaloadthatweighsmorethanthe
towingmachine.
2

SafetyandInstructionalDecals
Safetydecalsandinstructionsareeasilyvisibletotheoperatorandarelocatednearanyarea
ofpotentialdanger.Replaceanydecalthatisdamagedormissing.
decal109-6809
109-6809
1.Crushinghazardofhand—donotremovethewholebaggerfromthemachine;openthebaggertopandthenremovethebag(s)
fromthebagger.Donotremovethebaggertopwhenitisclosed;openthebaggertopandthenremoveit.
decal110-6691
110-6691
1.Thrownobjecthazard—keepbystandersaway.
2.Thrownobjecthazard,mower—donotoperatewithoutthe
deector,dischargecover,orgrasscollectionsystemin
place.
3.Cutting/dismembermenthazardofhandorfoot—stayaway
frommovingparts.
decal133-8061
133-8061
3

Setup
LooseParts
Usethechartbelowtoverifythatallpartshavebeenshipped.
ProcedureDescriptionQty.Use
1Nopartsrequired–Preparethemachine.
Bolt(3/8x1inch)4
Locknut(3/8inch)6
Leftweight-mountingbracket1
Rightweight-mountingbracket1
Washer2
Bolt(5/8x2-3/4inches)2
2
Suitcaseweight6
Installtheweights.
Stabilizerbracket1
Carriagebolt(5/16x3/4inch)2
Locknut(5/16inch)4
Self-tappingscrew(5/16x3/4inch)2
Bolt(5/16x1inch)2
Pivotframe1
Hairpincotter2
Rod2
3
Washer2
Installtheattachmentmount.
Latchrod1
4Hairpincotter1Installthelatchrod.
Baggertop1
5Baggerscreen1Assemblethebaggertop.
Grassbag2
Upperbaggertube1
Pivotbracket2
Bolt(5/16x1inch)4
6
Nut(5/16inch)4
Installthebaggertop.
Baggingcutoffbafe1
Frontbafe1
Locknut(5/16inch)1
Chute1
Carriagebolt2
Pushnut1
7
Handknob1
Installthebafesandchute.
8Dischargetube1Connectwiththedischargetube.
Note:Determinetheleftandrightsidesofthemachinefromthenormaloperatingposition.
4

1
PreparingtheMachine
NoPartsRequired
Procedure
1.Parkthemachineonalevelsurface.
2.Disengagetheblade-controlswitch.
3.Movethemotion-controlleversoutwardtothe
NEUTRAL-LOCKpositiontoengagetheparking
brake.
4.Shutofftheengineandremovethekey.
2
InstallingtheWeights
Partsneededforthisprocedure:
4Bolt(3/8x1inch)
6Locknut(3/8inch)
1Leftweight-mountingbracket
1Rightweight-mountingbracket
2Washer
2Bolt(5/8x2-3/4inches)
6Suitcaseweight
Procedure
Note:Thisprocedureisonlyformodelswithcontrol
levers.Steeringwheelmodelsdonotneedweights
installed.
CAUTION
Thebaggerchangestheweightdistributionof
themachine.Operatingthemachinewithout
thefrontweightsmaycauseanunstable
condition,whichcouldresultinalossof
control.
Ensurethefrontweightsareproperlyinstalled
beforeoperatingthemachinewiththebagger
attachment.
1.Installtheweight-mountingbracketstotheunder
sideoftheframeusing2bolts(3/8x1inch),
and2locknuts(3/8inch)asshowninFigure3.
2.Installthesuitcaseweightstotheweight
mountingbracketsusing2bolts(5/8x2-3/4
inches),2washers,and2locknuts(3/8inch)
asshowninFigure4.
3.Onceyouhaveinstalledalltheweightsand
brackets,ensurethatallthefastenersaretight.
Tightenasnecessary.
Important:Wheneveryouremovethe
baggerattachment,remembertoremovethe
frontweightstoreturntheproperstability
tothemachine.
g299192
Figure3
Castorforkandwheelnotshownforclarity.
1.Frontrightcaster4.Rightmountingbracket
2.Forwardhole(rightside
shown)
5.Bolts(3/8x1inch)
3.Locknut(3/8inch)
5

g299244
Figure4
1.Spacer3.Suitcaseweights
2.Locknut(3/8inch)4.Bolts(5/8x2-3/4inches)
3
InstallingtheAttachment
Mount
Partsneededforthisprocedure:
1Stabilizerbracket
2Carriagebolt(5/16x3/4inch)
4Locknut(5/16inch)
2Self-tappingscrew(5/16x3/4inch)
2Bolt(5/16x1inch)
1Pivotframe
2Hairpincotter
2Rod
2Washer
InstallingtheStabilizerBracket
andPivotFrame
1.Installthestabilizerbrackettotheengineguard
using2carriagebolts(5/16x3/4inch)and2
locknuts(5/16inch)(Figure5).
g300204
Figure5
1.Carriagebolt(5/16x3/4
inch)
2.Locknut(5/16inch)
2.Installthepivotframetothemachineframeas
showninFigure6.Securethepivotframetothe
machineframeusing2bolts(5/16x1inch)and
2locknuts(5/16inch).
Note:Removethehitchbracketandhardware
iftheyareinstalled.
g300205
Figure6
1.Locknut(5/16inch)2.Bolt(5/16x1inch)
3.Securethepivotframetothebottomofthe
machineframeusing2self-tappingscrews(5/16
x3/4inch)asshowninFigure7.
6

g300206
Figure7
1.Self-tappingscrew(5/16x3/4inch)
4.Installthebent,aredendofarodintothekeyed
slotintheleftsideofthemachineframe,and
movetherodrearwardtoseatitintheframe
(Figure8).
Note:Repeatthisstepfortherightsideofthe
machine.
g300207
Figure8
5.Insertthebentendsoftherodsintothe
attachmentmountasshowninFigure8and
securetheendofeachrodwithawasherand
hairpincotter.
4
InstallingtheLatchRod
Partsneededforthisprocedure:
1Latchrod
1Hairpincotter
Procedure
Installthelatchrodwithahairpincotter(Figure9).
g202360
Figure9
1.Hairpincotter2.Latchrod
7

5
AssemblingtheBaggerTop
Partsneededforthisprocedure:
1Baggertop
1Baggerscreen
Procedure
1.Turnthebaggertopover.
2.InstallthescreenasshowninFigure10andthat
itslopesdowntowardthecollectionbags.
Note:Makesurethatthescreenssnapinto
placeandthetabsengagethebaggertop.
g005666
Figure10
1.Baggertop3.Screentab
2.Screen4.Slotinbaggertop
8

6
InstallingtheBaggerTop
Partsneededforthisprocedure:
2Grassbag
1Upperbaggertube
2Pivotbracket
4Bolt(5/16x1inch)
4Nut(5/16inch)
Procedure
1.Installthebaggertoptothebaggerframe.
2.Installthepivotbracketsontothepivotframe
(Figure8).
3.Securethebaggertoptothepivotbracketswith
4bolts(5/16x1inch)and4nuts(5/16inch).
Note:Thebaggertopiseasiertoinstallif2
peopleworktogether.
g300208
Figure11
1.Baggerposts3.Nuts(5/16inch)
2.Bolts(5/16x1inch)
4.Liftthebaggertopandinstallthebagsbysliding
thebagframehooksontotheretainingbrackets
(Figure12).
g300378
Figure12
5.Lowerthebaggertopontothebags(Figure13).
g033030
Figure13
6.Attachthebaggerhoodstraptothelatchrod.
7.Installtheupperbaggertubebyinsertingthe
curvedendintotheopeninginthebaggertop.
Note:Ensurethatthearedendwiththe
retentionpostispointingdownandfrowardin
preparationtobematedwiththeFinishingKit.
9

7
InstallingtheBafesand
Chute
Partsneededforthisprocedure:
1Baggingcutoffbafe
1Frontbafe
1Locknut(5/16inch)
1Chute
2Carriagebolt
1Pushnut
1Handknob
Procedure
Neveroperatethemowerwiththedischargeopening
uncovered.Alwaysuseadischargecover,mulch
cover,orbaggingchutewhenoperatingthemower
deck.
1.Removetheexistingbafefromthemachine
(Figure14).
g299303
Figure14
2.Installthenewbaggingcutoffbafetothemower
deckatthesamelocationinthemowerdeckas
thepreviouslyremovedbafe(Figure19).
Note:Usetheexistingfastenersfromthat
locationtosecurethenewsmallbafetothe
mowerdeck.
g300211
Figure15
3.Rotatethebaggingcutoffbafetocontactthe
rearedgeofthedeck(Figure16).
g300212
Figure16
4.Installthecarriageboltandpushnutontothe
frontbafeasshowninFigure17.
g300213
Figure17
1.Pushnut2.Carriagebolt
5.Installthefrontbafetothefrontofthemower
deckusinganut(5/16inch)andacarriagebolt
asshowninFigure19.
10

g300214
Figure18
1.Carriagebolt2.Nut
6.Securethechutetothemowerdeckwiththe
handknob(Figure19).
g300215
Figure19
7.Handtightentheknobtosecurethechutetothe
mowerdeck(Figure19).
8.Hooktheexiblelatchonthechutetothe
retainingclaspweldedtothesidewallofthe
mowerdeck(Figure20).
g013098
Figure20
1.Retainingclasp2.Flexiblelatch
8
Connectingwiththe
DischargeTube
Partsneededforthisprocedure:
1Dischargetube
Procedure
1.Slidethecurvedendofthedischargetubeinto
theopeninginthebaggertop(Figure21).
11

g010641
Figure21
1.Dischargetube4.Peg
2.Openinginbaggertop5.Rubberstrap
3.Flaredendofdischarge
tube
2.Slidethearedendofthedischargetubeover
theendofthechute.Movetherubberretaining
straponthechutesnapsoverthepegonthe
dischargetubetosecureit(Figure21).
3.Installthewireontothesparkplug(s).
Operation
WARNING
Toavoidpersonalinjury,followthese
procedures:
•Becomefamiliarwithalloperatingand
safetyinstructionsintheOperator's
Manualforthemowerbeforeusingthis
attachment.
•Neverremovethedischargetube,bags,
baggertop,orthechutewhiletheengine
isrunning.
•Alwaysshuttheengineoffandwaitforall
movingpartstostopbeforeclearingan
obstructionfromthebaggingsystem.
•Neverperformmaintenanceormake
repairswhiletheengineisrunning.
WARNING
Withoutthegrassdeector,baggertubesor
completebaggerassemblymountedinplace,
youandothersareexposedtobladecontact
andthrowndebris.Contactwiththerotating
mowerblade(s)andthrowndebriswillcause
injuryordeath.
•Alwaysinstallthegrassdeectorwhen
removingthebaggerandchangingtoside
dischargemode.
•Ifthegrassdeectoriseverdamaged,
replaceitimmediately.Thegrassdeector
routesmaterialdowntowardtheturf.
•Neverputyourhandsorfeetunderthe
mower.
•Nevertrytoclearthedischargeareaor
mowerbladesunlessyoumovethepower
takeoff(PTO)tooffandrotatetheignition
keytooff.Alsoremovethekeyandpull
thewireoffofthesparkplug(s).
•Turnofftheenginebeforeuncloggingthe
dischargechute.
12

EmptyingtheGrassBags
DANGER
Debris,suchasleaves,grass,orbrushcan
catchre.Areintheengineareacancause
personalinjuryandpropertydamage.
•Keeptheengineandmuferareafreeof
debrisaccumulation.
•Takecarewhenopeningthebaggercover
tokeepdebrisfromfallingontotheengine
andmuferarea.
•Allowthemachinetocoolbeforestoringit.
Becarefulwhenliftingorhandlingagrassbagthatis
full.T oemptythegrassbags:
1.Parkthemachineonalevelsurfaceand
disengagethebladecontrolswitch.
2.Movethemotioncontrolleversoutwardto
theneutrallockposition,shutofftheengine,
removethekey,settheparkingbrakeandwait
forallmovingpartstostopbeforeleavingthe
operatingposition.
3.Open(raise)thebaggertop(Figure22).
g005758
Figure22
4.Compressdebrisintothebags.Withboth
hands,liftuponthebagandunhookitfromthe
retainingbracket.Emptythebag.Repeatthe
procedurefortheotherbag.
g300218
Figure23
g300217
Figure24
5.Installthebagsbyslidingthebagframehooks
ontotheretainingbrackets.
6.Lowerthebaggertopontothebags.
13

ClearingObstructionsfrom
theBagger
WARNING
Whenthebaggerisinoperation,theblower
isrotatingandcancutofforinjurehandsand
ngers.
•Beforeadjusting,cleaning,repairing
andinspectingtheblower,andbefore
uncloggingthechute,shutofftheengine
andwaitforallmovingpartstostop.
Removethekey.
•Useastickorsimilarobject,notyour
hands,toremoveanobstructionfromthe
blowerandtube.
•Keepyourface,hands,feet,andanyother
partofyourbodyorclothingawayfrom
concealed,moving,orrotatingparts.
1.Parkthemachineonalevelsurfaceand
disengagethebladecontrolswitch.
2.Movethemotioncontrolleversoutwardtothe
neutrallockposition,stoptheengine,remove
thekey,settheparkingbrakeandwaitfor
allmovingpartstostopbeforeleavingthe
operatingposition.
3.Checkthegrassbagsandemptythemifthey
arefull.
4.Removeandseparatethedischargetubeand
chutefromthebaggertopandmower.Using
astickorsimilarobject,carefullyremoveand
cleartheobstructionfromthemower,discharge
tube,chute,andthebaggertop.
5.Afteryouremovetheobstruction,installthe
completebaggersystemandresumeoperation.
RemovingtheBagger
CAUTION
Failingtoremovethefrontbaggerweights
andoperatingthemachinewithoutthebagger
attachmentmaycauseanunstablecondition,
whichcouldresultinalossofcontrol.
•Alwaysremovethefrontweightswhen
removingthebaggerattachment.
•Neveroperatethemachinewithoutthe
baggerattachmentandthefrontweights
installed.
YoucanremovethebaggerbyrepeatingtheSetup
sectionsfromallinstalledbaggerrelatedkitsin
reverseorder.Ifweightsareinstalled,alwaysremove
thefrontbaggerweightswhenremovingthebagger
attachments.
Note:Itisnecessaryonlytoremovethecutoffbafe
wheninstallingamulchingkit.
UsingtheDrawBar
Thebaggersupportbrackethasadrawbarfeature
thatyoucanusefortowing.
•Readandunderstandalltheoperatinginstructions
ofthemachine.
•Whenturning,slowdownandobservethe
clearance.
•Makewideturnsandkeeptowedequipmentclear
ofthetowingvehicle.
•Excessivedrawbarpullmaycausehydrostatic
transmissionfailure.
g300210
Figure25
1.Baggersupportbracketwithdrawbar
14

OperatingTips
TipsforBagging
RememberingtheSizeofthe
MachinewiththeAttachment
Rememberthatthemachineislongerandwiderwith
thisattachmentinstalled.Byturningtoosharplyin
connedplaces,youmaydamagetheattachment.
Trimming
Alwaystrimwiththeleftsideofthemower.Donottrim
withtherightsideofthemowerbecauseyoucould
damagethebaggerchuteanddischargetube.
CuttingHeight
Donotsetthemowercuttingheighttoolowbecause
longgrasssurroundingthemowercanpreventair
fromgettingunderthemowerandenteringthe
baggingsystem.Ifenoughairdoesnotgetunderthe
mower,thebaggingsystemwillplug.
CuttingFrequency
Cutthegrassoften,especiallywhenitgrowsrapidly.
Youwillhavetocutyourgrasstwiceifitgets
excessivelylong.
CuttingTechnique
Forbestlawnappearance,besuretoslightlyoverlap
themowerintothepreviouslycutarea.Thishelps
reducetheloadontheengineandreducesthechance
ofpluggingthechuteanddischargetube.
BaggingSpeed
Mostoftenyouwillbagwiththemowerthrottleinthe
FASTpositionanddriveatanormalgroundspeed.
However,inextremelydryanddustygrass,youmay
wanttoslightlyreducethethrottlespeedandincrease
thegroundspeedofthemower.Thebaggingsystem
mayplugifyoudrivetoofastandtheenginespeed
getstooslow.Onhills,itmaybenecessarytoslow
themowergroundspeed.Thishelpsmaintainthe
enginespeedandbaggingefciency.Mowdownhill
wheneverpossible.
CAUTION
Asthebaggerlls,extraweightisaddedto
thebackofthemachine.Ifyoustopand
startsuddenlyonhills,youmaylosesteering
controlorthemachinemaytip.
•Donotstartorstopsuddenlywhengoing
uphillordownhill.Avoiduphillstarts.
•Ifyoudostopthemachinewhengoing
uphill,disengagethebladecontrol.Then
backdownthehillusingaslowspeed.
•Avoidsuddenturnsorrapidspeed
changesonslopes.
•Neveroperatethemachinewithoutthe
baggerattachmentandthefrontweights
installed.
BaggingLongGrass
Excessivelylonggrassisheavyandmaynotbe
propelledcompletelyintothegrassbags.Ifthis
happens,thedischargetubeandchutemayplug.T o
avoidpluggingthebaggingsystem,mowthegrass
atahighheightofcut,thenlowerthemowertoyour
normalcuttingheightandrepeatthebaggingprocess.
BaggingWetGrass
Alwaystrytocutgrasswhenitisdrybecauseyour
lawnwillhaveaneatappearance.Ifyoumustcutwet
grass,usetheconventionalside-dischargefeatureof
themower.Severalhourslater,whentheclippings
aredry,installthecompletebaggerattachmentand
vacuumupthegrassclippings.
SignsofPlugging
Asyouarebagging,asmallamountofgrassclippings
normallyblowoutthefrontofthemower.Anexcessive
amountofclippingsblowingoutindicatesthatthe
bagsarefullorthesystemisplugged.
15

Maintenance
Note:Determinetheleftandrightsidesofthemachinefromthenormaloperatingposition.
CAUTION
Ifyouleavethekeyintheignitionswitch,
someonecouldaccidentlystarttheengine
andseriouslyinjureyouorotherbystanders.
Removethekeyfromtheignitionand
disconnectthewirefromthesparkplug
beforeyoudoanymaintenance.Setthewire
asidesothatitdoesnotaccidentallycontact
thesparkplug.
DANGER
Enginescanbecomehotwhentheyare
operating.Severeburnscanoccurfrom
contactinghotsurfaces.
Allowengines,especiallythemufer,tocool
beforetouching.
DANGER
Leaves,grass,orbrushcancatchre.Are
intheengineareacancausepersonalinjury
andpropertydamage.
•Keeptheengineandmuferareafreeof
debrisaccumulation.
•Takecarewhenopeningthebaggercover
tokeepdebrisfromfallingontotheengine
andmuferarea.
•Allowthemachinetocoolbeforestoringit.
RecommendedMaintenanceSchedule(s)
MaintenanceService
IntervalMaintenanceProcedure
Aftertherst10hours•Inspectthebagger.
Beforeeachuseordaily•Cleanthebagger.
Beforestorage•Inspectthebagger.
•Cleanthebagger.
InspectingtheBagger
Attachment
ServiceInterval:Aftertherst10hours
Beforestorage
1.Checkthechute,dischargetube,andthebagger
top.Replacethesepartsiftheyarecrackedor
broken.
2.Tightenallnuts,bolts,andscrews.
3.Inspectallfastenersandlatches;replaceany
missingordamaged.
4.Inspectthegrassbagsfordeterioration.
WARNING
Youorbystanderscouldbeseverely
injuredbyyingdebrisorthrownobjects
thatmaypassthroughtorn,worn,or
deterioratedgrassbags.
•Checkthegrassbagsforholes,rips,
wear,andotherdeterioration.
•Donotwashthegrassbags.
•Ifthebaghasdeteriorated,install
newgrassbagssuppliedby
themanufacturerofthisbagger
attachment.
16

InspectingtheMower
Blades
Inspectthemowerbladesregularlyandwhenevera
bladestrikesaforeignobject.
Ifthebladesarebadlywornordamaged,installnew
blades.RefertoyourmowerormowerOperator's
Manualforcompleteblademaintenance.
CleaningtheBagger
Attachment
ServiceInterval:Beforeeachuseordaily
Beforestorage
1.Aftereachuse,removeandwashtheinside
andoutsideofthebaggertop,dischargetube,
chute,andtheundersideofthemower,using
watersprayedfromagardenhose.Useamild
detergenttoremovestubborndirt.
2.Makesurethatyouremovemattedgrassfrom
allparts.
3.Flushthegrassbagswithwaterusinggarden
hosetoremoveanydebris.
4.Afterwashing,letallthepartsdrythoroughly.
Storage
StoringtheBagger
Attachment
Note:Topreventrapiddeteriorationofthebag
material,storethebagswheretheywilldrycompletely
aftereachuse.
1.Cleanthebaggerattachment;refertoCleaning
theBaggerAttachment(page17).
2.Inspectthebaggerattachmentfordamage;refer
toInspectingtheBaggerAttachment(page16).
3.Makesurethatthegrassbagsareemptyand
thoroughlydry.
4.Storethebaggerinaclean,dryplace,out
ofdirectsunlight.Thisprotectstheplastic
partsandextendsthelifeofthebagger.Ifyou
muststorethebaggeroutside,coveritwitha
weatherproofcover.
17

Notes:

Notes:

CaliforniaProposition65WarningInformation
Whatisthiswarning?
Youmayseeaproductforsalethathasawarninglabellikethefollowing:
WARNING:CancerandReproductiveHarm—www.p65Warnings.ca.gov.
WhatisProp65?
Prop65appliestoanycompanyoperatinginCalifornia,sellingproductsinCalifornia,ormanufacturingproductsthatmaybesoldinorbroughtinto
California.ItmandatesthattheGovernorofCaliforniamaintainandpublishalistofchemicalsknowntocausecancer,birthdefects,and/orother
reproductiveharm.Thelist,whichisupdatedannually,includeshundredsofchemicalsfoundinmanyeverydayitems.ThepurposeofProp65isto
informthepublicaboutexposuretothesechemicals.
Prop65doesnotbanthesaleofproductscontainingthesechemicalsbutinsteadrequireswarningsonanyproduct,productpackaging,orliteraturewith
theproduct.Moreover,aProp65warningdoesnotmeanthataproductisinviolationofanyproductsafetystandardsorrequirements.Infact,the
CaliforniagovernmenthasclariedthataProp65warning“isnotthesameasaregulatorydecisionthataproductis‘safe’or‘unsafe.’”Manyofthese
chemicalshavebeenusedineverydayproductsforyearswithoutdocumentedharm.Formoreinformation,gotohttps://oag.ca.gov/prop65/faqs-view-all.
AProp65warningmeansthatacompanyhaseither(1)evaluatedtheexposureandhasconcludedthatitexceedsthe“nosignicantrisklevel”;or(2)
haschosentoprovideawarningbasedonitsunderstandingaboutthepresenceofalistedchemicalwithoutattemptingtoevaluatetheexposure.
Doesthislawapplyeverywhere?
Prop65warningsarerequiredunderCalifornialawonly.ThesewarningsareseenthroughoutCaliforniainawiderangeofsettings,includingbutnot
limitedtorestaurants,grocerystores,hotels,schools,andhospitals,andonawidevarietyofproducts.Additionally,someonlineandmailorder
retailersprovideProp65warningsontheirwebsitesorincatalogs.
HowdotheCaliforniawarningscomparetofederallimits?
Prop65standardsareoftenmorestringentthanfederalandinternationalstandards.TherearevarioussubstancesthatrequireaProp65warning
atlevelsthatarefarlowerthanfederalactionlimits.Forexample,theProp65standardforwarningsforleadis0.5μg/day,whichiswellbelow
thefederalandinternationalstandards.
Whydon’tallsimilarproductscarrythewarning?
•ProductssoldinCaliforniarequireProp65labellingwhilesimilarproductssoldelsewheredonot.
•AcompanyinvolvedinaProp65lawsuitreachingasettlementmayberequiredtouseProp65warningsforitsproducts,butothercompanies
makingsimilarproductsmayhavenosuchrequirement.
•TheenforcementofProp65isinconsistent.
•CompaniesmayelectnottoprovidewarningsbecausetheyconcludethattheyarenotrequiredtodosounderProp65;alackofwarningsfora
productdoesnotmeanthattheproductisfreeoflistedchemicalsatsimilarlevels.
WhydoesToroincludethiswarning?
Torohaschosentoprovideconsumerswithasmuchinformationaspossiblesothattheycanmakeinformeddecisionsabouttheproductstheybuyand
use.Toroprovideswarningsincertaincasesbasedonitsknowledgeofthepresenceofoneormorelistedchemicalswithoutevaluatingthelevelof
exposure,asnotallthelistedchemicalsprovideexposurelimitrequirements.WhiletheexposurefromT oroproductsmaybenegligibleorwellwithinthe
“nosignicantrisk”range,outofanabundanceofcaution,TorohaselectedtoprovidetheProp65warnings.Moreover,ifTorodoesnotprovidethese
warnings,itcouldbesuedbytheStateofCaliforniaorbyprivatepartiesseekingtoenforceProp65andsubjecttosubstantialpenalties.
RevA
Table of contents
Other Toro Lawn Mower Accessories manuals

Toro
Toro REELMASTER 6000 Series User manual

Toro
Toro 08838 User manual

Toro
Toro 78562 User manual

Toro
Toro 111-8010 User manual

Toro
Toro 98-2671 User manual

Toro
Toro 04063 User manual

Toro
Toro 137-5470 User manual

Toro
Toro 30346 User manual

Toro
Toro Groundsmaster 4700-D User manual

Toro
Toro Pro Force Groundsmaster 3280-D User manual