manuals.online logo
Brands
  1. Home
  2. •
  3. Brands
  4. •
  5. Toshiba
  6. •
  7. DC Drive
  8. •
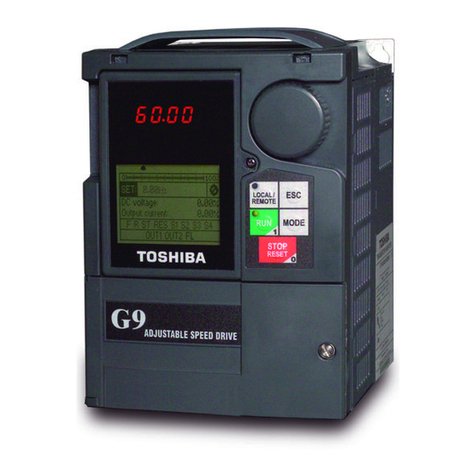
  9. Toshiba ACE-tronics G9 ASD User manual

Toshiba ACE-tronics G9 ASD User manual

G9 ASD
Simple Start Guide
G9 AS D Simple Start Guide
The G9
ASD
Simple Start Guide prov ides instructions on installation and operating procedures only.
For additional information regarding your new G9 ASD, consult the
G9 ASD Installation and Operation Manual
.
DO NOT
attempt to install or operate the G9 ASD until you have read and understood all of the user directions
contained in this guide, and the product safety information and product labels contained in the
G9 ASD Installation
and Operation Manual
. quipment wa rning lab e ls pr ovide use ful inform at ion and ind ica te an imm in ent ly haz ardous
situation that may result in serious injury, severe property and equipment damage, or loss of life if safe procedures are
not followed. Installation and operation shall be performed by qualified personnel only.
Frequently Asked Questions
General
Q
:
I did not receive an Installation an d Operation Manual with my ASD. How can I get one?
A
:
The
G9 ASD Quick Start Guide
and
the
G9
ASD
Installation and Operation Manual
can e downloaded from our we site
. To request a hard-copy of either document
contact the Toshi a Customer Support Center or your local Toshi a distri utor.
Q
:
Does To shi a offer training courses?
A
:
Yes. Train ing cours es ar e of fered at TIC
headquarters in Houston, Texas. There are two types of training — maintenance and repair (nominal fee), and applications (free). Our instructors have years
of hands-on experience in their respective fields and are continually eing trained on new products. Students will gain valua le experience on the equipment and trou leshoot real faults that
may e incurred during normal ASD setup, operation, and maintenance.
For a listin g of upcomin g trainin g courses or to register, visit our we site
a
nd click o n the training ta .
Q
:
Where can I find
additional information ao u t Toshi a International Corporatio n (TIC) and TIC products?
A
:
Additional information can e found on our we site. You may also contact
TIC for additional informatio n y writin g to 13131 West Little York Rd., Houston, Texas, 77041,
via
telephone at (713) 466-0277, or via fax at (713) 937-9349.
Application Specific
Q
:
Who is considered qualified personnel?
A
:
A qualified person is one who has the skills and knowledge a out the construction, installation, operation, and maintenance of the equipment and has received safety training on the hazards
involved. Qualified personnel are a le to recognize and properly address hazards associated with the application of motor-driven equipment, and are trained to safely energize, de-energize
and
ground said equipment, to safely lockout/tagout circuits and equipment, and clear faults in accordance with esta lished safety practices.
Q
:
What do I do if my motor is rotating in the wrong direction?
A
:
Qualified personnel should reverse any two of the three ASD
output pow er leads (U/T1, V/T2, or W/T3) connected to the motor.
Q
:
For safety and application-specific reasons I need to remotely mount the ASD. How do I accomplish this?
A
:
Select a mounting location that is easily accessi le y the user and mark the location of the screw holes. After drilling the screw holes, attach and secure the Electronic Operator Interface (EOI) to
the front side of the mounting location. Connect the extension ca le. For information on required hardware or for instructions on remote mounting using a Remote Mounting Kit, consult the
G9
ASD Installation and Operation Manual
.
If further assistance is required,
contact the Toshi a Customer Support Center.
Q
:
I followed all of the in structions ut my motor will not run. What now?
A
: Ensure that the input power to the ASD is connected and that the voltage at R/L1, S/L2, and T/L3 are as specified for your unit.
Ensure that the terminals of the terminal oard are configured
correctly for your application.
Perform a Reset (to factory default settings).
Ensure that the Local/Remote key is as required for your application and that you have provided a run command. If
further assistance is required,
contact the Toshi a Customer Support Center.
Q
:
During system operation I receive error messages that I do not understand. Where can I find information a out trips/faults/alarms and trou leshooting?
A
:
A complete list of LED
and
LCD screen displays, trip/fault/alarm descriptions and a list of possi le causes of all trips/faults/alarms can e found in the
G9 ASD Installation and Operation Manual
.
Phone: 800.894.0412 - Fax: 888.723.4773 - Web: www.clrwtr.com - Email: [email protected]
3. Connectivity
DANGER
!
Contact
With
Energized
Wiring
Will
Cause
Severe
Injury
Or
Loss
Of
Life.
W hen using an ASD output disconnect, the ASD and the motor
MUST
e stopped efore the
disconnect is either opened or closed. Closing the output disconnect while the 3-phase output
of the ASD is active may result in equipment damage or injury to personnel.
De-energize and lockout/
tagout the main power,
control power, and
instrumentation
connections
efore
connecting or
disconnecting the power
wiring to the equipment or
openin g the enclosure
door.
Connect the 3-phase input
power to the ASD to
terminals
R/L1
,
S/L2
, and
T/L3
. Connect the 3-phase o utput pow er from
terminals
U/T1
,
V /T2
, and
W/T3
to the
m oto r. Ens ure that all w iring is performed in accordance
with
national, state, and local electrical codes.
Install a circuit disconnecting device and rand circuit protection in accordance with the fault
current settings of the ASD and the 200 8 NEC Ar ticle 430.
The default settings of the ASD require the use of a factory-installed jumper from
the
CC
to
ST
termin als to e na le the ASD.
For
2-W ire Control
and
3-Wire Control
open the enclosur e
door to gain access to the
Terminal
Board
and continue elow.
-Wire Control
Install
a switch as descri ed elow from the
F
and/or
R
terminals to the
CC
terminals. Close or
reatt ach the en closure door.
1 — Normally
open
switch that will e used to provide the forward run command (Set to
Forward).
2 — Normally
open sw itch tha t will e used to provide the reverse run command (Set to
Reverse).
3-Wire Control
Install mome ntary push uttons as descri ed elow from the
F
and/or
R
terminals t o the
CC
terminal. Close or reattach the enclosure door.
1 — Normally
open
momentary push utton that will e used to provide the forward run
command (Set to Forward).
2
— Normally
open
m omen ta ry push utton that w ill e u sed to provide the reverse run
comman d (Set to Reverse).
3 — Nor m ally
closed
m omen tar y push utton that will e used to hold the output frequency
upon termination of the run command (Set to Hold
:
F115
= 50 (Hold, N.O.)
.
Bef o re t rning on the AS D ens re tha t:
The enclosure door is closed or reattached, and secure.
Terminals
R/L1
,
S/L2
, and
T/L3
are
connected to the
input power
and
terminals
U/T1
,
V /T2
, and
W/T3
are connected to the motor
.
The 3-p hase inpu t voltag e is as specified
and
there are no shorts and all grounds are secure
.
RES CC F R S1 S2 S3 S4 CC ST FP +SU
1
2
3
TB3
3-Wire St art/Stop Cont rol C onnections
3-Phase Input/Output Connections
2-Wire Start/Stop Control Connections
RES CC F S1 S2 S3 S4 CC ST FP +SU
TB3
R
1
2
1. Rece ipt & Identification
Inspect the eq uipment for damage that may have occurred during
shipping.
DO NOT
install or energize equipment that has een damaged.
Ensure that the rated capacity and model num er on the nameplate
conform to orde r specificatio ns.
Use proper lifting t echniq ues when moving the G9 ASD.
Contact your Toshi a Sales Representative to report discrepancies or
for assistance if required.
TRANSISTOR INVERTER
VT130G9U4025
INPUT OUTPUT
U (V-)
F (Hz)
I (A)
50/60 0/500
5.1
3.6
(CF 4 kHz)
3PH 380/480 3PH 380/480
G9 ASD Nameplate
2. Mountin
Only qualified personnel should install this equipment.
The installation of the equipment should conform to the 2008 National Electrical Code
(NEC)
Article 110, OSHA, as w ell as any oth er applica le nationa l, region al, or ind ustry cod es and
standards.
Insta llat ion pr actices shall conform to the latest revision of
the
NFPA 70E Electrical Safe ty
Requirements for Employee Workplace .
It is the responsi ility of the G9 ASD installer/maintenance personnel to ensure that the unit is
insta lled in an enclosure that will protect personnel against electric shock.
Location
Select a mounting location tha t is easily accessi le and
has adequate working space. Proper
illumina tion is required for makin g in spections ,
adjustments, and performing equipment
maintenance.
DO NOT
mount the G9
ASD in a locat ion that would produce catastrophic results if it were to
fall from its moun tin g location (equipment damage and/or injury to personnel).
Avoid installation in direct sunlight or in areas where vi ration, heat, humidity, dust, fi ers,
metal particles, explosive/corrosive mists or ga ses, sources of electrical nois e are presen t, or
where it would e exposed to harmful liquids, solvents, or other fluids
.
Temperature
The am ien t o pe ra t in g t e mper a t ur e rat in g is 1 4
to
104
F
(-10
to 40
C).
Ventilation
Insta ll th e unit in an upright position
and in a well-ventilated area.
W hen installin g adjacent ASDs horizontally, Toshi a recommends
at least 5 cm of space
etween units. However, if the top cover is removed from each ASD then horizontally
moun t ed ASDs may e inst a lled sid e- y- sid e wit h no space i n- et w een th e adj a cen t A SDs
.
For 230- v olt ASDs, a m in imu m of 10 cm of space i s requ ir ed a ov e an d e lo w adja cen t A SDs
and any o struction. For 460-volt ASDs, a minimum of 30 cm of space is required.
Lead Length
The ta le
elow lists the recommended maximum lead lengths for the listed motor voltages.
Lead le ngths from the ASD to the motor in excess of those listed e low may require filters to
e added to the output of the ASD.
Excessive lead leng ths may a dv ersely affect the
performan ce of the motor. Exceeding the peak voltage rating or the allow a le therm al rise
time of the motor insulation will reduce the life expectancy of the motor.
Contact your Toshi a Sales Representative for application assistance when using lead lengths
in excess of those lis ted.
For enclosure dimensions, mounting hole dimensions, current/voltage specifications, and
ca le/terminal specifications consult the
G9 ASD Quick Start Guide
.
Model PWM Carrier
Freq ency
NEMA MG1 Part 31
Compliant Motors
2
NEMA MG1
Part 30
Compliant Motors
2
230-Volt All 1000 feet 450 feet
460-Volt
< 5 kH z 600 feet 200 feet
>
5 kHz 300 feet 100 feet
Lead Length Recommend ations
G9 ASD Simple Start Guide
°°°°
Phone: 800.894.0412 - Fax: 888.723.4773 - Web: www.clrwtr.com - Email: [email protected]
Electronic Operator Interface (EOI)
Rotary
Encoder
LCD Screen
Wizard: RunWizard: Run
Run nowRun now
Run next timeRun next time
Manually configure (Finish)Manually configure (Finish)
Start p Wizard Screen
4. Pro rammin
The operating parameters displayed on the LCD
screen may e selected, viewed, or changed
using the
Electronic Operator Interface
(EO I). To
change a setting turn the
Rotary Enco der
to
highlight the desired
Pr imar y Men
item
(repeat
for
S b Me n
items as required). Select the item
to e chan ged and press the
Rotary Encoder
to
enter the
Edit
mode — the encoder acts as the
enter key.
Set the paramet er to the new value. To
exit the setting without saving a change press
the
ESC
key while the parameter is in the revers e video mode (dark ackground/light text).
Press the
Rotary Encoder
to accept the change.
Startup Wizard
Upon initial power up or factory reset the
Start p Wizard
will start automatically.
The
Star t p Wiz ard
will query the user to select
one of the following items:
R n No w
,
R n Ne xt
Time
, or
Man a lly Co nfig r e
.
Click
R n Ne xt Tim e
or
M an a lly Co nf ig r e
to
skip setup. The ASD may e setup at a later
time y directly accessing each of the startup parameters via the
Program Men
, the
associated
Direct Access N mber
, or y running the
Star t p W iz ar d
from the programming
menu.
Click
R n Now
to setup th e ASD now. The
Start p Wizard
will take the user through the
parameters listed elow.
At any point, the user may click
Next
to skip a param eter or click
Finish
to close the
Start p
Wizard
.
Click
Finish
when complete.
Start p Wizard Parameters
Direct
Acce ss
N mber
Star t p W iz ar d
Parameter Description
F405 Voltage/Frequen cy
Rating of Motor Used to input the nameplated voltage and frequency
of the motor eing used.
F012 Upper Limit Frequency Sets the highest frequency that the ASD will accept a s
a frequency command or frequency setpoint.
F013 Low er Limit Frequency Sets the low est frequ ency tha t the ASD wi ll accept as
a frequency command or frequency setpoint.
F000 Automatic Acceleration/
Decelera tion Setting Adjusts the acceleration and deceleration rates
according to the applied load.
F009 Acceleration Time Specifies the time in seconds for the output of the
ASD to go from 0.0 Hz to th e Maximum Frequency.
F010 Deceleration Time Specifies the time in seconds for the output of the
ASD to go from the Maximum Frequency to 0.0 Hz.
F015 Volts Per He rtz Setting Esta lishes the relationship etween the output
frequency and the output voltage of the ASD.
F406 Motor Current Rating Allows the user to input the Full-Load Amperage
(FLA) of the motor.
F407 Motor RPM Used to input the nameplated rated speed (RPM) of
the motor eing used.
F003 Command Source Esta lis hes the source of input commands (i.e., Run,
Stop, Jog, e tc.).
F004 Frequency Source Esta lishes the source of the primary frequency
reference.
F701 Display Unit Sets the unit of me asure for curr ent and voltag e
values displayed on the EOI.
Note
:
Use the
Motor Information
outline provided in this guide to record and retain
information a out the motor for future use.
Programming Options:
Direct Access to P arameters
Each parameter may e viewed or cha nged y entering the parameter num er of the setting
at the
Direct Access
Men
via Program

D irect Access

Applicable Parameter N mber
.
Changed From Default
A listing of all the
parameters that
have een changed from the default
setting may e viewed sequentially
y accessing the
Changed From
Defa lt
screen
via
Program

Utilities

Changed From Defa lt.
Press the
Rotary Encoder
w hile
stopped at a changed parameter to
display the settings of the changed
parameter. Press the
Rotary Encoder
to enter the
Edit
mode. Turn the
Rotar y Encoder
to change the
parameter setting.
Press the
ESC
key w hile the syste m is
performing a
Changed From De fa lt
search to terminate the search.
W hen finished searching, press the
ESC
key to take the menu ack one
level.
RR Analog Input
Freq e ncy Mo de 1
(
F004
)
esta lishes
the user-selected source of the
frequency-control input for the ASD. By default it is set to the RR terminal.
This input terminal may e programmed to control the speed or torque of the motor
.
The
Scaling
,
Gain
, and
Bias
of this terminal may e adjusted for application-specific suita ility
(see
F210
–
F215
).
V/I Analog Input
Freq e ncy Mo de 1
(
F004
)
esta lishes the user-sele cted source of the frequency-control input
for the ASD.
This is an isolated inp ut terminal. This termin al may e p rog rammed to control the speed or
tor q u e of the mot o r an d m us t e se t to r ecei ve e it he r curr en t (
SW301
set to
I
) or voltage
(
SW301
set to
V
).
The
Scaling
,
Gain
, and
Bias
of this terminal may e adjusted for a pplication -specific su ita ility
(see
F201
–
F206
).
FM Analog Output
By default, the
FM
analog
output terminal produces an output current or voltage that is
proportional to the output frequency of the ASD or of the magnitude of the function assigned
to this terminal (select current or voltage at
F681
). The program ma le functions for this
outpu t terminal ar e listed in the
G9 ASD Installation and Operation Manual
.
FM
Term inal Setup Paramete
rs:
F005
— Set F unction
F006
— Cali ra t e Term in a l S el ecti on
F681
— Volt age/Cur ren t Swit ching Selection
F682
— Respo nse Po larity Se lection
F683
— Bias Ad justment
AM Analog Output
By default, the
AM
analog
output terminal produces an 0-20
mA current that is proportional
to the output current of the ASD or of the magnitude of the function assigned to the terminal.
The programma le functions for this output terminal are listed in the
G9 ASD Installation and
Operation Manual
.
AM Terminal Setup Paramete
rs:
F670
— Set F unction
F671
— Cali ra t e Term in a l S el ecti on
F685
— Respo nse Po larity Se lection
F686
— Bias Adjustment
For a co mplete list ing o f dis crete and analog inputs/outputs see the
G9 ASD Quick Start Guide.
Discrete
Terminal Names
Direct
Access
N mber Terminal Defa lt
(Where
Programmable)
F114 RES Reset
F111 FForward Run
F112 RReverse Run
F115 S1 Preset Speed 1
F116 S2 Preset Speed 2
F117 S3 Preset Speed 3
F118 S4 Preset Speed 4
F113 ST Stand y
F676 FP Frequency Pulse
—+SU Refere nces CC
—CC Control Common
Phone: 800.894.0412 - Fax: 888.723.4773 - Web: www.clrwtr.com - Email: [email protected]
5. R un
Local
The
Local
m ode allows the
Command
and
Freq ency
control functio ns to e ca rried out via
the
EOI
.
To run the motor
perform the
following:
1. Press the
Mode
key until the
Freq enc y Com man d
screen is
displayed.
2. Press the
Local/Remote
key to
enter the
Local
mod e (g reen LED
illuminates).
3. Turn the
Rotary Encoder
un til the
desired
Freq e ncy Co mma nd
value is displa yed in the
SET
field
on the
LCD
screen.
4. Press the
R n
key and the motor
will
run at the
Freq e ncy Co mma nd
value.
(While running the
R n
LED will illumina te
red). Press t he
Stop/Reset
key
to stop
the
motor.
Remote
The
Remote
mode allows control of the
ASD via the
Command
mode
(
F003) and
the
Freq ency
mode (F004).
The
Terminal Board
is used in the
following example to demonstrate
Remote
mode operation:
To run
the motor
perform the following
.
1. Press the
Mode
key until the
Program
screen is displayed.
2. Select Program

Fundamental

Standard M ode Selectio n

Command Mode Selection

Terminal Block .
3.
Select Program

Fundamental

Standard Mode Selection

Frequency Mode 1

RR
.
4. Select Program

Terminal

Inp t Term inals
to verify t he following discrete terminal
assignments
:
F111
— F (Forward Run)
F112
— R (Re vers e Run )
F113
—
ST (Stan d y)
F114
— RES (Reset)
5. Activate the
ST
terminal and provide and
R n
command.
6. Apply a positive voltage across
RR
and
CC
.
For complete instructions on the
Command
and
Freq ency
control functions
see the
G9 ASD Installation a nd Ope ration Manu al
.
Freq enc y Com man d Scr ee n
0100%
SET:
DC Voltage:
Output Current:
0.00%
0.00%
0.00 Hz
OUT1 OUT2 FL
F R RES S1 S2 S3 S4ST
Startup Wizard...Startup Wizard...
Terminal...Terminal...
ProgramProgram
Direct Access...Direct Access...
Utilities...Utilities...
Fundamental...Fundamental...
Program Mode Screen
Ad ditional Information
Factory Default
Parameter
settings may e returned to factory default values via the
Type Reset
m enu,
Program

Utilities

Type Reset

Reset to Fa ct o ry De f a lt s
.
Save User Settings
A profile of an existing setup may e saved and re-applied when required y using the
Save
User Settings
feature. This function is carried out via Program

Utilitie s

Type Reset

Save User Settings
. With the initial setup saved, trou leshooting and diagnostics may e
performed and the starting setup may e re-applied when finished, via Program

Utilities

Type Reset

Restore User Settings
.
A profile of an existing setup may e saved to the
EOI
via
Program

Utilities

Type Reset

Save User Settings
to EOI.
The initial setup may e restored from the
EOI
via Prog ra m

Utilities

Type Reset

Restore User Settings from EOI
.
6. Brakin
The mo tor m ay continue to rotate and coast to a stop after eing shut off due to the inertia of
the load. If an immediate stop is required, one of the following raking systems should e used.
DC Injection Braking
The
DC Injection Braking
function may e setup and ena led y providing the proper
inform ation a t the parameters listed e low.
F250
— Braki ng Start Freq uen cy
F251
— Braki ng C urre nt
F252
— Braki ng Time
F253
— Forward/Reverse Braking Priority
F254
— Motor Shaft Fixing Control
Dynamic Braking
The
Dynamic Braking
function may e setup and ena led y connecting a raking resistor
from terminal
PA
to
PB
of the ASD an d provid ing the proper in form ation a t the par amet ers
listed
elow.
F304
— Braking Ena le/ Disa le
F308
— Braki ng Re sistance
F309
— Braki ng C apacit y
F639
— Braking Resistance Overload Time (10x Rated Torque)
Dynamic Braking uses the transistor
IGBT7
to dissipate the us voltage when required.
IGBT7
is standard item on the 25 HP and elow G9 ASD 230-volt systems and is standard on
the 400 HP a nd elow for the 460-volt systems.
IGBT7
is option al for all remaining systems.
Mount the resistor pack a ove or to the side of the ASD — never elow. The DBR generates
heat tha t will af fect the cooling capacit y of the heat sink so it is impo rtant to maintain a
minimum of six inches etween the resistor pack and the ASD.
For light-duty DBRs, use on e wire size smalle r (AWG or kcmil) than the motor leads. For heavy-
duty DBRs, use the same gauge wire as the motor leads — the total wire length from the ASD
to the DBR should not exceed 10 feet. Twist
the w ire approxim ate ly tw o times per foot
throughout the length of the wire
.
For additional infor mation a ou t raking, see the
G9 ASD Installation and Operation Manual
.
Motor Information Outline
Voltage/Frequency:
Current Rating:
RPM:
G9 ASD Simple Start Guide
Phone: 800.894.0412 - Fax: 888.723.4773 - Web: www.clrwtr.com - Email: [email protected]
Other manuals for ACE-tronics G9 ASD

3

Other Toshiba DC Drive manuals

Toshiba TOSVERT VF-P7 User manual

Toshiba

Toshiba TOSVERT VF-P7 User manual

Toshiba XM-6401B User manual

Toshiba

Toshiba XM-6401B User manual

Toshiba TOSVERT VF-P7 User manual

Toshiba

Toshiba TOSVERT VF-P7 User manual

Toshiba XM-6201B User manual

Toshiba

Toshiba XM-6201B User manual

Toshiba PROFIBUS-DP PDP003Z User manual

Toshiba

Toshiba PROFIBUS-DP PDP003Z User manual

Toshiba TOSVERT VF-FS1 Series User manual

Toshiba

Toshiba TOSVERT VF-FS1 Series User manual

Toshiba Q9+ User manual

Toshiba

Toshiba Q9+ User manual

Toshiba CANVIO AEROMOBILE User manual

Toshiba

Toshiba CANVIO AEROMOBILE User manual

Toshiba SuperMulti Drive User manual

Toshiba

Toshiba SuperMulti Drive User manual

Toshiba GX7R ASD User manual

Toshiba

Toshiba GX7R ASD User manual

Toshiba CV-10HA User manual

Toshiba

Toshiba CV-10HA User manual

Toshiba S15 User guide

Toshiba

Toshiba S15 User guide

Toshiba Tosvert VF-A5 User manual

Toshiba

Toshiba Tosvert VF-A5 User manual

Toshiba TOSVERT VF-PS1 User manual

Toshiba

Toshiba TOSVERT VF-PS1 User manual

Toshiba T300BMV2 User manual

Toshiba

Toshiba T300BMV2 User manual

Toshiba G7 User guide

Toshiba

Toshiba G7 User guide

Toshiba Adjustable Speed Drive H7 Series Installation manual

Toshiba

Toshiba Adjustable Speed Drive H7 Series Installation manual

Toshiba G3 Plus Pack Installation and operating instructions

Toshiba

Toshiba G3 Plus Pack Installation and operating instructions

Toshiba ACE-tronics G9 ASD User manual

Toshiba

Toshiba ACE-tronics G9 ASD User manual

Toshiba APOGEE FLN APG001Z User manual

Toshiba

Toshiba APOGEE FLN APG001Z User manual

Toshiba G7 User manual

Toshiba

Toshiba G7 User manual

Toshiba T300MV2 User manual

Toshiba

Toshiba T300MV2 User manual

Toshiba T300MVi MEDIUM VOLTAGE User manual

Toshiba

Toshiba T300MVi MEDIUM VOLTAGE User manual

Toshiba ATAPI User manual

Toshiba

Toshiba ATAPI User manual

Popular DC Drive manuals by other brands

Aerotech BA-Intellidrive BAI 10 user manual

Aerotech

Aerotech BA-Intellidrive BAI 10 user manual

Vacon 20 CP/X Applications manual

Vacon

Vacon 20 CP/X Applications manual

Leadshine Technology DMA860E user manual

Leadshine Technology

Leadshine Technology DMA860E user manual

Inovance CS200 user guide

Inovance

Inovance CS200 user guide

Delta Tau Geo Brick user manual

Delta Tau

Delta Tau Geo Brick user manual

Leadshine DM2282-IO-24 quick start guide

Leadshine

Leadshine DM2282-IO-24 quick start guide

Power Electronics SD300312 Hardware and installation manual

Power Electronics

Power Electronics SD300312 Hardware and installation manual

SEMIKRON SEMITOP E2 Technical Explanation

SEMIKRON

SEMIKRON SEMITOP E2 Technical Explanation

Mitsubishi Electric FR-E800-SCEPA quick start guide

Mitsubishi Electric

Mitsubishi Electric FR-E800-SCEPA quick start guide

ANSMANN FM4.0 Original operating instructions

ANSMANN

ANSMANN FM4.0 Original operating instructions

Eaton DC1-32030 Series Instruction leaflet

Eaton

Eaton DC1-32030 Series Instruction leaflet

Rexnord Falk V-Class VR Installation, operation & maintenance manual

Rexnord

Rexnord Falk V-Class VR Installation, operation & maintenance manual

ilntegral LED ILDRCVA042 installation guide

ilntegral LED

ilntegral LED ILDRCVA042 installation guide

Lenze SM100 manual

Lenze

Lenze SM100 manual

ABB ACS880-07C Hardware manual

ABB

ABB ACS880-07C Hardware manual

Emerson Unidrive M200-01100017 quick start guide

Emerson

Emerson Unidrive M200-01100017 quick start guide

Danfoss VLT FC 100 instruction manual

Danfoss

Danfoss VLT FC 100 instruction manual

Pro-dig T20K instruction manual

Pro-dig

Pro-dig T20K instruction manual

manuals.online logo
manuals.online logoBrands
  • About & Mission
  • Contact us
  • Privacy Policy
  • Terms and Conditions

Copyright 2025 Manuals.Online. All Rights Reserved.