manuals.online logo
Brands
  1. Home
  2. •
  3. Brands
  4. •
  5. Tyger
  6. •
  7. Automobile Accessories
  8. •
  9. Tyger TG-GD6D60078 User manual

Tyger TG-GD6D60078 User manual

1/5
TYGER GUARD NOTE: Installation may interfere with front bum-
per mounted sensors. Cutting is required. Assis-
tance is recommended.
TG-GD6D60078
(2) 8mm Bolt Plates
Passenger/right Side
Support Bracket
Passenger/right Side
Frame Bracket
Driver/left Side Support
Bracket
Tube Bracket Tube Bracket
Driver/left Side Frame
Bracket
Customer Support: www.TygerAuto.com/Contact V200728
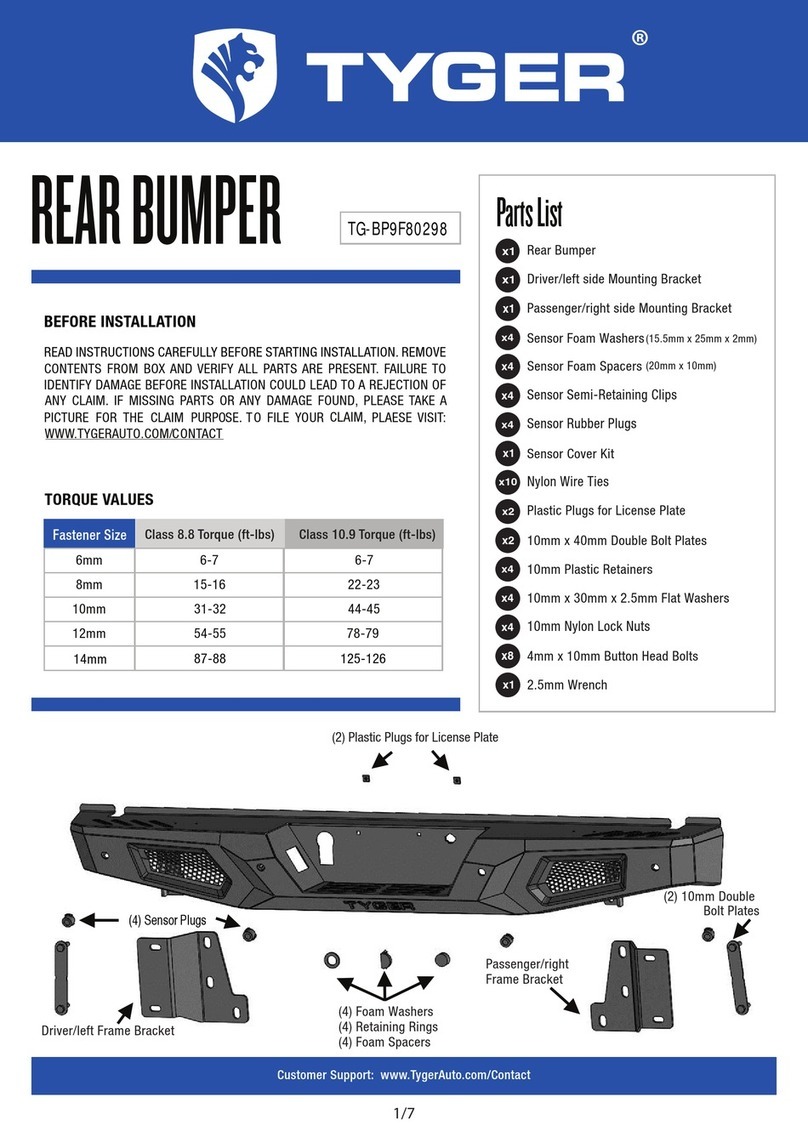
BEFORE INSTALLATION
READ INSTRUCTIONS CAREFULLY BEFORE STARTING INSTALLATION. REMOVE
CONTENTS FROM BOX AND VERIFY ALL PARTS ARE PRESENT. FAILURE TO
IDENTIFY DAMAGE BEFORE INSTALLATION COULD LEAD TO A REJECTION OF
ANY CLAIM. IF MISSING PARTS OR ANY DAMAGE FOUND, PLEASE TAKE A
PICTURE FOR THE CLAIM PURPOSE. TO FILE YOUR CLAIM, PLAESE VISIT:
WWW.TYGERAUTO.COM/CONTACT
TORQUE VALUES
6mm
8mm
10mm
12mm
6-7
15-16
31-32
54-55
6-7
22-23
44-45
78-79
14mm 87-88 125-126
Class 10.9 Torque (ft-lbs)
Class 8.8 Torque (ft-lbs)
Fastener Size
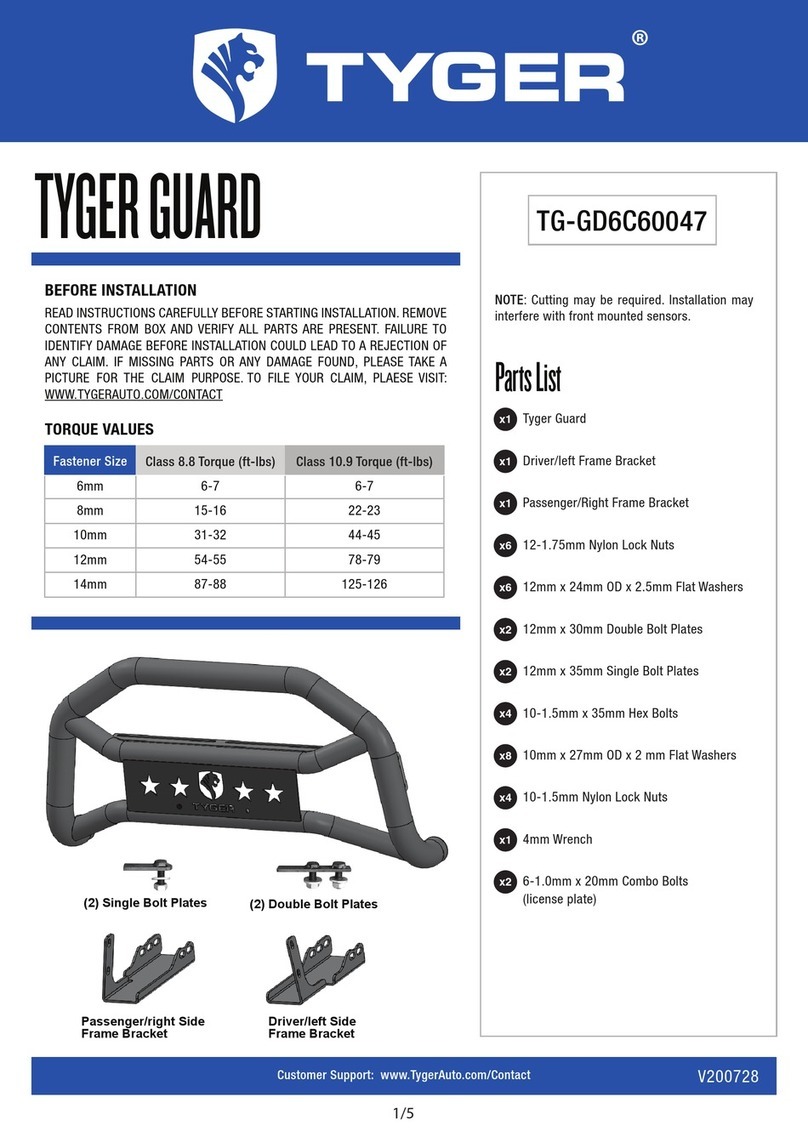
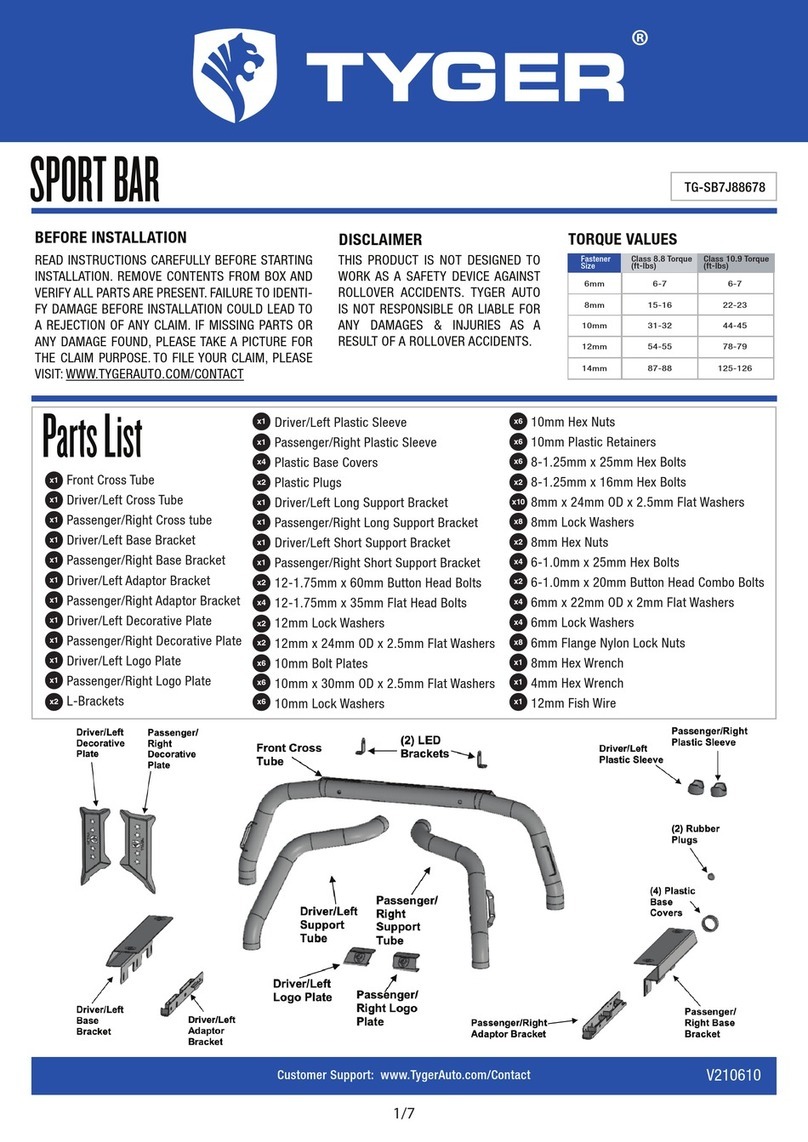
Parts List
Tyger Guard
Tube Brackets (passenger or driver side)
Driver/Left Frame Bracket
Passenger/Right Frame Bracket
Driver/Left Support Bracket
Passenger/Right Support Bracket
8-1.25mm Bolt Plates
8mm Plastic Retainers
12-1.75mm x 35mm Hex Bolts
12mm x 32mm OD x 3mm Flat Washers
12mm Lock Washers
12-1.75mm Hex Nuts
8-1.25mm x 35mm Hex Bolts
8-1.25mm x 30mm Hex Bolts
8mm x 24mm OD x 2mm Flat Washers
8mm Lock Washers
6-1.0mm x 20mm Combo Bolts
4mm Wrench
x1
x2
x1
x1
x1
x1
x2
x2
x4
x8
x4
x4
x4
x6
x14
x12
x2
x1
2/5
Start installation under the front bumper. Carefully remove the
plastic lower air dam attached to the bottom of the bumper. Do
not remove the electronic “active air dam” behind the bumper if
equipped. Pay close attention to the type and location of all facto-
ry hardware for reinstallation.
STEP 1
Move to the back of the driver/left side of the bumper, (Fig 1).
Select (1) 8mm Bolt Plate and (1) 8mm Plastic Retainer. Insert the
Bolt Plate into the space between the outer bumper cover and
bumper bracket, (Fig 2). Insert the threaded part of the Bolt Plate
back through the hole in the bumper bracket. Thread the Plastic
Retainer onto the Bolt Plate to hold it in place position.
NOTE: The Plastic retainer is used to help hold the Bolt Plate in
place but use is not mandatory for Bracket installation.
STEP 2
Front
Body bolt
(Fig 1) Driver/left mounting location
pictured from behind bumper
Front
8mm Bolt Plate
8mm Plastic Retainer
Remove the (2)
factory hex bolts
(Fig 2) Insert Bolt Plate back
through bumper bracket (arrow)
8mm Bolt Plate
8mm Plastic Retainer
(2) 8mm x 35mm Hex Bolts
(2) 8mm Lock Washers
(2) 8mm Flat Washers
8mm Flat Washer
8mm Lock Washer
8mm Hex Nut
Front
(Fig 3) Driver/left side Frame Bracket layout
Next, Remove the (2) factory hex bolts attaching the bumper to
the bumper bracket, (Fig 2). Select the driver/left Frame Mounting
Bracket. Attach the Bracket to the back of the bumper with the
included longer (2) 8mm x 35mm Hex Bolts, (2) 8mm Lock Wash-
ers and (2) 8mm Flat Washers, (Fig 3). Attach the Bracket to the
8mm Bolt Plate with (1) 8mm Flat Washer, (1) 8mm Lock Washer
and (1) 8mm Hex Nut. Do not fully tighten hardware at this time.
STEP 3
Customer Support: www.TygerAuto.com/Contact
3/5
Loosen but do not remove the hex bolt from the bottom of the
frame, (Figs 1 & 5). Select the driver/left Support Bracket, (Fig 4).
Insert the slotted end of the Bracket under the hex bolt.
a. On models with tow hooks, slide the Bracket between the head
of the hex bolt and the large flat washer, (Fig 5). Do not tighten
hex bolt at this time
b. On models without tow hooks, slide the Bracket between the
steel sleeve on the frame and the head of the hex bolt, (Figs 1 &
4).
STEP 4
(Fig 5) Models with tow hook, loosen rear bolt (arrow)
and slide top of Support Bracket between head of bolt
and large flat washer-no spacer required
Front
Loosen but do not
remove hex bolt
Front
8mm x 30mm Hex Bolt
(2) 8mm Flat Washers
8mm Lock Washer
8mm Hex Nut
(Fig 4) Driver/left Support Bracket
(model w/o tow hook illustrated)
(2) 8mm x 30mm Hex Bolts
(2) 8mm Lock Washers
(2) 8mm Flat Washers
Front
(Fig 6) Attach Tube Bracket to end of Tyger Guard
Line up the lower end of the Support Bracket with the slot in the
Frame Bracket. Attach the Support Bracket to the Frame Bracket
with (1) 8mm x 30mm Hex Bolt, (2) 8mm Flat Washers, (1) 8mm
Lock Washer and (1) 8mm Hex Nut, (Fig 4).
STEP 5
Repeat Steps 2-5 to install the passenger/right Frame and Sup-
port Bracket.
STEP 6
Next, select (1) Tube Mounting Bracket, (Fig 6). Attach the Bracket
to the end of the Tyger Guard with (2) 8mm x 30mm Hex Bolts, (2)
8mm Lock Washers and (2) 8mm Flat Washers. Leave hardware
loose at this time. Repeat this Step to install the passenger side
Tube Bracket.
STEP 7
Customer Support: www.TygerAuto.com/Contact
4/5
With help, position the Tyger Guard with Tube Brackets up to the
outside of the Mounting Brackets. Use the included (4) 12-
1.75mm x 35mm Hex Bolts, (8) 12mm Flat Washers, (4) 12mm
Lock Washers and (4) 12mm Hex Nuts to attach the Tyger Guard
and Tube Brackets to the Mounting Brackets, (Fig 7). Do not
tighten hardware.
STEP 8
Stand back from the vehicle and check to see that the Tyger
Guard is centered and level on the vehicle and adjust as neces-
sary. Fully tighten first the hardware securing the Mounting
Brackets to the vehicle. Next tighten only the (4) 8mm Hex Bolts
securing the Tube Brackets to the Tyger Guard as described in
Step 7. Do not tighten the 12mm hardware attaching the Tube
Brackets to the Mounting Brackets. Temporarily remove the
Tyger Guard with Tube Brackets attached.
STEP 9
(2) 12mm x 35mm Hex Bolts
(4) 12mm Flat Washers
(2) 12mm Lock Washers
(2) 12mm Hex Nuts
(Fig 7) Attach Tyger Guard to Mounting Brackets
Front
(Fig 8) Hold air dam up to bottom of Brackets. Trace
Bracket location onto inside of air dam. Dashed lines
indicate approximate sections to cut from air dam
Do not cut through the
top edge of the air dam
Front
Hold the plastic air dam up to the bumper and align it with the
mounting points. Mark the location of the Mounting Brackets onto
the back of the air dam, (Fig 8). Cut an approximately 1-1/2" wide
slot out of the bottom of the air dam.
NOTE: The size of the slot is an estimate only and may vary due
to different factory designs for the air dam and front bumper
covers.
IMPORTANT: To avoid weakening the air dam, do not cut the slot
any larger than necessary to clear Brackets only. Do not cut thr-
ough the top edge or mounting points, (Fig 8). Make several small
cuts first and check the fit often for a clean installation.
STEP 10
Customer Support: www.TygerAuto.com/Contact
5/5
Reinstall the air dam using the factory hardware.
NOTE: It may be necessary to loosen the Bracket hardware to
reinstall the air dam.
STEP 11
Installation pictured without the air dam
for instruction purposes only
Reinstall the Tyger Guard as described in Step 8.
STEP 12
Level and adjust the Tyger Guard and fully tighten all hardware.
STEP 13
Do periodic inspections to the installation to make sure that all
hardware is secure and tight.
STEP 14
Customer Support: www.TygerAuto.com/Contact
Other Tyger Automobile Accessories manuals

Tyger TG-BP6TTG-BP6T80568 User manual

Tyger

Tyger TG-BP6TTG-BP6T80568 User manual

Tyger T3 User manual

Tyger

Tyger T3 User manual

Tyger TG-BP6J85368 User manual

Tyger

Tyger TG-BP6J85368 User manual

Tyger T1 User manual

Tyger

Tyger T1 User manual

Tyger TG-BP9D80398 User manual

Tyger

Tyger TG-BP9D80398 User manual

Tyger TG-RK1B204B User manual

Tyger

Tyger TG-RK1B204B User manual

Tyger STAR ARMOR TG-AM2D20608 User manual

Tyger

Tyger STAR ARMOR TG-AM2D20608 User manual

Tyger ARMOR TG-AM2F20098 User manual

Tyger

Tyger ARMOR TG-AM2F20098 User manual

Tyger STAR ARMOR TG-AM2C20218 User manual

Tyger

Tyger STAR ARMOR TG-AM2C20218 User manual

Tyger TG-SB7J88678 User manual

Tyger

Tyger TG-SB7J88678 User manual

Tyger TG-BP9F80298 User manual

Tyger

Tyger TG-BP9F80298 User manual

Tyger Armor TG-AM2T20208 User manual

Tyger

Tyger Armor TG-AM2T20208 User manual

Tyger Guard TG-GD6C60047 User manual

Tyger

Tyger Guard TG-GD6C60047 User manual

Tyger STAR ARMOR TG-AM2C20108 User manual

Tyger

Tyger STAR ARMOR TG-AM2C20108 User manual

Popular Automobile Accessories manuals by other brands

Dunlop L.MAS.MOV.C.M installation manual

Dunlop

Dunlop L.MAS.MOV.C.M installation manual

Ezonetronics RM-LC2010 user manual

Ezonetronics

Ezonetronics RM-LC2010 user manual

Kuda 291600 Installation instruction

Kuda

Kuda 291600 Installation instruction

AL-KO Sawiko 3000 manual

AL-KO

AL-KO Sawiko 3000 manual

RainTracker RT-40A Troubleshooting Procedure

RainTracker

RainTracker RT-40A Troubleshooting Procedure

Art G 463 installation manual

Art

Art G 463 installation manual

Luverne 571477 installation manual

Luverne

Luverne 571477 installation manual

Curt Manufacturing LIPPERT 18109 installation manual

Curt Manufacturing

Curt Manufacturing LIPPERT 18109 installation manual

Menabo ACONCAGUA 3.0 Fitting instructions

Menabo

Menabo ACONCAGUA 3.0 Fitting instructions

weBoost Drive 3G-Flex 470013 Quick install guide

weBoost

weBoost Drive 3G-Flex 470013 Quick install guide

ALZA UGREEN CD204 user manual

ALZA

ALZA UGREEN CD204 user manual

Bilstein E4-WM5-Y711A00 Mounting instruction

Bilstein

Bilstein E4-WM5-Y711A00 Mounting instruction

AAMP Global PAC RP4-FD11 instructions

AAMP Global

AAMP Global PAC RP4-FD11 instructions

Kenwood CAW-1201-05 installation manual

Kenwood

Kenwood CAW-1201-05 installation manual

MVG 2504 E Installation instruction

MVG

MVG 2504 E Installation instruction

Jabra TOUR Instruction

Jabra

Jabra TOUR Instruction

Thule Rapid System 1359 Fitting instructions

Thule

Thule Rapid System 1359 Fitting instructions

Yakima ButtonDown AERO manual

Yakima

Yakima ButtonDown AERO manual

manuals.online logo
manuals.online logoBrands
  • About & Mission
  • Contact us
  • Privacy Policy
  • Terms and Conditions

Copyright 2025 Manuals.Online. All Rights Reserved.