manuals.online logo
Brands
  1. Home
  2. •
  3. Brands
  4. •
  5. Valor Fires
  6. •
  7. Electric Heater
  8. •
  9. Valor Fires 823 Instructions for use

Valor Fires 823 Instructions for use

Other manuals for 823

1

Other Valor Fires Electric Heater manuals

Valor Fires 833 Instructions for use

Valor Fires

Valor Fires 833 Instructions for use

Valor Fires 845 Instructions for use

Valor Fires

Valor Fires 845 Instructions for use

Valor Fires 834 Instructions for use

Valor Fires

Valor Fires 834 Instructions for use

Valor Fires 809 Instructions for use

Valor Fires

Valor Fires 809 Instructions for use

Valor Fires 833 Instructions for use

Valor Fires

Valor Fires 833 Instructions for use

Valor Fires 829 Instructions for use

Valor Fires

Valor Fires 829 Instructions for use

Valor Fires 850 Instructions for use

Valor Fires

Valor Fires 850 Instructions for use

Valor Fires 843 Instructions for use

Valor Fires

Valor Fires 843 Instructions for use

Valor Fires 828 Instructions for use

Valor Fires

Valor Fires 828 Instructions for use

Valor Fires 842 Instructions for use

Valor Fires

Valor Fires 842 Instructions for use

Valor Fires 820 Longlite Instructions for use

Valor Fires

Valor Fires 820 Longlite Instructions for use

Valor Fires 809 Instructions for use

Valor Fires

Valor Fires 809 Instructions for use

Valor Fires 820 Longlite Instructions for use

Valor Fires

Valor Fires 820 Longlite Instructions for use

Valor Fires 824 Blenheim Longlite Instructions for use

Valor Fires

Valor Fires 824 Blenheim Longlite Instructions for use

Valor Fires 831 Instructions for use

Valor Fires

Valor Fires 831 Instructions for use

Valor Fires 823 Instructions for use

Valor Fires

Valor Fires 823 Instructions for use

Valor Fires Dream 843 Instructions for use

Valor Fires

Valor Fires Dream 843 Instructions for use

Valor Fires 834 Instructions for use

Valor Fires

Valor Fires 834 Instructions for use

Popular Electric Heater manuals by other brands

Heatrex 240 Series owner's manual

Heatrex

Heatrex 240 Series owner's manual

U-Line H-6100 quick start guide

U-Line

U-Line H-6100 quick start guide

EINHELL QHT 1500 operating instructions

EINHELL

EINHELL QHT 1500 operating instructions

CONVECTAIR FOR Installation and user guide

CONVECTAIR

CONVECTAIR FOR Installation and user guide

Kogan KAHTP20BLKA quick start guide

Kogan

Kogan KAHTP20BLKA quick start guide

Black & Decker STANLEY ST-02-230-E manual

Black & Decker

Black & Decker STANLEY ST-02-230-E manual

Heatscope PURE Installation and instruction manual

Heatscope

Heatscope PURE Installation and instruction manual

Heylo DE 2 XL user manual

Heylo

Heylo DE 2 XL user manual

Harvia GL70 Instructions for installation and use

Harvia

Harvia GL70 Instructions for installation and use

Heylo DE 20 SH user manual

Heylo

Heylo DE 20 SH user manual

Harvia PP70SP Instructions for installation and use

Harvia

Harvia PP70SP Instructions for installation and use

Sunbeam Calentador SFH457A instruction manual

Sunbeam

Sunbeam Calentador SFH457A instruction manual

Harvia K10.5GS Instructions for installation and use

Harvia

Harvia K10.5GS Instructions for installation and use

THERMEx Frame E Wi-Fi Series user manual

THERMEx

THERMEx Frame E Wi-Fi Series user manual

Creda Heating Solution brochure

Creda

Creda Heating Solution brochure

SHUFT UniMAX-R 1400VE EC Technical manual

SHUFT

SHUFT UniMAX-R 1400VE EC Technical manual

HUUM CLIFF Series Installation and operation manual

HUUM

HUUM CLIFF Series Installation and operation manual

Harvia HL70S Instructions for installation and use

Harvia

Harvia HL70S Instructions for installation and use

manuals.online logo
manuals.online logoBrands
  • About & Mission
  • Contact us
  • Privacy Policy
  • Terms and Conditions

Copyright 2025 Manuals.Online. All Rights Reserved.

5132449/02
© Baxi Heating U.K. Limited 2008.
Model 823
Electric Heater
fitted with one of the following fascia.
Blenheim, Churchill,
Knightsbridge, Luxor, Seattle,
Silverdale, Westminster or
Willoughby.
(GC No. EF-032-29)
This guide is intended to help you
install and care for your Valor Fires
electric heater. Please read carefully
before installing and using your
heater. However, if further information
is required, our
Valor Fires Technical Helpline
will be pleased to help.
Telephone 0844 8711 565
(National call rates apply in the
United Kingdom)
In the Republic of Ireland
Telephone 0044 844 8711 565
Important: Please keep your guide in a safe place for future reference
INSTALLER AND OWNER GUIDE
© Baxi Heating U.K. Limited 2008.
All rights reserved. No part of this publication may be reproduced in any material form
(including photocopying), stored in any medium by electronic means (including in any
retrieval system or database) or transmitted, in any form or by any means, whether
electronic, mechanical, recording or otherwise, without the prior written permission of
the copyright owner.
Applications for the copyright owner's permission to reproduce any part of this
publication should be made, giving details of the proposed use, to the following
address: The Company Secretary, Baxi Heating UK Limited, The Wyvern Business
Park, Stanier Way, Derby, DE21 6BF.
Warning: Any person who does any unauthorised act in relation to a copyright work
may be liable to criminal prosecution and civil claims for damages.
Valor Fires, Erdington, Birmingham B24 9QP
www.firesandstoves.co.uk
Because our policy is one of constant development and improvement, details may vary slightly from
those given in this publication
Page 2
INSTALLER AND OWNER GUIDE
© Baxi Heating U.K. Limited 2008.
Safety First.
Valor Fires heaters are CE Approved and designed to meet the appropriate British
Standards and Safety Marks.
Quality and Excellence.
All Valor Fires heaters are manufactured to the highest standards of quality and
excellence and are manufactured to ISO 9001
CUSTOMER CARE
Thank you for choosing Valor Fires
All Valor Fires heaters are designed to meet the most stringent quality, performance
and safety requirements to provide our customers with many years of trouble free
service. This guide aims to improve your understanding and appreciation of your new
heater, by providing simple and informative instructions to enable you to install it and
to ensure that you benefit from the excellent performance and features it has to offer.
If you require further assistance, the Valor Fires Technical Helpline will be pleased to
help.
Please telephone 0844 8711 565 (local rates apply in the United Kingdom).
In the Republic of Ireland telephone 0044 844 8711 565.
Page 3
INSTALLER AND OWNER GUIDE
© Baxi Heating U.K. Limited 2008.
1. HANDLING AND UNPACKING
Before continuing any further with the installation of this heater please read the
following:
Unpacking.
The Knightsbridge, Westminster and Luxor heaters have fascias that are heavy.
To avoid damage, they are packed in a separate box within the main box.
Important safety instructions.
The approximate lifting weights (kg) of the heater parts are listed below:
Heater Heat engine Complete Fascia Spacer Fuel effect
Knightsbridge 5.5 11.13 1.3 1.0
Westminster 5.5 8.2 1.3 1.0
Luxor 5.5 13.8 1.3 1.0
Blenheim 5.5 4.58 N/A* 0.7
Churchill 5.5 4.58 N/A* 0.7
Seattle 5.5 0.91 N/A* 0.9
Silverdale 5.5 0.91 N/A* 0.9
Willoughby 5.5 5.3 1.3 1.0
* An optional spacer frame kit is obtainable either from your heater supplier or direct
from Valor Fires Sales. The kit is a 75mm (3 inch) spacer kit (Kit number 05801T1).
One person should be sufficient to lift the heater. If for any reason this weight is
considered too heavy then obtain assistance.
When lifting always keep your back straight. Bend your legs and not your back.
Avoid twisting at the waist. It is better to reposition your feet.
Avoid upper body/top heavy bending. Always bend from the knees rather than the
waist. Do not lean forward or sideways whilst handling the heater.
Always grip with the palm of the hand. Do not use the tips of fingers for support.
Always keep the heater as close to the body as possible. This will minimise the
cantilever action.
Use gloves to provide additional grip.
Always use assistance if required.
2. SAFETY
This appliance is not intended for use by persons (including children) with reduced
physical, sensory or mental capabilities, or lack of experience and knowledge, unless
they have been given supervision or instruction concerning use of the appliance by a
person responsible for their safety.
Page 4
INSTALLER AND OWNER GUIDE
© Baxi Heating U.K. Limited 2008.
Always
 Always install the heater in accordance with this guide. If in doubt obtain
expert advice.
 Always make sure the electrical socket is accessible and located adjacent to, but
not above the heater.
 Always disconnect the heater from the electrical supply before carrying out
cleaning, maintenance or replacing the lamps.
 Always make sure the heater is firmly secured to prevent it from being tipped
over.
 Always use a fireguard when young children, infirm persons and pet animals can
come into contact with the heater.
 Always use genuine Valor Fires spare parts.
Never
 Never leave children unsupervised in a room where the heater is ON and
unguarded.
 Never obstruct or cover the fan outlet or force items into heater openings.
 Never install or use the heater anywhere where water is in use, i.e.
Bathrooms, Kitchens, Shower Rooms and Swimming Pools etc.
 Never use aerosols or steam cleaners on or around the heater.
 Never route the electric supply cable under carpet etc.
 Never install the heater close to curtains or combustible materials.
 Never use the heater to dry clothes etc.
 Never sit or stand on the heater.
Never use the heater with a timer switch or similar device.
Important electrical safety.
The heater must not be located in front of or under an electrical socket; the socket
must always be accessible in order to disconnect the heater from the electrical supply
for maintenance and cleaning.
CAUTION: In order to avoid a hazard due to inadvertent resetting of the thermal cut
out, this appliance must not be supplied through an external switching device, such
as a timer, or connected to a circuit that is regularly switched on and off by the utility.
Important! This heater must be earthed.
 The heater is supplied with a 3 pin 13 Amp fused re-wireable plug with 1mm² 3
core cable.
 The wires in the cable are coloured in accordance with the following code: -
Live = Brown
Neutral = Blue
Earth = Green / Yellow
 The electric cable must be safely routed from the heater to an electrical socket.
Page 5
INSTALLER AND OWNER GUIDE
© Baxi Heating U.K. Limited 2008.
3. FITTING THE HEATER
The installation of this heater requires a reasonable level of DIY skills.
Please read this guide thoroughly before commencing installation and if in
doubt, seek help from a competent person.
Do I need any tools?
1. Depending upon the chosen method of installation you may need the following
screwdrivers: -
 A Pozidrive / Phillips / cross head. This should have a number 2 size tip.
 A Flat end.
2. If drilling into brickwork you will need a power drill (preferably with hammer action)
and appropriate size drill bit for the wall plugs supplied.
Where and how can you fit the heater?
Q Can the heater be installed into a ‘hole in the wall’ (elevated opening)?
A The heater is suitable for ‘hole in the wall’ installations; these being installations
where the heater is recessed into a builders opening. This is not referring to the
heater being hung on the wall. It is important that the electrical socket is
accessible and located adjacent to, but not above or behind the heater.
(The fascias have been designed for traditional installations where the base of
the fascia sits on a hearth or similar surface. For this reason we recommend that
a plinth be fitted under the heater).
Q Do you want to fit the heater into a surround or fireplace opening without
the spacer frame?
A The minimum rebate / depth required is 75mm (4 inches).
Q What opening size do you need in the surround or fireplace opening?
A This heater can be fitted into fireplaces or surrounds where the following
dimensions are available.
Width 400mm - 450 mm (15.35 inches - 17.72 inches)
Height 555mm - 590 mm (21.9 inches - 23.2 inches)
Depth At least 75mm (At least 3 inches)
Q Do you want to fit the heater against a flat wall with the base of the heater
on a hearth or similar surface?
A When fitted with the spacer frame* the heater is designed for this type of
installation.
*On Blenheim, Churchill, Silverdale and Seattle models an optional spacer frame kit is
obtainable either from your heater supplier or direct from Valor Fires Sales. The kit is
a 75mm (3 inch) spacer kit (Kit number 05801T1).
Page 6
INSTALLER AND OWNER GUIDE
© Baxi Heating U.K. Limited 2008.
Securing the heater.
The contents have been identified in figure 1 (Fascias and trims are not shown).
Page 7
INSTALLER AND OWNER GUIDE
© Baxi Heating U.K. Limited 2008.
Figure 1. Contents (Items are not to scale)
Contents Qty (Illustrations are not
to scale) Contents Qty (Illustrations are not to
scale)
Heater 1
Spacer frame
(Not supplied
with Blenheim,
Churchill,
Silverdale and
Seattle models)
1
Eyescrew 1
M4 x 25
screw
‘E’
2
Battery
‘AAA’ 2Steel wire 1
Woodscrew
‘C’ 4Wall plug 5
No.8 x 3/8
screw
‘D’
4M5 x 8
screw 2
Diffuser 1 Remote
control 1
Coal support
assembly
(Luxor only)
1
Bag of Coals (All
models except
Blenheim,
Churchill,
Silverdale &
Seattle)
1
Coal fuel
effect
(Blenheim &
Churchill only)
1
Pebble fuel
effect (Silverdale
& Seattle only)
1
The heater must be secured into position to prevent it from being tipped over.
The following securing options are available:
Method A - Securing the heater with Screws.
Method B - Securing the heater with Wire.
Method C - Securing the heater using a Spacer Frame*
*On Blenheim, Churchill, Silverdale and Seattle models an optional spacer frame kit is
obtainable either from your heater supplier or direct
from Valor Fires Sales. The kit is a 75mm (3 inch)
spacer kit (Kit number 05801T1).
General notes to read before fitting your heater.
On Knightsbridge, Luxor, Willoughby and
Westminster models there should be at least 30mm
(1.2 inches) clearance between the top of the
fascia and anything such as a shelf, fireplace
surround or mantel etc. This will allow the fascia to
be lifted off or removed during servicing. To check
this gently place the fascia against the surface to
which it is to be fixed. Measure the distance from
the top of the fascia.
Before fitting the fascia ensure that the back
page of this guide is completed.
Moving the cable guide.
At the base of the heater you will find an electric
cable which runs through a rectangular plastic
cable guide. As supplied the cable guide is fitted
into the rectangular cut-out on the right side of the
heater. If required, the cable guide can be removed
and put in the rectangular slot in the centre or left
hand side of the heater. For removal and fitting
please see the following sections.
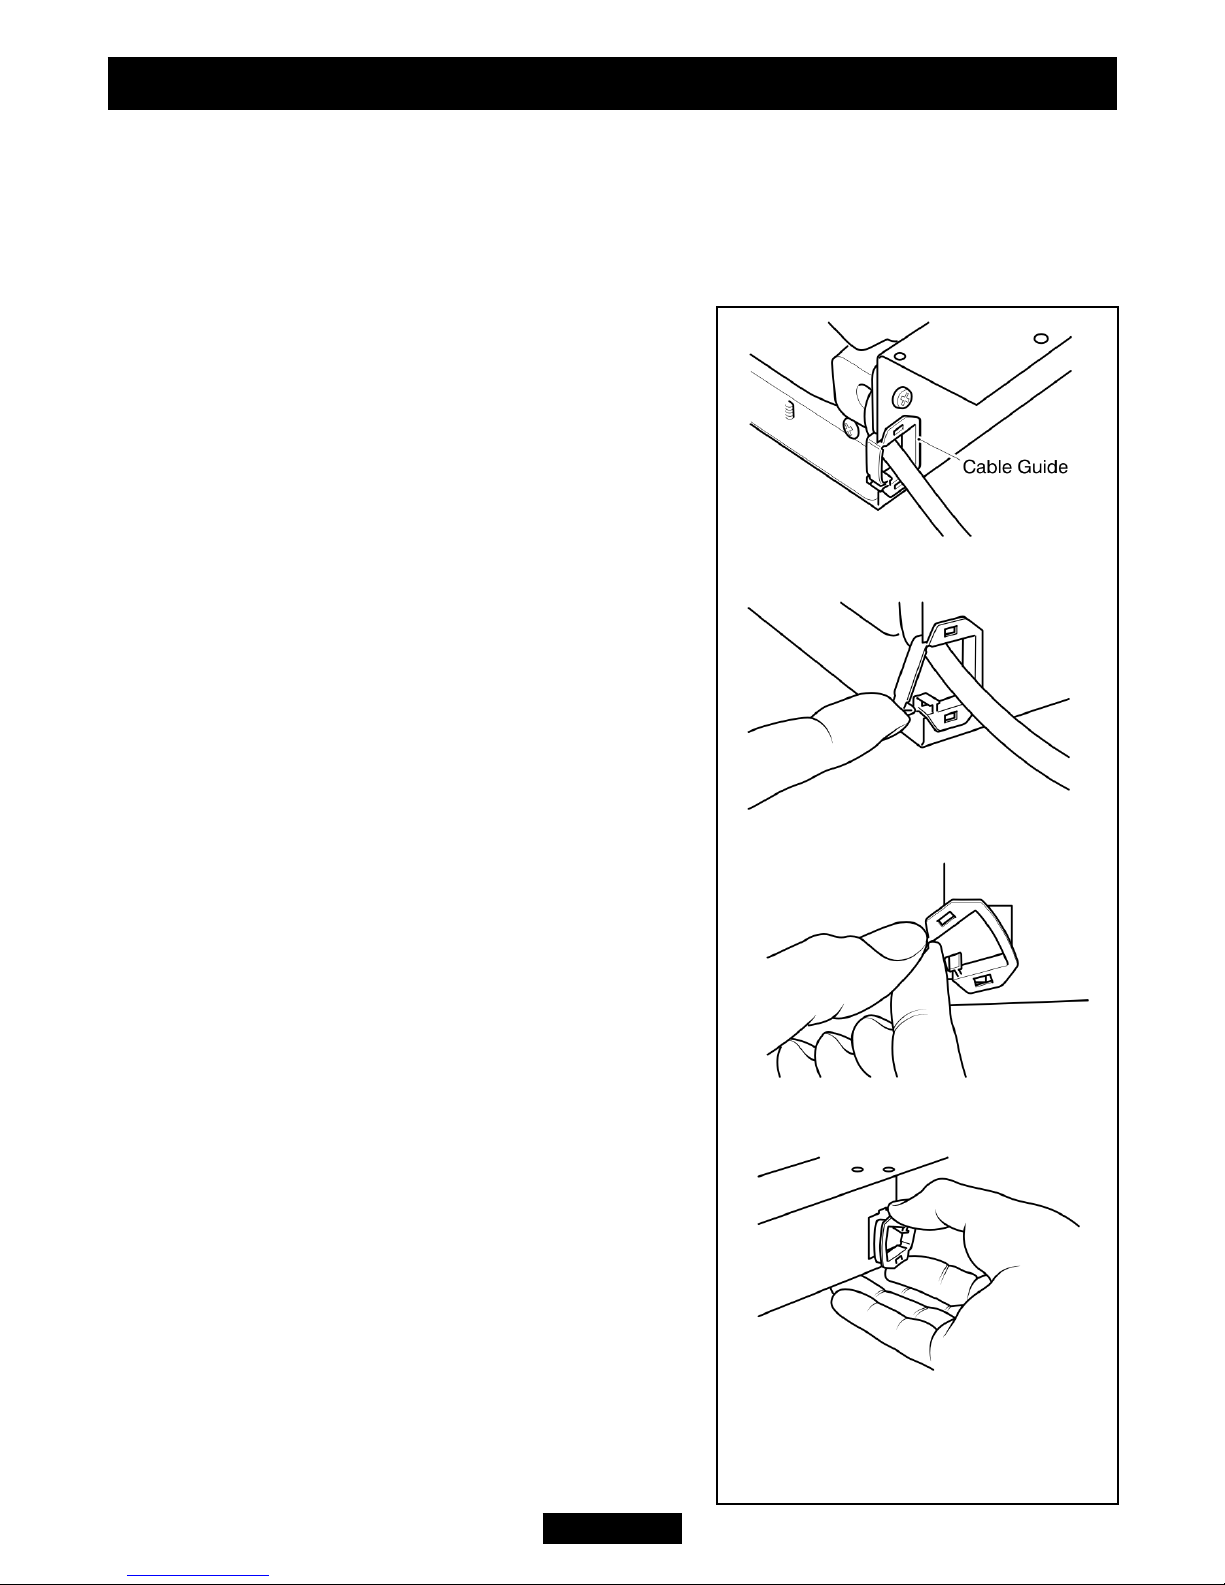
Removing the cable guide
1. Before removing the cable guide please note
that the wider part of the cable guide is on the
outer edge of the base (See figure 2- Item 1).
2. To remove the cable guide push and lift the tab
on the bottom. The bottom of the cable guide will
open (See figure 2- Item 2).
3. Lift the electric cable clear of the cable guide.
4. Hold the bottom of the cable guide close to the
heater then gently pull the cable guide away from
the rectangular slot (See figure 2- Item 3).
Page 8
INSTALLER AND OWNER GUIDE
© Baxi Heating U.K. Limited 2008.
Figure 2. Removing and
positioning the cable guide.
Item 1
Item 2
Item 3
Item 4
Fitting the cable guide.
When fitting the cable guide please remember that the wider part of the cable guide
has to be fitted against the outer edge of the base (See figure 2- Item 1).
1. Gently pinch the sides of the cable guide (See figure 2 - Item 4) and push the
cable guide into the required rectangular slot.
2. Place the electrical cable into the guide and close the top of the cable guide.
If the electric cable is damaged, to avoid a hazard it must be replaced by a Valor
Fires authorised service agent, or similarly qualified person (See the front cover of
this guide for useful telephone numbers).
All external wiring between the heater and the electrical supply shall comply with
current IEE regulations. Extension leads should
not be used.
Fascia support brackets.
On Westminster, Willoughby, Luxor and
Knightsbridge models, as supplied the fascia
support brackets may be flat against the heater
body. Using a suitable tool or gloved hand bend
the brackets as in figure 3. Do not bend the
brackets on Blenheim, Churchill, Silverdale or
Seattle models.
Heater fixing.
All fixings supplied with the heater have been
identified in figure 1.
If fitting the heater into a fireplace or surround
opening, try the heater in the opening to ensure
that it will fit.
If fitting the heater onto a decorative hearth surface
such as marble or tile it is advisable to protect the
hearth surface. Do not drag the heater across the
surface of the hearth as this may scratch the hearth
surface.
Method A - Screw fixing.
Note - If fixing to marble it is recommended that
Method B - ‘Wire fixing’ is used. Drilling marble
without the correct tools and experience may result in the marble cracking.
1. Place the heater into the fireplace or surround opening. Make sure that the heater
is in the middle of the surround or fireplace.
2. There are two slotted holes in the top of the heater (See figure 4). Mark through
the slotted holes so that their position is clear when the heater is removed.
Page 9
INSTALLER AND OWNER GUIDE
© Baxi Heating U.K. Limited 2008.
Figure 4. Slots for screw
fixing.
Figure 3. Fascia support brackets
3. Remove the heater.
4. Drill the screw locations using a suitably sized
masonry drill bit for the wall plugs supplied.
Insert wall plugs into the drilled holes.
5. Place the heater so that the slotted holes are in
line with the wall plugs in the fixing surface.
6. Screw and secure the heater with two
woodscrews (See figure 4).
Method B - Wire fix.
This method of fixing needs a fireplace opening
and is recommended when fixing the heater to a
marble surround or where the wall or brickwork is
in poor condition.
1. The fixing kit supplied with the heater includes
a steel wire and eyescrew (See figure
1). These can be used to secure the
heater to the back of a fireplace
opening.
2. Mark the eyescrew position on the
centre line at the back of the fireplace
opening and at a height of 533-560mm
(21 inches - 22 inches) (See figure 5).
3. Drill an appropriate size hole in the
marked position.
4. Insert a wall plug into the drilled
hole.
5. Screw the eyescrew into the wall
plug.
6. Position the heater in front of the
fireplace opening.
7. At the top of the heater there are
four small holes, two each side of the
heater (See figure 6- Item 1). From the
front of the heater, thread about 50mm
(2 inches) of the steel wire into the
inside small hole on the left side of the
heater (See figure 6 - item 2).
8. Thread the other end of the wire
through the remaining small hole on
the left hand side of the heater.
Continue to push the wire through this
Page 10
INSTALLER AND OWNER GUIDE
© Baxi Heating U.K. Limited 2008.
Figure 6. Steel wire fixing (Detail at top of
heater may differ from that shown)
Figure 5. Eyescrew position.