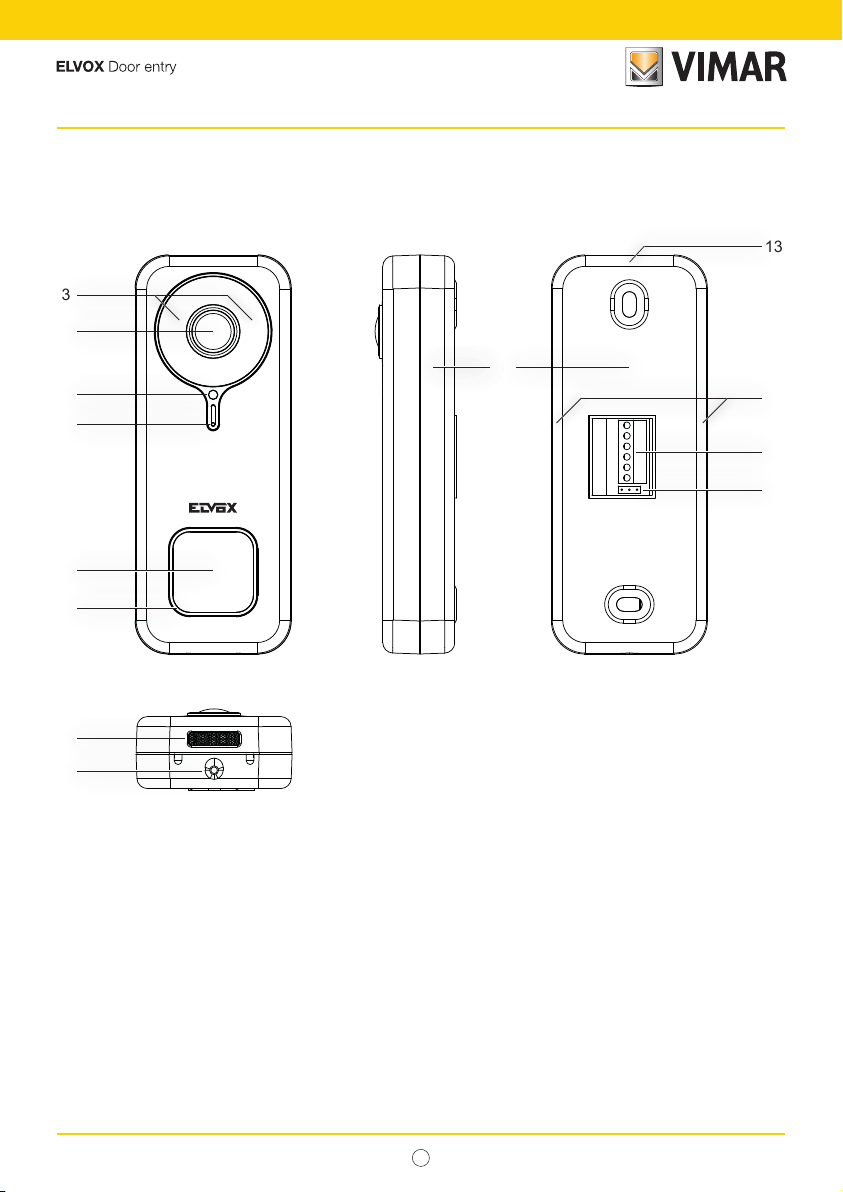
Vimar Elvox K40960 User manual

K40960 - K40965
Wi-Fi video doorbell
User Manual

EN
2
K40960 - K40965

EN 3
K40960 - K40965
Wi-Fi video doorbell
“Smart” video door entry outdoor station for calls towards connected Apps, with the possibility of answering,
locks and actuations management, audio and video storage on request or following specic events:
Functions
- Call towards the Apps installed on one or more smartphones
- sd-card support with 8GB-128GB capacity
- IEEE 802.11 b/g/n 2.4GHz Wi-Fi connectivity
- Firmware update support via OTA (Over the Air)
- Adjustable conversation volume
- Adjustable call ringtone volume
- Actuators activation (lock and relay)
- Noticationssupportfor:
• Motion detection
• Human presence detection
• Audio call
• Tamper detection
- Manualrecordingofphotosorvideos
- Automaticrecordingofphotosorvideosand5-secondpre-roll
- IR-cutlterwithinfraredlightingforoptimumnight-timevisibility
- Electronic ringtone connection support (optional)
- Voiceassistantssupport(currentlydevices:Echo,EchoShow.EchoFlex,Echodot,EchoStudio)
- Statusluminousindicator
- Supportforupto3pre-settablevoicemessages
- The device requires an Internet connection via an IPv4 network with DHCP server
Technical data
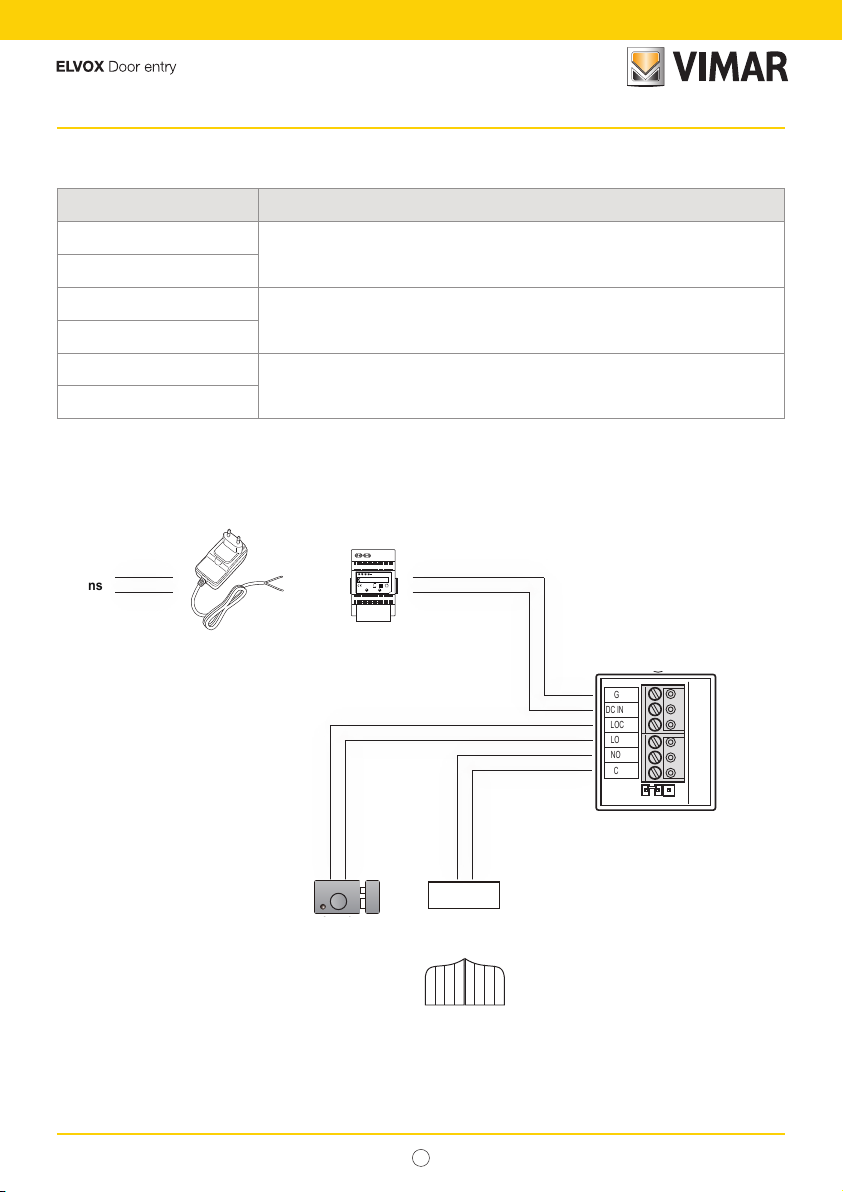
- DCinput:24V(usethepowersupplyunitsuppliedinthekitortherectier40962)
- CMOSsensor1/3”4MPx
- Max.videoresolution:2K(2560x1440)pixel
- H.264videocompression
- Digital WDR (wide dynamic image regulation)
- Dimensions:52(l)x133(h)x24.5(p)mm
- To work correctly there must be a stable connections to a Wi-Fi 2.4 GHz network with DHCP server and access
to the Internet
- theWi-FivideodoorbellsmartdeviceshouldbeplacedatadistancefromtherouterorfromtheWi-Finetwork
extenderthatguaranteesa“good”or“medium”signallevel,accordingtotheindicationsoftheVIEWDoorApp
- MaximumdistancebetweenWi-Fivideodoorbellandadditionalringtone:100m
-Wi-Fifrequencyrange:2412-2472MHz
- Wi-Fitransmittedpower:<100mW(20dBm)
- RFfrequencyrange:433.92MHz
- RFtransmittedpower:<10mW(10dBm)
- Protectionrating:IP54
- Lock:max12V–1.1A(maintenancecurrentdurationcanbesetintheapp;maintenancecurrentequalto
200mA)
- Relay:max12V–2A(relayactivationtimecanbesetintheapp,from0.5sto10s,in0.5ssteps)
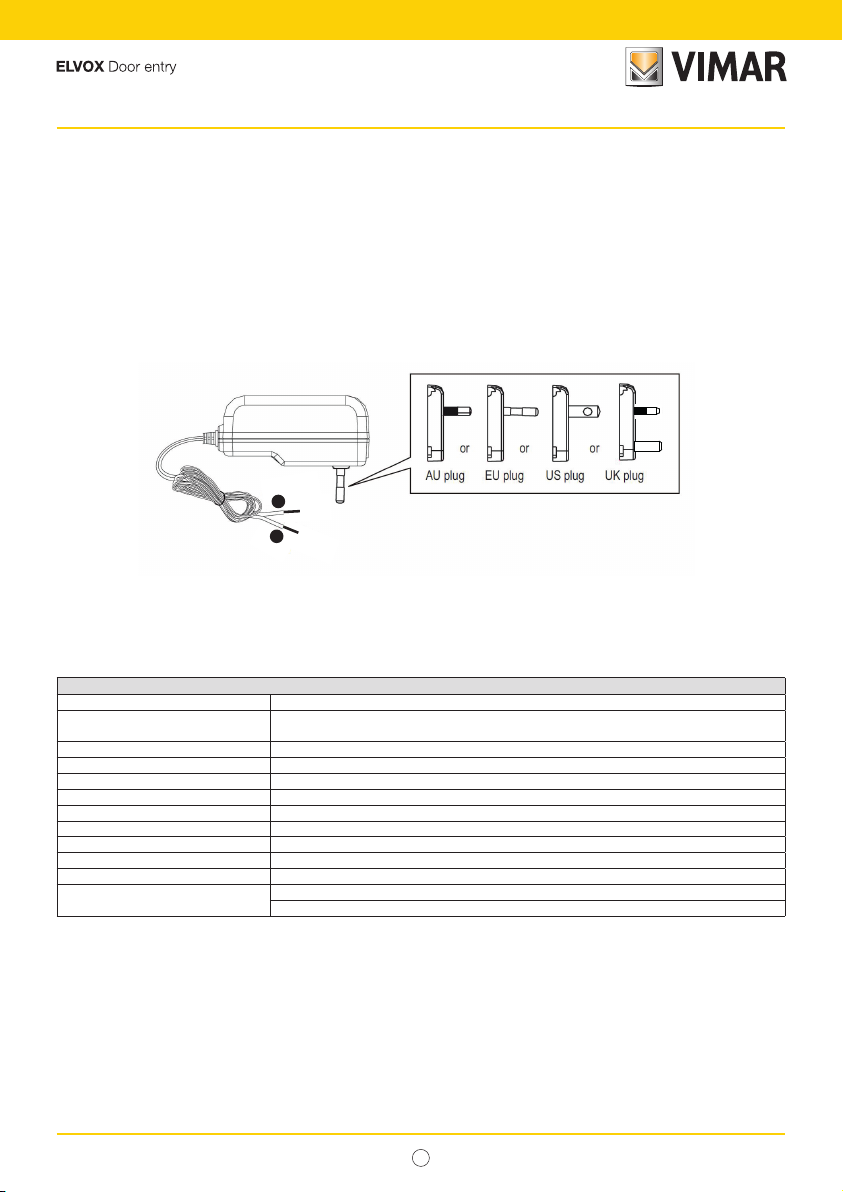
Power supply unit
Dependingontheversion,topowerthedevice,theKitincludesasstandardamulti-plugpowersupplyunitorapower
supplyunitforDINrail;forthetechnicalcharacteristicspleasecheckthefollowingpages.

EN
4
K40960 - K40965
VIEW Door App
- AvailableforAndroidsystem(versionsfrom5.1to12.0)andiOS(from10.0to15.0)
- ReceiptofcallsfromWi-Fivideodoorbell
- VideoandaudiopreviewfromWi-Fivideodoorbell
- Listofcallsreceivedfunction
- Consultingfunctionviatimeline
-Imageand/orvideosavingfunctionfromcallsorconsultation.
- Multi-systemandmulti-devicemanagementfunction(compatiblewithkitsK40945,K40946,K40947and
K40955,K40956,K40957)
- Lock or relay remote activation
- Settingcommunicationtimefrom60sto300s.
- Possibilityofsettingimageresolutiontothreelevels:HD(highresolution:2560x1440pixel);SD(medium
resolution:1280x720pixel);LD(lowresolution:640x284pixel).
- Requires login with a MyVimar account

EN 5
K40960 - K40965
1 (one) Wi-Fi video doorbell complete with rear bracket
1 (one) power supply unit (multi-plug or DIN)
1(one)8GBSD-card(installed)
2(two)3-pinterminals(installed)
2 (two) mounting screws
2 (two) wall plugs
1(one)spannerforanti-vandalscrew
1 (one) reset key
1(one)sheetofnameplatestickers
1(one)sheetofprotectivelabels
1 (one) instructions sheet
Kit: Package contents

EN
6
K40960 - K40965
1 - Video sensor
2- Bottom-Fixingbracket
3- InfraredLED
4 - Brightness sensor
5- Microphone
6- Callbutton
7- StatusLED
8- Speaker
9- Anti-vandalscrew
10 - Terminal block
11-NO-NCjumperforrelay
12-Sideanchorpoints
13-Upperanchorpoint
External details
3
1
4
6
5
7
8
9
2
13
10
11
Front view Rear viewSideview
Bottom side view
12

EN 7
K40960 - K40965
14 - Anti-tamper push button
15-Openingforreset
16-Slotforsd-card
17- Wiringconnector
18 - Label with QR code
Internal Details
GND
DC IN 24V
LOCK+
LOCK–
NO/NC
COM
14
17
18
16 15
GND
DC IN 24V
LOCK+
LOCK–
NO/NC
COM

EN
8
K40960 - K40965
State LED
State LED colour State
Staticwhite S1-deviceconguresandconnectedtothecloud,instand-by
Rotating white with ringback tone S2-callinprogress
Rotating green S3-conversationinprogressorrmwareupdateinprogress
Flashingred(3ashes) S4-missedcall
Continuousashingred S5-noWi-Ficonnection
Flashing red with alarm tone S6-tampersignal(anti-tamper)
Staticblue S7-devicenotcongured
Rotating blue S8-nocloudconnection

EN 9
K40960 - K40965
Connection terminal block description
Terminal Description
GND
Power supply
DC IN 24V
LOCK+
Electric lock
LOCK-
NO/NC
Relay
COM
GND
DC IN 24V
LOCK+
LOCK–
NO/NC
COM
Mains
Power supply
24 VDC
40104 40103
or
24V
INPUT:100-240V~50HZ 0.6A 28W
OUTPUT:24V1A
~100-240V LN
R
oHS
Lock
automatic door
Lock
automatic door
Lock
automatic door
24V
INPUT:100-240V~50HZ 0.6A 28W
OUTPUT:24V1A
~100-240V LN
R
oHS
Lock Relay

EN
10
K40960 - K40965
Multi-plug power supply unit: characteristics
(forapplicableversions)
-ACsupplyvoltage:100V-240V,0.6A,50Hz/60Hz
-DCoutput:24V,1A
-Dimensions(mm):43.5(W)x80.4(H)x38.5(D)
-AU/EU/UK/USplugadapters
+
-
Multi-plug power supply unit technical data
Manufacturer ShenzhenFujiaApplianceCo.,Ltd.
Address 5FofBuildingF,Hengchangrong(xinghui)Sci-Tech.Park,Huaning
Road,LonghuaDistrict,Shenzhen,Guangdong,P.R.China
Model FJ-SW2401000N
Input voltage 100-240 V
Inputfrequency 50/60Hz
Output voltage 24.0 Vd.c.
Output current 1.0 A
Output power 24.0 W
Averageperformanceinactivemode 89.1%
Low-loadperformance(10%) 76.3%
No-load power 0.09W
Regulatory Compliance ErP Directive
(EU)Regulationforexternalpowersupplyunitsno.2019/1782.

EN 11
K40960 - K40965
Power supply unit for DIN rail: characteristics
Technical characteristics
- Powersupply:100-240VAC50/60Hz
- Maximumpowerconsumption0.8A
- Dissipatedpower3.5W
- Outputvoltage(+/-)24VDCnominal(SELV-EN60950-1).
- Max.currentoutput:1A
- Operatingtemperature-5°C+35°C(indoor)
- 3x17.5mmmodules,dimensions:55x91x54mm
- SymbolforCLASSII
6
L
N
+ - -+
DistanzamassimatrauscitaDCalimentatoreDINevideocitofono•MaximumdistancebetweenDCoutputofDINpowersupplyunitandvideoentryphone
DistancemaximaleentresortieCCalimentationDINetportier-vidéo•MaximalerAbstandzwischenDC-AusgangvonDIN-NetzteilundVideohaustelefon
DistanciamáximaentresalidaCCalimentadorDINyvideoportero•DistânciamáximaentreasaídaDCdoalimentadorDINeovideoporteiro
ΜέγιστηαπόστασημεταξύεξόδουDCτροφοδοτικούDINκαιθυροτηλεόρασης
• Tipo di cavo
•Typeofcable
• Type de câble
•Kabeltyp•Tipodecable•Tipodecabo
•Τύποςκαλωδίου
• Lunghezza del collegamento
• Connection length
•Longueurdelaconnexion
•Anschlusslänge•Longituddelaconexión•Comprimentodaligação
•Μήκοςσύνδεσης
0.75mm² 15m
6
L
N
+ - -+
Ingresso•Input•Entrée•
Eingang • Entrada • Entrada •
Είσοδος
Uscita•Output•Sortie•
Ausgang•Salida•Saída•
Έξοδος
DIN rail
DIN rail
Rail DIN
DIN-Schiene
Carril DIN
DIN rail
ΡάβδοςDIN

EN
12
K40960 - K40965
Power supply unit for DIN rail: Possible installations
Installation on switchboard
Installation on junction box

EN 13
K40960 - K40965
Installation
1) Usingthekeyinthepackage,unscrewtheanti-vandalscrewonthebottomofthedevice(9).
2) Usingascrewdriver,delicatelyleveralongtheedgeofthebracket,nearthesideanchoringpoints(12):inthisway,
thebracket(2)isreleasedfromtheWi-Fivideodoorbellbody.
3) performthewiringofthecablestotheterminals,takingcarethatyouobservetheconnectionorderasspecicin
point(17).
4) Screwthebrackettothewall,xingrstlytheupperholeandcheckingthecorrectverticalposition,thennallythe
bottomhole.TocorrectlypositiontheWi-Fivideodoorbell,refertothefollowinggureatthebottom.
5) Tostorephotosandvideostakenwiththedevice,checkthattheSD-cardisinsertedintheslotindicatedinpoint
(16).
N.B.:ifnecessary,thesd-cardshouldbeinsertedintheslotontheconnectorsside,withtheconnectorsfacing
thefrontoftheWi-Fivideodoorbell.
6) Inserttheterminalblockintherelatedmaleconnectorandpowerupthedevice:itisnowpossibletoconnectitto
the VIEW Door App.
Below is the conguration procedure: we suggest you close the Wi-Fi video doorbell and tighten the closing
screw only once you have correctly connected the Doorbell to the App.
• Recommended height, unless different regulations are specied.
165 cm
120 cm

EN
14
K40960 - K40965
Opening
Surface mounting
1
2

EN 15
K40960 - K40965
Connection by means of removable terminal block
Closing
+
–
+
–
1
2

EN
16
K40960 - K40965
SD Card
SD card
–
+
SD card
–
+

EN 17
K40960 - K40965
Disassembly
2
1

EN
18
K40960 - K40965
App: Connection
Fig. 1
6) Tapon“Login”:thepageshownFig.2willbe
displayed.
Fig. 2
5) ActivatetheApp:theAppwilldisplaythepage
shownbelow(Fig.1):
1) InordertobeconnectedtotheVIEWDoorApp,thedevicerequiresaMyVimaraccount.Iftheaccountisnotavailable,
createoneatthelink:
https://www.vimar.com/en/int/user/login
(The account can be created both on the web and using the app).
2) Duringthecongurationprocess,thedevicewillsignalthecongurationstatususingthecoloursofthestatusLEDs
and voice messages (only in English)
Thevoicemessagesshouldbeconsideredacongurationaid
3) Thersttimeyouturniton:
- youwillhearthefollowingvoicemessage:“PleaseuseyourmobileforWi-Ficonguration”
- thestatusLEDwillbestaticblue(7s)
4) Make sure your mobile phone is connected to the Wi-Fi network you wish to connect the device to

EN 19
K40960 - K40965
7) Tap on the bottom (“Go to MyVimar login”)
to go to the account login page Fig.3. If you
don’thaveaMyVimaraccountyet,createitby
tappingonthelink“Wanttocreateaprole?
Doyouwanttomanageyourprole?”which
takes you to the MyVimar website
Fig. 3
8) Onceyouhaveloggedintoyouraccount,the
“Devices”pageisdisplayed,asshowninFig.4:
Fig. 4
9) Toconnectthedevice,touchthecentralicon
“+”,togotothepageshowninFig.5.Asyoucan
seeintheimage,thedevicecanbeidentied
inthreeways:
a. By scanning the QR code on the label on the
back,point(18)
b.By searching the local network (LAN, for
use with devices previously connected to
theWi-Finetwork),
c. Via manual conguration, using the data
shownonthelabelonthebackoftheWi-Fi
video doorbell.
Ineachoftheabovecases,theAppwillprompt
theuserwiththestepstofollow.
10)Belowisanillustrationofthecongurationofa
smart Wi-Fi video doorbell by scanning the QR
code (case a).
ScantheQRcode:theAppwillrecognisethecode
andthepageshowninFig.6willbedisplayed Fig. 6
Fig. 5

EN
20
K40960 - K40965
13)Afterresetconrmation,youwillhearthevoice
message:“Pleaseuseyourmobilephonefor
Wi-Ficonguration”
Fig. 8
Fig. 7
14)Subsequently, theApp will request the data
relating to the Wi-Fi network you wish to
connect the device to.
AftercheckingwhethertheSSIDoftheWi-Fi
network you wish to connect the Wi-Fi video
doorbell to is selected and that the related
passwordhasbeenentered,asshowninFig.
8,makesureyoutaponthenextpushbutton,
15)TheAppwillsearchforthedeviceandrequest
conrmationandanyauthorisationstoconnect
tothedevicewhoseUIDbeginswithODS,as
showninFig.9.
Depending on the Operating System used,
theApp may request specic authorisations,
asindicated further inthe paragraph entitled
“VIEWDoorApp:Permissions”.
Fig. 10Fig. 9
11)Thersttimeitisinstalled,thedeviceisalready
reset and ready for configuration: you can
thereforemoveontopoint12)andconrmthe
reset.
Ingeneral,ininstallationssubsequenttotherst
one:thepageshowninFig.7isnotdisplayed,
reset the device by inserting the reset key in the
holeshowninpoint(15)andlongpress until
youhearanacousticconrmationtone.
As soon as the device has completed the reset
process, you will hear the message “Reset
success”
12)ConrmtheresetonthepageshowninFig.7
Other manuals for Elvox K40960
1
This manual suits for next models
5
Table of contents
Other Vimar Accessories manuals

Vimar
Vimar Elvox 88T2 Assembly instructions

Vimar
Vimar ELVOX 6931 Assembly instructions

Vimar
Vimar Elvox K40960 User manual

Vimar
Vimar Arke 19784 User manual

Vimar
Vimar RA97 User guide

Vimar
Vimar LINEA 30179 Series User manual

Vimar
Vimar Eikon 20281 User manual

Vimar
Vimar BY-ALARM PLUS 03834 User manual

Vimar
Vimar 02692 User manual

Vimar
Vimar RA97 User manual