manuals.online logo
Brands
  1. Home
  2. •
  3. Brands
  4. •
  5. Vimar
  6. •
  7. Accessories
  8. •
  9. Vimar LINEA 30179 Series User manual

Vimar LINEA 30179 Series User manual

Viale Vicenza 14
36063 Marostica VI - Italy
www.vimar.com
xx179 01 2204
LINEA
30179.x
EIKON
20179
IDEA
16629
ARKÉ
19179
PLANA
14179
Thanks to UWB (radar ultra wide band) ultra-low power technology, the sensor is capable of
detecting presence with the utmost precision. The device is fitted with an input for external wired
contact which can be configured to control the activation of the relay or to activate the scenarios
in the View Wireless system. The front push button starts the configuration with the View Wireless
App and the LED signals the status of the relay.
TWO OPERATING MODES (ALTERNATIVE)
Stand alone •View Wireless System
Download the View Wireless App from the stores onto the tablet/smartphone you
will be using for configuration.
Depending on the mode you select, you will need:
Stand alone View Wireless System
Nothing else
Gateway art. 30807.x-20597-19597-16497-14597
View App for management via smartphone/tablet
When the device is powered for the rst conguration, we recommend you search for any
new rmware and perform the update.
Create your Installer account on MyVimar (on-line).
STAND ALONE CONFIGURATION
1.Wire all the radar sensors.
2.
Start the View Wireless App and log in with the credentials you just created.
3.
Create the system and the environments.
4.
Associate all the sensors with the environments.
To associate the radar sensor:
• Select “Add” ( ), choose the environment to place it and give it a name
• Select ; activate the Bluetooth connection on your tablet/smartphone and approach the
radar sensor
• Press the front push button to start the Configuration phase
5.For every device, set the function, the parameters and any accessory devices (wired or radio
control and related function).
CONFIGURATION IN THE VIEW WIRELESS SYSTEM
1.Wire all the devices in the system (radar sensors, 2-way switches, thermostats, gateway, etc.).
2.Start the View Wireless App and log in with the credentials you just created.
3.Create the system and the environments.
4.Associate all the devices with the environments, except for the gateway (which should be
associated last).
To associate the radar sensor:
• Select “Add” ( ), choose the environment to place it and give it a name
• Select ; activate the Bluetooth connection on your tablet/smartphone and approach the
radar sensor
• Press the front push button to start the Configuration phase
5.For every device, set the function, the parameters and any accessory devices (wired or radio
control and related function).
6. Transfer the configuration of the devices to the gateway and connect it to the Wi-Fi network.
7. Transfer the system to the Administrator user (who must have created his/her profile on
MyVimar).
For details please refer to the View Wireless App manual you can download from www.
vimar.com DOWNLOAD View Wireless MOBILE App
Summary of LED signals
• During normal operation (default colours):
LED Meaning
On
(white for Linea, amber for Eikon, blue for Arké, green
for Idea and Plana)
Colours and brightness can be customised using the
View Wireless App
Relay active
Off Relay not active
Flashing white
Manual forcing
(Relay active without timer
activated/deactivated with
front push button pressing)
•In the configuration phase:
LED Meaning
Flashing blue
(for max 2 min.)
Pending receipt of
a fw update
1 green flash Connection established with View Wireless
Blue permanently lit Device associated
via Bluetooth with the smartphone
1 white flash Device reset
RESETTING THE DEVICE.
The reset restores the factory settings. Within the first 5 minutes from powering, press the front
push button
for 30 s until the white LED flashes.
INSTALLATION RULES.
• Installation and configuration must be carried out by qualified persons in compliance with the
current regulations regarding the installation of electrical equipment in the country where the
products are installed.
• The device must be installed in flush mounting boxes or surface mounting boxes with Linea,
Eikon, Arkè , Idea and Plana mounting frames and cover plates.
• Installation must be carried out in mounting boxes with a depth of at least 48 mm.
• Installation must be carried out with the system switched off.
• The OUT terminals are separated by double insulation from the L-N-P terminals. Do not
connect a mains voltage circuit to the OUT terminals; these terminals can be connected to
SELV and ELV circuits according to the characteristics stated.
• Connect a double insulated cable or a reinforced cable type 01840.E to the OUT terminals.
• The device may only be used for indoor applications.
• Metal objects in front of the detector tend to alter its operation. Avoid installations where metal
surfaces are present in the first metre of the radar’s field of detection.
• The technology used is capable of detecting presence even through certain types of material
(for instance plasterboard, thin walls, fabric and wood), so suitable installation in the room is
necessary, as is the appropriate configuration of the maximum detection range.
• Do not install on partitions or walls subjected to shock and vibration.
• For surface mounting you can alternatively use the Vimar external mounting frame art. 00801
(only for Eikon, Arké and Plana series).
• Installation recommended at a minimum height of 1 m from floor level.
• Do not cover the detection range of the detector.
• Install the device at a distance of more than 2 m from any Wi-Fi 6E antennae.
• After the configuration phase (or after changing parameters) and every time it is switched on,
the detector performs an initial calibration phase lasting 45 s at the end of which it becomes
operational; during this phase, detection may not be precise.
Caution: The device is not suitable for detecting the presence of sleeping people.
CHARACTERISTICS:
• Rated supply voltage: 100-240 V~, 50/60 Hz.
• Max. power absorption from the mains: 1.1 W
• Output contact: 24 VAC or 30 VDC, 400 mA max (SELV and ELV), not suitable for controlling
electrical locks
• Bluetooth technology:
- RF transmission power: < 100 mW (20 dBm)
- Frequency range: 2400-2483.5 MHz
• UWB radar:
- RF transmission power: < 1mW (0 dBm)
- Frequency range: 7.3÷8.5 GHz
•Terminals:
- 2 terminals (L and N) for line and neutral
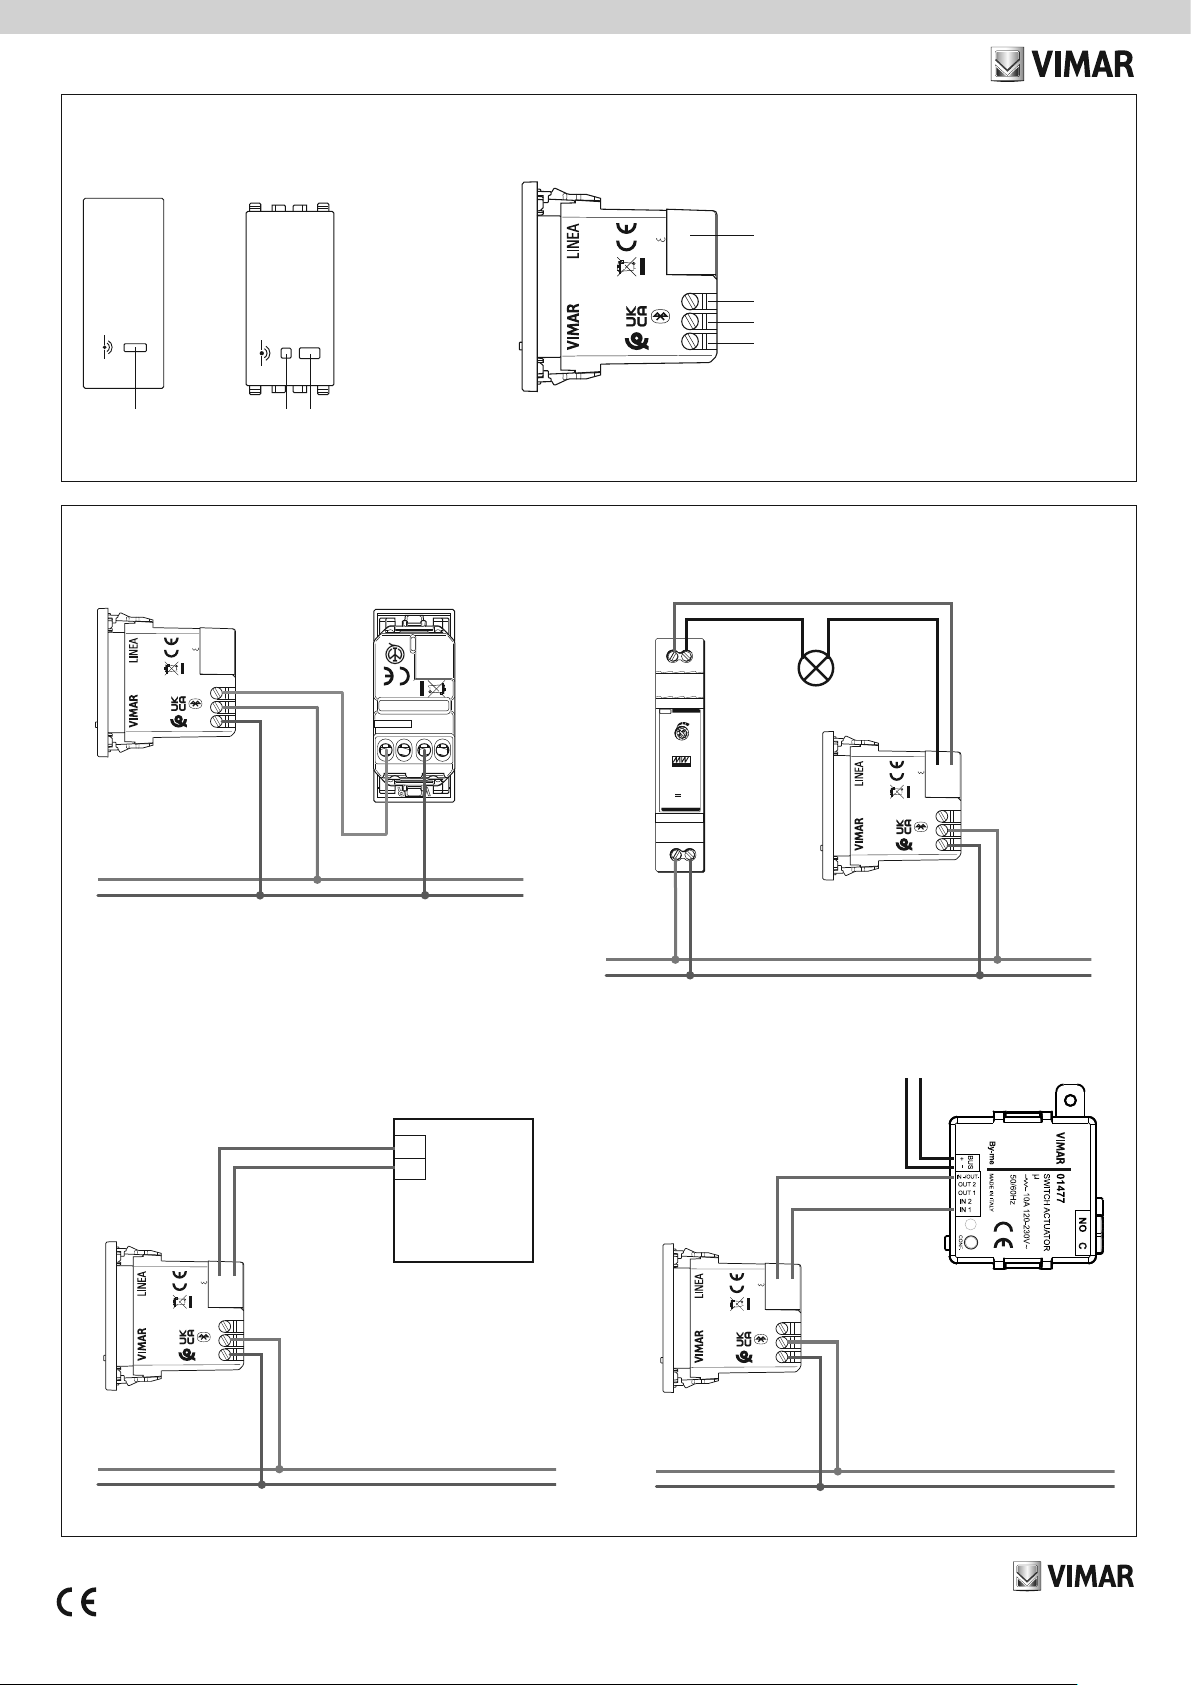
- 1 terminal (P) for connection to the remote wired control (for instance art. 30008-20008-
19008-16080-14008). The max distance between the IoT device and the push button is
50 m with a cable with a minimum cross-section of 1.5 mm2.
- 2 terminals (OUT) for the potential-free signal relay output for SELV and ELV circuits
• Front push button for configuration/reset and for manual forcing (in configurations in which this
mode is allowed).
• RGB LED indicating the output status (which can be set from the View Wireless App) and the
configuration status
• Operating temperature: -10 ÷ +40 °C (indoor)
• Protection degree: IP20
• Configuration via View Wireless App for View Wireless system in Bluetooth technology
• Controllable via View App
Connected radar sensor
Viale Vicenza 14
36063 Marostica VI - Italy
www.vimar.com
xx179 01 2204
WEEE - User information
The crossed bin symbol on the appliance or on its packaging indicates that the product at the end of its life must be collected separately
from other waste. The user must therefore hand the equipment at the end of its life cycle over to the appropriate municipal centres for the
differentiated collection of electrical and electronic waste. As an alternative to independent management, you can deliver the equipment you
want to dispose of free of charge to the distributor when purchasing a new appliance of an equivalent type. You can also deliver electronic
products to be disposed of that are smaller than 25 cm for free, with no obligation to purchase, to electronics distributors with a sales area
of at least 400 m2. Proper sorted waste collection for subsequent recycling, processing and environmentally conscious disposal of the old
equipment helps to prevent any possible negative impact on the environment and human health while promoting the practice of reusing and/
or recycling materials used in manufacture.
1.
DETECTION RANGE
2.
3.
2
42024
4
6
8
90°
8
8
90°
2
246
4
6
2
2468
4
DETECTION AREA
REGULATORY COMPLIANCE.1
RED Directive. RoHS directive.
Standards EN IEC 60669-2-1, EN 302 065-1, EN 302 065-2, EN 301 489-1, EN 301 489-33, EN
301 489-17, EN 300 328, EN 62311, EN IEC 63000.
Vimar SpA declares that the radio equipment complies with Directive 2014/53/EU. The full text
of the EU declaration of conformity is on the product sheet available on the following website:
www.vimar.com.
REACH (EU) Regulation no. 1907/2006 – Art.33. The product may contain traces of lead.
OPERATION
Operation, and therefore the management of the relay, widgets and notifications displayed by
the View App are connected to the setting assigned to the parameters during the configuration
phase.
Presence function
The presence in the detection area is signalled in the View App for the full duration plus the
absence check time (75 s). At the end of this time, the relay is deactivated with a delay that can
be set between 1 s and 16 hours.
PRESENCE
RELAY
absence check t
relay off t
75 s
Detection angle
The device detects the presence inside an area which can be set in the range of 0.5÷7 m, with
an opening angle of 90° (see figures 1, 2 and 3).
7 m
1 m

7 m
1 m

Viale Vicenza 14
36063 Marostica VI - Italy
www.vimar.com
xx179 01 2204
CONNECTIONS
FRONT VIEW
3. Connection to control switchboard or to device with potential-free inputs
TERMINALS
L
N
Input for wired push button for scenario recalling or device control
Relay output
30179
VIMAR SPA
VIALE VICENZA 14
36063 MAROSTICA VI
ITALY
MADE IN ITALY
OUT
®
24Vac/30Vdc
400mA
30179.x 20179-19179
16629-14179
A: Configuration push button
A+B A
B
B: Configuration LED
1. Connection with push button
L
N
1
10mm
L
30179
VIMAR SPA
VIALE VICENZA 14
36063 MAROSTICA VI
ITALY
MADE IN ITALY
OUT
®
24Vac/30Vdc
400mA
xx008
xx179
16629
2. Connection to the pilot lamp
L
N
+V
Vo
Adj.
−V
INPUT:(输入):
OUTPUT:(輸出):
100-240VAC
0,5A 50/60Hz
12V
NL
1,25A
10.8~13.8V
Max.1.25A
Max.15Watt
MEAN
WELL
“Terminal torque 4.4 Lb-in”
30179
VIMAR SPA
VIALE VICENZA 14
36063 MAROSTICA VI
ITALY
MADE IN ITALY
OUT
®
24Vac/30Vdc
400mA
00935
01831.1
xx179
16629
3.1
L
N
COM
IN
30179
VIMAR SPA
VIALE VICENZA 14
36063 MAROSTICA VI
ITALY
MADE IN ITALY
OUT
®
24Vac/30Vdc
400mA
Third-party switchboard
xx179
16629
3.2
L
N
30179
VIMAR SPA
VIALE VICENZA 14
36063 MAROSTICA VI
ITALY
MADE IN ITALY
OUT
®
24Vac/30Vdc
400mA
01477
By-me bus
xx179
16629
Viale Vicenza 14
36063 Marostica VI - Italy
www.vimar.com
xx179 01 2204
4. Connection to power relay to control a load at mains voltage
L
N
+V
Vo
Adj.
−V
INPUT:(输入):
OUTPUT:(輸出):
100-240VAC
0,5A 50/60Hz
12V
NL
1,25A
10.8~13.8V
Max.1.25A
Max.15Watt
MEAN
WELL
“Terminal torque 4.4 Lb-in”
30179
VIMAR SPA
VIALE VICENZA 14
36063 MAROSTICA VI
ITALY
MADE IN ITALY
OUT
®
24Vac/30Vdc
400mA
01831.1
12 V DC
Relay with coil
- 12 VDC
xx179
16629
N.B. Graphic representation of the Linea series. Position of terminals, wiring and functions also identical for Eikon, Arké Idea and Plana.

This manual suits for next models

4

Other Vimar Accessories manuals

Vimar 02692 User manual

Vimar

Vimar 02692 User manual

Vimar BY-ALARM PLUS 03834 User manual

Vimar

Vimar BY-ALARM PLUS 03834 User manual

Vimar Elvox K40960 User manual

Vimar

Vimar Elvox K40960 User manual

Vimar RA97 User guide

Vimar

Vimar RA97 User guide

Vimar Elvox EDP1 User manual

Vimar

Vimar Elvox EDP1 User manual

Vimar ELVOX CCTV User manual

Vimar

Vimar ELVOX CCTV User manual

Vimar Eikon Evo 21296 User manual

Vimar

Vimar Eikon Evo 21296 User manual

Vimar Elvox 88T2 Assembly instructions

Vimar

Vimar Elvox 88T2 Assembly instructions

Vimar Elvox EFA3 User manual

Vimar

Vimar Elvox EFA3 User manual

Vimar Eikon User manual

Vimar

Vimar Eikon User manual

Vimar Eikon 20784 User manual

Vimar

Vimar Eikon 20784 User manual

Vimar RA97 User manual

Vimar

Vimar RA97 User manual

Vimar Eikon 20281 User manual

Vimar

Vimar Eikon 20281 User manual

Vimar Elvox K40960 User manual

Vimar

Vimar Elvox K40960 User manual

Vimar ELVOX 6931 Assembly instructions

Vimar

Vimar ELVOX 6931 Assembly instructions

Vimar Arke 19784 User manual

Vimar

Vimar Arke 19784 User manual

Vimar Elvox 40961 User manual

Vimar

Vimar Elvox 40961 User manual

Popular Accessories manuals by other brands

ROSE DISPLAYS SNAIL ADHESIVE-GENERIC installation instructions

ROSE DISPLAYS

ROSE DISPLAYS SNAIL ADHESIVE-GENERIC installation instructions

SafeTrust 8845-000 quick start guide

SafeTrust

SafeTrust 8845-000 quick start guide

Matelec FMS-12064-A instructions

Matelec

Matelec FMS-12064-A instructions

Hella ONYX.WEATHER installation instructions

Hella

Hella ONYX.WEATHER installation instructions

Gira 5471 00 operating instructions

Gira

Gira 5471 00 operating instructions

Zicom Z.HA.HA.MC.ATOUCH.SENSOR user manual

Zicom

Zicom Z.HA.HA.MC.ATOUCH.SENSOR user manual

Philips AEA1000/00 user manual

Philips

Philips AEA1000/00 user manual

IWO 12000mAh user manual

IWO

IWO 12000mAh user manual

Hihome WPP-16R quick start

Hihome

Hihome WPP-16R quick start

Millefiori Hydro NA-393 quick start guide

Millefiori

Millefiori Hydro NA-393 quick start guide

SUTO S220 Instruction and operation manual

SUTO

SUTO S220 Instruction and operation manual

Dräger X-am 3500 quick start guide

Dräger

Dräger X-am 3500 quick start guide

Van Walt Rain Gauge operating instructions

Van Walt

Van Walt Rain Gauge operating instructions

Bretford M-SUB Assembly instructions

Bretford

Bretford M-SUB Assembly instructions

Vega VEGAPULS 6X operating instructions

Vega

Vega VEGAPULS 6X operating instructions

Work Sharp WS1 user guide

Work Sharp

Work Sharp WS1 user guide

Videosec RF-YKCZ-EU-220 instruction manual

Videosec

Videosec RF-YKCZ-EU-220 instruction manual

Cleral REFLEX Basic user manual

Cleral

Cleral REFLEX Basic user manual

manuals.online logo
manuals.online logoBrands
  • About & Mission
  • Contact us
  • Privacy Policy
  • Terms and Conditions

Copyright 2025 Manuals.Online. All Rights Reserved.