Vitek VT-3468 User manual


MANUAL INSTRUCTION
ÈÍÑÒÐÓÊÖÈß ÏÎ ÝÊÑÏËÓÀÒÀÖÈÈ
RADIO CASSETTE RECORDER WITH CD/ M 3/VCD LAYER
ÑÒÅÐÅÎ-ÌÀÃÍÈÒÎËÀ Ñ ÏÐÎÈÃÐÛÂÀÒÅËÌ CD/M 3/VCD ÄÈÑÊÎÂ
ÌÎÄÅËÜ VT-3468

ENGLISH
INTRODUCTION
Thank you for purchasing this appliance.
Please carefully read these operating instructions to learn how to correctly use
your new appliance. After reading these instructions, put them in a safe place for
future reference.
CAUTION
• To avoid fire or electric shock, keep the appliance away from water or moisture.
To avoid electric shock, do not open the housing. The appliance should be
repaired only by a qualified specialist.
• Using the controls or the appliance in any way that is not described in these
instructions can lead to e posure to dangerous levels of laser beam radiation.
• OPENING THE HOUSING OR BREAKAGE/FAILURE OF THE BLOCKING SYSTEM
CAN LEAD TO EXPOSURE TO INVISIBLE LASER RADIATION. AVOID DIRECT CON-
TACT WITH THE LASER LIGHT.
The compact disk player is classified as a CLASS 1
LASER PRODUCT
The CLASS 1 LASER PRODUCT label is on the rear panel
of the appliance.
NOTE: The manufacturer is not responsible for interference to radio
or television sets occurring as a result of technical changes made by the user
to this appliance. When using this appliance, you should avoid making
any technical changes outside your competence.
2
CLASS 1 LASER PRODUCT
LUOKAN 1 LASERLAITE
CLASS 1 LASERAPPARAT

ENGLISH
LOCATION OF CONTROLS
3
1. Speakers (Left & Right)
2. POWER button
3. Headphone jack
4. BASS BOOST button
5. VOLUME UP/DOWN buttons
6. Mode control switch
7. PAUSE button
8. STOP/EJECT button
9. FAST FORWARD button
10.BAND switch
11.REWIND button
12.PLAY button
13.RECORD button
14.Button for opening the CD compartment
15.TUNING knob
16.SKIP/SEARCH DOWN button
17.STOP button
18.PLAY/PAUSE button
19.SKIP/SEARCH UP button
20.PBC button
21.P/N button
22.CD compartment lid
23.Telescopic antenna
24.Carry handle
25.STANDBY/POWER Indicator
26.Remote control sensor
27.FM STEREO Indicator
28.Audio output jacks
(only for VCD/CD/MP3 playback)
29.Speakers (Left/Right)
30.Radio tuning scale
31.LCD display
32.Battery compartment
33.Power cord jack
34.Built-in microphone
35.Video output jack
(only for VCD/CD/MP3 playback)
36.AC voltage selector switch
37.Jack for e ternal microphone

ENGLISH
REMOTE CONTROL
OWER SOURCE (SYSTEM WITH 2 OWER SOURCES)
This appliance is designed to be used from two different power sources, which are listed below:
DC OWER SOURCE
This appliance can be powered by 8 type UM2 or C batteries. For best results, always use alkaline bat-
teries.
INSTALLING THE BATTERIES
1. Remove the battery compartment lid by gently pressing on it and pulling it up.
Insert 8 type UM2 or C batteries.
MAKE SURE TO OBSERVE POLARITY (+/-), AS INDICATED ON THE INSIDE OF THE COMPARTMENT.
2. Close the lid.
NOTE: To avoid damage to your appliance, remove the batteries if the appliance will not be used for
a long time or if the batteries have gone dead.
NOTE: If you wish to power the appliance with batteries, unplug the power cord both from the
power outlet and from the rear panel of the appliance.
AC OWER SOURCE
Insert one end of the power cord into power cord jack (33), and the other end into AC outlet.
NOTE: If your appliance is equipped with AC input voltage selector switch, make sure that it is set
on voltage the same as voltage in you local area.
4
38.On/Off button
39.Mute button
40.PBC button
41.P/N button
42.OSD button
43.REPEAT A-B button
44.REPEAT 1/ ALL button
45.PROGRAM button
46.ZOOM button
47.STEP button
48.VOLUME DOWN button
49.PLAY/PAUSE button
50.PREV button
51.Battery compartment lid
52.MODE button
53.Tone down button
54.Tone restore button
55.Tone up button
56.TIME button
57.RETURN/STOP button
58.NEXT button
59.VOLUME UP button
60.SLOW button
61.SOUND button
62.AUDIO button
63.Numeric buttons

ENGLISH
CONTROLS AND FUNCTIONS
CONNECTING THE A LIANCE TO A TELEVISION SET:
1. To connect the appliance to a television set through a SCART type cable, you must use an RCA-to-
SCART adapter, which can be purchased wherever audio-video equipment is sold.
2. To play NTSC disks, you must connect the appliance to a multi-system or NTSC television set.
3. Before connecting this appliance to a television set, make sure that it is turned off, and the power
cord is disconnected from the AC power outlet.
4. Do not close the ventilation openings on either of the appliances and place them in a way that
allows air to circulate freely.
5. Before connecting the appliance to another appliance, read the instructions for the other appliance
completely.
6. When connecting audio/video cables, observe color coding.
7. During playback, the volume of the television set may be less than when receiving broadcasts pro-
gramming. If this happens, set the volume to a desired level.
8. For correct connection of the unit to a TV-set by audio/video RCA-cable follow the diagram below
NOTE: If the appliance is not connected correctly to a television set, the audio or video might not
function properly. If this happens, disconnect the power source, check all connections, and turn the
appliance on once again.
LIQUID CRYSTAL DIS LAY (31)
1. Shows when CDs and VCDs are being
played.
2. Shows when the REPEAT all tracks func-
tion is turned on.
3. Shows the sequence number of the track
being played or the total number tracks on
the disk.
4. Shows when the REPEAT function is
turned on.
5. Shows when the REPEAT A-B function is
turned on.
6. Shows the minutes portion of the time
count of the track being played.
7. Shows when the REPEAT one track function is turned on.
5

ENGLISH
8. Shows the seconds portion of the time count of the track being played.
9. Shows when the PROGRAM function is turned on.
10.Shows when the PBC mode for VCD version 2.0 disks is turned on.
11.Shows when an MP3 disk is being played.
12.Shows when the RANDOM function is turned on.
13.Shows when the INTRO function is turned on.
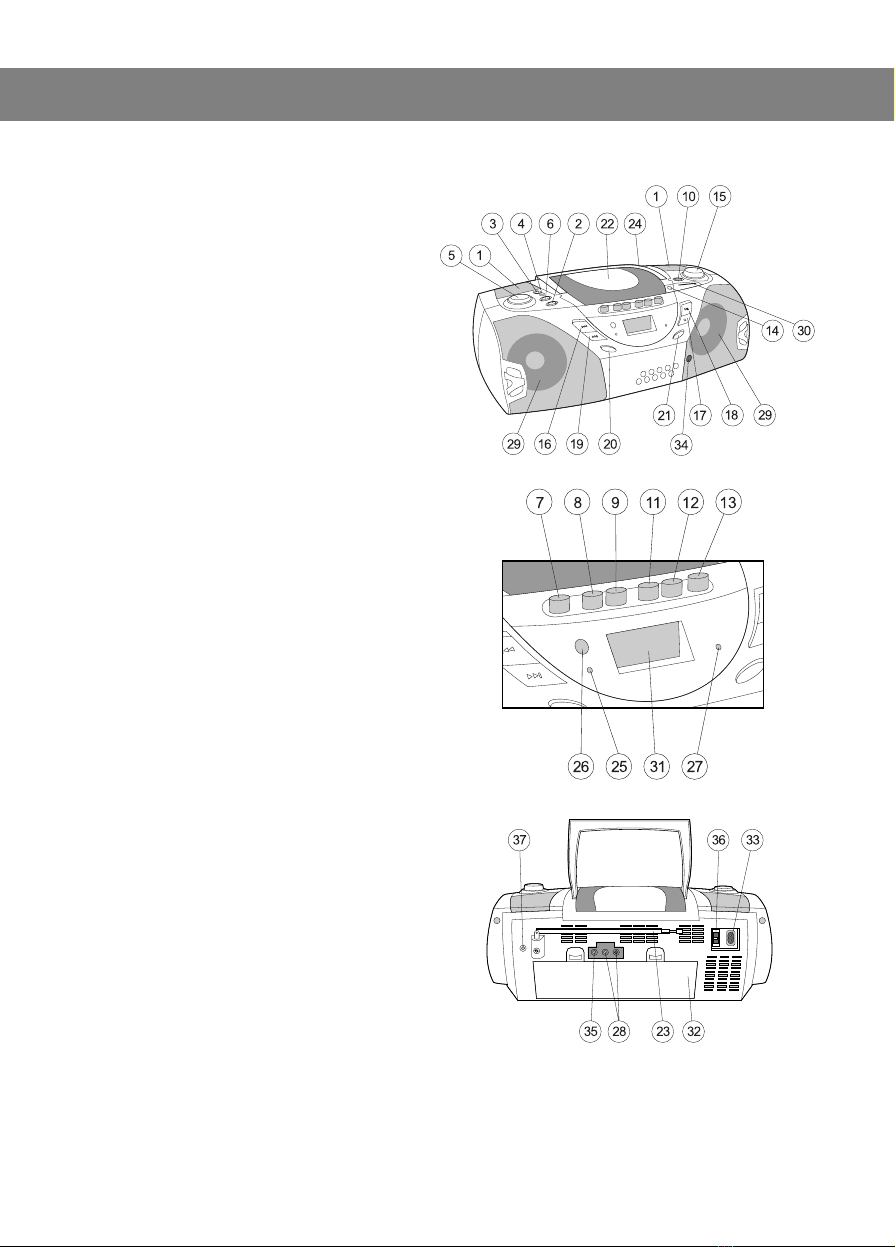
VCD DISK LAYBACK
1. Turn on the television set.
2. Press the POWER button (2). The STANDBY/POWER indicator (25) will light up.
3. To open the CD compartment lid (22) press the button for opening the CD compartment (14).
4. Holding the CD by the edges, place it in the compartment with the label up.
5. After you close the CD compartment lid (22) the player will count the tracks and begin playback.
6. Use the numeric buttons (63) to select the track you wish to listen.
7. To stop or pause playback, press the STOP (17) or PLAY/PAUSE (18) button.
BC BUTTON (20)
1. During VCD 2.0 disk playback, press the PBC button (20) once to see the menu of the disk on the
television screen, twice to turn on the disk scanning function (9-picture mode), or three times to turn off
the PBC function.
2. During MP3 playback, press the PBC button once to repeat one track, twice to repeat one folder,
three times to repeat all the tracks on the disk, or four times to turn off the REPEAT function.
3. During CD playback, press the PBC button once to repeat one track, twice to repeat all the tracks
on the disk, or three times to turn off the REPEAT function.
NOTE: During VCD2.0 disk playback with the PBC function turned on, the STOP button (17)|(57),
when pressed once, functions like the RETURN button. To stop VDC playback with the PBC function
turned on, press the STOP button (17)/(57) twice.
/N BUTTON (21)
1. In VCD/MP3/CD modes, press the P/N button (21) to choose between NTSC and PAL color system
video outputs.
2. In stop mode, press the P/N button (21) once to turn on the track programming mode. The words
PROG TRK will appear on the television screen. Select a track by pressing the SKIP/SEARCH DOWN
(16)/(50) or SKIP/SEARCH UP (19)/(58) button, then press the P/N (21)/(45) button to enter all of the
selected tracks in memory. To continue the programming procedure, press the SKIP/SEARCH DOWN
(16)/(50) or SKIP/SEARCH UP (19)/(58) button.
When you are finished programming, press the PLAY/PAUSE button (18)/(49) to begin playing the pro-
grammed tracks (it is possible to program up to 20 tracks).
SKI /SEARCH U (19) BUTTON
1. Pressing the SKIP/SEARCH UP button (19) once in VCD2.0 menu mode causes the menu on the
screen to move forward.
2. In VCD or CD/MP3 playback mode, press this button to select the ne t track for playback.
3. In VCD or CD/MP3 playback mode, press and hold this button for no less than 0.5 seconds to
select one of four forward scan speeds. Every time you press and hold the SKIP/SEARCH UP button
(19) for no less than 0.5 seconds, the player will advance to the ne t forward scan speed.
SKIP/SEARCH DOWN BUTTON (16)
1. Pressing the SKIP/SEARCH UP button (19) once in VCD2.0 menu mode causes the menu on the
screen to move backward.
2. In VCD or CD/MP3 playback mode, press this button to select the previous track for playback.
3. In VCD or CD/MP3 playback mode, press and hold this button for no less than 0.5 seconds to
select one of four reverse scan speeds. Every time you press and hold the SKIP/SEARCH UP button
(19) for no less than 0.5 seconds, the player will advance to the ne t reverse scan speed.
6

ENGLISH
/N (41) BUTTON ON THE REMOTE
In VCD/MP3/CD modes, press the P/N button (41) to choose between NTSC and PAL color system
video outputs.
OSD BUTTON (42) ON THE REMOTE
In VCD/MP3/CD disk playback mode, pressing the OSD button (42) once will resultin the current time
count of the track being played to appear on the television screen and LCD display (31). Pressing it
twice will display the remaining time of the track being played to appear on the television screen and
LCD display (31). Pressing it three times will cause the remaining time of the entire disk to appear, and
pressing it four times will resultin the current time count of the track being played to appear only on the
LCD display.
NOTE: In MP3 playback mode, only the current time count of the track being played and the
remaining playback time of the entire disk will appear on the television screen and LCD display (31).
BC BUTTON (40) ON THE REMOTE
This button functions just like PBC button (20) on the front panel of the appliance.
RE EAT BUTTONS
RE EAT 1/ALL BUTTON (44) ON THE REMOTE
1. During VCD/CD playback, press the "REPEAT 1/ALL" button (44) once for repeat playback of the
current track, twice for repeat playback of the entire disk, or three times to cancel the REPEAT function.
2. During MP3 playback, press the REPEAT 1/ALL button (44) once for repeat playback of the current
track, twice for repeat playback of the folder, three times for repeat playback of the entire disk, or four
times to cancel the REPEAT function.
RE EAT A-B BUTTON (43) ON THE REMOTE
1. This function is used to repeat a fragment of a track between two specific points on the current
CD/VCD track/disk (repeat playback between points A-B).
2. During playback, press the REPEAT A-B button (43) at the place where the repeat playback should
begin (point A).
3. Press the REPEAT A-B button (43) at the place (B) on the track/disk where repeat playback should
finish (point B). The repeat playback of the selected fragment will then begin.
4. Press the REPEAT A-B button (43) a third time to cancel the REPEAT A-B function.
NOTE: This function doesn't work in MP3 mode.
ROGRAM BUTTON (45) ON THE REMOTE
In stop mode or disk playback mode (PBC turned off), press the PROGRAM button (45) once to turn on
the track playback programming mode. You can enter up to 20 tracks in the program memory by press-
ing the number of the track using the numeric buttons (63).
HOW TO DO IT: Press the PROGRAM button (45), then the sequence number of the track using the
numeric buttons (63), and then press the PROGRAM button (45) once again. Repeat the track pro
gramming procedure (not more than 20 times). The selected tracks will be entered into playback
program. To begin playback of the program, press the PLAY/PAUSE (49) button.
ZOOM BUTTON (46)
1. During VCD disk playback, press the ZOOM button (46) once to double the size of the image on the
television screen, twice to quadruple it, and three times to return to the original image.
2. ZOOM mode doesn't work during CD/MP3 playback.
SLOW BUTTON (60)
Press the SLOW button (60) during VCD playback.
1. With every press of the SLOW button (60), the playback speed decreases by a factor of 2, 4, 8, and
16 respectively.
2. SLOW mode doesn't work during CD/MP3 playback.
7

ENGLISH
SOUND BUTTON (61)
With every press of the SOUND button (61) during VCD/MP3/CD playback, the sound effect changes.
The effect are: CONCERT, THEATER, STADIUM, CHURCH, 3D, ROUND, LIVE, and STANDARD.
NUMERIC BUTTONS 0-9/+10 (63)
1. You can select the track for playback by pressing the number buttons 0-9/+10 (63).
2. Press the +10 button once to select and play tracks with two-digit numbers. For e ample, you can
select track 13 by pressing the +10 button once followed by the 3 button, and you can select track 23
by pressing the +10 button twice followed by the 3 button.
3. You cannot use the numeric buttons (63) to select tracks when the PBC function is turned on. In this
case, you must press the STOP/RETURN button (61) to return to the main menu.
STE BUTTON (47)
1. During VCD playback, press the STEP button (47) to see frame-by-frame playback of the VCD.
Press the PLAY/PAUSE button to return to normal VCD playback mode.
2. Frame-by-frame playback cannot be used during CD/MP3 playback.
MODE BUTTON (52)
1. During VCD (PBC turned off)/CD playback, press the MODE button (52) once to turn on the RAN-
DOM sequence playback function, twice to turn on the INTRO function, or three times for normal play-
back mode.
2. During MP3 disk playback, press the MODE button (52) once to turn on the RANDOM sequence
playback function, or twice for normal playback mode.
STO /RETURN BUTTON (57)
1. Pressing the STOP/RETURN button (57) (PBC turned off) in VCD 2.0 disk playback mode will stop
the playback.
2. Pressing the STOP/RETURN button (57) during VCD1.1 or CD/MP3 disk playback will stop the play-
back.
3. Pressing the STOP/RETURN button (57) when the ZOOM mode is turned on will cause the image to
move down.
NEXT BUTTON (58)
1. Pressing the NEXT button (58) when the ZOOM mode is turned on will cause the image to move to
the right.
2. Pressing the NEXT button (58) when the VCD disk scanning function is turned on (9 track picture
mode) will cause the following track pictures to appear on the television screen, beginning with the
10th.
3. Press the NEXT button (58) in VCD or CD/MP3 playback mode to move to the ne t track.
4. In VCD or CD/MP3 playback mode, press and hold the NEXT button (58) for no less than 0.5 sec-
onds to select one of four forward scan speeds. Every time you press and hold the NEXT button (58) for
no less than 0.5 seconds, the player will move to the ne t forward scan speed.
REV BUTTON (50)
1. Pressing the PREV button (50) while the ZOOM mode is turned on will cause the image to move to
the left.
2. Pressing the PREV button (50) while the VCD scanning function is turned on (9 track picture mode)
will cause the previous track pictures to appear on the television screen, beginning with the first one.
3. Press the PREV button (50) while in VCD or CD/MP3 playback mode to move to the previous track.
4. In VCD or CD/MP3 playback mode, press and hold the PREV button (50) for no less than 0.5 sec-
onds to select one of four forward scan speeds. Every time you press and hold the PREV (50) button for
no less than 0.5 seconds, the player will go to the ne t forward scan speed.
NOTE: Pressing the PLAY/PAUSE button (49) when the ZOOM mode is turned on will cause the
image to move up.
8

ENGLISH
TONE CHANGE BUTTONS (53)/(55)/(54)
In VCD/CD playback mode, you can press the tone change buttons (53)/(55) to change playback tone.
You can press the tone restoration button (54) to change back to normal mode.
VOLUME U / DOWN BUTTONS (59)/(48)
The VOLUME UP/DOWN buttons (59)/(48) on the remote function just like the VOLUME UP/DOWN but-
tons (5) on the front panel of the appliance.
MUTE BUTTON (39)
Press the MUTE button (39) to turn off the sound.
To turn the sound back on, press the MUTE button again or one of the VOLUME UP/DOWN buttons.
OWER BUTTON (38)
The POWER button (38) is used to turn the appliance on or off. The POWER/STANDBY indicator (25) will
change from red to green or vice versa.
AUDIO BUTTON (62)
1. Press the AUDIO button (62) once to choose the left channel as the source of playback.
2. Press the AUDIO button (62) again to choose the right channel as the source of playback.
3. Press the AUDIO button (62) a third time to choose stereo playback.
4. Stereo mode is the main mode for playback.
TIME BUTTON (56)
Playback with previously set time in VCD/CD mode (enter the minutes and seconds when you want
playback to begin).
NOTE: The TIME function doesn't work in MP3 mode.
INSTALLING THE BATTERIES IN THE REMOTE CONTROL UNIT
1. Open the battery compartment.
2. Insert 2 type AAA/UM-4/LR03 batteries, observing the polarity indicated on the housing of the
remote.
3. Close the battery compartment.
NOTE: To avoid damage to the remote control, always remove the batteries if you are not planning
to use it for more than 1 month.
RANGE OF THE REMOTE
Point the remote at the remote control sensor (26) at an angle no greater than 30 degrees and from a
distance of no more than 3 meters from the front panel of the appliance.
LISTENING TO THE RADIO
1. Plug the appliance into AC power outlet. Press the POWER button (2) to turn on the appliance.
2. Set the FUNCTION switch (6) to RADIO.
3. Using the BAND switch (10), select the desired frequency band.
4. Rotate the TUNING knob (15) to select the desired station.
5. Slowly rotate the tuning knob forward and backward to find the optimal level of listening clarity.
6. The built-in AM antenna and telescopic FM antenna are directional antennas. When listening to an
FM radio station, pull out the telescoping antenna (23) to its full length. The best reception can be
attained by rotating the housing of the appliance (for the AM band) or the telescoping antenna (for the
FM band).
NOTE: In the FM band, the FM STEREO indicator (27) will light up when reception is good.
7. Press the VOLUME UP/DOWN button (5) to set the desired volume.
8. To turn off the radio, set the FUNCTION switch (6) to TAPE or VCD/CD/MP3.
9

ENGLISH
CASSETTE TA E O ERATION
FAST FORWARD (9) and REWIND (11) BUTTONS
To quickly move the cassette forward or backward, press the FAST FORWARD (9) or REWIND (11) but-
ton.
AUSE BUTTON (7)
The PAUSE button (7) is used to temporarily interrupt the recording on the cassette.
The pause button does not stop the motor and therefore should only be used for a short period of time.
AUTO STO
This appliance has a built-in automatic stop function. The cassette mechanism will turn off at the end of
the cassette.
STO /EJECT BUTTON (8)
To manually stop playback of the cassette, press the STOP/EJECT button (8).
CASSETTES
CHOOSING MAGNETIC TA E
The quality and condition of the magnetic tape used in the cassette player/recorder affects its record-
ing and playback quality.
Low-quality magnetic tape can be stretched or break during recording or playback, and broken tape
can twist around the tape winding mechanism and damage it. Stretched magnetic tape will produce
unpredictable distortions.
• Use cassettes made by well-known manufacturers.
• We do not recommend using cassettes with 120 minute capacity (C-120). They have a tendency to
stretch or break because the tape is so thin.
• This appliance is not intended to be used with CrO2, Fe-Cr or METAL tapes. Use cassettes with iron
o ide (g-Fe2O3) tape.
AN IM ORTANT NOTE ABOUT MAGNETIC TA E
When using low-quality magnetic tape, the playback might sound muffled or nearly indistinguishable.
THIS DOES NOT MEAN THAT THE PLAYBACK DEVICE IS BROKEN. The problem is that, over time, the
recording/playback head gets covered with magnetic particles from the cassettes or other substances.
To clean the magnetic heads, carefully follow the corresponding instructions. To avoid damaging the
heads, you should never use sharp or metal objects to clean them.
Common reasons for improper cassette functioning are:
1. Jamming of the tape, leading to uneven speed during playback.
2. Improper winding of the tape on the reels.
To avoid these problems, you should observe the following rules. Before putting the cassette into the
compartment, make sure that the tape inside the cassette is in good condition and properly wound. You
can correct winding problems with a pencil or ball-point pen. Insert it in one of the holes of the cassette
and slowly (to avoid damage to the tape) turn the reel until the other reel begins to turn. After listening
to the cassette, we recommend rewinding it to the beginning. Do not use damaged cassettes, because
this can lead to breakage of the tape movement mechanism.
10

ENGLISH
RO ER STORAGE OF CASSETTES
Do not store cassettes near sources of strong magnetic fields such as speakers. Strong magnetic fields
can damage or erase recordings.
Store cassettes in their cases in a cool, dry place.
LAYING CASSETTES
1. Open the cassette compartment by pressing the STOP/EJECT button (8). If the cassette is being
played, recorded, rewound, or fast-forwarded, you will have to press the STOP/EJECT eject button
twice: once to stop the function and again to open the compartment.
2. Insert a cassette in the cassette guide on the lid of the compartment with the magnetic tape down.
3. Close the cassette compartment.
4. Make sure that the mode control switch (6) is set to TAPE.
5. Press the PLAY button (12).
6. Set the desired volume using the VOLUME UP/DOWN button (5).
7. To stop the tape, press the STOP/EJECT button (8).
8. To open the cassette compartment, press the STOP/EJECT button (8) again.
To listen to the other side of the cassette, open the cassette compartment, take out the cassette, flip it,
insert it in the guide on the lid of the cassette compartment with the magnetic tape down, close the lid
and play it by pressing the PLAY (12) button.
CAUTION:
• The auto stop mechanism might not engage at the end of the cassette if you are powering the
appliance from weak batteries.
• If you are not planning to use the appliance for a long time, disconnect it from the power outlet
and remove the batteries.
• To avoid damage to the pinch roller, never leave the PLAY button pressed on a not-in-use device.
RECORDING RADIO ROGRAMS
1. Turn on the radio tuner and set the mode control switch (6) to RADIO.
2. Place the cassette to be recorded into cassette compartment.
3. Use the FAST FORWARD (9) or REWIND (11) buttons if necessary to find the place on the tape
where you want to begin recording, or begin recording from the beginning of the tape.
4. Tune the radio tuner to the desired station. Simultaneously press the RECORD (13) and PLAY but-
tons (12). Both must be pressed in order for recording to take place.
Attention: recording is only possible when the cassette has a stop-motion tab on the top. Removing the
tab prevents accidental erasure of the recording.
5. At the end of the tape, the auto stop function will engage and stop the recording process.
6. To temporarily stop the recording process, press the PAUSE button (7). To restart the recording
process, press PAUSE (7) again.
7. To stop recording, press STOP/EJECT (8).
8. To listen to the recording, press REWIND (11), then PLAY (12).
9. Set the desired volume with the VOLUME UP/DOWN (5) button.
ATTENTION: Always remove the power cord from the outlet if you don't plan to use the appliance
for a long time.
RECORDING FROM THE BUILT-IN MICRO HONE (34)
1. Set the mode control switch (6) to TAPE.
2. Insert the cassette you wish to record on in the cassette compartment.
3. Simultaneously press the RECORD (13) and PLAY (12) buttons.
4. When recording from the built-in microphone, point it at the source of the sound.
5. At the end of the tape, the auto stop function will engage and stop the recording process.
6. To temporarily stop the recording process, press the PAUSE button (7). To restart the recording
process, press PAUSE (7) again.
7. To stop recording, press STOP/EJECT (8).
11

ENGLISH
RECORDING FROM COM ACT DISK
1. Insert the cassette you wish to record on in the cassette compartment.
2. Open the CD compartment by pressing the OPEN (14) button, insert the CD and close the lid (22).
3. Set the mode control switch (6) to CD.
4. Press the PAUSE button (7).
5. To prepare for recording, simultaneously press the RECORD (13) and PLAY (12) buttons.
6. Select the desired track on the disk by using the SKIP/SEARCH UP/ DOWN buttons or number but-
tons on the remote.
7. Press the PAUSE button (7) to begin recording.
8. To stop recording, press the STOP/EJECT button (8).
9. To listen to the recording, press REWIND (11), and then PLAY (12).
CLEANING THE MAGNETIC HEADS
Over time, the magnetic heads of the cassette player/recorder, cap-
stan and pinch roller become dirty from contact with magnetic parti-
cles from the cassette. As a result, the sound becomes muffled,
weak, or distorted. Impurities on the movement mechanism can lead
to uneven movement or deformation of the magnetic tape.
To clean the magnetic heads and components of the tape move-
ment mechanism, remove the cassette, wipe the magnetic heads,
capstan and pinch roller with a cotton swab dipped in a special cleaning liquid or ethyl alcohol. Wait 10-
20 seconds before using the device again to allow the cleaning solution or alcohol to evaporate.
Never use sharp or metal objects to clean the magnetic heads.
HANDLING CDs
Protect CDs from dust, dirt, and scratches, and store them in their original package.
Never touch the read/write side of a CD. Use only a soft cloth to wipe CDs, and wipe them only from the
center to the edge. Do not use petrol or solvents to clean CDs, which can damage them. Store CD disks
away from sources of heat and keep them away from direct sunlight.
LAYING CDs
1. Set the mode control switch (6) to CD.
2. Open the CD compartment by pressing the OPEN (14) button.
3. Insert the CD with the label up.
• Do not touch the read/write (bottom) side.
• Never touch the lens inside the CD compartment.
4. Close the CD compartment (22). The disk will begin to spin, the LCD display (31) will show the total
number of tracks and playback will begin.
5. To temporarily stop playback, press the PLAY/PAUSE button (18), then press the PLAY/PAUSE but-
ton (18) once again to resume playback.
6. To search for tracks in the forward or backward directions, use the SKIP/SEARCH UP/ DOWN but-
tons (16), (19).
Pressing and holding the SKIP/SEARCH UP/ DOWN (16), (19) buttons for more than 1 second will allow
you to move along the track forward or backward. Press PLAY/PAUSE (18) to begin playback.
EXTERNAL MICRO HONE JACK (37)
This jack allows connection of a microphone with resistance from 300 to 600 Ohms and having a plug
diameter of 3.5 mm. The e ternal microphone can be used to record or superimpose sound during
CD/VCD playback or when listening to the radio.
12

ENGLISH
To regulate the general volume level, use the VOLUME UP/DOWN button (5).
NOTE:
1. Always disconnect the e ternal microphone when you are not using it.
2. You can superimpose sound with an e ternal microphone in TAPE, CD/VCD and RADIO modes.
HEAD HONE JACK (3)
For private listening, insert headphones (with plug diameter of 3.5 mm) in the PHONE jack (3). The
speakers will automaticly disconnect.
Caution: Using the headphones at high volume can cause hearing damage.
CHARACTERISTICS
GENERAL
Voltage 220 V ~50 Hz
Direct current 12V 8 UM2/"C" batteries
Remote control 3V - 2 AAA/UM-4/LR03 batteries.
Power consumption 29 W
Weight 4.6 Kg (without batteries)
Dimensions 510 mm (length) 176 mm (height) 263 mm (width)
Allowable operating temperature from +5°C to +35°C
RADIO TUNER
Bands AM/FM
Frequency ranges AM 540 -1600 KHz, FM 64 -108 MHz
CD LAYER
Playback system digital audio compact disk player
Digital-analog converter 1 bit digital-analog converter with 8X digital sampling
Frequency response 20-20000 Hz
CASSETTE LAYER/RECORDER
Recording system stereo
Biasing system magnetic erasure
Frequency response 125-6300 Hz
Wow and flutter 0.35% RMS
AUDIO
Output power 3 W per channel (RMS) with 10% non-linear distortion
Speaker resistance 4 Ohms
Headphone resistance 32 Ohms
ACCESSORIES
Brochure with instructions 1
Power cord 1
Audio/Video cable 1
Remote control 1
CAUTION: To avoid electric shock, do not e pose the appliance to water.
• Be sure to provide adequate ventilation of the appliance.
• Never close the ventilation openings on the housing of the appliance.
• Do not place burning candles on the housing of the appliance.
• This appliance can be used in tropical or moderate climatic conditions.
• At the end of the useful life of the appliance, remove the batteries and put them in a special
container for recycling.
IN ORDER TO DELIVER THE BEST QUALITY, THE SPECIFICATION OF THE UNIT MIGHT
CHANGE WITHOUT SUBJECT OF NOTICE
SERVICE LIFE OF THE UNIT NOT LESS 5 YEARS
13

ÂÂÅÄÅÍÈÅ
Ñïàñèáî çà ïîêóïêó ýòîãî èçäåëèÿ.
Ïîæàëóéñòà, ïîëíîñòüþ ïðî÷èòàéòå ýòè èíñòðóêöèè ïî ýêñïëóàòàöèè, äëÿ
òîãî ÷òîáû Âû çíàëè êàê ïðàâèëüíî ðàáîòàòü ñ Âàøåé àïïàðàòóðîé. Ïîñëå
îçíàêîìëåíèÿ ñ äàííîé èíñòðóêöèåé, óáåðèòå åå â íàäåæíîå ìåñòî, òàê ÷òîáû
â äàëüíåéøåì ê íåé ìîæíî áûëî áû ñíîâà îáðàòèòüñÿ.
ÏÐÅÄÎÑÒÅÐÅÆÅÍÈÅ
• Äëÿ èçáåæàíèÿ âîñïëàìåíåíèÿ èëè ðèñêà ïîðàæåíèÿ ýëåêòðè÷åñêèì òîêîì,
íå ïîäâåðãàéòå ýòî óñòðîéñòâî âîçäåéñòâèþ äîæäÿ èëè âëàãè. ×òîáû
èçáåæàòü ïîðàæåíèÿ ýëåêòðè÷åñêèì òîêîì íå îòêðûâàéòå êîðïóñ, ïî
âîïðîñàì ðåìîíòà îáðàùàéòåñü òîëüêî ê êâàëèôèöèðîâàííûì
ñïåöèàëèñòàì.
• Èñïîëüçîâàíèå ðåãóëÿòîðîâ, íàñòðîåê èëè âûïîëíåíèå ïðîöåäóð îòëè÷íûõ
îò òåõ, êîòîðûå îïèñàíû â äàííîé èíñòðóêöèè, ìîãóò ïðèâåñòè ê îïàñíîìó
îáëó÷åíèþ ëàçåðíûì èçëó÷åíèåì.
• ÂÎÇÌÎÆÍÎ ÎÁËÓ×ÅÍÈÅ ÍÅÂÈÄÈÌÛÌ ËÀÇÅÐÍÛÌ ÈÇËÓ×ÅÍÈÅÌ Â
ÑËÓ×ÀÅ ÎÒÊÐÛÒÈß ÑÈÑÒÅÌÛ ÈËÈ ÏÎËÎÌÊÈ ÈËÈ ÑÁÎß ÄÅÉÑÒÂÈß
ÁËÎÊÈÐÎÂÊÈ. ÈÇÁÅÃÀÉÒÅ ÍÅÏÎÑÐÅÄÑÒÂÅÍÍÎÃÎ ÊÎÍÒÀÊÒÀ Ñ
ËÀÇÅÐÍÛÌ ËÓ×ÎÌ.
ËÀÇÅÐÍÎÅ ÓÑÒÐÎÉÑÒÂÎ ÊËÀÑÑÀ 1
Ýòîò ïëååð êîìïàêò äèñêîâ êëàññèôèöèðóåòñÿ êàê
ËÀÇÅÐÍÎÅ ÓÑÒÐÎÉÑÒÂÎ ÊËÀÑÑÀ 1
Ýòèêåòêà "ËÀÇÅÐÍÎÅ ÓÑÒÐÎÉÑÒÂÎ ÊËÀÑÑÀ 1"
ðàçìåùàåòñÿ íà çàäíåé ïàíåëè óñòðîéñòâà.
ÇÀÌÅ×ÀÍÈÅ: Èçãîòîâèòåëü íå íåñåò îòâåòñòâåííîñòè çà ïîìåõè äëÿ ðàäèî
èëè òåëåâèçîðà âîçíèêàþùèå â ðåçóëüòàòå òåõíè÷åñêèõ èçìåíåíèé
ñäåëàííûõ ïîëüçîâàòåëåì â ýòîì óñòðîéñòâå. Ïðè ðàáîòå ñ óñòðîéñòâîì
ñëåäóåò èçáåãàòü äåëàòü êàêèå-ëèáî òåõíè÷åñêèå èçìåíåíèÿ íå âõîäÿùèå â
êîìïåòåíöèþ ïîëüçîâàòåëÿ.
14
ÐÓÑÑÊÈÉ
CLASS 1 LASER PRODUCT
LUOKAN 1 LASERLAITE
CLASS 1 LASERAPPARAT

ÐÀÑÏÎËÎÆÅÍÈÅ ÎÐÃÀÍÎÂ ÓÏÐÀÂËÅÍÈß
15
ÐÓÑÑÊÈÉ
1. Äèíàìèêè Â× (Ëåâûé & Ïðàâûé)
2. Êíîïêà POWER (“Ïèòàíèå”)
3. Ðàçúåì äëÿ íàóøíèêîâ
4. Êíîïêà BASS BOOST (“Óñèëåíèå áàñà”)
5. Êíîïêè VOLUME UP/DOWN
(“Óâåëè÷åíèå/óìåíüøåíèå ãðîìêîñòè”)
6. Ïåðåêëþ÷àòåëü ðåæèìîâ ðàáîòû
7. Êëàâèøà PAUSE (“Ïàóçà”)
8. Êëàâèøà STOP/EJECT
(“Ñòîï/Îòêðûòü ïîäêàññåòíèê”)
9. Êëàâèøà FAST FOWARD
(“Ïåðåìîòêà âïåðåä”)
10.Ïåðåêëþ÷àòåëü BAND (“Äèàïàçîí”)
11.Êëàâèøà REWIND (“Ïåðåìîòêà íàçàä”)
12.Êëàâèøà PLAY (“Âîñïðîèçâåäåíèå”)
13.Êëàâèøà RECORD (“Çàïèñü”)
14.Êíîïêà îòêðûòèÿ êðûøêè CD
15.Ðó÷êà TUNING (“Ïîèñê ðàäèî÷àñòîòû”)
16.Êíîïêà SKIP/SEARCH DOWN
(“Ïåðåõîä/ïîèñê âíèç”)
17.Êíîïêà STOP (“Ñòîï”)
18.Êíîïêà PLAY/PAUSE
(“Âîñïðîèçâåäåíèå/ïàóçà”)
19.Êíîïêà SKIP/SEARCH UP
(“Ïåðåõîä/ïîèñê ââåðõ”)
20.Êíîïêà PBC
(“Óïðàâëåíèå âîñïðîèçâåäåíèåì”)
21.Êíîïêà P/N (“PAL/NTSC”)
22.Êðûøêà îòñåêà CD
23.Òåëåñêîïè÷åñêàÿ àíòåííà
24.Ðó÷êà äëÿ ïåðåíîñêè
25.Èíäèêàòîð STANDBY/POWER
(“Ðåæèì îæèäàíèÿ/ñåòü”)
26.Äàò÷èê ïóëüòà ÄÓ
27.Èíäèêàòîð FM STEREO (“FM ñòåðåî”)
28.Ðàçúåìû àóäèî âûõîäà
( òîëüêî äëÿ âîñïðîèçâåäåíèÿ
VCD/CD/MP3)
29.Äèíàìèêè (Ëåâûé/Ïðàâûé)
30.Øêàëà íàñòðîéêè ðàäèî
31.ÆÊ-äèñïëåé
32.Îòñåê äëÿ áàòàðååê
33.Ðàçúåì äëÿ ïîäêëþ÷åíèÿ ñåòåâîãî
øíóðà
34.Âñòðîåííûé ìèêðîôîí
35.Ðàçúåì âèäåîâûõîäà
(òîëüêî äëÿ âîñïðîèçâåäåíèÿ
VCD/CD/MP3)
36.Ïåðåêëþ÷àòåëü ñåòåâîãî íàïðÿæåíèÿ
37.Ðàçúåì äëÿ âíåøíåãî ìèêðîôîíà

ÏÓËÜÒ ÄÈÑÒÀÍÖÈÎÍÍÎÃÎ ÓÏÐÀÂËÅÍÈß
ÈÑÒÎ×ÍÈÊ ÏÈÒÀÍÈß (ÑÈÑÒÅÌÀ Ñ 2-Ìß ÈÑÒÎ×ÍÈÊÀÌÈ ÏÈÒÀÍÈß)
Ýòî óñòðîéñòâî ïðåäíàçíà÷åíî äëÿ ðàáîòû îò äâóõ ðàçëè÷íûõ èñòî÷íèêîâ ïèòàíèÿ, êîòîðûå
ïåðå÷èñëåíû íèæå:
ÐÀÁÎÒÀ ÎÒ ÏÎÑÒÎßÍÍÎÃÎ ÒÎÊÀ
Ýòîò àïïàðàò ðàáîòàåò îò 8 áàòàðååê òèïà "UM2" èëè "C". Äëÿ íàèëó÷øåé ýôôåêòèâíîñòè âñåãäà
èñïîëüçóéòå "àëêàëèíîâûå" áàòàðåéêè.
ÐÀÁÎÒÀ ÎÒ ÁÀÒÀÐÅÅÊ
1. Ñíèìèòå êðûøêó îòñåêà áàòàðååê, ñëåãêà íàæàâ íà íåå è ïîòÿíóâ íàðóæó.
Âñòàâüòå 8 øòóê áàòàðååê òèïà "UM2" èëè "C".
ÓÁÅÄÈÒÅÑÜ, ×ÒÎ ÁÀÒÀÐÅÉÊÈ ÐÀÇÌÅÙÅÍÛ Â ÑÎÎÒÂÅÒÑÒÂÈÈ Ñ ÏÎËßÐÍÎÑÒÜÞ,
ÎÒÎÁÐÀÆÅÍÍÎÉ ÍÀ ÂÍÓÒÐÅÍÍÅÉ ÑÒÎÐÎÍÅ ÎÒÑÅÊÀ.
2. Çàêðîéòå êðûøêó.
ÂÍÈÌÀÍÈÅ! Äëÿ èçáåæàíèÿ ïîâðåæäåíèÿ Âàøåãî óñòðîéñòâà, èçâëåêèòå áàòàðåéêè, åñëè
óñòðîéñòâî íå áóäåò èñïîëüçîâàòüñÿ òå÷åíèå äëèòåëüíîãî âðåìåíè èëè åñëè áàòàðåéêè
ðàçðÿäèëèñü.
ÏÐÈÌÅ×ÀÍÈÅ: Äëÿ èñïîëüçîâàíèÿ óñòðîéñòâà ñ ïèòàíèåì íà áàòàðåéêàõ, èçâëåêèòå ñåòåâîé
øíóð, êàê èç ñåòåâîé ðîçåòêè, òàê è èç çàäíåé ïàíåëè àïïàðàòà.
ÐÀÁÎÒÀ ÎÒ ÑÅÒÈ ÏÅÐÅÌÅÍÍÎÃÎ ÒÎÊÀ
Âñòàâüòå îäèí êîíåö ñåòåâîãî øíóðà â ðàçúåì äëÿ ïîäêëþ÷åíèÿ ñåòåâîãî øíóðà (33), à äðóãîé
åãî êîíåö â ðîçåòêó ñåòè ïåðåìåííîãî òîêà.
16
ÐÓÑÑÊÈÉ
38.Êíîïêà âêëþ÷åíèÿ ïèòàíèÿ
39.Êíîïêà îòêëþ÷åíèÿ çâóêà
40.Êíîïêà PBC
(“Óïðàâëåíèå âîñïðîèçâåäåíèåì”)
41.Êíîïêà P/N (“PAL/NTSC”)
42.Êíîïêà OSD (“Ýêðàííîå ìåíþ”)
43.Êíîïêà REPEAT À-Â (“Ïîâòîð îòðåçêà A-B”)
44.Êíîïêà REPEAT 1/ ALL (“Ïîâòîð 1/Âñå”)
45.Êíîïêà PROGRAM (“Ïðîãðàììà”)
46.Êíîïêà ZOOM (“Ìàñøòàáèðîâàíèå”)
47.Êíîïêà STEP (“Øàã”)
48.Êíîïêà VOLUME DOWN
(“Óìåíüøåíèå ãðîìêîñòè”)
49.Êíîïêà PLAY/PAUSE
(“Âîñïðîèçâåäåíèå/Ïàóçà”)
50.Êíîïêà PREV (“Íàçàä”)
51.Êðûøêà îòñåêà äëÿ áàòàðååê
52.Êíîïêà MODE (“Ðåæèì”)
53.Êíîïêà ïîíèæåíèÿ òîíà
54.Êíîïêà âîññòàíîâëåíèÿ òîíà
55.Êíîïêà ïîâûøåíèÿ òîíà
56.Êíîïêà TIME (“Âðåìÿ”)
57.Êíîïêà RETURN/STOP (“Âîçâðàò/Ñòîï”)
58.Êíîïêà NEXT (“Ñëåäóþùèé”)
59.Êíîïêà VOLUME UP
(“Óâåëè÷åíèå ãðîìêîñòè”)
60.Êíîïêà SLOW (“Ìåäëåííî”)
61.Êíîïêà SOUND (“Çâóêîâûå ýôôåêòû”) 62.Êíîïêà AUDIO (“Àóäèî”)
63.Êíîïêè íàáîðà öèôð

ÏÐÈÌÅ×ÀÍÈÅ: Äëÿ óñòðîéñòâà îáîðóäîâàííîãî ïåðåêëþ÷àòåëåì âõîäíîãî íàïðÿæåíèÿ
óáåäèòåñü, ÷òî îí óñòàíîâëåí íà íàïðÿæåíèå, ñîîòâåòñòâóþùåå íàïðÿæåíèþ ìåñòíîé ñåòè.
ÐÀÁÎÒÀ ÎÐÃÀÍÎÂ ÓÏÐÀÂËÅÍÈß È ÔÓÍÊÖÈÈ
ÏÎÄÊËÞ×ÅÍÈÅ ÓÑÒÐÎÉÑÒÂÀ Ê ÒÅËÅÂÈÇÎÐÓ
1. Äëÿ ïîäêëþ÷åíèÿ óñòðîéñòâà ê òåëåâèçîðó ÷åðåç ðàçúåì òèïà SCART íåîáõîäèìî
èñïîëüçîâàòü ïåðåõîäíèê îò RCA ê SCART. Òàêîé ïåðåõîäíèê ìîæíî ïðèîáðåñòè ó ïðîäàâöà
àóäèî-âèäåî-òåõíèêè.
2. Äëÿ ïîääåðæêè äèñêîâ â ñèñòåìå NTSC ýòîò àïïàðàò íåîáõîäèìî ïîäêëþ÷àòü ê ìóëüòè-
ñèñòåìíîìó èëè NTSC òåëåâèçîðó.
3. Ïåðåä ïîäêëþ÷åíèåì ê òåëåâèçîðó óáåäèòåñü, ÷òî ýòîò àïïàðàò âûêëþ÷åí, à ñåòåâîé øíóð
îòêëþ÷åí îò ñåòåâîé ðîçåòêè.
4. Íå çàêðûâàéòå âåíòèëÿöèîííûå îòâåðñòèÿ íè íà îäíîì èç óñòðîéñòâ è ðàñïîëàãàéòå èõ òàê,
÷òîáû âîçäóõ ìîã ñâîáîäíî öèðêóëèðîâàòü.
5. Ïåðåä ïîäêëþ÷åíèåì àïïàðàòà ê äðóãîìó óñòðîéñòâó ïîëíîñòüþ îçíàêîìüòåñü ñ
ïðèëîæåííîé ê íåìó èíñòðóêöèåé.
6. Ïðè ïîäêëþ÷åíèè àóäèî/âèäåî êàáåëåé ñîáëþäàéòå öâåòîâóþ êîäèðîâêó.
7. Âî âðåìÿ âîñïðîèçâåäåíèÿ ãðîìêîñòü ó òåëåâèçîðà ìîæåò áûòü ìåíüøå ÷åì ïðè ïðèåìå
òåëåïåðåäà÷.  òàêîì ñëó÷àå óñòàíîâèòå ãðîìêîñòü íà íóæíûé óðîâåíü.
8. Äëÿ ïðàâèëüíîãî ïîäêëþ÷åíèÿ óñòðîéñòâà ê òåëåâèçîðó ñ ïîìîùüþ àóäèî/âèäåîêàáåëÿ RCA
(òþëüïàí) ñëåäóéòå íèæåïðèâåäåííîé ñõåìå ïîäêëþ÷åíèÿ.
ÏÐÈÌÅ×ÀÍÈÅ:  ñëó÷àå íåïðàâèëüíîãî ïîäêëþ÷åíèÿ àïïàðàòà ê òåëåâèçîðó àóäèî/âèäåî
ìîãóò îòñóòñòâîâàòü.  òàêîì ñëó÷àå îòêëþ÷èòå ñåòåâîå ïèòàíèå, ïðîâåðüòå âñå ñîåäèíåíèÿ,
ïîñëå ÷åãî ñíîâà âêëþ÷èòå ñåòåâîå ïèòàíèå.
17
ÐÓÑÑÊÈÉ

ÆÈÄÊÎÊÐÈÑÒÀËËÈ×ÅÑÊÈÉ ÄÈÑÏËÅÉ (31)
ÂÎÑÏÐÎÈÇÂÅÄÅÍÈÅ ÄÈÑÊÎÂ VCD
1. Âêëþ÷èòå òåëåâèçîð.
2. Íàæìèòå íà êíîïêó POWER (2), çàãîðèòñÿ èíäèêàòîð STANDBY/POWER (25).
3. Äëÿ îòêðûòèÿ êðûøêè îòñåêà CD (22) íàæìèòå êíîïêó îòêðûòèÿ êðûøêè îòñåêà CD (14).
4. Óñòàíîâèòå äèñê â îòñåê CD ýòèêåòêîé ââåðõ, óäåðæèâàÿ åãî çà êðàÿ.
5. Ïîñëå çàêðûòèÿ êðûøêè îòñåêà CD (22) ïðîèçîéäåò ñ÷èòûâàíèå è âîñïðîèçâåäåíèå äèñêà.
6. Íàæàòèåì íà êíîïêè íàáîðà öèôð (63) âûáåðåòå æåëàåìûé òðåê.
7. Äëÿ îñòàíîâêè èëè ïàóçû âîñïðîèçâåäåíèÿ íàæìèòå íà êíîïêó STOP (17) èëè PLAY/PUSE (18).
ÊÍÎÏÊÀ BC (20)
1. Âî âðåìÿ âîñïðîèçâåäåíèÿ VCD äèñêà ñòàíäàðòà 2.0 íàæìèòå íà êíîïêó PBC (20) îäèí ðàç -
äëÿ îòîáðàæåíèÿ íà ýêðàíå òåëåâèçîðà ìåíþ äèñêà, äâà ðàçà - äëÿ âêëþ÷åíèÿ ôóíêöèè
ñêàíèðîâàíèÿ äèñêà (ðåæèì 9 êàðòèíîê), òðè ðàçà - äëÿ âûêëþ÷åíèÿ ôóíêöèè PBC.
2. Ïðè âîñïðîèçâåäåíèè MP3 äèñêîâ íàæìèòå íà êíîïêó PBC îäèí ðàç - äëÿ ïîâòîðà
âîñïðîèçâåäåíèÿ îäíîãî òðåêà, äâà ðàçà - äëÿ ïîâòîðà âîñïðîèçâåäåíèÿ îäíîé ïàïêè, òðè ðàçà
- äëÿ ïîâòîðà âîñïðîèçâåäåíèå âñåõ òðåêîâ äèñêà, ÷åòûðå ðàçà - äëÿ âûêëþ÷åíèÿ ôóíêöèè
REPEAT.
3. Ïðè âîñïðîèçâåäåíèè CD íàæìèòå íà êíîïêó PBC îäèí ðàç - äëÿ ïîâòîðà âîñïðîèçâåäåíèÿ
îäíîãî òðåêà, äâà ðàçà - äëÿ ïîâòîðà âîñïðîèçâåäåíèÿ âñåõ òðåêîâ äèñêà, òðè ðàçà - äëÿ
âûêëþ÷åíèÿ ôóíêöèè REPEAT.
ÏÐÈÌÅ×ÀÍÈÅ: Ïðè âîñïðîèçâåäåíèè VCD2.0 äèñêà ñ âêëþ÷åííîé ôóíêöèåé PBC êíîïêà STOP
18
ÐÓÑÑÊÈÉ
1. Îòîáðàæàåò ïðîèãðûâàíèå äèñêîâ CD è VCD.
2. Îòîáðàæàåò âêëþ÷åíèå ôóíêöèè REPEAT
âñåõ òðåêîâ.
3. Îòîáðàæàåò ïîðÿäêîâûé íîìåð
âîñïðîèçâîäèìîãî òðåêà èëè îáùåå ÷èñëî
òðåêîâ íà äèñêå.
4. Îòîáðàæàåò âêëþ÷åíèå ôóíêöèè REPEAT.
5. Îòîáðàæàåò âêëþ÷åíèå ôóíêöèè
REPEAT A-B.
6. Îòîáðàæàåò âðåìÿ âîñïðîèçâîäèìîãî òðåêà
â ìèíóòàõ.
7. Îòîáðàæàåò âêëþ÷åíèå ôóíêöèè REPEAT
îäíîãî òðåêà.
8. Îòîáðàæàåò âðåìÿ âîñïðîèçâîäèìîãî
òðåêà â ñåêóíäàõ.
9. Îòîáðàæàåò âêëþ÷åíèå ôóíêöèè
PROGRAM.
10.Îòîáðàæàåò âêëþ÷åíèå ðåæèìà PBC äëÿ
äèñêîâ VCD âåðñèè 2.0.
11.Îòîáðàæàåò ðåæèì MP3 ïðè
ïðîèãðûâàíèè äèñêîâ ôîðìàòà MP3.
12.Îòîáðàæàåò âêëþ÷åíèå ôóíêöèè
RANDOM.
13.Îòîáðàæàåò âêëþ÷åíèå ôóíêöèè INTRO.

(17)/(57), ïðè îäíîêðàòíîì íàæàòèè, ôóíêöèîíèðóåò êàê êíîïêà RETURN. Äëÿ îñòàíîâêè
âîñïðîèçâåäåíèÿ VDC ñ âêëþ÷åííîé ôóíêöèåé PBC íàæìèòå íà êíîïêó STOP (17)/(57) äâà ðàçà.
ÊÍÎÏÊÀ /N (21)
1.  ðåæèìàõ VCD/MP3/CD íàæèìàéòå íà êíîïêó P/N (21) äëÿ ïîñëåäîâàòåëüíîãî ïåðåêëþ÷åíèÿ
âûõîäíîãî âèäåî ñèãíàëà ñèñòåì öâåòíîñòè NTSC è PAL.
2.  ðåæèìå îñòàíîâêè íàæìèòå íà êíîïêó P/N (21) îäèí ðàç äëÿ âêëþ÷åíèÿ ðåæèìà
ïðîãðàììèðîâàíèÿ òðåêîâ ïðè ýòîì íà ýêðàíå òåëåâèçîðà ïîÿâèòñÿ íàäïèñü "PROG TRK".
Âûáåðèòå íóæíûé òðåê íàæàòèåì íà êíîïêó SKIP/SEARCH DOWN (16)/(50) èëè SKIP/SEARCH UP
(19)/(58) ïîñëå ÷åãî íàæèìàéòå íà êíîïêó P/N (21)/(45) äëÿ âíåñåíèÿ êàæäîãî èç âûáðàííûõ
òðåêîâ â ïàìÿòü. Äëÿ ïðîäîëæåíèÿ ïðîöåäóðû ïðîãðàììèðîâàíèÿ íàæèìàéòå íà êíîïêó
SKIP/SEARCH DOWN (16)/(50) èëè SKIP/SEARCH UP (19)/(58).
Ïî îêîí÷àíèè ïðîãðàììèðîâàíèÿ íàæìèòå íà êíîïêó PLAY/PAUSE (18)/(49) äëÿ íà÷àëà
âîñïðîèçâåäåíèÿ çàïðîãðàììèðîâàííûõ òðåêîâ (âîçìîæíî ïðîãðàììèðîâàíèå íå áîëåå 20
òðåêîâ).
ÊÍÎÏÊÀ SKI /SEARCH U (19)
1. Ïðè îäíîêðàòíîì íàæàòèè íà êíîïêó SKIP/SEARCH UP (19) â ðåæèìå ìåíþ VCD2.0, ìåíþ íà
ýêðàíå ïåðåìåñòèòñÿ âïåðåä.
2. Â ðåæèìå âîñïðîèçâåäåíèÿ VCD èëè CD/MP3 íàæìèòå ýòó êíîïêó äëÿ âûáîðà
âîñïðîèçâåäåíèÿ òðåêà íàõîäÿùåãîñÿ âïåðåäè òåêóùåãî.
3.  ðåæèìå âîñïðîèçâåäåíèÿ VCD èëè CD/MP3 íàæìèòå è óäåðæèâàéòå ýòó êíîïêó â òå÷åíèå íå
ìåíåå 0,5 ñåêóíäû äëÿ âûáîðà îäíîãî èç ÷åòûðåõ ñêîðîñòíûõ ðåæèìîâ áûñòðîãî ïåðåìåùåíèÿ
ïî òðåêó âïåðåä. Ñ êàæäûì íàæàòèåì è óäåðæèâàíèåì êíîïêè SKIP/SEARCH UP (19) â òå÷åíèå íå
ìåíåå 0.5 ñåêóíä ïðîèãðûâàòåëü ïåðåéäåò â î÷åðåäíîé ñêîðîñòíîé ðåæèì ïåðåìåùåíèÿ ïî
òðåêó âïåðåä.
ÊÍÎÏÊÀ SKI /SEARCH DOWN (16)
1. Ïðè îäíîêðàòíîì íàæàòèè íà êíîïêó SKIP/SEARCH UP (19) â ðåæèìå ìåíþ VCD2.0, ìåíþ íà
ýêðàíå ïåðåìåñòèòñÿ íàçàä.
2. Â ðåæèìå âîñïðîèçâåäåíèÿ VCD èëè CD/MP3 íàæìèòå ýòó êíîïêó äëÿ âûáîðà
âîñïðîèçâåäåíèÿ òðåêà íàõîäÿùåãîñÿ ïîçàäè òåêóùåãî.
3.  ðåæèìå âîñïðîèçâåäåíèÿ VCD èëè CD/MP3 íàæìèòå è óäåðæèâàéòå ýòó êíîïêó â òå÷åíèå íå
ìåíåå 0,5 ñåêóíäû äëÿ âûáîðà îäíîãî èç ÷åòûðåõ ñêîðîñòíûõ ðåæèìîâ áûñòðîãî ïåðåìåùåíèÿ
ïî òðåêó íàçàä. Ñ êàæäûì íàæàòèåì è óäåðæèâàíèåì êíîïêè SKIP/SEARCH UP (19) â òå÷åíèå íå
ìåíåå 0.5 ñåêóíä ïðîèãðûâàòåëü ïåðåéäåò â î÷åðåäíîé ñêîðîñòíîé ðåæèì ïåðåìåùåíèÿ ïî
òðåêó íàçàä.
ÊÍÎÏÊÀ /N (41) ÍÀ ÏÓËÜÒÅ ÄÓ
 ðåæèìàõ VCD/MP3/CD íàæèìàéòå íà êíîïêó P/N (41) äëÿ ïîñëåäîâàòåëüíîãî ïåðåêëþ÷åíèÿ
âûõîäíîãî âèäåî ñèãíàëà ñèñòåì öâåòíîñòè NTSC è PAL.
ÊÍÎÏÊÀ OSD (42) ÍÀ ÏÓËÜÒÅ ÄÓ
 ðåæèìå âîñïðîèçâåäåíèÿ VCD/MP3/CD äèñêîâ íàæìèòå íà êíîïêó OSD (42) îäèí ðàç - äëÿ
îòîáðàæåíèÿ íà ýêðàíå òåëåâèçîðà è ÆÊ-äèñïëåå (31) òåêóùåãî âðåìåíè âîñïðîèçâîäèìîãî
òðåêà, äâà ðàçà - äëÿ îòîáðàæåíèÿ íà ýêðàíå òåëåâèçîðà è ÆÊ-äèñïëåÿ (31) îñòàâøåãîñÿ
âðåìåíè âîñïðîèçâîäèìîãî òðåêà, òðè ðàçà - äëÿ îòîáðàæåíèÿ îñòàâøåãîñÿ âðåìåíè
âîñïðîèçâåäåíèÿ âñåãî äèñêà, ÷åòûðå ðàçà - äëÿ îòîáðàæåíèÿ òåêóùåãî âðåìåíè
âîñïðîèçâîäèìîãî òðåêà òîëüêî íà ÆÊ-äèñïëåå.
ÏÐÈÌÅ×ÀÍÈÅ:  ðåæèìå âîñïðîèçâåäåíèÿ MP3 íà ýêðàíå òåëåâèçîðà è ÆÊ-äèñïëåÿ (31)
îòîáðàæàþòñÿ òîëüêî òåêóùåå âðåìÿ âîñïðîèçâîäèìîãî òðåêà è îñòàâøååñÿ âðåìÿ
âîñïðîèçâåäåíèÿ âñåãî äèñêà.
19
ÐÓÑÑÊÈÉ
Table of contents
Other Vitek Cassette Player manuals

Vitek
Vitek VT-3310 User manual

Vitek
Vitek VT3470 GY User manual

Vitek
Vitek VT-3458 User manual

Vitek
Vitek VT3470 GY User manual

Vitek
Vitek VT-3303 User manual

Vitek
Vitek VT-3223 User manual

Vitek
Vitek VT-3230 User manual

Vitek
Vitek VT-3304 User manual

Vitek
Vitek VT-3209 User manual

Vitek
Vitek VT-3211 User manual

Vitek
Vitek VT-3966B User manual

Vitek
Vitek VT-3404 User manual

Vitek
Vitek VT-3750 User manual

Vitek
Vitek VT-3750 User manual

Vitek
Vitek VT-3210 User manual

Vitek
Vitek VT3473 GY User manual

Vitek
Vitek VT-3207 User manual

Vitek
Vitek VT-3206 User manual

Vitek
Vitek VT-3455 User manual

Vitek
Vitek VT3470 GY User manual