Vitek VT-3966B User manual

UZ
4
15
27
39
52
3966IM.indd 1 07.07.2008 15:40:48

Pic. 1
3966IM.indd 2 07.07.2008 15:40:48

Pic. 2
3966IM.indd 3 07.07.2008 15:40:48

Please read these instructions carefully before connecting, operating or adjusting the appliance.
Follow all warnings and operating recommendations in this manual.
Keep this manual for future reference.
Warning: To prevent fire or shock hazard do not expose the appliance to rain or moisture.
To prevent shock hazard do not remove the cover yourself.
Apply to a service centre for repair and maintenance.
This lightning flash with arrowhead symbol, within an equilateral triangle, is
intended to alert the user to the presence of uninsulated “dangerous voltage”
within the product’s enclosure that may be of sufficient magnitude to constitute
a risk of electric shock to human beings.
The exclamation point within an equilateral triangle is intended to alert the user
to the presence of important operating and maintenance (servicing) instruc-
tions in the manual accompanying the appliance.
This appliance is classified as Class Laser Product. The corresponding mark is on the rear panel of
the appliance and it means that the appliance employs a beam system. Do not attempt to disassem-
ble the appliance. REFER TO QUALIFIED SERVICE PERSONNEL FOR REPAIR.
Connect this appliance to the 230 V and 50 Hz power source. Make sure that your home electricity
supply corresponds to the voltage specified on the appliance.
The apparatus shall not be exposed to dripping or splashing. No object filled with liquid, such as
vase, shall be placed on the apparatus.
Where the mains plug or an appliance coupler is used as the disconnect device, the disconnect de-
vice shall remain operable.
To prevent fire or shock hazard do not use this appliance near water, for example near a bath tub,
wash bowl, kitchen sink or washing machines, in a wet basement, or near a swimming pool, a cellar
with high humidity and such like places. Prevent the appliance from dripping and splashing. Do not
place objects filled with water for example vases on the appliance.
Do not overload wall outlets or extension cords as this can result in a risk of fire or electric shock.
Place the appliance in a way that you could easily pull out the plug from the socket if there are some
damages. Power-supply cords outside the appliance should not be strained, they should be routed
so that they are not likely to be walked on or pinched by items placed upon or against them, pay
particular attention to cords at plugs, convenience receptacles, and the point where they exit from
the appliance.
3966IM.indd 4 07.07.2008 15:40:48

5
Use only the extenders approved by the manu-
facturer otherwise it can be dangerous.
For additional protection during lighting and in
cases when you are not going to use the appli-
ance for a long time, unplug the appliance. It will
prevent the appliance from failure during light-
ing and power surges.
To unplug the appliance, do not pull by the cord,
hold it by the plug..
Install the appliance in places with proper ven-
tilation.
If you place the appliance on a bed, sofa or a
rug watch over the slots and openings in the
case, because they are provided for ventilation
to ensure reliable operation of the appliance and
to protect it from overheating.
The appliance should be placed far enough
from heat sources such as radiators, heaters,
stoves, or other devices (including amplifiers)
that produce heat. Do not expose the appliance
to direct sunlight, excessive dust or mechanical
shocks.
Provide that no foreign objects get into open-
ings of the appliance, it can lead to fire. If it
happens unplug the appliance and apply to the
service centre.
Unplug this appliance from the wall outlet and
refer servicing to qualified service personnel
under the following conditions:
a) When the power supply cord or plug is
damaged.
b) There are foreign objects inside the
appliance.
c) If the appliance has been exposed to rain or
water.
d) If the appliance does not operate normally
by following the operating instructions.
e) If the appliance has been dropped or its
cabinet has been damaged.
f) If the appliance exhibits a distinct change in
performance it indicates a need for service.
Unplug this appliance from the wall outlet before
cleaning. Use a damp cloth for cleaning. Do
not use liquid cleaners or aerosol cleaners.
Do not use cracked or deformed discs, it can
damage the appliance.
Hold the disc by the edges. Do not touch the
surface of the disk. Dust, scratches or finger-
prints on the surface may lead to a failure of the
appliance.
Protect the discs from direct sunlight; keep
them away from heat sources, high temperature
and moisture.
After usage, put the disc in the case for storage.
Wipe periodically the surface of the discs with a
soft cloth from the center to the edges. Do not
use detergents.
Cassette recorder (Pic. )
. Discs compartment
2. FM antenna
3. 3D SURROUND button
, 5.PRESET/FOLDER and buttons
6. REPEAT/MONO-ST button
7. RANDOM button
8. EQ/BBS button
9. VOLUME button
0. VOLUME button
. MUTE button
2. POWER button
3. FUNCTION button
. BAND button
5. cassette PAUSE button
6. cassette STOP/EJECT button
7. F.FWD cassette fast forward button
8. REW rewind button
9. cassette PLAY button
20. RECORD button
2. disk PLAY/PAUSE button
22. LCD display
23. STANDBY indication
2. STOP button
25. Right speaker
26. Left speaker
27. TIMER/SLEEP button
28. MODE button
29. SKIP/TUNING button
30. SKIP/TUNING button
3. ID3 button
32. MEMORY/CLK-ADJ button
33. Cassette deck
3. Stereo earphone jack
35. Power supply jack
36. Main battery compartment lid
3966IM.indd 5 07.07.2008 15:40:48

6
37. Additional battery compartment lid (reserve
supply for memory support)
38. Remote control SENSOR
39. USB jack
0. SD/MMC card jack
. STANDBY button
During operation press the STANDBY
button. The cassette recorder will switch to
the standby mode. The STANDBY indication
will light up.
To return to normal playback press the
STANDBY button once again.
2. FUNC button
3. BAND button
. REPEAT/MONO ST button
5. TIMER/SLEEP button
6. SKIP TUNING button
7. PLAY/PAUSE button
8. STOP button
9. MUTE button
a. Press the button to mute sound.
b. Press the button again to cancel the mute
mode.
0. RANDOM button
. SKIP TUNING button
2. VOLUME button
3. VOLUME button
. IR emitter
5. Battery compartment lid
Before connecting the appliance, make sure
that your home electricity supply corresponds to
the voltage specified on the appliance.
. To connect the appliance, insert one end of
the power cord in the jack (35, pic. ) and
the other one – in the socket. The STANDBY
indication will light up.
2. To switch on the appliance press the
POWER button.
Note: Static electricity can lead to interferences
in the operation of the appliance. In this case
disconnect the appliance, and then connect
again. If the problem does not disappear, apply
to the service center.
. Disconnect the cassette recorder.
2. Open the main battery compartment lid
(36, pic. ) on the rear of the appliance, by
pressing two catches following the arrow.
3. Open the additional battery compartment
lid (37, pic.). Insert 3 UM-3/AA batteries
(not supplied) in the battery compartment to
support memory of the appliance. Close the
battery compartment lid (37, pic. ).
Insert 8 UM-/D batteries (not supplied) in
the main battery compartment.
. Close the battery compartment lid
(36, pic. ).
Insert 2 UM-/АAA batteries (not supplied) in
the battery compartment of the remote control.
When using the remote control direct it to infra-
red SENSOR on the cassette recorder. Effective
distance of the remote control is about 5 me-
ters, if it decreases very much, check the bat-
teries and replace them if necessary.
Functions of the remote control buttons are
similar to those on the cassette recorder. Some
buttons perform two functions, depending on
the mode selected: disc playback mode or radio
mode.
Do not expose the remote control to high tem-
perature and direct sunlight; it can influence the
operation of the appliance.
Battery leakage can lead to injuries and dam-
ages of the appliance. To avoid damages of
batteries follow the instructions below:
- Place the batteries properly, following the
polarity marked inside the appliance.
- Do not use old and new batteries or
batteries of different types together.
- Take the batteries out if you are not going to
use the appliance for a long time.
You can set time when the cassette recorder is
in the standby mode.
. Press the MEMORY/CLK-ADJ button once.
Time indication will start flashing on the
LCD display. Use the SKIP TUNING or
button to adjust hours.
2. Press the MEMORY/CLK-ADJ button once
3966IM.indd 6 07.07.2008 15:40:48

7
again. Minutes indication will start flashing on the LCD display. Use the SKIP TUNING or
button to adjust minutes.
Note: When the appliance is disconnected or battery charge of reserve supply is low, current time
indications will be reset. When power is supplied again, time indication will be constantly
flashing. In this case you will need to set time again.
You can adjust your cassette recorder so that the alarm will switch on and automatically switch off at
preset time every day. You can use a disc, radio, a cassette, USB and SD/MMC devices as a sound
signal.
Note: if a cassette is chosen as a sound source, press the PLAY button at first (9, pic. ).
. Alarm switching on time.
In the current time mode press the MODE button once. The “ON TIME” indication will appear on
the LCD display, and the “TIMER” indication will be constantly flashing.
Set the time for the alarm to switch on, as described in the TIME SETTING chapter.
2. Setting the time of switching off the alarm.
Press the MODE button once again. The “OFF TIME” indication will appear on the LCD display,
and the “TIMER” indication will be constantly flashing.
Set the time for the alarm to switch off, as described in the TIME SETTING chapter.
3. Sound source setting.
Press the MODE button again. The current mode will appear on the LCD display (for instance:
TUNER).
Press the MEMORY/CLK-ADJ button first, then select the sound source, successively pressing the
SKIP TUNING or button.
. Alarm volume setting.
Press the MODE button again. The previous volume level will appear on the LCD display (for
instance: VOL 20).
Press the MEMORY/CLK-ADJ button first, then set the desired volume level, successively
pressing the SKIP TUNING or button. To choose the preset volume level, press the
MEMORY/CLK-ADJ button again.
3966IM.indd 7 07.07.2008 15:40:49

8
Note: you can change volume level in the
range of 0-0.
5. Switching on the alarm.
Press the TIMER/SLEEP button. “TIMER”
will appear on the LCD display.
When the preset time is reached, the alarm
will automatically switch on.
6. Switching off the alarm.
Press the TIMER/SLEEP button again. The
“TIMER” indication will disappear.
You can set time for the cassette recorder to
switch off (max. 90 minutes).
. In the radio/cassette mode press the
TIMER/SLEEP button. The “90” minutes
indication will appear on the LCD display,
and the “SLEEP” indication will be flashing.
2. To change the time press and hold the
TIMER/SLEEP button. You can set time for
the cassette recorder to switch off in the
range of 0-90 minutes with 0 minutes step.
3. When the preset time is reached, the
cassette recorder will automatically switch
off.
. To cancel the timer mode press the TIMER/
SLEEP button again. The “SLEEP” indication
will disappear. To switch off the cassette
recorder press the POWER button.
You can set one of the five preset modes of the
equalizer: FLAT, JAZZ, ROCK, CLASSIC and
POP.
. In a playback mode select the desired
mode, successively pressing the EQ/BBS
button. The following indications will
successively appear on the LCD display:
FLAT, JAZZ, ROCK, CLASSIC and POP.
2. In order to amplify bass signals press and
hold the EQ/BBS button at least for 2
seconds. “X BAS ON’’ will appear on the
LCD display.
To cancel low frequency amplification mode
press the EQ/BBS button again at least for
2 seconds. “X BAS OFF’’ will appear on the
LCD display.
To switch on 3 D sound effect while listening to
music set the 3D SURROUND button to ON po-
sition. To switch off the effect set the button to
OFF position.
To mute sound, press the MUTE button.
For individual listening to music through the
earphones (not supplied) connect them to the
earphones jack (3, pic. ). Use the VOLUME
or button to adjust volume. The speak-
ers will automatically turn off when headphones
are connected.
This cassette recorder is equipped with electri-
cal digital tuning system. Besides that, you can
tune and store 20 radio stations in each band
FM and MW (AM).
. Switch on the cassette recorder by pressing
the POWER button.
2. To select the TUNER mode press the
FUNCTION button successively. The
“TUNER’’ indication will appear on the LCD
display.
3. To select FM or MW (AM) band press the
BAND button.
. Tune to the desired radio station.
Manually: to select the desired station
press the SKIP TUNING or buttons
successively.
Automatically: Press and hold the SKIP
TUNING or button for more than
second, tuner will start scanning and will
stop it automatically when a strong signal
from the radio station is found.
5. Switch the MONO/STEREO mode. If the
stereo signal from FM radio stations is weak,
3966IM.indd 8 07.07.2008 15:40:49

9
press the REPEAT/MONO-ST button to
improve sound quality, to switch on to the
MONO mode.
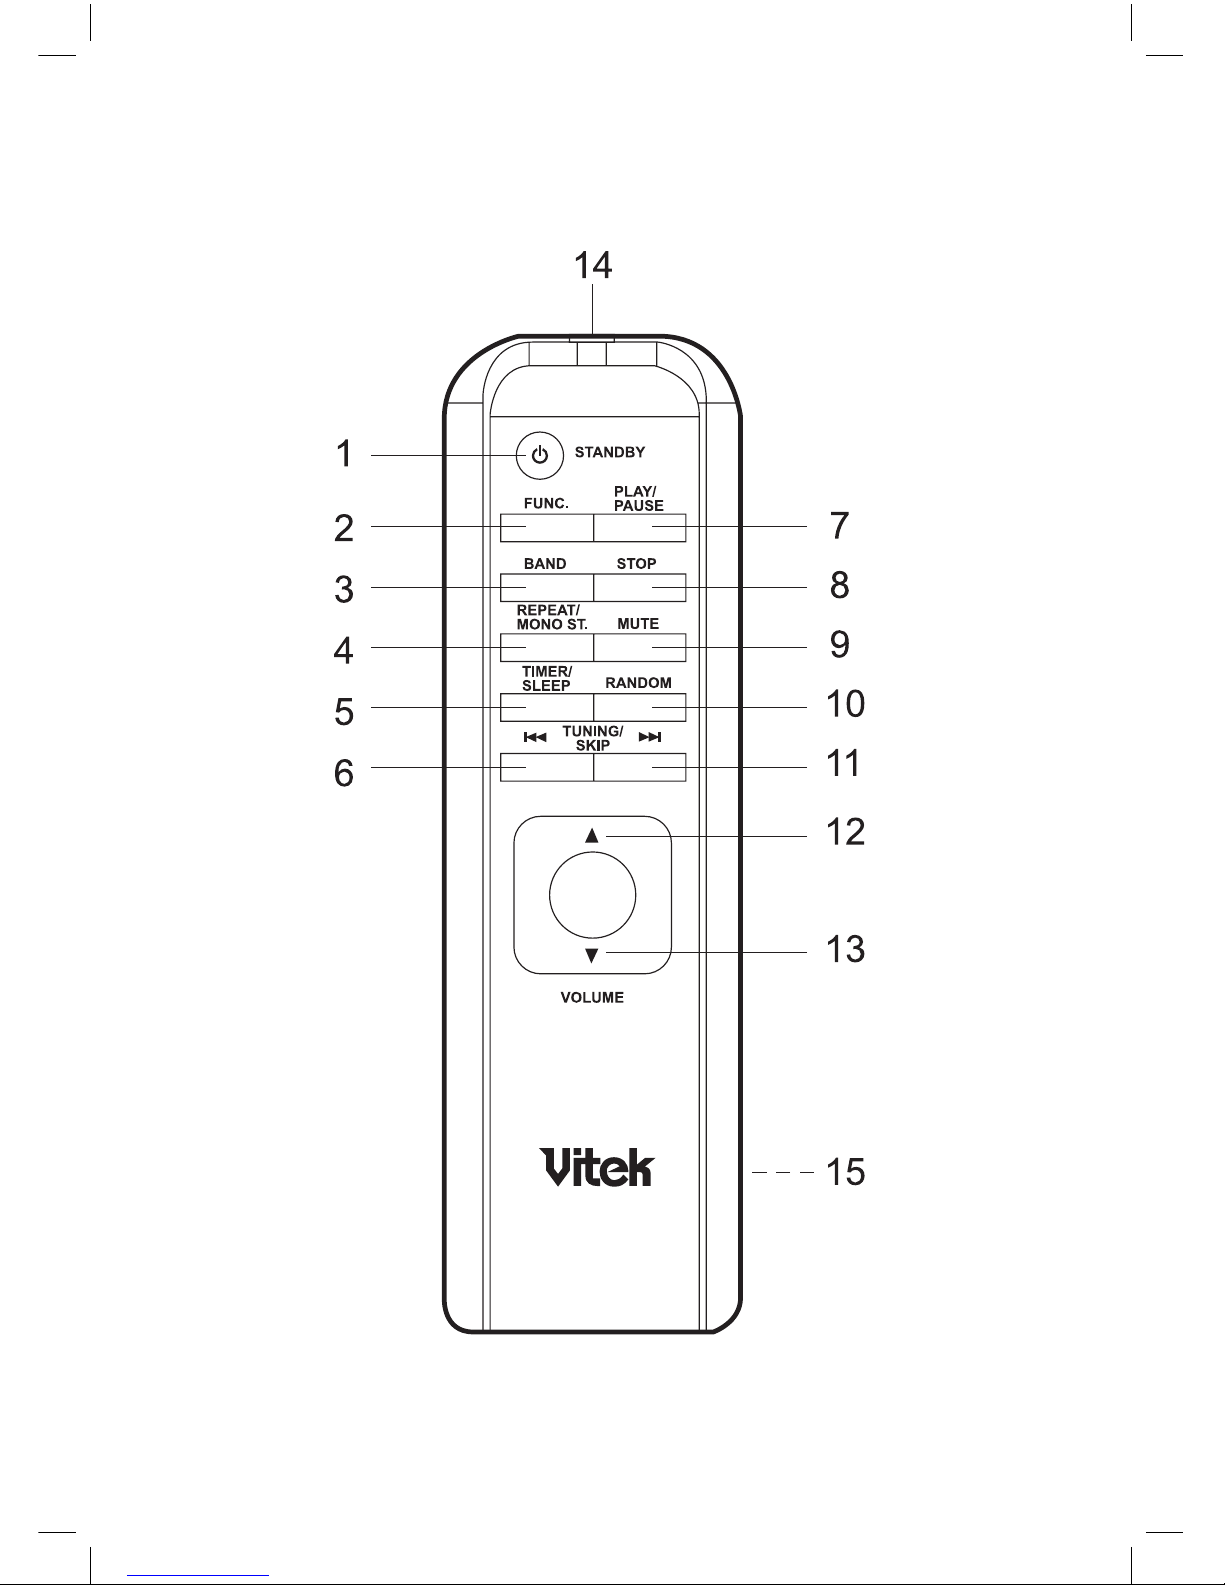
For the best FM reception, completely extend
the FM ANTENNA (2, pic.). The device has a
built-in antenna in order to receive AM signals.
Turn the device left or right in order to achieve
the best signal reception.
You can tune and store 20 stations in each band
FM and MW (AM).
. Select the band and tune to the station,
which you want to program.
2. Press the MEMORY/CLK-ADJ button. The
“MEMORY” indication and the “00” station
indication will be flashing on the LCD display
for 3 seconds.
3. Use the PRESET/FOLDER or
buttons to select the station number from
to 20, under which you want to store the
radio station.
. Press the MEMORY/CLK-ADJ button again,
to store the settings.
5. Repeat steps – for all radio stations,
which you want to store in memory.
Note: you must select the station number
while the MEMORY indication is flashing,
otherwise the station will not be stored in the
memory. If the indication disappears before
you select the number of the station, repeat
steps -.
To recall the programmed radio stations select
the corresponding frequency band (FM or MW
(AW)) and press the PRESET/FOLDER or
buttons successively to select the desired
radio station.
Note: The preset stations are stored in memory,
while the device is plugged in and the battery is
not low. When the power is off or the battery is
low the preset radio stations will be erased from
memory. You will need to program them again.
Loading – open the CD compartment lid. Insert
a CD disc and close the CD compartment lid.
Ejecting – after the playback stops open the CD
compartment lid and eject the disc. Put the disc
in the case for storage.
Always close the CD compartment lid in order
to prevent it from getting dust. Always eject a
disc from the CD compartment if it is not being
played back.
. Switch on the cassette recorder by pressing
the POWER button.
2. Select the CD playback mode. To select it
press the FUNCTION button successively
until the “CD” indication appears on the LCD
display.
3. Open the CD compartment. Insert a CD disc
and close the CD compartment. Number of
tracks and total playback time will appear on
the LCD display.
If after a CD disc have been inserted the “NO
DISC” indication appears on the LCD display,
check whether the disc is inserted properly. The
disc should be inserted with the label up.
. To playback the disc from the first track
press the PLAY/PAUSE button.
You can select a track, which will be played
back first. To do it, select a track using the
SKIP TUNING or buttons, then press
the PLAY/PAUSE button.
5. To pause the playback, press the PLAY/
PAUSE button again. The “PLAY” indication
and the playback time will be constantly
flashing. To resume to playback mode press
the button once again.
6. To stop the playback, press the STOP
button.
Note: if the CD compartment lid is open, the
“OPEN” indication will appear on the LCD
display.
You can program playback of tracks (max. 60
tracks) in a desired sequence.
. Switch on the cassette recorder by pressing
3966IM.indd 9 07.07.2008 15:40:50

0
the POWER button.
2. Open the CD compartment. Insert a CD disc
and close the CD compartment.
3. When the CD playback is stopped, press
the MEMORY/CLK-ADJ button. The
“MEMORY” indication will be flashing on the
LCD display, and track number on the disc
and its programmed number “P-0” will be
displayed.
Select the desired track, successively
pressing the SKIP TUNING or button.
To store the selected track press the
MEMORY/CLK-ADJ button. Programming
indication will switch to “Р-2”.
. Programming the next track: select the
next track, successively pressing the SKIP
TUNING or buttons. Then press the
MEMORY/CLK-ADJ button to store the
selected track in memory. You can program
up to 60 tracks.
Press the MEMORY/CLK-ADJ button
successively to look through the list of
programmed tracks.
To playback press the PLAY/PAUSE button. To
stop the playback, press the STOP button.
To erase programmed playback press the STOP
button, when the playback stops, open the CD
compartment lid.
This function allows repeating all tracks on the
disc or programmed discs.
. To repeat one track press the REPEAT/
MONO-ST button once, the “REPEAT” indication
will appear on the LCD display.
2. To repeat all tracks on the disc press the
REPEAT/MONO-ST button twice, The “REPEAT
ALL” indication will appear on the LCD display.
3. To cancel the repeat mode press the RE-
PEAT/MONO-ST button until the repeat indica-
tion disappears.
This function allows you to playback tracks in
random order.
. Press the RANDOM button once, the
“RANDOM” indication will appear on the
LCD display, random playback will start.
2. To cancel the random playback mode, press
the RANDOM button again, the “RANDOM”
indication will disappear.
This appliance can playback most of MP3 discs
but there are cases when the disc is not played
back due to the settings of the software used for
recording this disc.
. Switch on the cassette recorder by pressing
the POWER button.
2. Select discs playback mode. To select it
press the FUNCTION button successively
until the “MP3” indication appears on the
LCD display.
3. Open the disk compartment. Insert an MP3
disc and close the compartment. Number
of folders and tracks will appear on the LCD
display.
3966IM.indd 10 07.07.2008 15:40:50

. To start playback from the first track press
the PLAY/PAUSE button.
5. You can select a track, which will be played
back first. To do it, select a track using the
SKIP TUNING or buttons, when the
playback stops press the PRESET/FOLDER
or buttons to select the desired
folder, then select a track using the SKIP
TUNING or buttons.
Press the PLAY/PAUSE button to start
playback.
6. Press the ID3 button during an MP3 disc
playback. Track title and album title will
appear on the LCD display. Press the ID3
button twice to display scrolling text.
Information on the LCD display can be
different from the software settings. Tags in
Russian can be displayed incorrect.
7. To pause the playback, press the PLAY/
PAUSE button. The “PLAY” indication and
playback time will be constantly flashing.
To resume to the playback mode press this
button once again.
8. To stop the playback, press the STOP
button. Number of folders and tracks will
appear on the LCD display.
You can program playback of tracks (max. 60
tracks) in a desired sequence.
. Switch on the cassette recorder by
pressing the POWER button. Open the
compartment. Insert an MP3 disc and close
the compartment. When the CD playback
is stopped, press the MEMORY/CLK-ADJ
button. The “MEMORY” indication will
be flashing on the LCD display, and track
number on the disc and its programmed
number “P-0” will be displayed.
2. Select the desired track, successively
pressing the SKIP TUNING or button
or press the PRESET/FOLDER or
buttons to select the desired folder, then
select a track using the SKIP TUNING or
buttons.
3. To store the selected track press the
MEMORY/CLK-ADJ button. Programming
indication will switch to “Р-2”.
. Repeat steps -3 to program the next track.
You can program up to 60 tracks.
5. Press the MEMORY/CLK-ADJ button
successively to look through the list of
programmed tracks.
6. To playback press the PLAY/PAUSE button.
7. To stop playback press the STOP button.
To erase programmed playback press the
STOP button, when the playback stops,
open the CD compartment lid.
This function allows repeating tracks on the МР3
3966IM.indd 11 07.07.2008 15:40:51

2
disc.
. To repeat one track press the REPEAT/
MONO-ST button once, the “REPEAT”
indication will appear on the LCD display.
2. To repeat the whole folder on the disc press
the REPEAT/MONO-ST button twice, the
“REPEAT FOLDER” indication will appear on
the LCD display.
3. To repeat all tracks on the МР3 disc press
the REPEAT/MONO-ST button thrice, the
“REPEAT ALL” indication will appear on the
LCD display.
. To cancel the repeat mode press the
REPEAT/MONO-ST button until the repeat
indication disappears.
This function allows you to playback tracks in
random order.
. Press the RANDOM button once, the
“RANDOM” indication will appear on the
LCD display, random playback will start.
2. To cancel the random playback mode, press
the RANDOM button again, the “RANDOM”
indication will disappear.
Note: in case of incorrect information on the
LCD display or malfunction, disconnect the ap-
pliance from the power sources, and then con-
nect again. If the problem remains apply to the
nearest service centre. Tags in Russian can be
displayed incorrect.
. Switch on the cassette recorder by pressing
the POWER button. Successively press the
FUNCTION button to select the TAPE mode,
until the “TAPE” indication appears on the
LCD display.
2. Press the STOP/EJ button and insert a
cassette in the cassette deck.
3. Close the cassette deck.
. To playback the cassette, press the PLAY
button.
5. Use the VOLUME or buttons to adjust
volume.
6. To pause the playback, press the PAUSE
button.
7. Press the STOP/EJ button to stop the
playback.
8. To fast forward and rewind use the F.FWD/
REW buttons correspondingly.
9. When the playback is finished it will stop
automatically.
0. Press the STOP/EJ button to eject the
cassette, eject the cassette.
WARNING! In order not to damage the cassette
mechanism or the tape press the STOP/EJ
button after each operation.
. Tune to the desired radio station; follow the
instructions in the RADIO chapter.
2. Insert a cassette without record on it in a
cassette deck.
3. Press the PAUSE button.
. Press the RECORD button, the PLAY button
will be pressed automatically. You can adjust
volume level without being afraid to make
sound quality worse.
5. Press the PAUSE button to start recording.
6. To pause press the PAUSE button. To
3966IM.indd 12 07.07.2008 15:40:51

3
resume to recording mode press this button
once again.
7. To stop press the STOP/EJ button. When the
cassette is recorded completely, the record
will stop automatically.
You can record from other sources, for instance
from CD disc or USB device. Switch on the de-
sired source and follow instructions in the chap-
ter RECORD FROM RADIO.
. Switch on the cassette recorder, by pressing
the POWER button.
2. To select the USB mode, press successively
the FUNCTION button, until the “USB”
indication appears on the LCD display.
3. Insert the USB device (for example, portable
МРЗ player or flash memory) into the USB
jack (39, pic. ). Number of folders and
tracks will appear on the LCD display.
Note: if neither portable MP3 player nor flash
memory device is connected to the USB “NO
DEV” will appear on the LCD display.
. To playback press the PLAY/PAUSE button.
5. Control buttons and order of operations
while using USB are the same as those of
a МР3 disc. Follow the instructions in the
chapter PLAYING MP3 DISCS.
. Switch on the cassette recorder by pressing
the POWER button.
2. To select the SD mode, press successively
the FUNCTION button, until the “SD”
indication appears on the LCD display.
3. Insert a SD/MMC card into the jack (0, pic.
). Number of folders and tracks will appear
on the LCD display.
.
Note: if no SD/MMC card is connected to the
jack (0, pic. ) “NO SD” will appear on the LCD
display.
5. To playback press the PLAY/PAUSE button.
6. Control buttons and order of operations
while using memory card are the same as
those of a МР3 disc. Follow the instructions
in the chapter PLAYING MP3 DISCS.
Power consumption 25W
Power supply AC 230V
Dimensions L 422 X W 240
X H 167 mm
Output Speakers RMS: 3.5Wx2CH
Speakers 1. Big Speaker: 4
Ohm, 4-Inch,
5W x2pcs
2. Small speaker:
8ohm, 2-Inch
0.5Wx2pcs
3. Buzzer plate: Dim.
20mmx2pcs
Battery Units :UM-1, ‘D’ x8pcs
Backup : ‘AA’ X3pcs
Remote: ‘AAA’ X2pcs
Frequency band 20Hz~20kHz
S/N ratio 60dB
FM/MW (AM):
Frequency band FM: 65~108MHz
AM: 522~1620kHz
Intermediate frequency FM IF:10.7MHz
Antenna FM: Rod Antenna
AM: Built in FERRITE
CORE
3966IM.indd 13 07.07.2008 15:40:51

Record system DC_BIAS Recording
Frequency range 125Hz~6.3kHz
S/N ratio 28dB
Recycling of electronic and electrical appliances
(Used in the EU countries and other countries in
Europe with selective sorting system)
This product is marked by the symbol of
the selective sorting, relating to the electrical
and electronic component scrap. That means
that the product must be taken by a selective
system of collection in order to reduce any en-
vironmental impact. The electronic products not
having been the subject of a selective sorting
are potentially dangerous for the environment
and human health because of the potential
presence of dangerous substances. For details
apply to the service dealing with recycling or to
the shop where you bought the product.
The manufacturer reserves the right to change
the design and specifications of the unit without
preliminary notice.
Details regarding guarantee conditions can be
obtained from the dealer from whom the appli-
ance was purchased. The bill of sale or receipt
must be produced when making any claim un-
der the terms of this guarantee.
This product conforms to the EMC-Re-
quirements as laid down by the Council
Directive 89/336/EEC and to the Law
Voltage Regulation (73/23 EEC)
3966IM.indd 14 07.07.2008 15:40:52

5
Перед подключением, использованием или
настройкой устройства внимательно прочи-
тайте инструкцию. Необходимо соблюдать
все предупреждения и рекомендации по экс-
плуатации устройства, приведенные в этом
руководстве.
Сохраните руководство, используйте его в
дальнейшем в качестве справочного мате-
риала.
Предупреждение: во избежание
возникновения пожара или поражения
электрическим током не подвергайте
устройство воздействию дождя или влаги.
Чтобы избежать удара электрическим
током, не открывайте корпус устройства
самостоятельно. Сервисное обслуживание
должно осуществляться только
квалифицированными специалистами
сервисных центров.
Значок молнии в равностороннем
треугольнике указывает
пользователю на наличие
опасного напряжения внутри
корпуса устройства, которое
может привести к поражению
электрическим током.
Значок восклицательного знака
в равностороннем треугольнике
указывает пользователю на
наличие важных рекомендаций
по эксплуатации и техническому
обслуживанию в инструкции по
эксплуатации.
Данный продукт классифицируется как
ЛАЗЕРНОЕ УСТРОЙСТВО КЛАССА . Соот-
ветствующая этикетка находится на задней
панели устройства и означает, что устройс-
тво использует лазерные лучи. Возможность
лазерного облучения отсутствует, если при-
бор не вскрывается. ОБСЛУЖИВАНИЕ УСТ-
РОЙСТВА ДОЛЖНО ВЫПОЛНЯТЬСЯ ТОЛЬКО
КВАЛИФИЦИРОВАННЫМИ СПЕЦИАЛИСТА-
МИ СЕРВИСНОГО ЦЕНТРА.
Данное устройство работает от сети пере-
менного тока с напряжением 230 В и час-
тотой 50 Гц. Проверьте, соответствует ли
напряжение в электрической сети рабочему
напряжению устройства.
Избегайте попадания на прибор капель или
брызг. Не помещайте сосуды с водой (на-
пример, вазы) на прибор.
В случае, если сетевой шнур подключен к
сети, а приборный штекер не подключен к
устройству, последний должен быть в ис-
правном состоянии
Во избежание возникновения пожара или по-
ражения электрическим током не размещай-
те это устройство в условиях повышенной
влажности (около ванн, тазов с водой, ку-
хонных раковин, стиральных машин, рядом с
плавательным бассейном, в сырых подвалах
и т.д.). Не допускайте попадания на устройс-
тва капель воды или брызг. Запрещается ста-
вить на устройство заполненные жидкостью
емкости (например, вазы).
Не допускайте перегрузки розеток или удли-
нителей, так как это может привести к пожа-
ру или поражению электрическим током.
Устанавливайте данное устройство таким
образом, чтобы в случае неисправности вил-
ку сетевого провода можно было немедлен-
но вынуть из розетки. Сетевые провода не
должны быть натянуты там, где они выходят
из устройства; их необходимо прокладывать
так, чтобы они не запутывались, чтобы на них
не стояли какие-либо предметы мебели.
Не используйте сетевые удлинители, кото-
рые не разрешены изготовителем устройс-
тва, так как это может быть опасным.
Для дополнительной защиты устройства во
время грозы, а также в тех случаях, когда вы
3966IM.indd 15 07.07.2008 15:40:52

6
не собираетесь использовать его в течение
длительного времени, отключите устройство
от розетки электросети. Это исключит выход
прибора из строя из-за ударов молнии или
скачков напряжения в электросети.
Для отсоединения сетевого шнура беритесь
непосредственно за сетевую вилку, ни в коем
случае не тяните за шнур.
Устанавливайте устройство в местах с доста-
точной вентиляцией.
При размещении устройства на кровати,
диване, софе, ковре или на других подобных
предметах обстановки необходимо просле-
дить за тем, чтобы вентиляционные щели и
отверстия не были закрыты, поскольку они
обеспечивают надежную работу устройства и
защищают его от перегрева.
Не размещайте устройство вблизи источ-
ников тепла (например, радиаторов, элек-
трообогревателей, духовок или других уст-
ройств) либо являющихся источниками тепла
(в том числе и усилителей), а также в местах,
где оно может быть подвержено воздейс-
твию прямых солнечных лучей, чрезмерному
запылению.
Не допускайте попадания каких-либо пред-
метов через отверстия в корпусе устройства,
это может повлечь за собой возгорание уст-
ройства, а также поражение электрическим
током. Если возгорание все-таки произошло,
сразу отсоедините устройство от сети и об-
ратитесь в сервисный центр.
В описанных ниже ситуациях необходимо вы-
ключить устройство из розетки и обратиться
к квалифицированному персоналу для ре-
монта устройства:
a) Сетевой провод или вилка повреждены.
b) В устройство попали какие-либо пред-
меты.
c) Устройство попало под дождь или на него
разлили воду.
d) Устройство не работает нормально.
e) Устройство упало или было повреждено
каким-либо другим образом.
f) Заметны явные изменения в работе уст-
ройства.
Перед чисткой выключите устройство из
розетки. Для чистки устройства используйте
влажную мягкую ткань. Запрещается исполь-
зовать для этих целей жидкие или аэрозоль-
ные чистящие средства.
Не используйте треснутые или деформиро-
ванные диски, это может вызвать поломку
устройства.
Берите диск только за края. Не прикасай-
тесь к рабочей поверхности диска. Пыль,
царапины или отпечатки пальцев на рабочей
поверхности диска могут привести к выходу
его из строя.
Не подвергайте диск воздействию прямых
солнечных лучей, источников тепла, высокой
температуры и влажности.
После использования уберите диск в футляр
на хранение.
Периодически протирайте рабочую поверх-
ность диска мягкой тканью от центра к краям.
Не пользуйтесь обычными моющими средс-
твами.
3966IM.indd 16 07.07.2008 15:40:52

7
. отсек для дисков
2. FM-антенна
3. кнопка включения объемного звучания 3D
SURROUND
, 5.кнопки предварительных установок/пе-
реключения папок PRESET/FOLDER
и
6. кнопка повтора воспроизведения/выбора
режима моно-стерео REPEAT/MONO-ST
7. кнопка воспроизведения треков в произ-
вольном порядке RANDOM
8. кнопка установки режимов эквалайзера/
усиления низких частот EQ/BBS
9. кнопка увеличения уровня громкости
VOLUME
0. кнопка уменьшения уровня громкости
VOLUME
. кнопка выключения звука MUTE
2. кнопка включения/выключения устройс-
тва POWER
3. кнопка переключения функций FUNCTION
. кнопка переключения диапазонов BAND
5. кнопка приостановки воспроизведения
кассеты PAUSE
6. кнопка остановки/извлечения кассеты
STOP/EJ
7. кнопка ускоренной перемотки кассеты
вперед F.FWD
8. кнопка ускоренной перемотки кассеты
назад REW
9. кнопка воспроизведения кассеты PLAY
20. кнопка записи RECORD
2. кнопка воспроизведения/приостановки
диска PLAY/PAUSE
22. LCD-дисплей
23. индикатор режима ожидания STANDBY
2. кнопка остановки воспроизведения STOP
25. правый динамик
26. левый динамик
27. кнопка включения будильника/таймера
TIMER/SLEEP
28. кнопка переключения режимов MODE
29. кнопка перехода к предыдущему треку
SKIP/TUNING
30. кнопка перехода к следующему треку
SKIP/TUNING
3. кнопка ID3
32. кнопка запоминания установленных ра-
диостанций/настройки часов MEMORY/
CLK-ADJ
33. кассетоприемник
3. гнездо для подключения стереонаушни-
ков
35. гнездо для подключения к электросети
36. крышка батарейного отсека основного
питания
37. крышка дополнительного батарейного
отсека/отсек для батарей (резервное пи-
тание для поддержки памяти устройства)
38. датчик сигналов от пульта дистанционно-
го управления SENSOR
39. USB-разъем
0. разъем для SD/MMC-карты
. кнопка STANDBY
Во время работы магнитолы нажмите на
кнопку STANDBY. Магнитола перейдет в
режим ожидания, загорится индикатор
режима ожидания STANDBY.
Для возврата к нормальному режиму ра-
боты нажмите кнопку STANDBY еще раз.
2. кнопка переключения функций FUNC
3. кнопка переключения диапазонов BAND
. кнопка повтора воспроизведения/выбора
режима моно-стерео REPEAT/MONO-ST
5. кнопка включения будильника/таймера
TIMER/SLEEP
6. кнопка перехода к предыдущему треку
SKIP TUNING
7. кнопка остановки/приостановки воспро-
изведения PLAY/PAUSE
8. кнопка остановки воспроизведения STOP
9. кнопка выключения звука MUTE:
a. нажмите кнопку для выключения звука,
b. для включения звука нажмите кнопку еще
раз
0. кнопка воспроизведения треков в произ-
вольном порядке RANDOM
. кнопка перехода к следующему треку
SKIP TUNING
2. кнопка увеличения уровня громкости
3. кнопка уменьшения уровня громкости
. инфракрасный (ИК) излучатель
5. крышка батарейного отсека
Перед подключением устройства к сети
убедитесь, что напряжение в электрической
сети соответствует рабочему напряжению
3966IM.indd 17 07.07.2008 15:40:52

8
устройства.
. Для подключения магнитолы к сети
вставьте один конец сетевого шнура в
гнездо (35, Рис. ) а другой – в розетку.
Загорится индикатор режима ожидания
STANDBY.
2. Для включения магнитолы нажмите кноп-
ку POWER.
Примечание: статическое электричество мо-
жет привести к помехам в работе устройства.
В этом случае отключите устройство от ис-
точников питания, а затем подключите снова.
Если проблема не решится, обратитесь в
ближайший сервисный центр.
. Отключите магнитолу от сети.
2. Откройте крышку батарейного отсека
основного питания (36, Рис. ) сзади маг-
нитолы, нажав на две защелки в направ-
лении по стрелке.
3. Откройте крышку дополнительного ба-
тарейного отсека (37, Рис. ). Вставьте 3
батарейки UM-3/AA (не входят в комплект
поставки) в батарейный отсек для подде-
ржки памяти устройства. Закройте крыш-
ку отсека (37, Рис. ).
Вставьте 8 батареек UM-/D (не входят в
комплект поставки) в батарейный отсек
основного питания устройства.
. Закройте крышку батарейного отсека (36,
Рис. ).
Вставьте 2 батарейки UM-/AAA (не входят в
комплект поставки) в батарейный отсек пуль-
та дистанционного управления.
При использовании пульта дистанционного
управления направляйте его на инфракрас-
ный датчик на вашей магнитоле SENSOR.
Эффективное расстояние работы пульта дис-
танционного управления составляет около
пяти метров, в случае его сильного уменьше-
ния проверьте батарейки, и при необходи-
мости замените их.
Функции кнопок на пульте дистанционного
управления аналогичны функциям кнопок на
магнитоле. Некоторые кнопки выполняют две
функции, это зависит от того, выбран режим
воспроизведения диска или прослушивания
радиоприемника.
Не подвергайте пульт дистанционного управ-
ления воздействию повышенной температу-
ры или прямого солнечного света, это может
негативно сказаться на его работе.
Протечка батарей может стать причиной пов-
реждения устройства. Чтобы избежать пов-
реждения батарей, следуйте приведенным
ниже инструкциям:
- Устанавливайте батареи правильно, соб-
людая полярность в соответствии с обоз-
начениями на устройстве.
- Не используйте вместе разные батареи
(старые и новые, разных типов и т.п.).
- Вынимайте батареи, если устройство не
будет использоваться в течение длитель-
ного времени.
Вы можете установить время, когда магнито-
ла находится в режиме ожидания.
. Нажмите один раз кнопку MEMORY/CLK-
ADJ. На LCD-дисплее начнет мигать ин-
дикация часов. При помощи кнопки SKIP
TUNING или установите часы.
2. Нажмите еще раз кнопку MEMORY/CLK-
ADJ. На LCD-дисплее начнет мигать ин-
дикация минут. При помощи кнопки SKIP
TUNING или установите минуты.
Примечание: в случае отключения питания
и разрядки (или отсутствия) батареек
резервного питания показания текущего
времени будут сброшены. При возобнов-
лении подачи электричества индикация
времени будет постоянно мигать. Пот-
ребуется повторная установка текущего
времени.
Вы можете настроить вашу магнитолу таким
образом, чтобы каждый день в установ-
ленное время включался и автоматически
выключался будильник, в качестве источника
звуковых сигналов которого можно исполь-
зовать диск, радио или кассету, а также ус-
тройства, подключаемые к разъемам USB и
SD/MMC.
3966IM.indd 18 07.07.2008 15:40:52

9
Примечание: если в качестве источника звукового сигнала выбрана кассета, сначала нужно
нажать кнопку PLAY (9, Рис. ).
. Установка времени включения будильника
В режиме текущего времени нажмите один раз кнопку MODE. На LCD-дисплее появится ин-
дикация «ON TIME», а индикатор «TIMER» будет постоянно мигать.
Установите время включения будильника, как описано в разделе УСТАНОВКА ВРЕМЕНИ.
2. Установка времени выключения будильника
Нажмите еще раз кнопку MODE. На LCD-дисплее появится индикация «OFF TIME», а индика-
тор «TIMER» будет постоянно мигать.
Установите время выключения будильника, как описано в разделе УСТАНОВКА ВРЕМЕНИ.
3. Установка источника звукового сигнала
Нажмите еще раз кнопку MODE. На LCD-дисплее появится текущий режим (например,
TUNER).
Нажмите сначала кнопку MEMORY/CLK-ADJ, затем выберите источник звукового сигнала,
последовательно нажимая SKIP TUNING или .
. Установка уровня громкости будильника
Нажмите еще раз кнопку MODE. На LCD-дисплее появится предыдущий уровень громкос-
ти (например, VOL 20).
Нажмите сначала кнопку MEMORY/CLK-ADJ, затем установите желаемый уровень гром-
кости, последовательно нажимая SKIP TUNING или . Для ввода установленного уров-
ня громкости нажмите еще раз кнопку MEMORY/CLK-ADJ.
Примечание: уровень громкости можно изменять в диапазоне от 0 до 0.
5. Включение будильника
Нажмите кнопку TIMER/SLEEP. На LCD-дисплее появится индикатор «TIMER».
По достижении установленного времени автоматически включится будильник.
6. Отключение будильника
Нажмите еще раз кнопку TIMER/SLEEP. Индикатор «TIMER» погаснет.
3966IM.indd 19 07.07.2008 15:40:53

20
Вы можете установить время выключения
магнитолы (максимум 90 минут).
. В режиме прослушивания радио/вос-
произведения музыки нажмите кнопку
TIMER/SLEEP. На LCD-дисплее появит-
ся индикация минут«90», а индикатор
«SLEEP» будет мигать.
2. Для изменения времени нажмите и удер-
живайте кнопку TIMER/SLEEP. Вы можете
установить время выключения магнитолы
в интервале от 0 до 90 минут с шагом 0
минут.
3. По достижении установленного времени
магнитола автоматически выключится.
. Для отключения таймера нажмите еще
раз кнопку TIMER/SLEEP. Индикатор
«SLEEP» погаснет. Для выключения маг-
нитолы нажмите кнопку POWER.
Вы можете выбрать один из пяти предвари-
тельно запрограммированных режимов эква-
лайзера: FLAT, JAZZ, ROCK, CLASSIC или POP.
. При прослушивании музыки выберите
желаемый режим, последовательно
нажимая кнопку EQ/BBS. На LCD-дисп-
лее будут последовательно появляться
индикаторы режимов: FLAT, JAZZ, ROCK,
CLASSIC, POP.
2. Для усиления низких частот нажмите и
удерживайте кнопку EQ/BBS не менее
двух секунд. На LCD-дисплее появится
индикатор «X BAS ON».
Для отключения усиления низких частот
нажмите и удерживайте кнопку EQ/BBS
не менее двух секунд. На LCD-дисплее
появится индикатор «X BAS OFF».
Для включения эффекта объемного звуча-
ния при прослушивании музыки установите
кнопку 3D SURROUND в положение ON (вкл.).
Для отключения данного эффекта установите
кнопку в положение OFF (выкл.).
Для выключения звука нажмите кнопку MUTE.
Для прослушивания музыки через наушники
(в комплект поставки не входят) подключите
их к гнезду (3, Рис. ). При помощи кнопки
VOLUME или отрегулируйте уровень
громкости. При подключении наушников
динамики магнитолы отключатся автомати-
чески.
Данная магнитола имеет систему электрон-
ной цифровой настройки. Кроме этого, вы
можете настроить и сохранить 20 станций в
каждом из диапазонов FM и MW (AM).
. Включите магнитолу, нажав кнопку
POWER.
2. Для выбора режима TUNER последо-
вательно нажимайте кнопку FUNCTION.
На LCD-дисплее появится индикатор
«TUNER».
3. Для выбора диапазона частоты FM или
MW (AM) нажмите кнопку BAND.
. Настройте радиостанцию.
Вручную: для выбора желаемой радио-
станции последовательно нажимайте
кнопку SKIP TUNING или .
Автоматически: удерживайте нажатой
кнопку SKIP TUNING или более од-
ной секунды, тюнер начнет сканирование
и автоматически остановит сканирование
при нахождении сильного сигнала от ра-
диостанции.
5. Переключите режим MONO/STEREO.
Если стереосигнал, получаемый от FM-
радиостанции, слабый, то для улучше-
ния качества звучания нажмите кнопку
REPEAT/MONO-ST, чтобы переключиться
в режим моно.
Для наилучшего приема в диапазоне FM
3966IM.indd 20 07.07.2008 15:40:53
Table of contents
Languages:
Other Vitek Cassette Player manuals

Vitek
Vitek VT-3750 User manual

Vitek
Vitek VT-3223 User manual

Vitek
Vitek VT-3304 User manual

Vitek
Vitek VT-3211 User manual

Vitek
Vitek VT3470 GY User manual

Vitek
Vitek VT-3458 User manual

Vitek
Vitek VT-3468 User manual

Vitek
Vitek VT-3206 User manual

Vitek
Vitek VT3473 GY User manual

Vitek
Vitek VT-3404 User manual

Vitek
Vitek VT-3750 User manual

Vitek
Vitek VT-3210 User manual

Vitek
Vitek VT-3303 User manual

Vitek
Vitek VT-3476 User manual

Vitek
Vitek VT3470 GY User manual

Vitek
Vitek VT-3209 User manual

Vitek
Vitek VT-3455 User manual

Vitek
Vitek VT3470 GY User manual

Vitek
Vitek VT-3456 GY User manual

Vitek
Vitek VT-3103 User manual