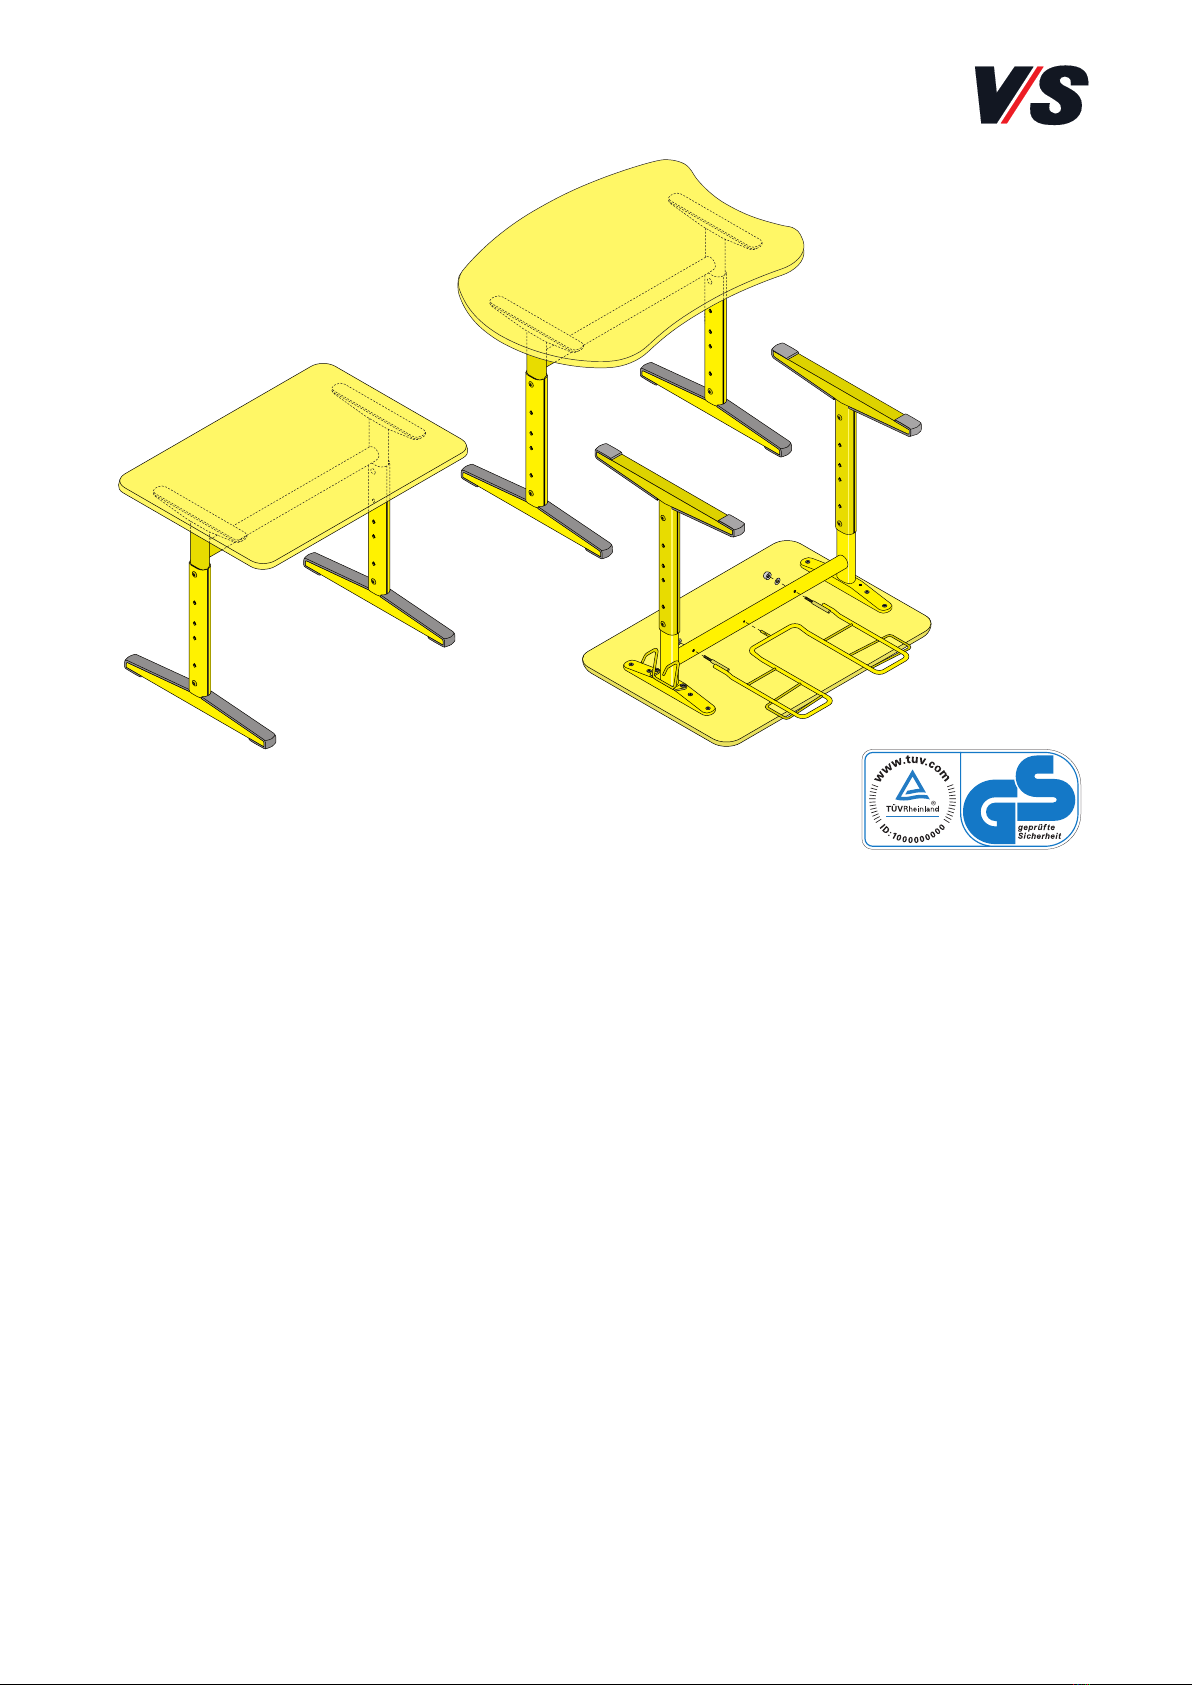
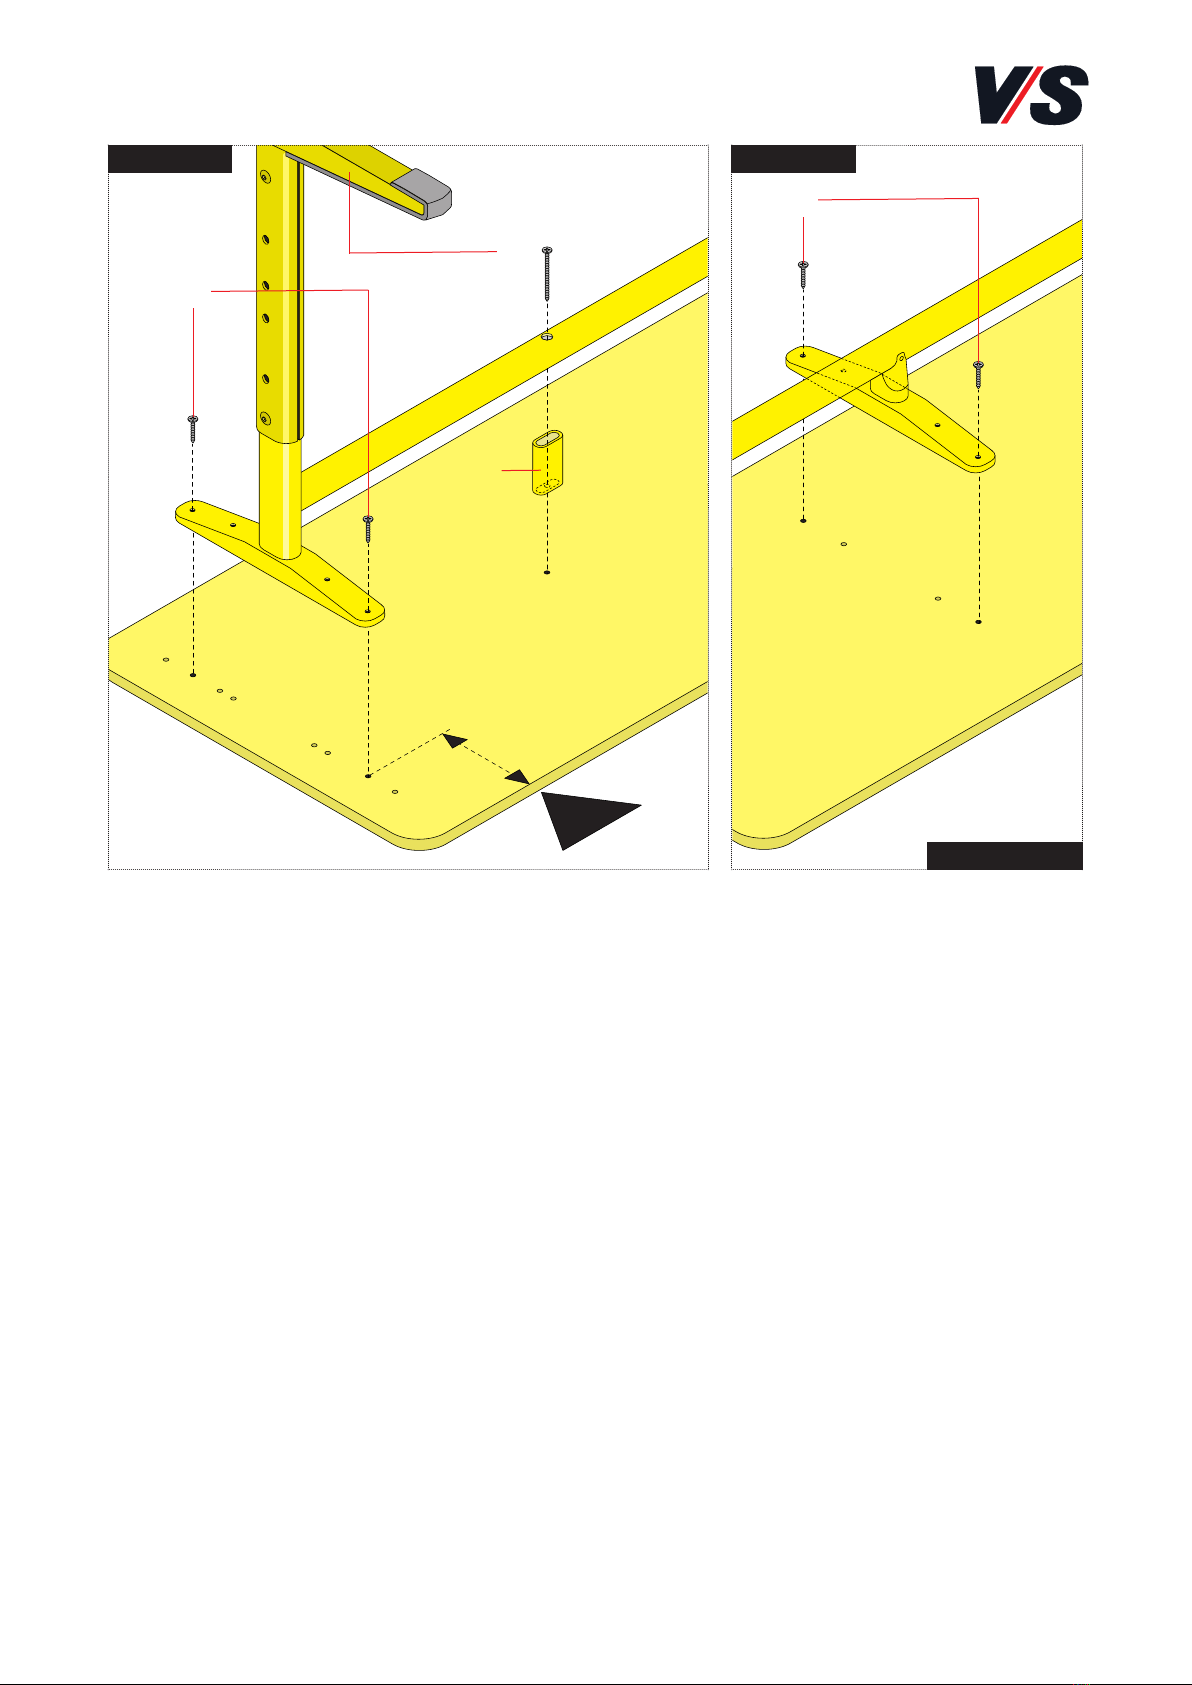
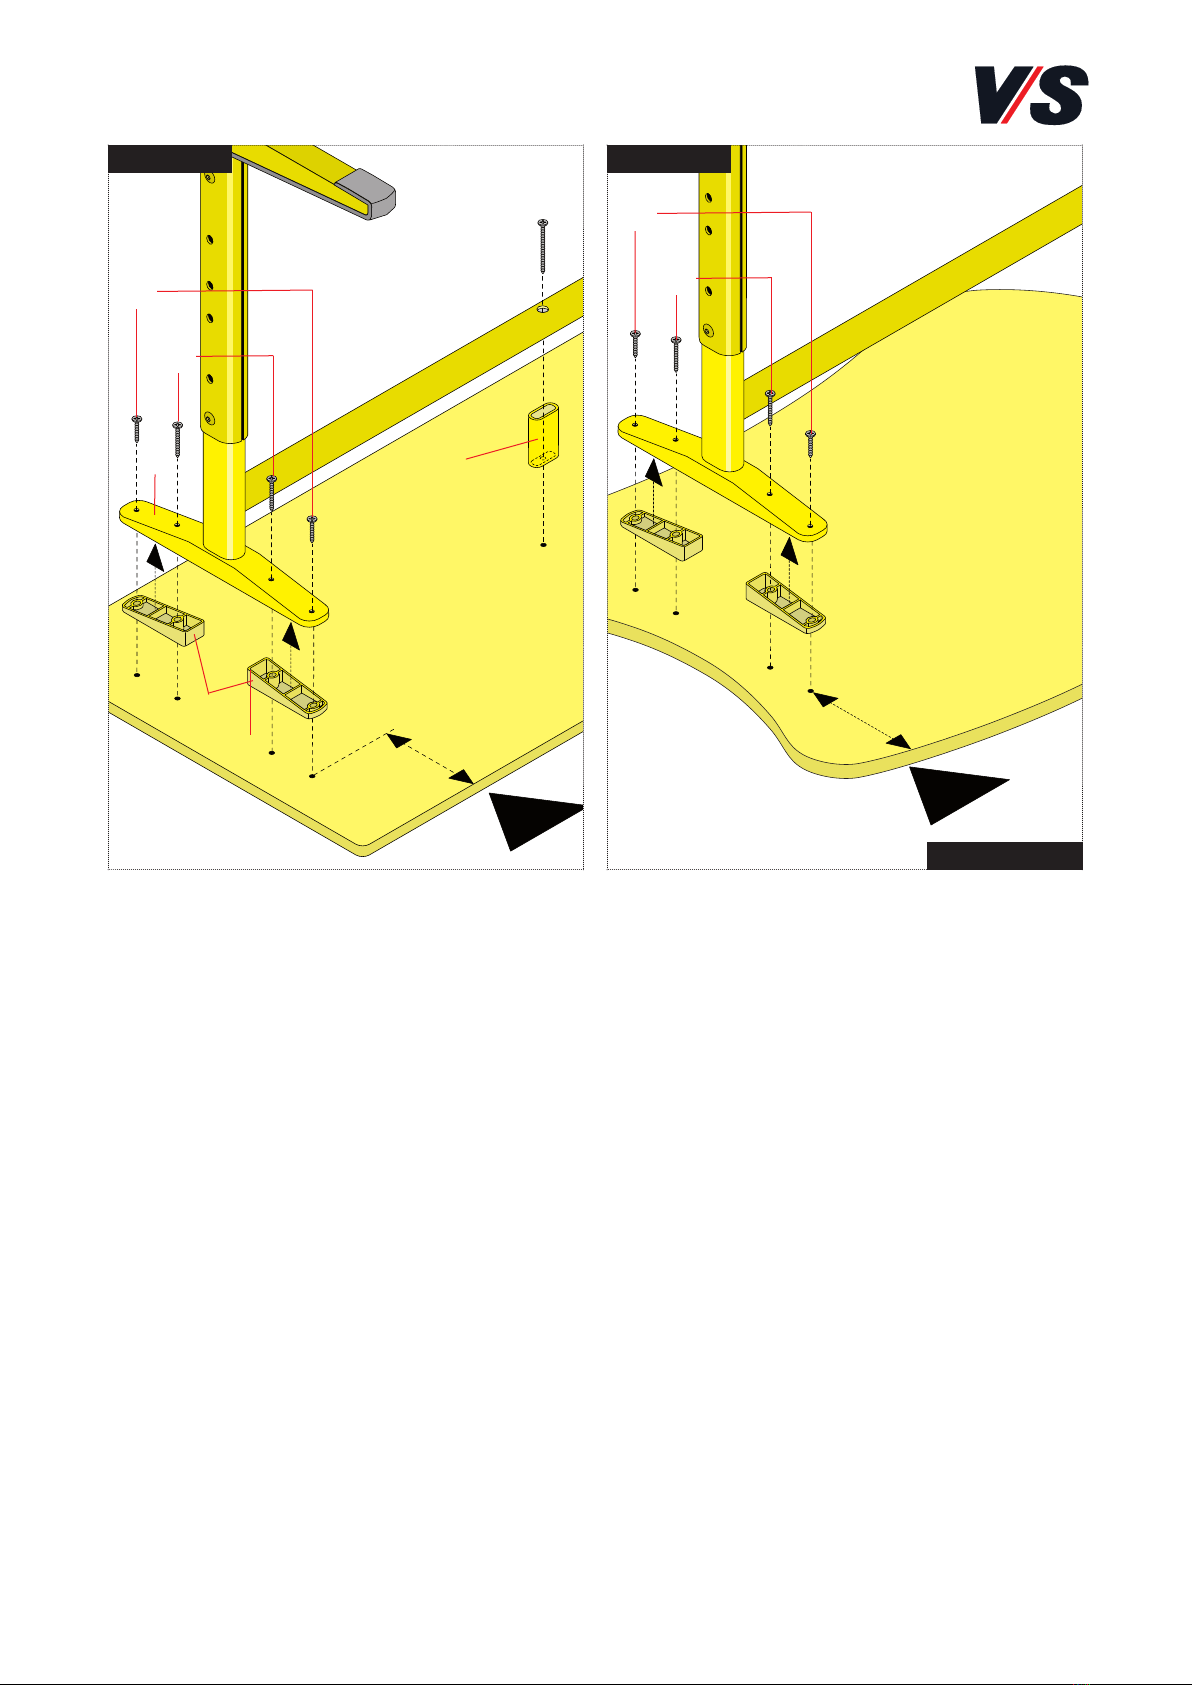
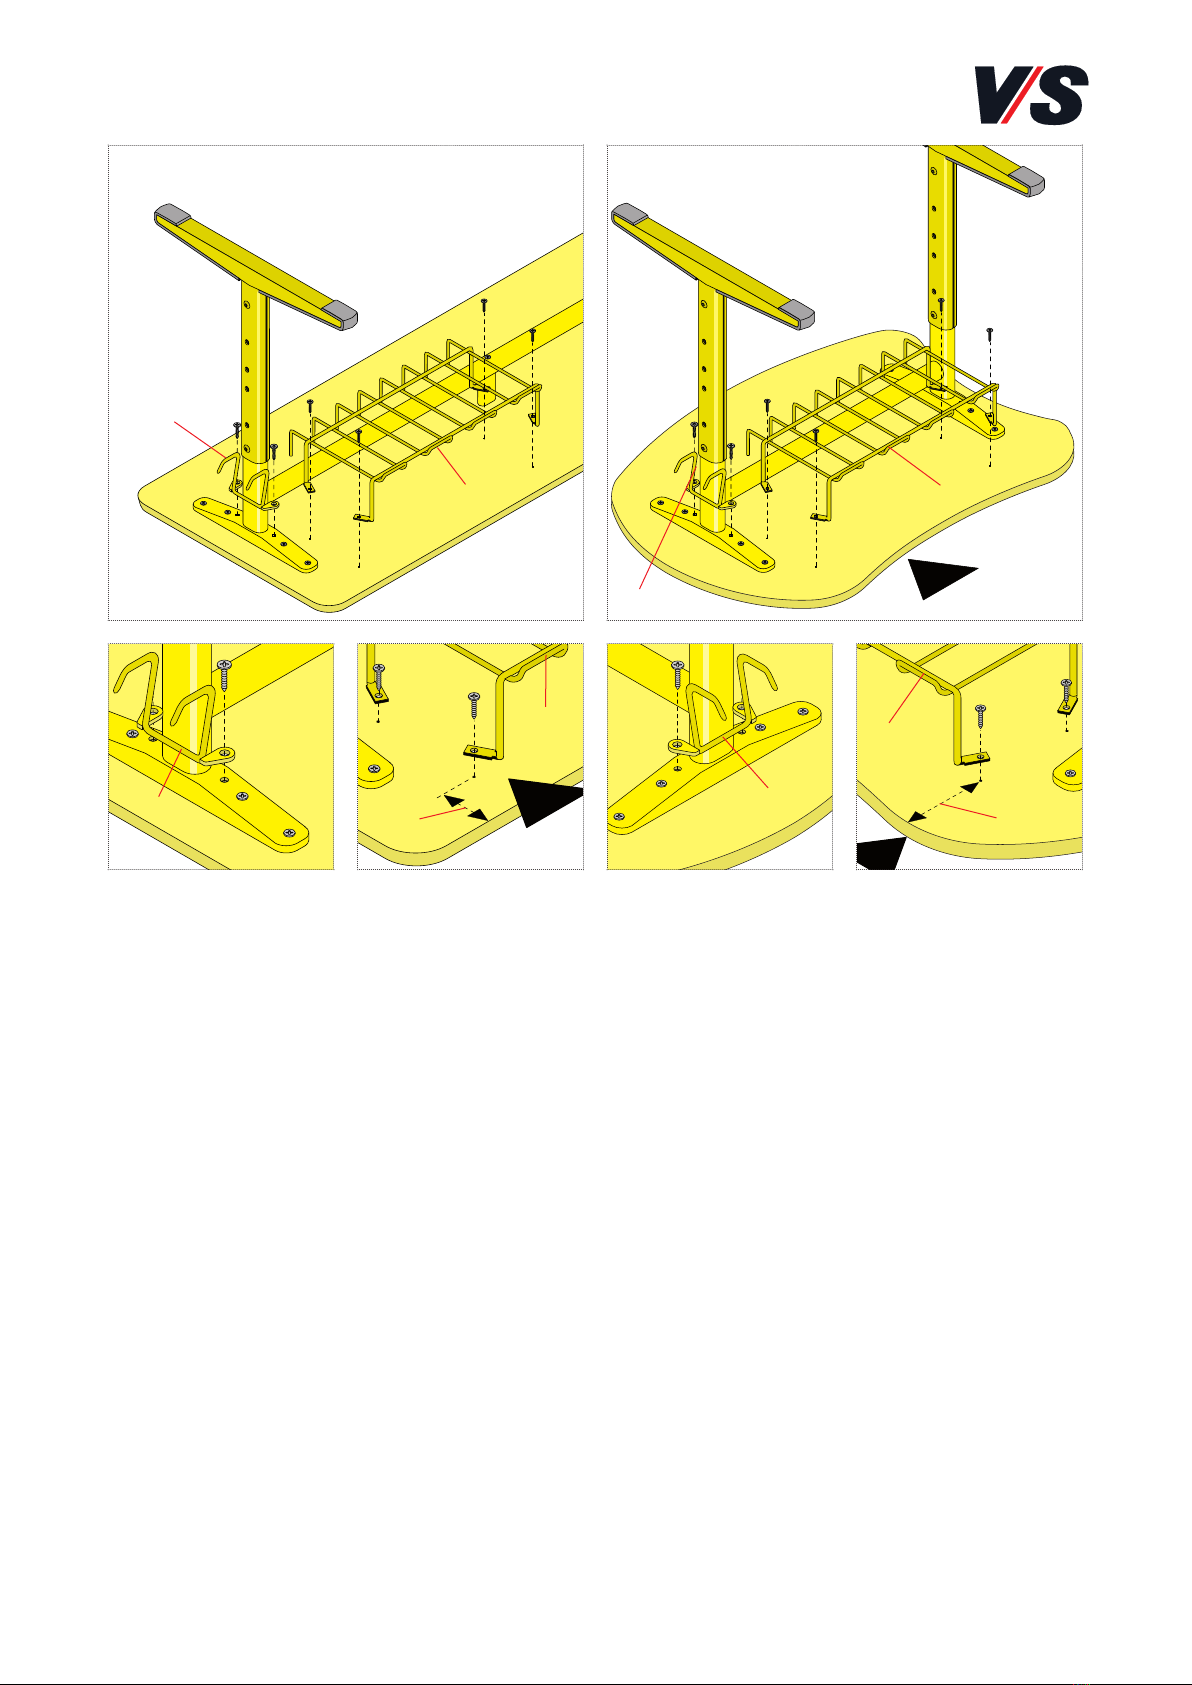
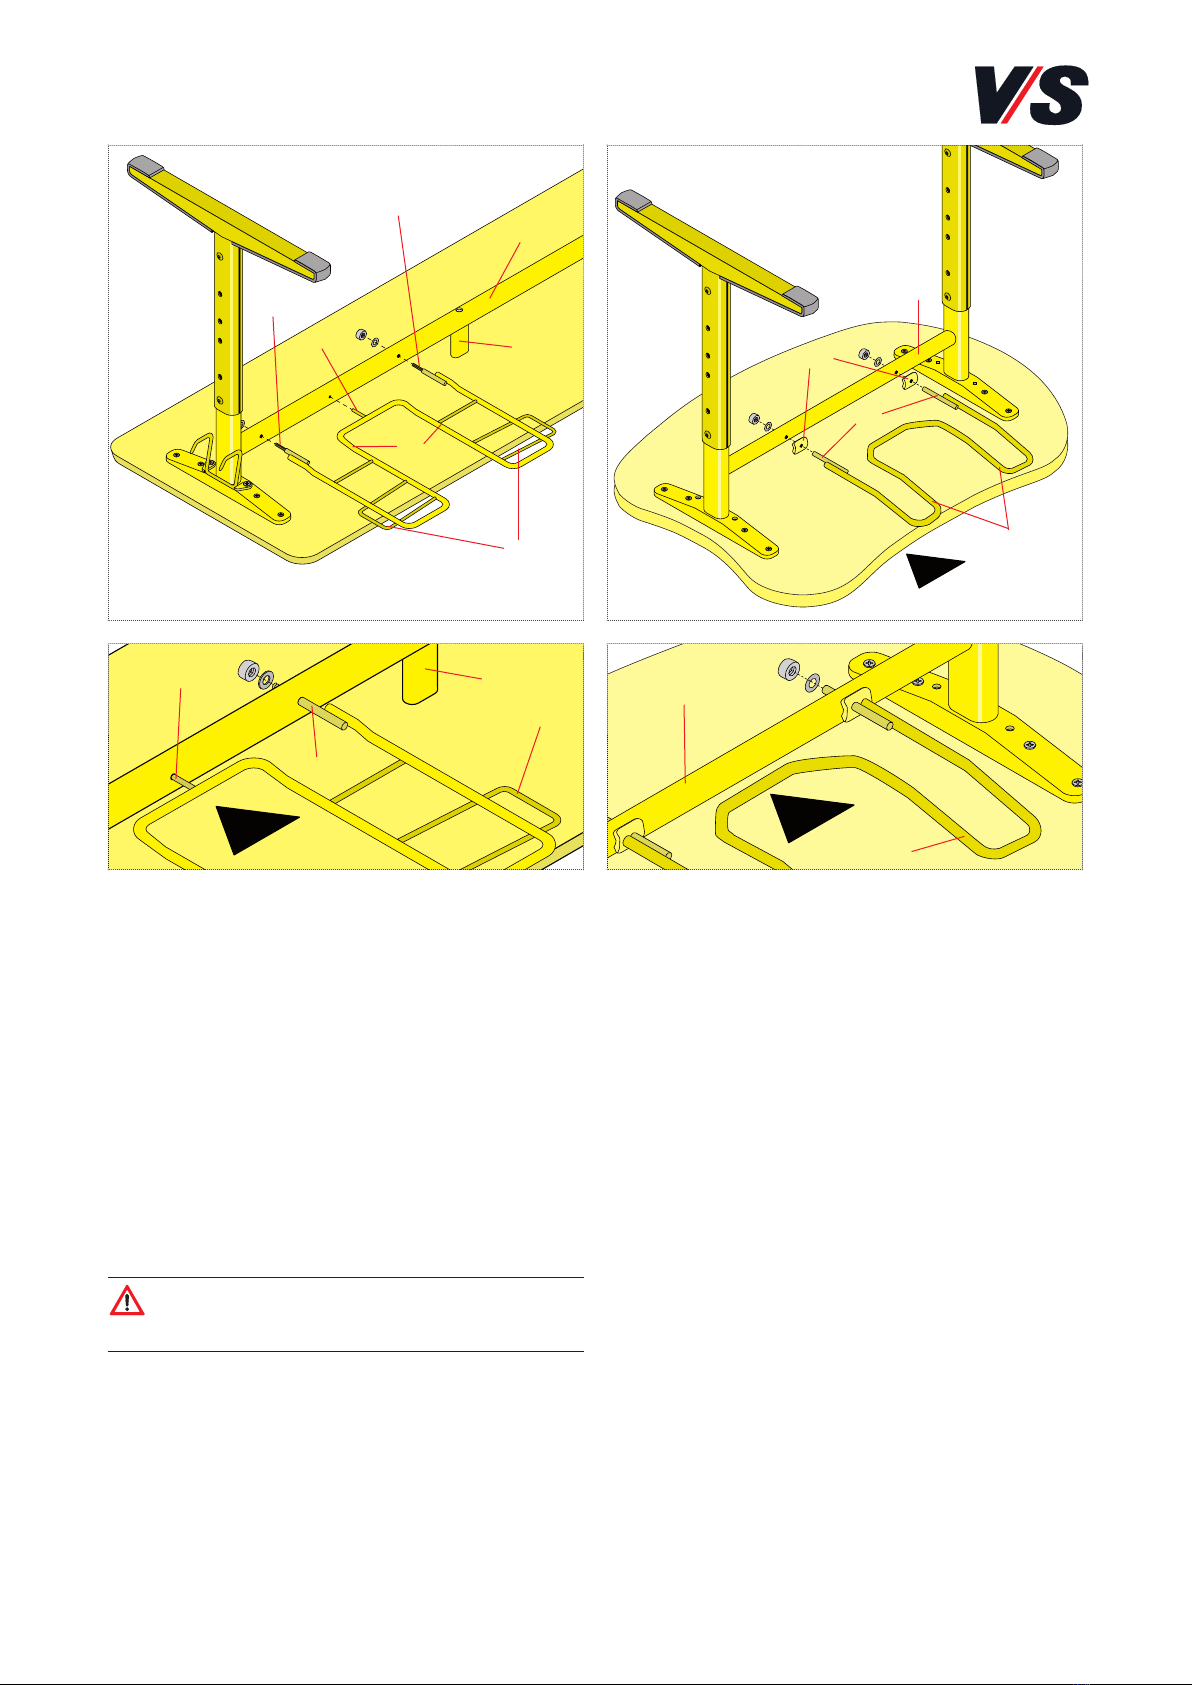
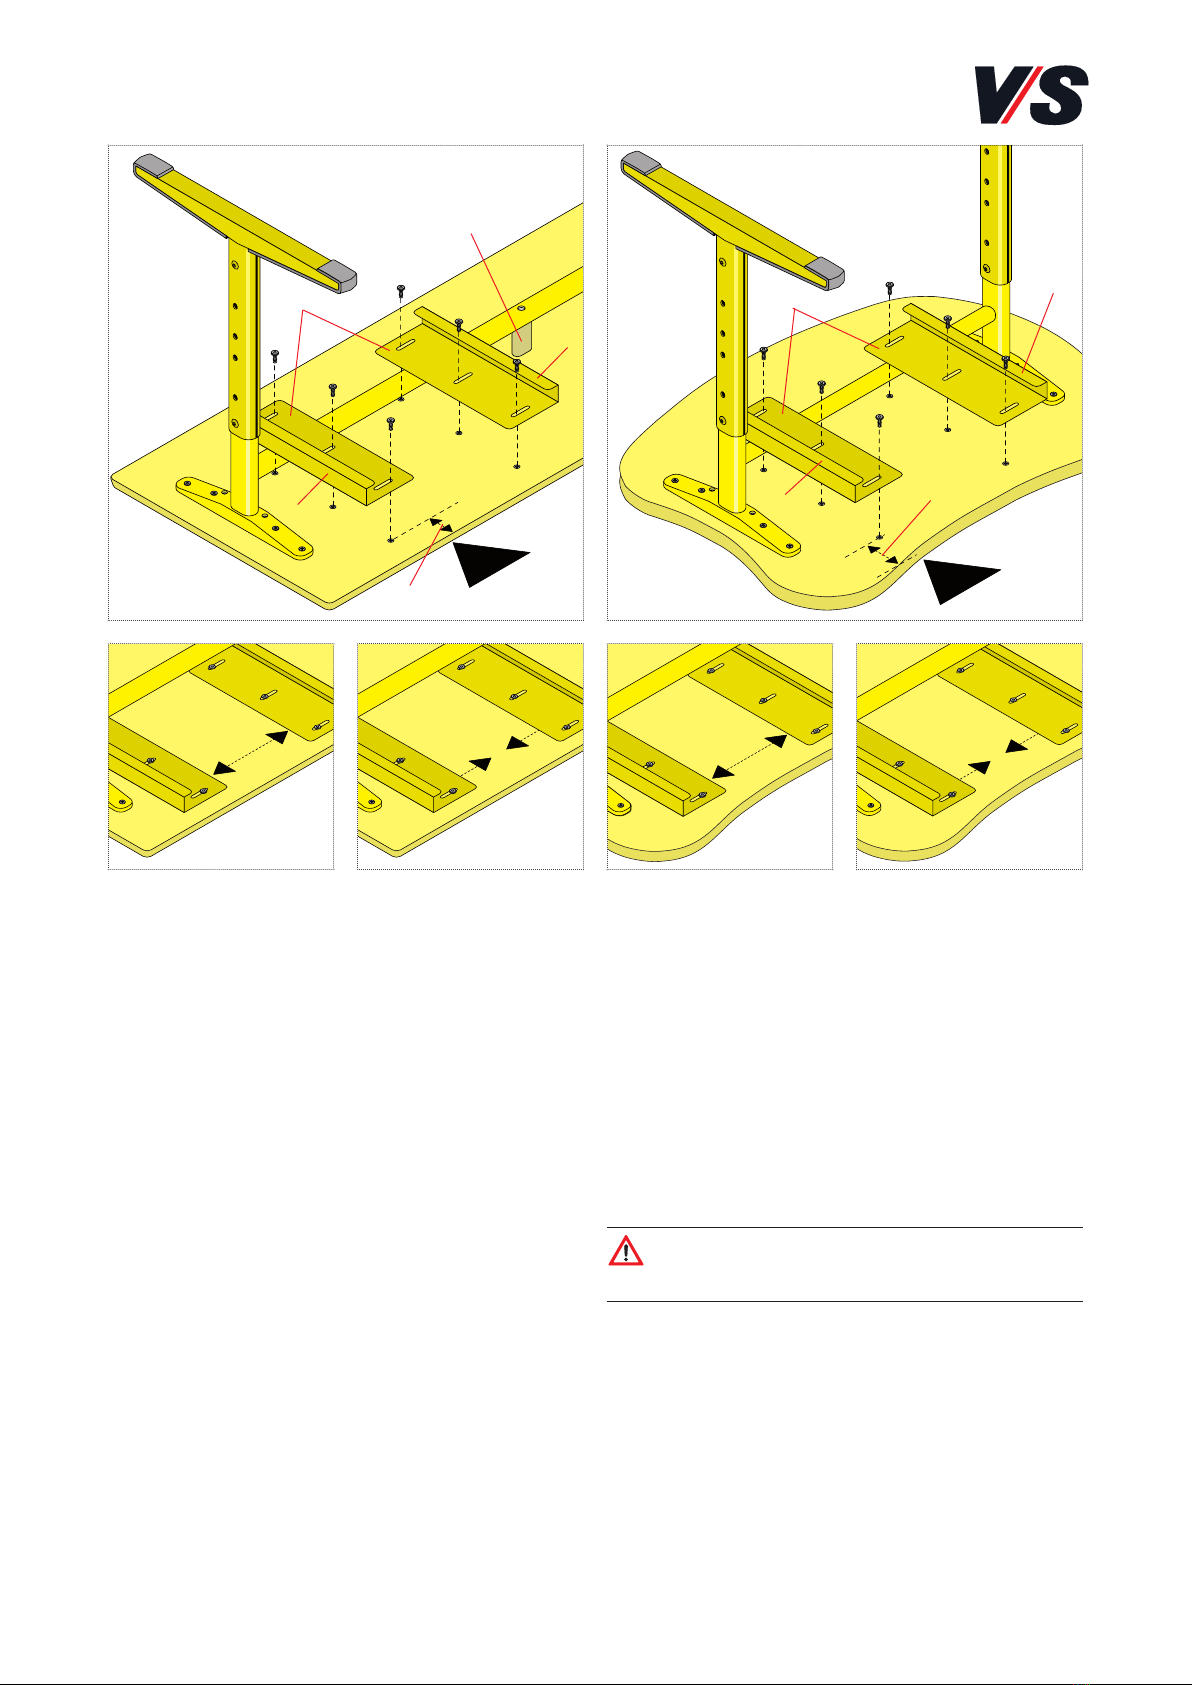
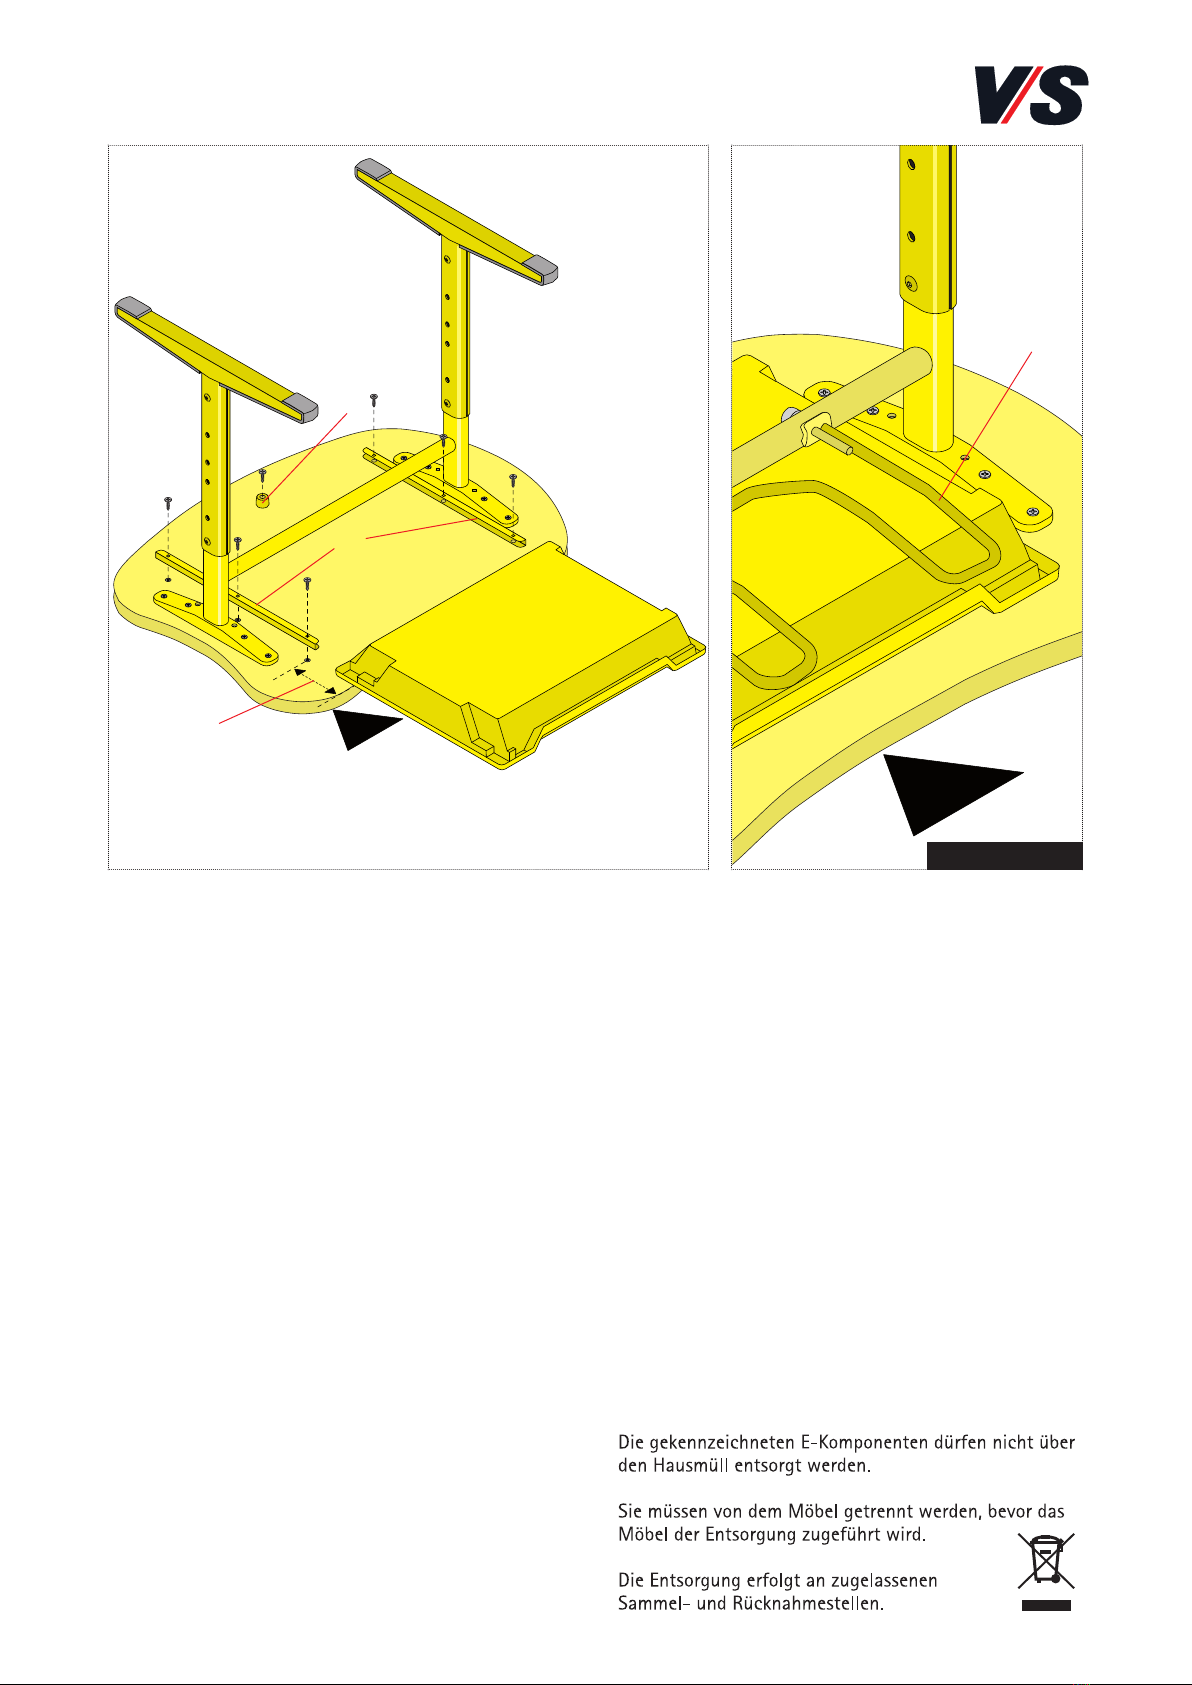
VS LIGNOdur Uno-M-Step 22405 User manual

VS Vereinigte Spezialmöbelfabriken GmbH & Co.KG
http://links.vs-service.com/downloads/70-196_V04_DEENFR_UnoMStep-22405-11-144949.pdf
INSTRUCTIONS DE MONTAGE: 70-196 V04 000918
Uno-M-Step.
UnoBean-Step
Valable pour les modèles :
22405 à 22411, 01468.
22412, 22413.
A conserver soigneusement !
ASSEMBLY INSTRUCTIONS: 70-196 V04 000918
Uno-M-Step.
UnoBean-Step
Valid for models:
22405 to 22411, 01468.
22412, 22413.
Please store this document in a safe place!
MONTAGEANLEITUNG: 70-196 V04 000918
Uno-M-Step.
UnoBean-Step
Gültig für die Modelle:
22405 bis 22411, 01468.
22412, 22413.
Bitte sorgfälltig aufbewahren!

2
Inhalt.
Allgemeiner Sicherheitshinweis 2
1. Allgemeine Informationen 2
2. Tischgestell aufschrauben.
- LIGNOdur. Uno-M-Step 22405, 22408, 22409, 22411 3
3. Tischgestell aufschrauben.
- LIGNOpal. Uno-M-Step 22406,
22407, 22410, 22412, 22413 4
- LIGNOpal. UnoBean-Step 01468 4
Zubehör montieren
4. Mappenhaken und Gitterbuchablage montieren
- Uno-M-Step 22405-22413 5
- UnoBean-Step 01468 5
5. Stuhlabhängung mit Ablage montieren
- Uno-M-Step 22405-22413 6
- UnoBean-Step 01468 6
6. Stuhlabhängeschienen montieren
- Uno-M-Step 22405-22413 7
- UnoBean-Step 01468 7
7. Universalbox montieren
- UnoBean-Step 01468 8
Allgemeiner Sicherheitshinweis
In unseren Bedienanleitungen verwenden wir folgende
Symbole und Hinweise:
Achtung! Bei diesem Symbol handelt es sich um einen
sehr wichtigen Hinweis.
1. Allgemeine Informationen
Vor Beginn der Montage ist zu prüfen, ob die gelieferten
Teile mit den Montage- bzw. Lieferscheinen (und Plänen)
übereinstimmen und ob Transportschäden vorhanden sind.
Sollte die korrekte Aufstellung der Möbel nicht möglich
sein, dann ist eine Rücksprache mit dem Kundendienst in
der VS-Zentrale notwendig.

3
LIGNOdur LIGNOdur
(1)
(4)
(6)
(2)
(3)
(7)
(6)
Modell 22411
-LIGNOdur Zweisitzer 22405
Plattenstütze (7) 260 mm von der Nutzerseite (4) stellen.
Das Tischgestell (1) auf die Tischplattenunterseite (3)
legen. Über die beiden Lochreihen ausrichten. Die linke
vordere Befestigungsposition (3) ist 130 mm von der
Nutzerseite (4) (-> außer Mitte). Je Seite mit den bei-
den Senkkopfschrauben ø 6,3x15,5 mm an den äußeren
Positionen (6) anschrauben. Plattenstütze (7) mit einer
Zylinderkopfschraube M6x70 mm anschrauben.
-LIGNOdur Zweisitzer 22411
Das Tischgestell (1) auf die Tischplattenunterseite (2)
legen. Über die beiden Lochreihen ausrichten. Die linke
vordere Befestigungsposition (3) ist 130 mm von der
Nutzerseite (4) (-> außer Mitte). Je Seite und in der
Mitte mit beiden Senkkopfschrauben ø 6,3x15,5 mm an
den äußeren Positionen (6) anschrauben.
2. Tischgestell aufschrauben
LIGNOdur
Uno-M-Step 22405, 22408, 22409, 22411
-LIGNOdur Einsitzer 22408
Das Tischgestell (1) auf die Tischplattenunterseite (2)
legen. Über die beiden Lochreihen ausrichten. Die linke
vordere Befestigungsposition (3) ist 130 mm von der
Nutzerseite (4) (-> außer Mitte). Je Seite mit den bei-
den Senkkopfschrauben ø 6,3x15,5 mm an den äußeren
Positionen (6) anschrauben.
-LIGNOdur Einsitzer 22409
Das Tischgestell (1) auf die Tischplattenunterseite (2)
legen. Über die beiden Lochreihen ausrichten. Die linke
vordere Befestigungsposition (3) ist 140 mm von der
Nutzerseite (4). Je Seite mit den beiden Senkkopf-
schrauben ø 6,3x15,5 mm an den äußeren Positionen
(6) anschrauben.

4
LIGNOpal LIGNOpal
(1)
(4)
(4)
(12)
(13)
(12)
(13)
(16)
(11)
(10)
(14)
(8)
Modell 01468
3. Tischgestell aufschrauben
LIGNOpal
Uno-M-Step
22406, 22407, 22410,
22412, 22413
UnoBean-Step 01468
Die Tischplatte wird umgekehrt auf eine saubere Montage-
fläche gelegt (z.B. Schutzdecke etc.).
-LIGNOpal Einsitzer 22410, 22412
Vier Füllstücken (8) in das Gestell (1) eindrücken. Das
Tischgestell (1) auf die Tischplattenunterseite (10) legen.
Über die beiden Lochreihen ausrichten. Die linke vordere
Befestigungsposition (11) ist 140 mm von der Nutzer-
seite (4). Je Seite mit den beiden Spaxschrauben 6x32
mm an den inneren (12) und 6x24 mm an den äußeren
(13) Positionen anschrauben.
-LIGNOpal Zweisitzer 22406, 22413
Plattenstütze (14) 325 mm von der Nutzerseite (4)
stellen. Vier Füllstücken (8) in das Gestell (1) eindrücken.
Das Tischgestell (1) auf die Tischplattenunterseite (10)
legen. Über die beiden Lochreihen ausrichten. Die linke
vordere Befestigungsposition (11) ist 140 mm von der
Nutzerseite (4). Je Seite mit den beiden Spaxschrauben
6x32 mm an den inneren (12) und 6x24 mm an den
äußeren (13) Positionen anschrauben. Plattenstütze (14)
mit einer Senkkopfschrauben 6x80 mm anschrauben.
-LIGNOpal Zweisitzer 22407
Wie Zweisitzer 22406 vorher.
-LIGNOpal Einsitzer 01468
Wie Einsitzer 22410 vorher. Jedoch ist die linke vordere
Befestigungsposition (16) 165 mm von der Nutzerseite (4).

5
(1)
(2)
(1)
(2)
(1)
(2)
(1)
(2)
(3) (3)
(4)
(4)
(4)
4. Mappenhaken und Gitterbuchablage
montieren
Uno-M-Step
22405-22413
UnoBean-Step 01468
Die Tischplatte wird umgekehrt auf eine saubere Montage-
fläche gelegt (z.B. Schutzdecke etc.).
-Mappenhaken
Modelle 22405 bis 22413 und 01468
Mappenhaken (1) mit 2 Schrauben 4,8x19 mm in den
dafür vorgesehenen Bohrungen im Gestell befestigen.
Bei Modell 01468 (Einsitzer) wird der Mappenhaken
generell auf der linken Seite von der Nutzerseite (4)
montiert.
-Gitterbuchablage
LIGNOdur 22405, 22408, 22409, 22411
Die Gitterbuchablage (2) über die vorgebohrten Löcher
positionieren (Abstand (3) von der Nutzerseite (4) beträgt
88 mm bzw. 68 mm bei Modell 22411). Jede Gitterbuch-
ablage mit 4 Blechschrauben 4,8x13 mm anschrauben.
-Gitterbuchablage
LIGNOpal 22406, 22407, 22410, 22412, 22413,
01468.
Die Gitterbuchablage (2) über die vorgebohrten Löcher
positionieren (Abstand (3) von der Nutzerseite (4) beträgt
88 mm bzw. 133 mm bei Modell 01468). Jede Gitterbuch-
ablage mit 4 Blechschrauben 5x20 mm anschrauben.

6
(4) (4)
(4)
(12)
(11)
(11)
(7)
(6)
(7)
(5)
(6)
(7)
(8)
(9)
(5)
(6)
(6)
(7)
(8)
(9)
(10)
5. Stuhlabhängung mit Ablage
montieren
Uno-M-Step
22405-22410, 22412, 22413
UnoBean-Step 01468
Die Tischplatte wird umgekehrt auf eine saubere Montage-
fläche gelegt (z.B. Schutzdecke etc.).
-Modelle 22405 bis 22413
Die Stuhlaufhängung (5) von der Nutzerseite (4) mit
den Gewindebolzen (6) in den Quersteg (7) einstecken.
Die dünnen Drahtspangen (8) müssen zur Tischplatte
zeigen. Den mittleren Bolzen (9) einstecken und die
Stuhlaufhängung ganz durchschieben. Mit der Scheibe
und der M8 Hutmutter festschrauben.
Achtung! In Verbindung mit der Stuhlaufhängung
darf bei den Modellen 22408 und 22409 (Einsitzer)
keine Plattenstütze (11) montiert werden.
-Modelle 01468
Zuerst die beiden Distanzscheiben (12) in die Gewinde-
bolzen (6) der Stuhlaufhängung (5) aufstecken. Die
Stuhlaufhängung (5) von der Nutzerseite (4) mit den
Gewindebolzen (6) in den Quersteg (7) einstecken,
worauf zu achten ist, dass sich die Wölbung der
Distanzscheiben an den Rundrohr-Quersteg anschmiegt.
Die Abkröpfungen (10) der Stuhlaufhängung mussen
zur Tischplatte zeigen. Mit der Scheibe und der M8
Hutmutter festschrauben.

7
(1)
(2)
(5)
(6) (7) (7)(6)
(8)
(1)
(2)
(5)
(5)
(5)
(4) (4)
6. Stuhlabhängeschienen montieren
Uno-M-Step
22405-22413
UnoBean-Step 01468
Die Tischplatte wird umgekehrt auf eine saubere Montage-
fläche gelegt (z.B. Schutzdecke etc.).
-LIGNOdur 22405, 22408, 22409, 22411
Die Stuhlaufhängeschienen (1) über die vorgebohrten
Löcher in der Tischplatte positionieren (Abstand (2) von
der Nutzerseite (4) beträgt 50 mm). Dabei zeigen die
Abkantungen (5) der Schienenpaare immer nach au-
ßen. Über die Langlöcher in den Stuhlaufhängeschienen
kann man die Größe der Sitzschale eingestellt werden
(nach außen <---> große Sitzschale (6) /nach innen
>---< kleine Sitzschale (7)). Jede Stuhlaufhängeschiene
mit 3 Flachkopfschrauben M6x12 mm anschrauben.
-LIGNOdur 22406, 22407, 22410, 22412, 22413,
01468.
Die Stuhlaufhängeschienen (1) über die vorgesehenen
Muffen in der Tischplatte positionieren (Abstand (2)
von der Nutzerseite (4) beträgt 50 mm bzw. 76/85 mm
bei Modell 01468). Dabei zeigen die Abkantungen (5)
der Schienenpaare immer nach außen. Über die Lang-
löcher in den Stuhlaufhängeschienen kann man die
Größe der Sitzschale eingestellt werden (nach außen
<---> große Sitzschale (6) / nach innen >---< kleine
Sitzschale (7)). Jede Stuhlaufhängeschiene mit 3 Flach-
kopfschrauben M6x15 mm anschrauben.
Achtung! In Verbindung mit der Stuhlaufhängung darf
bei den Modellen 22408 und 22409 (Einsitzer) keine
Plattenstütze (8) montiert werden.

8
(6)
(5)
(5)
(1)
(2)
(3)
(4)
(4)
Modell 01468
7. Universalbox montieren
UnoBean-Step 01468
Die Tischplatte wird umgekehrt auf eine saubere Montage-
fläche gelegt (z.B. Schutzdecke etc.).
- Die Führungsschienen (1) über die vorgebohrten Löcher
in der Tischplatte positionieren (Abstand (2) von der
Nutzerseite (4) beträgt 100/108 mm). Dabei zeigen die
Öffnungen der Führungsschienen zueinander. Jede Füh-
rungsschiene mit 3 Senkkopfschrauben 3,5x15 mm an-
schrauben.
Der Gummistopper (3) mit 1 Spaxschraube 4x20 mm
in die dafür vorgesehene Bohrung in der Tischplatte
befestigen. Die Universalbox inkl. Deckel (5) von der
Nutzerseite (4) aus in die beiden Fuhrungsschienen (1)
einschieben bis zum Gummistopper (3).
Die Kombination Universalbox (5) mit Stuhlaufhängung
(6) ist ebenfalls möglich.

9
Contents.
General note on safety 9
1. General information 9
2. Screwing on table frame.
- LIGNOdur. Uno-M-Step 22405, 22408, 22409, 2241110
3. Screwing on table frame.
- LIGNOpal. Uno-M-Step 22406,
22407, 22410, 22412, 22413 11
- LIGNOpal. UnoBean-Step 01468 11
Mounting accessories
4. Mounting schoolbag hook and lattice bookshelf
- Uno-M-Step 22405-22413 12
- UnoBean-Step 01468 12
5. Mounting chair suspension with shelf
- Uno-M-Step 22405-22413 13
- UnoBean-Step 01468 13
6. Mounting chair-suspension runners
- Uno-M-Step 22405-22413 14
- UnoBean-Step 01468 14
7. Mounting universal box
- UnoBean-Step 01468 15
General note on safety
We use the following symbols and notes in our assembly
instructions:
Caution! This symbol refers to an
important note on assembly.
1. General information
Before commencing assembly, check whether the supplied
parts correspond to those in the assembly/delivery notes
(and drawings) and whether they have been damaged du-
ring transportation. If you are unable to erect the furniture
correctly, please consult the Customer Service department
at VS Head Office.

10
(1)
(4)
(5)
(5)
(6)
(6)
(2)
(3)
(7)
LIGNOdur LIGNOdur
Model 22411
-LIGNOdur two-seater 22405
Position the table top support (7) 260 mm from the
user side (4). Place the table frame (1) on the bottom
of the table top (3). Align it against the two rows of
holes. The front left fixing position (3) is 130 mm from
the user side (4) (-> off-centre). On each side, use the
two countersunk-head screws ø 6.3x15.5 mm to screw
on at the outside positions (6). Screw on the table top
support (7) using a fillister-head screw M6x70 mm.
-LIGNOdur two-seater 22411
Place the table frame (1) on the bottom of the table
top (2). Align it against the two rows of holes. The
front left fixing position (3) is 130 mm from the user
side (4) (-> off-centre). On each side and in the middle,
use the two countersunk-head screws ø 6.3x15.5 mm
to screw on at the outside positions (6).
2. Screw on the table frame
LIGNOdur
Uno-M-Step 22405, 22408, 22409, 22411
-LIGNOdur one-seater 22408
Place the table frame (1) on the bottom of the table
top (2). Align it against the two rows of holes. The
front left fixing position (3) is 130 mm from the user
side (4) (-> off-centre). On each side, use the two
countersunk-head screws ø 6.3x15.5 mm to screw on
at the outside positions (6).
-LIGNOdur one-seater 22409
Place the table frame (1) on the bottom of the table
top (2). Align it against the two rows of holes. The front
left fixing position (3) is 140 mm from the user side (4).
On each side, use the two countersunk-head screws
ø 6.3x15.5 mm to screw on at the outside positions (6).

11
LIGNOpal LIGNOpal
(1)
(4)
(4)
(12)
(13)
(12)
(13)
(16)
(11)
(10)
(14)
(8)
Model 01468
3. Screwing on table frame
LIGNOpal
Uno-M-Step
22406, 22407, 22410,
22412, 22413
UnoBean-Step 01468
Turn the table top over and lay on a clean assembly surface
(e.g. protective cover, etc.).
-LIGNOpal one-seater 22410, 22412
Press four filler pieces (8) into the frame (1). Lay the
table frame (1) on the underside of the table top (10).
Align by way of the two rows of holes. The front left
fastening position (11) is 140 mm from the user side
(4). Screw down on each side with the two 6x32 mm
Spax screws at the inner (12) and with 6x24 mm at the
outer (13) positions.
-LIGNOpal two-seater 22406, 22413
Position the table-top support (14) 325 mm from the
user side (4). Press four filler pieces (8) into the frame
(1). Lay the table frame (1) on the underside of the ta-
ble top (10). Align by way of the two rows of holes. The
front left fastening position (11) is 140 mm from the
user side (4). Screw down on each side with the two
6x32 mm Spax screws at the inner (12) and with 6x24
mm at the outer (13) positions. Screw on the table-top
support (14) with one 6x80 mm countersunk-head
screw.
-LIGNOpal two-seater 22407
As two-seater 22406 above.
-LIGNOpal one-seater 01468
As one-seater 22410 above. But the front left fastening
position (16) is 165 mm from the user side (4).

12
(1)
(2)
(1)
(2)
(1)
(2)
(1)
(2)
(3) (3)
(4)
(4)
(4)
4. Mounting schoolbag hook and lattice
bookshelf
Uno-M-Step
22405-22413
UnoBean-Step 01468
Turn the table top over and lay on a clean assembly surface
(e.g. protective cover, etc.).
-Schoolbag hook
Models 22405 to 22413 and 01468
Fasten the schoolbag hook (1) with two 4.8x19 mm
screws in the designated holes in the frame. On model
01468 (one-seater) the schoolbag hook is normally
mounted on the left side from the user side (4).
-Lattice bookshelf
LIGNOdur 22405, 22408, 22409, 22411
Position the lattice bookshelf (2) over the predrilled
holes (distance (3) from the user side (4) is 88 mm or
68 mm for model 22411). Screw on each lattice books-
helf with four 4.8x13 mm sheet screws.
-Lattice bookshelf
LIGNOpal 22406, 22407, 22410, 22412, 22413,
01468
Position the lattice bookshelf (2) over the predrilled
holes (distance (3) from the user side (4) is 88 mm or
133 mm for model 01468). Screw on each lattice
bookshelf with four 5x20 mm sheet screws.

13
(4) (4)
(4)
(12)
(11)
(11)
(7)
(6)
(7)
(5)
(6)
(7)
(8)
(9)
(5)
(6)
(6)
(7)
(8)
(9)
(10)
5. Mounting chair suspension with shelf
Uno-M-Step
22405-22410, 22412, 22413
UnoBean-Step 01468
Turn the table top over and lay on a clean assembly surface
(e.g. protective cover, etc.).
-Models 22405 to 22413
Insert the chair suspension (5) from the user side (4)
with the threaded pins (6) into the cross-bar (7). The
thin wire links (8) must point to the table top. Insert
the middle pin (9) and slide the chair suspension
through completely. Screw down with the washer and
the M8 cap nut.
Caution! In conjunction with the chair suspension do
not mount a top support (11) on the models 22408 and
22409 (one-seater).
-Models 01468
First attach the two spacers (12) to the threaded pins
(6) of the chair suspension (5). Insert the chair suspen-
sion (5) from the user side (4) with the threaded pins
(6) into the cross-bar (7), making sure the curvature of
each spacer fits snugly onto the round-tube cross-bar.
The offsets (10) of the chair suspension must point to
the table top. Screw down with the washer and the M8
cap nut.

14
(1)
(2)
(5)
(6) (7) (7)(6)
(8)
(1)
(2)
(5)
(5)
(5)
(4) (4)
6. Mounting chair-suspension runners
Uno-M-Step
22405-22413
UnoBean-Step 01468
Turn the table top over and lay on a clean assembly surface
(e.g. protective cover, etc.).
-LIGNOdur 22405, 22408, 22409, 22411
Position the chair-suspension runners (1) over the pre-
drilled holes in the table top (distance (2) from the user
side (4) is 50 mm). Here the folded edges (5) of the
runner pairs always point outwards. The size of the seat
shell can be adjusted via the elongated holes in the
chair-suspension runners (outwards < --- > large seat
shell (6) /inwards >---< small seat shell (7)). Screw on
each chair-suspension runner with three M6x12 mm
slotted pan-head screws.
-LIGNOdur 22406, 22407, 22410, 22412, 22413,
01468
Position the chair-suspension runners (1) over the de-
signated sleeves in the table top (distance (2) from the
user side (4) is 50 mm or 76/85 mm for model 01468).
Here the folded edges (5) of the runner pairs always
point outwards. The size of the seat shell can be adjusted
via the elongated holes in the chair-suspension runners
(outwards < --- > large seat shell (6) /inwards >---<
small seat shell (7)). Screw on each chair-suspension
runner with three M6x15 mm slotted pan-head screws.
Caution! In conjunction with the chair suspension do
not mount a top support (8) on the models 22408 and
22409 (one-seater).

15
(6)
(5)
(5)
(1)
(2)
(3)
(4)
(4)
Model 01468
7. Mounting universal box
UnoBean-Step 01468
Turn the table top over and lay on a clean assembly surface
(e.g. protective cover, etc.).
- Position the guide rails (1) over the predrilled holes in
the table top (distance (2) from the user side (4) is
100/108 mm). Here the openings of the guide rails
point to each other. Screw on each guide rail with
three 3.5x15 mm countersunk-head screws.
Secure the rubber stopper 2 with one 4x20 mm Spax
screw in the designated hole in the table top. Slide the
universal box incl. lid (5) from the user side (4) into the
two guide rails (1) up against the rubber stopper (3).
It is also possible to combine the universal box (5) with
the chair suspension (6).

16
Sommaire.
Consignes générales de sécurité 16
1. Généralités 16
2. Montage du piètement.
- LIGNOdur. Uno-M-Step 22405, 22408, 22409, 22411 17
3. Montage du piètement.
- LIGNOpal. Uno-M-Step 22406, 22407, 22410, 22412,
22413 18
- LIGNOpal. UnoBean-Step 01468 4
Montage des accessoires
4. Montage du crochet porte-sac et du casier en
treillis métal
- Uno-M-Step 22405-22413 19
- UnoBean-Step 01468 19
5. Montage du porte-chaise avec porte-document
- Uno-M-Step 22405-22413 20
- UnoBean-Step 01468 20
6. Montage des rails du porte-chaise
- Uno-M-Step 22405-22413 21
- UnoBean-Step 01468 21
7. Montage Universalbox
- UnoBean-Step 01468 22
Consignes générales de sécurité
Dans nos modes d'emploi, nous utilisons les symboles et les
remarques suivants :
Attention ! Ce symbole fait référence à une note
très importante.
1. Généralités
Avant de procéder au montage. Vérifier que les pièces liv-
rées correspondent au bon de livraison respectivement aux
plans du montage et que la livraison n’a pas été endomma-
gée pendant le transport. Au cas où un montage correct ne
semblerait pas possible, veuillez contacter le service après-
vente de votre représentant VS.

17
(1)
(4)
(5)
(5)
(6)
(6)
(2)
(3)
(7)
LIGNOdur LIGNOdur
Modèle 22411
-LIGNOdur table biplace 22405
Placer le support plateau (7) à 260 mm du côté utilisa-
teur (4). Poser le piétement de la table (1) sur l'envers
du plateau de table (3). Aligner sur les deux rangées de
perforations. La position de fixation avant gauche (3)
est à 130 mm du côté utilisateur (4) (-> sauf au centre).
Fixer le piétement de chaque côté à l’aide des vis à tête
fraisée ø 6,3x15,5 mm sur les positions externes (6).
Visser le support plateau (7) au moyen d'une vis à tête
lentiforme M6x70 mm.
-LIGNOdur table biplace 22411
Poser le piétement de la table (1) sur l'envers du plateau
de table (2). Aligner sur les deux rangées de perforations.
La position de fixation avant gauche (3) est à 130 mm
du côté utilisateur (4) (-> sauf au centre). Fixer le
piétement au centre à l’aide des vis à tête fraisée
ø 6,3x15,5 mm sur les positions externes (6).
2. Montage du piètement
LIGNOdur
Uno-M-Step 22405, 22408, 22409, 22411
-LIGNOdur table monoplace 22408
Poser le piétement de la table (1) sur l'envers du plateau
de table (2). Aligner sur les deux rangées de perforations.
La position de fixation avant gauche (3) est à 130 mm
du côté utilisateur (4) (-> sauf au centre). Fixer de
piétement de chaque côté à l’aide des vis à tête fraisée
vis ø 6,3x15,5 mm sur les positions externes (6).
-LIGNOdur table monoplace 22409
Poser le piètement de table (1) sur l'envers du plateau (2).
Aligner sur les deux rangées de perforations. La position
de fixation avant gauche (3) est à 140 mm du côté
utilisateur (4). Fixer le piétement de chaque côté à l’aide
des vis à tête fraisée ø 6,3x15,5 mm sur les positions
externes (6).

18
LIGNOpal LIGNOpal
(1)
(4)
(4)
(12)
(13)
(12)
(13)
(16)
(11)
(10)
(14)
(8)
Modèle 01468
3. Montage du piètement
LIGNOpal
Uno-M-Step
22406, 22407, 22410,
22412, 22413
UnoBean-Step 01468
Poser le plateau à l’envers sur un plan de travail propre
(p. ex. sur une couverture, etc.).
-LIGNOpal table monoplace 22410, 22412
Enfoncer les flipots (8) dans le piètement (9). Poser le
piètement (1) sur l'envers du plateau de table (10). Ali-
gner sur les deux rangées de perforations. La position
de fixation avant gauche (11) est à 140 mm du chant
côté utilisateur (4). Visser de chaque côté les deux vis à
bois 6x32 mm en position intérieure (9) et 6x24 mm en
position extérieure (13).
-LIGNOpal table biplace 22406, 22413
Poser le support plateau (14) au centre du plateau de
table (remarque : une seule perforation (15) à 300 mm
du chant arrière) et fixer à l’aide des deux vis à bois
6x20 mm. Enfoncer les flipots (8) dans le piètement (1).
Poser le piètement (1) sur l'envers du plateau de table
(10). Aligner sur les deux rangées de perforations. La
position de fixation avant gauche (11) est à 140 mm
du chant côté utilisateur (4). Visser de chaque côté les
deux vis à bois 6x32 mm en position intérieure (12)
et 6x24 mm en position extérieure (13). Fixer le sup-
port plateau (14) avec une vis Parker 4,8x32 mm.
-LIGNOpal table biplace 22407
Voir la table biplace 22406 décrite précédemment.
-LIGNOpal table monoplace 01468
Voir table monoplace 22410 ci-dessus. Noter que la
position de la fixation avant gauche (16) est à 165 mm
du côté utilisateur (4).

19
(1)
(2)
(1)
(2)
(1)
(2)
(1)
(2)
(3) (3)
(4)
(4)
(4)
4. Montage du crochet porte-sac et du
casier en treillis métal
Uno-M-Step
22405-22413
UnoBean-Step 01468
Poser le plateau à l’envers sur un plan de travail propre
(p. ex. sur une couverture, etc.).
-Crochet porte-sac
Modèles 22405 à 22413 et 01468
Fixer le crochet porte-sac (1) à l'aide des 2 vis 4,8x19
mm dans les perforations prévues à cet effet dans le
piètement. Pour le modèle 01468 (monoplace), le cro-
chet porte-sac est en général monté à gauche du côté
utilisateur (4).
-Casier treillis métal
LIGNOdur 22405, 22408, 22409, 22411
Placer le casier treillis métal (2) au-dessus des perfora-
tions (la distance (3) du côté utilisateur (4) est de 88
mm ou 68 mm pour le modèle 22411). Fixer le casier
treillis métal à l'aide des 4 vis Parker 4,8x13 mm.
LIGNOpal 22406, 22407, 22410, 22412, 22413,
01468.
Placer le casier treillis métal (2) au-dessus des perfo-
rations (la distance (3) du côté utilisateur (4) est de
88 mm resp. 133 mm pour le modèle 01468). Fixer lle
casier treillis métal à l'aide des 4 vis Parker 5x20 mm.

20
(4) (4)
(4)
(12)
(11)
(11)
(7)
(6)
(7)
(5)
(6)
(7)
(8)
(9)
(5)
(6)
(6)
(7)
(8)
(9)
(10)
5. Montage du porte-chaise avec porte-
document
Uno-M-Step
22405-22410, 22412, 22413
UnoBean-Step 01468
Poser le plateau à l’envers sur un plan de travail propre
(p. ex. sur une couverture, etc.).
-Modelle 22405 à 22413
Introduire le porte-chaise (5) par le goujon fileté (6)
dans la traverse (7) en passant par le côté utilisateur
(4). Les agrafes métalliques (8) sont orientées côté
plateau de table. Faire glisser entièrement le goujon
central (9) dans le porte-chaise. Fixer à l'aide de la
rondelle et de l'écrou borgne M8.
Attention ! Pour les modèles 22408 et 22409 (mono-
place), il ne faut pas monter de support plateau (11) lors
du montage du porte-chaise.
-Modelle 01468
Introduire d'abord les deux rondelles d'écartement (12)
dans les goujons filetés (6) du porte-chaise. Puis intro-
duire le porte-chaise (5) par le goujon fileté (6) dans
la traverse (7) en passant par le côté utilisateur (4) en
veillant à ce que l'arrondi des rondelles d'écartement
épousent la forme de la traverse en tube d'acier. Les
parties coudées (10) du porte-chaise sont orientées
côté plateau de table. Fixer avec la rondelle et l'écrou
borgne M8.
This manual suits for next models
9
Table of contents
Languages:
Other VS Indoor Furnishing manuals
Popular Indoor Furnishing manuals by other brands

fantastic furniture
fantastic furniture Nicholls Lamp Table Black Ash quick start guide

Rolf Benz
Rolf Benz 50 Assembly instructions

Lightolier
Lightolier Lytecaster 378X specification

Verco
Verco Profile operating instructions

Safavieh Furniture
Safavieh Furniture Ajana MED5703 manual

Edsbyn
Edsbyn Continental I-desk Assembly instruction