manuals.online logo
Brands
  1. Home
  2. •
  3. Brands
  4. •
  5. VS
  6. •
  7. Indoor Furnishing
  8. •
  9. VS 09448 User manual

VS 09448 User manual

VS Vereinigte Spezialmöbelfabriken GmbH&Co.KG
Hochhäuser Straße 8 · 97941 Tauberbischofsheim · Tel.: 09341/880 · [email protected]
http://links.vs-service.com/downloads/70-261_V01_DEEN_Leaf-165723.pdf
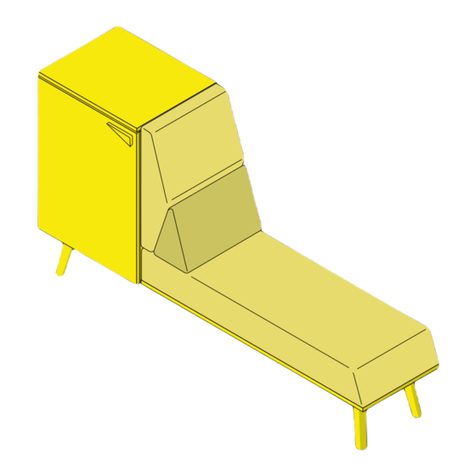
Intended use:
Tent elements for teaching establishments. Used together
with padded floor mats, Gugl/tent mast or Shift+ Landscape
cabinet modules, these create temporary withdrawal spaces
for children. No liability will be assumed for any use other
than that intended. The tent element can be packed toget-
her into a teardrop shape and stowed away in the storage
bag (model 09450). For indoor storage and use (in a dry,
dust-free environment).
General comments:
Before using the products, read these instructions carefully
and pay special attention to the safety instructions. Keep
these instructions for future consultation and communicate
them to other users.
General note on safety:
The following symbols and notes are used in these
instructions:
Important! This symbol indicates an important assembly
note.
Caution! This symbol indicates a very important
note.
On the Web:
These instructions are also available online for download via
the link indicated at the top of the page.
Scope of delivery:
see Fig. 1.1.
Bestimmung:
Zeltelemente für Bildungseinrichtungen. In Verbindung mit
Bodenpolstermatten, Gugl/Zeltmast oder Shift+ Landscape
Schrankmodulen entstehen temporäre Rückzugsorte für Kinder.
Für eine nicht bestimmungsgemäße Verwendung wird keine
Haftung übernommen. Das Zeltelement kann tropfenförmig
zusammengebunden und in der Aufbewahrungstasche Modell
09450 verstaut werden. Verwendung und Aufbewahrung im
Innenbereich (trocken und staubfrei).
Allgemeiner Hinweis:
Lesen Sie diese Anleitung vor Benutzung der Produkte sorg-
fältig und beachten Sie insbesondere auch die Sicherheits-
hinweise. Bewahren Sie die Anleitung zum späteren Nachlesen
auf bzw. geben Sie diese an andere Benutzer weiter.
Allgemeiner Sicherheitshinweis:
In dieser Anleitung verwenden wir folgende Symbole und
Hinweise:
Wichtig! Bei diesem Symbol handelt es sich um einen
wichtigen Montagehinweis.
Achtung! Bei diesem Symbol handelt es sich um einen
sehr wichtigen Hinweis.
Im Internet:
Diese Anleitung wird Ihnen auch online als Download bereit-
gestellt über den in der Kopfleiste angegebenen Link.
Lieferumfang:
siehe Abb. 1.1.
BEDIENUNGSANLEITUNG: 70-261 V01 010222
Leaf
ASSEMBLY INSTRUCTIONS: 70-261 V01 010222
Leaf
Zeltelement
Tent element
Modell 09448
Aufbewahrungstasche
Storage bag
Modell 09450
Zeltmast
Tent mast
Modell 09449
Zeltelement-Magnet-
beschlag (4er Set)
Tent element magnetic
fitting (set of 4)
Modell 09444
2
Betrieb:
Beachten Sie die Hinweise auf den folgenden Seiten.
Fehlersuche und Service:
Bei eventuell auftretenden Fehlern wenden Sie sich bitte an
den VS-Kundendienst: [email protected]
Reinigung:
Hinweise zur Reinigung finden Sie im Internet unter:
vs.de/kataloge/reinigung/
Weitergabe und Entsorgung:
Bei Weitergabe des Produkts ist auch diese Anleitung zu
übergeben. Für eine umweltfreundliche Entsorgung
informieren Sie sich bitte bei Ihrer zuständigen Kommune.
Use:
Please take account of the notes on the following pages.
Faults and service:
If any faults occur, please contact the
VS Customer Service: [email protected]
Cleaning:
Notes on cleaning can be found on the Web at:
vs.de/kataloge/reinigung/en
Transfer and disposal:
If the product is transferred to a new owner or user then it
must be accompanied by these instructions. Please contact
your responsible local authority department regarding
environmentally friendly disposal.
Kombinationsvarianten Combination variants
Magnetbefestigung
magnetic fitting
3
1. Aufbau der Zeltelemente
Mounting the tent elements
Vorbereiten der Zeltelemente: Nehmen Sie das Zelt-
element (1) aus der Verpackung (Polybeutel). Es ist mit
einem Band (2) zusammengebunden.
Achtung! Das Gebinde steht unter Spannung! Halten
Sie die Enden fest. Lösen Sie vorsichtig die Verbindung.
Breiten Sie das Zeltelement auf dem Boden aus und
bringen Sie die Rundstabenden (3) in die äußeren
Laschen (4) ein. Das gespannte Element kann an der
Polstermatte, am Zeltmast etc. angebracht werden.
Sollen die Elemente nach dem Abbauen in der Auf-
bewahrungstasche verstaut werden, gehen Sie in
umgekehrter Reihenfolge vor.
Preparing the tent elements: Remove the tent element
(1) from the packaging (polybag). It is bound together
with a band (2).
Caution! The packaging element is under tension!
Hold the ends tight. Carefully loosen the connection.
Spread the tent element out on the floor and insert the
round rod ends (3) into the outer tabs (4). When ten-
sioned, the element can be fastened to the padded mat,
the tent mast, etc. If you want to store the elements in
the storage bag after they have been dismounted then
proceed in the reverse order of steps.
Befestigung: Jedes Zeltelement verfügt durch die
Beschlagsteile über einen Befestigungspunkt auf der
schmalen und drei auf der breiten Seite. Diese sind mit
den entsprechenden Gegenstücken zu verbinden.
Beispiel Polstermatte (Abb. 1.2): Zum Verbinden
führen Sie das Beschlagsteil des Zeltelements (5) an
das der Polstermatte (6). Zum Lösen ziehen Sie am
roten Band (7).
Wichtig! Zur Gewährleistung der Verbindung müssen
die Beschläge staubfrei sein!
Fixing: With the fixing parts, each tent element
possesses one fixing point on the narrow side and
three on the wide side. These are to be connected
to the according counterpieces. Example of padded mat
(Fig. 1.2): To connect, guide the fixing part of the tent
element (5) to that of the padded mat (6). To release,
pull the red strap (7).
Important! The fittings must be dust-free to ensure the
connection!
DE
EN
DE
EN
1.2
1.1
(7)
(5)
(6)
(1)
(2)
(3)
(4)
4
Aufbau nur mit Polstermatte: Befestigen Sie zunächst
die drei Beschlagsteile der breiten Zeltelementseite an
den Beschlagsteilen der Polstermatte (8).Biegen Sie
dann das Zeltelement über die Matte und befestigen
Sie wiederum die Beschlagsteile (9) miteinander.
Mounting with padded mat only: First of all, fasten
the three fixing parts on the wide side of the tent
element to the fixing parts on the padded mat (8).
Then bend the tent element over the mat and attach
the fixing parts (9) together.
Aufbau mit Polstermatte 60°und Zeltmast:
Aus mehreren Elementen können runde Behausungen
(11) gebaut werden. Der Zeltelementbeschlag (9) wird
am Zeltmast-Halter (12) befestigt. Schieben Sie den
Halter entlang des Rundstabs (10) auf eine der zwei
möglichen Positionen und drehen Sie ihn so, dass der
Bolzen (13) in den Bajonettverschluss einrastet.
Mounting with 60° padded mat and tent mast:
Round enclosures (11) can be constructed by combining
several elements. The fixing part of the tent element (9) is
fastened to the tent mast holder (12). Slide the holder
along the tent pole (10) to one of the two positions
and turn it so that the bolt (13) engages in the bayonet
fixing.
Aufbau mit Polstermatte 60°, Gugl und Zeltmast:
Stellen Sie den Zeltmast mit dem Standteller (14) in
den Gugl (15) und verschließen Sie den Gugl von oben
mit der Abdeckplatte (16). Bringen Sie dann den Halter
(12) wie oben beschrieben an die gewünschte Position.
Mounting with 60° padded mat, Gugl and tent mast:
Place the tent mast with the mounting plate (14) in the
Gugl (15) and close this from above with the Gugl cover
plate (16). Then move the holder (12) to the desired
position as described above.
Aufbau mit Zeltelement-Magnetbeschlägen:
Die Beschläge (17) können an alle Shift+ Landscape
Schrankrückwände oder andere magnethaftende
Flächen angebracht und daran die Zeltelementseiten
befestigt werden (Kombinationsbeispiele auf Seite 2).
Mounting with tent element magnetic fittings:
The fittings (17) can be attached to all Shift+ Landscape
cabinet backs or other magnetic surfaces and the
sides of the tent elements can be attached to them
(see example combinations on page 2).
DE
EN
DE
EN
DE
EN
DE
EN
1.4
1.5
1.6
1.3
(8)
(9) (9)
(8)
(10)
(10)
(11)
(12)
(9)
(12)
(12)
(15)
(14)
(16)
(13)
(17)

This manual suits for next models

3

Other VS Indoor Furnishing manuals

VS LearnBox Series User manual

VS

VS LearnBox Series User manual

VS JustBe 40630 User manual

VS

VS JustBe 40630 User manual

VS 21707 Manual

VS

VS 21707 Manual

VS TriTable-II User manual

VS

VS TriTable-II User manual

VS Pareto-Twin 21758 User manual

VS

VS Pareto-Twin 21758 User manual

VS Uno-M-Step User manual

VS

VS Uno-M-Step User manual

VS Lounge HiBack Series User manual

VS

VS Lounge HiBack Series User manual

VS Pareto User manual

VS

VS Pareto User manual

VS OfficeBox 40500-05 User manual

VS

VS OfficeBox 40500-05 User manual

VS Shift+ Base Series User manual

VS

VS Shift+ Base Series User manual

VS LIGNOdur Uno-M-Step 22405 User manual

VS

VS LIGNOdur Uno-M-Step 22405 User manual

VS PantoSwing 31400 User manual

VS

VS PantoSwing 31400 User manual

VS 901 Series User manual

VS

VS 901 Series User manual

VS 800 Series User manual

VS

VS 800 Series User manual

VS Shift+ Landscape Cabinet modules User manual

VS

VS Shift+ Landscape Cabinet modules User manual

VS 800 Series User manual

VS

VS 800 Series User manual

VS 600 Series User manual

VS

VS 600 Series User manual

VS 21710 Manual

VS

VS 21710 Manual

VS Vis-a-Vis Lounge Series User manual

VS

VS Vis-a-Vis Lounge Series User manual

VS Niche 800 Series User manual

VS

VS Niche 800 Series User manual

VS StepByStep-I 02901 User manual

VS

VS StepByStep-I 02901 User manual

VS 31506 User manual

VS

VS 31506 User manual

VS Level Series User manual

VS

VS Level Series User manual

VS StepByStep-I User manual

VS

VS StepByStep-I User manual

Popular Indoor Furnishing manuals by other brands

Tenzo 7706 Assembly instruction

Tenzo

Tenzo 7706 Assembly instruction

Homeworks 75-101-BTC manual

Homeworks

Homeworks 75-101-BTC manual

Next WHITE HIGHSLEEPER 880598 Assembly instructions

Next

Next WHITE HIGHSLEEPER 880598 Assembly instructions

Cooper Lighting 1487 Specification sheet

Cooper Lighting

Cooper Lighting 1487 Specification sheet

pardo LOWLINE SINGLE Assembly instructions

pardo

pardo LOWLINE SINGLE Assembly instructions

Polywood 4601X Assembly instructions

Polywood

Polywood 4601X Assembly instructions

EXPEDO KNIGHT S2K5 Assembly manual

EXPEDO

EXPEDO KNIGHT S2K5 Assembly manual

Lightolier Lytespan 22OR3 specification

Lightolier

Lightolier Lytespan 22OR3 specification

Home Styles Pantry 88 5022 69 Assembly instructions

Home Styles

Home Styles Pantry 88 5022 69 Assembly instructions

Pronto Dressoir Assembly instructions

Pronto

Pronto Dressoir Assembly instructions

8i 210820 instructions

8i

8i 210820 instructions

IKEA BRIMNES 304.852.32 manual

IKEA

IKEA BRIMNES 304.852.32 manual

Closet Maid Selectives S25RPDW5 quick start guide

Closet Maid

Closet Maid Selectives S25RPDW5 quick start guide

Costway HU10110 user manual

Costway

Costway HU10110 user manual

VALERA 1265-WB Dimensions

VALERA

VALERA 1265-WB Dimensions

RIGHT ANGLE R-Style Tango Assembly instructions

RIGHT ANGLE

RIGHT ANGLE R-Style Tango Assembly instructions

Lightolier Calculite C2X21LEDWW specification

Lightolier

Lightolier Calculite C2X21LEDWW specification

home star YZ98-016-095-04 Assembly instructions

home star

home star YZ98-016-095-04 Assembly instructions

manuals.online logo
manuals.online logoBrands
  • About & Mission
  • Contact us
  • Privacy Policy
  • Terms and Conditions

Copyright 2025 Manuals.Online. All Rights Reserved.