8
10
92
5 4
6 7
31
slide
a
b
b
a
a
b
c
b
a
a
b
Model 1260/1261
es
ESPAÑOL
1260-2110 · 01/2020
Instrucciones de uso
Máquina de corte de pelo
es
INSTRUCCIONES DE SEGURIDAD
IMPORTANTES
Cuando use un aparato eléctrico, siempre debe respetar las
precauciones de seguridad básicas, que incluyen las siguientes:
LEA TODAS LAS INSTRUCCIONES Y MEDIDAS
DE SEGURIDAD ANTES DE USAR ESTE
ARTEFACTO.
PELIGRO:
Para reducir el riesgo de muerte o lesiones por descarga eléctrica:
1. No tome un artefacto que se haya caído en el agua.
Desconéctelo inmediatamente del tomacorriente.
2. No lo use mientras se baña o bajo la ducha.
3. No coloque ni guarde el aparato en donde pueda caerse o ser
arrastrado a una tina o un fregadero. No lo coloque ni lo deje
caer en el agua u otro líquido.
4. Siempre desconecte la unidad del tomacorriente inmediatamente
después usarla.
5. Desenchufe este aparato antes de limpiarlo.
ADVERTENCIA:
Para reducir el riesgo de quemaduras, incendios,
descargas eléctricas o lesiones a personas:
1. Este aparato puede ser utilizado por niños de 14 años de edad
en adelante y por personas con capacidades físicas, sensoriales
o mentales reducidas o que carezcan de experiencia y
conocimientos, si han recibido supervisión o instrucción por parte
de una persona responsable de su seguridad respecto al uso
del aparato de manera segura, y si comprenden los peligros que
conlleva. Es necesario supervisar a los niños para asegurarse
de que no jueguen con el aparato. Los niños no deben realizar la
limpieza ni el mantenimiento sin supervisión.
2. Use este aparato sólo para el uso para el que está diseñado,
según se describe en este manual. No utilice accesorios no
especificados por el fabricante.
3. Nunca use este aparato si presenta daños en el cable o el
enchufe, si no funciona correctamente, después de dejarlo caer
o dañarlo, ni después de que se haya sumergido en agua. Lleve
el aparato a un centro de servicio para su revisión y reparación.
4. Mantenga el cable alejado de superficies calientes.
5. Nunca utilice este aparato con las aberturas de ventilación
bloqueadas ni colocado sobre una superficie suave, como una
cama o un sofá, en donde sea posible que se bloqueen las
aberturas de ventilación Mantenga las aberturas de ventilación
libres de pelusa, polvo y objetos similares.
6. No use al aire libre, ni en lugares donde se usen productos en
aerosol (rociadores) o donde se administre oxígeno.
7. Nunca deje caer ni inserte ningún objeto en ninguna abertura.
8. No utilice este artefacto con un peine dañado o roto ni con
cuchillas a las que le falten dientes, ya que pueden provocar
lesiones. Antes de usar, asegúrese de que las cuchillas estén
bien alineadas. (Vea las Instrucciones de mantenimiento de la
cortadora. Es posible que no apliquen para todos los artefactos).
9. Durante el uso, no coloque ni deje el artefacto en un lugar donde
se supone que un animal pudiera dañarlo o expuesto al clima.
10. Para desconectarlo, gire todos los controles a la posición “OFF”
y después, retire el enchufe del tomacorriente.
11. Gire todos los controles a la posición “OFF” antes de
encenderlo o retirar las cuchillas o accesorios.
12. Nunca debe dejar desatendido un artefacto que tenga un cable
permanentemente conectado cuando esté enchufado.
13. Mantenga este artefacto seco.
14. Las cuchillas pueden calentarse luego de un uso prolongado.
GUARDE ESTAS INSTRUCCIONES
ESTA CORTADORA FUE DISEÑADA PARA USO
COMERCIAL ÚNICAMENTE
Use cortadoras de cabello solamente para cortar cabello humano. Use
solamente cortadoras para animales para cortar el pelaje de animales
Este aparato está diseñado solo con fines de recorte.
Eliminación y reciclaje
Elimine el aparato de acuerdo con la normativa legal vigente.
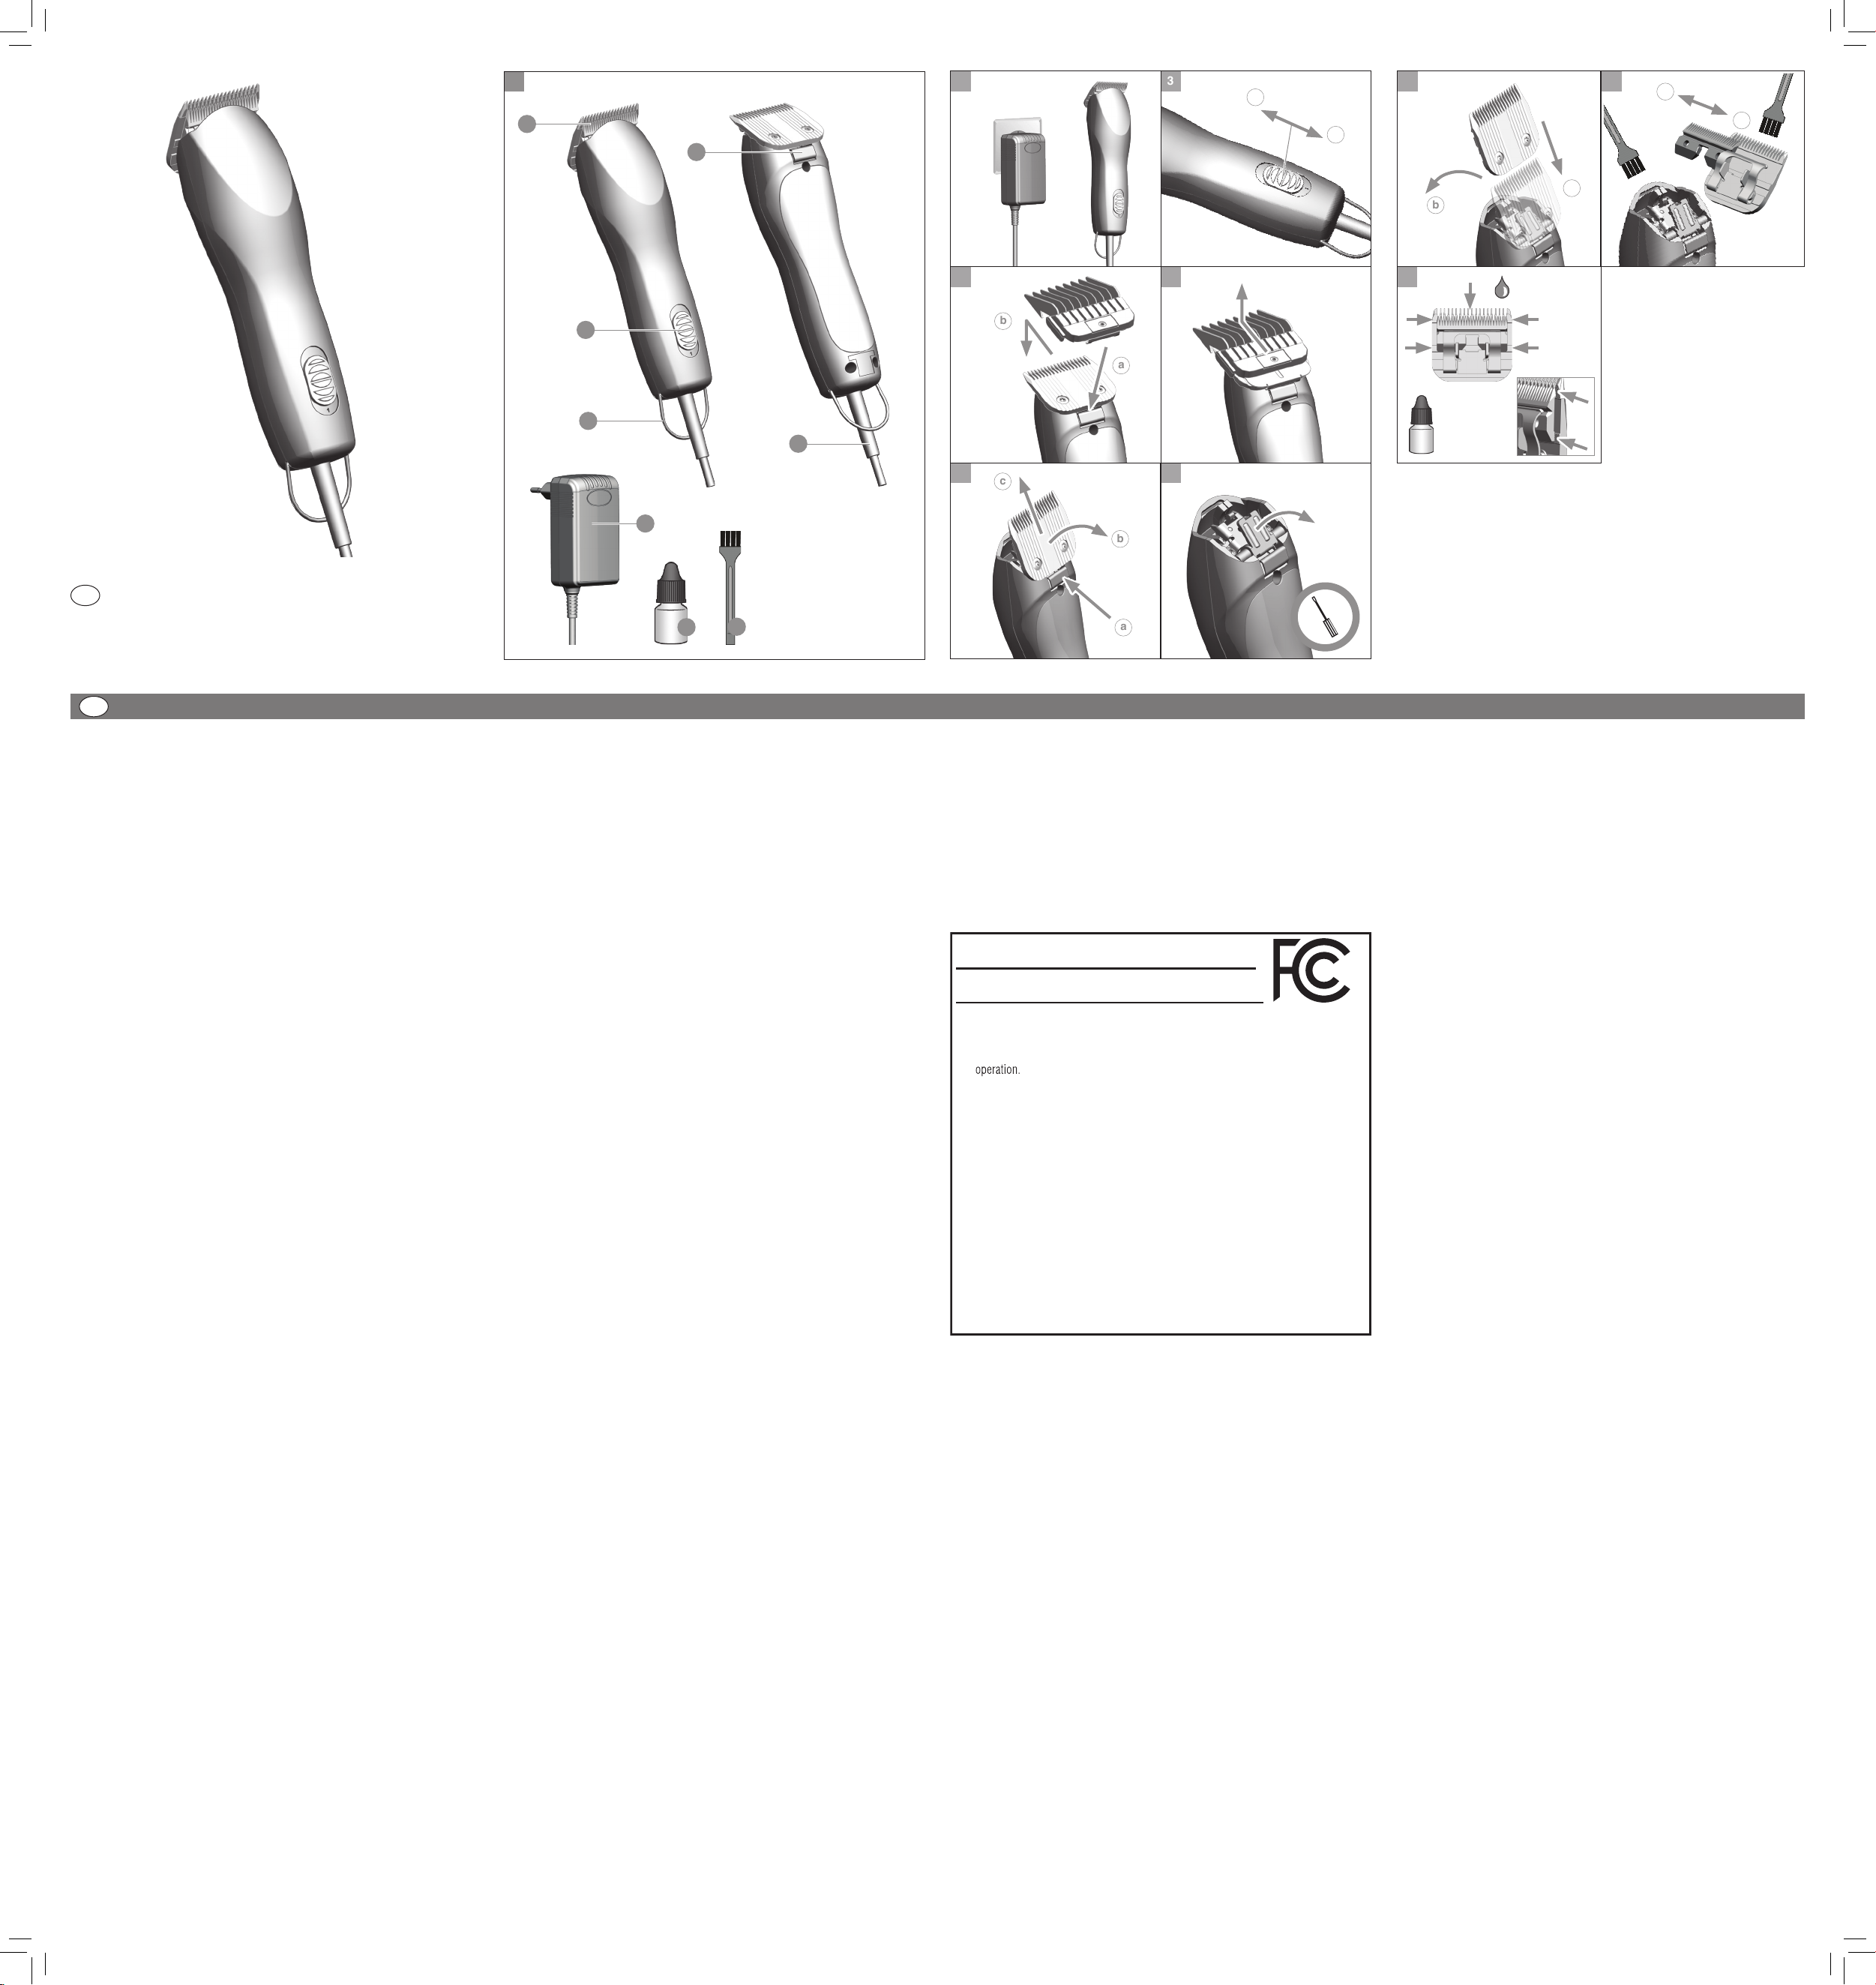
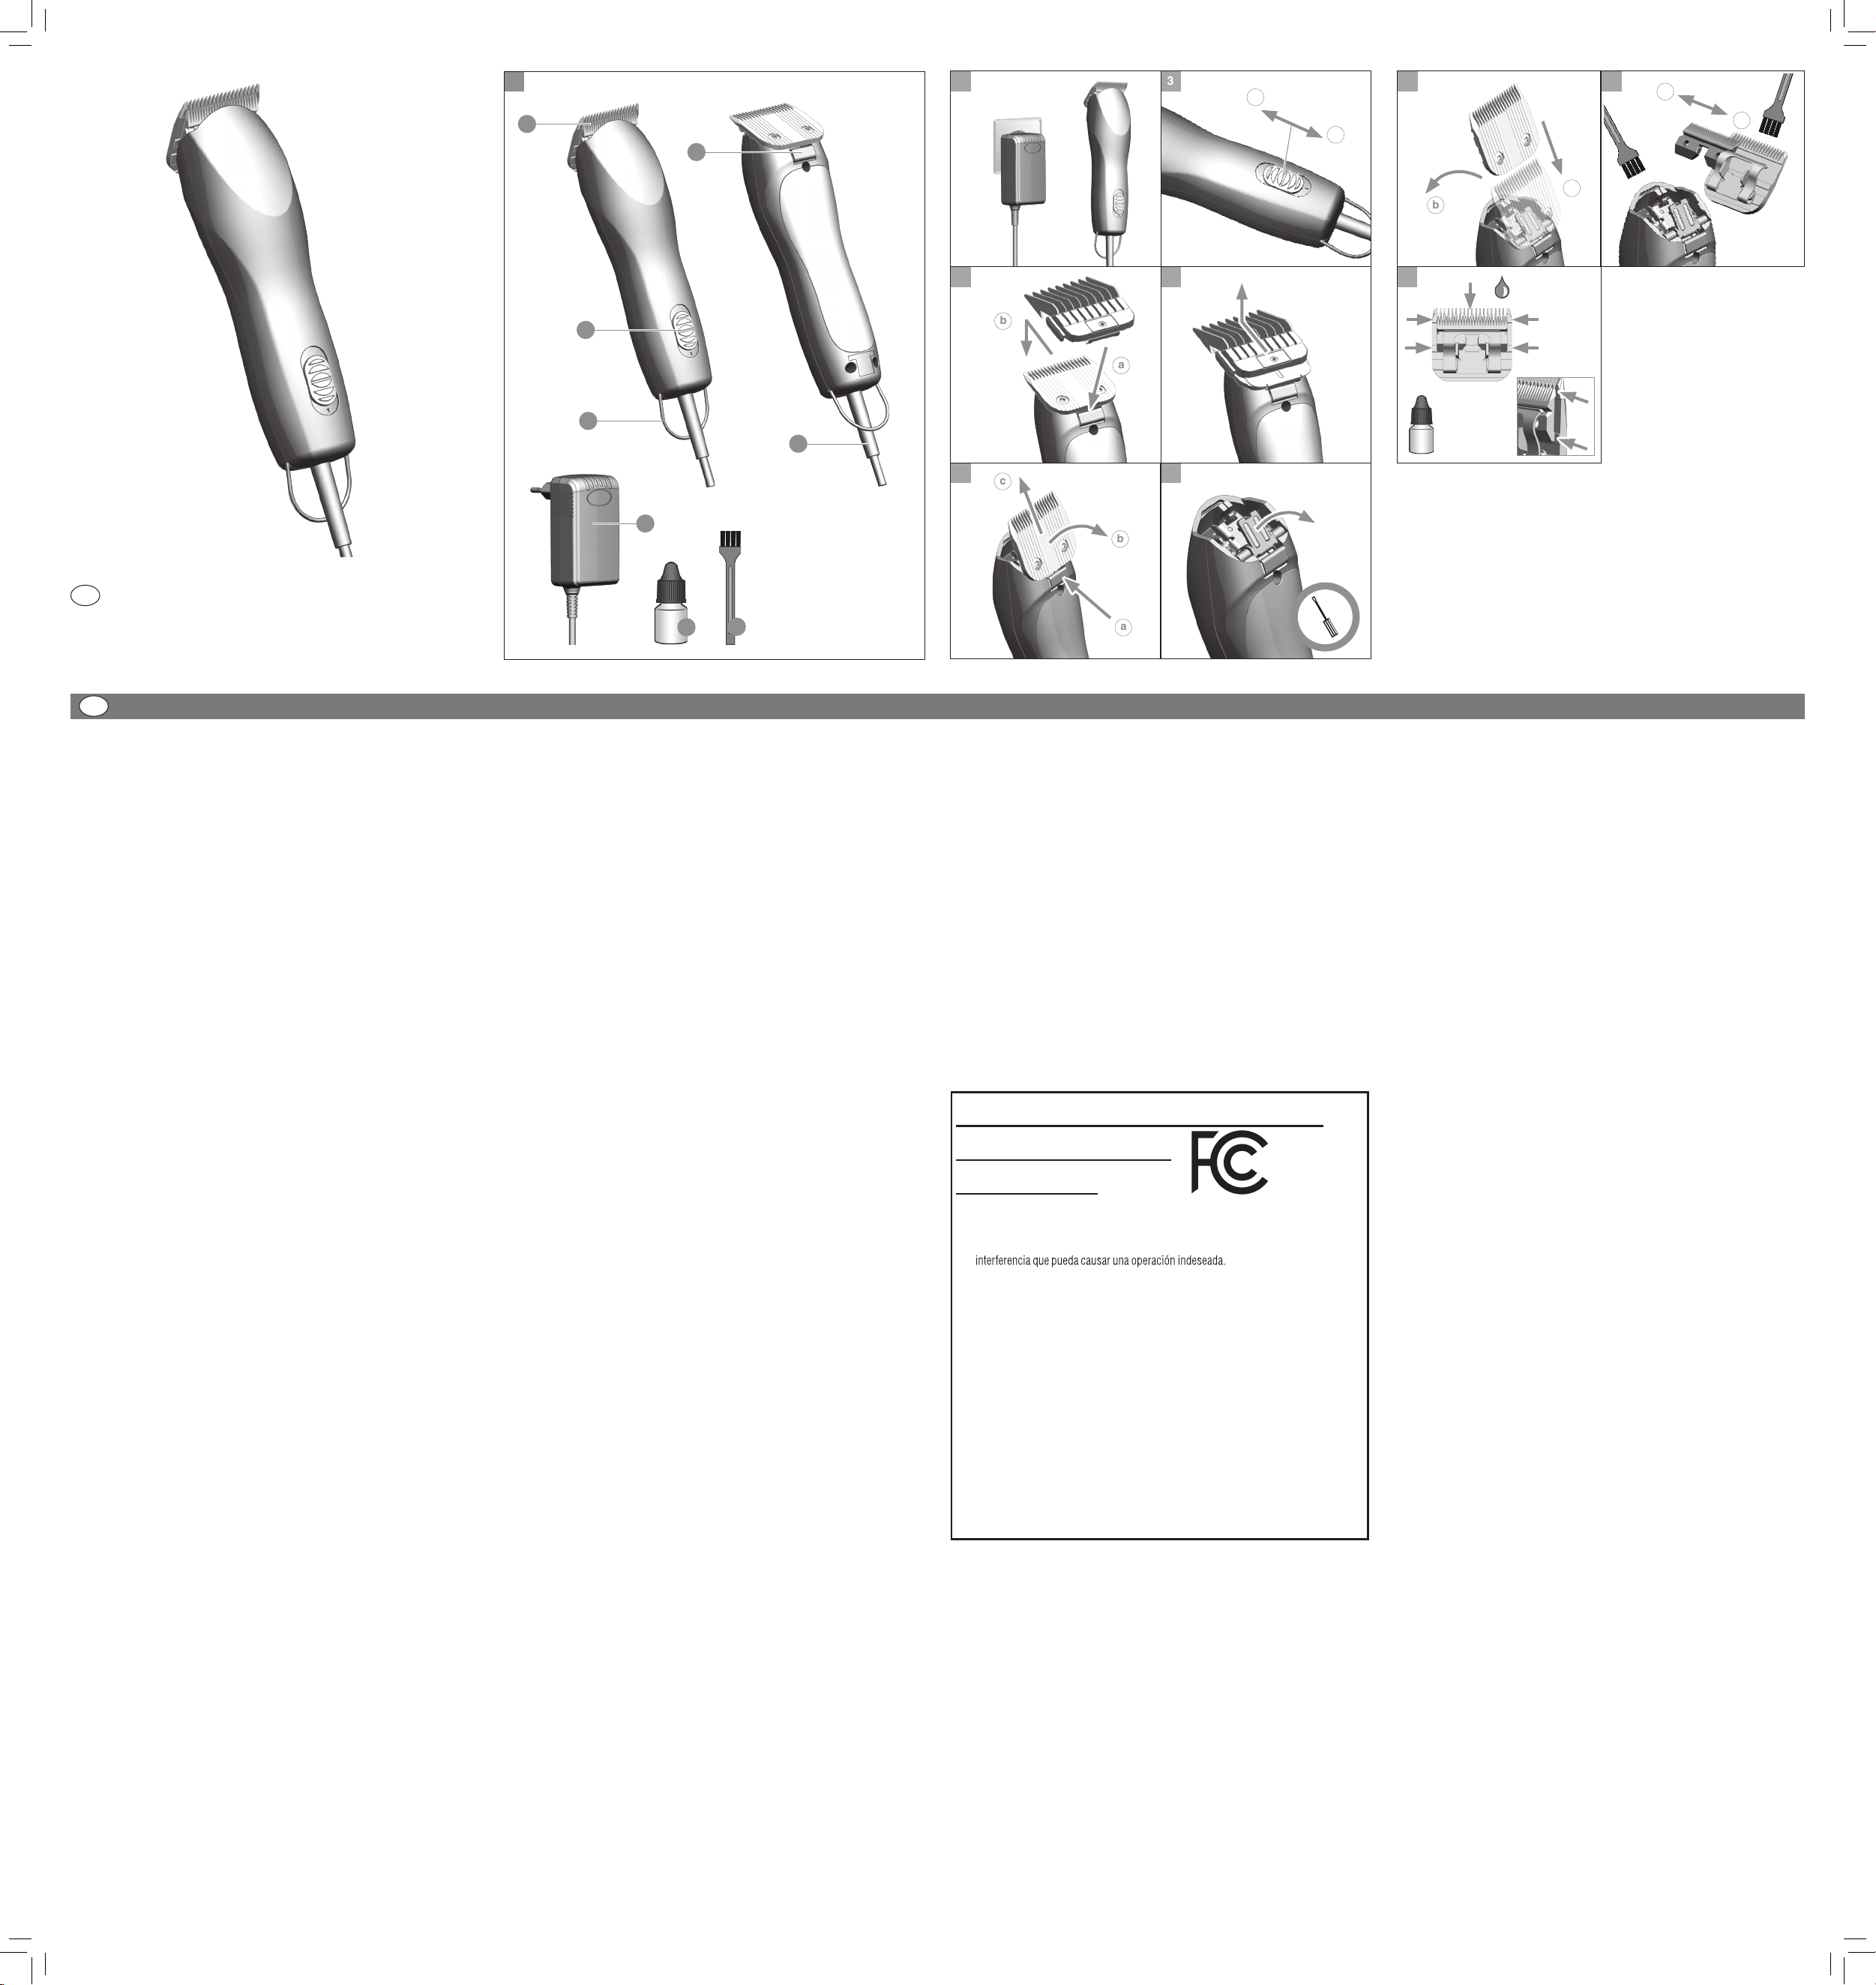
Componentes (fig. 1)
A
Cabezal de corte
B
Botón de bloqueo del cabezal de corte
C
Interruptor de conexión/desconexión
D
Colgador
E
Cable de red
F
Cepillo de limpieza
G
Aceite para cabezales de corte
H
Fuente de alimentación conmutada
Funcionamiento con alimentación de red
· Conecte la fuente de alimentación conmutada a la toma de
corriente (fig. 2).
· Encienda el aparato y vuelva a apagarlo (fig. 3
ⓑ
) después de utili-
zarlo con el interruptor de conexión/desconexión (fig. 3
ⓐ
).
· El aparato tiene dos velocidades que se pueden seleccionar
mediante el interruptor de conexión/desconexión.
· Posición 1 = lenta
· Posición 2 = rápida
Corte con peine
· El aparato se puede utilizar también con peines. El uso del peine
permite realizar diferentes longitudes de corte.
· El accesorio se puede adquirir en comercios especializados.
Colocación y extracción del peine
· Coloque el peine en el borde inferior del cabezal de corte (fig. 4
ⓐ
)
y deslícelo sobre el canto del peine de corte hasta que quede
enclavado (fig. 4
ⓑ
).
· Deslice el peine en dirección al canto de corte del peine de corte
(fig. 5) y retírelo del cabezal de corte.
Cambio del cabezal de corte
· Apague el aparato con el interruptor de conexión/desconexión
(fig. 3) y
desenchúfelo de la red.
· Pulse el botón de bloqueo (B) (fig. 6
ⓐ
) en dirección al cabezal de
corte y separe
el cabezal de la carcasa (fig. 6
ⓑ
).
· Retire el cabezal de corte del soporte (fig. 6
ⓒ
).
· Asegúrese de que el soporte está desplegado. Si no lo está, puede
desplegarlo con un destornillador plano (fig. 7).
· Coloque el nuevo cabezal de corte en el soporte (fig. 8
ⓐ
).
· Encienda el aparato (fig. 3
ⓐ
). Despliegue el cabezal de corte y
presiónelo hasta que encaje de forma audible (fig. 8
ⓑ
).
Limpieza y conservación
· Después de cada uso, desmonte el peine (fig. 5) y retire el cabezal
de corte de la carcasa (fig. 6). Elimine los restos de pelo de la aber-
tura de la carcasa y del cabezal de corte con el cepillo de limpieza
(fig. 9).
·
Atención:
No abrir los tornillos del cabezal de corte.
No extraiga por completo la cuchilla.
· Deslice la cuchilla lateralmente (fig. 9
ⓐ
) y elimine con el cepillo de
limpieza los restos de pelo de la cuchilla y del peine de corte. Una
vez finalizada la limpieza, coloque la cuchilla de nuevo en su posi-
ción (fig. 9
ⓑ
). Coloque la cuchilla
centrada con respecto al peine de corte.
· Después de limpiar el cabezal de corte se recomienda aplicar
un spray de limpieza. El spray mantiene los cabezales de corte
higienizados y protegidos contra virus y bacterias.
· Lubrique el cabezal de corte con aceite para cabezales de corte
(fig. 10).
· Recomendamos limpiar y conservar el cabezal de corte durante y
después del corte de pelo con el spray Blade Ice. Blade Ice es un
spray que refrigera, lubrica y limpia rápidamente el cabezal de corte
y lo protege de la corrosión.
· Después de la limpieza vuelva a fijar el cabezal de corte (figs. 7/8).
Deje funcionar el aparato durante aprox. 10 segundos para que el
aceite se reparta uniformemente.
· Lubrique con frecuencia el cabezal de corte para garantizar una
óptima calidad de corte permanente.
· En el caso de que, a pesar de limpiar y lubricar el cabezal de corte
con regularidad, su capacidad de corte disminuya después de un
uso prolongado, éste deberá cambiarse.
· Limpie el aparato únicamente con un paño suave y, en caso nece-
sario, ligeramente humedecido.
· Solicite el aceite para cabezales de corte y el spray Blade Ice a
su proveedor habitual o a nuestro Departamento de Atención al
Cliente.
con Aprobación
de la FCC:
1. Este dispositivo cumple con la parte 15 de las Reglas de la FCC. Su operación está sujeta
a las dos condiciones siguientes: (1) Este dispositivo no puede causar interferencia
nociva, y (2) este dispositivo debe aceptar cualquier interferencia recibida, incluyendo la
2. Los cambios y modificaciones que no sean aprobados explícitamente por la parte
responsable del cumplimiento podrían anular la autorización del usuario para usar este
dispositivo.
3. NOTA: Este equipo ha sido probado y se ha determinado que cumple con los límites
de un dispositivo digital de Clase B, en los términos de la parte 15 de las Reglas de
la FCC. Estos límites están diseñados para brindar una protección razonable contra
la interferencia nociva en una instalación residencial. Este equipo genera, utiliza y
puede emitir energía de radiofrecuencia y, de no instalarse y usarse de acuerdo con
las instrucciones, puede causar interferencia nociva a las radiocomunicaciones.
Sin embargo, no hay garantía de que no ocurrirá interferencia en una instalación en
particular. Si este equipo causa interferencia nociva a la recepción de radio o televisión,
lo que puede determinarse al encender y apagar el equipo, se invita al usuario a tratar de
corregir la interferencia tomando una o más de las siguientes medidas:
–Reorientar o reubicar la antena de recepción.
–Aumentar la separación entre el equipo y el receptor.
–Conectar el equipo a un tomacorriente que esté en un circuito diferente a aquel
en el que está conectado el receptor.
–Consultar a su distribuidor o a un técnico experimentado de radio y televisión.
A
C
D
E
F
G
B
H
1260-2110.indd 21260-2110.indd 2 1/8/20 12:46 PM1/8/20 12:46 PM