Xplova E5 User manual

GPS Cycling Computer
User’s Manual

2
© Copyright 2012, Xplova Incorporated. This publication, including all
photographs, illustrations and software, is protected under international copyright laws,
with all rights reserved. Neither this User’s Manual, nor any of the material contained
herein, may be reproduced without written consent of the manufacturer. Download the
latest version of this document at www.xplova.com.
Visit http://tour.xplova.com/
Platform Free Bicycle route planning web service
Manufactured by:
Xplova Inc.
www.xplova.com
5F-1A, No. 128, Xinhu 2nd Road, Neihu District,
Taipei City 11494, Taiwan (R.O.C.)
Tel: 886-2-77207928
Fax: 886-2-77207938
http://www.xplova.com/en/support/
Email: sales @xplova.com
Version: 1.00

3
Contents
Getting Started ........................................................................ 5
Features of the Xplova E5 .................................................................. 5
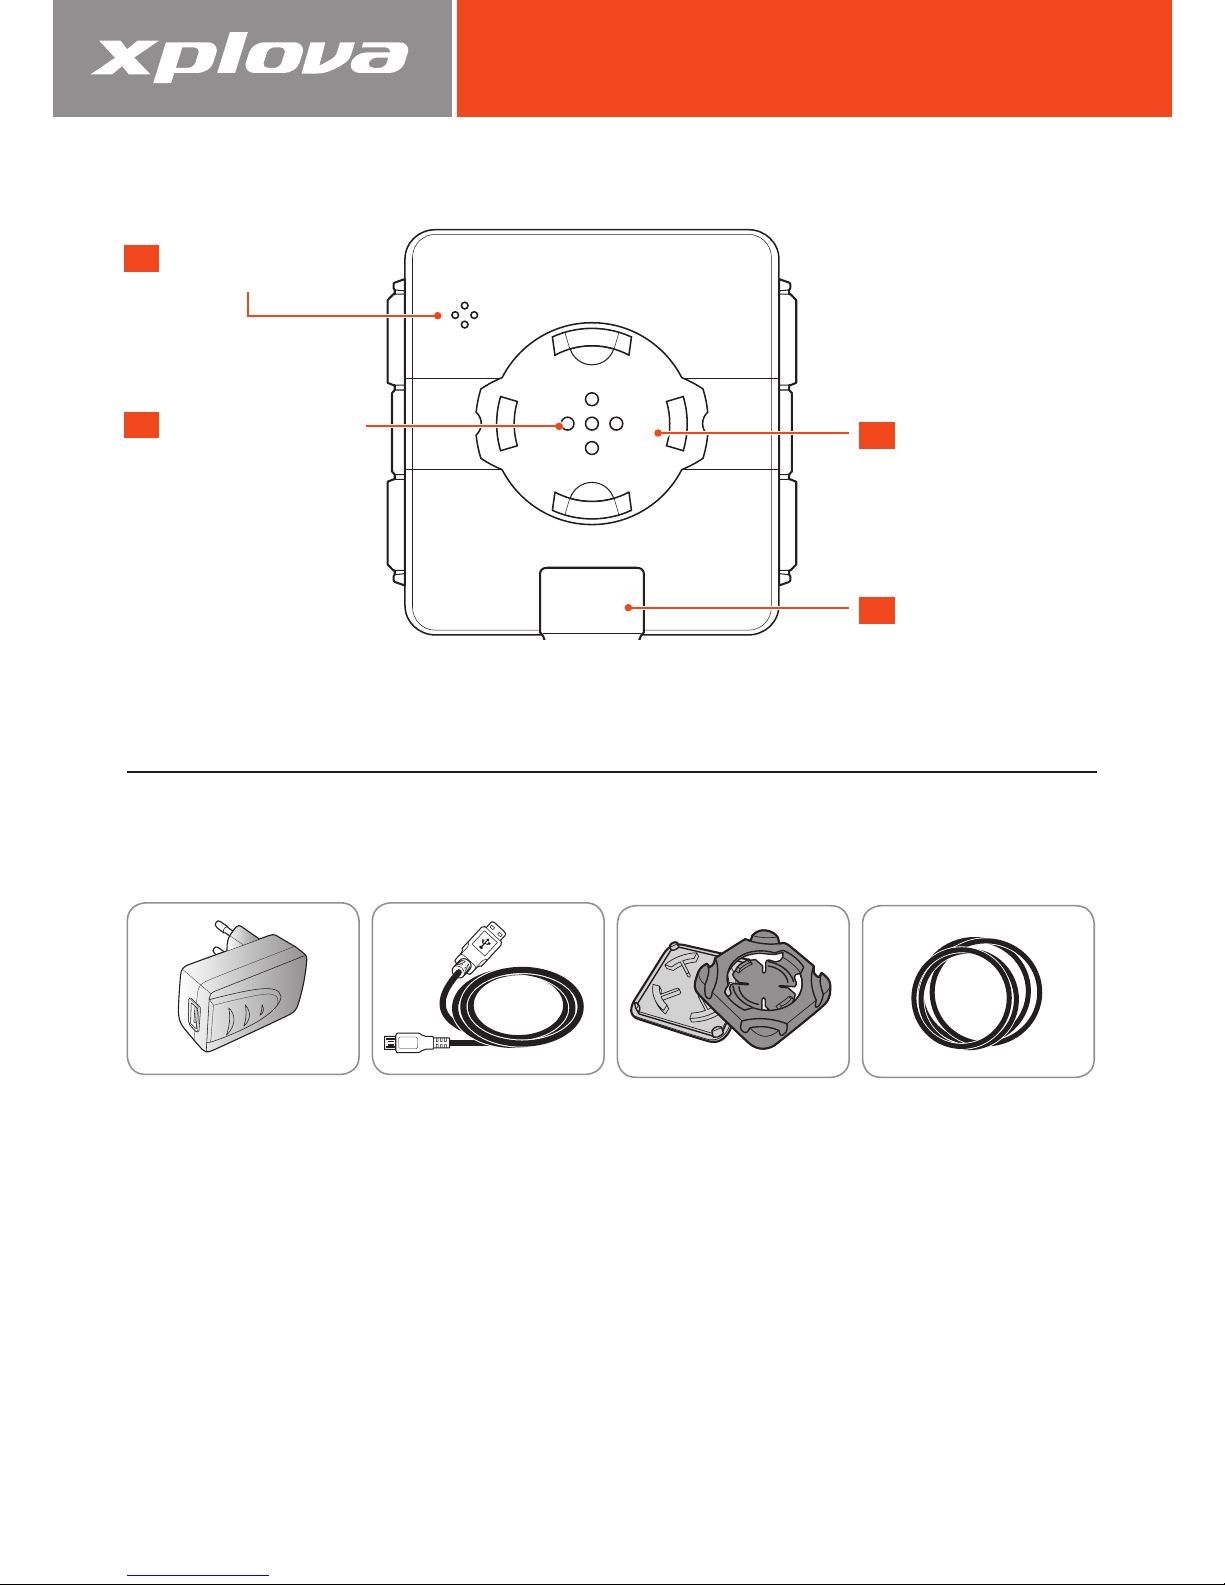
Getting to Know the Xplova E5.......................................................... 6
Xplova E5 Front View........................................................................... 6
Xplova E5 Rear View ............................................................................ 7
Accessories........................................................................................ 7
Optional Accessories........................................................................... 7
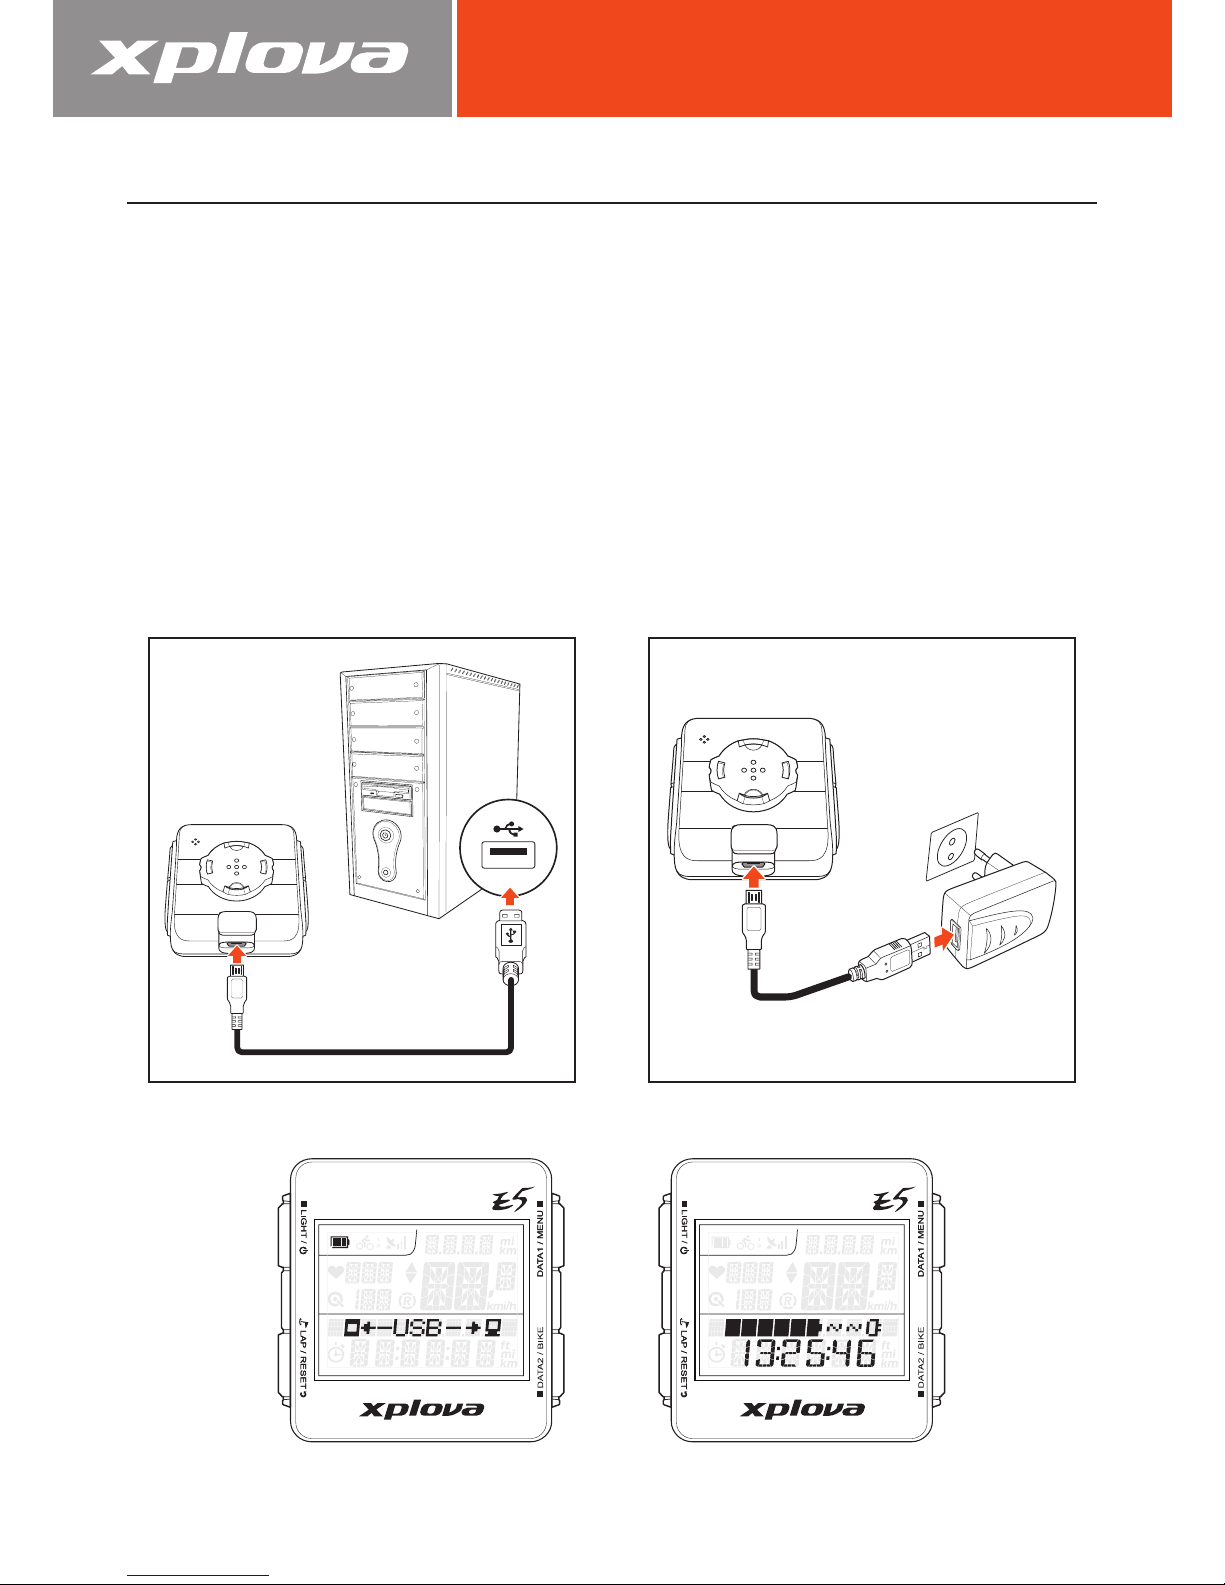
Charging the Xplova E5..................................................................... 8
Mounting the Xplova E5 .................................................................... 9
Connecting to Sensors........................................................................ 10
Using Xplova E5....................................................................... 11
Powering Up the Xplova E5 ............................................................... 11
Acquiring GPS Signal ......................................................................... 11
The LCD Screen .................................................................................. 12
Idle Mode............................................................................................ 13
Using the Button Controls .................................................................. 14
Button Operation Description .............................................................. 14
Adjusting the Backlight...................................................................... 14
Selecting Data Display....................................................................... 15
Upper Screen Data (Data 1) ................................................................. 15
Lower Screen Data (Data 2).................................................................. 15
Creating Personal Profile ................................................................... 16
Selecting Bike Profile ......................................................................... 16
Marking Lap / Location ..................................................................... 16
Resetting Recording ........................................................................... 17
Changing the Settings .............................................................. 18
Using the Menu ................................................................................. 18
The Menu Tree .................................................................................... 18
Menu Button Controls Description....................................................... 19
RECORD Menu ................................................................................... 21
WARNING Menu................................................................................ 22
GPS Menu.......................................................................................... 23

4
ALT (Altitude) Menu............................................................................ 23
SOUND Menu .................................................................................... 24
S-PAUSE (Smart Pause) Menu............................................................. 25
Bike Menu ......................................................................................... 25
HRM (Heart Rate Monitor) Menu ........................................................ 27
USER Menu ........................................................................................ 27
TIME Menu......................................................................................... 28
UNIT Menu ........................................................................................ 28
F-RESET (Factory Reset) Menu ............................................................. 29
Using the Accessories............................................................... 30
Heart Rate Monitor (Optional)............................................................ 30
Pairing the Heart Rate Monitor ............................................................ 30
Wearing the Heart Rate Monitor........................................................... 31
Changing the Heart Rate Monitor Battery............................................. 31
Combo Cadence Sensor (optional)...................................................... 31
Pairing the Combo Cadence Sensor ..................................................... 31
Combo Cadence Sensor Parts .............................................................. 32
Installing the Combo Cadence Sensor.................................................. 33
Changing the Combo Cadence Battery................................................. 34
Power Meter (optional) ...................................................................... 34
Pairing with the Power Meter ............................................................... 35
Calibrating the Power Meter ................................................................ 35
Using Web Applications ........................................................... 36
Sharing Your Activities....................................................................... 36
What Can You Do?............................................................................... 36
Updating the Xplova E5 Software...................................................... 37
Downloading the Software................................................................... 37
Updating the Software......................................................................... 38
Appendix................................................................................. 41
Specifications..................................................................................... 41
Wheel Size Table ............................................................................... 42
Declarations of Conformity....................................................... 43

5
Getting Started
Congratulations on having purchased the Xplova E5 GPS Cycling Computer. In this
chapter, you will discover key features and understand how to set up your device and
use the basic features of the user interface.
Features of the Xplova E5
The Xplova E5 is a light-weight and stylish GPS Cycling Computer for performance
driven cyclists and those who are keen to share their cycling journeys with friends.
With Xplova Smart Dynamic Logging Technology, Xplova E5 automatically tracks
speed, distance, location, elevation, slope using a high sensitivity GPS and barometer.
By adding an ANT+ compatible Heart Rate Monitor, Speed/Cadence Combo Sensor
or compatible Power Meter, Xplova E5 becomes a training companion which dutifully
records every detail of your ride. All these recorded activities can be uploaded to
http://tour.xplova.com/ community portal for performance analysis, off-line
competition, mapping and sharing.
Ease of Use
• Large-screen display
• Built-in rechargeable battery
• Shows up to 7 cycling data simultaneously
• Intuitive data select buttons
• High precision GPS receiver
• View and record real-time cycling data
• Mark different riding paths with the lap function
GPS and multiple sensors
• Low power digital wireless sensors support (ANT+)
• Barometric altimeter
• Monitor body conditions with warnings for time, distance, calories, and
maximum heart rate
Xplova Smart Dynamic Logging Technology
• Automatically tracks all cycling data
• No more Start/Stop key to record an activity

6
Getting to Know the Xplova E5
Xplova E5 Front View
1
• Short press to change the backlight
level
(High/Low/Off).
• Long press to turn the power on/
off.
• Long press for over 5 seconds to
reset the device.
2
• Short press to mark lap and
position.
• Long press to reset, save records
and start a new record.
3
• Short press to switch the data
displayed on the upper screen.
• Long press to enter or exit the menu.
4
• Short press to switch the data
displayed on the lower screen.
• Long press to select a bike prole.
1
2
3
4
LIGHT / Power
LAP / RESET
DATA1 / MENU
DATA2 / BIKE

7
Xplova E5 Rear View
1
4
Pressure and
Temperature Hole
Micro USB Port
(under waterproof cap)
3Mounting Guide
2Buzzer Sound Hole
Accessories
The Xplova E5 comes with the accessories shown below. Check to make sure all
items are included in the package; if anything is missing, contact your Xplova retailer.
USB Power Adapter USB Cable Bike Mount with
Mount Pad
Rubber Bands
Optional Accessories
The Xplova E5 can be paired with optional accessories to provide a complete
solution for cycling and outdoor activities. Follow the instructions on “Using the
Accessories” on page 30 to pair and install the following devices:
• Heart Rate Monitor (HRM)
• Speed / Cadence Combo Sensor
• Power Meter

8
Charging the Xplova E5
Before using your Xplova E5, make sure it is properly charged and ready to go.
Charge the Xplova E5 for at least 3 hours before rst use to make sure the built-in
battery is fully charged. Xplova E5 can be charged using the supplied USB adapter or
any standard USB port.
To charge the Xplova E5:
1. Open the waterproof cap on the base of the Xplova E5.
2. Plug the micro USB cable to the micro USB port of your Xplova E5.
3. Plug the other end of the USB cable to a computer or to the supplied power
adapter and the power outlet.
The following screens may be displayed when charging the Xplova E5.
or
Connected to computer
via USB cable
Device is off while charging
with USB power adapter

9
Mounting the Xplova E5
1. Align the mount pad to the bike handle bar
and the bike mount to the mount pad.
2. Loop a rubber band from one corner of the
bike mount, passing through the bottom
side, to the other corner.
3. Loop a rubber band from another corner,
passing through the bottom side, to the other
corner to secure the bike mount in place.
4. Align the mounting guide to the bike mount.
5. Install and then turn the Xplova E5 clockwise
to lock it in place.

10
Connecting to Sensors
If you plan to use the optional combo cadence sensor, heart rate monitor, and/or
power meter, you will need to pair the devices with your Xplova E5 before using them.
See “Using the Accessories” on page 30.

11
Using Xplova E5
This chapter provides instructions on how to power up your device and use the
button controls and full features and functions of your Xplova E5.
Powering Up the Xplova E5
After charging the Xplova E5, you are now ready to begin using your device.
Long press . The LCD screen briey displays the device rmware version
and serial number.
NOTE: The LCD screen may appear differently from the above illustration.
To turn the power off, long press until a POWER OFF message is
displayed on screen.
Acquiring GPS Signal
The Xplova E5 comes fully equipped with X-Navi technology designed to maximize
your cycling experience. Once turned on, the Xplova E5 automatically searches for
satellite signals. Go outside to an area free from tall obstructions. The greater the
exposure, the faster the Xplova E5 will be able to acquire a signal. Signal acquisitions
can take 5 to 15 minutes to complete under open skies. The GPS icon indicates the
signal strength when GPS is xed.
GPS icon

12
The LCD Screen
The LCD screen displays different types of information.
1
23
4
Item Description
1Status Bar Displays status icons.
Battery Status Shows the battery capacity and charging status.
Bike Prole Shows the current selected bike prole.
Signal Status Shows the GPS signal strength.
2Indicators Displays the paired sensors and their values.
Heart Rate
Monitor Status
When a heart rate monitor is paired, this icon and
the heart rate value are displayed. The value “---”
is shown when the heart rate monitor is not paired
or is out of communication range.
Combo Cadence
Status
When a combo cadence is paired, this icon and
the cadence value are displayed. The value “---” is
shown when the combo cadence is not paired or is
out of communication range.
Recording Status Indicates recording is in progress. A ashing “ ”
icon indicates no recording in progress.
Speed Up The icon indicates the current speed is equal or
greater than the average speed.
Speed Down Indicates the current speed is smaller than the
average speed.

13
Item Description
3Upper Data Display Displays speed, hear rate and cadence information.
Current speed Shows the current speed and heart rate/ cadence if
heart rate / cadence setting is enabled.
AVG (Average speed) Shows the average speed and heart rate cadence if
heart rate / cadence setting is enabled.
MAX (Maximum speed) Shows the maximum speed achieved and heart rate
cadence if heart rate / cadence setting is enabled.
4Lower Data Display Displays the clock, altitude, slope, trip time,
calories, temperature, and power information.
Idle Mode
When no movement nor sensors are detected within a period
of time, the Xplova E5 goes to idle mode to save power. In idle
mode, only the battery icon and clock are displayed. Press any
buttons to return to normal mode or when speed is detected.
After being idle for 2 hours, the Xplova E5 automatically turns off.

14
Using the Button Controls
The Xplova E5 has four button controls that behave differently depending on the
key press duration. The following images will be shown throughout this document to
indicate the key press duration needed for a particular operation.
Button Operation Description
Long Press Short Press
Adjusting the Backlight
To adjust the brightness setting, short press repeatedly to scroll
through the brightness options. Options are: HIGH, LOW, OFF.

15
Selecting Data Display
The LCD display shows different types of data.
Upper Screen Data (Data 1)
Short press repeatedly to toggle the upper data display.
Current data Average data Maximum data
Lower Screen Data (Data 2)
Short press repeatedly to toggle the lower data display.
Bike ODO
Clock
Altitude + Slope
Trip Time
Calories + Temperature
Trip Time
Power
Trip Time
Total Climb
Trip Time

16
Creating Personal Profile
With the User Prole, you can edit information about yourself such as your gender,
height, weight, and birth year. See “USER Menu” on page 27 for details.
Selecting Bike Profile
You can congure up to three bike proles on Xplova E5: Bike1, Bike2, and
Custom. For details, see “Bike Menu” on page 25.
To switch between the bike profiles:
1. Enter Bike prole
selection.
2. Scroll through bike
prole options.
3. Conrm selection.
Marking Lap / Location
During recording, press to mark a new LAP or mark the current
location to the current recording session.

17
Resetting Recording
During recording, long press to reset the recording and start a new
recording.

18
Changing the Settings
Using the Menu
The Menu Tree
The Xplova E5 has a number of customizable settings available so you can control
functionality and personalize your device.
Menu Item Description
1. RECORD Allows you to view your exercise records. You can
view records according to record number, summary,
or lap detail.
2. WARNING Allows you to congure the Xplova E5 to notify you
when you exceed a specied time, distance, calories
burnt, or heart rate value.
3. GPS Allows you to view GPS signals and reset the GPS
receiver.
4. ALT (Altitude) Allows you to congure up to four altitude settings.
5. SOUND Allows you to enable or disable beep sound.
6. S-PAUSE (SMART PAUSE) Allows you to specify the minimum speed limit by
which the Xplova E5 will automatically pause when
the device goes below that limit.
7. BIKE Allows you to congure the wheel size and set the
current bike to pair with speed, cadence and combo
sensors or a power meter.
8. HRM (Heart Rate Monitor) Allows you to pair your device with a heart rate
monitor.
9. USER Allows you to set your prole.
10. TIME Allows you to congure the Xplova E5 clock.
11. UNIT Allows you to set the default unit of measurement.
12. F-RESET (Factory Reset) Allows you to reset the device to its factory default
settings.
NOTE: Some settings can be changed via http://tour.xplova.com/.

19
Menu Button Controls Description
To bring up the menu, long press .
To adjust the menu settings, use the button operations below to select an item,
conrm an option, and exit or return to a previous screen.
Scroll to Next Item Select the Item Return to Previous
NOTE: You can also long press to exit the menu and return to the
main screen.

20
Depending on the current settings, the following screen terminologies may appear:
Indicates options are available. Press to scroll through other options.
Indicates numeric entry. Press to scroll to the next eld.
Indicates the current menu level.
Indicates next menu available. Press to scroll to the next menu.
Press to enter the setting.
Below is an example of setting the distance in Warning menu.
Enter the Menu Conrm Option
Conrm to Change Value
Adjust Value
NOTE: A blinking eld is the
current data eld.
Scroll to Next Field
Select an Option
Exit screen
Other manuals for E5
1
Table of contents
Other Xplova Bicycle Accessories manuals