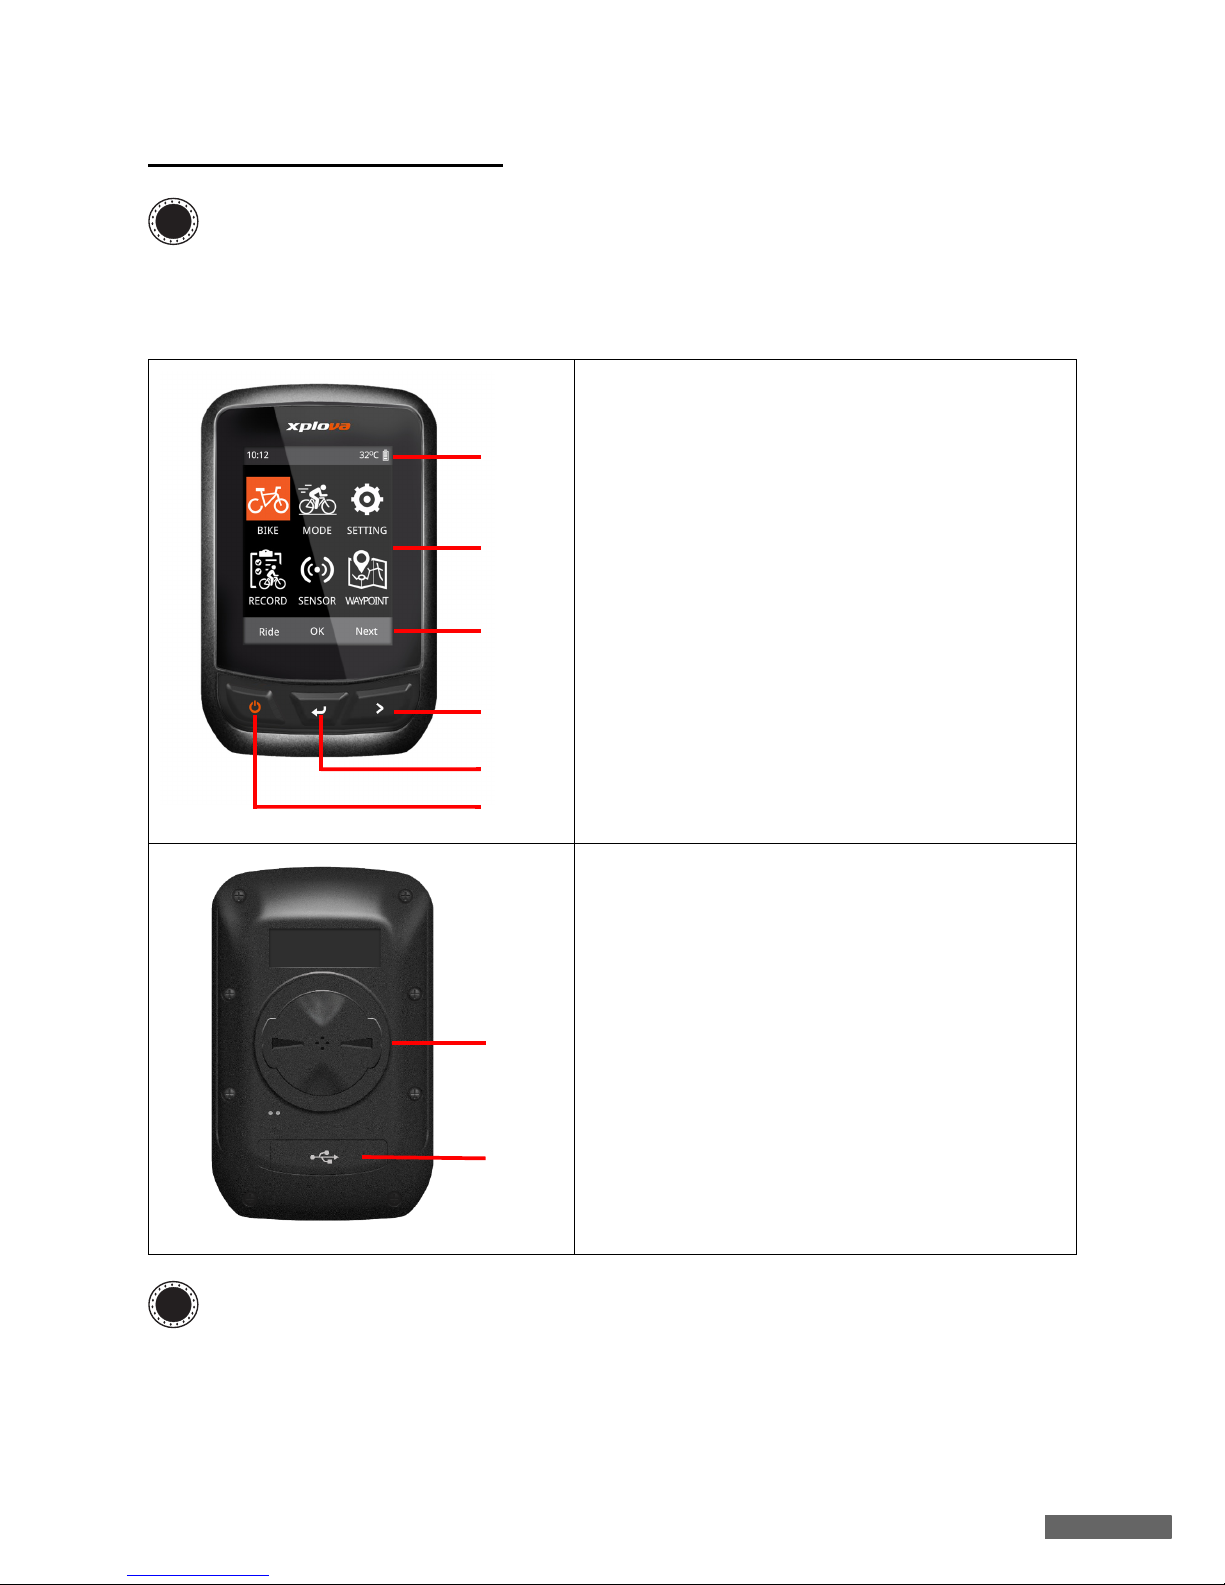
Xplova X3 User manual

Xplova X3
Smart Cycling Computer
User Manual

2
CONTENTS
MEET YOUR X3 3
Description of the screen and
buttons . . . . . . . . . . . . . . . . . . . . . 3
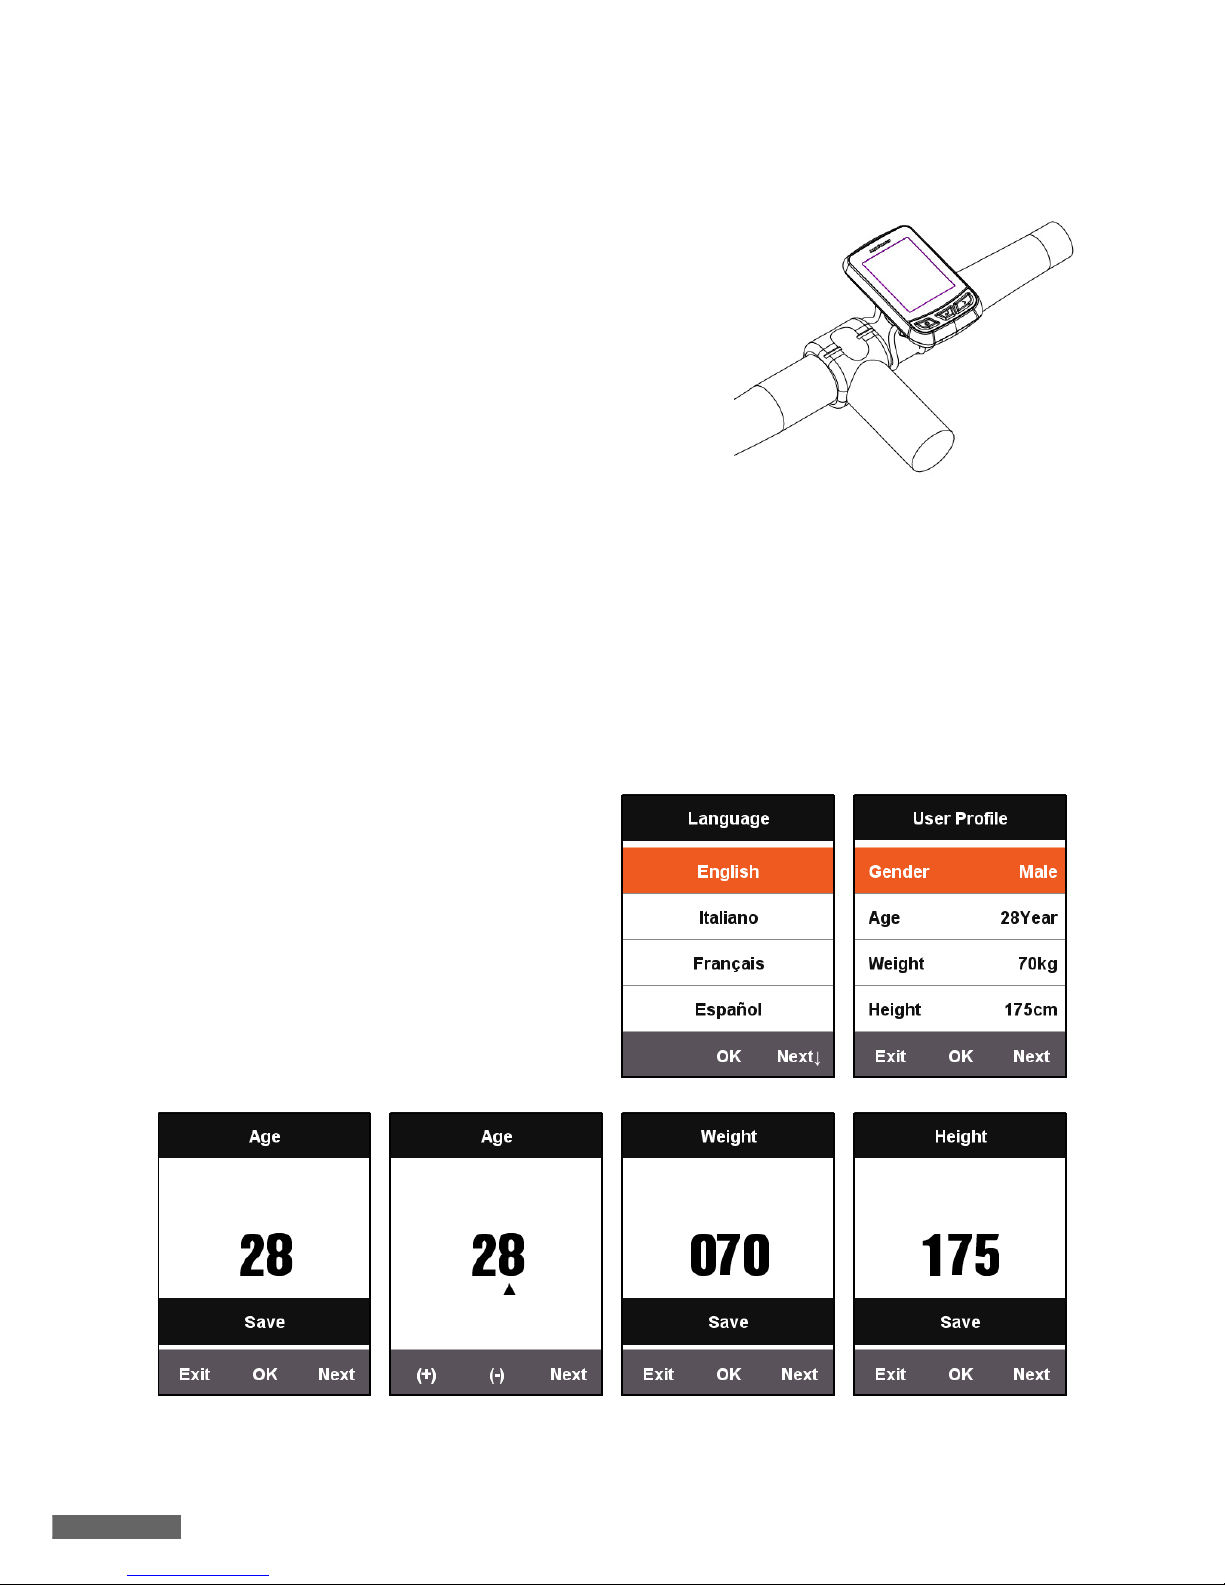
Installation instructions . . . . . . . 4
Installation steps . . . . . . . . . . . . . . 4
De-installation steps. . . . . . . . . . . 4
Perform the initial settings . . . . . 4
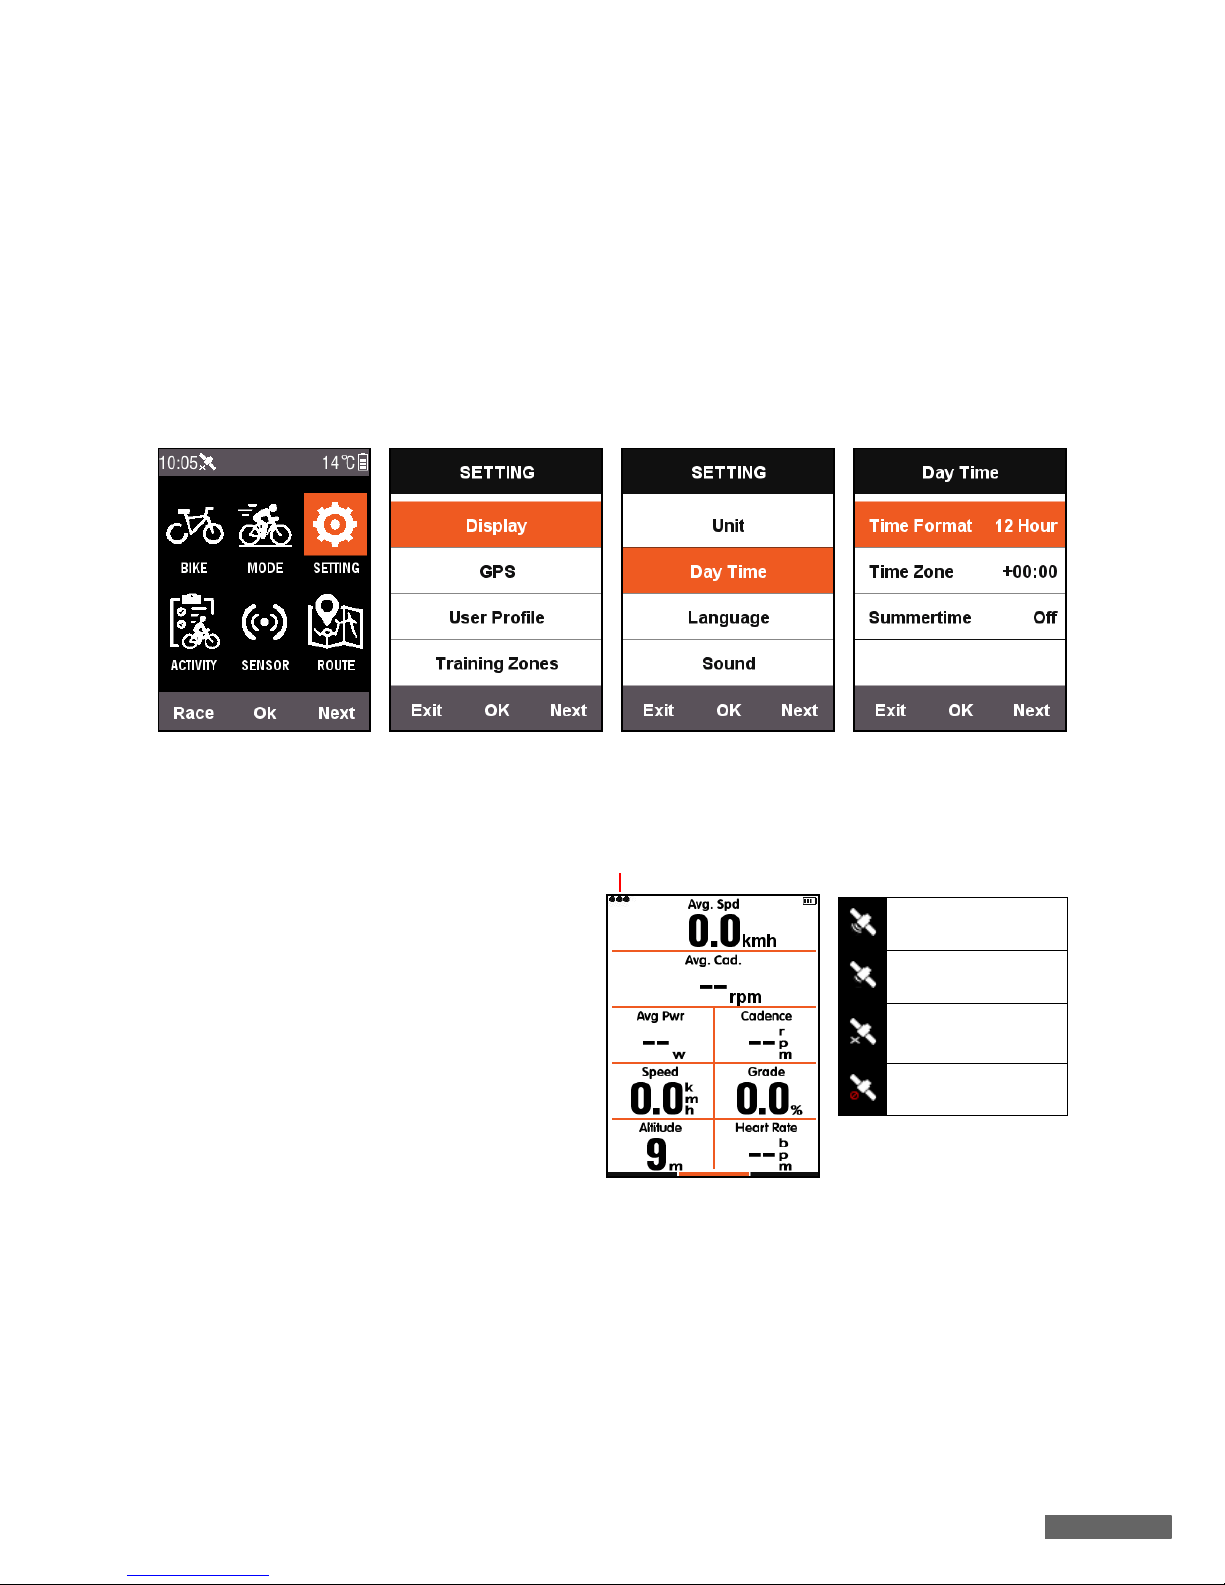
Time . . . . . . . . . . . . . . . . . . . . . . . 5
GPS . . . . . . . . . . . . . . . . . . . . . . . . 5
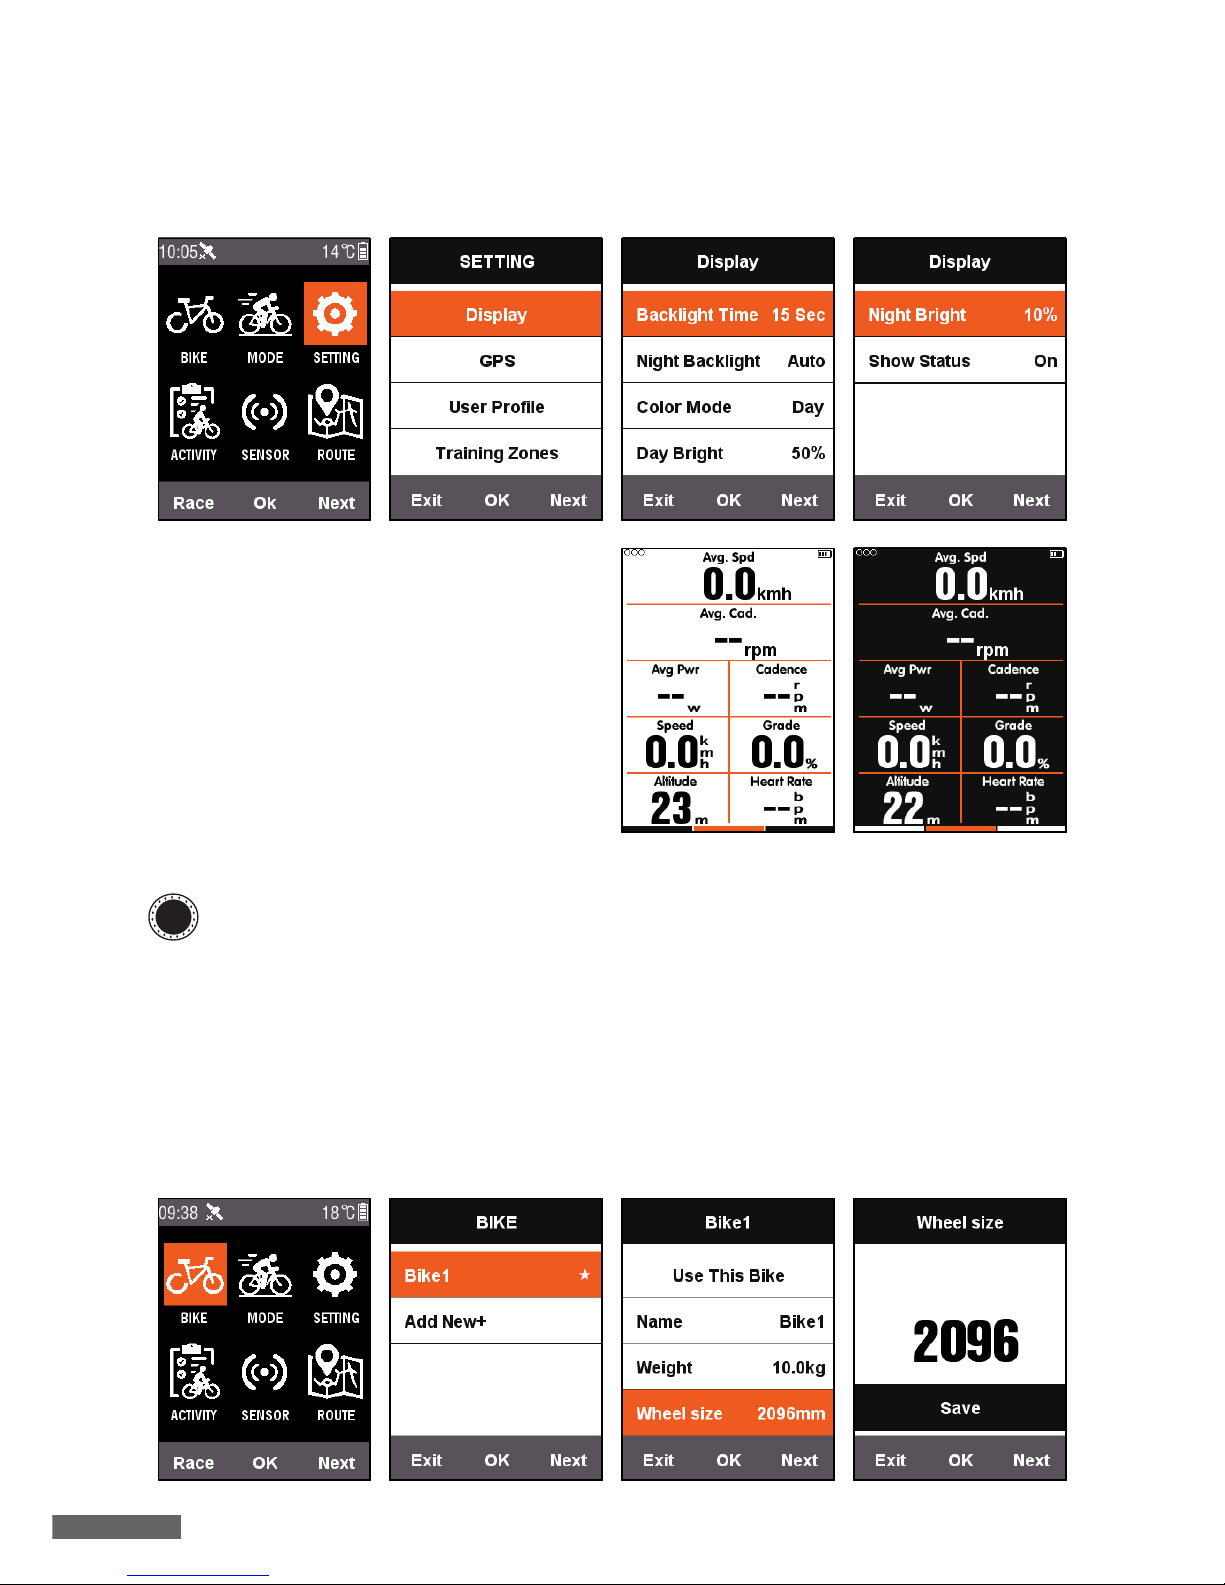
Display . . . . . . . . . . . . . . . . . . . . . 6
BIKE . . . . . . . . . . . . . . . . . . . . . . . 6
ANT+ sensor . . . . . . . . . . . . . . . . . 8
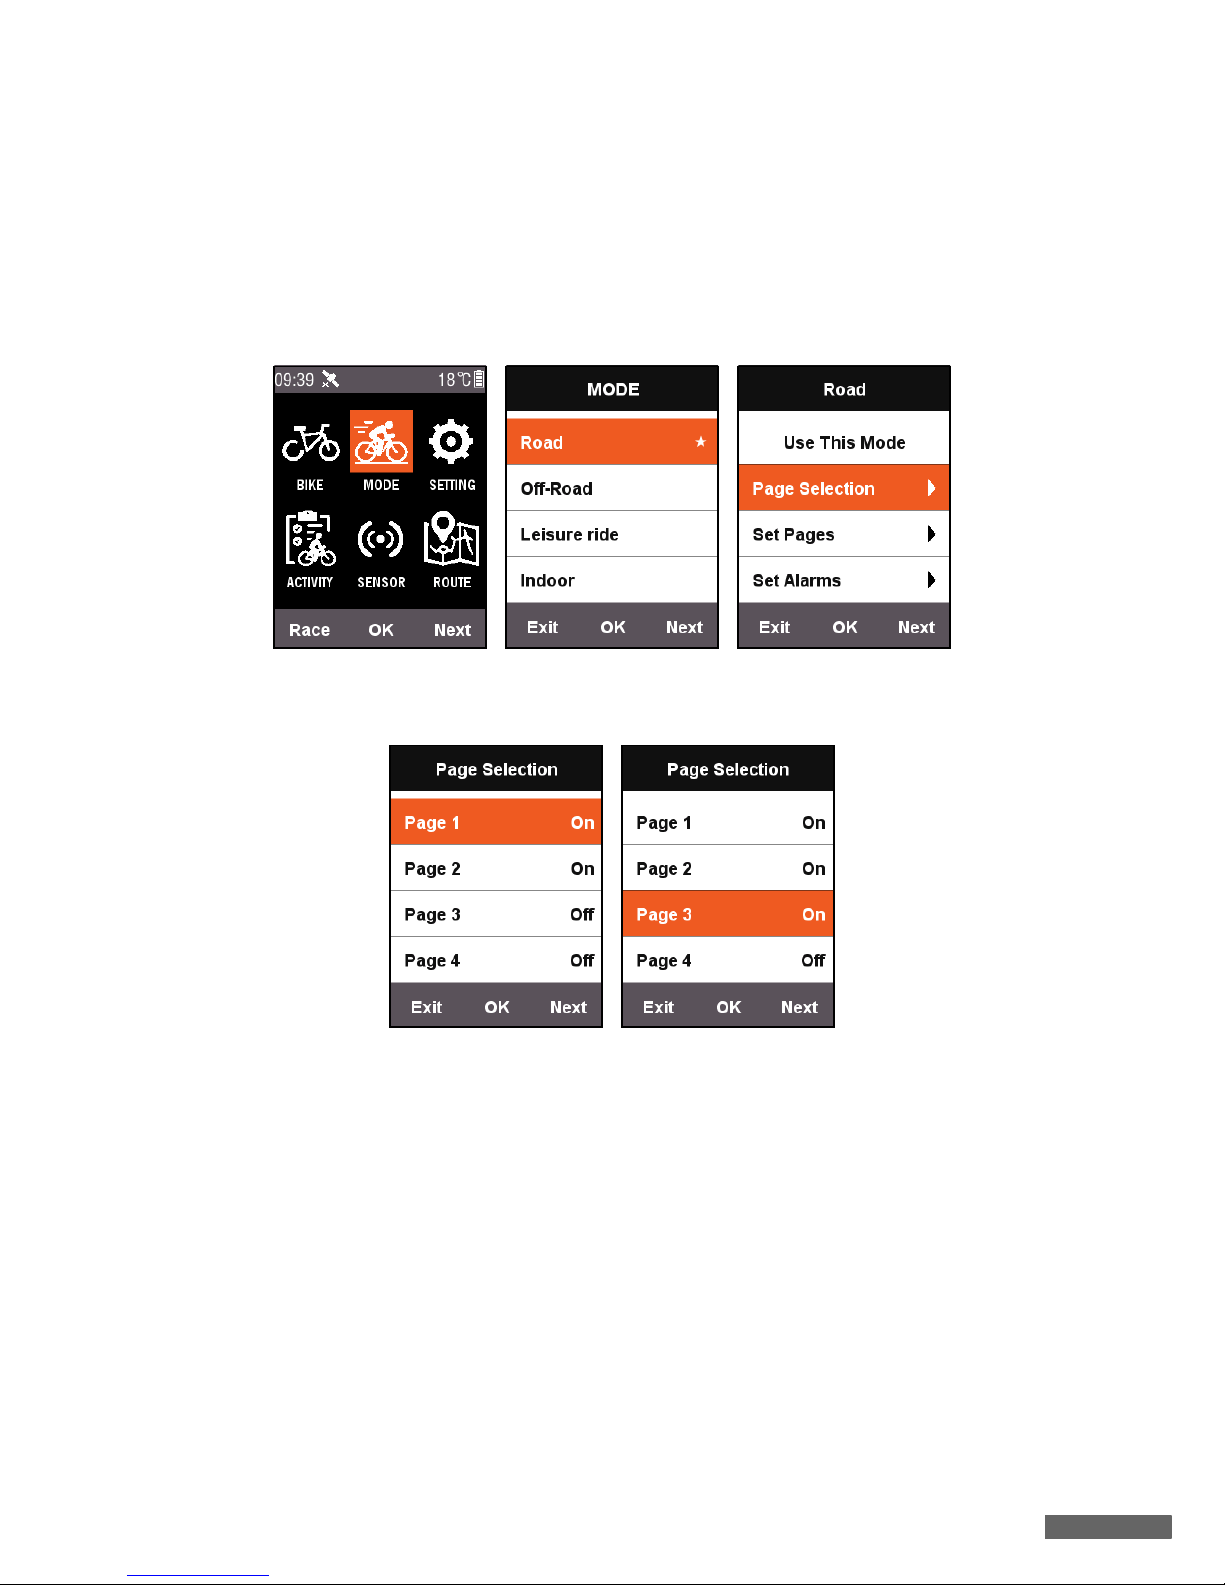
Customize MODE screen on X3 . 9
Page Selection . . . . . . . . . . . . . . . . 9
Set Pages . . . . . . . . . . . . . . . . . . . 10
Auto functions . . . . . . . . . . . . . . 13
Auto Save . . . . . . . . . . . . . . . . . . 13
Auto Pause . . . . . . . . . . . . . . . . . . 13
Auto Lap . . . . . . . . . . . . . . . . . 14
Auto Switch Page. . . . . . . . . . . . . 15
Height Page (Altitude) . . . . . . . . 15
Set Training Intensity 16
Training Zones . . . . . . . . . . . . . . 16
Set Alarms . . . . . . . . . . . . . . . . . 17
Route 18
History Routes . . . . . . . . . . . . . . 18
My Routes . . . . . . . . . . . . . . . . . . 18
RIDE . . . . . . . . . . . . . . . . . . . . . . 19
Pause and continue . . . . . . . . . . 19
Switch page . . . . . . . . . . . . . . . . 19
Lap . . . . . . . . . . . . . . . . . . . . . . . . 20
Stop recording . . . . . . . . . . . . . . 20
View activities . . . . . . . . . . . . . . . 20
Upload ride data . . . . . . . . . . . . . 21
Download Xplova Connect app . . 21
Upload through
Xplova Connect app . . . . . . . . . . . 21
Upload through USB . . . . . . . . . . 22
More functions 22
Switch modes . . . . . . . . . . . . . . . 22
Add new bike . . . . . . . . . . . . . . . 23
Power saving options 24
Auto Power Off . . . . . . . . . . . . . . 24
Auto Standby . . . . . . . . . . . . . . . . 24
GPS power save mode . . . . . . . . 25
Manual pause . . . . . . . . . . . . . . . 25
Speed from sensor . . . . . . . . . . . 26
Charging description . . . . . . . . . 26
Upgrade your X3 firmware 26
Get the firmware . . . . . . . . . . . . 26
Connect X3 with your computer 27
Specifications 28
Safety instructions 29

MEET YOUR X3
3
MEET YOUR X3
Description of the screen and buttons
!
Note:
The information in this User Manual is subject to change without notice.
A. Status field
B. Main menu
C. Button prompt field
D. Right button: Scroll down / Go to next page
E. Middle button: Confirm / Start riding / Lap /
Stop timer / Resume timer
F. Left button (POWER button): Power on /
Return to previous page / Power off (Long
press)
G. Bike mount latch
H. Micro USB port
!
Note:
Some functions on certain interfaces are a bit different, please refer to the "Button
prompt field" shown at the bottom of the screen.
F
E
D
A
B
C
H
G

MEET YOUR X3
4
Installation instructions
Installation steps
1. Hold the bike mount on top of the rubber pad evenly
together, ensuring they are aligned squarely to each
other. Then place them on the bike handlebar.
2. Loop an elastic band from one tab of the bike mount.
Stretch the free end of the elastic band underneath
the bike handlebar and up to the other tab. Ensure the
bike mount stays in place securely.
3. Align the latch on the back of X3 with the bike mount
notch. Press downward slightly and turn X3 until it
locks in place.
De-installation steps
1. Rotate X3 counterclockwise until the latch no longer locks it.
2. Remove X3 and keep it in a safe place.
Perform the initial settings
Initial settings will be conducted when you power on X3 for the first time. Please input
language, gender, age, weight and height information as shown on the screen in that order.
When making numeric settings, please refer
to the button prompt at the bottom of the
screen, the right button (Next) enables you
to switch between each number and Save
status; the left button and middle button can
otherwise increase and decrease numbers.
After adjusting the numeric settings, press
the right button to switch to Save status and
then press the middle button to save.

MEET YOUR X3
5
Time
The Xplova X3 has an advanced high-precision GPS receiver built in. X3 will set up the time
automatically after receiving GPS signals. The user only needs to adjust time zone and daylight
saving time according to the region.
GPS
X3 will search for satellites automatically
after powering on. Please stay in an
outdoor environment with an
unobstructed view of the sky. The GPS will
take about 30 seconds - 2 minutes to
search for satellites for the first time.
When it is in a stationary state, it will help
the GPS to reduce its search time.
On the menu screen press left button
(Return) to switch to the cycling screen.
The icon on the left upper side of the
screen also shows current satellite signal
strength.
The GPS signal view can display the condition of the current satellite signals received.
1. Press Next to select SETTING. Press OK to open SETTING menu.
2. Enter SETTING menu, select Day Time.
• Change the time format as desired, and select your time zone.
• Time of day is determined automatically, the X3 will calibrate the time automatically
after receiving GPS signals.
Satellite signal strength
Signal: Good
Signal: Fair
No signal
(Not Fixed)
GPS off

MEET YOUR X3
6
Display
Press Next on the main menu screen to select SETTING. Backlight time and brightness can be
adjusted in Display.
BIKE
The speed sensor calculates speed and ride distance from the wheel size; the wheel size is set
as follows:
1. Press Next on the main menu screen to select BIKE, press OK to enter BIKE menu.
2. Select Bike 1 by sequence and input correct wheel size information.
Show Status can set up if the satellite signal,
activity status and power icon are to be
displayed on the top of the screen.
Color Mode can set to black on white (Day),
white on black (Night), or switch
automatically based on the clock time.
Color Mode - Day Color Mode - Night
!
Note:
Day Bright will only be in effect in the cycling screen and the backlight brightness on
the menu screen will be set to 100% by force at daytime.

MEET YOUR X3
7
Wheel sizes:
Wheel size Length (mm) Wheel size Length (mm)
12 × 1.75 935 26 × 1.75 2023
14 × 1.5 1020 26 × 1.95 2050
14 × 1.75 1055 26 × 2.00 2055
16 × 1.5 1185 26 × 2.10 2068
16 × 1.75 1195 26 × 2.125 2070
18 × 1.5 1340 26 × 2.35 2083
18 × 1.75 1350 26 × 3.00 2170
20 × 1.75 1515 27 × 1 2145
20 × 1-3/8 1615 27 × 1-1/8 2155
22 × 1-3/8 1770 27 × 1-1/4 2161
22 × 1-1/2 1785 27 × 1-3/8 2169
24 × 1 1753 650 × 35A 2090
24×3/4 Tubular 1785 650 × 38A 2125
24 × 1-1/8 1795 650 × 38B 2105
24 × 1-1/4 1905 700 × 18C 2070
24 × 1.75 1890 700 × 19C 2080
24 × 2.00 1925 700 × 20C 2086
24 × 2.125 1965 700 × 23C 2096
26 × 7/8 1920 700 × 25C 2105
26 × 1(59) 1913 700 × 28C 2136
26 × 1(65) 1952 700 × 30C 2170
26 × 1.25 1953 700 × 32C 2155
26 × 1-1/8 1970 700C Tubular 2130
26 × 1-3/8 2068 700 × 35C 2168
26 × 1-1/2 2100 700 × 38C 2180
26 × 1.40 2005 700 × 40C 2200
26 × 1.50 2010
!
Note:
Actual wheel sizes may vary depending on the tyre brand, the tyre pressure and the
degree of tyre friction.

MEET YOUR X3
8
ANT+ sensor
Before using the sensor for the first time, please pair peripheral devices like speed, cadence
sensor, and heart rate monitor first. Combo sensors or speed sensors are not subject to
weather or terrain influences and can provide accurate speed and distance data.
Description of all the icons in the status field are as follows:
1. Press Next on the main menu screen to
select SENSOR, press OK to enter
SENSOR menu.
2. You can select either Search All or search
for a single type of sensor.
!
Note:
When the Search All function is processing, pressing any of the keys will have no
effect. Each peripheral device has a pairing number and can safely receive peripheral
signals after pairing correctly. Each set of device setting connections can connect to
different devices on its own. After a device is switched on, the peripheral sensor will
connect automatically. After the connection is successful, an ID number will be
displayed at the corresponding sensor and the status on top of the menu will display
an icon of the connected device.
HRM
Speed
Cadence
Power
Bluetooth
GPS signal
Power level

MEET YOUR X3
9
Customize MODE screen on X3
In the MODE menu, you can make exclusive settings like displayed pages, data fields and
content to be displayed in each field on your X3 based on your preferences.
Page Selection
Press Next on the main menu screen to select MODE and select a bike mode to set up
(the mode being used will be marked with a symbol).
Press OK to enter and select Page Selection. Press OK to toggle between On and Off for each
page.

MEET YOUR X3
10
Set Pages
In Set Pages, press OK to display the current settings for the page, press the right button Next
to display the number of data field (1 ~ 10) to be displayed on this page.
After adjusting the data field, press OK to enter settings for the content to be displayed in each
field, press the right button to move the cursor to select the displayed content you would like
to change to.
The following is an example to adjust the content displayed on the third field Distance to Clock
Time and describes each step for the display in each field.

MEET YOUR X3
11
After pressing the right button Next to move the cursor, selecting the third field Distance and
pressing OK, the Choose Group menu will pop up, then select Other functions. After pressing
OK, the Choose Function menu will pop up, then select Clock Time, and press OK button again
to finish the setup.
After returning to the cycling screen, you can see the third field on this page that shows Clock
Time.

MEET YOUR X3
12
The following table lists all the currently supported information content and groups:
Group Information content
Speed functions
• Speed
• Avg. Spd
• Avg. Spd Mov.
• Max Speed
• Lap Speed
•L-LapSpd
• Lap Max Speed
• L. L Max Spd
Cadence functions
• Cadence
• Avg. Cad.
•MaxCad.
•LapCad.
• L. Lap Cad.
• Lap Max Cad.
• L. L Max Cad.
• Cadence Zone
HRM functions
•Heartrate
•AvgHR
•MaxHR
• Lap HR
• L-Lap HR
• Lap Max HR
• L.L Max HR
• HR Zone
• Heart Rate%
• Avg HR%
• Max HR%
• Lap HR%
• L-Lap HR%
• Lap Max HR%
• L. L Max HR%
Power functions
•Power
• Avg Pwr
• Max Pwr
• Lap Pwr
• L-Lap Power
• Lap Max Pwr
• L.L Max Power
• Pwr Zone
•Pwr3s
• Pwr10s
• Pwr30s
• Pwr %FTP
• Pwr IF
• Pwr NP Avg
• Pwr TSS
• Pwr watts/kg
• Kilojoules
• Pwr Left %
• Pwr Right %
• L. TQ. Effect.
• R. TQ. Effect.
• L. Ped. Smooth.
• R. Ped. Smooth.
Distance functions •Distance
•AscentDist
•DescentDist
•LapDist.
• L-Lap Dist.
• Odometer
Altitude functions
• Altitude
•Grade
•VAM
•VAM30s
• Elevation (+)
• Elevation(-)
• Max Altitude
• Min Altitude
• VAM+ Avg
• VAM- Avg
• VAM+ Max
• VAM- Max
• Avg Grade +
• Avg Grade -
• Max Grade +
• Max Grade -
Time functions
• Elapsed Time
• Moving Time
• Record. Time
• Avg. Lap Time
•Laps
• Lap Time
• L-LAP Time
Other functions • Clock Time
• Sunrise
• Sunset
• Temperature
• GPS
•Accuracy
Kcal • Kcal

MEET YOUR X3
13
Auto functions
Auto Save
Press Next on the main menu screen to
select MODE. Select a bike mode and press
OK to select Auto Save to see current Auto
Save settings. Select OK to set up the
duration of Auto Save. You can select Off to
disable this function.
When the Auto Save function is off, you can
press the middle button when you are on the
cycling screen to manually start recording
(the mode being used will be marked with a
symbol).
Auto Pause
Press Next on the main menu screen to select
MODE. Select Auto Pause to see current Auto
Pause settings. Press OK to set up Auto
Pause. You can also select Off to turn off the
function. If you disable the Auto Pause
function, you can pause manually. Please
refer to Manual pause.

MEET YOUR X3
14
Auto Lap
Press Next on the main menu screen to select MODE. Select a bike mode and press OK to
select Auto Lap to enable/disable the location or distance.
•Location: When X3 detects you have passed the same path during the ride, it will start
Auto Lap function.
•Distance: After default value is reached, Auto Lap function will be activated. Default
distance value can be set on Auto Lap menu.

MEET YOUR X3
15
Auto Switch Page
When Auto Switch Page is activated, the displayed page on the cycling screen will switch pages
at fixed time intervals (Faster or Slower).
Height Page (Altitude)
When Height Page (Altitude) function is activated, an elevation plot of routes passed can be
displayed on the cycling screen. You can also set up the information display area and displayed
contents in Set Pages.

Set Training Intensity
16
Set Training Intensity
Training Zones
Press Next on the main menu screen to select SETTING and then select HR Zone in Training
Zones.
First, set up the Max HR. After the setup is completed, it will be divided into 5 heart rate zones
automatically. You can also adjust the zone values in each zone separately.
!
Note:
Use the same method to set up Pwr Zone and Cadence zones.

Set Training Intensity
17
Set Alarms
If you want to control the range of certain information during training, you can turn on Set
Alarms in the MODE menu.
Take heart rate as an example: when Heart Rate alert is activated, you can set up Max Heart
Rate alert and Min Heart Rate alert separately.
When the current heart rate detected during a ride exceeds the set alert range, the cycling
computer will pop up a warning message and an alert will be sounded.
The Xplova X3 provides the following alert sounds:
• By time: Alerts will come up when the set minute(s) have passed.
• By distance: Alerts will come up when the set kilometer has been attained.
• By calories: Alerts will come up after consuming set calories.
• By cadence: Alerts will come up when the set kilometer has been attained.
• By power: Alerts will come up when the set kilometer has been attained.

Route
18
Route
History Routes
My Routes
The Xplova X3 supports routes planned in .fit, .gpx and .tcx formats. After a route is planned on
the website, use a USB cable to copy the route file to the Xplova Navigation folder on the cycling
computer.
After X3 is turned on, you can find the file in ROUTE - User Routes right away. After entering the
route file, you can start Navigation or Return.
You can use saved route information in
memory to start Navigation function. Press
Next on the main menu to select ROUTE to
choose History Routes and select the
information list to start Navigation function.
After you select a record from the list and
open it, it will show a graph of the recorded
GPS tracks. Choose Navigation or Return to
switch to the route map page under cycling
screen. On this page you can press middle
button to zoom in and out the route you are
currently on.
!
Note:
When you start recording from ACTIVITY menu, selecting Map can also start Route
function.
!
Note:
• The length of the route file name has to be less than 28 characters, or it cannot be
displayed.
•https://www.xplova.com provides route downloads and custom route functions
Please download the .gpx format.

Route
19
Pause and continue
Switch page
Pressing the right button on the cycling screen will switch to the default pages. The indication
bar at the bottom of the screen will show the current page. (For more information on page
settings, please refer to RIDE - Page Selection and Set Pages.)
RIDE
After entering the cycling screen, the
computer will detect motion after you start
RIDE and a box asking if it should start
recording pops up.
In recording status, a red light will flash by the
power indicator on the right upper corner of
the screen.
When you finish riding, the computer will
detect that motion is stopped and will stop
recording automatically. When the ride
pauses, the red indicator will stop flashing
and the computer will record automatically
again when the ride continues.
If pause recording is used manually, press
the middle button will continue recording in
the paused status.
Red indicator

Route
20
Lap
Record and analyze information of several laps. You can press the
middle button in the recording status, and the screen will start a new
lap and show previous lap time.
Stop recording
View activities
When a ride is finished, you can view Saved activity directly on the computer.
1. Press the left button to return to the main menu screen.
2. Press Next on the main menu screen to select ACTIVITY, press OK to select Saved activity.
3. You can select Last activity to view the latest ride activity directly, or view All activities.
If you would like to stop recording the ride,
press the left button to pop up "Finish and
Save?". Press the middle button to save and
finish the ride.
When the ride is finished, the red indicator
on the right upper screen will disappear.
Also in the recording status, if you turn off
the computer directly, the record will be
saved automatically.
Other manuals for X3
1
Table of contents
Other Xplova Bicycle Accessories manuals