ABB 83220-SM-xxx-500 User manual

0073-1-7516 │ │ 22.02.2012
ABB-Welcome
Pos: 2 /DinA4 - Anleitungen Onlin e/Inhalt/KNX/Door Entry/83220-AP-xxx/ Titelbla tt - 83220-AP-xxx - ABB @ 19\mod_1323249806476_15. docx @ 111084 @ @ 1
83220-SM-xxx-500
83220
-SM-xxx-515
ABB
-WelcomeTouch
=== Ende der Liste für Te xtmarke Cover ===

ABB
-Welcome
| 0073-1-7516
— 2 —
Pos: 4 /Busch-Jaeger (Neustruk tur)/Modul-Struktur/ Online-Dokumentation/Inhal tsverzeichnis (--> Für alle Dokument e <--)/Inhaltsverzeichn is @ 19\mod_132064904438 6_15.docx @ 109653 @ @ 1
1Safety....................................................................................................................................................................... 3
2Intended use ............................................................................................................................................................ 3
3Environment............................................................................................................................................................. 3
3.1 ABB devices............................................................................................................................................ 3
4User Manual............................................................................................................................................................. 3
5Operation ................................................................................................................................................................. 5
5.1 Standard operation ................................................................................................................................. 5
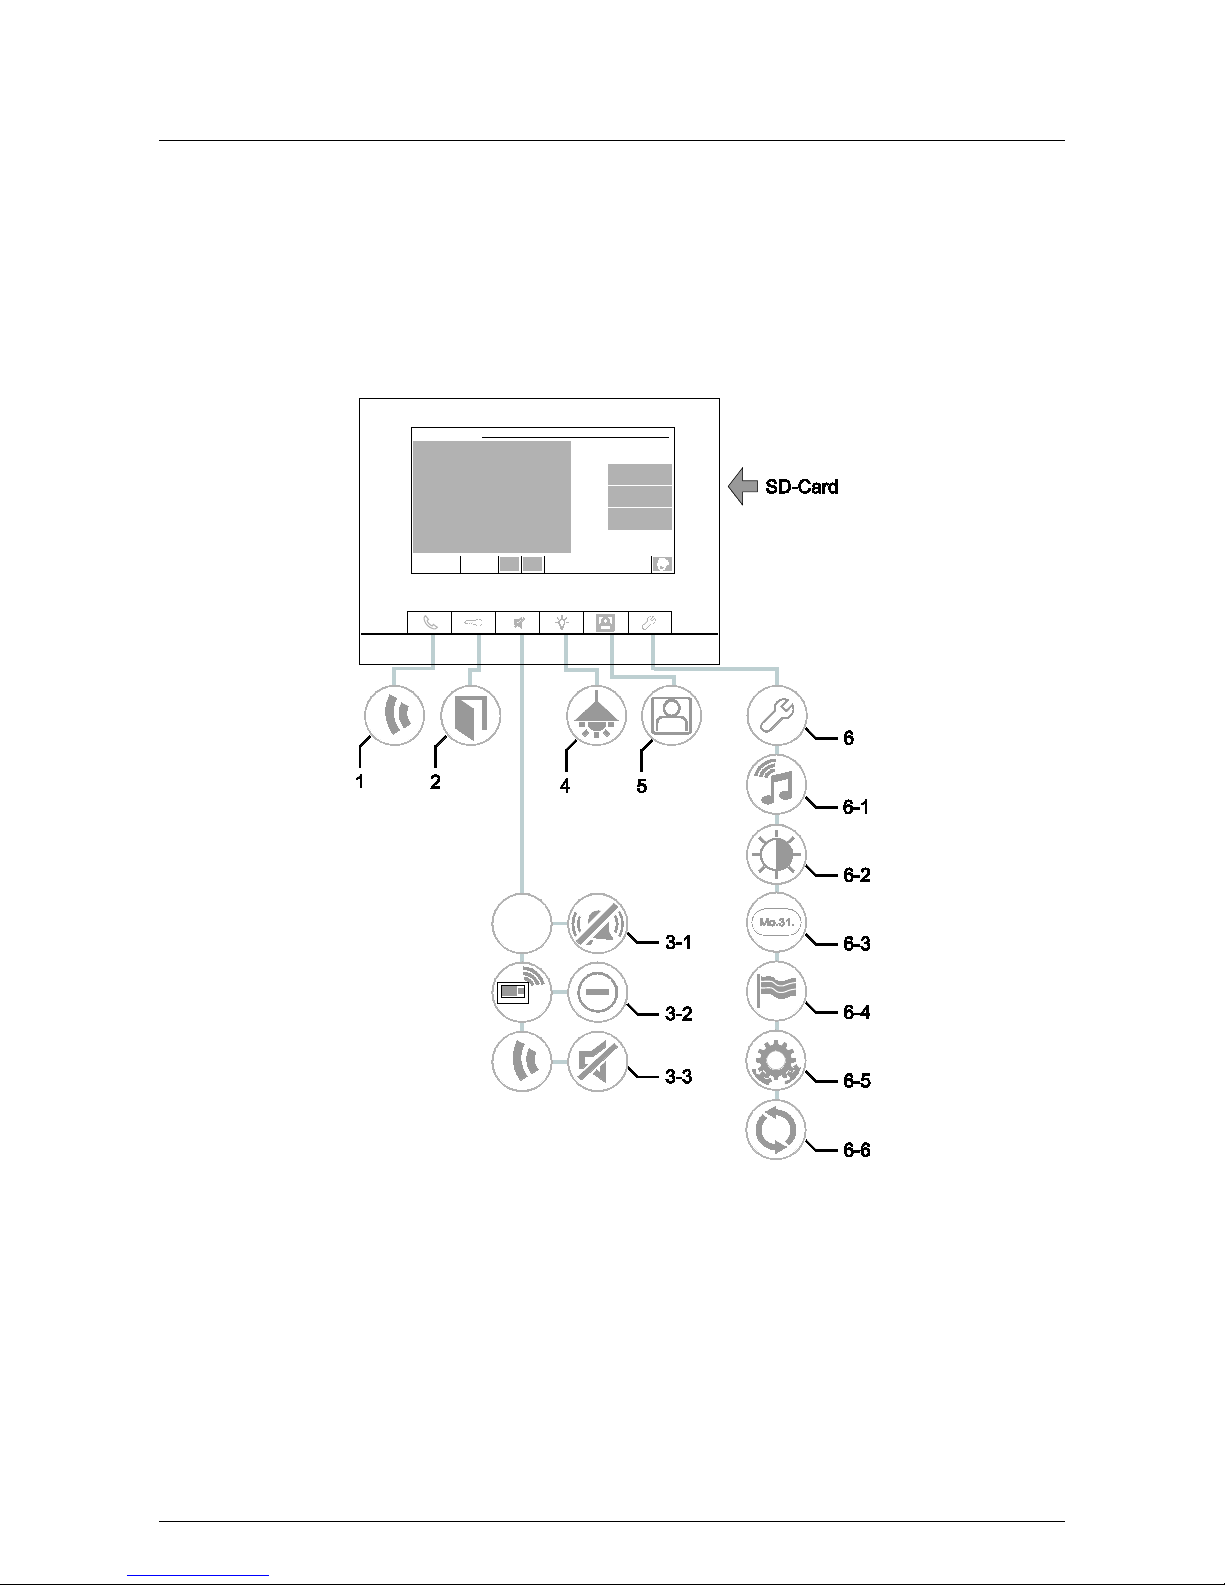
5.1.1 Control elements..................................................................................................................................... 5
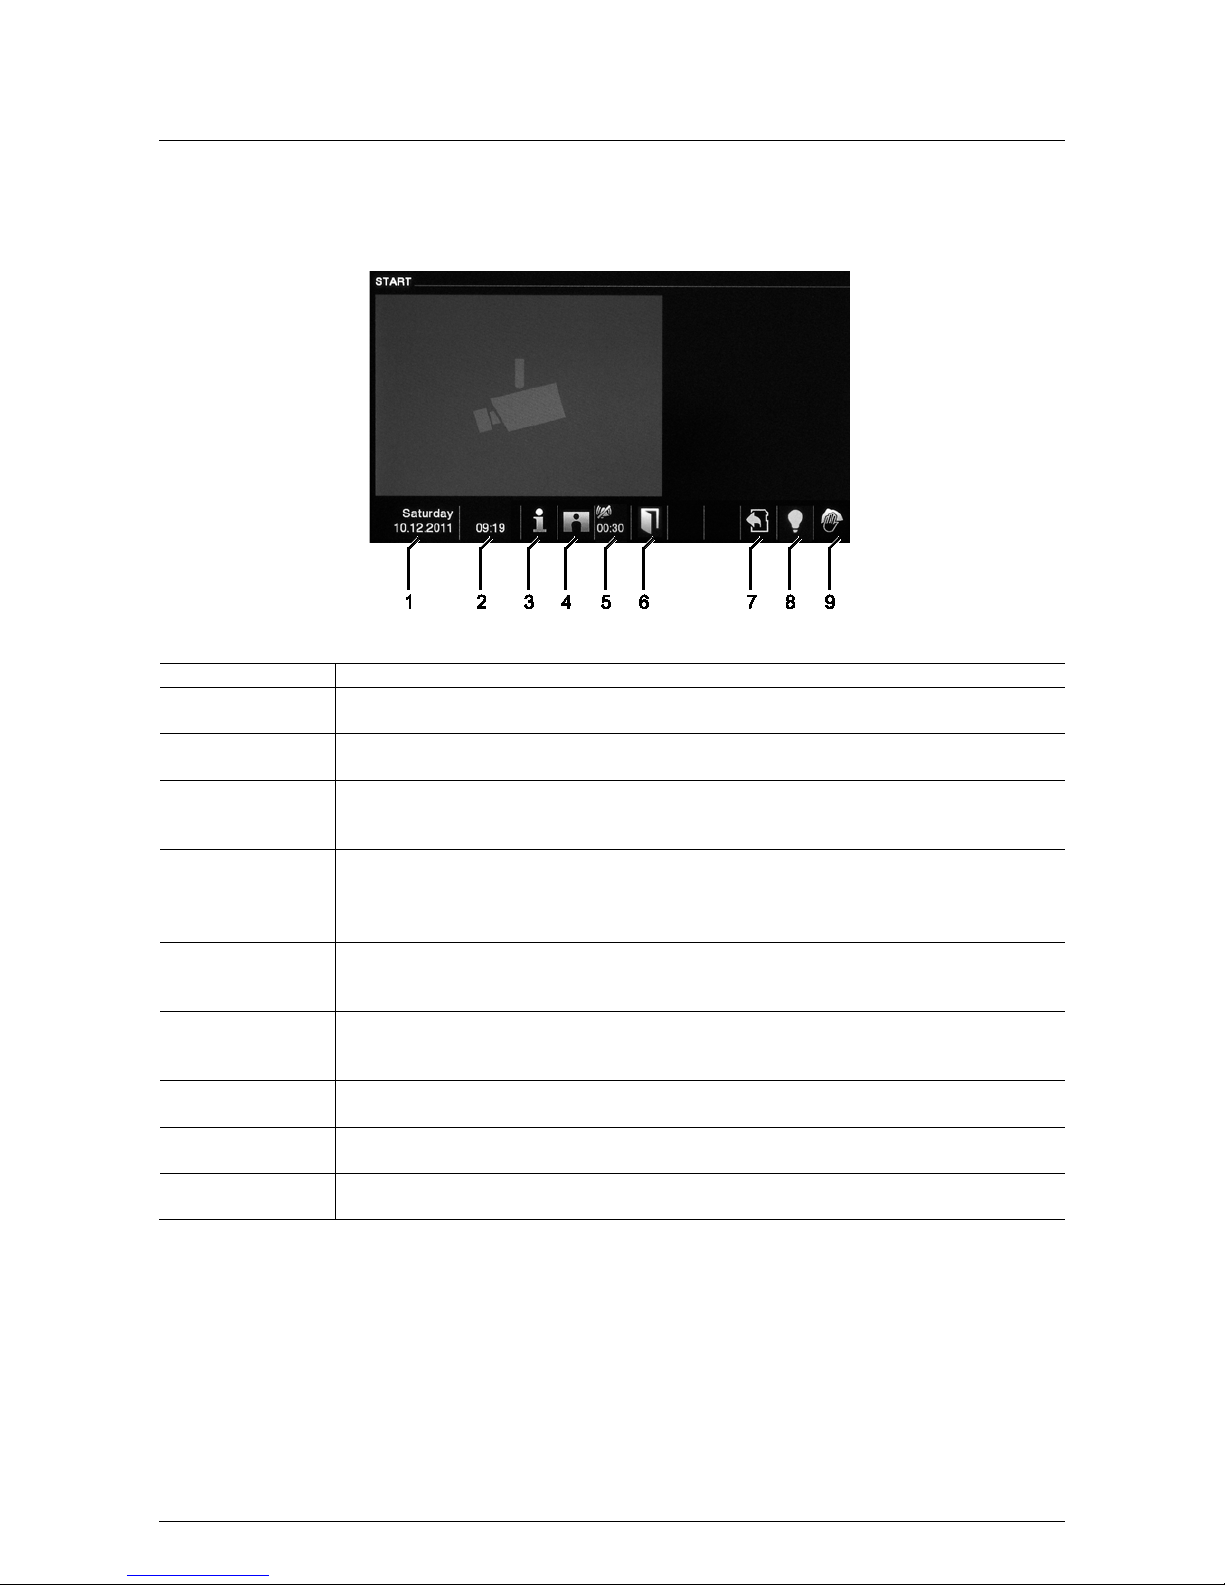
5.1.2 Welcome screen and status bar.............................................................................................................. 7
5.2 Control actions ........................................................................................................................................ 8
5.2.1 Setting up the voice and video connection.............................................................................................. 8
5.2.2 Opening the door .................................................................................................................................... 9
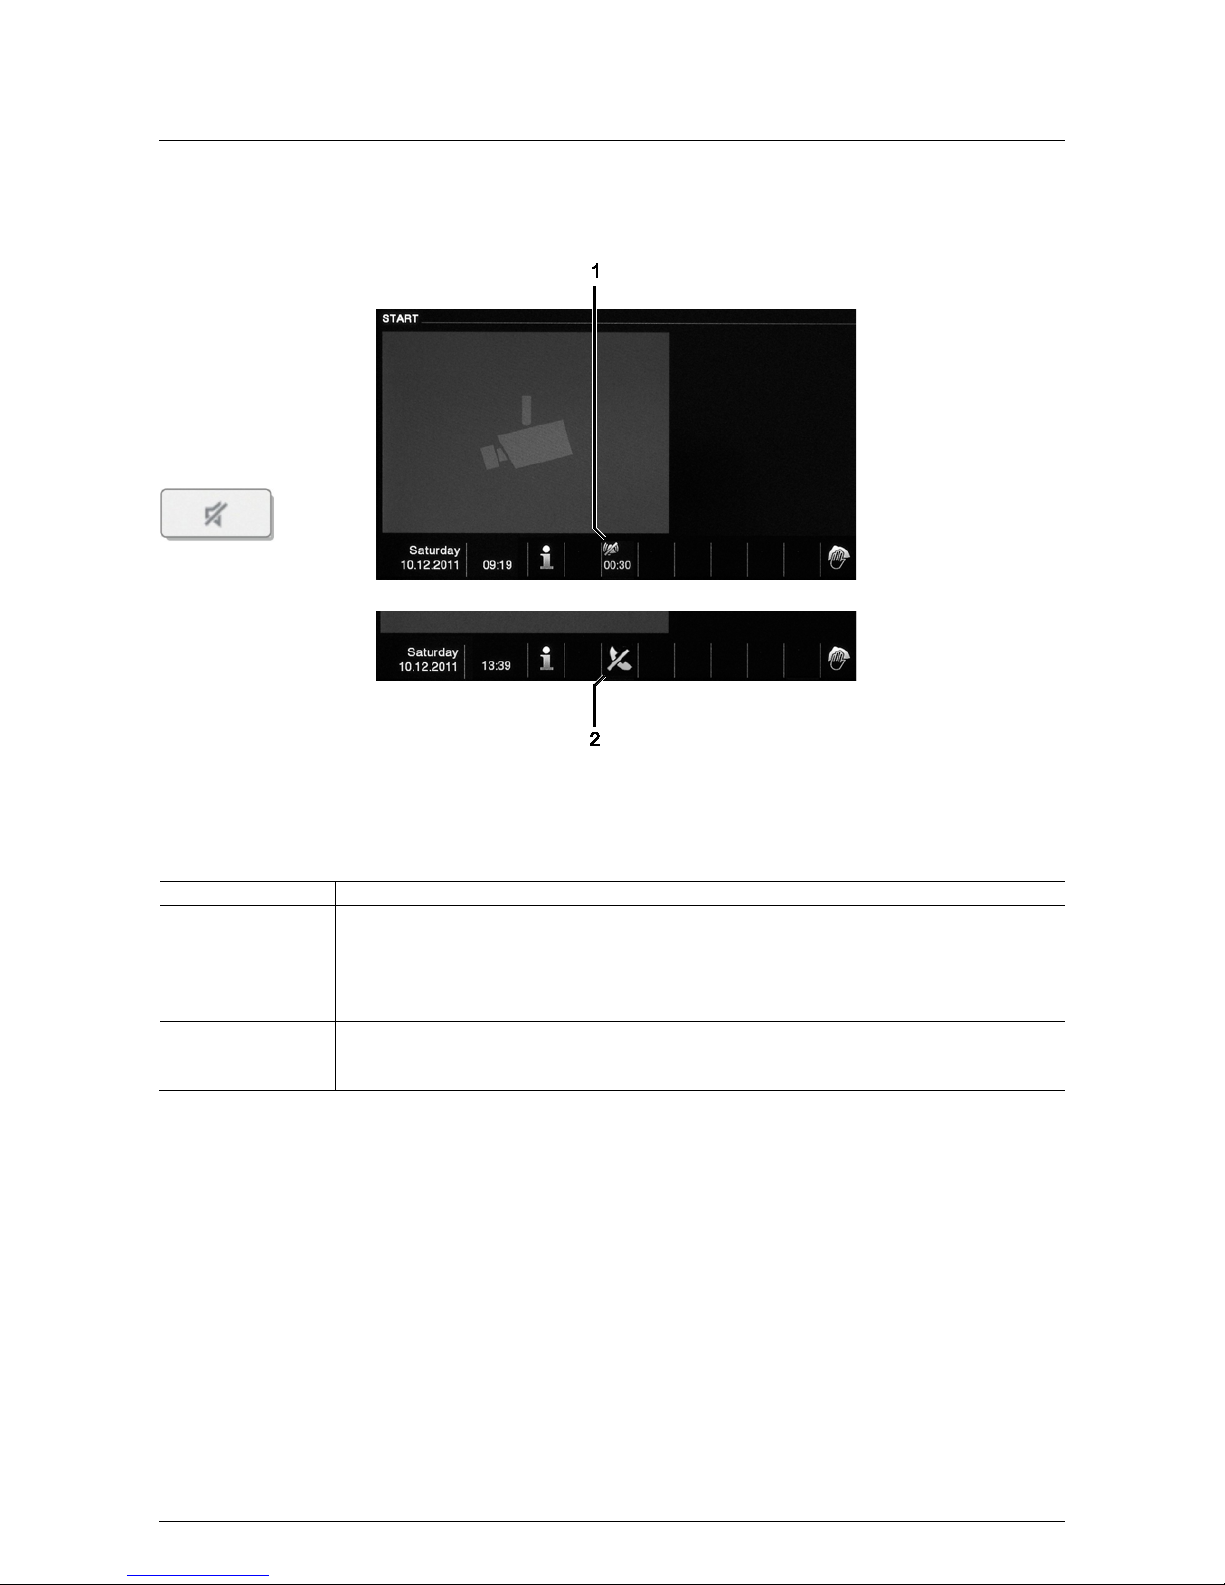
5.2.3 Muting ....................................................................................................................................... 10
5.2.4 Switching the light ................................................................................................................................. 11
5.2.5 Events and picture memory / history..................................................................................................... 12
5.2.6 Inserting the SD card ............................................................................................................................ 15
5.2.7 Settings ....................................................................................................................................... 16
5.2.7.1 Overview ....................................................................................................................................... 16
5.2.7.2 Volume ....................................................................................................................................... 18
5.2.7.3 Display ....................................................................................................................................... 19
5.2.7.4 Date / time ....................................................................................................................................... 21
5.2.7.5 Language ....................................................................................................................................... 22
5.2.7.6 Door Entry System................................................................................................................................ 24
5.2.7.7 Firmware update ................................................................................................................................... 25
5.3 Cleaning................................................................................................................................................ 26
5.4 Adjusting the device.............................................................................................................................. 27
5.4.1Terminal resistor ................................................................................................................................... 27
5.4.2 Setting the master/slave switch............................................................................................................. 27
6Technical data........................................................................................................................................................ 28
7Mounting / Installation ............................................................................................................................................ 29
7.1Requirements for the electrician ........................................................................................................... 29
7.2 General installation instructions ............................................................................................................ 29
7.3 Mounting ............................................................................................................................................... 30
7.4 Connection............................................................................................................................................ 34
8Addressing............................................................................................................................................................. 35
8.1 Addressing the stations......................................................................................................................... 35
8.1.1 Potentiometer ....................................................................................................................................... 35
8.1.2 Setting the address of the outdoor station:............................................................................................ 35
8.1.3 Assigning the doorbell push-button of an outdoor station to an apartment ........................................... 35
8.1.4 Setting the address of the indoor station............................................................................................... 35
8.1.5 Setting of the "standard outdoor station"............................................................................................... 36
8.2 Video for addressing the device............................................................................................................ 38
=== Ende der Liste für Te xtmarke TOC ===

ABB
-Welcome
Safety
| 0073-1-7516
— 3 —
Pos: 6 /Busch-Jaeger (Neustruk tur)/Modul-Struktur/ Online-Dokumentation/Übersc hriften (--> Für alle Dokumente <--) /1. Ebene/S - T/Sicherhei t @ 18\mod_1302612791790_1 5.docx @ 103357 @ 1 @ 1
1 Safety
Pos: 7 /Busch-Jaeger (Neustruk tur)/Modul-Struktur/ Online-Dokumentation/Sic herheit (--> Für alle Dokumente <--) /Warnhinweise/Sic herheit - 230 V @ 18\mod_130260681675 0_15.docx @ 103308 @ @ 1
Warning
Electric voltage!
Risk of death and fire due to electrical voltage of 230 V.
– Work on the 230V supply system may only be performed by authorised electricians!
– Disconnect the mains power supply prior to installation and/or disassembly!
Pos: 8 /Busch-Jaeger (Neustruk tur)/Modul-Struktur/ Online-Dokumentation/Übersc hriften (--> Für alle Dokumente < --)/1. Ebene/A - F/Bestimmun gsgemäßer Gebrauch @ 18\mod_130 2763321316_15.doc x@ 103483 @ 1 @ 1
2 Intended use
Pos: 9 /DinA4 - Anleitungen Onlin e/Inhalt/KNX/Door Entry/83220-AP-xxx/Bes timmungsgemaesser Gebr auch - 83220-AP-xxx-500 @ 20\mod_13245611686 99_15.docx @ 112728 @ @ 1
The ABB-WelcomeTouch 83220-SM-xxx-500 is an integral part of the ABB Welcome door communication system
and operates exclusively with components from this system. The device must only be installed in dry indoor
rooms.
Pos: 10 /Busch-Jaeger (Neustruk tur)/Modul-Struktur/ Online-Dokumentation/Übersc hriften (--> Für alle Dokument e <--)/1. Ebene/U - Z/ Umwel t @ 18\mod_130261 4158967_15.docx @ 103383 @ 1 @ 1
3 Environment
Pos: 11 /Busch-Jaeger (Neustruk tur)/Modul-Struktur/ Online-Dokumentation/Umwel t (--> Für alle Dokumente <--)/ Hin wei se/ Hi n wei s - Umwelt - Hinweis Elektro geräte @ 18\mod_1302763973 434_15.docx @ 103500 @ @ 1
Cons ider the protection of the environment!
Used electric and electronic devices must not be disposed of with domestic waste.
– The device contains valuable raw materials which can be recycled. Therefore, dispose of the
device at the appropriate collecting depot.
Pos: 12 /DinA4 - Anleitungen Online/U eberschriften/2. /ABB Geraete @ 19\mod_13231628 43832_15.docx @ 110875 @ 2 @ 1
3.1 AB B devices
Pos: 13 /Busch-Jaeger (Neustruk tur)/Modul-Struktur/ Online-Dokumentation/Umwel t (--> Für alle Dokumente <--) /Hi nwe ise / Hin wei s - Umwelt - ABB Elektroger äte @ 19\mod_1323162745839_ 15.docx @ 110867 @ @ 1
All packaging materials and devices from ABB bear the markings and test seals for proper disposal. Always
dispose of the packaging material and electric devices and their components via the authorized collecting depots
and disposal companies.
ABB products meet the legal requirements, in particular the laws governing electronic and electrical devices and
the REACH ordinance.
(EU-Directive 2002/96/EG WEEE and 2002/95/EG RoHS)
(EU-REACH ordinance and law for the implementation of the ordinance (EG) No.1907/2006)
Pos: 14 /DinA4 - Anleitungen Online/U eberschriften/1. /Anwenderhandbuch @ 19\mod_13093472 27593_15.docx @ 107473 @ 1 @ 1
4 User Manual
Pos: 15 /DinA4 - Anleitungen On line/Inhalt/KNX/Door Entry/Systemhandb uch/Anwenderhandbuch - ABB @ 19\mod_1323 163157997_15.doc x@ 110883 @ @ 1
Detailed information for planning ABB-Welcome systems is contained in the user manual. Download at
www.Busch-Jaeger.com.
Pos: 16 /Busch-Jaeger (Neustruk tur)/Modul-Struktur/ Online-Dokumentation/Steuer module - Onli ne-Dokumentation (--> Für alle Dok umente <--)/++++++++++++Seitenumbruch++++++++++++ @ 9\mod_1268898668093_ 0.docx @ 52149 @ @ 1

ABB
-Welcome
User Manual
| 0073-1-7516
— 4 —
Pos: 17 /Busch-Jaeger (Neustruk tur)/Modul-Struktur/ Online-Dokumentation/Steuer module - Onli ne-Dokumentation (--> Für alle Dok umente <--)/++++++++++++Seitenumbruch++++++++++++ @ 9\mod_1268898668093_ 0.docx @ 52149 @ @ 1

ABB
-Welcome
Operation
| 0073-1-7516
— 5 —
Pos: 18 /DinA4 - Anleitungen Online/U eberschriften/1. /Bedienung @ 18\mod_130261 3924165_15.docx @ 103365 @ 1 @ 1
5 Operation
Pos: 19 /DinA4 - Anleitungen Online/ Ueberschriften/2. /Normaler Betrieb @ 18\mod_1 302768820965_15.doc x@ 1035 40 @ 2 @ 1
5.1 S tandard operation
Pos: 20 /DinA4 - Anleitungen Online/U eberschriften/3. /Bedienelemente @ 20\mod_1323260 220559_15.doc x@ 111647 @ 3 @ 1
5.1.1 Control elements
Pos: 21 /DinA4 - Anleitungen Online/ Inhalt/KNX/DoorEntr y/83220-AP-xxx/Bedienele mente - 83220-AP-xxx@ 18\mod_1303212853 605_15.docx @ 103673 @ @ 1
Fig. 1: Overview of control buttons

ABB
-Welcome
Operation
| 0073-1-7516
— 6 —
No.
Func tion
1
Press this button accept a call.
2
Press this button to open the door.
3
-1 Press this button to deactivate the doorbell.
3
-2 While a call is pending, this button has the "reject call" function.
- Press this button reject a call.
3
-3 During the conversation the button has the "mute" function.
Press on this button to activate the mute function.
– The party at the other end cannot hear you.
- Press the button again to continue the conversation.
4
Press this button to switch on the lighting.
5
Press this button to display the events and picture memory / history.
6
Press this button to change to "Settings".
– Setting nos. 6-1 to 6-6 are available on the touch screen.
6
-1 •The ring tone volume
6-2
•The brightness of the display
6
-3 •The time and date
6-4
•The language
6
-5 •Door Entry System
6
-6 •Firmware update
Pos: 22 /Busch-Jaeger (Neustruk tur)/Modul-Struktur/ Online-Dokumentation/Steuer module - Onli ne-Dokumentation (--> Für alle Dok umente <--)/++++++++++++Seitenumbruch++++++++++++ @ 9\mod_1268898668093_ 0.docx @ 52149 @ @ 1

ABB
-Welcome
Operation
| 0073-1-7516
— 7 —
Pos: 23 /DinA4 - Anleitungen Online/U eberschriften/3. /Startbildschir mun d Statusleiste @ 20\mod_1323260 336194_15.doc x@ 111695 @ 3 @ 1
5.1.2 Welcome s creen and status bar
Pos: 24 /DinA4 - Anleitungen Online/ Inhalt/KNX/DoorEntry /83220-AP-xxx/Startbildschi rm und Statusleiste - 83220-AP-xxx @ 20\mod_132326037186 4_15.docx @ 111903 @ @ 1
Fig. 2: Status bar
No.
Func tion
1
Current date
- Set the date by touching the button.
2
Time
- Set the correct time by touching the button.
3
System information
- Call up the address (number of the indoor station) of this panel and the current hardware and software
information by touching the button.
4
History
- New information is available in History (events and picture memory) when this icon flashes. E.g., a
missed call.
- Display the events and picture memory by touching the button.
5
Mute function
- The icons "crossed-out handset" and "crossed-out bell" indicate the mute function of the microphone or
the loudspeaker of the panel.
6
Open entrance door
- The "Open door" icon is displayed when you press the door opener or activate the function "Automatic
door opener".
7
SD card
- The icon shows whether you have inserted an SD card.
8
Light
- The icon is shown when you have switched the light directly from the panel.
9
Cleaning blockage
- The icon is shown when the display is blocked to prevent functions being triggered during cleaning.
Pos: 25 /Busch-Jaeger (Neustruk tur)/Modul-Struktur/ Online-Dokumentation/Steuer module - Onli ne-Dokumentation (--> Für alle Dok umente <--)/++++++++++++Seitenumbruch++++++++++++ @ 9\mod_1268898668093_ 0.docx @ 52149 @ @ 1

ABB
-Welcome
Operation
| 0073-1-7516
— 8 —
Pos: 26 /DinA4 - Anleitungen Online/ Ueberschriften/2./ Bedienaktionen @ 20\mod_13 23262294281_15.doc x@ 1119 11 @ 2 @ 1
5.2 C ontrol ac tions
Pos: 27 /DinA4 - Anleitungen Online/ Ueberschriften/3./ Sprech- und Videoverbindung @ 20\mod _1323262368700_15.doc x @ 111927 @ 3 @ 1
5.2.1 S etting up the voice and video connection
Pos: 28 /DinA4 - Anleitungen Online/ Inhalt/KNX/DoorEntr y/83220-AP-xxx/Sprech- und Video verbindung - 83220-AP-xxx @ 20\mod_13232 62341852_15.doc x@ 111919 @ @ 1
Fig. 3: Setting up the voice and video connection
The following functions are available for setting up the voice and video connections (pressing the handset button):
No.
Func tion
1
Designation of camera
2
Set the volume by touching the respective buttons (plus and minus).
3
If several outdoor stations or external cameras are connected:
– Select the camera by touching the respective buttons (forward and back).
4
Set the display by touching the respective buttons.
•Saturation of the display (plus and minus)
•Contrast of the display (plus and minus)
Pos: 29 /Busch-Jaeger (Neustruk tur)/Modul-Struktur/ Online-Dokumentation/Steuer module - Onli ne-Dokumentation (--> Für alle Dok umente <--)/++++++++++++Seitenumbruch++++++++++++ @ 9\mod_1268898668093_ 0.docx @ 52149 @ @ 1

ABB
-Welcome
Operation
| 0073-1-7516
— 9 —
Pos: 30 /DinA4 - Anleitungen Online/U eberschriften/3. /Tuer oeffnen @ 20\mod_1323263 277453_15.doc x@ 111935 @ 3 @ 1
5.2.2 Opening the door
Pos: 31 /DinA4 - Anleitungen Online/ Inhalt/KNX/DoorEntr y/83220-AP-xxx/Tuer oeffnen - 83220-AP-xxx @ 20\mod_1323267958 479_15.docx @ 112109 @ @ 1
Fig. 4: Opening the door
When activating the door opener (by pressing the key button), the following function is available:
No.
Func tion
1
The "Open door" icon is displayed when you press the door opener or activate the function "Automatic door
opener".
Pos: 32 /Busch-Jaeger (Neustruk tur)/Modul-Struktur/ Online-Dokumentation/Steuer module - Onli ne-Dokumentation (--> Für alle Dok umente <--)/++++++++++++Seitenumbruch++++++++++++ @ 9\mod_1268898668093_ 0.docx @ 52149 @ @ 1

ABB
-Welcome
Operation
| 0073-1-7516
— 10 —
Pos: 33 /DinA4 - Anleitungen Online/U eberschriften/ 3./Stumm schal ten @ 20\mod_13232636071 42_15.docx @ 111951 @ 3 @ 1
5.2.3 Muting
Pos: 34 /DinA4 - Anleitungen Online/ Inhalt/KNX/DoorEntr y/83220-AP-xxx/Stumm scha lten - 83220-AP-xxx @ 20\mod_132326 3648687_15.doc x@ 111959 @ @ 1
Fig. 5: Mute function (mute timer)
The following functions are available for muting (mute timer):
No.
Func tion
1
No call is pending:
If you press the "Mute function" while no call is pending the bell sound of the panel is deactivated for a
certain period.
- If calls come in during this time, only the video image is displayed.
- Missed calls are displayed in the events and picture storage.
2
A call is pending:
If you press the button "Mute function" during a call, the microphone of the panel is deactivated until the
button is pressed again.
Pos: 35 /Busch-Jaeger (Neustruk tur)/Modul-Struktur/ Online-Dokumentation/Steuer module - Onli ne-Dokumentation (--> Für alle Dok umente <--)/++++++++++++Seitenumbruch++++++++++++ @ 9\mod_1268898668093_ 0.docx @ 52149 @ @ 1

ABB
-Welcome
Operation
| 0073-1-7516
— 11 —
Pos: 36 /DinA4 - Anleitungen Online/ Ueberschrif ten/3./Licht schalt en @ 20\mod_1323264614518 _15.docx @ 111967 @ 3 @ 1
5.2.4 S witching the light
Pos: 37 /DinA4 - Anleitungen Online/ Inhalt/KNX/DoorEntr y/83220-AP-xxx/Licht schalte n - 83220-AP-xxx @ 20\mod_132326469317 1_15.docx @ 111995 @ @ 1
Fig. 6: Switching lights
When activating the light switch, the following function is available:
No.
Func tion
1
The "Light" icon is displayed when you press the button "Switching lights".
Pos: 38 /Busch-Jaeger (Neustruk tur)/Modul-Struktur/ Online-Dokumentation/Steuer module - Onli ne-Dokumentation (--> Für alle Dok umente <--)/++++++++++++Seitenumbruch++++++++++++ @ 9\mod_1268898668093_ 0.docx @ 52149 @ @ 1

ABB
-Welcome
Operation
| 0073-1-7516
— 12 —
Pos: 39 /DinA4 - Anleitungen Online/ Ueberschriften/3./ Ereignis- und Bildspeicher - Histor y @ 20\mod_1323264954284_15. docx @ 112093 @ 3 @ 1
5.2.5 E vents and picture memory / history
Pos: 40 /DinA4 - Anleitungen Online/ Inhalt/KNX/DoorEntr y/83220-AP-xxx/Ereignis- und Bi ldspeicher - His tory - 83220-AP-xxx @ 20\mod_13232 65076529_15.docx @ 112101 @ @ 1
The panel records all events. Pressing the "History" button displays the last 100 events (prior events are
overwritten).
Fig. 7: Events and picture storage / history
No.
Func tion
1
If you have activated the function "Auto snapshots activated" in the system settings, the flashing icon in the
status bar signals a newly taken snapshot.
- The symbol stops flashing when you call up the events and picture storage.

ABB
-Welcome
Operation
| 0073-1-7516
— 13 —
Fig. 8: Events and picture storage / history

ABB
-Welcome
Ope
ration
| 0073-1-7516
— 14 —
During a call you can take a snapshot at any time by pressing the "History" button, even when the "Automatic
snapshots" function is not active.
The following functions are available for the "Events and picture storage /history" function.
No.
Func tion
1
If you have activated the system setting "Automatic snapshots", a miniature view is displayed in the events
list when incoming calls are missed.
- Date, time and the type of the event are recorded together with the snapshot.
- If no automatic snapshots are active, a camera icon is displayed in the miniature view.
2
Individual entries or the entire list can be deleted at any time.
- Snapshots which you would like to archive can be copied on an inserted SD card (SD, SDHC).
3
Three pictures are are always made when a visitor rings the bell. This ensures an optimum snapshot.
- All recorded pictures are called up via the detail view.
4
Display of the detail view of a record
5
Select the event by touching the respective buttons (forward and back).
6
Select the single picture by touching the respective buttons (1 to 3).
Pos: 41 /Busch-Jaeger (Neustruk tur)/Modul-Struktur/ Online-Dokumentation/Steuer module - Onli ne-Dokumentation (--> Für alle Dok umente <--)/++++++++++++Seitenumbruch++++++++++++ @ 9\mod_1268898668093_ 0.docx @ 52149 @ @ 1

ABB
-Welcome
Operation
| 0073-1-7516
— 15 —
Pos: 42 /DinA4 - Anleitung en Online/Ueberschriften/ 3./SD-Karte einfuegen @ 20\mod_1324291 540680_15.doc x@ 112363 @ 3 @ 1
5.2.6 Inserting the SD card
Pos: 43 /DinA4 - Anleitungen Online/ Inhalt/KNX/DoorEntr y/83220-AP-xxx/SD-Karte einfüg en - 83220-AP-xxx@ 20\mod_13242915 81867_15.docx @ 112371 @ @ 1
Fig. 9: Inserting the SD card
Pos: 44 /Busch-Jaeger (Neustruk tur)/Modul-Struktur/ Online-Dokumentation/Steuer module - Onli ne-Dokumentation (--> Für alle Dok umente <--)/++++++++++++Seitenumbruch++++++++++++ @ 9\mod_1268898668093_ 0.docx @ 52149 @ @ 1

ABB
-Welcome
Operation
| 0073-1-7516
— 16 —
Pos: 45 /DinA4 - Anleitungen Online/U eberschriften/3. /Einstellungen @ 20\mod_1 323267988133_15.doc x@ 1122 27 @ 3 @ 1
5.2.7 S ettings
Pos: 46 /DinA4 - Anleitungen Online/U eberschriften/4. /Übersicht @ 20\mod_1323 856515464_15.doc x @ 112244@ 4 @ 1
5.2.7.1 Overview
Pos: 47 /DinA4 - Anleitungen Online/ Inhalt/KNX/DoorEntr y/83220-AP-xxx/Einstellung en Uebersicht- 83220-AP-xxx @ 20\mod_13 23263342029_15.doc x@ 11194 3 @ @ 1
Fig. 10: Overview of settings
The following areas are available when touching the "Settings" button:
No.
Func tion
1
Volume
– The volumes of the bell sounds
2
Display
– Different display settings
3
Date and time
– Different time settings
4
Language
– The local language
5
Door Entry System
– Different system settings, e.g bell sounds
6
Firmware update

ABB
-Welcome
Operation
| 0073-1-7516
— 17 —
Fig. 11: Settings
To change into the settings areas of the list field (1), carry out the following steps:
1. To display the hidden functions, tip on the scroll buttons (2).
2. Touch one of the setting areas.
3. Touch the button "Set" (3).
– The device changes to the setting area selected.
– The individual functions are described in the following chapters.
– The device changes back to the start page via button "Back".
Pos: 48 /Busch-Jaeger (Neustruk tur)/Modul-Struk tur/Online-Dokumentation/ Steuermodule - Onli ne-Dokumentation ( --> Für alle Dokumente <--)/++++++++++++Seitenumbruch ++++++++++++@ 9\mod_126889 8668093_0.docx @ 52149 @ @ 1

ABB
-Welcome
Operation
| 0073-1-7516
— 18 —
Pos: 49 /DinA4 - Anleitungen Online/U eberschriften/4. /Lautstaerke @ 20\mod_13238 56705443_15.doc x@ 112251 @ 4 @ 1
5.2.7.2 Volume
Pos: 50 /DinA4 - Anleitungen Online/ Inhalt/KNX/DoorEntr y/83220-AP-xxx/Einstellung en Lautstaerke- 83220-AP-xxx @ 20\mod_ 1323856817689_15.doc x @ 112259 @ @ 1
Fig. 12: Setting the volume
When changing to "Volume" the following functions become available:
No.
Func tion
1
Bell-sound volume
– Set the volume of the bell sound via the "Plus / minus" buttons.
2
Mute timer
- Use the "Plus / minus" buttons to set the time of the mute function which you activate via the "mute"
button.
– Before the adjustment tip on ""Hours" or "Minutes". The active range is marked with a frame.
3
OK
– By tipping on this button you activate the settings.
4
Back
– By tipping on this button you return to the start page without saving the settings.
Pos: 51 /Busch-Jaeger (Neustruk tur)/Modul-Struktur/ Online-Dokumentation/Steuer module - Onli ne-Dokumentation (--> Für alle Dok umente <--)/++++++++++++Seitenumbruch++++++++++++ @ 9\mod_1268898668093_ 0.docx @ 52149 @ @ 1

ABB
-Welcome
Operation
| 0073-1-7516
— 19 —
Pos: 52 /DinA4 - Anleitungen Online/U eberschriften/4./ Display @ 20\mod_1323859069 487_15.docx @ 112267 @ 4 @ 1
5.2.7.3 Dis play
Pos: 53 /DinA4 - Anleitungen Online/ Inhalt/KNX/DoorEntr y/83220-AP-xxx/Einstellung en Display- 83220-AP-xxx @ 20\mod_13238 59176842_15.doc x@ 11227 5 @ @ 1
Fig. 13: Display settings
When changing to "Display", the following functions become available:
No.
Func tion
1
Brightness
- Set the brightness of the display via the "Plus / minus" buttons.
2
Screen saver
– The display is preset as digital clock
– If an SD card with suitable pictures is located in the device, you can select a screen saver via the fold-
down menu. If several pictures are stored on the SD card they are displayed as a slide show.
Slide show (electronic picture frame)
– Each picture appears for 20 seconds.
Picture requirements:
– The pictures must be stored on the SD card in directory "DCIM" (Digital Camera Images) on the first
level.
– The maximum admissible size of the picture is 2048 x 1960 pixel.
– The maximum admissible resolution of a picture is 800 x 480 pixel.
– The resolution of the display is 800 x 600. Larger pictures will be reduced to this resolution.
– The format supported is "jpg".
3
Touch feedback
– By tipping on the checkbox you activate or deactivate the feedback tone which sounds when the display
is touched.
4
The entire screen
– Activate or deactivate the full-page mode of the door camera by tipping on the checkbox. The full-page
mode remains active for the period the picture of the visitor is shown after the door bell has been rung.
5
OK
– By tipping on this button you activate the settings.
6
Back
– By tipping on this button you return to the start page without saving the settings.
7
Calibration
– If the buttons and the associated graphics of the display are no longer superimposed, the monitor must
be calibrated.
– Tip on the calibration button and then consecutively on the 5 displayed position crosses. Finally confirm
the dialogue box displayed.
The display has been calibrated.

ABB
-Welcome
Operation
| 0073-1-7516
— 20 —
8
Screen saver Off
– Select the active period for the screen saver via the fold-down menu until it switches itself off
automatically.
– Available are 5 / 15 / 30 minutes.
– To protect the display the maximum period for the display is limited to 30 minutes.
9
Screen saver On
– Select the start time for the screen saver via the fold-down menu.
– Available are 30 / 60 / 120 seconds.
Pos: 54 /Busch-Jaeger (Neustruk tur)/Modul-Struktur/ Online-Dokumentation/Steuer module - Onli ne-Dokumentation (--> Für alle Dok umente <--)/++++++++++++Seitenumbruch++++++++++++ @ 9\mod_1268898668093_ 0.docx @ 52149 @ @ 1
This manual suits for next models
1
Table of contents
Other ABB Intercom System manuals

ABB
ABB i-HD H81365P A Series User manual

ABB
ABB H8138.K Series User manual

ABB
ABB M22311 Series User manual

ABB
ABB 2Line User manual

ABB
ABB M22343 Series User manual

ABB
ABB M22311 Series User manual

ABB
ABB H8131xPx-A User manual

ABB
ABB Video Outdoor Station User manual

ABB
ABB Welcome M M25102 C Series User manual

ABB
ABB 83210-AP-xxx-500 User manual

ABB
ABB M22301 series User manual

ABB
ABB W2252 BL User manual

ABB
ABB H8137xPx-S User manual

ABB
ABB ABB-Welcome User manual

ABB
ABB H81402FR Series User manual

ABB
ABB M22381-W User manual

ABB
ABB Welcome M2233 Series User manual

ABB
ABB M22301 series User manual

ABB
ABB M2231 SERIES User manual

ABB
ABB 83205-SM-500 Series User manual