Abus HomeTec Pro Manual

1
Pro
CFA3100
Bluetooth-Türschlossantrieb
Bluetooth door lock actuator
Actionneur de serrure Bluetooth
Bluetooth-deurslotaandrijving
Azionatore per serrature di porte
Accionamiento de cierre por Bluetooth para puertas
www.abus.com

2 3
Montage- und Bedienungsanleitung ................................... 3 - 17
Fitting and operating instructions ..................................... 18 - 32
Instructions de montage et d’utilisation ............................. 33 - 47
Montage- en gebruikshandleiding ..................................... 48 - 62
Istruzioni di montaggio ed uso .......................................... 63 - 77
Instrucciones de montaje y funcionamiento ......................... 78 - 92
Vielen Dank, dass Sie sich für dieses ABUS Produkt entschieden haben!
Bitte lesen Sie diese Anleitung vor der Montage und Inbetriebnahme sorg-
fältig durch. Bewahren Sie die Anleitung auf und weisen Sie jeden Nutzer
auf die Bedienung des Produktes hin.
Inhalt
Batteriehinweise ...................................................................
Gewährleistung .....................................................................
Konformitätserklärung ............................................................
Der Inhalt dieser Montage- und Bedienungsanleitung entspricht dem aktu-
ellen Stand zur Zeit der Drucklegung. Aufgrund von Updates und Weiterent-
wicklungen kann die gedruckte Anleitung zum Zeitpunkt der Inbetriebnah-
me des Produktes eventuell veraltet sein.
Bitte besuchen Sie daher unsere Internetseite und geben
Sie "CFA3100
Downloads" stets die aktuelle und vollumfängliche Version
der Montage- und Bedienungsanleitung.

4 5
1.
1.
HomeTec Pro
dem Türschlossantrieb aus weiteren optionalen Komponenten. Um den
Bluetooth-Türschlossantrieb CFA3100
Voraussetzung für den Betrieb des Türschlossantriebs ist ein Zylinderüber-
stand auf der Innenseite der Tür von 7-12 mm (plus Stärke des Beschlags
Schlüssel erfolgt, muss der Türzylinder die beidseitige „Not- und
Gefahrenfunktion“ aufweisen, das heißt, er ist von beiden Seiten zu
schließen, auch wenn ein weiterer Schlüssel auf der gegenüberliegenden
des Türzylinders. Stellen Sie sicher, dass sich Tür und Zylinder einwandfrei
und leichtgängig bedienen lassen.
Das Produkt ist nur für die Verwendung in trockenen Innenräumen vorge-
sehen und darf nicht an Feuer-, Brandschutz- oder Fluchttüren montiert
werden! Der Türschlossantrieb kann nicht in Verbindung mit automatisch
ausschließlich über die Schloss-Falle aktiviert werden und nicht den
-
immer mit bzw. deponieren Sie ihn an einem im Fehlerfall erreichbaren
werden. Die Bedienung von außen per Schlüssel oder von innen per Dreh-
-
zylinders beeinträchtigen. Alle Anwender sollten zur bestimmungsgemäßen
Nutzung des Systems eine Berechtigung per App oder einen Zugang per
optional erhältlicher Komponenten erhalten.
2.
4x
4,2 x 9,5 mm
+
-
4x
S1
AA
3.
Option 2
Option 1

6 7
4. Montage des Antriebs
Symbol-
erklärung
Vorsicht!
Montage /
Bedienung
Schließzylinder mit Not- und Gefahren-
funktion. Beidseitig schließbar, auch
wenn innen der Schlüssel steckt.
X =
7 - 12 mm
X
Der Schließzylinder muss auf
der Innenseite 7 - 12 mm
überstehen. Wenn dieser
Überstand auch durch das
nicht erreicht werden kann,
muss der Zylinder getauscht
ebenfalls erfolgen, wenn der
vorhandene Zylinder keine
Not- und Gefahrenfunktion
aufweist!
4.1a
4.1b
X
4.1c
X
X =
7 - 12 mm?
X =
7-12 mm
Messen Sie von der Mitte der Befesti-
gungsschraube des Zylinders die bei-
den Maße außen und innen, jeweils
dem ermittelten Maß addieren Sie auf
der Innenseite mindestens 7 mm, so
dass Sie auf die nächste Zylinderlänge
kommen.
Beispiel: Sie messen außen 40 mm, in-
nen 30 mm. Ihr vorhandener Zylinder
müsste daher ein 30/40-Zylinder sein.
Zylinder gibt es in 5 mm-Schritten. Um
-
ge einen 40/40-Zylinder.
4.2a
4.2b 4.2c
1.
2.
3.
4.
1.
2.
3.
4.
4.2d 4.2e
check!
Maß
außen
Maß
innen
-
mieters für den Tausch
des Schließzylinders
ein, falls Ihr Schließ-
zylinder zu einer
speziellen Schließanlage
es der Fall sein, dass
Generalschlüssel für die
Wohnungstüren vor-
handen sind (z.B. bei
check!
4.3a
4.2a
4.2a
4.2a
ok /
nicht ok
weiter
mit

8 9
4.3a 4.3b
Y =
4 - 7 mm
Y
4.3c 4.3d
Y =
4 - 7 mm
Y
4.3e Unter-
schiedliche
Stellung für
Zacken- und
Wendeschlüssel
beachten!
4.4a
1.
2.
3.
4.5
>> 4.5a-c
>> 4.6a-e
>> 4.7a-c
verschraubung>> 4.8a-c
4.5a 4.5b
4.4b
press!
1.
1.
2.
Bis zum
Anschlag
drehen!
gekenn-
zeichnete
Seite muss
sich rechts
4.5c
Schlüsselkopf eines Schlüssels absägen.
4.3
4.9a
Variante A Variante A
Variante A

10 11
4.6a 4.6b
4.6c 4.6d
4.7a
48 Std
press!
10 sek.
Bis zum
Anschlag
drehen!
gekenn-
zeichnete
Seite muss
sich rechts
4.6e
4.7b
4.7c
4x
S1
4x
4.8b
4.8a
38 mm
4.8c
38 mm
4.9a
Schrauben ggf. kürzen.
4.9a
Variante B Variante B
Variante B
Variante C Variante C
Variante C Variante D
Variante D Variante D

12 13
4.9a 4.9b
90°
4.9c 4.9d
click!
4.9e
4x AA
+
click!
ACCU
+ready
to
use
5.1
Navigation
Verlassen
Verriegeln /
Bestätigen
leuchten blinken schnelles
blinken
+
-
+
-
+
-
5.
Bluetooth®an Ihrem Smartphone.
• Starten Sie die App und folgen Sie den Anweisungen in der App.
• Alternativ zum Smartphone kann der Türschlossantrieb auch mit weiteren
• Achten Sie auf die Zuordnung der verschiedenen Keycards zu den
• Bewahren Sie die ABUS Keycard(s) unbedingt auch nach dem Einlern-
vorgang an einem sicheren Ort auf!
Karte nicht an Dritte weiter.
Um eine einwandfreie Funktion zu gewährleisten empfehlen wir aus-
HomeTec Pro App

14 15
Piepton Fehlerquelle beheben
check!
5.2
5.2 a
des Zylinders.
6. Batteriewechsel
ca. 3 Sek. - 10 Sek.
AA
+
-
A
B
1.
2.
3.
vier Batterien und setzen Sie
dann die vier neuen Batterien oder
Akkus „ready to use“ ein.
AA
+
AA
+
6.1 b 6.1 d
-
A
B
1.
2.
6.1a 6.1b
6.1d
4x AA
+
ACCU
+ready
to
use
6.1c
6.1e
5.2
im Auslieferungszustand oder nach Werksreset
ca. 3 Sek. - 10 Sek.
dreht automatisch
+
press 3 sec.
press
dreht automatisch
schließen
5.2 a
press
=
+
-
+
-
+
-

16 17
Tipps zur Fehlerbehebung
7.
Fehler / Informa-
tion
Ursache
-
vorgang blinken
beim ersten
Schließvorgang die
akustisches Signal.
Die Tür wurde während
des zweiten Teils des
geschlossen
ausführen und Tür zum
angegebenen Zeitpunkt
schließen
Während der nor-
malen Bedienung
akustisches Signal
- Die Tür ist während
des Betriebs nicht ge-
schlossen, so dass der
Tür gegen die Türkante
bewegt
oder
- mindestens eine
Batterie ist verkehrt
herum eingelegt
oder
- die Schlossmechanik ist
schwergängig oder die
Tür ist falsch eingestellt
- Tür schließen und Be-
dienung wiederholen
und Polarität der
Batterien prüfen / Bat-
terien richtig einsetzen
>> 6.
- Tür korrekt einstellen
Schlossmechanik
schmieren
Vor jeder Dreh-
bewegung des
ein akustisches
Signal
Batterien sind leer Batterien wechseln
>> 6.
Antriebs statt
-
lich mit dem Schlüssel
geschlossen oder am
gedreht
Keine Maßnahme not-
wendig.
zur korrekten Positi-
onserkennung nach
manueller Drehung
des Antriebes mittels
Schlüssel von außen
Technische Daten
Abmessungen 138 x 52 x 65 mm
418 Gramm
IP Klasse IP 20
Batterietyp 4 * AA 1,5 V Alkaline
Betriebstemperaturbereich 0°C bis +40°C
Funkfrequenz
abgestrahlte maximale Sendeleistung < 10dBm eirp
Verschlüsselung
8.
Rechtliche Hinweise
9.
Batteriehinweise
Batterien in den Mund nehmen und verschlucken. Dies kann zu ernsthaf-
ten Gesundheitsschäden führen. Suchen Sie in einem solchen Fall sofort
einen Arzt auf!
Verätzungsgefahr bei Kontakt mit ausgelaufenen oder beschädigten
Batterien! Benutzen Sie in diesem Fall geeignete Schutzhandschuhe und
reinigen Sie das Batteriefach mit einem trockenen Tuch. Batterien dürfen
Gewährleistung
-
-
ersetzt. Die Gewährleistung endet in diesen Fällen mit dem Ablauf der
ursprünglichen Gewährleistungslaufzeit. Weitergehende Ansprüche sind
ausdrücklich ausgeschlossen.
Verschleiß und Nichtbeachtung dieser Anleitung entstanden sind. Von der
Gewährleistung ausgeschlossen sind mitgelieferte Batterien. Bei Geltend-
machung eines Gewährleistungsanspruchs ist dem zu beanstandenden
Fehlerbeschreibung beizufügen.
Technische Änderungen vorbehalten. Für Druckfehler und Irrtümer keine
Konformitätserklärung
Verwendung in Übereinstimmung mit den grundlegenden Anforderungen
folgenden Internetadresse verfügbar: www.abus.com.
Entsorgung
-

18 19
Thank you for choosing this ABUS product!
Please read this guide carefully before installation and use. Keep these
instructions and provide all users with instruction on how to use it.
Content
Battery instructions ................................................................
Warranty ..............................................................................
Declaration of Conformity .........................................................
Disposal ...............................................................................
status at the time of printing. The printed manual may be outdated at
the time of the product’s entry into service due to updates and further
developments.
We therefore ask you to visit our website and enter
"CFA3100
version of the installation and operating instructions on the product page
under the "Downloads" column.
1.
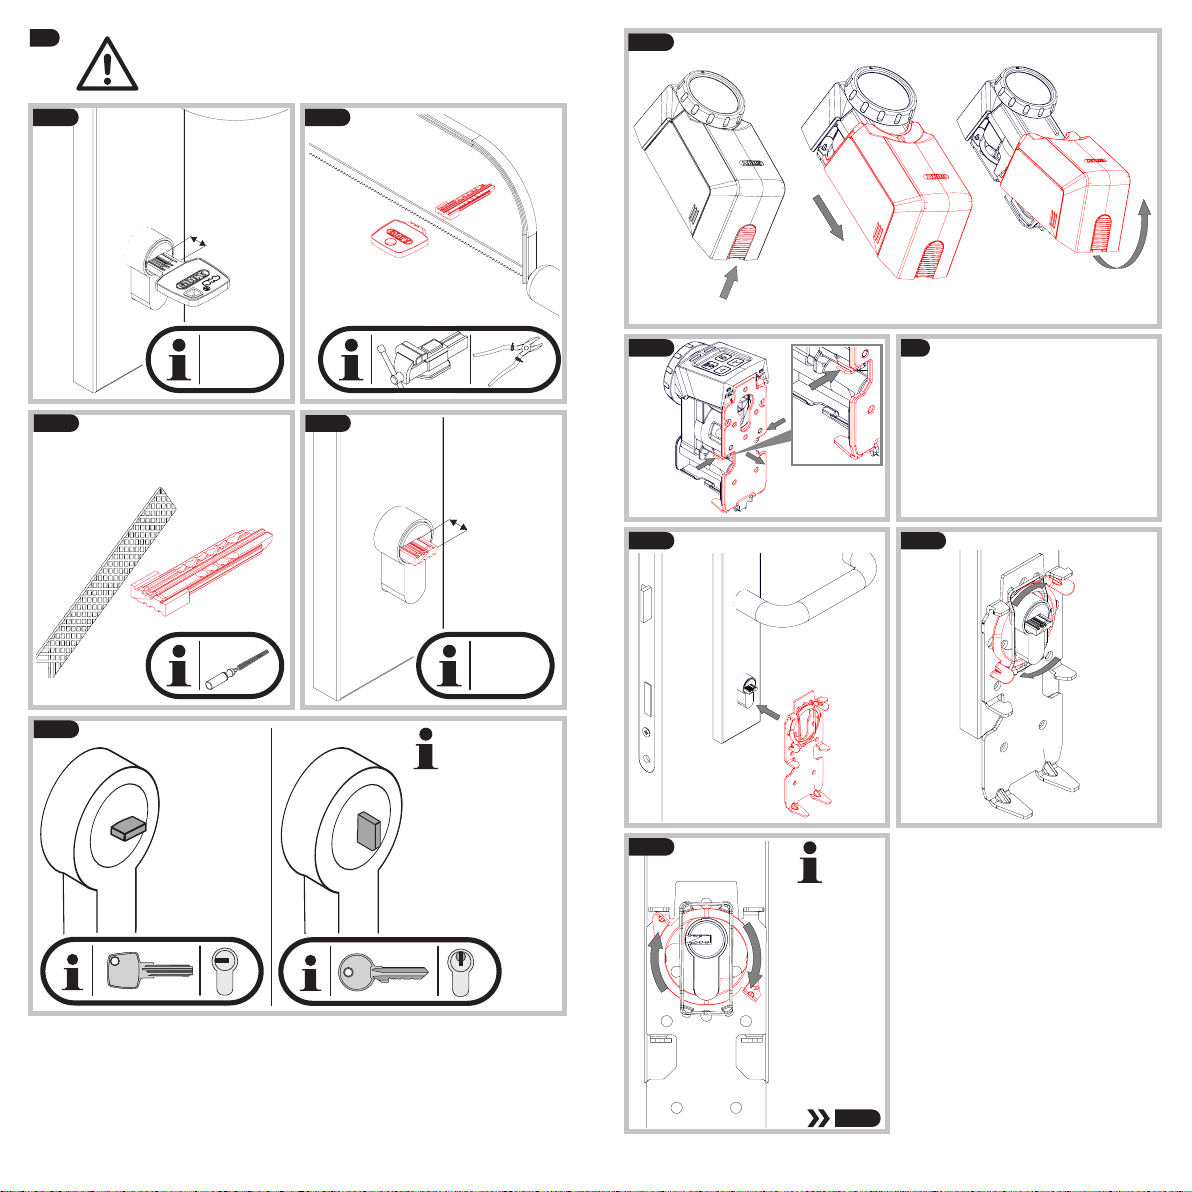
1. Possible uses and important information
HomeTec Pro
of inward-opening doors. The system consists of the door lock actuator
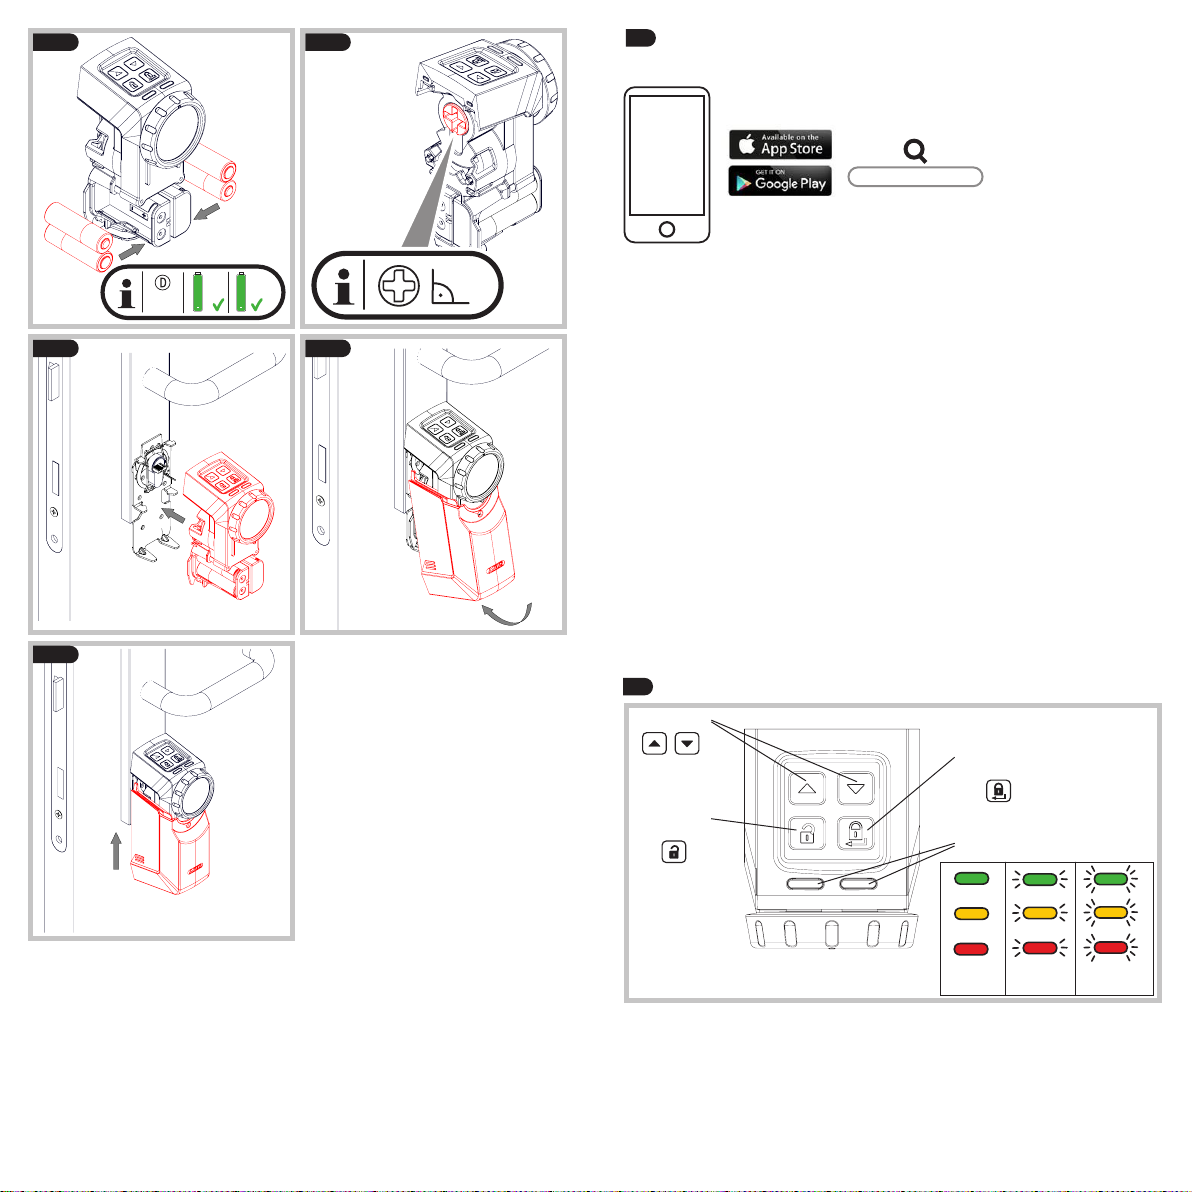
in addition to other optional components. In order to use the door lock
actuator as intended, you will need a Bluetooth-enabled smartphone
Bluetooth door lock actuator CFA3100
For the door lock actuator to work, the cylinder must project 7-12 mm on
-
se the actuator operates with a key permanently inserted in the lock,
the cylinder must have an „emergency“ feature on both sides where the
door can be closed from both sides even if another key is inserted on
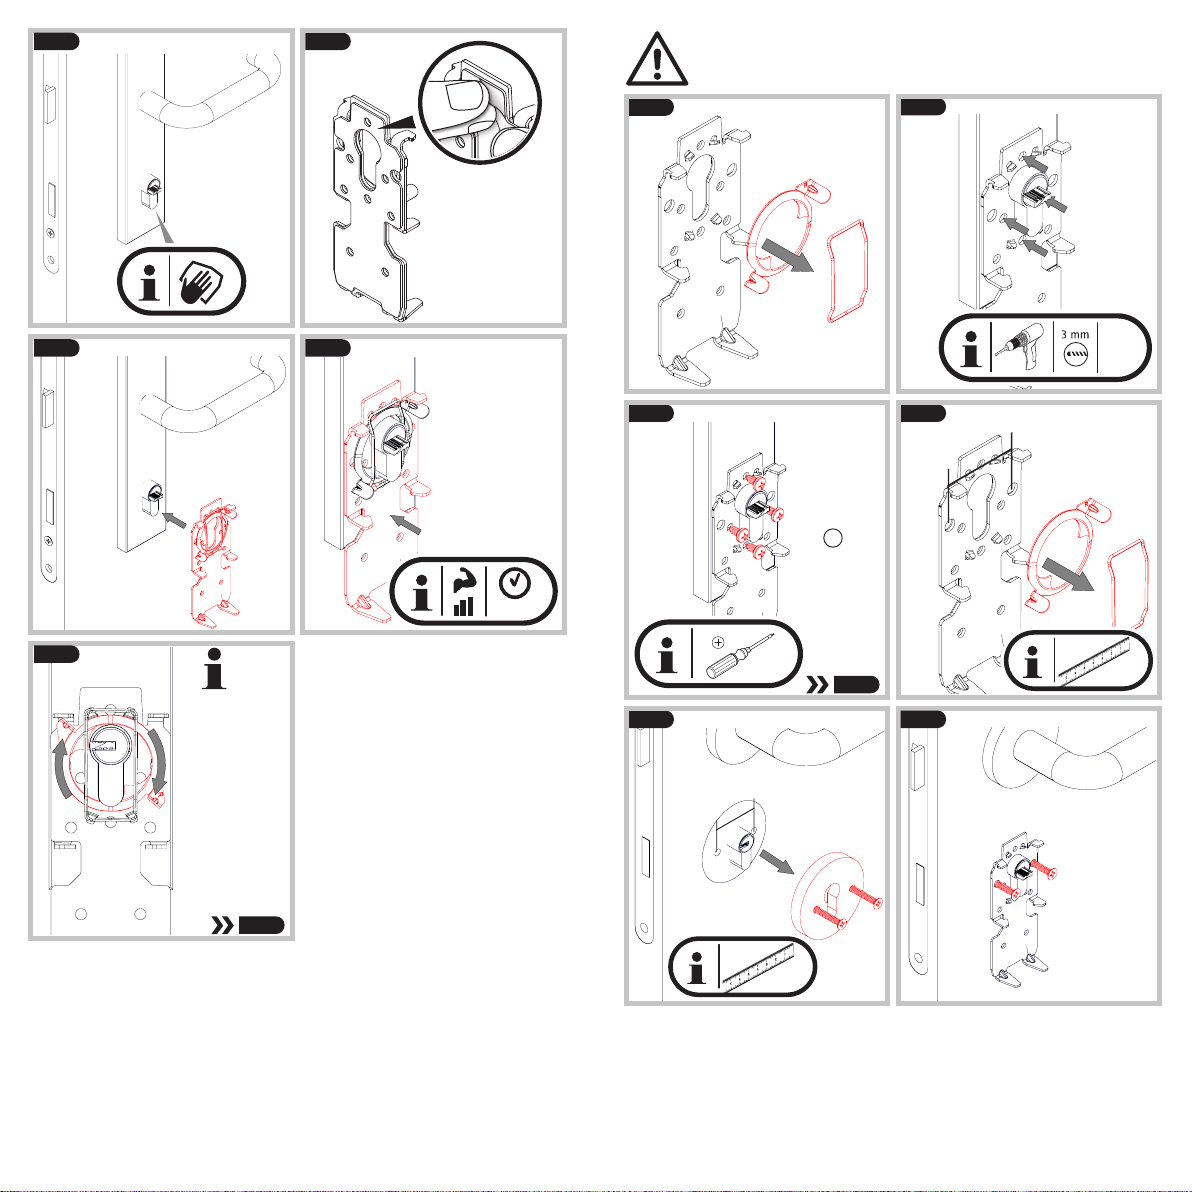
compliant with DIN 18252. Please check the setup of your door and cylinder
lock before installation. Make sure that the door and cylinder are operating
properly and smoothly.
This product is designed for use in dry interior conditions only and may
can not be used in conjunction with automatically locking mortise locks
and panic locks. The use on doors with automatically locking elements
which are activated exclusively via the lock latch and which do not include
the lock bolt is however possible.
-
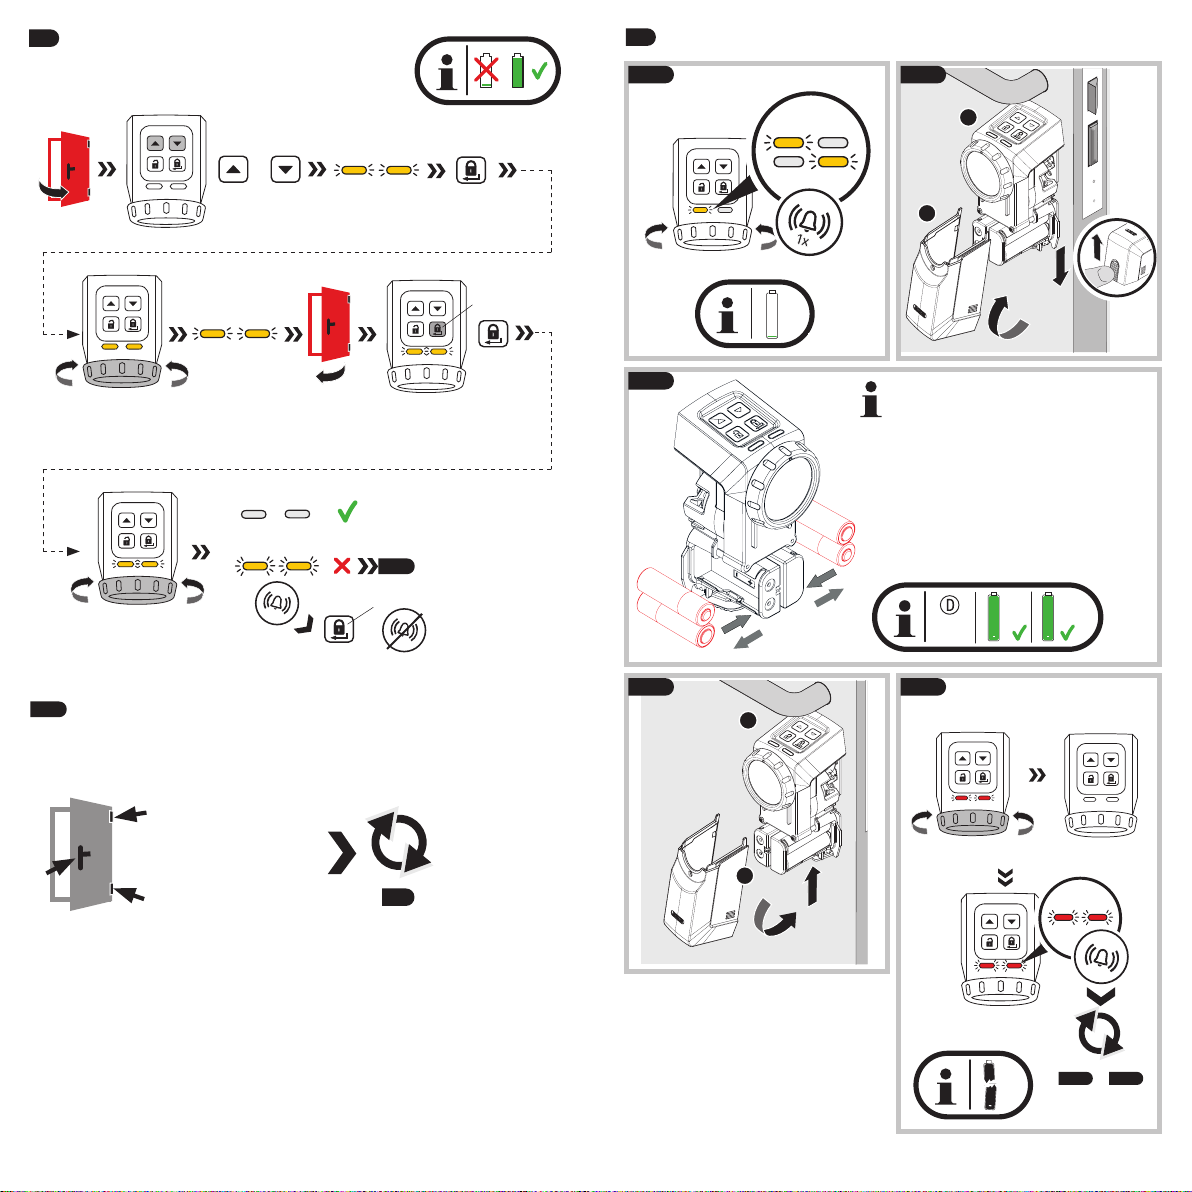
sons. For this reason, you should always carry a key for the lock with you or
store it in a safe location that can be reached in the event of a fault (ABUS
the outside using the key. In the event of an emergency or panic situation,
a fault or dead batteries, the door can always be mechanically unlocked
from inside by hand using the operating wheel. Operation from outsi-
de by key or from inside by rotary wheel is only intended for emergency
all users should be given permission via the app or access via optional
components.

20 21
2.
4x
4,2 x 9,5 mm
+
-
4x
S1
AA
3.
Option 2
Option 1
4. Installation instructions
Icon
explana-
tion
Caution! Further
fitting / using
details
Door cylinder has to operate even
with a key inserted on the inside.
X =
7 - 12 mm
X
The locking cylinder must
project 7-12 mm on the
inside. If this projection can
be achieved by removing an
cylinder must be replaced. It
must also be replaced if the
existing cylinder does not
have an emergency function!
4.1a
4.1b
X
4.1c
X
X =
7 - 12 mm?
Get your landlord’s
permission, if necessary,
to replace the locking
cylinder, unless your
locking cylinder belongs
to a special master key
system. It may be that
there are master keys
for opening apartment
doors in an emergency
(e.g. at senior housing

22 23
X =
7-12 mm
Measure the two dimensions, inside
and outside, from the centre of the
cylinder’s mounting screw, including
side. Add at least 7 mm on the inside
to the dimension measured to get the
closest cylinder length.
should then be a 30/40 cylinder.
Cylinders come in 5mm increments. To
the next standard length, a 40/40
cylinder.
4.2a
4.2b 4.2c
1.
2.
3.
4.
1.
2.
3.
4.
4.2d 4.2e
check!
Dim.
outside
Dim.
inside
check!
4.3a
4.2a
4.2a
4.2a
ok /
not ok
continue
with
4.3a 4.3b
Y =
4 - 7 mm
Y
4.3c 4.3d
Y =
4 - 7 mm
Y
4.3e
positions for
serrated
and reversible
keys!
Warning! ABUS accepts no liability for damages.
Obtain consent from your landlord if applicable.
4.3

24 25
4.4a
1.
2.
3.
4.5 Mounting the holding plate
4.5a 4.5b
4.4b
press!
1.
1.
2.
Turn as far
as it will
go! The side
labelled
be on the
right!
4.5c
4.9a
Version A Version A
Version A
4.6a 4.6b
4.6c 4.6d
48 h
press!
10 sec.
Turn as far
as it will
go! The side
labelled
be on the
right!
4.6e
4.9a
Version B Version B
Version B Version B
Version B

26 27
4.7a 4.7b
4.7c
4x
S1
4x
4.8b
4.8a
38 mm
4.8c
38 mm
Do not drill mortice lock screws!
May be shortened if necessary
4.9a
Version C Version C
Version C Version D
Version D Version D
4.9a 4.9b
90°
4.9c 4.9d
click!
4.9e
4x AA
+
click!
ACCU
+ready
to
use
+
-
+
-
+
-

28 29
5.1
Navigation
Unlock /
shining flashing flashing
rapidly
5.
smartphone.
• Start the app and follow the instructions in the app.
• As an alternative to a smartphone, the door lock power unit can also be
and always scan the correct keycard.
• Always keep ABUS keycard(s) in a secure place even aer the teaching
process!
smartphone, and for proof of ownership for matters related to warranty
claims and repair. Do not give the card to third parties.
To guarantee proper function, we expressly recommend performing
components in a timely manner. The app will provide information on this.
HomeTec Pro App
check!
5.2
5.2 a
Adjustment of the door
or cylinder.
5.2 Optional: Program the drive on the door in
(programming is intended to be done in the
aprox. 3 sec. - 10 sec.
turns automatically
+
press 3 sec.
open
press
turns automatically
close
5.2 a
press
=

30 31
6. Battery replacement
aprox. 3 sec. - 10 sec.
AA
+
-
A
B
1.
2.
3.
automatic calibration run
First remove the four batteries and
then insert four new batteries / accus
AA
+
AA
+
6.1 b 6.1 d
-
A
B
1.
2.
6.1a 6.1b
6.1d
4x AA
+
ACCU
+ready
to
use
6.1c
6.1e
+
-
+
-
+
-
Tips for troubleshooting
7.
Fault / information Cause Solution
process and a
sustained acoustic
signal sounds
The door was not closed
during the second part
of the teach-in process
process and close the
time
during normal
service and a
sustained acoustic
signal sounds
- The door is not closed
during operation so
the drive pushes the
door bolt against the
door edge
or
- at least one battery is
inserted the wrong
way round
or
- the locking mechanism
calibrated incorrectly
- Close the door and
repeat operation
- open the battery
compartment and
check the polarity of
the batteries/insert
the batteries correctly
>> 6.
- set the door correctly
mechanism
An acoustic signal
sounds before
every rotational
movement by the
drive
The batteries are dead Change the batteries
>> 6.
Before opening the
door, the drive
carries out a refe-
rence movement
The door has since been
manually opened/closed
using a key or the drive’s
handwheel has been
turned
No action is required.
A reference movement is
necessary to identify the
drive has been manually
turned using a key from
outside or the hand-
wheel from inside.
Tecnical data
Dimensions 138 x 52 x 65 mm
418 grams
IP class IP 20
Battery type 4 * AA 1,5 V alkaline
Operating temperature range 0°C to +40°C
Max. radiated transmission power < 10dBm eirp
8.

32 33
Legal information
9.
Battery instructions
Batteries must be kept out of reach of children. Children can put batteries
in their mouths and choke. This can cause serious injury. Seek immediate
medical attention in this event!
Contact with expired or damaged batteries may cause chemical burns! In
these cases, use suitable protective gloves and clean the battery compart-
ment with a dry cloth. Batteries must not be heated or thrown into an
Warranty
ABUS products are designed, manufactured and tested in accordance with
applicable regulations with great care. The warranty exclusively covers
faults that are caused by material or manufacturing defects. If a material
or replaced at the discretion of the warrantor. In such cases, the warranty
ends with the termination of the original warranty period. Any further
claims are expressly excluded.
ABUS assumes no liability for defects or damage that has been caused by
wear and tear or non-compliance with this operating and installation inst-
ructions document. The included batteries are not covered by the warranty.
If a warranty claim is asserted, the product must be returned with the
original receipt with date of purchase and a brief written description of the
fault.
Subject to technical alterations. No liability for mistakes and printing
errors.
Declaration of Conformity
the essential requirements and other relevant provisions of Directive
www.abus.com.
Disposal
get information on collection points for waste equipment from your local
authority, from local waste disposal companies or your dealer.
Merci d’avoir choisi ce produit ABUS !
Veuillez lire cette notice attentivement avant le montage et la mise en
service. Conservez cette notice d’utilisation et donnez à tous les utilisateurs
les instructions sur la façon de l’utiliser.
Teneur
Garantie ...............................................................................
Mise au rebut ........................................................................
la mise en service du produit.
Nous vous conseillons donc de vous rendre sur notre site Internet
et de saisir « CFA3100 » dans le champ de recherche. Sur
manuel de montage et d’utilisation dans l’onglet « Téléchargements ».

34 35
1.
1. Application et indications importantes
HomeTec Pro
comprend un actionneur de porte, mais aussi des composants en option.
Android.
Actionneur de serrure Bluetooth CFA3100
et de votre cylindre. Assurez-vous que la porte et le cylindre fonctionnent
parfaitement.
-
-
tement avec les serrures de mortaise et verrouillage de panique automa-
le verrou et qui ne comprennent pas le verrou est cependant possible.
2.
4x
4,2 x 9,5 mm
+
-
4x
S1
AA
3.
Option 2
Option 1

36 37
4. Instructions de montage
-
tion des
symbols
Atten-
tion ! Instructions de
montage /
utilisation
Cylindre de porte avec fonction
X =
7 - 12 mm
X
l’intérieur-
sible d’obtenir cette saillie
cylindre. Un remplacement
4.1a
4.1b
X
4.1c
X
X =
7 - 12 mm?
Si votre cylindre de serr-
installation de fermeture
-
torisation de votre prop-
pour le remplacement
du cylindre de serrure.
Dans certains cas, il peut
y avoir des passe-
partout pour l’ouverture
de secours des portes
-
dences pour personnes
X =
7-12 mm
respectivement la ferrure de porte ou la
-
teindre la longueur de cylindre suivante.
paliers de 5 mm. Pour pouvoir installer le
d’un cylindre de la longueur standard
40/40.
4.2a
4.2b 4.2c
1.
2.
3.
4.
1.
2.
3.
4.
4.2d 4.2e
check!
Dim.
ext.
Dim.
int.
check!
4.3a
4.2a
4.2a
4.2a
ok /
pas ok
continuer
avec

38 39
4.3a 4.3b
Y =
4 - 7 mm
Y
4.3c 4.3d
Y =
4 - 7 mm
Y
4.3e
positions
4.3 4.4a
1.
2.
3.
4.5
>> 4.5a-c
>> 4.6a-e
>> 4.7a-c
garniture rosette>> 4.8a-c
4.5a 4.5b
4.4b
press!
1.
1.
2.
Tourner
jusqu’en
-
se trouver à
droite !
4.5c
4.9a
Variante A Variante A
Variante A
This manual suits for next models
1
Table of contents
Languages:
Other Abus Door Lock manuals

Abus
Abus FTS 3002 User manual

Abus
Abus 7010 E User manual

Abus
Abus HomeTec Pro CFA3000S User manual

Abus
Abus PR2600 Manual

Abus
Abus HomeTec Pro CFA3000 Instruction Manual

Abus
Abus 4010 Manual

Abus
Abus HomeTec Pro CFA3000 User manual

Abus
Abus CFA3100 Manual

Abus
Abus 7010E User manual

Abus
Abus AWLX PRO Mounting instructions