AJAX KeyPad Plus User manual

KeyPad Plus User Manual
Updated May 24, 2021
KeyPad Plus is a wireless touch keypad for managing the Ajax security system with
encrypted contactless cards and key fobs. Designed for indoor installation. Supports “silent
alarm” when entering the . Indicates the current security mode with a LED light.
Manages security modes using passwords and . Indicates the current
security mode with a LED light.
The keypad only works with , и running OS Malevich 2.11 and higher.
Connection to and the and integration modules is not supported!
The keypad operates as part of the Ajax security system by connecting via the
to the hub. The communication range without
obstacles is up to 1700 meters. The pre-installed battery life is up to 4.5 years.
Functional elements
duress code
cards or key fobs
Hub Plus Hub 2 Hub 2 Plus
Hub ocBridge Plus uartBridge
Jeweller
secure radio communication protocol
Buy KeyPad Plus keypad

Operating principle
KeyPad Plus arms and disarms the security of the entire facility or separate groups as well
as allows activating the Night mode. You can control the security modes with KeyPad Plus
using:
11. buttonNight mode
12. SmartBracket mounting plate (to remove the plate, slide it down)
Do not tear off the perforated part of the mount. It is required for actuating the tamper in case of
any attempt to dismantle the keypad.
13. Tamper button
14. Power button
15. Keypad QR Code
1. Passwords. The keypad supports common and personal passwords, as well as arming
without entering a password.
2. Cards or key fobs. You can connect and to the system. To
quickly and securely identify users, KeyPad Plus uses the DESFire® technology.
DESFire® is based on the ISO 14443 international standard and combines 128-bit
encryption and copy protection.
Tag key fobs Pass cards
00:00
00:04

Before entering a password or using Tag/Pass, you should activate (“wake up”) the KeyPad
Plus by sliding your hand over the touch panel from top to bottom. When it is activated, the
button backlight is enabled, and the keypad beeps.
The KeyPad Plus is equipped with LED indicators that show the current security mode and
keypad malfunctions (if any). The security status is displayed only when the keypad is
active (the device backlight is on).
You can use the KeyPad Plus without ambient lighting as the keypad has a backlight. The
pressing of the buttons is accompanied by a sound signal. The backlight brightness and
keypad volume are adjustable in the settings. If you do not touch the keypad for 4 seconds,
KeyPad Plus reduces the backlight brightness, and 8 seconds later goes into power-saving
mode and turns off the display.
If the batteries are discharged, the backlight turns on at the minimum level regardless of the settings.
Function button
KeyPad Plus has a Function button that operates in 3 modes:
Off — the button is disabled and nothing happens after it is pressed.
Alarm — after the Function button is pressed, the system sends an alarm to the
security company monitoring station and all users.
Mute interconnected re alarm — after the Function button is pressed, the system
mutes the re alarm of the FireProtect/FireProtect Plus detectors. Available only if an
is enabled (Hub → Settings → Service →
Firedetectors settings)
Interconnected FireProtect Alarm

Duress code
KeyPad Plus supports duress code. It allows you to simulate alarm deactivation. The
and installed at the facility will not give you away in this case, but the security
company and other users of the security system will be warned about the incident.
Two-stage arming
KeyPad Plus can participate in two-stage arming, but cannot be used as a second-stage
device. The two-stage arming process using Tag or Pass is similar to arming using
personal or common password on the keypad.
Event transmission to the monitoring station
The Ajax security system can connect to the CMS and transmit events and alarms to the
monitoring station of the security company in Sur-Gard (ContactID), SIA DC-09, and other
proprietary protocol formats. A complete list of supported protocols is available . The
device ID and the number of the loop (zone) can be found in .
Connection
KeyPad Plus is incompatible with Hub, third-party security central units, and ocBridge Plus and
uartBridge integration modules.
Before starting connection
Learn more
Ajax
app sirens
Learn more
Learn more
here
its states
1. Install the Ajax app and . Add a hub and create at least one room.create an account
2. Ensure that the hub is on and has Internet access (via Ethernet cable, Wi-Fi, and/or
mobile network). This can be done by opening the Ajax app or by looking at the hub
logo on the faceplate — it lights white or green if the hub is connected to the network.
3. Make sure that the hub is not in armed mode and does not start updates by checking
its status in the app.

Only a user or PRO with full administrator rights can add a device to the hub.
To connect KeyPad Plus
The keypad only works with one hub. When connected to a new hub, the device stops sending
commands to the old hub. Once added to a new hub, KeyPad Plus is not removed from the device list
of the old hub. This must be done manually through the Ajax app.
KeyPad Plus turns off automatically 6 seconds after being turned on if the keypad fails to
connect to the hub. Therefore, you do not need to turn off the device to retry the
connection.
Updating the statuses of devices in the list depends on the Jeweller settings; the default
value is 36 seconds.
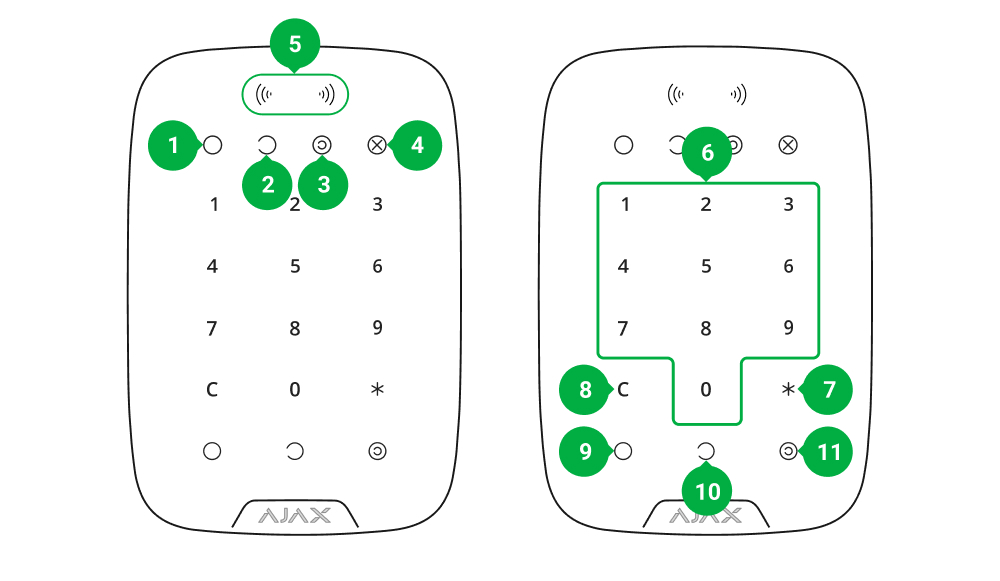
Icons
The icons represent some of KeyPad Plus states. You can see them in the Devices tab
in the Ajax app.
Icon Value
Jeweller signal strength — Displays the signal strength between the hub or and
KeyPad Plus
Battery charge level of KeyPad Plus
KeyPad Plus works via a ReX radio signal range extender
1. Open the Ajax app. If your account has access to multiple hubs, select the one to which
you want to connect KeyPad Plus.
2. Go to the Devices menu and click Add Device.
3. Name the keypad, scan or enter the QR code (located on the package and under the
SmartBracket mount), and select a room.
4. Click Add; the countdown will begin.
5. Turn on the keypad by holding the power button for 3 seconds. Once connected,
KeyPad Plus will appear in the hub device list in the app. To connect, locate the keypad
at the same protected facility as the system (within the coverage area of the hub radio
network range). If the connection fails, try again in 10 seconds.
range extender

KeyPad Plus body status notications are temporarily disabled
KeyPad Plus is temporarily deactivated
Pass/Tag reading is enabled in KeyPad Plus settings
Pass/Tag reading is disabled in KeyPad Plus settings
States
The states include information about the device and its operating parameters. The states
of KeyPad Plus can be found in the Ajax app:
Parameter Value
Malfunction
Pressing opens the KeyPad Plus malfunctions list.
The eld is displayed only if a malfunction is detected
Temperature
Keypad temperature. It is measured on the processor
and changes gradually.
Acceptable error between the value in the app and the
room temperature: 2–4°C
Jeweller signal strength
Jeweller signal strength between the hub (or ReX range
extender) and the keypad.
Recommended values — 2-3 bars
Connection
Connection status between the hub or range extender
and the keypad:
Battery charge The battery charge level of the device. Two states are
available:
Learn more
Learn more
1. Go to the Devices tab.
2. Select KeyPad Plus from the list.
Online — the keypad is online
Oine — no connection to the keypad
ОК

When the batteries are discharged, the Ajax apps and
the security company will receive appropriate
notications.
After sending a low battery notication, the keypad can
work for up to 2 months
Lid
The status of the device tamper, which reacts to the
detachment of or damage to the body:
Works via *range extender name*
Displays the status of the ReX range extender use.
The eld is not displayed if the keypad works directly
with the hub
Pass/Tag Reading Displays if card and keyfob reader is enabled
Easy armed mode change/Assigned group easy
management
Displays whether or not the security mode can be
switched with Pass or Tag and without conrmation by
the control buttons , ,
Temporary Deactivation
Shows the status of the device:
Firmware KeyPad Plus rmware version
ID Device identier
Device No. Number of the device loop (zone)
Battery low
How battery charge is displayed in Ajax
apps
Opened
Closed
What is a tamper
No — the device operates normally and transmits
all events
Lid only — the hub administrator has disabled
notications about the body opening
Entirely — the hub administrator has entirely
excluded the keypad from the system. The device
does not execute system commands and does not
report alarms or other events
Learn more

Settings
KeyPad Plus is congured in the Ajax app:
To apply the settings after the change, click the Back button
Parameter Value
First eld
Device name. Displayed in the list of hub devices, SMS
text, and notications in the event feed.
To change the device name, click on the pencil icon
.
The name can contain up to 12 Cyrillic characters or up
to 24 Latin characters
Room
Selecting the virtual room to which KeyPad Plus is
assigned. The name of the room is displayed in the
text of SMS and notications in the event feed
Group Management
Selecting the security group controlled by the device.
You can select all groups or just one.
The eld is displayed when the is
enabled
Access Settings
Selecting the method of arming/disarming:
Keypad code Selection of a common password for security control.
Contains 4 to 6 digits
Duress code
Selecting a common duress code for silent alarm.
Contains 4 to 6 digits
1. Go to the Devices tab.
2. Select KeyPad Plus from the list.
3. Go to Settings by clicking on the gear icon .
Group mode
Keypad code only
User passcode only
Keypad and user passcode
Learn more

Function button Selecting the function of the * button (Function
button):
Arming without Password
The option allows you to arm the system without
entering a password. To do this, just click on the Arm
or Nightmode button
Unauthorized Access Auto-Lock
If active, the keypad is locked for the pre-set time if an
incorrect password is entered or unveried
passes/tags are used more than 3 times in a row
within 1 minute.
It is not possible to disarm the system via keypad
during this time. You can unlock the keypad through
the Ajax app
Auto-lock Time (min)
Selecting the keypad lock period after wrong password
attempts:
Brightness
Selecting brightness of the keypad buttons backlight.
The backlight works only when the keypad is active.
This option does not affect the brightness level of
pass/tag reader and security modes indicators
Volume Selecting the keypad buttons volume level when
pressed
Off — the Function button is disabled and does not
execute any commands when pressed
Alarm — after the Function button is pressed, the
system sends an alarm to the CMS and to all users
Mute Interconnected Fire Alarm — when pressed,
mutes the re alarm of FireProtect/FireProtect Plus
detectors. Available only if an Interconnected
FireProtect Alarm is enabled
Learn more
3 minutes
5 minutes
10 minutes
20 minutes
30 minutes
60 minutes
90 minutes
180 minutes

Pass/Tag Reading When enabled, the security mode can be controlled
with Pass and Tag access devices
Easy armed mode change/Assigned group easy
management
When enabled, changing the security mode with Tag
and Pass does not require conrmation by pressing
the arm, disarm, or Night mode button. The security
mode is switched automatically.
The option is available if Pass/Tag Reading is enabled
in the keypad settings.
If the group mode is activated, the option is available
when the keypad is assigned to a particular group —
the Group Management eld in the keypad settings
Alert with a siren if the panic button is pressed
The eld is displayed if the Alarm option is selected for
the Function button.
When the option is enabled, the sirens connected to
the security system give an alert when the * button
(Function button) is pressed
Jeweller Signal Strength Test
Switches the keypad to the Jeweller signal strength
test mode
Attenuation Test
Switches the keypad to the Attenuation test mode
Pass/Tag Reset
Allows deleting all hubs associated with Tag or Pass
from device memory
Temporary Deactivation
Allows the user to disable the device without removing
it from the system. Two options are available:
Learn more
Learn more
Learn more
Learn more
Entirely — the device will not execute system
commands or participate in automation scenarios,
and the system will ignore device alarms and other
notications
Lid only — the system will only ignore notications
about the triggering of the device tamper button
Learn more about temporary deactivation
of devices

User Manual Opens the KeyPad Plus User Manual in the Ajax app
Unpair Device Disconnects KeyPad Plus from the hub and deletes its
settings
Entry and exit delays are set in the corresponding detector settings, not in the keypad settings.
Adding a personal password
Both common and personal user passwords can be set for the keypad. A personal
password applies to all Ajax keypads installed at the facility. A common password is set for
each keypad individually and can be different or the same as the passwords of other
keypads.
To set a personal password in the Ajax app:
Each user sets a personal password individually. The administrator cannot set a password for all users.
Adding passes and tags
KeyPad Plus can work with , , and third-party cards and key fobs
that use DESFire® technology. The maximum number of connected passes/tags depends
on the hub model. At the same time, the bound passes and tags do not affect the total limit
of devices on the hub.
Hub model Number of Tag or Pass devices
Hub Plus 99
Hub 2 50
Hub 2 Plus 200
The procedure for connecting Tag, Pass, and third-party devices is the same. See the
connecting instructions .
Learn more about entry and exit delays
1. Go to the user prole settings (Hub → Settings → Users → Your prole settings).
2. Select Passcode Settings (User ID is also visible in this menu).
3. Set User Code and Duress Code.
Tag key fobs Pass cards
here

Security management by passwords
You can manage the Night mode, security of the entire facility or separate groups using
common or personal passwords. The keypad allows you to use 4 to 6 digit passwords.
Incorrectly entered numbers can be cleared with the button.
If a personal password is used, the name of the user who armed or disarmed the system is
displayed in the hub event feed and in the notications list. If a common password is used,
the name of the user who changed the security mode is not displayed.
Arming with a personal password
The username is displayed in the notications and events feed
Arming with a common password
The device name is displayed in the notications and events feed

KeyPad Plus is locked for the time specied in the settings if an incorrect password is entered three
times in a row within 1 minute. The corresponding notications are sent to users and to the monitoring
station of the security company. A user or PRO with administrator rights can unlock the keypad in the
Ajax app.
Security management of the facility using a common password
For example: 1234 →
Group security management with a common password
For example: 1234 → * → 2 →
1. Activate the keypad by swiping your hand over it.
2. Enter the common password.
3. Press the arming /disarming /Night mode key.
1. Activate the keypad by swiping your hand over it.
2. Enter the common password.
3. Press the * (Function button).
4. Enter the Group ID.
5. Press the arming /disarming /Night mode key.

If a security group is assigned to KeyPad Plus (in the eld in the
keypad settings), you do not need to enter the group ID. To manage the security mode of
this group, entering a common or personal password is sucient.
If a group is assigned to KeyPad Plus, you will not be able to manage Night mode using a common
password. In this case, Night mode can only be managed using a personal password if the user has
the appropriate rights.
Security management of the facility using a personal password
For example: 2 → * → 1234 →
Group security management with a personal password
For example: 2 → * → 1234 → * → 5 →
What is Group ID
Group Management
Rights in the Ajax security system
1. Activate the keypad by swiping your hand over it.
2. Enter the User ID.
3. Press the * (Function button).
4. Enter your personal password.
5. Press the arming /disarming /Night mode key.
What is User ID
1. Activate the keypad by swiping your hand over it.
2. Enter the User ID.
3. Press the * (Function button).
4. Enter your personal password.
5. Press the * (Function button).
6. Enter the Group ID.
7. Press the arming /disarming /Night mode key.

If a group is assigned to KeyPad Plus (in the Group Managementeld in the keypad
settings), you do not need to enter the group ID. To manage the security mode of this group,
entering a personal password is sucient.
Using a duress code
A duress code allows you to simulate alarm deactivation. The Ajax app and sirens installed
at the facility will not give the user away in this case, but the security company and other
users will be warned about the incident. You can use both a personal and a common
duress code.
Scenarios and sirens react to disarming under duress in the same way as to normal disarming.
To use a common duress code
For example: 4321 →
To use a personal duress code
For example: 2 → * → 4422 →
What is Group ID
What is User ID
Learn more
1. Activate the keypad by swiping your hand over it.
2. Enter the common duress code.
3. Press the disarming key .
1. Activate the keypad by swiping your hand over it.
2. Enter the User ID.
3. Press the * (Function button).
4. Enter the personal duress code.
5. Press the disarming key .

Security management using Tag or Pass
Note that if is enabled in the KeyPad Plus settings, you do not need to press
the Arm, Disarm, or Night mode button. The security mode will change to the opposite after tapping
Tag or Pass.
Mute Fire Alarm function
KeyPad Plus can mute an interconnected re alarm by pressing the Function button (if the
required setting is enabled). The reaction of the system to pressing a button depends on
the settings and the state of the system:
Keep in mind that the option is available only if is
enabled.
Indication
KeyPad Plus can report the current security mode, keystrokes, malfunctions, and its status
by LED indication and sound. The current security mode is displayed by the backlight after
the keypad is activated. The information about the current security mode is relevant even if
the arming mode is changed by another device: a key fob, another keypad, or an app.
1. Activate the keypad by swiping your hand over it. KeyPad Plus will beep (if enabled in
the settings) and turn on the backlight.
2. Bring Tag or Pass to the keypad pass/tag reader. It is marked with wave icons.
3. Press the Arm, Disarm, or Night mode button on the keypad.
Easy armed mode change
Interconnected FireProtect Alarms have already propagated — by the rst press of the
Button, all sirens of the re detectors are muted, except for those that registered the
alarm. Pressing the button again mutes the remaining detectors.
Interconnected alarms delay time lasts — by pressing the Function button, the siren of
the triggered FireProtect/FireProtect Plus detector is muted.
Interconnected FireProtect Alarm
Learn more

You can activate the keypad by swiping your hand over the touch panel from top to bottom.
When activated, the backlight on the keypad will turn on and a beep will sound (if enabled).
Event Indication
There is no connection to the hub or ReX range
extender LED X blinks
KeyPad Plus body is open (SmartBracket mount is
removed) LED X blinks briey once
Touch button pressed
Short beep, the current system security status LED
blinks once. The volume depends on the keypad
settings
The system is armed Short beep, Armed or Night mode LED lights up
The system is disarmed Two short beeps, the Disarmed LED lights up
An incorrect password was entered or there was an
attempt to change security mode by an unconnected or
deactivated pass/tag
Long beep, digital unit LED backlight blinks 3 times
The security mode cannot be activated (for example, a
window is open and the System integrity check is
enabled)
Long beep, the current security status LED blinks 3
times
The hub does not respond to the command — there is
no connection Long beep, X (Malfunction) LED lights up
The keypad is locked due to a wrong password attempt
or attempt to use an unauthorised pass/tag
Long beep, during which the security status LEDs and
keypad backlight blink 3 times
The batteries are low After changing the security mode, the XLED lights up.
The touch buttons are locked for this time.
When you try to turn on the keypad with discharged
batteries, it emits a long beep, the X LED smoothly
lights up and goes off, then the keypad turns off
How to replace batteries in KeyPad Plus

Functionality testing
The Ajax security system provides several types of tests that help you make sure that
installation points of devices are selected correctly.
KeyPad Plus functionality tests do not start straight away but after no more than one hub-
detector ping period (36 seconds when using the standard hub settings). You can change
the ping period of devices in the Jeweller menu of the hub settings.
Tests are available in the device settings menu (Ajax App → Devices → KeyPad Plus →
Settings )
Choosing a location
When holding KeyPad Plus in your hands or using it on a table, we cannot guarantee that the touch
buttons will work properly.
It is a good practice to install the keypad 1.3 to 1.5 meters above the oor for convenience.
Install the keypad on a at, vertical surface. This allows KeyPad Plus to be rmly attached
to the surface and to avoid false tamper triggering.
Jeweller Signal Strength Test
Attenuation Test

Besides, the placement of the keypad is determined by the distance from the hub or the
ReX range extender, and the presence of obstacles between them that prevent the passage
of the radio signal: walls, oors, and other objects.
Be sure to check the Jeweller signal strength at the installation site. If the signal strength is low (a
single bar), we cannot guarantee a stable operation of the security system! At the very least, relocate
the device as repositioning even by 20 cm can signicantly improve the signal reception.
If poor or unstable signal strength is still reported after the relocation of the device, use the
Do not install the keypad:
Installing the keypad
Prior to installing KeyPad Plus, be sure to select the optimal location following the requirements of this
manual!
ReX radio signal range extender
In places where parts of clothing (for example, next to the hanger), power cables, or
Ethernet wire may obstruct the keypad. This can lead to false triggering of the keypad.
Inside premises with temperature and humidity outside the permissible limits. This
could damage the device.
In places where KeyPad Plus has an unstable or poor signal strength with the hub or
ReX range extender.
Within 1 meter of a hub or ReX range extender. This could result in the loss of
connection with the keypad.
Close to electrical wiring. This may cause communication interferences.
Outdoors. This could damage the device.
1. Attach the keypad to the surface with double-sided adhesive tape and carry out signal
strength and attenuation tests. If the signal strength is unstable or if one bar is
displayed, move the keypad or use the ReX range extender.
Double-sided adhesive tape may only be used for temporary attachment of the keypad. The
device attached with adhesive tape can at any time be detached from the surface and fall, which
may lead to failure. Please note that if the device is attached with adhesive tape, the tamper will
not trigger when trying to detach it.
Other manuals for KeyPad Plus
1
Table of contents
Other AJAX Security System manuals

AJAX
AJAX Button User manual

AJAX
AJAX HomeSiren User manual

AJAX
AJAX MotionProtect User manual

AJAX
AJAX StreetSiren User manual

AJAX
AJAX StreetSiren DoubleDeck User manual

AJAX
AJAX StreetSiren User manual

AJAX
AJAX Hub 2 User manual

AJAX
AJAX StreetSiren User manual

AJAX
AJAX Hub 2 Plus User manual

AJAX
AJAX DoubleButton User manual

AJAX
AJAX HomeSiren User manual

AJAX
AJAX Hub 2 Plus User manual

AJAX
AJAX StreetSiren User manual

AJAX
AJAX Hub Hybrid User manual

AJAX
AJAX KeyPad User manual

AJAX
AJAX StreetSiren User manual

AJAX
AJAX HomeSiren User manual

AJAX
AJAX StreetSiren User manual

AJAX
AJAX DoubleButton User manual

AJAX
AJAX vhfBridge User manual