Aristel AN208 User manual

A
Ar
ri
is
st
te
el
l
N
Ne
et
tw
wo
or
rk
ks
s
User Manual for the
AN208
2 Line / 9 Handset Telephone System
Aristel Networks Pty Ltd
Unit 1, 25 Howleys Road
Notting Hill. Victoria. 3168
Telephone:03 8542 2300
Facsimile: 03 9544 3299
AN208 User Manual Version 1.5 December 2006
1


TABLE OF CONTENTS
1. GENERAL...................................................................................................................................... 1
2. INSTALLATION ............................................................................................................................ 1
2.1. Charger................................................................................................................................. 1
2.2. Batteries in Handset ............................................................................................................. 1
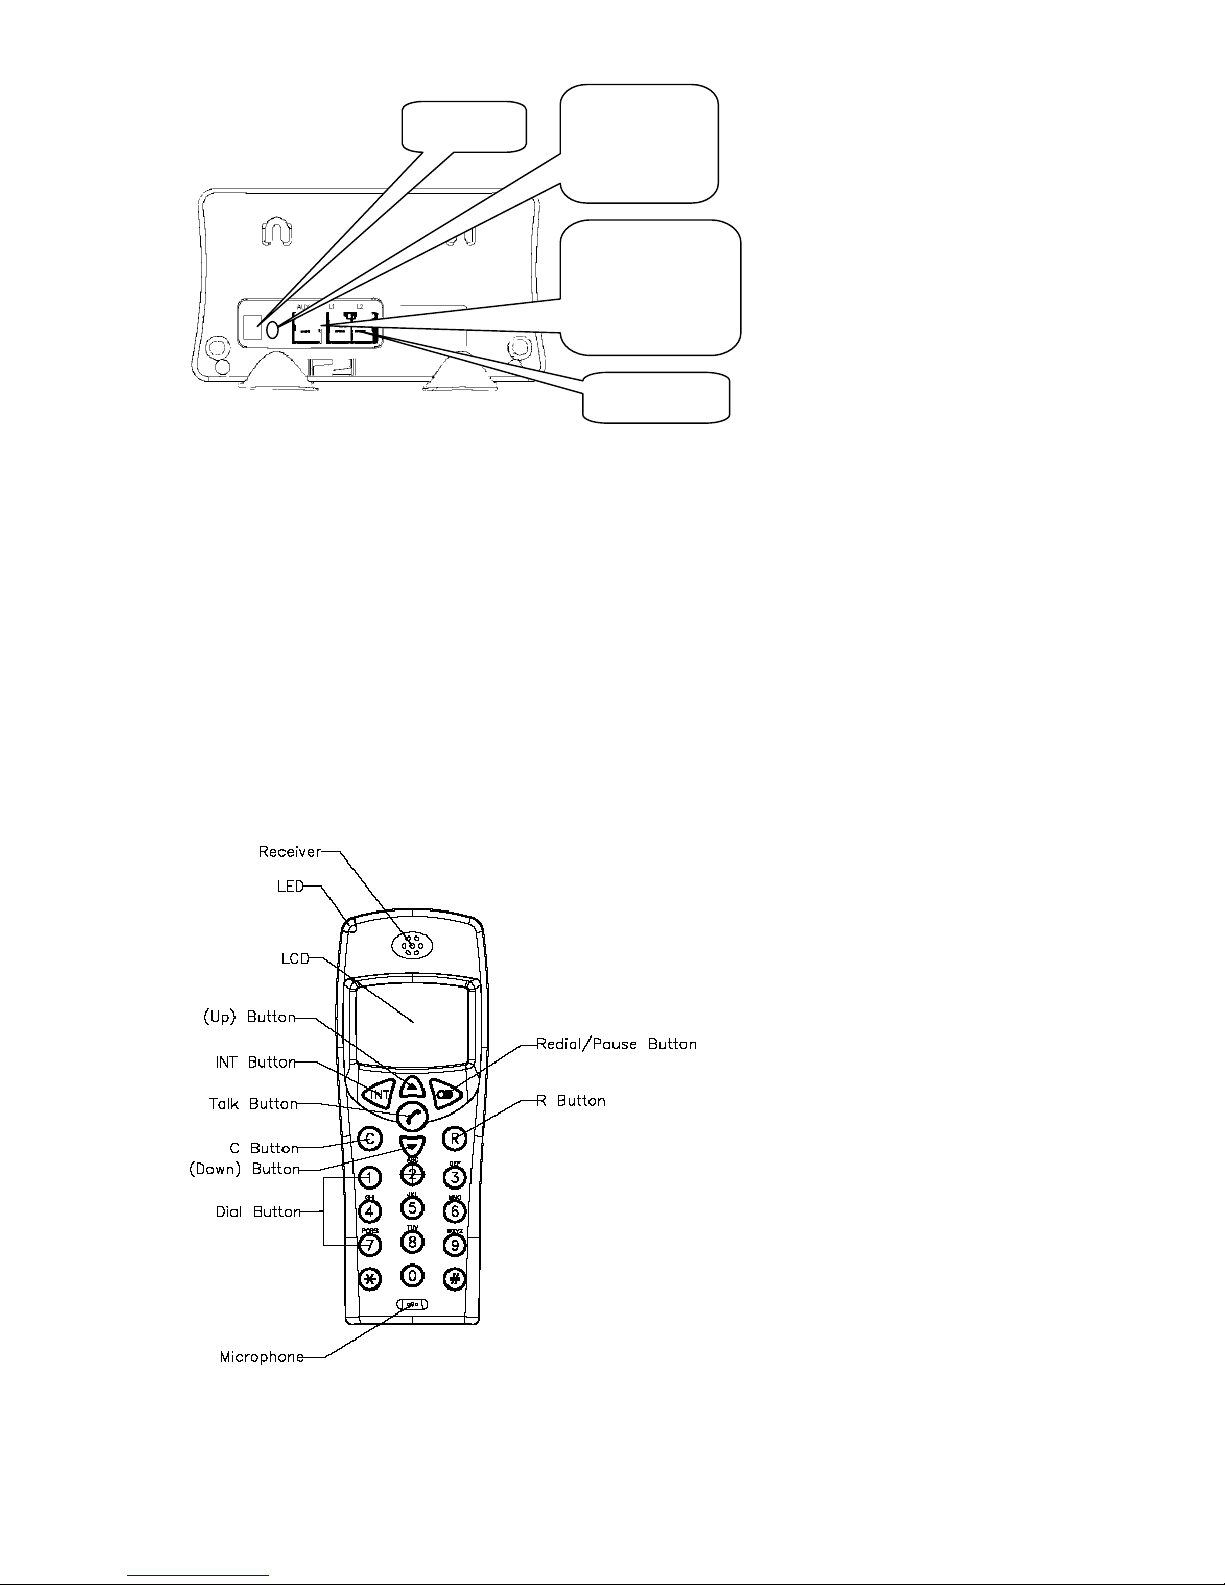
2.3. Base Station Rear................................................................................................................. 2
2.4. Handset Controls.................................................................................................................. 2
2.5. Handset Key / LCD displays brief overview :..................................................................... 3
2.6. Using the Menu:................................................................................................................... 3
2.7. Handset Display Language .................................................................................................. 3
3. GETTING STARTED..................................................................................................................... 4
3.1. Ringing Priority ................................................................................................................... 4
3.2. Line Priority For Handsets................................................................................................... 5
3.3. Handset Group ..................................................................................................................... 5
4. HANDSET OPERATION............................................................................................................... 6
4.1. Switching the Handset On / Off........................................................................................... 6
4.2. Making an external call........................................................................................................ 6
4.3. Making an Internal Call ....................................................................................................... 7
4.4. Answering an Incoming Phone Call .................................................................................... 7
4.5. Changing the Speaker Volume............................................................................................. 8
4.6. Deactivating the Microphone (Mute) .................................................................................. 8
4.7. Last Number Redial ............................................................................................................. 8
4.8. Calling a Number Out of the Caller List.............................................................................. 8
5. Call Transfer, On Hold, Toggle and Three Party Conference......................................................... 9
5.1. Call on Hold......................................................................................................................... 9
5.2. Transfer External Call to Another Handset.......................................................................... 9
5.3. Alternate Call ....................................................................................................................... 9
5.4. Three Party Conference Call.............................................................................................. 10
5.5. Handling Two External Calls Simultaneously Using One Handset................................... 10
6. PHONEBOOK.............................................................................................................................. 10
6.1. Using the Alphanumerical Keypad .................................................................................... 10
6.3. Changing a Number and/or Name in Phonebook ...............................................................11
6.4 Reading the Phonebook List ............................................................................................... 12
6.5. Erasing One Number and/or Name from the Phonebook.................................................. 12
6.6. Erasing All Numbers and/or Names from the Phonebook................................................. 12
7. HANDSET SETTINGS ................................................................................................................ 13
7.1. Key Lock............................................................................................................................ 13
7.2. Selecting the Ringer Melody and Volume for External Calls............................................ 13
AN208 User Manual Version 1.5 December 2006
1

7.3. Selecting the Ringer Melody and Volume for Internal Calls ............................................. 13
7.4. HOT CALL/Baby Call Function ....................................................................................... 14
7.5. Enable/Disable Key Tone................................................................................................... 14
7.6. Naming a Handset.............................................................................................................. 15
7.7. Set PIN Code ..................................................................................................................... 15
7.8. Auto PICKUP On/Off ........................................................................................................ 16
7.9. To Answer Call Using Anykey .......................................................................................... 16
7.10. Erase Caller List............................................................................................................... 16
7.11. Handset Reset................................................................................................................... 17
8. Subscribe / Unsubscribe a Handset............................................................................................... 17
8.1. Subscribe a handset to the DECT system .......................................................................... 17
8.2. Remove Subscription of a Handset from the DECT system.............................................. 19
8.3. To Change the Previously Assigned Handset No. ............................................................. 20
8.4. Selecting a Base Station..................................................................................................... 20
9. BASE SETTINGS ........................................................................................................................ 20
9.1. Dialing Mode ..................................................................................................................... 20
9.2. Set Recall/Flash Time ........................................................................................................ 21
9.3. To Set Pause Time.............................................................................................................. 21
9.4. Call Barring........................................................................................................................ 21
9.5. Least Cost Route................................................................................................................ 22
9.6. Change PIN Code .............................................................................................................. 23
9.7 Reset Base Station Settings................................................................................................. 23
10.TECHNICAL DATA.................................................................................................................... 24
2

1. GENERAL
This is a Two Analogue Line DECT System which utilizes all the services that are offered by the Analogue
(PSTN) network.
You can subscribe up to 9 handsets on this DECT System Base station and every handset can be subscribed
on 4 different base stations. (Maximum number of extensions can be extended to 15)
Other brand handsets may also be subscribed to this DECT System station, if they support the GAP
standard.
Important note: not all the functions of this DECT System can be used if you use a handset other than
the Aristel DECT System handset. To have the best performance from this DECT System, we
recommend using only the Aristel DECT System handsets.
2. INSTALLATION
2.1. Charger
Before you use the telephone for the first time, you must make sure the batteries are charged for 15 hours. If
you don’t do this, the telephone may not function to its full range potential.
Installation of the charger:
- Plug one end of the adapter into a power outlet and the other end into the adapter jack on the side of the
charger.
Charger
2.2. Batteries in Handset
- Open the battery compartment
- Put the 3 rechargeable batteries (AAA, 550mA) in the battery compartment
- Close the battery compartment.
- For the initial charge, leave the handset on the charger for a minimum of 15 hours.
Battery indicator:
The battery is fully charged.
The battery is ¾ charged 75%)
The battery is 50% charged.
The battery is low. When the battery is low, you will hear warning signals and the battery
symbol on the display will blink.
AN208 User Manual Version 1.5 December 2006
1

2.3. Base Station Rear
Auxiliary
Fax/ANSMachine/
Modem
Power Jack 3.5mm External
Music On-Hold
Socket
Line 1/Line 2
NOTE: Aux input is connected to line 1 and can be used to connect a modem, fax, or ordinary handset
type phone. If the Aux input is using line 1, then line 1 will not be available to the system until the Aux
call has ended.
Plug one end of the adapter into the power outlet and the other end into the adapter jack on the bottom of the
base.
Connect one end of the telephone cord with the analogue (PSTN) phone jack (RJ11) and the other end to the
back of the DECT PABX station into the Line 1 jack.
Do the same for Line 2.
2.4. Handset Controls
2

2.5. Handset Key / LCD displays brief overview :
OK/Intercom Redial
Phonebook MenuSelect
Talk Signal Strength
On / Off / Flash / Recall Mute / Delete / Cancel
Missed Call RingerOff
Battery Mute
Baby call/Hot Call Speaker Phone
Menu *Line Busy Indication
* The icon “L1” or “L2” appears in all handsets when one of the external line is connected. When both lines
are in use, ”12” appears on the display.
2.6. Using the Menu:
The phone is menu driven.
To enter the Menu, press the Menu key ( Down key) and confirm selection with OK key.
You are now able to scroll through the menu by using the Up and Down Key
OK key is often used to confirm a setting or to enter a sub menu.
The button (Erase key) is often used to return to a previous menu or to abort the operation.
Press the button for 2 seconds to return to stand by mode.
2.7. Handset Display Language
You can select one of four different display languages. They are English, German, Italian and French.
- Press Menu key when the handset is in standby mode..
- Select HS SETTING by using the UP and DOWN keys .
AN208 User Manual Version 1.5 December 2006
3

- Press OK key to confirm.
- Select LANGUAGE by using the UP and DOWN keys .
- Press OK key to confirm.
- Select the desired language by using the UP and DOWN keys .
- Press OK to confirm.
3. GETTING STARTED
Before you start working with this DECT System, you need to make some minimum settings to utilize the
DECT System functions. Please do these settings first. This handset can then be used as a receptionist
handset.
3.1. Ringing Priority (by default, all handsets will ring simultaneously)
On an external call, this priority handset will ring for the pre-programmed ring cycles before the other
handsets ring.
-- Press Menu key when the handset is in standby mode..
- Select BS SETTING by using the UP and DOWN keys .
- Press OK key to confirm
Enter Master PIN ( Default Master Pin is 1590)
Press OK key to confirm.
- Select RING PRIOR by using the UP and DOWN keys .
Press OK key to confirm.
Select Line 1 or Line 2 by using UP and DOWN keys
Press OK key to confirm.
Select handset HS NO. by using UP and DOWN keys
Press OK key to confirm.
Select ringer count RING CNT by using UP and DOWN keys
Press OK key to confirm
4

3.2. Line Priority For Handsets (default assignment is alternative)
You can set external line access priority and assignment to a handset, the handset can then only use the
assigned external line to make external calls. Each handset has choices of Alternative, Line 1 first, Line 2
first, Line 1 only, Line 2 only and No ( No access to external line)
This external line priority has no effect on receiving incoming calls.
- Press MENU key when the unit is in standby mode.
- Select BS SETTING by using the UP and DOWN keys and press OK key
- Enter the Base Pin code MASTER PIN (Default is 1590)
- Press OK key to confirm.
- Select SELECT LINE by using the UP and DOWN keys .
- Press OK to confirm.
- Select the desired handset by using the UP and DOWN keys . (HS1 =HANDSET 1)
- Press OK to confirm.
Select the desired priority by using the UP and DOWN keys .
- Press OK to confirm.-
3.3. Handset Group
You can set a group of handsets to ring and answer the assigned external line when an incoming external call
is on the line.
Please note: When a handset is assigned by Ringing Priority to ring on the restricted line, it always
completes Ringing Priority first.
To assign a handset to only ring and answer a designated external line,
- Press MENU key when the handset is in standby mode.
- Select BS SETTING by using the UP and DOWN keys and press OK key
- Enter the Base Pin code MASTER PIN (Default is 1590)
AN208 User Manual Version 1.5 December 2006
5

- Press OK key to confirm.
- Select RING GROUP by using the UP and DOWN keys .
Press OK key to confirm.
Select the desired external line by using UP and DOWN keys .
Press OK key to confirm.
Select the handset not to ring by pressing a number from 1 to 9 (1 = handset No. 1). The selected handset
number will appear as “X”.
Press DOWN key for handset No.10 to No.15. Ex., press 0 for handset No.10 and press 2 for handset
No. 12. The selected handset number will appear as “X”.
Press OK key to confirm.
NOTE! The handsets selected as above (marked by X), are the handsets that WILL NOT RING in the
group(s)
4. HANDSET OPERATION
4.1. Switching the Handset On / Off :
To switch off the handset, press and hold the Line button for 2 seconds in the standby mode.
To switch on the handset press and hold the Line button again for 2 seconds.
When the handset is switched off, no calls can be made or received.
4.2. Making an external call
4.2.1. Direct Call
• Press the Line button, you will hear the external dial tone.
• Enter the telephone number and wait for connection
• “ L1 Busy ” = L1 Line in use
• “ L1 L2 ” = Both lines in use
•Press the Line button During conversation, for a minimum of 2 seconds. You can now make the
conversation handsfree via the built-in speaker and microphone.
6

Press the Line button again for 2 seconds to stop the hands free mode or press the line key for a short
duration to disconnect the call
4.2.2. Pre- dialing
• Enter the telephone number. If needed, you can erase digits by pressing the Erase button “ C ”.
• Press the Line button . The phone number will be dialed automatically.
4.3. Making an Internal Call
If you have more then one handset subscribed to the PABX, you can make an internal call between the
Handsets
• Press OK / INTERCOM key
• Press a handset No. The called handset will ring
• Press ‘line key’ on the called handset and start talking
4.4.Answering an Incoming Phone Call
When there is an external incoming call, the telephone number is displayed if sent by the network.
When the incoming call is an internal call, the display shows the calling handset No.
When it is an external call and the number is not transferred (private call), ‘EXTERNAL‘ is displayed.
4.4.1. Answering Call
To answer an incoming call, press the LINE button.
4.4.2. Transferring a Call to Another Handset
You can transfer an internal or external call to another handset.
Press Line key to answer the call.
Press OK/INTERCOM key and then a handset No.
Press Line key again to disconnect the call and transfer the call to the handset
The call has now been transferred.
4.4.3 Making a Hands Free Phone Call
AN208 User Manual Version 1.5 December 2006
7

With the Aristel DC209 handset you can make handsfree phone calls.
Press the Line button , during conversation, for minimum 2 seconds. You can now make the conversation
handsfree via the built-in speaker and microphone.
Press the Line button again for 2 seconds to stop the hands free mode or press the line key for less
than 1 second to disconnect the call.
4.5. Changing the Speaker Volume
The volume of the speaker can be changed by using the Up and Down Key during conversation.
The volume can be changed in 10 levels.
4.6. Deactivating the Microphone (Mute)
It is possible to mute the microphone during a conversation:
• Press C button to mute the microphone, Mute indicator appears on display.
• Press C button again to activate the microphone. Mute indicator will disappear.
4.7. Last Number Redial
The DECT PABX handset saves the three last dialed telephone numbers in the redial memory.
• You can enter the Redial list by pushing REDIAL key in the stand-by mode.
• Scroll through the Redial memory by pushing REDIAL key.
• When the desired number appears on the display, press the Line button.
• The number will be dialed automatically.
Press the button for 2 seconds to escape the redial list if you don’t want to make a call from the list.
4.8. Calling a Number Out of the Caller List
The DECT PABX handset saves the telephone numbers of the last 10 external incoming calls in the caller
list. This is only done when the telephone number of the incoming call has been sent via the analogue
8

network.
Press MENU key when the handset is in standby mode.
Select CALLER ID by using the UP and DOWN keys and press OK key
• Scroll through the Caller List by using the UP and DOWN keys .
• When the desired number appears on the display, press the LINE button .
• The number will be dialed automatically.
5. Call Transfer, On Hold, Toggle and Three Party Conference
5.1. Call on Hold
To put a call on hold during conversation, press OK/INTERCOM key .
If you want to retrieve the call on hold, press OK/INTERCOM key again.
If you press Line key after external call on hold, the external call will call back.
5.2. Transfer External Call to Another Handset
Make a call or after receiving an incoming call, press OK/INTERCOM key.
Enter the internal handset No. and press Line button to transfer the external call.
You will be disconnected but both other parties can talk together.
5.3.Alternate Call (Toggling between an internal call and an external call)
If you place an external call on hold, you can make a call to another internal handset. You can then toggle
between the first and the second call.
Put the external call on hold by pressing OK/INTERCOM key .
Enter the called internal handset No., when the call is connected, press OK/INTERCOM key (Toggle)
to switch between both calls. One call will be placed on hold and you can talk to the other caller.
Note: If you press the Line button, you will be disconnected and the other handset will be talking to the
external caller alone.
AN208 User Manual Version 1.5 December 2006
9

5.4. Three Party Conference Call
You can establish a three party conference with another internal caller and an external caller.
Put the external call on hold by pressing OK/INTERCOM key.
Enter the called internal handset No., when the call is connected, press “#” button for 2 sec to establish three
party conference. Both handsets will start counting the talking time.
Note: If during the conference call you want to talk to only the internal caller, press OK/INTERCOM
key. External call will be placed on hold. You can Toggle or restart conference at any time.
5.5. Handling Two External Calls Simultaneously Using One Handset
You handle two external calls simultaneously using one handset.
If a second external call comes in while you are talking to the first external caller,
- Put the first external caller on hold by pressing OK/INTERCOM key .
- Press Line button once to let the second caller ring on your handset.
- Once it rings, press Line button again to pick up the second caller.
- Press OK/INTERCOM again to put the second caller on hold and press Line button.
- The previously on-hold first caller will ring your handset.
- Press Line button to resume conversation with the first caller.
While talking to the first caller, the 2nd caller is on-hold. No other handset can access the second caller.
6. PHONEBOOK
6.1. Using theAlphanumerical Keypad
Use the alphanumerical keypad to enter text. To select a letter, press the corresponding button. E.g. if you
press numerical button ‘5’, the first character (J) will be displayed. Press it multiple times if you want to
select another character under this button. Press button ‘2’ twice to select the letter ‘B’. If you want to select
‘A’ as well as ‘B’, press button ‘A’ first, wait for 2 seconds until the cursor has moved to the next location
and select then button ‘B’. Wrongly entered characters can be erased by pressing the C button . Press
“ *” key to show small case letter, e.g., a, b, c
Available Characters: Press the correct buttons to get the following characters:
10

[ 1 ] ( ) —
[ 2 ] A B C a b c ,
[ 3 ] D E F d e f :
[ 4 ] G H I g h I +
[ 5 ] J K L j k l %
[ 6 ] M N O m n o /
[ 7 ] P Q R S p q r s
[ 8 ] T U V t u v
[ 9 ] W X Y Z w x y z
[ 0 ]β™√⇐
[ * ] change between small and capital letter
[ # ] #
[DOWN] <space>
6.2. Adding an Entry to the Phonebook
- Press Menu key when the handset is in standby mode.
- Select PHONE BOOK by using the UP and DOWN keys .
- Press OK key to confirm.
- Select ADD by using the UP and DOWN keys .
Press OK key to confirm.
Enter the name and press OK key to confirm.
Enter the number and press OK key to confirm.
During adding, press Cbutton for 2 seconds to abort.
6.3. Changing a Number and/or Name in Phonebook
Press Menu key when the unit is in standby mode..
- Select PHONE BOOK by using the UP and DOWN keys .
- Press OK key to confirm.
- Select EDIT by using the UP and DOWN keys .
Press OK key to confirm.
AN208 User Manual Version 1.5 December 2006
11

Select the name and number to change by using UP and DOWN keys
Press OK key to confirm.
Use C button to erase old entry, enter new number and press OK key to confirm.
During changing, press Cbutton for 2 seconds to abort.
6.4 Reading the Phonebook List
Press Menu key when the handset is in standby mode..
- Select PHONE BOOK by using the UP and DOWN keys .
- Press OK key to confirm.
- Select READ by using the UP and DOWN keys .
Press OK key to confirm.
Scroll the phonebook list by using UP and DOWN keys
Press Cbutton to return to standby mode.
6.5. Erasing One Number and/or Name from the Phonebook
Press Menu key when the handset is in standby mode.
Select PHONE BOOK by using the UP and DOWN keys .
- Press OK key to confirm.
- Select DELETE by using the UP and DOWN keys .
Press OK key to confirm.
-Select the phonebook entry to be deleted by using UP and DOWN keys
Press OK key to confirm and then press OK key to confirm again
During the deleting, press Cbutton to abort.
6.6. ErasingAll Numbers and/or Names from the Phonebook
- Press Menu key when the handset is in standby mode.
- Select PHONE BOOK by using the UP and DOWN keys .
- Press OK key to confirm.
- Select ERASE ALL by using the UP and DOWN keys .
- Press OK key to confirm. And then press OK key to confirm again
12

- During the deleting, press Cbutton to abort
7. HANDSET SETTINGS
7.1. Key Lock
- Press MENU key when the handset is in standby mode..
- Select KEY LOCK by using the UP and DOWN keys .
- Press OK key to confirm
The display shows “LOCKED”. The keypad is now locked.
After press DOWN key and OK key , the keypad will be released.
7.2. Selecting the Ringer Melody and Volume for External Calls
- Press MENU key when the handset is in standby mode..
- Select HS SETTING by using the UP and DOWN keys .
- Press OK to confirm.
- Select SET EXTRING/MELODY EXT by using the UP and DOWN keys .
- Press OK to confirm.
- Select the desired ringer melody by using the UP and DOWN keys .
- Press OK to confirm.
- Select the desired ringer volume by using the UP and DOWN keys .
- Press OK to confirm.
7.3. Selecting the Ringer Melody and Volume for Internal Calls
- Press MENU key when the handset is in standby mode..
AN208 User Manual Version 1.5 December 2006
13

- Select HS SETTING by using the UP and DOWN keys .
- Press OK to confirm.
- Select SET INTRING/MELODY INT by using the UP and DOWN keys .
- Press OK to confirm.
- Select the desired ringer melody by using the UP and DOWN keys .
- Press OK to confirm.
- Select the desired ringer volume by using the UP and DOWN keys .
- Press OK to confirm.
7.4. HOT CALL/Baby Call Function Note: Baby/Hot Call function cannot be used in handsfree mode.
If you enable this function, the programmed number will be dialed automatically when any key is pressed.
All other functions of the keypad will be disabled until Baby Call has been cancelled.
- Press MENU key when the handset is in standby mode..
- Select HS SETTING by using the UP and DOWN keys .
- Press OK to confirm.
- Select HOT CALL/BABY CALL by using the UP and DOWN keys .
- Press OK to confirm.
- Enter baby call telephone number using numeric key pad.
- Press OK key to confirm. The display will show BABY CALL.
- Press DOWN key twice quickly to disable baby call.
7.5. Enable/Disable Key Tone
- Press MENU key when the handset is in standby mode..
- Select HS SETTING by using the UP and DOWN keys .
- Press OK to confirm.
- Select SET KEYTONE by using the UP and DOWN keys .
14

- Press OK to confirm.
- Select ON/OFF by using the UP and DOWN keys .
- Press OK to confirm
7.6. Naming a Handset
The name of the handset will be displayed in standby mode. If you want to enter or change this name:
- Press MENU key when the handset is in standby mode..
- Select HS SETTING by using the UP and DOWN keys .
- Press OK to confirm.
- Select USER NAME by using the UP and DOWN keys .
- Press OK to confirm.
- Enter or change the handset name by means of the alphanumerical keypad.
- Press OK to confirm.
7.7. Set PIN Code
To change default handset PIN code.
- Press MENU key when the handset is in standby mode..
- Select HS SETTING by using the UP and DOWN keys .
- Press OK to confirm.
- Select SET PINCODE by using the UP and DOWN keys .
- Press OK to confirm.
Enter the Handset Pin code, HS PIN: (DEFAULT PIN = 1590)
Press OK to confirm.
- Enter the new Pin code: NEW PIN
- Press OK to confirm.
AN208 User Manual Version 1.5 December 2006
15

- Re-enter the new Pin code: RETYPE:
- Press OK to confirm.
7.8.Auto PICKUPOn/Off
When a call comes in, a handset automatically answers the call when it is removed from charger
. Press MENU key when the handset is in standby mode..
- Select HS SETTING by using the UP and DOWN keys .
- Press OK to confirm.
- Select AUTO ANSWER/AUTO PICKUP by using the UP and DOWN keys .
- Press OK to confirm.
- Select ON/OFF by using the UP and DOWN keys .
- Press OK to confirm
7.9. To Answer Call Using Anykey
- Press MENU key when the handset is in standby mode..
- Select HS SETTING by using the UP and DOWN keys .
- Press OK to confirm.
- Select ANYKEY TALK by using the UP and DOWN keys .
- Press OK to confirm.
- Select ON/OFF by using the UP and DOWN keys .
- Press OK to confirm
7.10. Erase Caller List
- Press MENU key when the handset is in standby mode.
- Select HS SETTING by using the UP and DOWN keys .
16
Other manuals for AN208
1
Table of contents
Other Aristel Telephone manuals

Aristel
Aristel DV-38 User guide

Aristel
Aristel KP-30 User manual

Aristel
Aristel SLT70 User manual

Aristel
Aristel AV-96 User guide

Aristel
Aristel Powerphone User manual

Aristel
Aristel AV SERIES User manual

Aristel
Aristel Genius X2 User manual

Aristel
Aristel AV-8 User guide

Aristel
Aristel DV SERIES User manual

Aristel
Aristel AV-8 User manual