Aristel AV-8 User guide

Aristel
System Administrator’s Manual
Arista Systems Corporation
Aristel

SYSTEM ADMINISTRATOR’S MANUAL
Table Of Contents
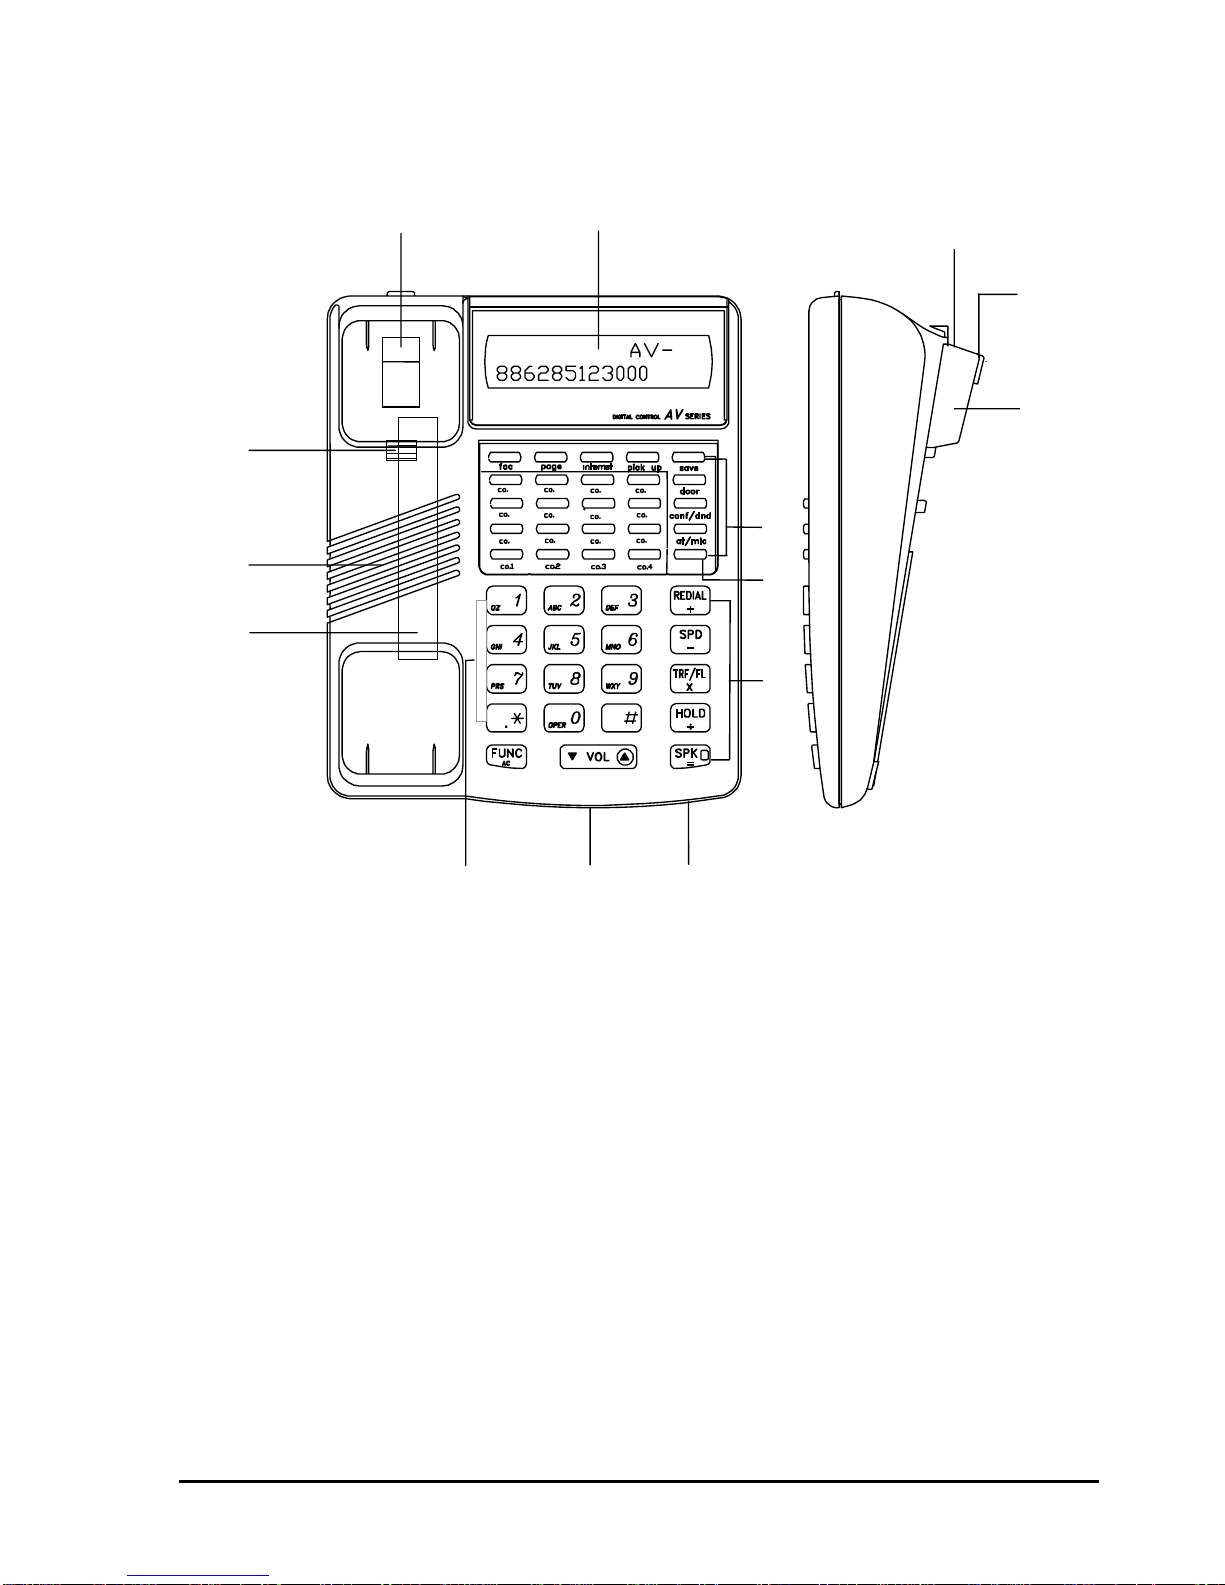
A. KEY TELEPHONE LAYOUT............................................................................3
B. KEY TELEPHONE STATION OPERATION ....................................................5
1. ANSWERING CALLS....................................................................................5
2. BABY LISTENING.........................................................................................5
3. BACKGROUND MUSIC................................................................................5
4. CALL FORWARD..........................................................................................6
5. CALL SIGNAL...............................................................................................6
6. CALL SPLIT ..................................................................................................6
7. CALL TRANSFER.........................................................................................7
8. CALL WAITING.............................................................................................7
9. CHECK IN / CHECK OUT.............................................................................8
10. CONFERENCE .............................................................................................8
11. DAY SWITCHING / NIGHT SWITCHING......................................................8
12. DATE / TIME SETTING.................................................................................8
13. DO NOT DISTURB........................................................................................9
14. DOOR PHONE..............................................................................................9
15. ENVIRONMENT MONITORING....................................................................9
16. FIRE ALARM OFF (CONSOLE ONLY)..............................................................9
17. FORCED ACCOUNT CODE.........................................................................9
18. NON ENFORCED ACCOUNT CODES/S....................................................10
19. HAND MODE SWITCHING.........................................................................10
20. HANDSFREENOTE7 ......................................................................................10
21. HEADSETS.................................................................................................10
22. HOLD CALLS..............................................................................................10
23. INDIVIDUAL ALARM...................................................................................11
24. INTERNAL CALLS ......................................................................................12
25. LOCK/UNLOCK YOUR TELEPHONE.........................................................12
26. LOCK/UNLOCK RS232 (CONSOLE ONLY)....................................................13
27. MACRO KEY ASSIGNMENT (CONSOLE ONLY) ...........................................13
28. MUTE..........................................................................................................13
29. MESSAGE TEXT ........................................................................................13
30. MORNING CALL.........................................................................................14
31. OHCA..........................................................................................................14
32. OUTGOING CALLS.....................................................................................14
33. OVERRIDE AND MONITOR.......................................................................14
34. PAGINGNOTE 18............................................................................................15
35. PICK UP......................................................................................................16
33. PULSE/TONE SWITCHING........................................................................16
34. REDIAL .......................................................................................................16
35. RELEASING CALLS....................................................................................17
36. REVIEW STATION PRIME DATA...............................................................17
Arista Systems Corporation 1

37. REVIEW RS232 STATUS (CONSOLE ONLY) ................................................18
38. SPEED DIAL...............................................................................................18
39. STATION OPERATION HELP LIST............................................................19
40. TOLL PASSWORD .....................................................................................19
41. VOICE MESSAGE ......................................................................................20
42. VOLUME / FREQUENCY CONTROL .........................................................21
C. SINGLE LINE TELEPHONE STATION OPERATION ...................................22
1. ANSWERING CALLS...............................................................................22
2. CALL FORWARD........................................................................................22
3. CALL SIGNAL.............................................................................................23
4. CALL SPLIT ................................................................................................23
5. CALL TRANSFER.......................................................................................23
6. CALL WAITING...........................................................................................23
7. CONFERENCE ...........................................................................................24
8. DOOR PHONE............................................................................................24
9. DO NOT DISTURB......................................................................................24
10. EXTERNAL CALLS (SEE OUTGOING CALLS).................................................25
11. FORCED ACCOUNT CODE.......................................................................25
12. HOLD CALLS..............................................................................................25
13. INDIVIDUAL ALARM...................................................................................25
14. INTERNAL CALL.........................................................................................25
15. LOCK/UNLOCK YOUR TELEPHONE.........................................................26
16. MORNING CALL.........................................................................................26
17. OUTGOING CALL.......................................................................................26
18. OVERRIDE AND MONITOR.......................................................................27
19. PAGING ......................................................................................................27
20. PICK UP......................................................................................................28
21. REDIAL .......................................................................................................28
22. RELEASING CALL......................................................................................28
23. SPEED DIAL...............................................................................................29
Arista Systems Corporation
2

A. KEY TELEPHONE LAYOUT
For 15 Keys Model
5
Aristel
13
12
8
9
7
6
4
3
2
10
1 11
38
Features:
1. Hook Switch
2. Handpiece Wall Mount Clip
3. Speaker
4. Handset Cradle
5. Dial Keypad
6. Quick Reference Card
7. Microphone
8. Function Keys
9. DSS Keys
10. LCD Display
11. Line Cord Jack
12. Handset Cord Jack
13. Table/Wall Mount Bracket
Arista Systems Corporation 3

For 25 Keys Model
5
14
14 15 16
13
12
11
10
9
8
5 6 7
cal
Aristel
13
12
8
9
7
6
4
3
2
10
1 11
38
Features:
1. Hook Switch
2. Handpiece Wall Mount Clip
3. Speaker
4. Handset Cradle
5. Dial Keypad
6. Quick Reference Card
7. Microphone
8. Function Keys
9. DSS Keys
10. LCD Display
11. Line Cord Jack
12. Handset Cord Jack
14. Calculator Function (for 25 keys display Models only)
Arista Systems Corporation
4

B. KEY TELEPHONE STATION OPERATION
1. ANSWERING CALLS
Automatic Answer
Step 1: Handset on Hook. Press DSS key assigned for [AT/MIC] function to enable
Automatic Answer function. The [AT/MIC] LED will be ON.
Step 2: Press [AT/MIC] again to disable Automatic Answer function and [AT/MIC]
LED will go OFF.
External Call
Step 1: During incoming ringing, lift handset or press [SPK] on the ringing station, or
press the flashing DSS key assigned for that incoming line, or dial the
incoming CO number by using [SPECIAL CODE]NOTE 1.
NOTE 1: [#]+[4]+[0]+[1] = C.O. Line 1
[#]+[4]+[0]+[2] = C.O. Line 2 MODEL SPECIAL CODE
AV-8 #401 ~ #403
AV-12 #401 ~ #404
AV-38 #401 ~ #412
AV-64/64H #401 ~ #420
AV-256 #401 ~ #440
……………………………………
[#]+[4]+[1]+[0] = C.O. Line 10
[#]+[4]+[1]+[1] = C.O. Line 11
……………………………………
[#]+[4]+[3]+[9] = C.O. Line 39
[#]+[4]+[4]+[0] = C.O. Line 40
Other Calls
Step 1: During ringing, lift handset or press [SPK] on the ringing station.
2. BABY LISTENING
Step 1: Lift handset, or press [SPK]on the HANDSFREE key telephone which will be listened.
Step 2: Press [#]+[51].
Step 3: Lift handset, or press [SPK] on the listening telephone and dial the listened station
numberNOTE 2.
Cancel Baby Listening
Step 1: Handset on Hook and hang up or press [SPK] twice from the listened telephone to
cancel this function.
NOTE 2: Once the Baby Listening Function is enabled, the microphone on the listened
telephone will be active all the time. When the listening telephone receives a call, it
will not ring on the listened station but the environment surrounding the listened
station will still be heard.
3. BACKGROUND MUSIC
Step 1: On hook.
Step 2: Press [#]to play background music from speaker.
Cancel Background Music
Step 1: Press [#]or [SPK] to cancel background music.
Arista Systems Corporation 5

4. CALL FORWARD
All Incoming Call Forward
Step 1: Handset On Hook.
Step 2: Press DSS key assigned for [CFW] function in system Program Zone 500 and then
enter [Forwarded Station Number], or press [FUNC] + [21] + [Forwarded Station
Number].
Incoming Busy Call Forward
Step 1: Handset On Hook.
Step 2: Press [FUNC]+[22]+[Forwarded Station Number].
Incoming No Answer Call Forward
Step 1: Handset On Hook
Step 2: Press [FUNC]+[23]+[Forwarded Station Number].
Incoming Busy or No Answer Call Forward
Step 1: Handset On Hook
Step 2: Press [FUNC]+[24]+[Forwarded Station Number].
Call Follow Me
Step 1: Handset On Hook
Step 2: Press [FUNC]+[25]+[Forwarded Station Number].
Call Forward External (From Own Station)
Step 1: Handset On Hook
Step 2: Press [FUNC] +【26】+【1ST SPD Code 0-9】/【SPD DSS1~DSS10】
Note:【1ST SPD Code 0-9】(Key number):Press Code 0~9 that the forward external
number have be saved before.
【SPD DSS1~DSS10】(DSS):Press DSS1~DSS10 that the forward external
number have be saved before.
To cancel each Call Forward : Repeat Step 1, but replace [Forwarded Station Number]
with [Own Station Number].
5. CALL SIGNAL
Changing Voice to Ring or Ring to Voice
(The default should be set in Program Zone 207, Type=0 or 1).
Step 1: During call, press [∗]to change calling signal from Voice to Ring or Ring to
Voice.
6. CALL SPLIT
Step 1: During conversation with party A, press [HOLD] to place call A on hold.
Step 2: Call party B.
Step 3: When party B answers, Hook Flash or press [FLASH] to place party B on
hold and retrieve party A.
Step 4: Repeat Step 3 to talk to parties A and B alternatively.
Arista Systems Corporation
6

7. CALL TRANSFER
Announced Transfer
Step 1: During the call, press [HOLD] to put call on hold.
Step 2: Dial required station number.
Step 3: Wait for the called station to answer.
Step 4: Hang up handset (refer to Program Zone 234).
Unannounced Transfer (Camp On)
Step 1: During the call, press [HOLD] to put call on hold.
Step 2: Dial required station number.
Step 3: Press [TRF/FL] (refer to Program Zone 234).
Step 4: Hang up handset.
Quick Transfer
By DSS Key
Step 1: During the call, press DSS key assigned for the transferred station. The system will
automatically hold the call.
Step 2: Call will be transferred as soon as the transferring station hangs up.
By PageNOTE 3.
Step 1: During call press [PAGE]. The system will automatically hold call.
Step 2: Page the transferred party and wait for answering page.
Step 3: The transferred party answers paging by pressing [BE PAGED].
Step 4: The paging party hangs up and the call will then be transferred.
NOTE 3: This function can only operate within Program Zone 234=1.
8. CALL WAITING
Step 1: Call an internal station which is engaged or does not answer.
Step 2: Listen for BusyNOTE 4.a or Ring Back ToneNOTE 4.b.
Step 3: Press DSS key assigned for Message Waiting [MW] function in Program Zone 500.
NOTE 4:
a. If the called station is busy, after the station is free it will recall to the station which eaves
the message. Once the leaving message station answers the recall, it will also recall to
the left message station. After left message station answers the recall, these 2 stations
can talk to each other.
b. If the called station is a Key Telephone and one of the DSS keys on the phone is
assigned for [MW] function, then the LED of that DSS key will flash. If no DSS has been
assigned for [MW] function, then the station cannot carry out Call Waiting function.
Answer Call Waiting
Step 1: If the station is busy when another station leaves the message, just wait for the recall
after the station is free.
Step 2: If the station is free and one of the DSS keys is assigned for [MW] function, press the
flashing LED of [MW] DSS key to call the station which left the message. After the
leaving message station answers the call these two stations can talk to each other.
CO Queuing
Step 1: Access a CO line and listen for a busy tone.
Step 2: Press the DSS key assigned for Message Waiting [MW] in Program Zone 500 to call
waiting to the busy CO.
Step 3: The busy CO will be placed in the CO queue.
Arista Systems Corporation 7

Step 4: Once the busy CO in CO queue is free it will recall to the call waiting station and can
then be used when the station answers it.
9. CHECK IN / CHECK OUT
(Console Only)
Check in :
Step1: On Hook, press[Func]+[DSS1]+[Ext. Number]+[Save]+[SPK]
Check out :
Step1 : On Hook, press[Func]+[DSS2]+[Ext. Number]+[Save]+[SPK]
10. CONFERENCE
Combined External/Internal Conference
Step 1: During conversation with an external (or internal) party, press [HOLD] to place the
call on hold.
Step 2: Dial another station number or make another external call.
Step 3: After this call is answered, press [CONF] key assigned in Program Zone 500.
External Conference
Step 1: During conversation with an external party, press [HOLD] to place the call on hold.
Step 2: Make an external call.
Step 3: After this call is answered, press the [CONF] key assigned in Program Zone 500.
Internal Conference
Step 1: During conversation with an internal party, press [HOLD] to place the call on hold.
Step 2: Dial the other station number which is to participate in the conference.
Step 3: After the other station answers your call, press the [CONF] key assigned in Program
Zone 500.
11. DAY SWITCHING / NIGHT SWITCHING
Automatic/Manual Mode Switching (Console Only)
Step 1: Handset on Hook.
Step 2: Press [FUNC]+[TRF/FL]+[∗]to switch from Automatic to Manual Mode, or vice versa.
Step 3: If in Automatic Mode, the system will automatically switch the Service Mode to “Night
Transfer” when Day Time in Program Zone 306 activates.
Step 4: If in Manual Mode, the Night Service switching must be according to “Manual Night
Switching” as the following.
Manual Night Switching (Console Only)
Step 1: Handset on Hook.
Step 2:Press [FUNC]+[TRF/FL]+[TRF]FL] to change from Day Switch to Night SwitchNOTE 16.
NOTE 16: During Night Switch, LCD on console phone (first console on Program Zone 400-
01) will display “NIGHT TRANSFER” in the upper right hand corner and DSS15 LED
will flash.
12. DATE / TIME SETTING
(Must be in Manual Mode)
Night Switching : press[FUNC]+[TRF/FL]+[TRF/FL]+[SPK]
Day Switching : press[FUNC]+[TRF/FL]+[TRF/FL]+[SPK]
Arista Systems Corporation
8

13. DO NOT DISTURB
Step 1: Handset on Hook.
Step 2: Press the DSS key assigned for Do Not Disturb [DND] function in Program Zone
500.
Step 3: Repeat Step 2 to cancel.
14. DOOR PHONE
Call Door Phone
Step 1: Lift handset (or press [SPK] on Key Telephone) and listen for dial tone.
Step 2: After dial tone is heard, dial [#]+[61] to call Door Phone 1 or [#]+[62] to call Door
Phone 2, or press key programmed as Door Key in Program Zone 500.
Door Phone Call
Step 1: Press Door button.
Step 2: The internal stations programmed to answer the Door Phone Call in Program Zone
602 will ring.
Open Door
Step 1: During conversation with Door user, dial [0] to open the door.
15. ENVIRONMENT MONITORING
Step 1: Lift handset, or press [SPK] on the telephone which is assigned to have the
monitoring function on Program Zone 506-ST-7=1.
Step 2: Press [#]+[54] [Monitored Station Number]NOTE 5.
NOTE 5:
a. The monitoring level of the Environment Monitor function is the same as the monitoring
level in Program Zone 504-ST-2.
b. Once the monitored station is enabled, the microphone will be active until the monitoring
station releases the monitoring.
c. The monitored station will not be rung when the monitoring station calls it, and the voice
from the monitoring station will not be heard by the monitored station.
16. FIRE ALARM OFF (Console Only)
Step 1: During fire alarm ringing, lift handset or press [SPK] key.
Step 2: Press [#]+[52] to turn off the firm alarm ringing.
17. FORCED ACCOUNT CODE
Step 1: Handset on Hook.
Step 2: Press [FUNC]+[1].
Step 3: Enter forced Account Code number assigned in Program Zone 403NOTE 6.
NOTE 6: The system will automatically select a free CO for outgoing calls. All telephone digits
will break Toll Restriction.
Arista Systems Corporation 9

18. NON ENFORCED ACCOUNT CODES/S
(Refer to System Administrator’s Manual for programming details)
Step1: During call, press [SAVE]+[Message Wait]+[Account Number]+[SAVE]
19. HAND MODE SWITCHING
Handset To Handsfree Mode
Step 1: Press [AT/MIC] DSS key assigned in Program Zone 500 during conversation and
then hang up.
Handsfree to Handset Mode
Step 1: Lift up handset during conversation.
20. HANDSFREENOTE7
Step 1:Handset on hook.
Step 2: Press the DSS key assigned for [AT/MIC] function in Program Zone 500.
NOTE 7: Handsfree function will only be operated on telephones with handsfree kit fitted.
21. HEADSETS
Enable Headset
Step 1: Handset on Hook.
Step 2: Press [SPK]+[#]+[56]+[HEADSET PASSWORD]NOTE 8.
Step 3: Unplug Handset from the Key Telephone, and plug-in headset to the jack which
Handset is plugged in.
Answering Call
Step 1: Press [SPK].
Disconnect Call
Step 1: Press [SPK].
Disable Headset
Step 1: Press [SPK]+[#]+[56]+[HEADSET PASSWORD].
Step 2: Replace handset.
NOTE 8: Please refer to Program Zone 301-08 for [HEADSET PASSWORD].
22. HOLD CALLS
Exclusive Hold
Step 1: During the call, press [HOLD] twiceNOTE 9.
Step 2: Hang up handset.
NOTE 9: If there is any one DSS Key to indicate the held call, DSS LED will be flashing as 1
sec. On and 1 sec. Off with Green color from your own telephone; and will be
steady on with Red color from other key telephone.
Arista Systems Corporation
10

Retrieving Exclusive Hold
External Calls
Step 1: While call is on hold, lift handset or press [SPK].
Step 2: Press DSS keyNOTE 10 assigned for the held call (LED is slow Flashing as Green color)
or dial the held CO number by [SPECIAL CODE]NOTE 1 on page 1.
NOTE 10: If retrieving the held call from other key telephone, lift the handset, and press DSS
key assigned for the held call (LED is steady Red color) or dial the held CO
number by using [SPECIAL CODE]NOTE 1 on page 1. During hearing Busy Tone,
press [HOLD].
Internal Calls
Step 1: While call is on hold, lift handset, or press [SPK].
Step 2:Press DSS keyNOTE 11 assigned for the held call (LED is slow flashing as Green color),
then dial the held station number.
NOTE 11: If retrieving the held call from other key telephone, lift the handset, and press DSS
key assigned for the held call (LED is steady Red color) or dial the held station
number. During hearing Busy Tone, press [HOLD].
Normal Hold
Step 1: During the call, press [HOLD] onceNOTE 12.
Step 2: Hang up handset.
NOTE 12: If there is any one DSS Key to indicate the held call, DSS LED will be flashing as
250ms On and 250ms Off with Green color from your own telephone and Red color
from other key telephone.
Retrieving Normal Hold
External Calls
Step 1: While call is on hold, lift handset or press [SPK].
Step 2: Press DSS keyNOTE 13 assigned for the held call (LED is Flashing as Green color) or
dial the held CO number by [SPECIAL CODE]NOTE 1 on page 1.
NOTE 13: If retrieving the held call from other key telephone, lift the handset, and press DSSkey assigned for the held call (LED is flashing as Red color) or dial the held CO
number by using [SPECIAL CODE]NOTE 1 on page 1. During hearing Busy Tone, press
[HOLD].
Internal Calls
Step 1: While call is on hold, lift handset, or press [SPK].
Step 2: Press DSS keyNOTE 14 assigned for the held call (LED is flashing as Green color) then
dial the held station number.
NOTE 14: If retrieving the held call from other key telephone, lift the handset, and press DSS
key assigned for the held call (LED is flashing as Red color) or dial the held station
number. During hearing Busy Tone, press [HOLD].
23. INDIVIDUAL ALARM
Date/Time Setting (Console Only)
Step 1: Handset on Hook.
Step 2: Press [FUNC]+[9]+[#].
Step 3: Enter the Item number.
Step 4: Press [SAVE] to access Program Zone 304 to System Date/Time Setting.
Arista Systems Corporation 11

Individual Station Alarm (Console Only)
Step 1: Handset on Hook.
Step 2: Press [FUNC]+[REDIAL].
Step 3: Dial the number of the station to be alarmed.
Step 4: Enter the alarm time and duration.
Step 5: Press [SAVE] to exit.
Own Station Alarm
Step 1: Handset on Hook.
Step 2: Press [FUNC]+[9] (if it is the console, press [FUNC]+[9]+[9]).
Step 3: Enter the alarm time and duration.
Step 4: Press [SAVE] to exit.
24. INTERNAL CALLS
Call Operator
Step 1: Lift handset.
Step 2: Listen for dial tone.
Step 3: Dial [0] or [9] (programmable in Program Zone 201).
Handsfree Option
Step 1: Handset on Hook. Press [SPK].
Step 2: Dial the station number, or press the DSS key assigned for the called station.
Hot Call (Only available when Program Zone 508 is set for this station)
Step 1: Lift handset.
Step 2: The assigned station will be called automatically.
Manual Call (Only available when Program Zone 505, P=4 is enabled)
Step 1: Lift handset to call the operator.
Normal Call
Step 1: Lift handset, or press [SPK].
Step 2: Listen for dial tone and then dial required station number, or press the DSS key
assigned for the station number you wish to call, lift handset, or press [SPK].
Step 3: Listen for dial tone and then dial required station number.
25. LOCK/UNLOCK YOUR TELEPHONE
Lock/Unlock
Step 1: Handset on Hook.
Step 2: Press [FUNC]+[3].
Step 3: Enter your security number (maximum of 3 digits).
Step 4: The station will be automatically Locked/Unlocked.
Temporary Lock/Unlock
Step 1: Handset on Hook.
Step 2: Press [FUNC]+[4].
Step 3: Enter your security number (maximum of 3 digits).
Step 4: The station will be automatically Locked/Unlocked.
Note:If lose password, please refer to Zone 505
Arista Systems Corporation
12

26. LOCK/UNLOCK RS232 (Console Only)
Step 1: Lift handset, or press [SPK].
Step 2: Press [#]+[53] to lock or unlocked RS232.
27. MACRO KEY ASSIGNMENT (Console Only)
Step 1: Handset on Hook.
Step 2: Press [FUNC]+[7].
Step 3: Press one DSS key from [DSS16 ~ DSS25]. The key selected must be a key that
has not already been programmed as a Function Key in Program Zone 500.
Step 4: Press keys in sequence.
Step 5: Press [SAVE].
Example:
Step 1: Handset on Hook.
Step 2: Press [FUNC]+[7].
Step 3: Press [DSS15] which has not been programmed as a Function Key in Program
Zone 500.
Step 4: Press [FUNC]+[8]+[1] and then [SAVE]. [DSS15]will then be the Function Key for
Static Ringing Volume Control Setting in Station Function 42, Method 2. This means
that pressing [DSS15] will enable direct access to setting Static Ringing Volume level.
Cancel Macro Key (Console Only)
Step 1: Handset on Hook.
Step 2: Press [FUNC]+[7].
Step 3: Press the DSS key (from [DSS15 ~ DSS25]) which has been set as the Macro Key.
Step 4: Press [REDIAL].
28. MUTE
Step 1: During conversation on handset mode, press [SPK]. Your voice will not transmit
through the handset.
Step 2: To recover the conversation, press [SPK] again.
29. MESSAGE TEXT
Step 1: Handset on Hook.
Step 2: Press [FUNC]+[HOLD].
Step 3: Press [1 ~ 6] to select preferred message. Six different messages can be selected:
Message Text (dependent on EPROM Version):
TYPE A: TYPE B:
0 In A Meeting 0 Reserved
1 Do Not Disturb 1 Do Not Disturb
2At Lunch 2Back At
3Will Be Back 3Not in Office
4Call 4Return On
5Vacation 5Ring My Mobile
6Business Trip 6Call
Step 4: Press [SAVE]+[SPK] to confirm selection.
Arista Systems Corporation 13

Step 5: Once the message is selected the message will also be displayed on the LCD of a
calling station.
Step 6: Repeat Steps 1 and 2 and press [SPK] to cancel the message.
30. MORNING CALL
Individual Station Morning Call (Console Only)
Step 1: Handset on Hook.
Step 2: Press [FUNC]+[REDIAL].
Step 3: Dial the number of the station to be alarmed.
Step 4: Enter the alarm time and duration = 99.
Step 5: Press [SAVE].
Own Station Morning Call
Step 1: Handset on Hook.
Step 2: Press [FUNC]+[9] (if it is the console, press [FUNC]+[9]+[9])NOTE 15.
Step 3: Enter the alarm time and duration = 99.
Step 4: Press [SAVE]+SPK].
NOTE 15: If the duration is not 99 then the Morning Call function will become Alarm function.
31. OHCA
Step 1: Call a busy station which is on Handset Mode and with OHCA cabling installed.
Step 2: Press [1] to talk to the busy station through speaker and microphone. Busy
stationNOTE 17 must be a handsfree telephone.
NOTE 17: The busy station must be programmed to be an OHCA station in Program
Zone 502-ST-2=6.
32. OUTGOING CALLS
Automatic CO Access
Step 1: Lift handset or leave handset on Hook.
Step 2: Listen for Intercom Dial Tone (if not on Hook).
Step 3: Dial [9] or [0].
Step 4: Listen for CO line Dial Tone and then dial required telephone number.
Hot Call (Refer to Program Zone 508)
Step 1: Lift handset.
Individual CO Access
Step 1: Lift handset, or leave handset on Hook and press [SPK].
Step 2: Listen for Intercom Dial Tone.
Step 3: Press DSS button assigned for CO, or dial [#401] ~ [#408].
Step 4: Listen for CO line Dial Tone.
Step 5: Dial required telephone number.
33. OVERRIDE AND MONITOR
Cancel Override and Monitor
Arista Systems Corporation
14

Step 1: Handset on Hook.
Monitor
Step 1: Lift handset and dial number.
Step 2: If the station or CO line is busy, press [#].
Step 3: During monitoring, the monitoring party can hear the existing conversation from the
two monitored parties but the monitored parties cannot hear the monitoring party.
Override
Step 1: Lift handset and dial number.
Step 2: If the station or CO line is busy, press [0].
Step 3: An Override Tone will be heard on the overridden station.
Step 4: During overriding, three (3) parties can have a conference.
Note:Refer to Zone 504
34. PAGINGNOTE 18
All Internal and External
Step 1: Lift handset.
Step 2: Press [#]+[0].
All External
Step 1: Lift handset.
Step 2: Press [#]+[9].
All Internal
Step 1: Lift handset.
Step 2: Press [#]+[1].
Answer Paging
Step 1: Lift handset.
Step 2: Press [#]+[∗].
NOTE 18: When paging, you can broadcast the voice through the handset of the telephone
over the speaker of the Key Telephone for Internal Paging, or the external paging
device for External Paging.
External Zone
Step 1: Lift handset.
Step 2: Press [#]+[3]+[Zone Number 1~8].
Internal Zone
Step 1: Lift handset.
Step 2: Press [#]+[2]+[Zone Number 1~8].
Incoming Paging
External Party
Step 1: Assign the trunk in the system to be DISA trunk in Program Zone 604-CO-
03=1 or 2 or 3 or 8 on Day or Night.
Step 2: Set up the Password for the Incoming Paging Password in Program Zone 301-05.
For example, Zone 305-05=”23dddddd”.
Step 3: External party makes an incoming call to the system through DISA trunk.
Step 4: Once the system has answering the incoming call, the external call can dial [#]+[1],
followed by [Incoming Paging Password] to make paging to all internal stations. For
Example, dial [#123
Arista Systems Corporation 15

35. PICK UP
All Pick Up
Step 1: Lift handset or leave handset on Hook during other station ringing (only Key
Telephones can use this function when On Hook).
Step 2: Press [∗]+[0].
Group Pick Up
Step 1: Lift handset or leave handset on Hook during other station ringing (only Key
Telephones can use this function when On Hook).
Step 2: Press [∗]+[Group Number 1~8] when off Hook. Press [∗]+[2]+[Group
Number 1~8] with handset on Hook.
Incoming CO Pick Up
Step 1: Lift handset or leave handset on Hook during other station ringing (only Key
Telephones can use this function when On Hook).
Step 2: Press CO line number by [SPECIAL CODE]NOTE 1 on page 1 with handset, or press
[∗]+[4]+[CO line number] with handset on Hook.
Own Group Pick Up
Step 1: Lift handset or leave handset on Hook during other station ringing (only Key
Telephones can use this function when On Hook).
Step 2: Press [∗]+[1].
Station Pick Up
Step 1: Lift handset or leave handset on Hook during other station ringing (only Key
Telephones can use this function when On Hook).
Step 2: Press [Ringing Station Number]+[∗]with handset off Hook, or press
[∗]+[3]+[Ringing Station Number] with handset on Hook.
33. PULSE/TONE SWITCHING
Step 1: Access a Pulse outgoing line.
Step 2: Pressing the DSS key assigned for Pulse/Tone [P/T]NOTE 19 function in Program
Zone 500 which is the same as [MW] function will change Pulse outgoing to Tone
outgoing.
NOTE 19: Pulse/Tone switching function can only be from Pulse to Tone.
34. REDIAL
Auto-Redial
Step 1: The Busy or Ring Back tone will be heard when making an outgoing call.
Step 2: Press [SAVE] and the system will store the number dialed.
Step 3: Lift handset, or press [SPK] if using handsfree mode.
Step 4: Press [SPD]+[REDIAL] and the system will redial the stored number. During the
Save Redial, the [SAVE] LED will flash.
Last Number Redial
Step 1: Lift handset or leave handset on Hook.
Step 2: Press [REDIAL] and the system will automatically select a free CO line and dial the
last outgoing telephone number.
Arista Systems Corporation
16

35. RELEASING CALLS
Handset
Step 1: Hang up during or after the call is finished.
Handsfree
Step 1: Press [SPK] during or after the call.
External Call With Handset
Step 1: During or after the call, hang up or press [TRF/FL] key.
External Call Handsfree
Step 1: During or after the call, press [SPK] or [TRF/FL].
36. REVIEW STATION PRIME DATA
Step 1: Leave handset on Hook.
Step 2: Press [TRF/FL] once.NOTE 20
I1 : The software version number of A4IPUA in the 1st cabinet.
I2 : The software version number of A4IPUA in the 2nd cabinet.
I3 : The software version number of A4IPUA in the 3rd cabinet.
I4 : The software version number of A4IPUA in the 4th cabinet.
NOTE 20: Step 2 is only available when the system model number is “AV-256”; otherwise,
please skip Step 2 and go to Step 3 directly.
Step 3: Press [TRF/FL] once.
MMNOTE 21 :System Model Number.
C : System Data Status.
C=U →System Data has been programmed.
C=S→System Data has been reset to default.
SSSSNOTE 22: System Software version number.
P1P2P3 :Port Number where Key Station is located on Key Station or Hybrid
Station Interface. (Please refer to Program Zone 502-PORT-IP)
NOTE 21:
NOTE 22: The model number of the PCB where System Software is located:
Arista Systems Corporation 17
A
RISTEL AV-MM C
VER:SSSSPORT:P1P2P3
MM = 8 12 38 64 64H 256
System Model AV-8 AV-12 AV-38 AV-64 (8 slots) AV-64H (10 slots) AV-256
System Model AV-8 AV-12 AV-38 AV-64 (or 64H) AV-256
PCB Model A3MBUA A7MBUA A6MBUA A2MPUA A4MPUA
I1:VXXX I2:VXXX
I3:VXXX I4:VXXX

37. REVIEW RS232 STATUS (Console Only)
Step 1: Handset on Hook.
Step 2: Press [TRF/FL] twice (in AV-8/AV-12/AV-38/AV-64/64H), or press [TRF/FL] 3 times
(in AV-256).
SMDR is unlockNOTE 22
V
ER:SSSSPORT:P1P2P3
NOTE 22: If system’s RS232 output is locked will display “SMDR is lock”, if system’s RS232output is unlock will display ‘SMDR is unlock”
38. SPEED DIAL
Individual Speed Dial Programming
Step 1: Handset on Hook.
Step 2: Press [FUNC]+[SPD] (or [FUNC]+[SPD]+[2] if the phone is the console).
Step 3: Press DSS key, or enter [0~9] to access Individual Speed Dial CodeNOTE 23 area.
Step 4: Key in telephone number and press [SAVE].
Individual Speed Dial Operation
Step 1: Lift handset or leave handset on Hook.
Step 2: Press [SPD] and the Individual Speed Dial Code.
Step 3: Or first select a free CO line manually then press [SPD] and the Individual Speed Dial
Code.
NOTE 23: There are two types of Individual Speed Dial Codes:Numerical Code : [00] to [09]
DSS Code : [DSS1] to [DSS10]
Name Speed Dial Programming (Console Only)Step 1: Enable Program Zone 227=1.
Step 2: Off hook.
Step 3: Press [FUNC]+[SPD]+[S] (where S: Selecting Code [0~3]).
S=1 →System Speed Dial
S=2 →Individual Speed Dial
S=3 →Station Name Setting
Step 4: Press [DSS5] to switch the setting status between Code Setting and CO Line Setting
(optional).
Step 5: Enter the letterNOTE 24 by keying in the following numerical keys:
A = [2] H = [4][4] O = [6][6][6] V = [8][8][8]
B = [2][2] I = [4][4][4] P = [7] W = [9]
C = [2][2][2] J = [5] Q = [1] X = [9][9]
D = [3] K = [5][5] R = [7][7] Y=[9][9][9]
E = [3][3] L = [5][5][5] S = [7][7][7] Z=[1][1]
F = [3][3][3] M = [6] T = [8]
G = [4] N = [6][6] U = [8][8]
Arista Systems Corporation
18

NOTE 24: During entering of names, press [DSS3] to go back to the previous position or
[DSS4] to go forward to the next position to enter another letter.
Name Speed Dial Operation (Any Key Station)
Step 1: Assign a DSS key to be the Name Speed Dial function key in Program Zone 500 =
FUNC 74. For example, [DSS1].
Step 2: Lift handset.
Step 3: Press [DSS1]+Code [S] (where S: Selecting Code [0~3]).
S=1 →System Speed Dial
S=2 →Individual Speed Dial
S=3 →Station Name Setting
Step 4: Enter only the first character of the name.
System Speed Dial Programming (Console Only)
Step 1: Lift handset.
Step 2: Press [FUNC]+[SPD]+[1].
Step 3: Enter [SPD Code] and Item Number.
Step 4: Press [SAVE] to access Program Zone 404 for system speed dial assignment.
Step 5: Key in the required telephone number and press [SAVE].
System Speed Dial Operation
Step 1: Lift handset or leave handset on Hook.
Step 2: Press [SPD].
Step 3: Enter Speed Dial Code in Program Zone 404. The system will automatically select a
free CO according to the programming specification.
Step 4: Or select a free CO line manually then press [SPD] and enter the System Speed Dial
Code. If using Program Zone 227=0, then only the Station Code can be used.
Step 5: Press [DSS1] to confirm entry.
Step 6: Press [DSS1] to search for the previous name, or [DSS2] to search for the next
name.
Step 7: When the desired name has been selected, press [SPK] to run Name SPD function.
39. STATION OPERATION HELP LIST
Step 1: Handset on Hook.
Step 2: Press [FUNC]+[0] to display list of Station Operation Functions on the LCD of your
phone. Each function will be displayed on screen for 3 seconds before scrolling on to
the next function.
Step 3: Press [0] while the Station Operation Function is displayed to access that function.
40. TOLL PASSWORD
Step 1: Leave handset on Hook to select a free CO line.
Step 2: Press [FUNC]+[∗].
Step 3: Key in the Toll Password in Program Zone 301-04.
Step 4: Press [SAVE].
Step 5:After a one-second tone is heard, enter the outgoing long distance telephone number.
Arista Systems Corporation 19
Other manuals for AV-8
1
This manual suits for next models
5
Table of contents
Other Aristel Telephone manuals

Aristel
Aristel KP-30 User manual

Aristel
Aristel 50 Series User manual

Aristel
Aristel AV-96 User guide

Aristel
Aristel AV SERIES User manual

Aristel
Aristel SLT70 User manual

Aristel
Aristel DV-38 User manual

Aristel
Aristel Genius X2 User manual

Aristel
Aristel AV SERIES User manual

Aristel
Aristel DV-38 User guide

Aristel
Aristel IPX-100 User manual