Installation
Nimbus 4 & Nimbus Professional Mattress Replacement (MR)
Place the MR directly onto the bed base, with the tubeset and CPR
located at the foot end of the bed.
Use the fastener straps provided to attach the MR to
the bed frame.
To Complete Mattress Installation
Quick Start
When the Nimbus pump is switched on using the power switch, the
pump will run a self diagnostic check for approximately 3 seconds
during which all indicators will be illuminated.
The Wait and Low Pressure indicators will remain illuminated while
the mattress inflates.Allow approximately 15 minutes for the mattress
to inflate fully.
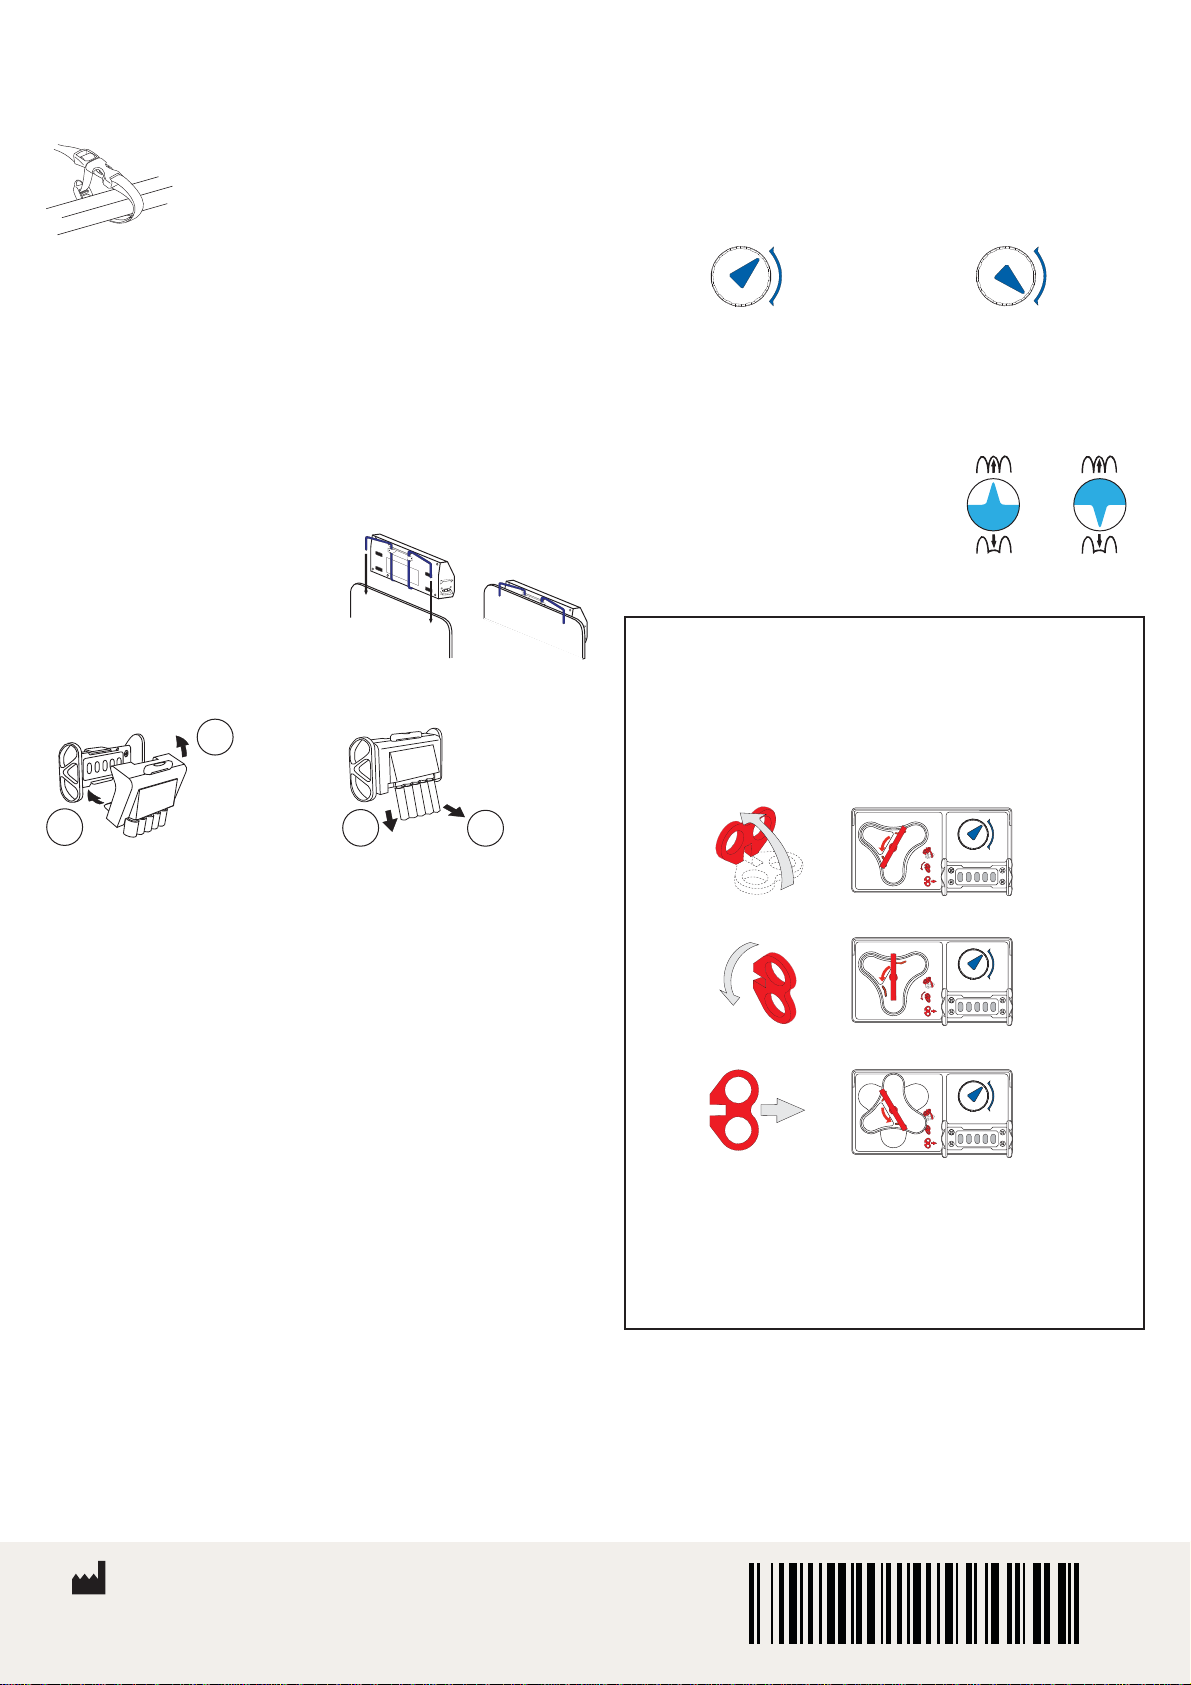
Transport Mode
To transport a patient using the Nimbus Professional mattress,
turn the Transport control at the foot end of the mattress clockwise
to Transport. Switch off the pump and disconnect the tubeset. In
this mode the mattress will support the patient for up to 12 hours.
To resume operation, reconnect the pump, turn the transport control
counterclockwise to Normal and switch on.
CPR CONTROL
IN THE EVENT OF CARDIAC ARREST
In the event of a patient suffering cardiac arrest and CPR
needing to be administered:
To Activate the CPR:
1. Lift the red handle on the control panel at foot end of the
mattress.
SAFETY SIDES
Regarding the use of safety sides, always refer to your local trust
policy AND the product instructions for use.
If the bed has divided sections for independent elevation
of a patient’s head and/or knees, attach the mattress
to the movable parts of the bed frame only.
Zip the protective cover over the mattress. Make sure that theArjo logo
is uppermost and at the foot end of the mattress.
Check that the transport control is set to Normal and the CPR control
is closed and locked in position.
Make sure that the mains power cable and tubeset are positioned to avoid
causing a trip or other hazard, and are clear of moving bed mechanisms
or other possible entrapment areas. Where cable management flaps
are provided along the sides of the mattress, these should be used to
cover the mains power cable.
The CPR control must be visible and accessible at all times.
If the pump is to be hung from the end
of the bed, attach the bed bracket to
the bed frame.
Alternatively the pump can be placed
underneath the bed, either upright or
lying on its back.
Make sure the tubeset is securely connected to the pump and the
mattress.
Insert the mains power connector into the socket on the side of the
pump. Connect the mains power cable to a suitable mains power outlet.
2. Turn the handle counterclockwise.
3. Pull the handle away from the panel.
To Reset the CPR:
1. Turn the grey triangular seal clockwise and push onto the
connectors.
2. Turn the red handle clockwise.
3. Fold the handle flat to lock in position.
Vent Valve Control
To deflate a cell, turn the Vent Valve 180°
clockwise, to point downwards.
Refer to “Guidelines for Selecting Mattress
Vent Valves to Open” in the “Operation”
section of the product instructions for use.
649934EN_04: 05/2019
4. The grey triangular seal will rotate and the air will rapidly
exhaust from the mattress.
To Connect
Tubeset To Disconnect
Tubeset
1
2
1
2
Warning: Do not place the patient on the mattress until it is
fully inflated and normal operating pressure has been
reached.
Once the mattress is fully inflated, the Wait and Low Pressure indicators
will extinguish. Place a bed sheet over the mattress and tuck in loosely.
Once the patient is on the mattress, the pump will automatically sense
and adjust the pressure in the cells to support the patient.
Transport
Mode
Normal
Transport
Normal
Mode
Normal
Transport
The Nimbus 4 has 5 cells with Vent Valves at the foot end. The
Nimbus Professional has 19 cells all with Vent Valves (the shoulder
support cell has no Vent Valve and cannot be deflated).
Closed Open
CPR
1
3
NORMAL
TRANSPORT
2
FAST DEFLATE
CPR
1
3
NORMAL
TRANSPORT
2
FAST DEFLATE
1
3
NORMAL
TRANSPORT
2
FAST DEFLATE
CPR
ArjoHuntleigh AB
Hans Michelsensgatan 10
211 20 Malmö, Sweden
www.arjo.com
® and ™ are trademarks belonging to the Arjo group of companies.
© Arjo 2019.
As our policy is one of continuous improvement, we reserve the right to modify designs without prior notice.
The content of this publication may not be copied either whole or in part without the consent of Arjo.


