manuals.online logo
Brands
  1. Home
  2. •
  3. Brands
  4. •
  5. Assa Abloy
  6. •
  7. Door Opening System
  8. •
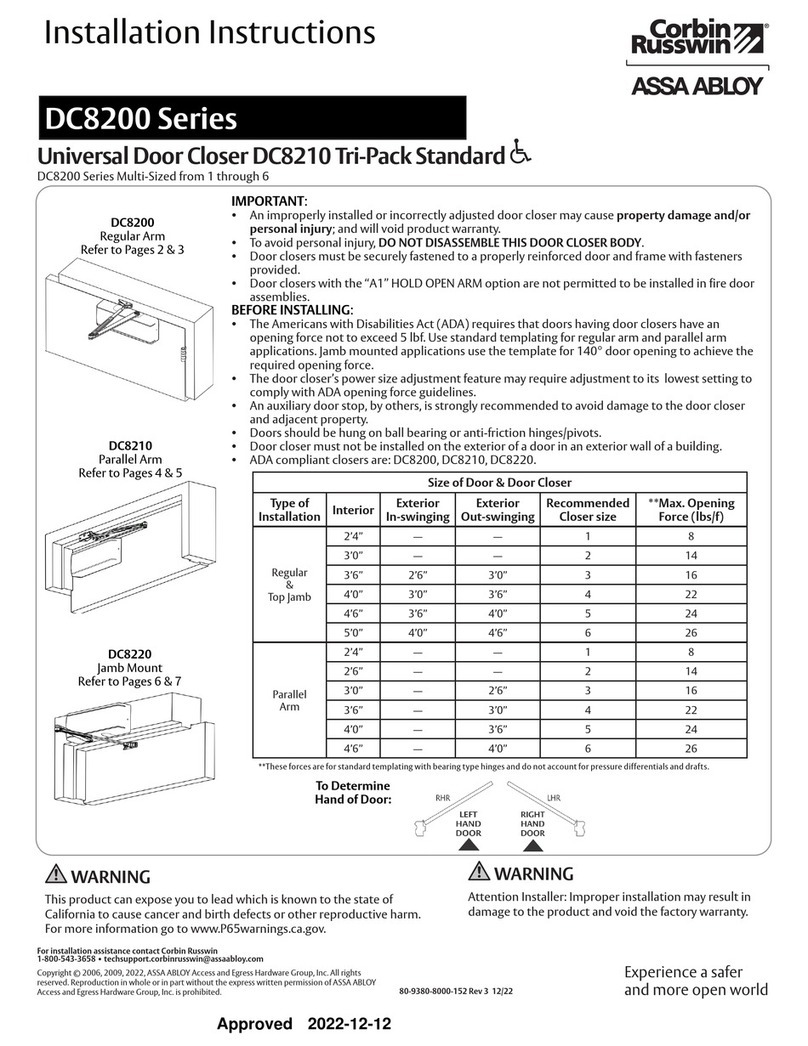
  9. Assa Abloy Lockwood L7714SDSIL User manual

Assa Abloy Lockwood L7714SDSIL User manual

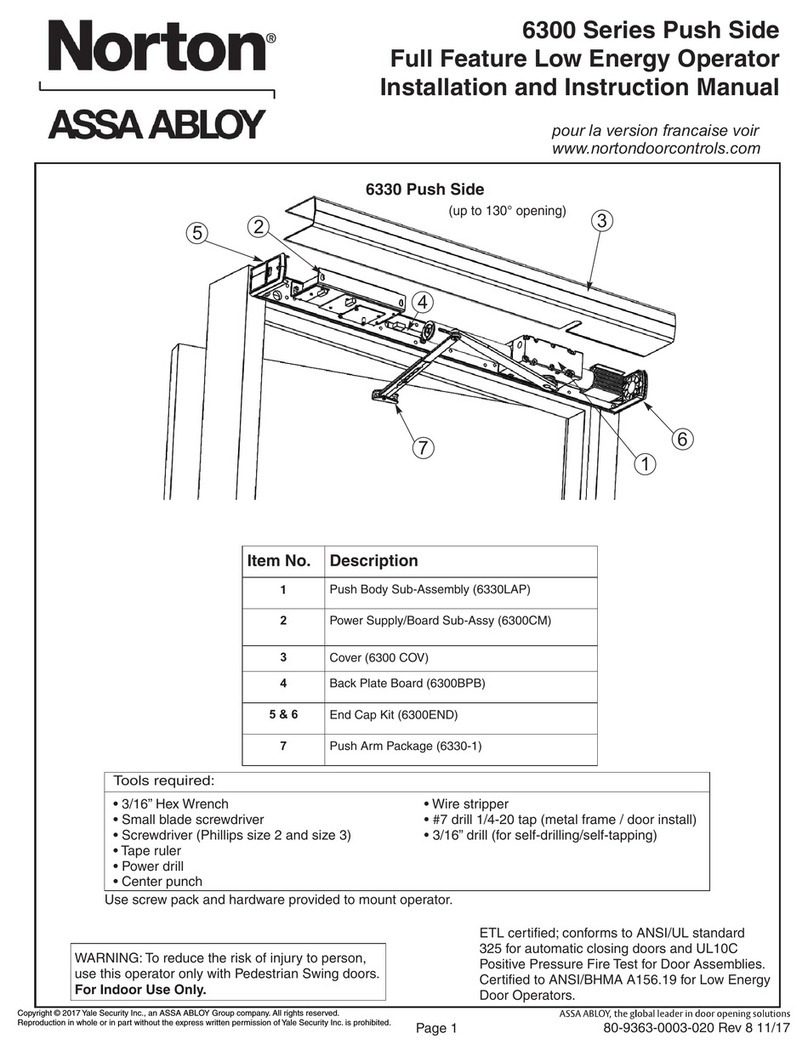
L7714SDSIL Sliding Door Closer
1 x Door Closer
Installation Instructions
Application: Automatically closes sliding doors.
Door Specifications:
• Maximum Door Height 2500mm
• Maximum Door Width 1200mm
• Maximum Door Weight 60kg
• Minimum Reveal Depth
(Door Frame Thickness) 70mm
Tools Required:
• 5mm Hexagonal Allen Key
• Adjustable Spanner
• Drill
• 2.5mm Drill Bit
• 3.0mm Drill Bit
• Phillips Screwdriver
• Flat Head Screwdriver
Pack Contents
1 x Bent Arm
1 x Straight Arm
1 x 800mm Track
4 x Track Fixing
Screws
1 x Spacer
4 x Closer
Mounting Screws
1 x Wheel and Axle1 x Wheel Cover
4 x Arm Screws
2. ASSEMBLE THE DOOR CLOSER AND
STRAIGHT ARM
• Place the spacer onto the square
drive shaft.
• Secure the straight arm onto the Closer
unit using the arm screw.
Note: Arm Orientation - The Straight Arm
square hole has been designed with a 10º
pre-load. Ensure that the straight arm
points away from the side of the closer that
the cover plate attaches to.
3. MARK POSITION
• Measure half the length of the
stationary panel and with a pencil draw
a line 90˚ on the reveal.
• Cut out the template supplied over
page. Align the edge of the template
against the line you drew on the side
facing away from the sliding panel.
• Mark the position of the screw holes
according to the template and drill
ø3mm holes.
4. INSTALL THE DOOR CLOSER
• Install the Door Closer onto the timber
door reveal using the closer mounting
screws
5. INSTALL THE TRACK
Note: Remove screw cover plug on
the back of the door panel before
attaching track.
• Line up the track with the edge of the
sliding door recess and flush with the
inside surface of the sliding panel.
• Drill four ø2.5mm holes into the back
of the door.
• Secure the top of the track only with
two of the four track fixing screws.
Note: To secure position - A length of
double sided tape will help hold the track in
position while drilling holes.
077704 0807-1
8. ASSEMBLE THE WHEEL ONTO THE
BENT ARM
• Place a spanner around the axle to hold
it stationary and fix the arm
screw tightly.
9. SECURE THE BENT ARM ONTO THE
STRAIGHT ARM
• Loosely do up the arm screws in two
of the four holes provided, as far apart
as possible.
• Adjust the overall length of the arm
assembly so that it stays horizontal
when the door is closed, without
hitting the timber reveal.
• Tighten the screws fully.
Note: Important - Attempt to do this only
once as the tightened screws will damage
the surface finish.
10. ADJUST SPEED
• Use a flat head screwdriver to adjust
the speeds.
• Use a 5mm hexagonal allen key to
adjust the power.
• Check the operation of the door and
readjust as necessary.
Note:
Backcheck Adjustment: Increases or
decreases cushioning when opening the door
Delayed Action: Increases or decreases hold
open time
Closing Speed: Adjusts the speed at which the
door closes
Latching Speed: Adjusts the speed at the end
of the closing operation
7. FIX TRACK
• Fix the bottom of the track in position
using 2 x track fixing screws.
1. BEFORE BEGINNING, MAKE SURE THAT THE SLIDING DOOR IS CLEAN AND FREE SLIDING. Clean dust and debris from the track. See reverse for the sliding door troubleshooting guide.
6. MOUNT THE WHEEL ONTO
THE TRACK
• Slide the wheel, axle and wheel cover
up into the track from the bottom.
Note: Ensure axle is pointing out away
from glass.
11. FINISHING
• Slide closer cover into position.
• Press cap over exposed square
spindle.
These surfaces flush
L7714SDSIL Sliding Door Closer
GUARANTEE
ASSA ABLOY Australia Pty Limited (“ASSA ABLOY”) warrants its Lockwood products against defects in workmanship and materials, subject to the limitations and exclusions set out in this Warranty. If, within the normal
working life of a product, it is found to be defective, and none of the limitations and exclusions set out in this Warranty apply, ASSA ABLOY will supply the same or equivalent product free of charge. This is the only remedy
granted by ASSA ABLOY under this Warranty. Limitations: All electrical and electronic components used in ASSA ABLOY’s Lockwood range of products (excluding batteries) are guaranteed for a period of 12 months from
the date of proof of purchase, unless stated otherwise. Exclusions: This Warranty does not cover: 1. Damage to or malfunction or failure of the Lockwood product caused or contributed to by: (a) improper installation or
failure to follow fitting instructions; (b) improper maintenance; (c) fair wear and tear; (d) any modification or repair which has not been authorized by ASSA ABLOY; (e) use of substitute or replacement parts or cylinders
other than genuine ASSA ABLOY parts or cylinders; or (f) use of batteries other than those specified by ASSA ABLOY. 2. The cost of: (a) removal and/or replacement of the Lockwood product; (b) freight and/or travelling
time; (c) replacement batteries; or (d) any modification or repairs to a Lockwood product, unless authorised by ASSA ABLOY. 3. Damage to or deterioration of the plated finishes Florentine Bronze, Architectural Bronze,
Polished Brass, Gold and Satin Brass, which are classified as soft finishes, and are subject to deterioration under some environmental conditions. 4. Personal injury, property damage or economic loss, however caused.
SymmetryTM 5 Year Finish Warranty ASSA ABLOY Australia Pty Limited will replace five-year branded Symmetry product if within five years from the proven date of purchase it tarnishes, discolours or corrodes when
properly installed and subject to no more than fair wear and tear.
SymmetryTM Everbrass® Warranty Everbrass® product is coated both on the exterior and interior surfaces with a lifetime anti-tarnish finish. ASSA ABLOY Australia Pty Limited will replace Everbrass® branded product if it
corrodes, tarnishes or discolours when properly installed and subject to no more than fair wear and tear.
This Warranty is in addition to and not in substitution for any rights of the purchaser under the Trade Practices Act and state or territory legislation.
Screw Hole Template
To Use
• Cut out the template following the perforated line
• Follow Step 3.
Template
SLIDING DOOR TROUBLESHOOTING GUIDE
Problem Reason Possible Remedy
Door does not close at all. Closer speed adjustment screws (B) are wound in too far. Adjust as per Step 10.
Power adjustment set too low. Adjust as per Step 10.
Debris caught beneath the sliding door. Clean the track using vacuum cleaner and ensure it is free of debris.
Rollers do not roll properly. Adjust rollers if possible, otherwise contact your door maintenance
service company.
Sliding Door brush seals are too stiff Contact your door maintenance service company.
Door slams shut. Incorrect adjustment of latching speed (A). Adjust latching speed screw (A) to slow final closing.
Full door opening movement
restricted.
Backcheck adjustment is wrong. Adjust backcheck adjustment screw (C) fully to minus (-) as per Step 10.
100.0
ø3.0 DRILL
30.0
30.0
42.5
ALIGN THIS EDGE WITH INSIDE EDGE OF REVEAL (WHERE TIMBER MEETS ALUMINIUM)
Cut Out Carefully
ALIGN THIS EDGE WITH CENTRE MARKED ON REVEAL
Patent: NZ 556113
ASSA ABLOY New Zealand Limited
6 Armstrong Road, Albany, North Shore City 0632
www.assaabloyasiapacific.com

Other Assa Abloy Door Opening System manuals

Assa Abloy Norton 5700 Series User manual

Assa Abloy

Assa Abloy Norton 5700 Series User manual

Assa Abloy Norton 6300 Series User manual

Assa Abloy

Assa Abloy Norton 6300 Series User manual

Assa Abloy Corbin Russwin PED159 User manual

Assa Abloy

Assa Abloy Corbin Russwin PED159 User manual

Assa Abloy Norton 5700 Series User manual

Assa Abloy

Assa Abloy Norton 5700 Series User manual

Assa Abloy SARGENT 1431 Series User manual

Assa Abloy

Assa Abloy SARGENT 1431 Series User manual

Assa Abloy SARGENT 281 Series User manual

Assa Abloy

Assa Abloy SARGENT 281 Series User manual

Assa Abloy Yale 6000 Series User manual

Assa Abloy

Assa Abloy Yale 6000 Series User manual

Assa Abloy G-CO-CS User manual

Assa Abloy

Assa Abloy G-CO-CS User manual

Assa Abloy Corbin Russwin PED5400 FE User manual

Assa Abloy

Assa Abloy Corbin Russwin PED5400 FE User manual

Assa Abloy SARGENT 351 Series User manual

Assa Abloy

Assa Abloy SARGENT 351 Series User manual

Assa Abloy Norton 7540ST Series User manual

Assa Abloy

Assa Abloy Norton 7540ST Series User manual

Assa Abloy DC140 User manual

Assa Abloy

Assa Abloy DC140 User manual

Assa Abloy SW60 Manual

Assa Abloy

Assa Abloy SW60 Manual

Assa Abloy Norton 6300 Series User manual

Assa Abloy

Assa Abloy Norton 6300 Series User manual

Assa Abloy SARGENT FIREGUARD 2499 User manual

Assa Abloy

Assa Abloy SARGENT FIREGUARD 2499 User manual

Assa Abloy CloserPlus Ramp Norton XF460 User manual

Assa Abloy

Assa Abloy CloserPlus Ramp Norton XF460 User manual

Assa Abloy Norton 9300BCH User manual

Assa Abloy

Assa Abloy Norton 9300BCH User manual

Assa Abloy RIXSON SMOK-CHEK V 0101 User manual

Assa Abloy

Assa Abloy RIXSON SMOK-CHEK V 0101 User manual

Assa Abloy SW100 User manual

Assa Abloy

Assa Abloy SW100 User manual

Assa Abloy Norton 7500H Series User manual

Assa Abloy

Assa Abloy Norton 7500H Series User manual

Assa Abloy Norton 7700ST User manual

Assa Abloy

Assa Abloy Norton 7700ST User manual

Assa Abloy Corbin Russwin DC6200 Series User manual

Assa Abloy

Assa Abloy Corbin Russwin DC6200 Series User manual

Assa Abloy NORTON RIXSON 5200 Series User manual

Assa Abloy

Assa Abloy NORTON RIXSON 5200 Series User manual

Assa Abloy RD150-3 User manual

Assa Abloy

Assa Abloy RD150-3 User manual

Popular Door Opening System manuals by other brands

Eco FSA ECO SR-EFR BG Assembly instruction

Eco

Eco FSA ECO SR-EFR BG Assembly instruction

Scrigno antamatic OPEN 2.0 installation manual

Scrigno

Scrigno antamatic OPEN 2.0 installation manual

Dorex DX KA installation instructions

Dorex

Dorex DX KA installation instructions

Dormakaba UNIVERSAL GK 30 Mounting instructions

Dormakaba

Dormakaba UNIVERSAL GK 30 Mounting instructions

CAME FA01467M4A quick start guide

CAME

CAME FA01467M4A quick start guide

Resolution Products RE102 quick guide

Resolution Products

Resolution Products RE102 quick guide

Dorma ITS 96 Fixing instructions

Dorma

Dorma ITS 96 Fixing instructions

Criminalistics Premier Canine System Plus manual

Criminalistics

Criminalistics Premier Canine System Plus manual

Sanela SLZA 30AZ Instructions for use

Sanela

Sanela SLZA 30AZ Instructions for use

Chamberlain T user guide

Chamberlain

Chamberlain T user guide

Record DFA 127 instructions

Record

Record DFA 127 instructions

LCN 4050 Series installation instructions

LCN

LCN 4050 Series installation instructions

CDVI Digiway SR Easy start guide

CDVI

CDVI Digiway SR Easy start guide

samet slidea manual

samet

samet slidea manual

Johnson Controls MC-302E PG+ installation guide

Johnson Controls

Johnson Controls MC-302E PG+ installation guide

Portalp SW10 installation guide

Portalp

Portalp SW10 installation guide

Häfele Finetta Flatfront M35 FB Assembly and adjustments

Häfele

Häfele Finetta Flatfront M35 FB Assembly and adjustments

Dorma 8900 DS quick start guide

Dorma

Dorma 8900 DS quick start guide

manuals.online logo
manuals.online logoBrands
  • About & Mission
  • Contact us
  • Privacy Policy
  • Terms and Conditions

Copyright 2025 Manuals.Online. All Rights Reserved.