BEGA Gantenbrink-Leuchten KG · Postfach 31 60 · 58689 Menden · info@bega.com · www.bega.com
Bitte beachten Sie:
Den im Leuchtengehäuse bendlichen
Trockenmittelbeutel nicht entfernen.
Er dient zur Aufnahme von Restfeuchtigkeit.
Please note:
Do not remove the desiccant pouch from the
luminaire housing.
It is needed to remove residual moisture.
Attention :
Ne pas ôter le sachet de dessicant se trouvant
dans l’armature.
Il permet d’absorber l’humidité résiduelle.
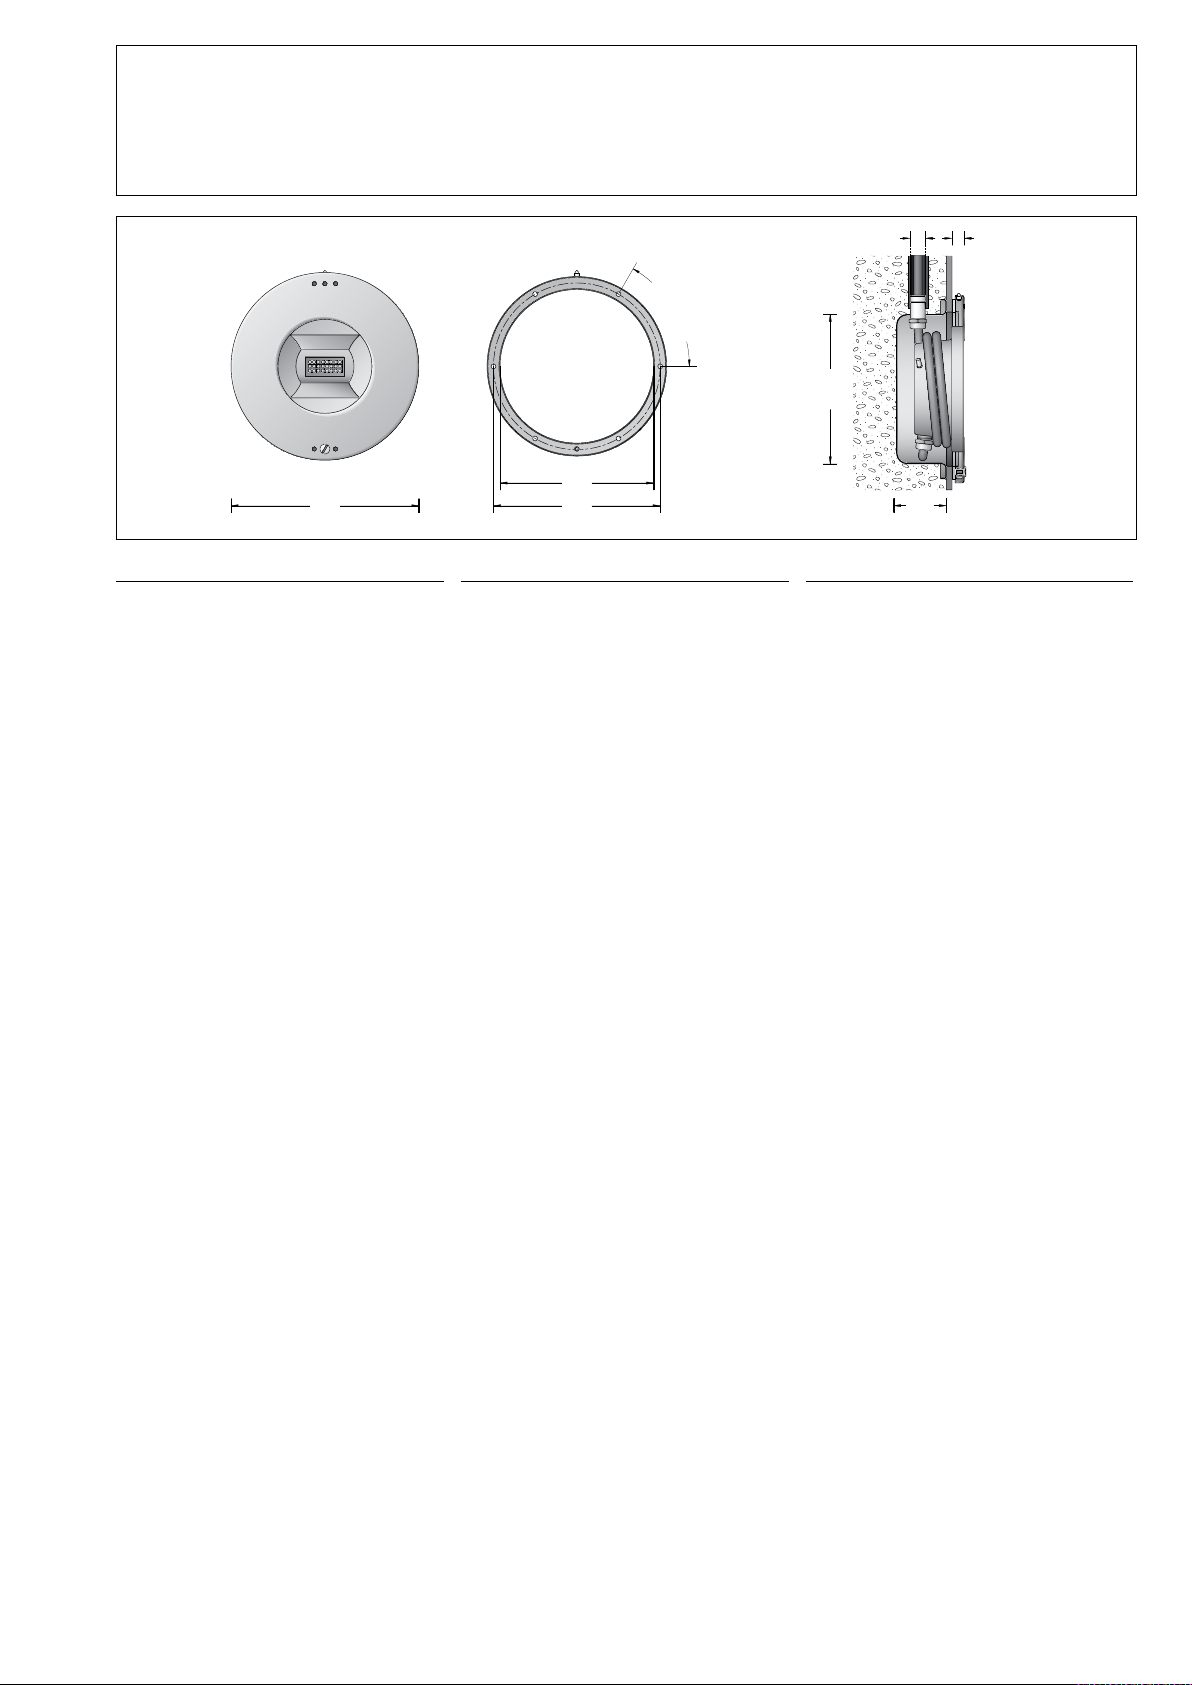
Austausch des LED-Moduls
Die Bezeichnung des LED-Moduls ist auf einem
Etikett in der Leuchte vermerkt.
BEGA Ersatzmodule entsprechen in Lichtfarbe
und Lichtleistung den ursprünglich verbauten
Modulen.
Der Austausch kann mit handelsüblichem
Werkzeug durch qualizierte Personen erfolgen.
Anlage spannungsfrei schalten.
LED sind hochwertige elektronische
Bauteile! Bitte vermeiden Sie während des
Auswechselns eine direkte Berührung der
LED-Lichtaustrittsäche mit den Händen.
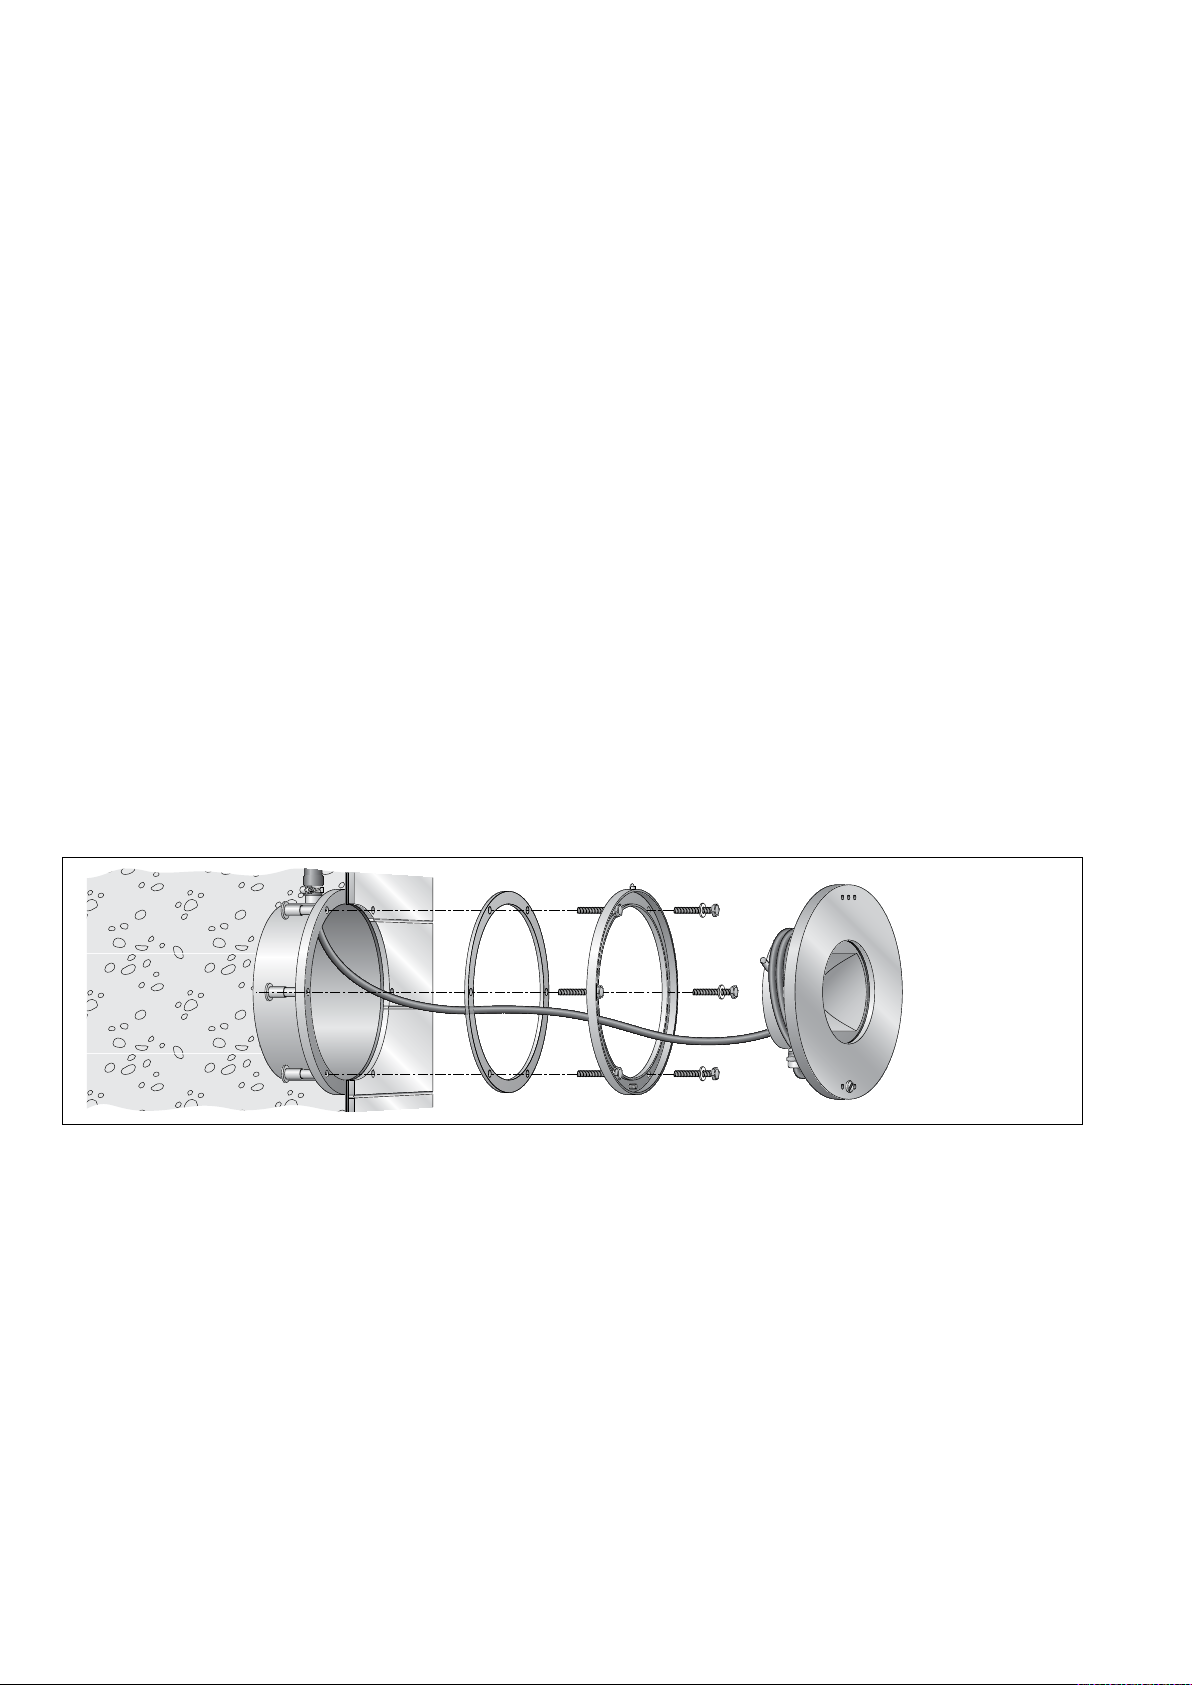
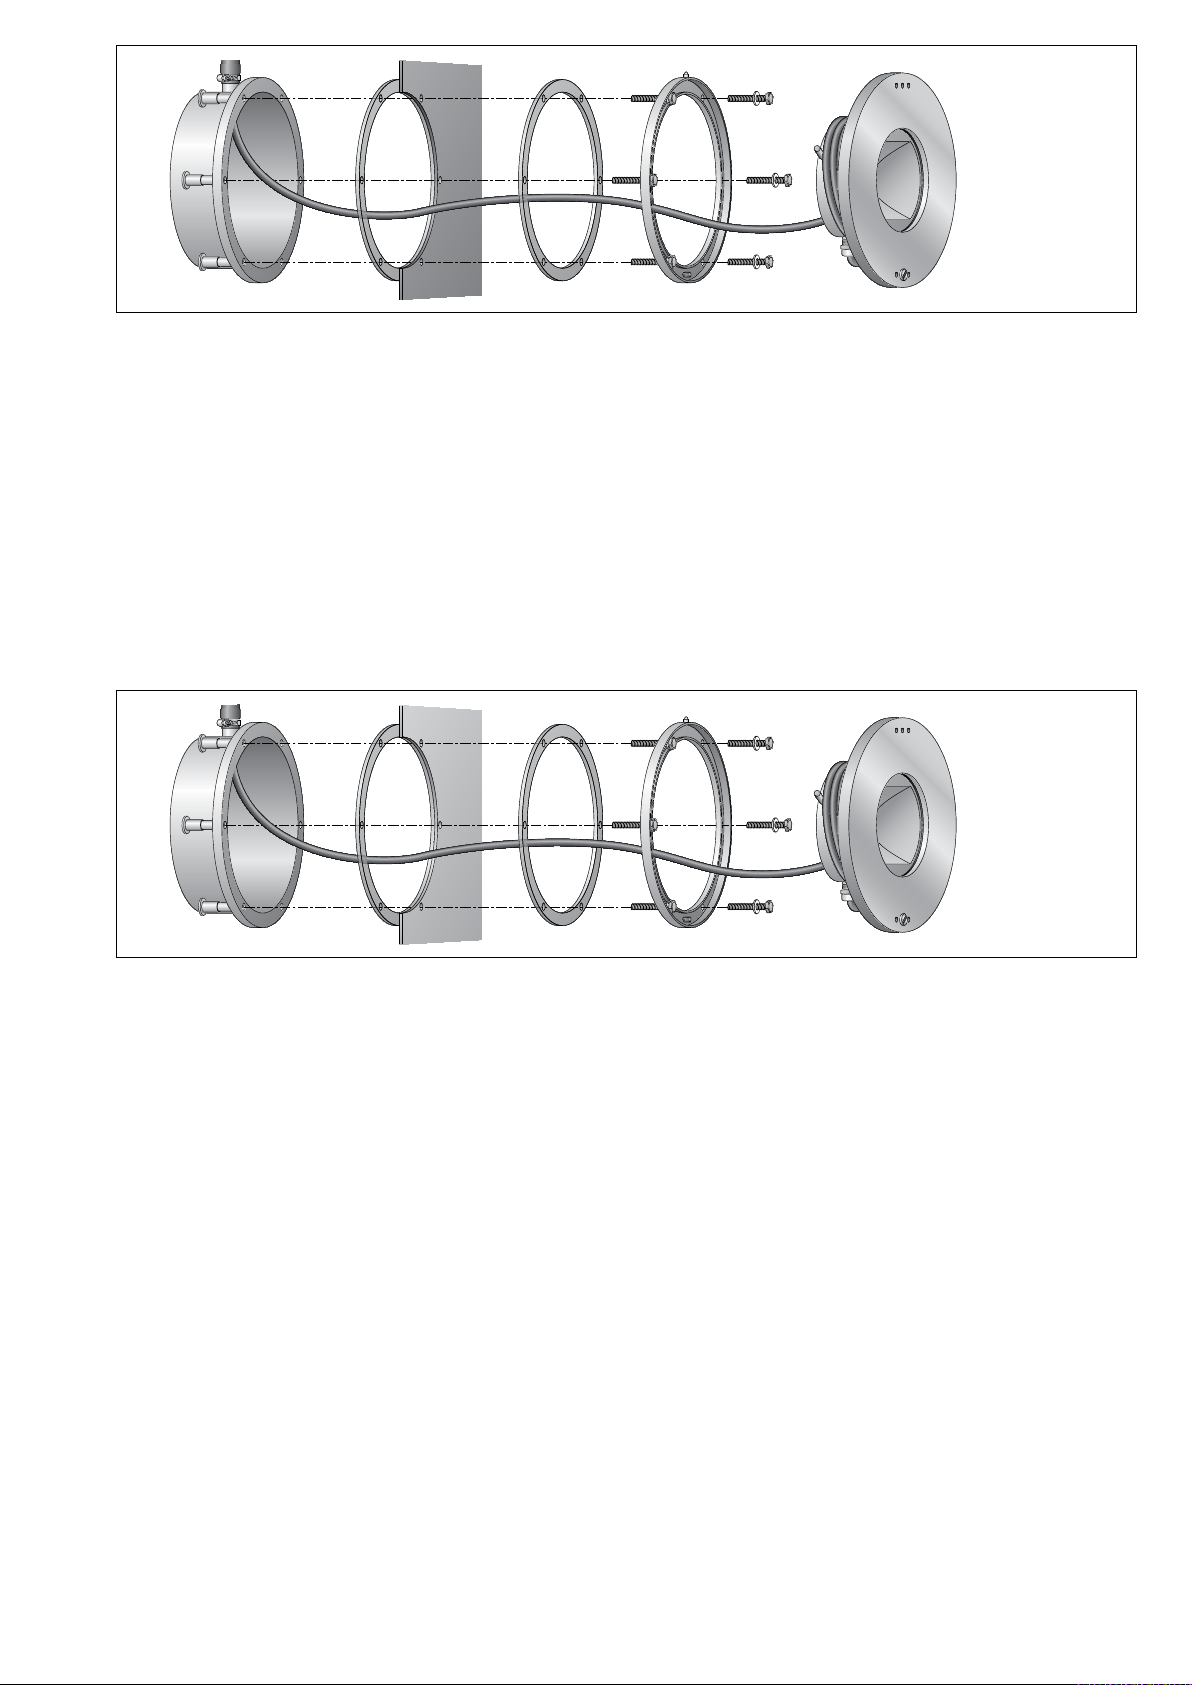
Drehteil mit beigefügtem Schraubendreher
lösen. Lampengehäuse aushängen, Leitung
abwickeln und Leuchtengehäuse über
den Beckenrand heben. Zum Öffnen des
Lampengehäuses Muttern lösen.
Reektor demontieren.
LED-Modul austauschen.
Montagehinweise des LED-Moduls beachten.
Den im Leuchtengehäuse bendlichen
Trockenmittelbeutel nicht entfernen.
Er dient zur Aufnahme von Restfeuchtigkeit.
Anschlussleitung und Dichtungen überprüfen,
ggf. ersetzen.
Lampenraum, Glas und Dichtächen reinigen
und trocknen. Bitte beachten Sie hierzu die
Hinweise unter – Reinigung · Pege –.
Reektor einlegen. Dichtung mit Glas über die
Gewindebolzen vom Abdeckring setzen. Auf
richtigen Sitz der Dichtung achten.
Abdeckring mit Dichtung und Glas auf
Lampentopf auegen. Dabei Lage der
Leitungs-verschraubung und Drehteil beachten
(siehe Zeichnung). Lampentopf mit Abdeckring
dicht verschließen. Muttern über Kreuz
gleichmäßig fest anziehen.
Anzugsdrehmoment = 2 Nm.
Leitung um Lampentopf wickeln.
Lampengehäuse auf Zapfen einhängen und
Drehteil mit beigefügtem Schraubendreher
anziehen.
Replacing the LED module
The designation of the LED module is noted on
a label in the luminaire.
The light colour and light output of BEGA
replacement modules correspond to those of
the modules originally tted.
The module can be replaced by qualied
persons using standard tools.
Disconnect the electrical installation.
LED are high-quality electronic components !
Please avoid touching the light output opening
of the LED directly during relamping.
Undo swivel using enclosed screw driver.
Take out complete lamp housing and lift onto
the pool side.
To open the lamp housing undo nuts.
Disassemble reector.
Replace LED-Module. Note installation
instructions of the LED module.
Do not remove the desiccant pouch from the
luminaire housing.
It is needed to remove residual moisture.
Check connecting cable and gaskets and
replace if necessary.
Clean and dry lamp compartment, glass and
sealing surface. Please note the instructions
under – cleaning · maintenance –
Insert reector.
Place gasket with glass over the threaded bolts
of the cover-ring. Make sure that gasket is
positioned correctly.
Place cover ring with gasket and glass onto
lamp housing. Note position of screw cable
gland and swivel (refer to drawing).
Tightly closely the lamp housing with cover
ring. Tighten rmly nuts crosswise.
Torque = 2 Nm.
Wind the cable round the lamp housing.
Hook the lamp housing onto the locating pin
and tighten swivel using enclosed screw driver.
Remplacement du module LED
La désignation du module LED est inscrite sur
une étiquette collée dans le luminaire.
Les modules de rechange BEGA
correspondent aux modules d’origine en
termes de couleur de lumière et de ux
lumineux. Le module LED peut être remplacé
par une personne qualiée à l’aide d’outils
disponibles dans le commerce.
Débrancher l’installation.
Les LED sont des composants électroniques
de haute précision!
Eviter de toucher la surface de diffusion des
LED avec les doigts pendant le remplacement.
Desserrer la vis en utilisant le tournevis fourni.
Extraire le boîtier-lampe et le déposer sur le
bord du bassin. Pour ouvrir le boîtier-lampe
desserrer les écrous.
Démonter le réecteur.
Remplacer le module LED. Respecter la che
d’utilisation du module LED.
Ne pas ôter le sachet de dessicant se trouvant
dans l’armature.
Il permet d’absorber l’humidité résiduelle.
Vérier le câble de raccordement et les joints,
le cas échéant remplacer si endommagés. Bien
nettoyer et sécher le compartiment lampe, le
verre et les surfaces des joints.
Voir – nettoyage – maintenance.
Poser le réecteur sur la cheville de centrage.
Installer le joint avec le verre monté sur les
tiges letées de l’anneau. Veiller au bon
emplacement du joint.
Poser l’anneau avec le joint et le verre sur
le boîtier-lampe. Vérier le positionnement
du presse-étoupe et de la vis (voir schéma).
Serrer de façon étanche le boîtier-lampe avec
l’anneau.
Visser fermement et en diagonale les écrous.
Moment de serrage = 2 Nm.
Enrouler le câble autour du boîtier-lampe.
Suspendre le boîtier-lampe dans l’ergot de
xation et serrer avec la vis en utilisant le
tournevis fourni.
Reinigung · Pege
Um Oberächenschäden auf der Schwimm-
badleuchte zu vermeiden, muss das Wasser
einen neutralen ph-Wert haben und frei von
metallangreifenden Bestandteilen sein.
(Anforderung nach DIN 19643-1)
Sollten sich dennoch Verfärbungen und
Ablagerungen von Feststoffen auf der
Leuchte bilden, müssen diese mit geeigneten
Edelstahlreinigern entfernt werden.
Bei Reinigungsarbeiten am Schwimmbecken,
darf die Leuchte nicht mit metallangreifenden
Reinigungsmitteln oder Säure in Berührung
kommen. Es dürfen keine Hochdruckreiniger
verwendet werden.
Cleaning · Maintenance
To avoid damages on the surface of the
swimming pool luminaire, the water must have
a neutral pH-value and should be free from
metal attacking ingredients.
(Requirements according to DIN 19643-1)
However, in case of discolourations and
deposits of solid materials on the luminaire,
same must be removed by using suitable
stainless steel cleansers.
When cleaning the pool the luminaire must not
come in contact with metal affecting cleansers
or acid.
For cleaning do not use high pressure cleaners.
Nettoyage · Entretien approprié
An d’éviter toute dégradation de l’enveloppe
du luminaire de piscine, l’eau de la piscine doit
avoir une valeur pH neutre et ne pas contenir
de substances attaquant le métal.
(Exigences sur DIN 19643-1)
Dans le cas de formation de taches ou de
dépôts d’autres produits sur le luminaire, ils
doivent être nettoyés avec des produits
d’entretien usuels pour l’acier inoyxdable.
Lors du travaux de nettoyage du bassin le
luminaire ne doit en aucun cas se trouver
en contact avec des produits de nettoyage
attaquant le métal ou avec des solutions
d’acide chlorydrique.
Ne pas utliliser de nettoyeur haute pression.
Ergänzungsteile
BEGA Sicherheitstransformatoren nach
DIN EN 61558/VDE 0570, Teil 2-6
70 565 Netzteil für 0- 35 W
70 566 Netzteil für 0- 50 W
70 567 Netzteil für 0- 75 W
70 169 Netzteil für 0- 150 W
Accessories
BEGA Safety transformers according to
DIN EN 61558/VDE 0570, part 2-6
70 565 Power supply unit for 0- 35 W
70 566 Power supply unit for 0- 50 W
70 567 Power supply unit for 0- 75 W
70 169 Power supply unit for 0- 150 W
Accessoires
Transformateurs de sécurité BEGA selon
DIN EN 61558/VDE 0570, partie 2-6
70 565 Boîtier d’alimentation pour 0 - 35 W
70 566 Boîtier d’alimentation pour 0 - 50 W
70 567 Boîtier d’alimentation pour 0 - 75 W
70 169 Boîtier d’alimentation pour 0 - 150 W
70 223 Einbauverteilerdose
für den Einbau in Fußböden oder
in Wänden. Für die Installation
von Leitungen für Verbraucher in
Schutzklasse III
70 223 Recessed distribution box
for ush installation into oors or in
walls. For the installation of cable for
the swimming pool luminaire safety
class III
70 223 Boîte de dérivation à encastrer
pour encastrement dans le sol ou les
murs. Pour le câblage de projecteurs
de piscine de classe de protection III
Zu den Ergänzungsteilen gibt es eine
gesonderte Gebrauchsanweisung. For the accessories a separate instructions
for use can be provided upon request. Une che d’utilisation pour ces accessoires est
disponible.
Ersatzteile
Ersatzglas 14 015 8
Drehteil M5 51 252 7
PVC-Schutzschlauch ø 28x3,5 62 025 0
LED-Modul 3000 K LED-0400/830
PG-Endverschraubung 75 021 5V
Reektor 761235
Dichtung Flansch 82 029 5
Dichtung Glas 83 080 6
Spares
Spare glass 14 015 8
Captive nut M5 51 252 7
PVC-safety hose ø 28x3,5 62 025 0
LED module 3000 K LED-0400/830
Additional PG screw gland 75 021 5V
Reector 761235
Gasketange 820295
Gasketglass 830806
Pièces de rechange
Verre de rechange 14 015 8
Ecrou M5 51 252 7
Gaine PVC de protection ø 28x3,5 62 025 0
Module LED 3000 K LED-0400/830
PE supplémentaire 75 021 5V
Réecteur 761235
Jointdelaasque 820295
Joint du verre 83 080 6