FC80AC
03/22-01 PC
LE13411AA
BTicino SpA – Viale Borri, 231 – 21100 Varese – Italy – www.bticino.com
• Descrizione
• Description
• Description
• Beschreibung
• Descripción
• Beschrijving
• Descrição
• Описание
•
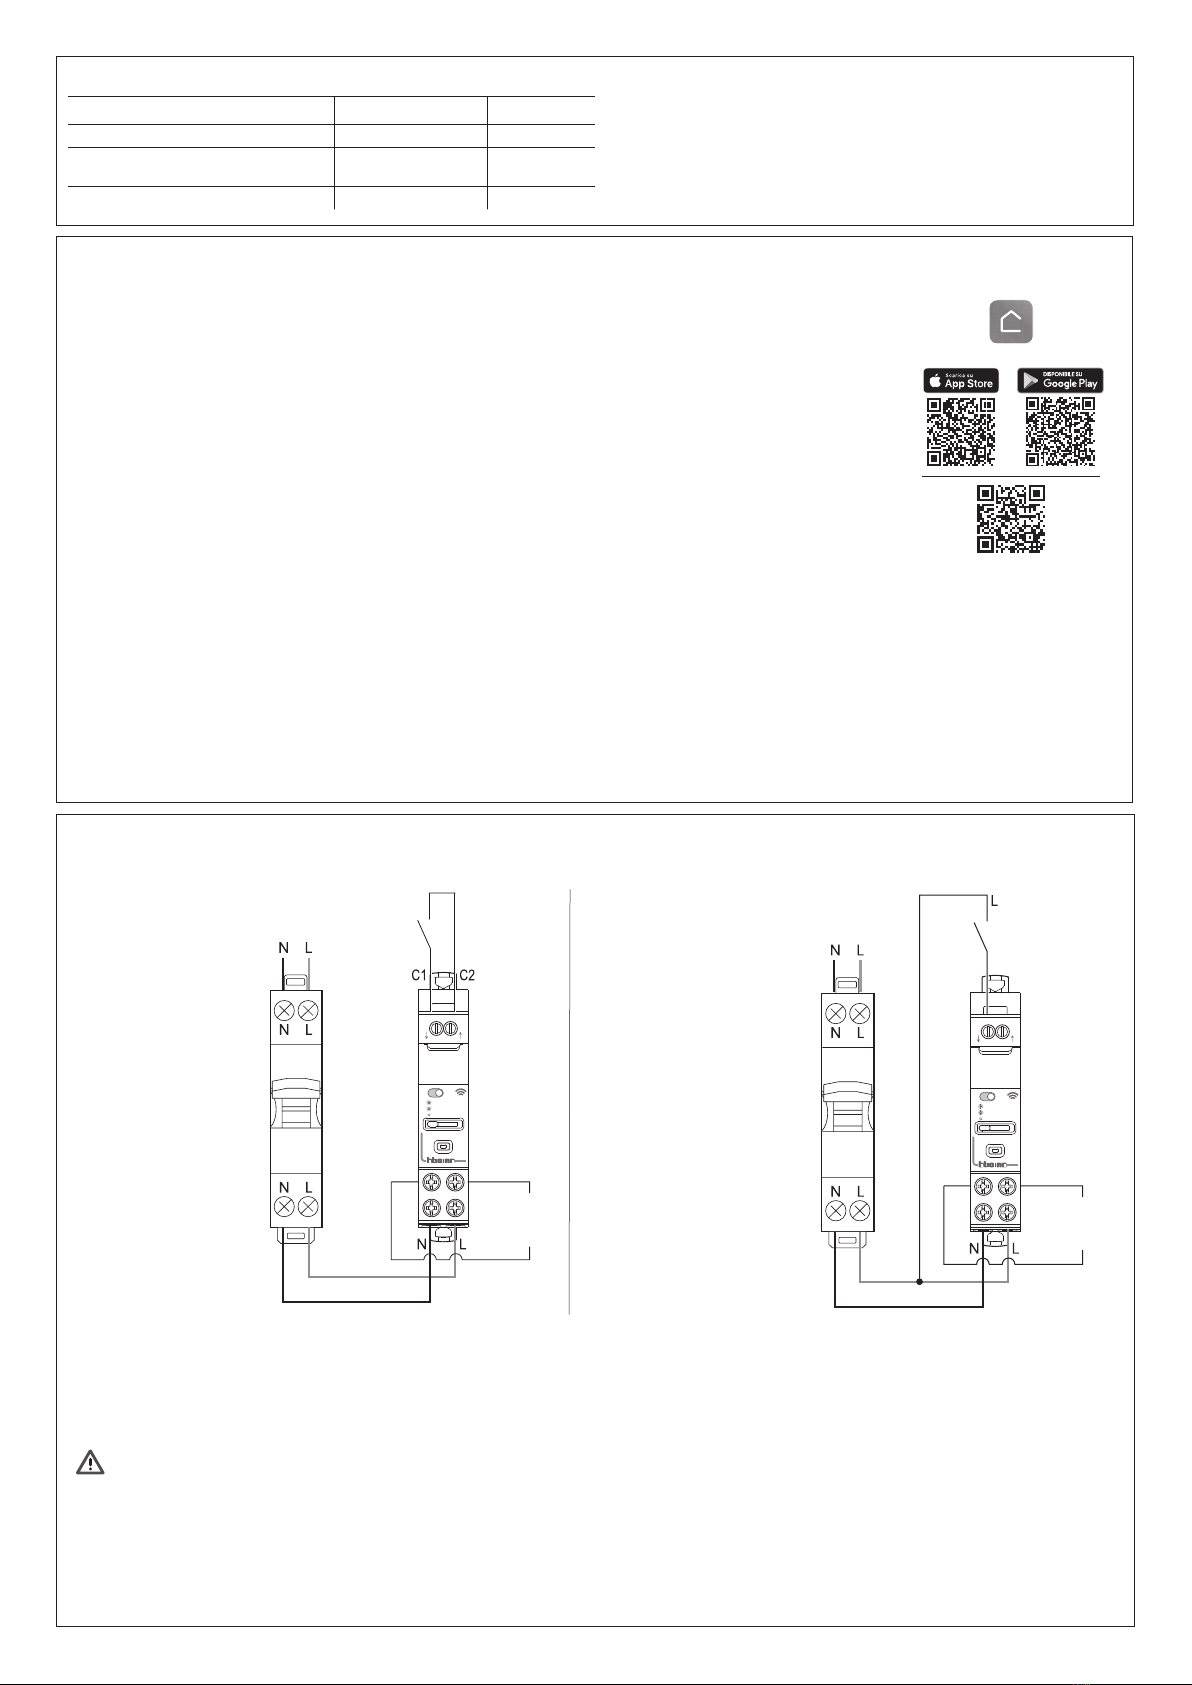
N L
2
C1 C2
N
1
FC80AC
:
:
:
AUTO
:
I
O OFF
ON
5
4
1
6
2
3
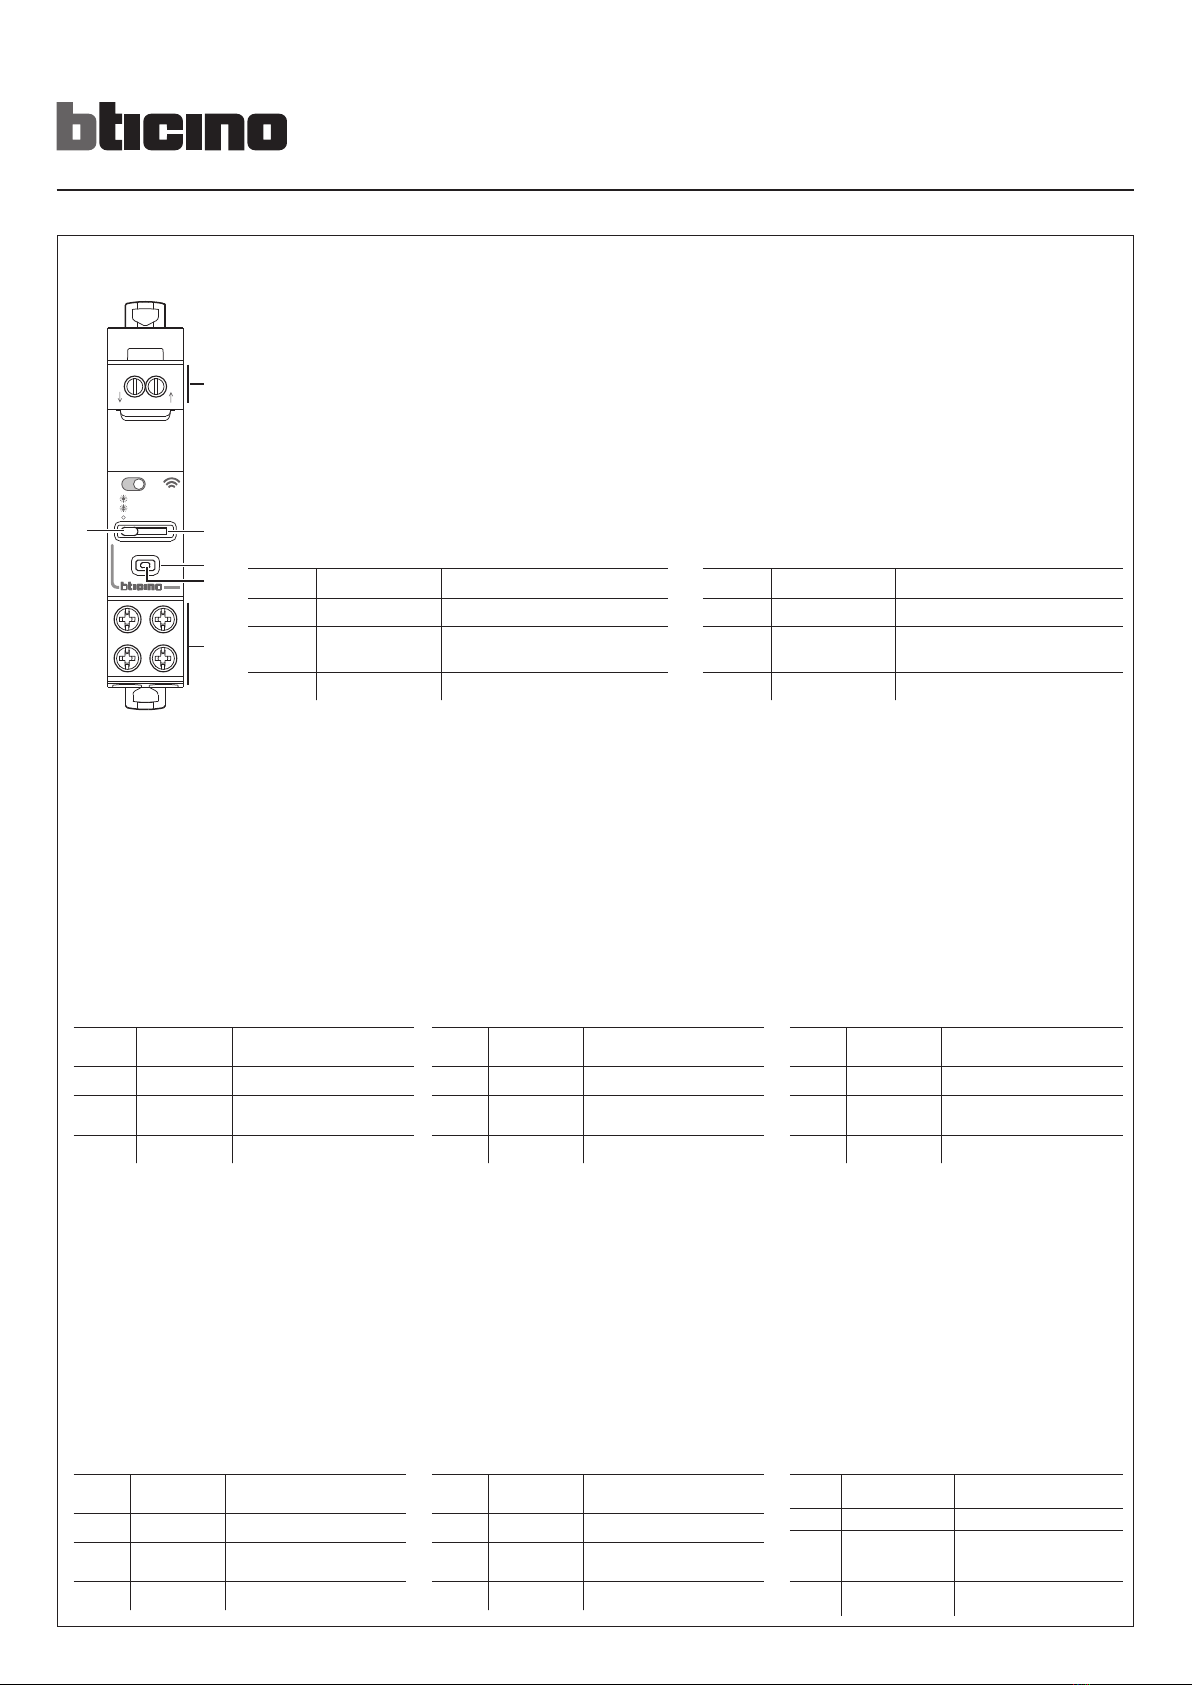
1. Morsetti di collegamento per interruttore aggiuntivo
2. Pulsante di comando ( * )
3. Led segnalazione
Rosso: non associato ad impianto
Spento: associato ad un impianto
4. Pulsante di reset
5. Led stato carico e presenza interruttore aggiuntivo
Spento: contatto aperto
Verde: contatto chiuso
Lampeggio blu: contatto aperto e modalità automatica attiva
Lampeggio verde/blu: contatto chiuso e modalità automatica attiva
6. Morsetti di collegamento
( * ) I comandi inviati avranno un effetto diverso in base alla modalità impostata tramite app.
Comando Modalità ON/OFF Modalità opzione ore di punta/ore non di punta
OFF Apre contatto (1-2) Apre contatto (1-2)
ON Chiude contatto (1-2) Chiude contatto (1-2).
Se (C1-C2) cambia stato, attiva comando AUTO
AUTO Non disponibile Contatto (1-2) segue lo stato di (C1-C2)
1. Connection clamps for additional switch
2. Control pushbutton ( * )
3. Notification LED
Red: not associated to the system
Off: associated to the system
4. Reset push button
5. Load status LED and presence of additional switch
OFF: open contact
Green: closed contact
Blue flashing: open contact and active automatic mode
Green/blue flashing: closed contact and active automatic mode
6. Connection clamps
( * )The commands sent will have a different effect depending on the mode set using the app.
Control ON/OFF mode Peak hours/ off-peak hours option mode
OFF Opens contact (1-2) Opens contact (1-2)
ON Closes contact (1-2) Closes contact (1-2).
If (C1-C2) changes status, it activates AUTO command
AUTO Not available Contact (1-2) follows the status of (C1-C2)
1. Bornes de branchement pour interrupteur supplémentaire
2. Bouton de commande ( * )
3. Voyant LED
Rouge : non associé à une installation
Éteint : associé à une installation
4. Bouton de réinitialisation
5. LED état de la charge et présence interrupteur
supplémentaire
Éteint : contact ouvert
Vert : contact fermé
Clignotement bleu: contact ouvert et modalité
automatique active
Clignotement vert/bleu: contact fermé et modalité
automatique active
6. Bornes de branchement
( * ) Les commandes envoyées auront un effet différent en fonction du mode
défini au moyen de l’appli.
Commande Modalité ON/OFF Mode option
heures pleines/ heures creuses
OFF
Ouvre le contact (1-2)
Ouvre le contact (1-2)
ON Ferme le contact
(1-2)
Ferme le contact (1-2). Si (C1-C2)
change d'état, active la commande AUTO
AUTO Non disponible Le contact (1-2) suit l'état de (C1-C2)
1. Anschlussklemmen für einen zusätzlichen Schalter
2. Steuertaste
3. Meldeleuchte ( * )
Rot: nicht einer Anlage zugeordnet
Ein: einer Anlage zugeordneth
4. Reset-Taste
5. Led Stromlaststatus und zusätzlicher Schalter
vorhanden
Aus: offener Kontakt
Grün: geschlossener Kontakt
Blau blinkend: offener Kontakt und automatischer
Modus aktiv
Grün/blau blinkend: offener Kontakt und
automatischer Modus aktiv
6. Anschlussklemmen
( * ) Die gesendeten Steuerungen haben je nach dem über die App
eingestellten Modus eine andereWirkung
Steuerung ON/OFF-Modus Optionsmodus
Spitzen-/Nebenzeiten
OFF
Kontakt öffnen (1-2)
Kontakt öffnen (1-2)
ON Kontakt schließen
(1-2)
Kontakt schließen (1-2).Wenn (C1-C2) den
Zustand ändert, wird der Befehl AUTO aktiviert
AUTO Nicht verfügbar
Kontakt (1-2) folgt dem Status von (C1-C2)
1. Bornes de conexión para interruptor adicional
2. Pulsador de mando
3. LED de señal ( * )
Rojo: no asociado a una instalación
Apagado: asociado a una instalación
4. Pulsador de reset
5. Led de estado de la carga y presencia de interruptor
adicional
Apagado: contacto abierto
Verde: contacto cerrado
Parpadeo azul: contacto abierto y modalidad
automática activada
Parpadeo verde/azul: contacto cerrado y modalidad
automática activada
6. Bornes de conexión
( * ) Los comandos enviados tendrán un efecto diferente dependiendo del
modo configurado mediante la app.
Comando Modo ON/OFF Modo opción horas
punta/horas no punta
OFF Abre contacto (1-2) Abre contacto (1-2)
ON Cierra contacto
(1-2)
Cierra contacto (1-2).Si (C1-C2) cambia
de estado, activa comando AUTO
AUTO No disponible Contacto (1-2) sigue el estado de (C1-C2)
1. Aansluitklemmen voor extra schakelaar
2. Bedieningsknop
3. Signalering met leds ( * )
Rood: niet met de installatie gekoppeld
Uit: met een installatie gekoppeld
4. Resetknop
5. Led status lading en aanwezigheid extra schakelaar
Uit: open contact
Groen: gesloten contact
Knipperend blauw: contact open en automatische
modus geactiveerd
Knipperend groen/blauw: contact gesloten en
automatische modus geactiveerd
6. Aansluitklemmen
( * ) Het effect van de verzonden bedieningen varieert afhankelijk van de
modus die met de app is ingesteld.
Bediening Modus ON/OFF Modus optie piekuren/daluren
OFF Opent contact (1-2) Opent contact (1-2)
ON Sluit contact (1-2) Sluit contact (1-2). Activeert de bediening
AUTO als de (C1-C2) van status verandert
AUTO Niet beschikbaar Contact (1-2) volgt de status van (C1-C2)
1. Bornes de conexão para interruptor adicional
2. Botão de controle
3. LED de sinalização ( * )
Vermelho: não associado a equipamento
Apagado: associado a um equipamento
4. Botão de rearme (Reset)
5. Led de estado e presença de interruptor adicional
Desligado: contacto aberto
Verde: contacto fechado
Azul a piscar: contacto aberto e modo automático
ativo
Verde/azul a piscar: contacto fechado e modo
automático ativo
6. Bornes de conexão
( * ) Os comandos enviados terão um efeito diferente em função do modo
definido através da app
Comando Modo ON/OFF Modo opção
horário de pico/horário fora de pico
OFF Abre o contacto (1-2) Abre o contacto (1-2)
ON Encerra o contacto
(1- 2)
Encerra o contacto (1- 2). Se (C1-C2)
muda de estado, ativa o comando AUTO
AUTO Não disponível Contacto (1-2) segue o estado de (C1-C2)
1. Соединительные клеммы для дополнительного выключателя
2. Кнопка управления
3. Сигнальный светодиод ( * )
Красный: не сопряжен с системой
Выключен: сопряжен с системой
4. Кнопка сброса
5. Светодиод состояния нагрузки и наличия
дополнительного выключателя
Выключен: контакт разомкнут
Зеленый: контакт замкнут
Мигает синим светом: контакт разомкнут,
активирован автоматический режим
Мигает зеленым/синим светом: контакт замкнут,
активирован автоматический режим
6. Соединительные клеммы
( * ) Отправленные команды будут иметь разное действие в
зависимости от режима, заданного с помощью приложения
Команда Режим ВКЛ / ВЫКЛ Режим опции пиковые часы/
непиковые часы
ВЫКЛ
Размыкает контакт (1-2)
Размыкает контакт (1-2)
ВКЛ Замыкает контакт
(1-2)
Замыкает контакт (1-2). Если (C1-C2)
меняет свое состояние, активируется
команда АВТО
АВТО Недоступно Контакт (1-2) следует состоянию
(C1-C2)