•BTV, S.L.GARANTIZApormediodesurednacionaldeServiciosdeAsistenciaTécnica(SAT),lacaja
fuerteseñalada,contracualquierdefecto de fabricación,mecánicooelectrónico,queafecteasu
buenfuncionamientodurante2 años apartirdelafechadecompra,presentandoestecerticado
debidamentecumplimentado,juntoconlafactura,oel ticket de compraoelalbarán de entrega.
•Esta garantía no cubre las averías producidas por causas no imputables a la caja fuerte, tales como
violencia, accidentes, uso indebido, sometimiento a excesiva temperatura, exceso de humedad,
ambiente salino, deciente instalación por ltración de agua, cemento, yeso, materiales de
instalación, soldaduras, etc.
•La garantía quedará anulada si la caja fuerte es manipulada por personas ajenas a nuestra
organización.
•Duranteelperiododegarantía,laspiezasylamanodeobradelareparaciónseránporcuentadeBTV,
S.L.Eldesplazamientodeuntécniconoestáincluidoenlagarantía.
•Fábricano aceptará ninguna mercancía si previamente no se ha acordado la entrega con el SAT
(ServiciodeAsistenciaTécnica)central.
•Lasbaterías(pilas)noestánamparadasporestagarantía.
•Estagarantíanoafectalosderechosdequedisponeelconsumidorconformealaley23/2003.
MUY IMPORTANTE: Este certicado de garantía debe permanecer en su poder. Es imprescindible
presentarlo al SAT junto con la factura oticket de compra y los datos que se solicitan debidamente
cumplimentados por el establecimiento vendedor: Fecha de venta y sello del establecimiento.
La tarjeta debe entregarse al SAT o adjuntarse a la caja en el caso de enviarla en un transporte.
Las piezas sustituidas quedarán en poder del SAT.
Ante cualquier incidencia, póngase en contacto con su proveedor habitual, el SAT de zona más cercano
o con el Servicio de Atención al Cliente (SAC) en el teléfono 902 190 386, donde personal especializado
atenderá sus consultas.
PERIODO DE GARANTÍA EN TERRITORIO ESPAÑOL:
2 AÑOS A PARTIR DE LA FECHA DE COMPRA.
SERVICIO DE ATENCIÓN AL CLIENTE (SAC) / CUSTOMER SEVICE: 902 190 386
CONDICIONES DE GARANTÍA
1TECHNICAL FEATURES
Power supply: 4 AA Alkaline batteries. Do not use rechargeable
batteries. Replace the batteries every year for correct functioning.
Look at the sell-by date on the batteries. Respect the enviroment. Do
not throw the batteries in the garbage.
Codes from 1 to 10 digits.
Automatic blocking system for 5 minutes when more than 3
consecutive incorrect codes are entered.
Low batteries’ warning system.
One user code plus one EMERGENCY CODE.
Emergency key provided.
External power supply to open your safe in case the batteries are
completely discharged.
Interior light
Don’t install your safe in a humid environment.
IMPORTANT! Check all those points with the door open, before
closing it. Read carefully these instructions and warranty before
any action.
2OPENING/ CLOSING INSTRUCTIONS
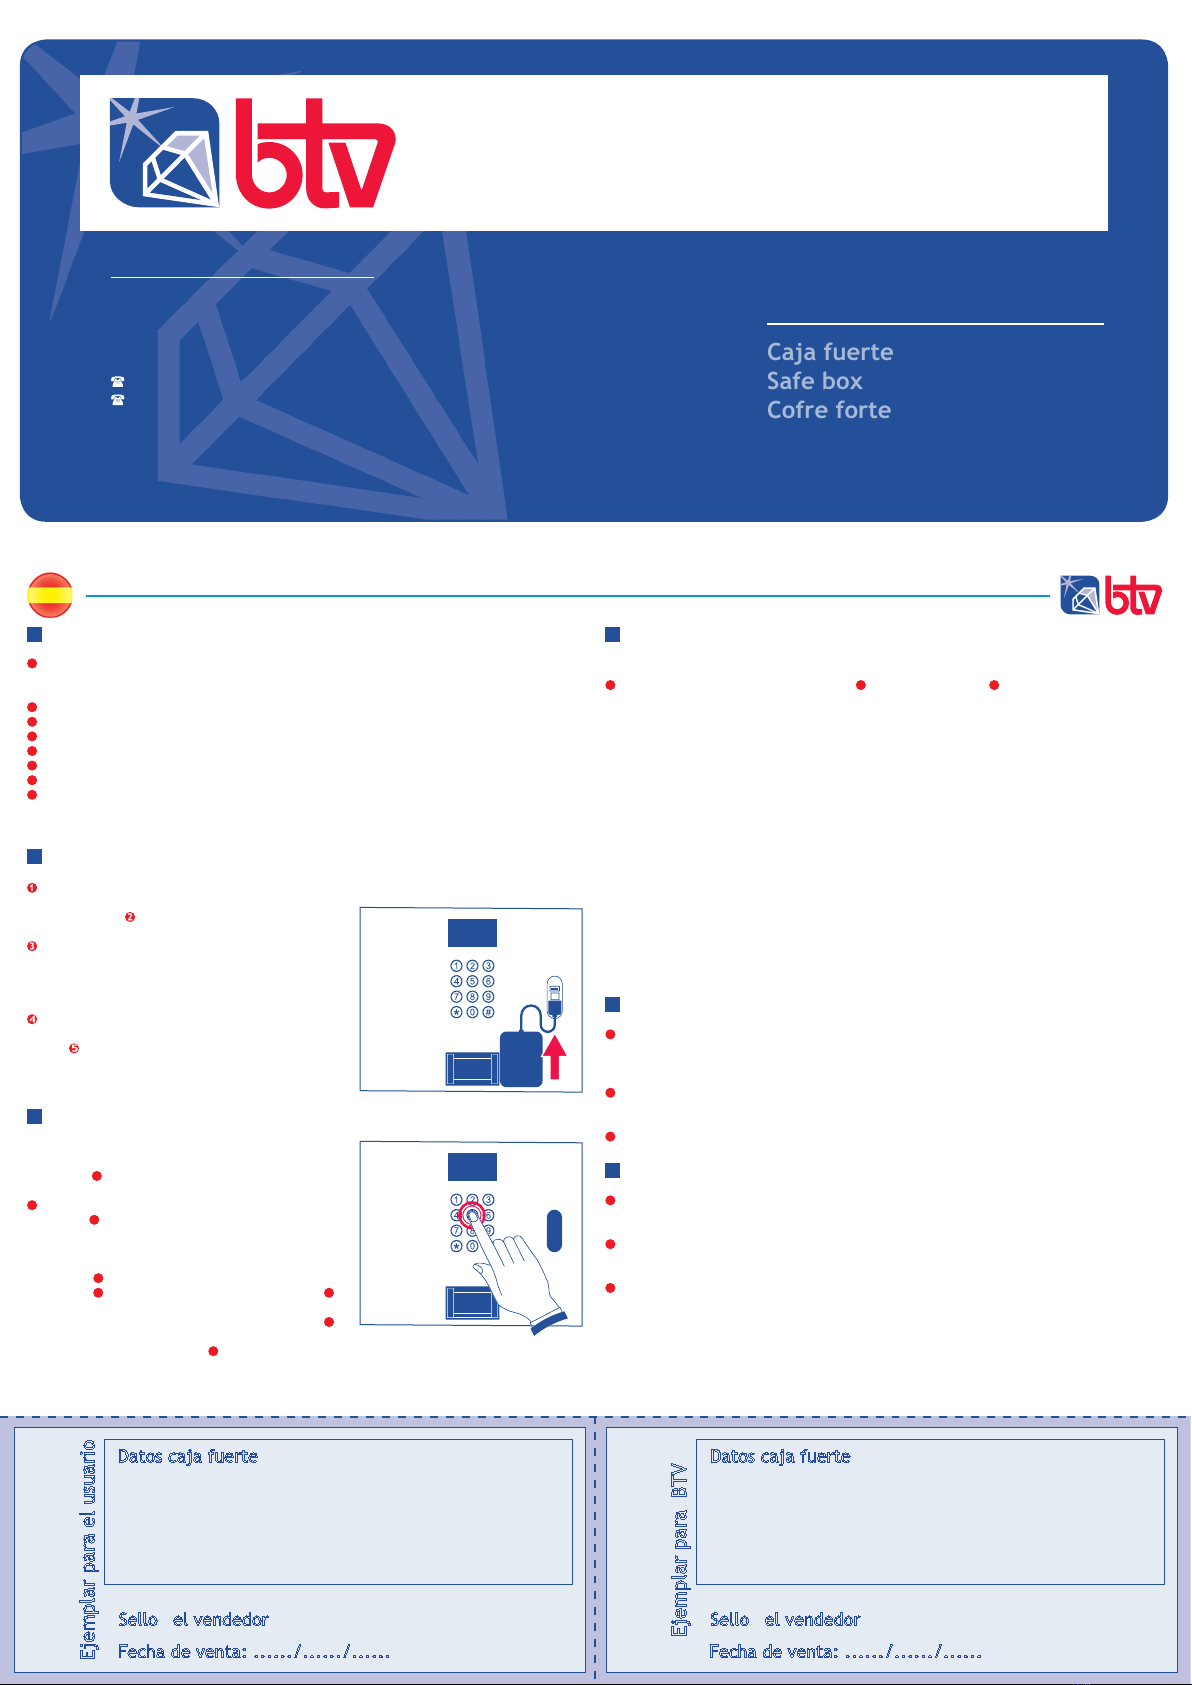
First opening: install 4 AA batteries into the external battery case, plug in the oulet on the face
plate. Touch the keypad with your hand to wake up system, the input icon will light up. input
the code, it will beep 2 times if it is correct code, then show “OPEN”, the Open icon light up means
the door is opening, when show “OPENED” and the Unlock icon will light up, means the door was
open. (it will beep 3 times if it is incorrect code, then show E-CODE and the Error icon will light
up for 2 seconds). Remove the batteries from the external battery case to the battery case on
the back of the door. Now you can use the safe without the external power supply. Push the
door close and press # to show “close” , means the door is closing, when show “closed” , means
the door was closed.
3CODE SETTINGS
Change personal code: Every safe has been programmed with equal code (1 2 3), for your security
don’t forqet to change it. Push away the rear cover of the internal battery box then press the
related switch to show “USER”, the Set icon and Code icon will light up, input your new personal
code then press “#”, it will show “AGAIN”, input you new personal code again then press “#”, it
will show “DONE”, means the personal code has been changed. It can also enter into this function
by selecting the icon.
Change master code: Every safe has been programmed with equal code (1 5 9), for your security
don’t forqet to change it. Touch the keypad with your hand an wake up system, the Input icon
will light up, press “*” to light up Set icon, input “0” then press “*”, input original master code,
then press “#”, it will show “NEU” if it is correct master code and Code icon will light up, input
your new master code then press “#”, it will show “AGAIN”, input your new master code again then
press “#”, it will show “DONE”, which indicate the master code has been changed.
4SYSTEM SETTINGS
LOG IN SYSTEM SETTINGS: Touch the keypad to wake up system, the input icon will light up, press
“*” to light up Set icon, then input the code, it will beep 2 times if it is correct code, Record icon
twinkles, the Time, Hide, Light, Code icon light up, which indicates it has been logged into system
settings . During this period, 1-9 buttons are disable, “*” as the return key, “0” as the next item
key, “#” as the conrm key.
CHECK OPENING RECORDS: Log into system setting, press “0” to Record icon then press “#”,
Record icon light up and other icons light off. It will show the opening record now, the rst page is
the record nº and second page is the opening date and time.
E.g.: 001-U
001= the last opening record
U = use personal code to open
A= use master code to open
E = use key to open
DATE AND TIME SETTING: Log into system settings, press “0” to time icon then press “#” to
conrm, Time icon light up and other icons light off. You can set the date and time now.
CODE HIDING SETTING: Log into system setting, press “0” to Hide icon, then press “#” to conrm,
Hide icon light up and other icons light off. Press “#” to able/disable code hiding function.
5EMERGENCY OPENING
Emergency key which allow you to open the safe in case of electronic anomaly, discharged
batteries, forgetting the code number programmed. The keyhole can be found unther the little
cover. Move the cover and introduce the key, turn it an open the door.
Emergency code number to open the safe in case you forgotten your normal opening code
number. Enter your emergency code number as usual.
External power supply to open your safe in case the batteries are completely discharged.
6OTHER FEATURES
Incorrect code: if the code number that you have entered is not the one programmed before,
you will read “E-CODE” and the Error icon will light up for 2 seconds.
Low voltage: After using period of time, if the red light ashed 8 times after open the door,
which indicates voltage is too low, please change the batteries as soon as you could.
Replacement of batteries: the batteries’ holder can be found in a compartment inside the door,
under a small cover. Once you have removed the cover, change all FOUR batteries for new ones and
secure the cover back. Check the right functioning of the safe before locking it.
Fig. 2
Fig. 1
Fig. 2
Fig. 1
1CARACTERÍSTICAS TÉCNICAS
Alimentação: 6 V. Quatro pilhas alcalinas modelo AA (não utilizar
pilhas recarregáveis). Recomendamos a troca de pilhas anualmente
para um correto funcionamento. Vigie a validade das pilhas. Não deite
as pilhas gastas no lixo doméstico.
Códigos de longitude variável de 1 a 10 dígitos.
Sistema de bloqueio automático de 5 minutos ao introduzir uma
cominação errada mais de 3 vezes.
Sistema de aviso de baterias baixas (a luz vermelha pisca 8 vezes
depois de abrir a porta).
Luz de acesso interior para a troca de pilhas (baterias).
Dispõe de uma CHAVE DE EMERGÊNCIA.
Conexão para alimentação externa que permite a abertura no
esgotamento de pilhas.
Luz interior
Instale o cofre em local de pouco húmido.
IMPORTANTE! Realize os primeiros teste com a porta aberta, antes de
fechar a porta do cofre.
2INSTRUÇÕES DE ABERTURA / ENCERRAMENTO
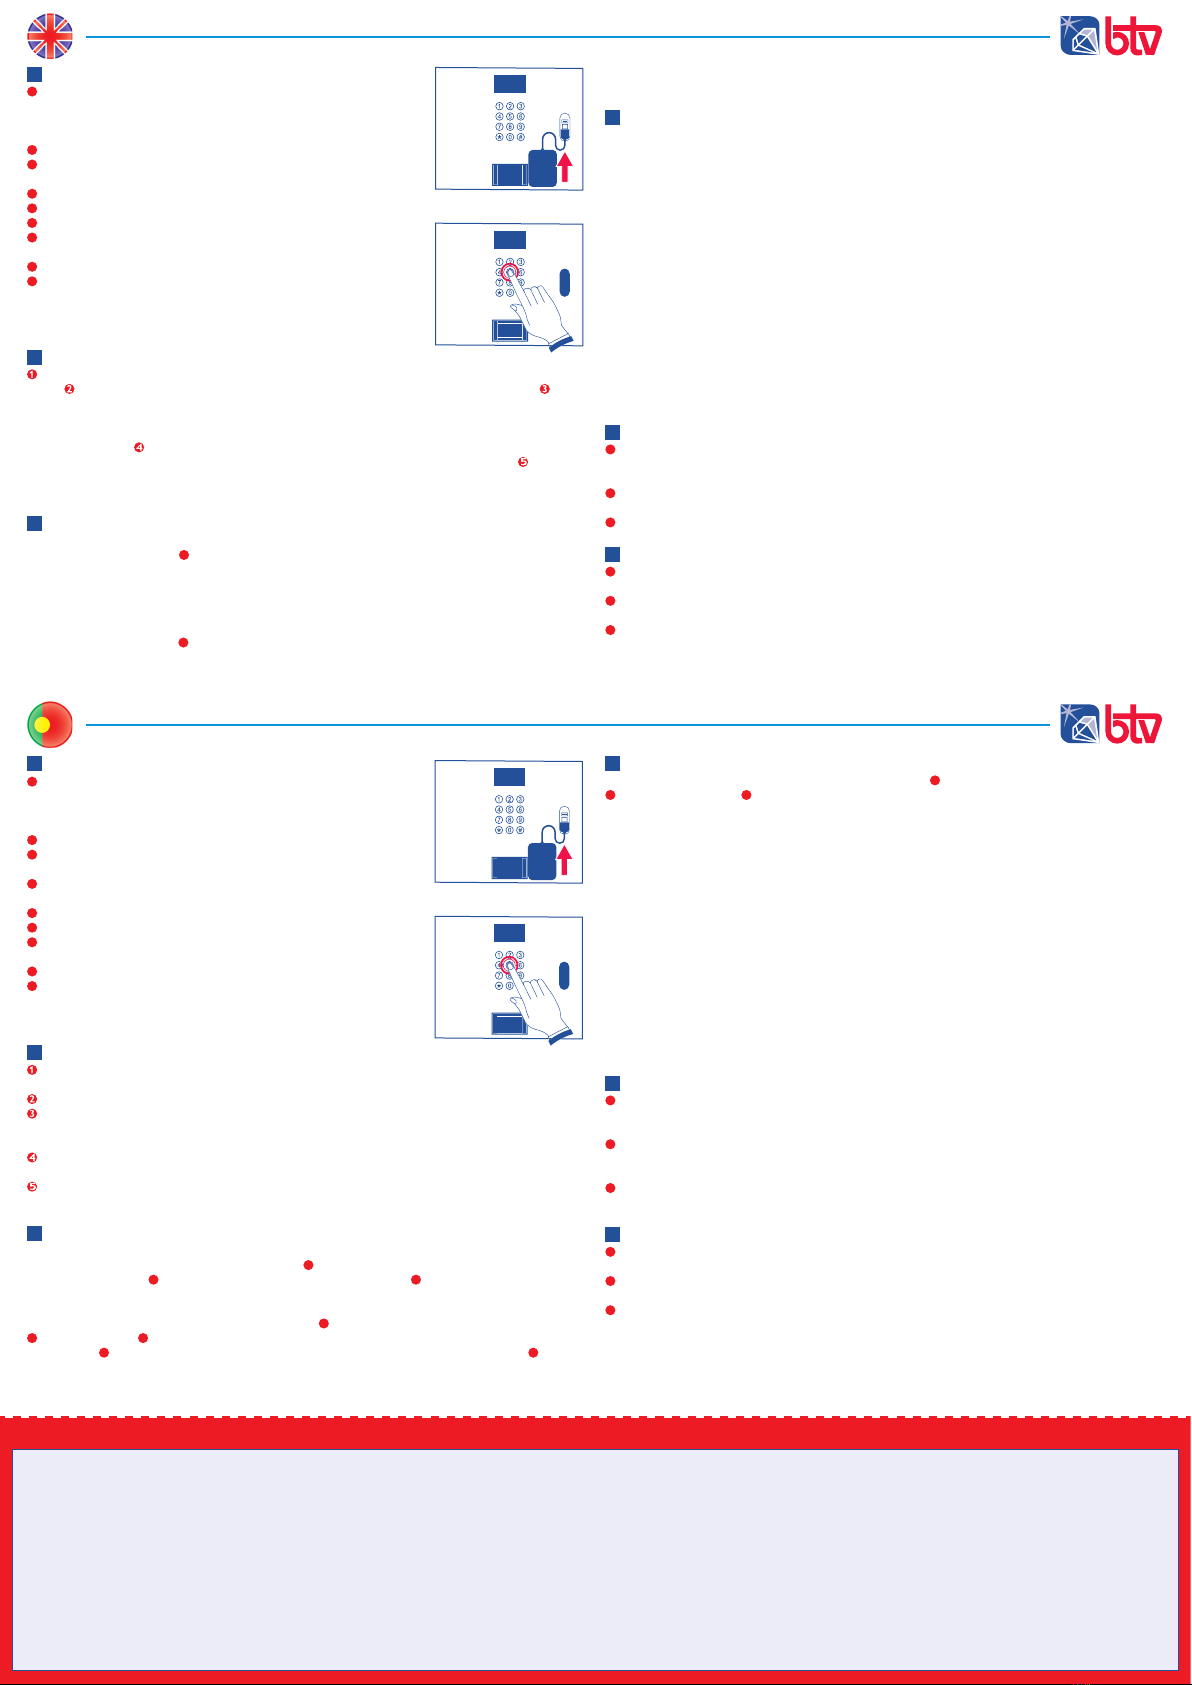
Para abrir pela primeira vez o cofre, coloque 4 pilhas no portapilhas externo e ligue-o à ligação
da porta (g-1).
Toque o teclado com a mão para ativar o sistema. Acende-se o ícone Imput (g-2).
Marcar os números da combinação. Ao sair da fábrica, os cofres têm a combinação 1 2 3 #. Se
a combinação está correta, ouvirá 2 bips e ler-se-á “OPEN”. Quando o display mostrar OPENED a
porta está aberta. Puxe a asa e abra a porta.
Tire as pilhas do porta-pilhas externo e coloque-as no portapilhas interior situado na parte de
trás da porta.
Para fechar, prima #. No display lê-se “CLOSE” enquanto fecha a porta. Quando no display se lê
“CLOSED” a porta fechou-se.
3PROGRAMAÇÃO / MUDANÇA DE COMBINAÇÕES
Código de utilização: Todos os cofres saem da fábrica com o mesmo código de utilização (1 2 3).
Para sua segurança não se esqueça de o alterar. Abra a caixa. Carregue no botão do interior da
caixa. Lê-se “USER”. Tecle a sua combinação +#. Lê-se “AGAIN”. Volte a teclar a combinação
+ #. Lê-se “DONE”
Código de emergência: Todos os cofres saem da fábrica com o mesmo código de utilização (1 5
9). Para sua segurança não se esqueça de o alterar. Abra a caixa. Tecle *. Acende-se o ícone Set.
Tecle 0. Tecle *. Digitar el código de emergência + #. No display lê-se “NEW” e acende-se o
ícone Code. Introduzir novo código, seguido de tecla “#”. No display lê-se “AGAIN”. Volte a
introduzir o novo código para conrmação + “#”. No display lê-se “DONE” indicando que o novo
código master se gravou.
4PROGRAMAÇÃO DO COFRE
PARA ENTRAR NO MODO DE PROGRAMAÇÃO DO COFRE: Toque o teclado para ativar o sistema.
Premir * (ícone SET). Digitar o código seguido de # (2 bips, ícone RECORD pisca, ícones TIME,
HIDE, LIGHT, CODE iluminam-se). Neste momento, os números de 1 a 9 estão inabilitados. A tecla *
é para voltar, o 0 para passar ao seguinte item e # para conrmar.
REGISTO DE ABERTURAS: Entrar no modo de programação. Selecionar o ícone RECORD. Veem-se
os dados da última abertura realizada. (2 ecrãs, o primeiro mostra o nº de abertura e o segundo
a data e a hora).
ex: 001 OU
001: Última abertura
OU: Abertura com código de utilizador
A: Abertura com código master
E: Abertura com chave
DATA E HORA: Entrar no modo de programação e selecionar o ícone TIME. A seguir programar a
data e a hora.
OCULTAÇÃO DO CÓDIGO: Entrar na programação e selecionar o ícone Hide. Premir # para habilitar/
desabilitar esta função.
5ABERTURA DE EMERGENCIA
Chave mestra de emergência, para abrir o cofre nos casos de anomalia eletrónica, pilhas
esgotadas, esquecimento da combinação programada, etc…Introduza a chave de emergência na
fechadura, abrir a porta e retirar a chave.
Um código de emergência, para abrir o cofre em caso de esqueça seu código habitual. Para
abrir com este código de emergência, digite o número da mesma maneira que faz com o código
habitual..
Conexão de alimentação exterior para realizar aberturas de emergência no caso das pilhas se
gastarem. Uma vez aberto o cofre, troque todas as pilhas por quatro pilhas alcalinas novas.
6OBSERVAÇÕES
Erro de código: se o código marcado não for o programado anteriormente, ouvirá um som de
especial que indica que este código não está correto.
Baterias baixas: este sistema deteta o nível das pilhas quando é demasiado baixo, e que é o
momento de trocar as quatro pilhas. Ao abrir a porta a luz vermelha pisca 8 vezes.
Alteração de baterias: pode-se aceder ao porta-pilhas no interior do cofre, no reverso da
porta. O porta- pilhas encontra-se debaixo da tampa. Abra a tampa. Uma vez aberta, troque as
QUATRO pilhas (não deixe nenhuma pilha antiga). Feche novamente a tampa, e verique o correto
funcionamento antes de fechar. Descarte as pilhas gastas sem prejudicar o meio ambiente.