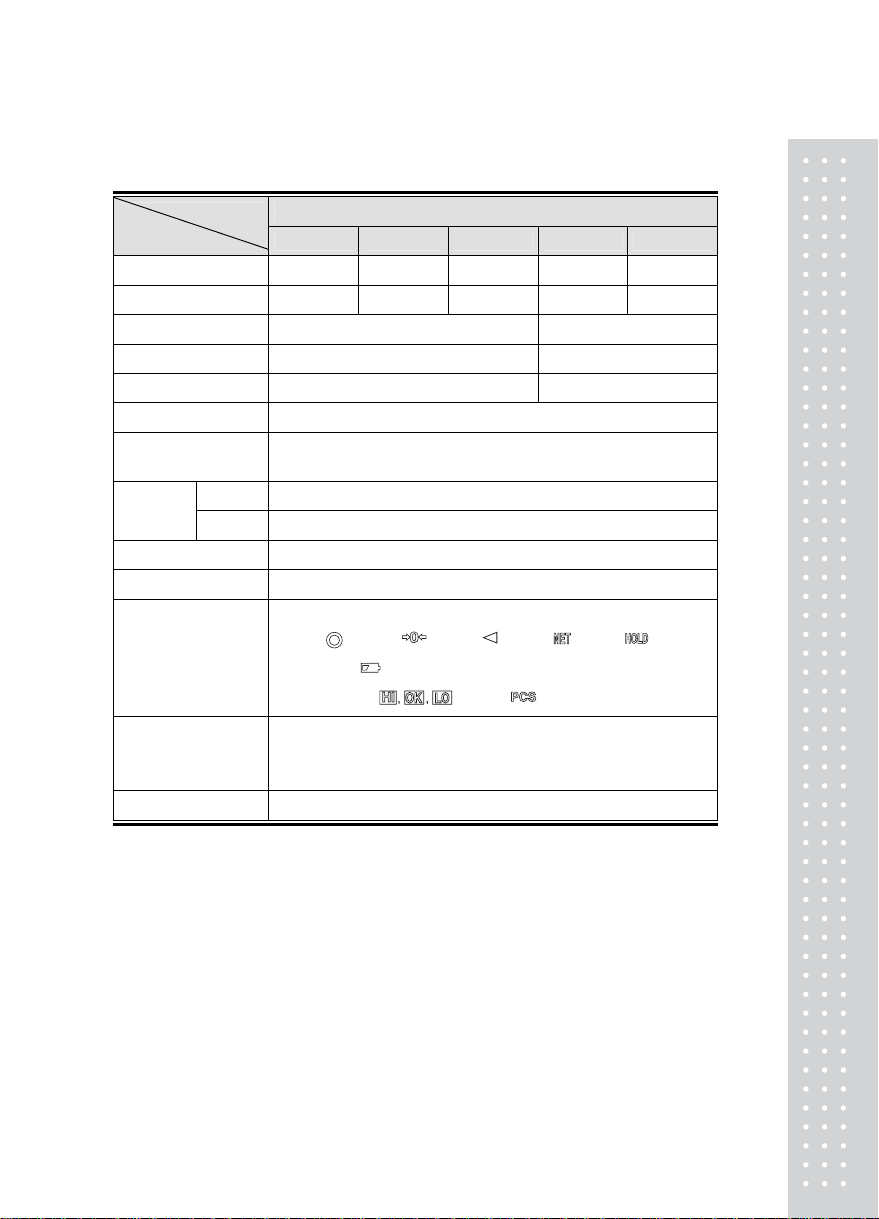
CAS BW-1N User manual

2

3
CONTENTS
CAUTIONS ................................................................. 4
INTRODUCTION..................................................... 6
FEATURES & MAIN FUNCTIONS.................... 6
SPECCIFICATION .................................................. 7
PART NAME & KEY FUNCTION ...................... 8
SYSTEM MODE ......................................................11
GENERAL FUNCTION & DESCRIPTION ... 16
CONVERSION MODE ......................................... 18
PRINT FORMAT .................................................... 20
RS-232C COMMUNICATION............................ 21
USING & BATTERY.............................................. 23
HOW TO INSTALL THE BW............................. 25
TEST MODE ............................................................ 26
ERROR MESSAGE DESCRIPTION
& MANAGMENT................................................... 30

4
CAUTIONS

5

6
INTRODUCTION
We greatly appreciate for you to purchase BW of CAS.
This goods has the excellent performance and splendid properties through strict test
under severe quality management.
It is recommended to read this manual in full before using BW for good function
application.
FEATURES
■Simple outdoor using in use of battery
■Using general (Mn, Alkaline) battery or rechargeable battery (NiCd)
■Easy operation and various function
■SPAC™ single pass automatic span calibration
■Water proof (IP65)
■High precise resolution
■Liquid crystal display of 6 place weight (LCD)
■Using long-time battery
MAIN FUNCTIONS
■Hold Function
■COUNT Function (Unit weight setting, unit weight setting by sample)
■Low / High Weight Comparing
■Serial Communication Interface (RS-232)
■Serial Printer Connection
■Self Hardware Test
■Independent Zero Calibration
■Gravity Compensation

7
SPECIFICATION
BW-1N
Model
Item BW-6 BW-15 BW-30 BW-60 BW-150
Max Capacity 6kg 15kg 30kg 60kg 150kg
Interval 2g 5g 10g 20g 50g
Platter Size 280(W)x280(D) x 80(H) 405(W)x525(D) x 105(H)
Product Size 280(W)x350(D) x 530(H) 425(W) x 675(D) x 755(H)
Product Weigh About6kg About 17 kg
Charge Time About 6 hr
Discharge About 30 hr (BL ON),
About 60 hr (BL OFF).
General ON/OFF, Zero, Net, Hold, PCS, RS232, HI, LO, Compare
Function Option Backlight
Operatint Temp -10℃~ +40℃
Tare Max Capacity
6 Digit LCD(24mm Height)
Stable ( ), Zero ( ), Tare ( ), Net ( ),Hold ( ),
Low battery ( ), Weight unit (kg),
Display
High, OK, Low ( ),Count( )
Power (Option) 1. DC 7.2V(6EASIZE "AA" ) 2500mAh Rechargeable battery
2. DC 9V(6EASIZE " C " ) Dry Battery
3. DC 12V 1.25A ACAdaptor
Power consumption approx. 0.25W

8
PART NAME & KEY FUNCTION
1. Part Name
2. DISPLAY

9
LAMP SYMBOL DESCRIPTION
STABLE ON when current weight is stable
ZERO ON when current weight is 0
NET ON at displaying the pure weight
HOLD
TARE ON at weighing the moving object
ON when tare is activated.
HI ON when current weight is more than high limit value.
OK ON when current weight is right weight band.
LOW ON when current weight is less than low limit value.
BAT
Display the battery recharging time (rechargeable battery)
Display the battery replacing time (dry battery)
- about 6.9V remain
PCS ON when current mode is count mode.
CHARGE
When charging battery, charging lamp (RED) is ON.
When it is completed, charging lamp (GREEN) is ON.
POWER ON at connecting the DC 12V adapter.
Minus ON when weight is “-“
Kg Weight unit

10
3. KEY Part
KEY SYMBOL DESCRIPTION
ON / OFF Use to power ON / OFF (Press for approx 3 seconds)
ZERO /
MODE Use in case of rezero (within 2% of max. capacity),
To enter the system mode by pressing for 2 seconds
TARE
Use at weighing in use of TARE
Enter the TIME SETTING MODE by pressing for 2 seconds
*
Use to turn ON / OFF Back Light (Option) or
to print out in the case that F_2 is set to 4.
Enter the CONVERSION MODE by pressing for 2 seconds.
■Hi/Low Comparing Mode key or Weighing Mode Key
NET /
GROSS Use to display NET weight or GROSS weight.
Enter the TESTMODE by pressing for 2 seconds
HOLD Use to weight the moving object (Manual,Automatic)
■Counting Mode Key
U.W. Use to display the unit weight (for approx. 5 seconds)
W. Use to display the current weight (for approx. 5 seconds)

11
SYSTEM MODE
■Simple weight mode
Display the weight after weighing.
■High / Low comparing mode
Determine that the weight is high, normal or low value and perform the display.
■Count mode
Display the quantity by setting the unit or sample weight.
■Quantity comparing mode
Perform the display after discrimination by setting High / Low quantity.
1. MODE CONVERSION
■Press Zero-Mode key for 2~3 sec. to display the following message.
■Execute depending on the below mode conversion and setting method.
2. DIGIT INPUT METHOD
Input the digit in use of the below keys.
■STAR key : Use to set the input value to
■G/N key : Use to increase the first place of value by on.
■TARE key : Use to move the current place to the left by one place.
■ENTER key : Use to move the current place to the right by one place.
■MODE key : Use to complete the input.

12
Ex) For 20.5 input
Display KEY DESCRIPTION
STEP 1
Press once (Set to “0” )
STEP 2 Press five times.
STEP 3 Press once (Move to the left by one place)
STEP 4 Press once
STEP 5 Press twice times (input 2 as the 3th place value)
STEP 6 Input completion
3. SIMPLE WEIGHING MODE CONVERSION
Display KEY PLATFORM DESCRIPTION
STEP 1
Press once
STEP 2 Empty Press once.
Generally operated
4. HIGH / LOW COMPARING MODE CONVERSION
■In case of no resetting the High / Low value
Display KEY PLATFORM DESCRIPTION
STEP 1
Press twice
STEP 2 Empty Press once.
Generally operated

13
■In case of resetting the High / Low value
Display KEY PLATFORM DESCRIPTION
STEP 1
Press twice
STEP 1 Press once (Low weight input)
STEP 1 INPUT Refer to 'Digit input' In page 11
STEP 1 High value input
STEP 1 INPUT Refer to 'Digit input' In page 11
STEP 1 Empty Generally operated
5. COUNT MODE CONVERSION
■In case of no setting the unit / sample weight
Display KEY PLATFORM DESCRIPTION
STEP 1
Press three times
STEP 2 Empty Press once
Generally operated
■In case of setting the unit weight (Min. range of unit weight ; Min. Division)
Display KEY PLATFORM DESCRIPTION
STEP 1
Press three times
STEP 2 Press once
STEP 3 Display the set weight
STEP 3 Input the unit weight
Digit input in page 11
STEP 5 Press 'Mode' key to round & display
unit weight. Generally operated
Step 5. Ex) Min. division is 0.1
Input the unit weight as 0.532 and round off the second place of decimal to 0.5

1
4
■In case of setting the unit weight by sample (Samples : 10 - 200 , 10 unit)
Display KEY PLATFORM DESCRIPTION
STEP 1
Press three times
STEP 2 Press once
STEP 3 Press once
STEP 4 Press once
STEP 5 Empty Press five times.
Simple count input(50pcs)
STEP 6 Empty Press once [ENTER]
STEP 7 Sample Press once with empty
[ENTER] key
STEP 8 Unit weight display.
Press once
STEP 9
STEP 10 Empty Generally operated
Note :※For setting the unit weight by sample count, the min. unit weight
shall be more than min. division

15
6. COUNT COMPARING MODE CONVERSION
■In case of no setting the High / Low quantity
Display KEY PLATFORM DESCRIPTION
STEP 1
Press four times
STEP 2 Press once.
Generally operated
■In case of setting the High / Low quantity
Display KEY PLATFORM DESCRIPTION
STEP 1
Press four times
STEP 2 Press once.
Low value setting
STEP 3 Low value input
Digit input in page 11
STEP 4 Press once
High value input
STEP 5 High value input
Digit input in page 11
STEP 6 Press once.
Generally operated

16
GENERAL FUNCTION & DESCRIPTION
1. REZERO FUNCTIOIN (Use at change zero point)
■Rezero band range : Within 2% of Maximum capacity
Zero point is changed. Press 'Zero' key. Zero lamp is ON.
2. TARE FUNCTIOIN (Use at weighing in use of TARE)
■Maximum TARE range : Maximum capacity
Put the TARE on platform0
(TARE weight : 10kg) Press 'TARE' key.
(The TARE weight is saved) Put the object on platform
(object weight : 20kg)
Note :※The weight including TARE weight can't exceed the maximum capacity
■In case to want know the Gross weight
Press 'NET/GROSS' key
(object + TARE weight display)
■In case to want know the NET weight
Press 'NET/GROSS' key (object weight display)
Remove the TARE and object form platform to display the saved TARE weight
■In case to remove the Tare weight
Remove the TARE and object from load cell(up figure) and press TARE key(weight is 0)

1
7
3. HOLD FUNCTIOIN (Use at weighing the moving object)
■Auto hold function (Hold function operated whenever weighing)
Empty the platform Press'Hold'key'Autohold'
messageisdisplayed for 1sec. Hold lamp is ON
When the weight change is
stable after putting the
Object(20kg) on platform,
'Hold' message is displayed
The weight is averaged for
approx. 3~5 sec. The hold weight is displayed.
※Hold start is more than 5.5 division and 10% of maximum capacity after displayed hold weight.
■To release the hold weight Empty the platform or press 'Hold' key and
return to the normal operation
■Auto hold function release
Empty the platform Press 'Hold' key
Auto hold release message is shown for 1 sec.
And then normally operated. 'Hold' lamp is OFF.
■Manual hold function (Executed at pressing 'Hold' key)
Put the object (10kg) on
platform Press 'Hold' key.
'Hold' message is displayed
for 1 sec.
The weight is averaged for
displayed. 3-5 sec.
The hold weight is displayed. Empty the platform or press
'Hold' key to release the hold weight and perform the normal
operation. 'Hold'lampisOFF
※If change weight is more than 10% of maximum capacity after displayed hold
weight, hold function is cancelled

1
8
CONVERSION MODE
1. ENTER method
If you press the * key for three seconds to normal operation state, after display "SET"
Message for one second and then enter.
2. KEY using
Move to the next menu.
Increase the set point.
Return to the normal operation at completion of setting :[ENTER] key.
3. CONVERSION menu (F01 - F06)
F - 1 : Auto power OFF setting.
F - 2 : RS-232C communication setting.
F - 3 : Select print format type.
F - 4 : Stable condition
F - 5 : Display Time Control
F - 6 : Hold Time Control
■F – 1 : Auto power OFF setting
Auto power OFF function is used to spare the battery by means of power off
when this scale is not used.
Set point Meaning
F – 1 0 Auto power OFF is not used
F – 1 1~9 Automatically power off when the weight is not change or no key is used
for 1 ~ 9 minutes

19
■F – 2 : RS-232C communication setting
Set point Meaning
F – 2 0 No transmit
F – 2 1 -
F – 2 2 Transmit at stable weight
F – 2 3 Transmit at data request. (Data request signal “D”)
F – 2 4 Use for print mode
■F - 3 : Select print format type
Set point Meaning
F – 2 0 Select print format 1
F – 2 1 Select print format 2
F – 2 2 Select print format 1 + Current Time
F – 2 3 Select print format 2 + Current Time
■F - 4 : Stable Condition
Set point Meaning
F – 4 1~9 Stable level 1~ 9
■F - 5 : Display Time Control
Set point Meaning
F – 5 1~9 Display Time Control (1 : Past, 9 : Slow)
■F - 6 : Hold Time Control
Set point Meaning
F – 6 1~7 Hold Time Control (1 : Past, 7 : Slow)

20
Print Format
Weight Mode - - - - - - - - - - - - - - - - - - - - - - - - - - - - - - - - - -
< Format 1 > < Format 2 >
No. 001 : 1.00 kg 001 : Net 1.00 kg
Tare0.00kg
Gross1.00kg
< Format 1 + Time > < Format 2 + Time >
2005 03. 17 11:23:46 2005 03. 17 11:23:46
No. 001 : 1.00 kg 001 : Net 1.00 kg
Printed weight is net weight.※Tare0.00kg
Gross1.00kg
PCS Mode - - - - - - - - - - - - - - - - - - - - - - - - - - - - - - - - - - - -
< Format 1 > < Format 2 >
No. 001 : 1.00 pcs 001 : Net 1.00 pcs
Tare0.00pcs
Gross 1.00 pcs
< Format 1 + Time > < Format 2 + Time >
2005 03. 17 11:23:46. 2005 03. 17 11:23:46
No. 001 : 1.00 pcs 001 : Net 1.00 pcs
※Printed count is net count. Tare0.00pcs
Gross 1.00 pcs

21
RS-232C communication
1. Port connection method
Connect the computer serial port with RS-232C port in the back panel
of indicator as follows to communicate with computer
(2)TXD ◆
(1)RXD ◆
(5)GND ◆
- - - - - - - - - - - - - - - - - - - -
- - - - - - - - - - - - - - - - - - - -
- - - - - - - - - - - - - - - - - - - -
CN 1 of
Indicator
( male )
3 Receive Data◆
2 Transmit Data◆
7 Signal Ground◆
4 Request to Send◆
5 Clear to Send◆
6 Data Set Ready◆
8 Carrier Detect◆
20 Data Terminal Ready◆
Computer serial 25 pin port(female)
(2)TXD ◆
(1)RXD ◆
(5)GND ◆
- - - - - - - - - - - - - - - - - - - -
- - - - - - - - - - - - - - - - - - - -
- - - - - - - - - - - - - - - - - - - -
CN 1 of
Indicator
( male )
◆2 Receive Data
◆3 Transmit Data
◆5 Signal Ground
◆1 Carrier Detect
◆4 Data Terminal Ready
◆6 Data Set Ready
◆7 Request to Send
◆8 Clear to Send
Computer serial 9 pin port (female)
2. RS-232C Output data format
■Baud rate : 9600bps
■Data bit : 8, Stop bit : 1, Parity bit : None
■Code : ASCII
This manual suits for next models
5
Table of contents
Other CAS Scale manuals