CAS EB-WS-6 User manual

2

3
CONTENTS
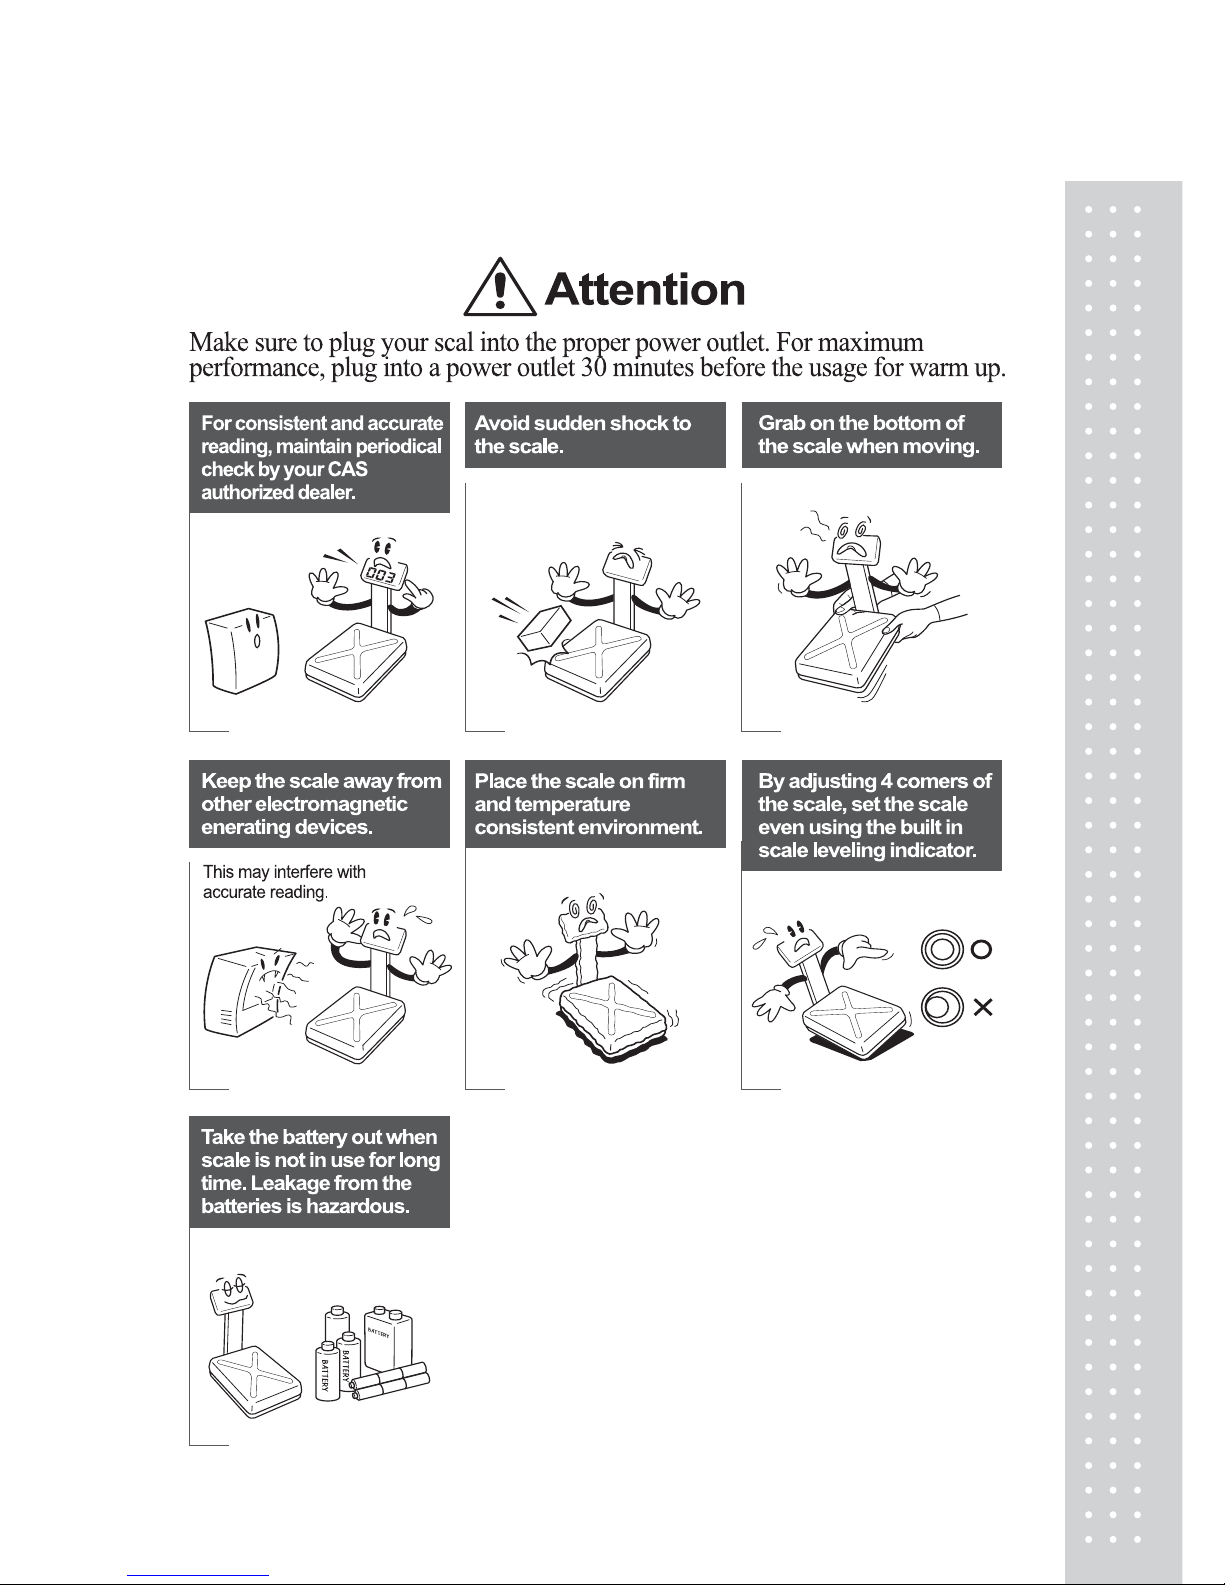
PRECAUTIONS........................................................ .4
PREFACE.................................................................... 6
OVERALL VIEW..................................................... .6
DISPLAY & KEYBOARD ...................................... .7
OPERATIONS........................................................... .9
I. Programming Mode.......................................... .9
Chapter 1. Basic Operation ................................ .10
Chapter 2. PLU Saving & Calling-up ................ .13
Chapter 3. User’s Set-up Mode .......................... .17
Chapter 4. Formatting Printing Receipt ............ .23
II. Sales Mode ...................................................... .28
Chapter 5. Sales Transaction.............................. .29
Chapter 6. Discount & Payment ........................ .40
Chapter 7. Daily Total Sales ............................... .42
Chapter 8. Save function (Option)........................ .44
ASCII CODE ........................................................... .47
ERROR MESSAGES............................................. .48
SPECIFICATION................................................... .49
3

4
PRECAUTIONS
4

5
5

6
PREFACE
Thank you for the purchasing CAS EB series.
This series have been designed with CAS reliability, under rigid quality control and with
outstanding performance. Your specialty departments can enjoy with CAS product. We hope
that CAS product meets your needs.
The user manual is designed to guide you to understand product operation and proper care of
product.
OVERALL VIEW
6

49
DISPLAY & KEYBOARD
■LCD TYPE : Front Display
Table : Symbols on Display
SYMBOLS DESCRIPTION
ZERO To adjust zero
STABLE Stable status
NET Tare on
CHARGE Charge status
SAVE Save on
Display battery status
Back light on status
■KEYBOARD
7

50
KEYS FUNCTIONS
~ , To input all of numerical data
~ Direct PLU keys (24EA)
To save PLU
To call up PLU
To clear data
To set zero
To set or clear tare value
To turn on & off the scale
To turn on & off the backlight.
Used to prevent the auto clearing of unit price and tare weight
both
To make several sales transaction by adding up
To make discount transaction
To multiply the same item when making sales transaction
To check total sales amount or finalize sales transaction
Used to convert a kilogram and pound
8

9
OPERATIONS
I. Programming Mode
Chapter 1. Basic Operation
a. Turning the scale on / off
b. Turning backlight on / off
c. Zero function
d. Display battery voltage
e. Tare function
- One time tare
- Successive tare
Chapter 2. PLU Saving & Calling-up
a. Saving unit price on PLU
b. Saving PLU name (option)
c. Calling up PLU
- Indirect PLU
- Direct PLU
Chapter 3. User’s Set-up Mode
a. Auto power-off
b. LCD backlight on / off
c. LCD backlight brightness control
d. Low Battery Backlight ON/OFF Function
e. Selecting the printer
Chapter 4. Formatting Printing Receipt
a. Setting the Printer
b. Receipt header setting
c. Receipt currency (unit) setting
d. Receipt date setting
9

10
Chapter 1. Basic Operation
a. Turning the scale on / off
1) Press "ON/OFF"key to turn on.
2) Press "ON/OFF"key to turn OFF
b. Turning the backlight on / off
1) Press "BACK LIGHT" key for Back light on.
2) Press "BACK LIGHT: key for Back light off
10
STABLE ZERO NET
STABLE ZERO NET
STABLE ZERO NET
STABLE ZERO NET

11
c. Zero function
1) Press "ZERO"key to set zero point unless the weight window indicate “0.00”under the
empty platter.
)
d. Tare function
Tare means the weight of container. You may use tare function when you weigh an item
with container and measure only the weight of item.
■One time tare
1) Place a container on the platter.
Ex) 2.00kg of tare.
11
STABLE ZERO NET
STABLE ZERO NET

12
2) Press “TARE” key to enter a tare weight
Ex) 2.00Kg of tared
■Successive tare
1) Place another container on the platter.
Ex) 1.00 kg of tare
2) Press “TARE” key to enter a tare weight
3) After weighing item remove all of the container from the platter.
4) Press “TARE” key again to cancel a tare weight.
12
STABLE ZERO NET
STABLE ZERO NET
STABLE ZERO NET
STABLE ZERO NET
STABLE ZERO NET

14
Chapter 2. PLU Saving & PLU Calling-up
a. Saving unit price on PLU
Number of PLU Range Remarks
PLU 200 1~200
PLU name (option) 28 1~28
●Number of direct PLU may be different on product model.
●“C” key is to clear data input.
1) Press numeric key to input unit price you wish to have. Ex) 1.99
2) Press MEMORYkey.
3) Press numeric key to input a PLU address.
Ex) PLU 10.
13
STABLE ZERO NET
STABLE ZERO NET
STABLE ZERO NET

15
4) Press MEMORY key.
b. Saving PLU name (option)
■If you have “24 PLU name inputting option” you may save the name of PLU for 1~28.
■“C” key is to input, save a character, and move to next character (or byte).
■“TARE” key is to save and exit.
1) Input appropriate ASCII codes to save the PLU name.
※Please refer to the ASCII table on page 48.
Ex) “APPLE” is “4, 1, C, 5, 0, C, 5, 0, C,….
C C
CC C
Press "4", "1"
Press "C"
Press "5", "0"
Press "C"
Press "5", "0"
Press "C"
14
STABLE ZERO NET
STABLE ZERO NET
STABLE ZERO NET
STABLE ZERO NET

16
Press "4", "C"
Press "C"
Press "4", "5"
Press "C"
2) Press TAREkey to exit to normal weighing mode or Ckey up to maximum 8th byte. Then
automatically exit to normal weighing mode.
■Please refer to “Alphabetic key location”.
15
STABLE ZERO NET
STABLE ZERO NET
STABLE ZERO NET

17
c. Calling up a PLU
■Indirect PLU
1) To call up indirect PLU Saved press appropriate numeric keys (address) and PLU key
Ex) PLU 10
2) To cancel calling up indirect PLU press “ ” key
■Direct PLU
1) To call up direct PLU Saved press appropriate numeric keys (address) and "PLU"key.
Ex) PLU 10
2) To cancel calling up direct PLU press “ ” key
16
STABLE ZERO NET
STABLE ZERO NET
STABLE ZERO NET
STABLE ZERO NET

18
Chapter 3. User’s Set-up Mode
This section explains how to set up the following functions.
Functions Options Remarks
1. Auto power-off NO / 10 / 30 / 60
2. LCD Backlight On/OFF OFF / ON / 3 / 5 / 10
3. Backlight Bright control 1 ~ 7(defualt 3)
4. Low Battery Backlight On/Off BL-on / BL-off
5. Printer selection NON/DEP-50/DLP-50
6. PLU tare NO / YES
İt is applied only during
using PLU tare with unit
change function.
1) To get into “User’s Set-up Mode” press "ON/OFF"key pressing and holding
"ZERO"key.
+
■Press “ZERO” key to save current option and move to next function setting mode.
■Press “TARE” key to move to other next option.
17
STABLE ZERO NET

19
a. Auto power-off
This section explains how to set backlight on & off function and automatic off function.
Table :
Options Description Remarks
NO No auto power-off.
10 (minutes) Auto power-off in 10 minutes when no use.
30 (minutes) Auto power-off in 30 minutes when no use.
60 (minutes) Auto power-off in 60 minutes when no use.
1) Select an option you wish to have by using “TARE” key. Ex) 30 (minuets)
2) Press “ZERO” key to move next function setting, EL Backlight ON/OFF.
18
STABLE ZERO NET
STABLE ZERO NET

20
b. LCD backlight ON/OFF
Table :
Options Description Remarks
OFF Backlight OFF
ON Backlight ON
3 (Seconds) Automatic backlight-off when not in use for 3 seconds.
5 (Seconds) Automatic backlight-off when not in use for 5 seconds.
10 (Seconds) Automatic backlight-off when not in use for 10 seconds.
1) Use “TARE” key to select one of backlight auto power-off option or EL Backlight
ON/OFF.
Ex) Select 5 seconds backlight auto power-off option.
2) Press “ZERO” key to move next function setting, EL Backlight ON/OFF.
19
STABLE ZERO NET
STABLE ZERO NET

21
C. LCD backlight brightness control
This section explains how to set backlight on & off function and automatic off function.
Table :
Options Description Remarks
1 ~ 7 1(dimmest) ~ 7(brightest).
1) Use “TARE” key to select one of backlight brightness level.
Ex) Select 3rd level of backlight brightness.
2) Press “ZERO” key to move next function setting.
d. Low Battery Backlight ON/OFF function
This section explains how to set backlight on & off when low battery status.
Table :
Options Description Remarks
BL-on Back-light on when low battery status.
BL-off Automatic backlight-off when low battery status.
1) Use “TARE” key to select backlight auto power-off when low battery status.
※ : Low battery condition
20
STABLE ZERO NET
STABLE ZERO NET
STABLE ZERO NET

22
2) Press “ZERO” key to move next function setting.
e. Selecting the printer
This section explains how to select the printer option when you’d like to use the printer
connected to EB series.
Table :
Options Description Remarks
NON No printer in use
DEP-50 DEP-50 printer interface
DLP-50 DLP-50 printer interface
1) Select the printer you’re using with ER by pressing “TARE” key. EX) DEP-50
■If you press “ZERO” key you can automatically go to normal weighing mode.
21
STABLE ZERO NET
STABLE ZERO NET
This manual suits for next models
8
Table of contents
Other CAS Scale manuals