Cavist 7 User manual

CAVIST.
Instruction manual
Manuel d’utilisation
Gebruachsanweisung
Gebruiksaanwijzing
Manual de Usuario
Manuale d’uso
Wine cellar -7bottles
Cave àvin -7bouteilles
Weinkeller -7Flaschen
Wijnkelder -7flessen
Cantina -7bottiglie
Bodega -7botellas
BWC150SS 15 cm
7 Bottle built-in
wine cabinet

ENGLISH
NOTE: This User Instruction Manual contains important information, including safety &
installation points, which will enable you to get the most out of your appliance. Please keep it
in a safe place so that it is easily available for future reference, for you or any person not
familiar with the operation of the appliance.
Important safety information
Your safety is of the utmost importance to us. Please make
sure that you read this instruction booklet before attempting
to install or use the appliance.
IMPORTANT: Any installation work must be carried out
by a qualified electrician or competent person.
Use of the appliance
o Your appliance is only designed to be used in the home. It is suitable for storing and chilling
wine. NO food stuffs must be stored in the appliance. If it is used for any other purpose or it is
not used correctly, then HKoenig will accept no liability for any damage that is caused.
o Altering the specification of the appliance must not be attempted for reasons of safety.
Before using your appliance
o Check the appliance for any signs of transport damage. If you notice any damage, then you
should not connect your appliance to your mains supply and should contact your retailer.
Refrigerant
o Your appliance contains R600a refrigerant, therefore care should be taken:
§ During the transportation and installation of the appliance, make sure that the
refrigeration pipework does not get damaged.
§ If it does become damaged then sources of ignition and open flames should be
avoided. Also the room that the appliance is situated in should be thoroughly
ventilated.
o Do not place any objects on top of the appliance, as this may damage the table top.
Child safety
• Packaging material should be kept away from children.
• Children should not be allowed to touch the controls or play
with the appliance.

General safety
• Do not pull on the power supply cable to remove the plug
from your mains supply socket.
• Do not pull out or insert the plug with wet hands.
• Do not attempt to use your appliance outdoors or any place
where it is likely to come into contact with the elements.
• Before cleaning the appliance or performing maintenance
work, ensure that the appliance has been disconnected
from your mains supply.
• Never allow the back coils of the appliance to come into
contact with the wall surface.
• Always ensure that the location where you are installing
your appliance is free of stored items such as papers and
other flammable materials.
• Never block the ventilation openings of the appliance,
either on the inside or its exterior.
• It is vital to keep your appliance well ventilated, so that
there is proper air flow between the bottom of the unit and
the plinth/kick plate which it is sitting on.
• Do not place electrical devices inside of the appliance,
such as mixers or ice cream makers.
• This appliance may be used by children of at least
8 years of age, as long as they are supervised and
have been given instructions about using the
appliance safely and are fully aware of the dangers
involved.
• Cleaning and maintenance should not be carried
out by children unless they are at least 8 years of age
and are supervised by an adult.

• Keep the appliance and its power cord out of reach
of children under 8 years of age.
• When using electrical equipment, safety precautions
must always be taken to prevent the risk of fire, electric
shock and/or injury in the event of misuse.
• Make sure that the voltage rating on the typeplate
corresponds to your main voltage of your installation.
If this is not the case, contact the dealer and do not
connect the unit
• Never leave the unit unattended while in operation.
• Please keep this document at hand and give it to
the future owner in case of transfer of your device
• Cleaning and maintenance should not be carried out by
children unless they are at least 8 years of age and are
supervised by an adult.
• Keep the appliance and its power cord out of reach of
children under 8 years of age.
• Make sure that the voltage rating on the typeplate
corresponds to your main voltage of your installation. If
this is not the case, contact the dealer and do not connect
the unit
• Please keep this document at hand and give it to the
future owner in case of transfer of your device
• The device must not be used if it has been dropped, it
obvious signs of damage are visible or if it has leaks.
Service
You should not attempt to repair the appliance yourself, as this could cause injury or a more serious
malfunction. If you require a service call then please contact Hkoenig Customer Care Department.

Specifications of your wine cabinet
Dimensions of appliance
Height: 872 - 890 mm
Width: 148 mm
Depth: 525 mm
Dimensions of aperture*
Height: 875 mm (min)
Width: 155 mm (min)
Depth: 570 mm (min)
o Gross capacity: 22 litres
o Bottle capacity: 7 x 0.75 litre Bordeaux style wine bottles
o Energy efficiency class: B
o Noise level: 39 dB
o Electronic push button control operation
o LED display
o 6 Adjustable wooden shelves
o Adjustable temperature
o Internal light
o Water drainage
o Black exterior
o Reversible door
o Adjustable feet
o Tempered glass door
o Stainless steel door frame and handle
o Designed to store wine at its optimum temperature between 5°C and 22°C.

Description of the appliance
Product features
1) Stainless steel door
2) Stainless steel handle
3) Digital control panel
4) Adjustable shelves
5) Adjustable foot
Control panel
The control panel is located in the middle of the appliance.
1) ON / OFF control button
2) Light control button
3) Temperature display
4) Temperature plus button
5) Temperature minus button
Description of the product features
Control panel
o The control panel is located in the middle of the appliance, behind the glass door. This means
it is easy to set the temperature of the appliance and see what temperature the appliance is set
to.

7
One cooling zone
o There is one cooling zone inside of your wine cabinet.
o The cooling zone has a temperature control and temperature display.
Interior light
o The cooling zone has an interior light. The light can be switched on and off by using the light
control button (2).
The wine cabinet shelves
o The wooden shelves are fully adjustable to suit various wine bottle shapes and sizes.
o To prevent damaging the door gasket, make sure the door is fully open when pulling the shelves
out of the rail compartment.
o For easy access to the bottles stored, pull the shelves out approximately 1/3 of the way.
Using your wine cabinet
Before switching on
o Make sure that it has been installed by a suitably qualified person, as per the information
contained in HKoenig’s installation instructions.
o After delivery, wait for eight hours before connecting the appliance to your mains supply. This
will allow any refrigerant gasses that may have been disturbed during the transportation
process to settle.
o The outside of the appliance and the removable accessories contained within it, should be
cleaned with a solution of liquid detergent and water.
o The interior of the appliance should be cleaned with a solution of sodium bicarbonate dissolved
in lukewarm water. The interior and accessories should be thoroughly dried, after the cleaning
process has been completed.
o There can be an odour when you first switch on the appliance. It will lessen as the appliance
starts to cool.
During first use
IMPORTANT: When you use the wine cabinet for the first time or restart the appliance after it
has been turned off for a long time, there could be a few degrees variance between the
temperature you select and the one indicated on the LED display. This is normal and it is due
to the length of activation time. Once the wine cabinet has been running for a few hours
everything will be back to normal.
o When you first switch on the appliance, the compressor will run continuously until the wine
cabinet reaches a cool enough temperature.

8
o During this period of time, you should try not to open the door frequently or place bottles inside
of the appliance.
o If the unit is switched off or unplugged, you must allow at least 5 minutes before restarting the
appliance or reconnecting it to your mains supply.
Switching on the appliance and setting the temperature
o To switch the appliance on, press the ON / OFF control button (1) for 5 seconds.
o The temperature setting for the appliance is adjustable within the range of 5°C - 22°C / 40°F /
72°F.
o When you press the temperature plus (4) or minus (5) button for the first time, the LED display
will show the factory default temperature setting of 12°C / 54°F.
o Use the temperature plus (4) and minus (5) buttons to set the desired internal temperature.
o The temperature will increase by 1°C or 1°F if you touch the plus button (4) once and will
decrease by the same amount if you press the minus button (5) once.
o When you set a new temperature, the display will show the previous temperature for 5 seconds,
before showing the actual temperature. During this time, the cabinet temperature will adjust
accordingly.
o To view the set temperature in the wine cabinet, press the plus (4) or minus (5) button. The
display will flash the temperature for 5 seconds.
o Cool air falls and warmer air rises, so there will be a slight temperature variation between the
top of the cabinet and the bottom of the cabinet.
IMPORTANT: When the temperature is changed, the compressor works harder to reach the
required temperature. During this time, the side panels of the wine cabinet can reach up to
45°C however they will cool down when the set temperature is reached.
Changing between Fahrenheit and Celsius
o You can select whether the temperature display shows Celsius or Fahrenheit.
o To alter what the temperature display is showing, press the plus button (4) for 5 seconds.
o You cannot change the display if you are in the process of adjusting the temperature of the
wine cabinet.

9
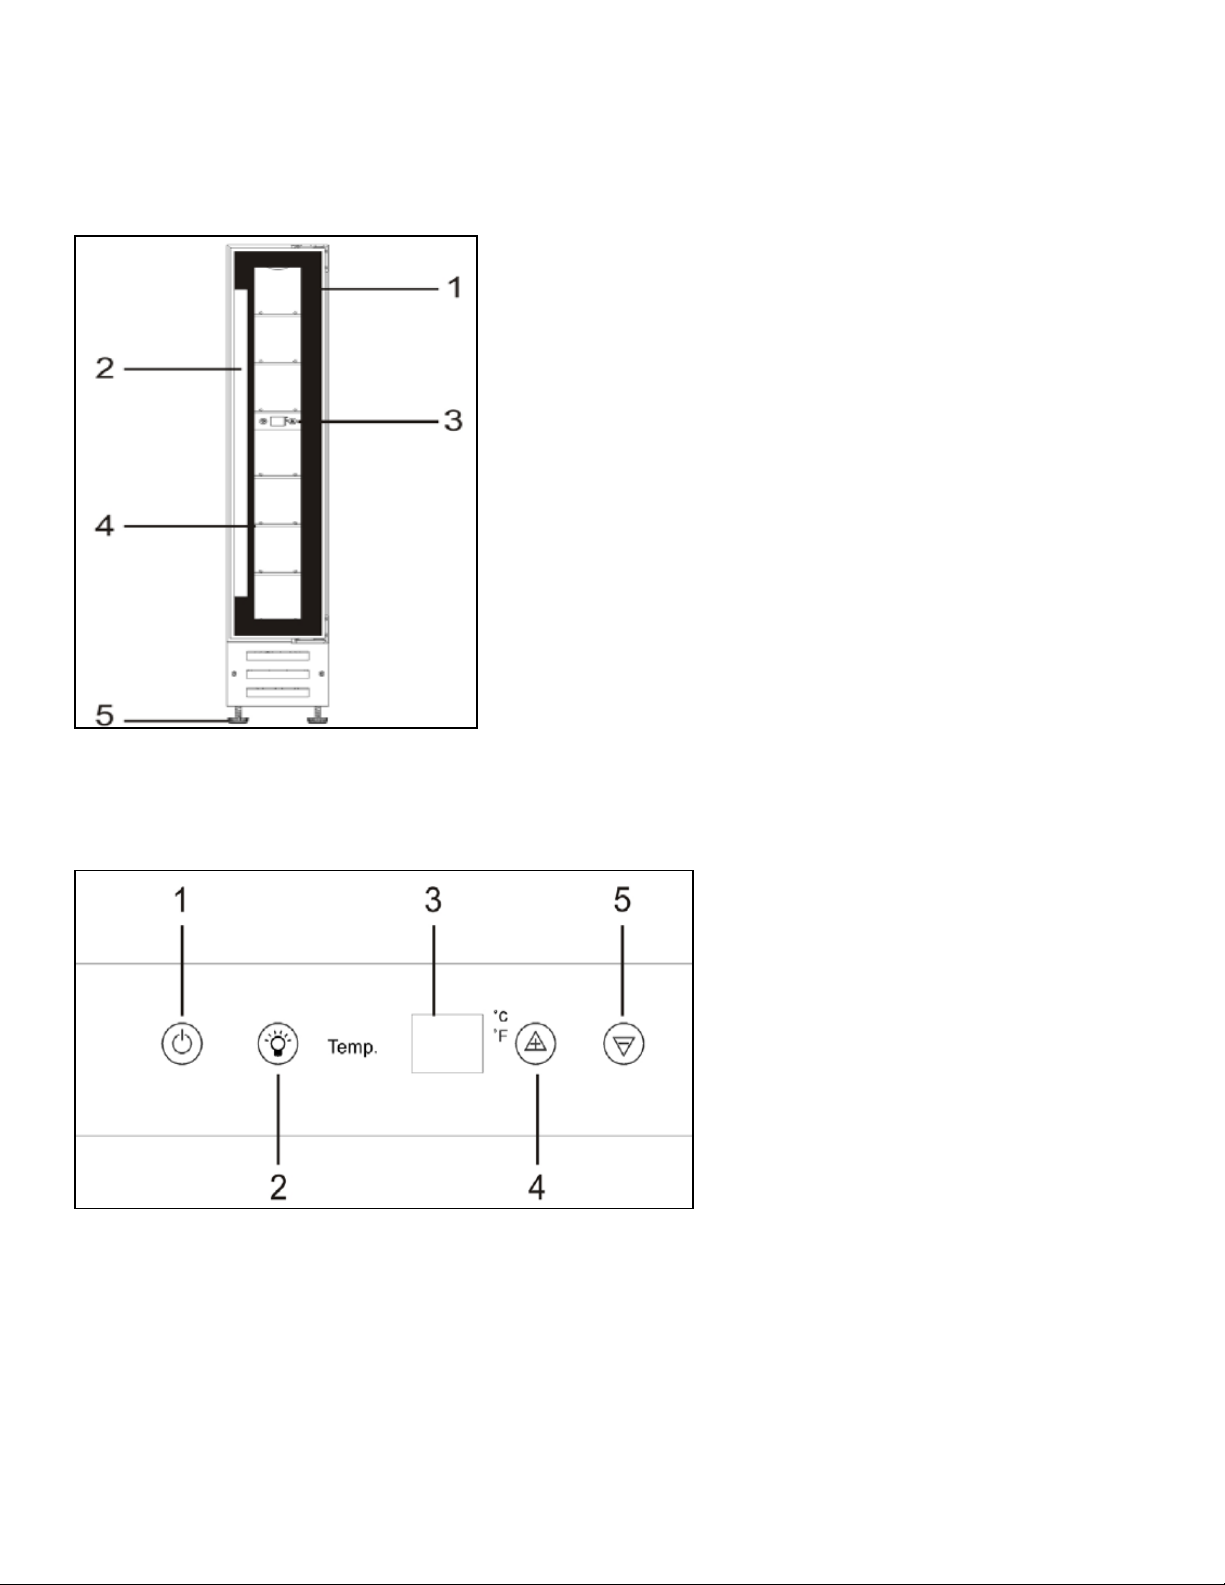
Loading the wine cabinet
o IMPORTANT: Your appliance is ideally suited to store 0.75 litre Bordeaux style wine bottles. While
the cabinet can store larger bottles, you must make sure that they do not prevent the door from
shutting properly.
o Always check that you can close the door without it fouling on a wine bottle, before shutting
it.
o When loading several bottles of wine at once, it will take longer for the appliance to cool the
individual bottles.
o As many bottles may differ in size and dimensions, the actual number of bottles you are able
to store may vary. The maximum storage number is based on standard 0.75 litre Bordeaux
style wine bottles.
o You can place 7 standard size bottles in your appliance with 1 bottle on each shelf.
Wine storage problems
Corking- a tiny percentage of bottled wine (about 1%) will suffer from this. The cork reacts with the
wine and gives it a musty, unpleasant taste. It is the most common wine storage problem and is
caused by harmless bacteria growing on the cork. As unfortunate as this is, there is nothing to do but
to discard all of the wine in the affected bottle. This is not to be confused with small fragments of cork
floating in the wine itself, which will not impair the flavour.
Oxidisation- when wine has been opened and left for longer than a day; it tends to lose its aroma and
colour, giving an overall flat taste. The only way to avoid this, it to either drink the wine on the same
day it was opened or to use a vacuum device specially designed for removing oxygen from opened
wine bottles. If you use such a device, the wine should still be consumed shortly afterwards.
Ullage- this is loss of wine from the bottle by evaporation or leakage. Signs of ullage include wine
seeping around the cork, a protruding cork or a stained label. It can happen if the bottle has been
allowed to get too warm. The wine may still be drinkable, if the leakage was recent; however, you
should be aware that if the wine cools down again, contraction can cause more air to be sucked into
the bottle and result in further deterioration.
Slight effervescence in still wine- this isn’t really a problem with the way the wine has been stored,
but as a result of incomplete malolactic fermentation before the wine was bottled. A good way to get
rid of the effervescence is to let the wine breathe. Alternatively you can use a bottle vacuum device,
after about five minutes the effervescence will vanish.
Sediment- this is not normally a problem, however both red and white wines can produce sediment
after a number of months in a bottle. The sediment consists of tartrate crystals and is totally harmless.
If anything the building of sediment can be considered a good sign because it means that the wine
was not subjected to much (if any) filtering, meaning that the flavours and aromas should be preserved
better.

10
A good way to get around sediment (if it is a problem) is to stand the bottle upright, the day before
opening, so that the sediment can settle to the bottom of the bottle.
You can also decant your wine; decanting will “open up” the flavour of both young and old wines, but
younger wines in particular. To decant, pour the wine slowly and evenly into your decanter.
CLEANING AND MAINTENANCE
WARNING: PLEASE ENSURE THAT YOUR APPLIANCE IS
DISCONNECTED FROM YOUR MAINS SUPPLY BEFORE
ATTEMPTING TO CLEAN IT.
• Do not clean the appliance by pouring water onto it or
spraying water over it.
• The interior of the wine cabinet should be cleaned
periodically, using a solution of bicarbonate of soda and
lukewarm water.
• Clean the accessories separately with soap and water. Do
not clean them in a dishwasher.
• Do not use abrasive products, detergents or soaps.
• After washing the appliance, wipe over the area that you
have cleaned with a damp cloth and then dry it thoroughly.
• When cleaning is complete, dry your hands and then
reconnect the plug to your mains supply.
Defrosting
o Defrosting occurs automatically inside of the wine cabinet during operation. The defrost water is
collected by the evaporating tray and evaporates automatically.
o The evaporating tray and defrost water drain hole should be cleaned periodically. This will prevent
water from collecting in the bottom of the wine cabinet, instead of flowing down the defrost
drainage channel and drain hole.
o You can also pour a small amount of water down the drain hole to clean inside of it.
o You should be careful to make sure that wine bottles do not touch the rear wall of the appliance,
as this can interrupt the automatic defrosting process and deflect water into the base of your wine
cabinet.

11
Removing the shelves for cleaning
o To remove any of the shelves from the rail compartment, move the shelf to the position where the
notch of the wooden shelf is directly under the plastic post and lift the wooden shelf. Please ensure
these are replaced when the shelf is put back.
o Make sure the shelves are fully engaged before loading any bottles into the cabinet. Pull the shelves
out all the way to the STOP position and push them back in several times to make sure the shelves
are properly engaged.
Moving your wine cabinet
If you need to move your wine cabinet to another location you should follow the steps outlined below.
o Remove all items from the wine cabinet.
o Securely tape down all loose items such as the shelves inside of the appliance.
o Turn the adjustable foot up to the base to avoid damage.
o Tape the door closed.
o Ensure that the appliance stays secure in the upright position during transportation. Also
protect the outside of the appliance with a blanket or similar item.
Power failure
o Most power failures are corrected within a few hours and should not affect the temperature of
your appliance if you minimise the number of times the door is opened.
o If the power is going to be off for a longer period of time, you need to take the proper steps to
protect the contents.
IMPORTANT: If the appliance is unplugged, the power is lost or turned off you must wait 3 to 5
minutes before restarting the wine cabinet. If you attempt to restart before this time delay, the
wine cabinet will not turn on.

12
Vacation time
Short holidays: Leave the wine cabinet in operation for holidays of less than 3 weeks.
Long absences: If the appliance will not be used for several months, remove all items, turn off the
appliance and unplug the electricity cable. Clean and dry the interior thoroughly. To prevent odour
and mould growth, leave the door open slightly by blocking it open if necessary.
Installation
IMPORTANT: Before installation and usage read all the instructions and make sure that the
voltage (V) and the frequency (Hz) indicated on the rating plate are exactly the same as the
voltage and frequency in your home. The rating plate can be found on the front edge of the
inside of the wine cabinet.
The manufacturer declines all responsibility in the event of the installer failing to observe all the
accident prevention regulations in force, which are necessary for normal use and the regular operation
of the electric system.
Positioning
o It is advisable that your appliance is only installed in a location where the ambient temperature of
the room, corresponds with the climate classification that is stated on the rating plate of your
appliance. Your appliance may not function correctly if the ambient temperature falls outside of
the following ranges.
Climate classification
Appropriate ambient temperature
SN
+10 to +32 degrees centigrade
N
+16 to +32 degrees centigrade
ST
+18 to +38 degrees centigrade
T
+18 to +43 degrees centigrade
o Positioning the appliance requires two people in order to avoid injuries or damage to the appliance.
o Your appliance should not be located in direct sunlight or exposed to continuous heat or extremes
of temperature (e.g. next to a radiator or boiler). If this is not feasible, then you should install an
insulation plate between the appliance and the adjacent heat source.
o You should check whether there is an electrical socket available, which will be accessible after
your appliance is installed.
o Place the appliance flatly and firmly on a solid base. The appliance is fitted with adjustable feet on
the front side, which should be used to level the appliance.
o Be sure to leave enough space for the opening of the door, to avoid damage to the appliance or
personal injury.
IMPORTANT: The vent at the base of the appliance is for ventilation. Nothing should be placed
in front of this vent; otherwise your wine cabinet may not operate properly.
Built-in installation

13
o Your wine cabinet can be used as a freestanding or a built in unit. The clearances shown in the
above drawing should be followed for both types of installation.
o In particular the depth dimension must be observed.
o IMPORTANT: The vent at the base of the appliance is for ventilation. Nothing should be
placed in front of this vent; otherwise your wine cabinet may not operate properly.
o A decorative plinth can be fitted to the front of the base vent as long as the cut out shown in the
diagram below is made in the plinth. This cut out is required whether the vent is removed or not.

14
Installing the handle
o Remove the door gasket on the side you wish to install the handle. You can see two designated
holes for handle installation.
o Install the handle tightly as shown in the diagram above with the two screws, lock washers and
flat washers provided.
o Replace the door gasket.
Reversing the door of your wine cabinet
This appliance has the capability of the door opening from either the left or right hand side.
Any parts that you remove from the appliance whilst reversing the door, should be retained for
later use.
o Open the glass door and remove the two screws, under
the right bottom corner of the glass door, that are used to hold
the right lower hinge to the door shaft assembly.
o Be careful to support the glass door with both hands to
prevent it dropping after removing the screws.

15
o Pull down to remove the glass door and place it on a
padded surface to prevent scratching it.
o Remove the right top hinge and right lower hinge.
o Take the left top hinge and left lower hinge from the
plastic bag that contained this manual then install them in the
designated positions on the left side of the cabinet.
o Turn the glass door around 180° and reinstall it.
IMPORTANT: Check that the door opens and shuts correctly, without fouling, after you have
completed the door reversal process.
After the door has been reversed, you should check the door seal of the wine cabinet. The seal
should not be creased or crushed; otherwise there will be a gap between it and the inside of
the door.
IMPORTANT: WHEN YOU HAVE REVERSED THE DOOR OF THE APPLAINCE, IF YOU HAVE
PLACED THE APPLIANCE ON ITS BACK, YOU MUST WAIT FOR 8 HOURS BEFORE SWITCHING
THE APPLIANCE BACK ON.

16
Troubleshooting
PROBLEM
POSSIBLE CAUSE
Appliance does not
operate
Not plugged in.
The circuit breaker has tripped or the fuse has blown.
Temperature inside the
appliance is too warm.
The temperature controls are set too warm. Set the temperature controls
to a cooler setting and allow several hours for the temperature to
stabilise.
The door is being kept open too long or is being opened too frequently,
which is allowing warm air to enter the appliance.
The door is not closed completely.
The door gasket is not sealing correctly.
The appliance has recently been disconnected from the mains supply; it
will take at least four hours for it to get down to temperature again.
Temperature inside the
appliance is too cold
The temperature controls are set too cold. Set the temperature controls
to a warmer setting and allow several hours for the temperature to
stabilise.
Vibration
Check to ensure that the appliance is on a level surface.
The appliance is touching the back wall behind it. Reposition the
appliance and move it from the wall.
If vibration continues to occur, then turn off the appliance and unplug it
from your mains supply. Then contact the Customer Care Department for
assistance.
Moisture is forming on
the inside of the
appliance.
The door is slightly open.
The door is being kept open too long or is being opened too frequently.
Open the door less often.
The door is not sealed properly.
Moisture is forming on
the outside of the
appliance.
The door is slightly open, causing cold air from inside the appliance to
meet warm, moist air from the outside.
ENVIRONMENT
CAUTION:
Do not dispose of this product as it has with other household products. There is a separation of this waste
product into communities, you will need to inform your local authorities about the places where you can
return this product. In fact, electrical and electronic products contain hazardous substances that have
harmful effects on the environment or human health and should be recycled. The symbol here indicates that
electrical and electronic equipment should be chosen carefully, a wheeled waste container is marked with a cross.
Adeva SAS / H.Koenig Europe - 8 rue Marc Seguin - 77290 Mitry Mory - France
www.hkoenig.com - [email protected] - [email protected] - Tél: +33 1 64 67 00 05

17
FRANÇAIS
NOTE: Ce mode d'emploi contient des informations importantes à propos de la sécurité et de
l'installation, ce qui vous permettra de profiter le plus possible de votre appareil. Veuillez
ranger ces instructions dans un endroit sûr, afin de pouvoir les relire plus tard ou les donner à
une personne qui ne sait pas faire fonctionner l’appareil.
Informations importantes sur la sécurité
Votre sécurité est très importante pour nous ; n'oubliez pas de lire ce mode d'emploi avant d'essayer
d'installer l'appareil.
IMPORTANT: Toute installation doit être faite par un électricien qualifié ou une personne
compétente.
L’utilisation de l’appareil
o Cet appareil ne doit être utilisé qu'à domicile, et il ne sert qu'à ranger et à refroidir du vin, et il
ne faut PAS y mettre de la nourriture. Si vous l'utilisez pour autre chose, HKoenig ne peut être
responsable des dégâts qui peuvent s'ensuivre.
o Pour des raisons de sécurité, vous ne devez pas changer les spécifications de l'appareil.
Avant l’utilisation de votre appareil
o Vérifiez si l'appareil a été endommagé durant le transport ; si vous remarquez un dégât
quelconque, vous ne devez pas connecter votre appareil et vous devez immédiatement
contacter votre fournisseur.
Le Réfrigérant
o Votre appareil contient un réfrigérant de R600a, alors vous devez prendre les précautions
suivantes :
§ durant le transport et l'installation de votre armoire à vin, faites attention à ne pas
endommager la tuyauterie de la réfrigération
§ Si cette dernière est endommagée, il ne faut pas placer l'appareil à côté du feu.
Vous devez vous assurer qu'il y ait une bonne ventilation dans la pièce où
l'appareil est placé.
o Ne mettez aucun objet sur le sommet de l'appareil, car cela peut l’endommager.
LA SÉCURITÉ DES ENFANTS
o L'emballage ne doit pas être mis à la portée des enfants.
o Les enfants ne doivent pas toucher les commandes, ni
jouer avec l'appareil.

18
LA SÉCURITÉ GÉNÉRALE
o Ne tirez pas sur le cordon d'alimentation si vous voulez
débrancher l'appareil.
o Il ne faut pas brancher ou débrancher l'appareil si vous
avez les mains mouillées.
o N'utilisez pas votre armoire à 20 à l'extérieur, et ne
l'exposez pas aux éléments.
o Vous devez débrancher l'appareil avant de le nettoyer ou
de l'entretenir.
o Les anneaux se trouvant à l'arrière de l'appareil ne
doivent jamais toucher le mur.
o Lorsque vous installez votre appareil, ne le placez pas à
proximité de papiers ou d'autres matériaux inflammables.
o La ventilation intérieure et extérieure de l'appareil ne doit
jamais être bloquée.
o Votre appareil doit impérativement recevoir une bonne
ventilation, afin de permettre à l'air de circuler librement
entre le pas de l'appareil et le socle sur lequel il est posé.
o Ne placez aucun appareil électroménager (tels que les
mixeurs ou les glacières) dans votre armoire à vin.
o Cet appareil peut être utilisé par des enfants âgés d’au
moins 8 ans, à condition qu’ils bénéficient d’une
surveillance ou qu’ils aient reçu des instructions
quant à l’utilisation de l’appareil en toute sécurité et
qu’ils comprennent bien les dangers encourus.
o Le nettoyage et l’entretien par l’utilisateur ne doivent
o pas être effectués par des enfants, à moins qu’ils ne
soient âgés de plus de 8ans et qu’ils soient sous la
surveillance

19
d’un adulte.
o Conserver l’appareil et son câble hors de portée des
enfants âgés de moins 8ans.
o Lors de l’utilisation d’appareils électriques, des
précautions de sécurité doivent toujours être
prises pour prévenir tout risque d’incendie, de choc
électrique et/ou de blessure en cas de mauvaise
utilisation.
o Vérifier que le voltage indiqué sur la plaque signalétique
de l’appareil correspond bien à celui de votre
installation électrique. Si ce n’est pas le cas,
adressez-vous au revendeur et ne branchez pas
l’appareil
o Ne jamais laisser l’appareil sans surveillance lorsqu’il
est en fonctionnement.
Veuillez conserver ce document à disposition et le
remettre au futur propriétaire en cas de cession de votre
appareil
o Le nettoyage et l’entretien par l’utilisateur ne doivent pas
être effectués par des enfants, à moins qu’ils ne soient
âgés de plus de 8 ans et qu’ils soient sous la surveillance
d’un adulte.
o Conserver l’appareil et son câble hors de portée des
enfants âgés de moins 8 ans.
o Vérifier que le voltage indiqué sur la plaque signalétique
de l’appareil correspond bien à celui de votre installation
électrique. Si ce n’est pas le cas, adressez-vous au
revendeur et ne branchez pas l’appareil.

20
o Veuillez conserver ce document à disposition et le
remettre au futur propriétaire en cas de cession de votre
appareil.
o L’appareil ne doit pas être utilisé s’il a chuté, s’il y a des
signes visibles de dommages ou en cas de fuite.
Les réparations
Vous ne devez pas essayer de réparer l'appareil par vous-même, car vous pouvez l'endommager ou
même vous blesser. Si vous avez besoin d'une réparation quelconque, veuillez contacter le
département de services aux clients de HKoenig.
SPECIFICATIONS DE VOTRE ARMOIRE A VIN
Dimensions de l’appareil
Hauteur : 872 - 890 mm
Largeur : 148 mm
Profondeur : 525 mm
Dimensions de l’ouverture*
Hauteur : 875 mm (min)
Largeur : 155 mm (min)
Profondeur : 570 mm (min)
Table of contents
Languages:
Other Cavist Wine Cooler manuals