Cavist 91 User manual

C A V I S T.
Instruction manual
Manuel d’utilisation
Gebruachsanweisung
Gebruiksaanwijzing
Manual de Usuario
Manuale d’uso
Wine cellar - 91 bottles
Cave à vin - 91 bouteilles
Weinkeller - 91 Flaschen
Wijnkelder - 91 flessen
Cantina - 91 bottiglie
Bodega - 91 botellas

ENGLISH
To ensure proper use of this wine cooler and your safety, please read the following
instructions completely before operating this appliance.
NAMES OF THE PARTS
1.
HandleDigital
2.
Control Panel
3.
Glass Door
4.
Wood Shelves
5.
Condenser
6.
Cabinet
7.
Foot

SPECIFICATIONS
IMPORTANT SAFETY INSTRUCTIONS
To reduce the risk of fire, electrical shock,or injury when
using your appliance, follow these basic precautions:
Read all instructions before using the wine cooler.
DANGER or WARNING: Risk of child entrapment.
To avoid the possibility of child entrapment, please take the
following precautions before throwing out the wine cooler.
-Remove all doors from the unit.
-Leave the shelves in place so that children may not easily
climb inside.
-Never allow children to operate, play with, or crawl inside
the wine cooler.
-Children should be supervised to ensure that they do not
play with the appliance. Keep the mains cord out of the
reach of children. Do not let the mains cord hang over the
edge of the table or worktop on which the appliance stands.
This appliance is not intended for use by persons (including
children) with reduced physical, sensory or mental
capabilities, or lack of experience and knowledge, unless
Type
CAVIST91
Volume (liter)
215L
Material
Case
Iron
Door
Glass
Unit Dimension(W×D×H)(mm)
540*555*1220 MM
Packaging Dimension ( W×D×H)(mm)
580*590*1280 MM
Net Weight (Kg)
52KG
Gross Weight (Kg)
55KG
Power Consumption(KW·h/24h)
0.41
Fitting ambient temperature range of working
≤32°C
Temperature Range
5°C -18°C
Rated Voltage
220~240V
Rated Frequency
50Hz
Rated current
0.3A
Input power
100W

they have been given supervision or instruction concerning
use of the appliance by a person responsible for their safety.
Do not use the appliance if the plug, the mains cord or the
appliance itself is damaged. If the mains cord is
damaged, you must have it replaced by the manufacturer,
or an authorized service centre or similarly qualified persons
in order to avoid a hazard.
Refrigerants: All refrigeration products contain refrigerants,
which under the guidelines of federal law must be removed
before disposal of product. It is the consumer’s
responsibility to comply with federal and local regulations
when disposing of this product. Never clean wine cooler
parts with flammable fluids. The fumes can create a fire
hazard or explosion.
Do not store or use gasoline or any other flammable vapors
and liquids in the vicinity of this or any other appliance. The
fumes can create a fire hazard or an explosion.
Cleaning and maintenance should not be carried
out by children unless they are at least 8 years of age
and are supervised by an adult.
Make sure that the voltage rating on the typeplate
corresponds to your main voltage of your installation. If this
is not the case, contact the dealer and do not connect the
unit.
Please keep this document at hand and give it to the future
owner in case of transfer of your device.
The device must not be used if it has been dropped, it
obvious signs of damage are visible or if it has leaks.

INSTALLATION INSTRUCTIONS
Before Using Your Wine Cooler
Remove the exterior and interior packing.
Before connecting the wine cooler to the power source,
let it stand upright for approximately 4 hours. This will
reduce the possibility of a malfunction in the cooling system
from improper handling during transportation. Clean the
interior surface with lukewarm water using a soft cloth.
Installing Your Wine Cooler
This wine cooler is designed to be free standing only, and
should not be recessed or built-in.
Allow 5 inches of space between the back and sides of the
wine cooler, which allows the proper air ventilation. Adjust
the feet to keep the wine cooler level. Locate the wine
cooler away from direct sunlight and sources of heat (stove,
heater, radiator, etc.). Direct sunlight may affect the acrylic
coating and heat sources may increase electrical
consumption. Ambient temperature below 5°C or above
32°C will hinder the performance of this appliance.
Depending on the location of the appliance, the direction of
the door opens can be changed.
This unit is not designed for use in a garage or any other
outside installation.
Avoid locating the wine cooler in moist areas.
Plug the wine cooler into dedicated, properly installed-
grounded wall outlet. Do not under any circumstances cut or
remove the third (ground) prong from the power cord. Any
questions concerning power and/or grounding should be
directed toward a certified electrician or an authorized
service center.
This unit is not designed to be installed in an RV or used
with an inverter.

After plugging the wine cooler into a wall outlet, turn the
unit on and allow the unit to cool down for 3 ~ 4 hours
under before placing wine bottles or beverages in the
appliance.
ELECTRICAL CONNECTION
Improper use of the grounded plug can result in the risk
of electrical shock. If the power cord is damaged, have it
replaced by an authorized service center.
This wine cooler should be properly grounded for your
safety. The power cord of this wine cooler is equipped with
a three-prong plug which mates with standard three prong
wall outlets to minimize the possibility of electrical shock.
Do not, under any circumstances, cut or remove the third
ground prong from the power cord supplied. This wine
cooler requires a standard 220~240 Volt A.C. /50Hz
electrical outlet with three-prong ground.
This wine cooler is not designed to be used with an inverter.
The cord should be secured behind the wine cooler and not
left exposed or dangling to prevent accidental injury.
Never unplug the wine cooler by pulling the power cord.
Always grip the plug firmly and pull straight out from the
receptacle.
Do not use an extension cord with this appliance. If the
power cord is too short, have a qualified electrician or
service technician install an outlet near the appliance.
Use of an extension cord can negatively affect the
performance of the unit.
If any problems with the wine cooler persist, please
contact our Customer Service Dept. to consult with a
representative at
cavist.cav.ist
or visit our website to
request warranty service at
www.cav.ist

OPERATING YOUR APPLIANCE
Temperature Control
Control Panel
The control panel is located at the top of the appliance.
Light button Display for lower zone
Temperature zone setting Increase Temperature
Display for upper zone Decrease Temperature
SELECT THE TEMPERATURE
The unit has two temperature zones. For each zone,the temperature range can be set between 5°C
and 18°C (40 ° and 65 ° F).
IMPORTANT
:
THE TEMPERATURE SELECTED FOR THE LOWER COMPARTMENT MUST ALWAYS BE HIGHER
THAN THE TOP COMPARTMENT. FOR OPTIMUM PERFORMANCE, THE DIFFERENCE BETWEEN
THE TWO ZONES SHOULD BE MINIMUM OF 4 ° C
The wine cooler shelves
The shelves are fully adjustable to suit various wine bottle shapes and sizes.
To prevent damaging the door gasket, make sure the door is fully open when pulling shelves out of
the rail
compartment.
For easy access to the bottles stored, pull the shelves out approximately 1/3. The shelves are
designed with an emergency stop to prevent them being removed too far when loaded.

HANDLE INSTALLATION
To install the door handle follow the below steps:
1. Open the door of the appliance and move the door gasket
slightly to one side so that you can see two designated holes for
handle installation
2. Install the handle tightly as shown in the diagram above with
the two screws provided.
3. Ensure the door gasket falls back into place and that the door
opens and closes correctly.
USING YOUR WINE COOLER
Before switching on
o Make sure that it has been installed by a suitably qualified person, as per the information
contained in the installation instructions.
o After delivery, wait for eight hours before connecting the appliance to your mains supply. This will
allow any refrigerant gasses that may have been disturbed during the transportation process to
settle.
o The outside of the appliance and the removable accessories contained within it, should be
cleaned with a solution of liquid detergent and water.
o The interior of the appliance should be cleaned with a solution of sodium bicarbonate dissolved in
lukewarm water. The interior and accessories should be thoroughly dried, after the cleaning process
has been completed.
o There can be an odour when you first switch on the appliance. It will lessen as the appliance starts
to cool.
During first use
IMPORTANT: When you use the wine cooler for the first time or restart the appliance after it has
been turned off for a long time, there could be a few degrees variance between the temperature
you select and the one indicated on the LED display. This is normal and it is due to the length of
activation time. Once the wine cooler has been running for a few hours everything will be back to
normal.
o When you first switch on the appliance, the compressor will run continuously until the wine cooler
reaches a cool enough temperature.
o During this period of time, you should try not to open the door frequently or place bottles inside
of the appliance.
o If the unit is switched off or unplugged, you must allow at least 5 minutes before restarting the
appliance or reconnecting it to your mains supply.
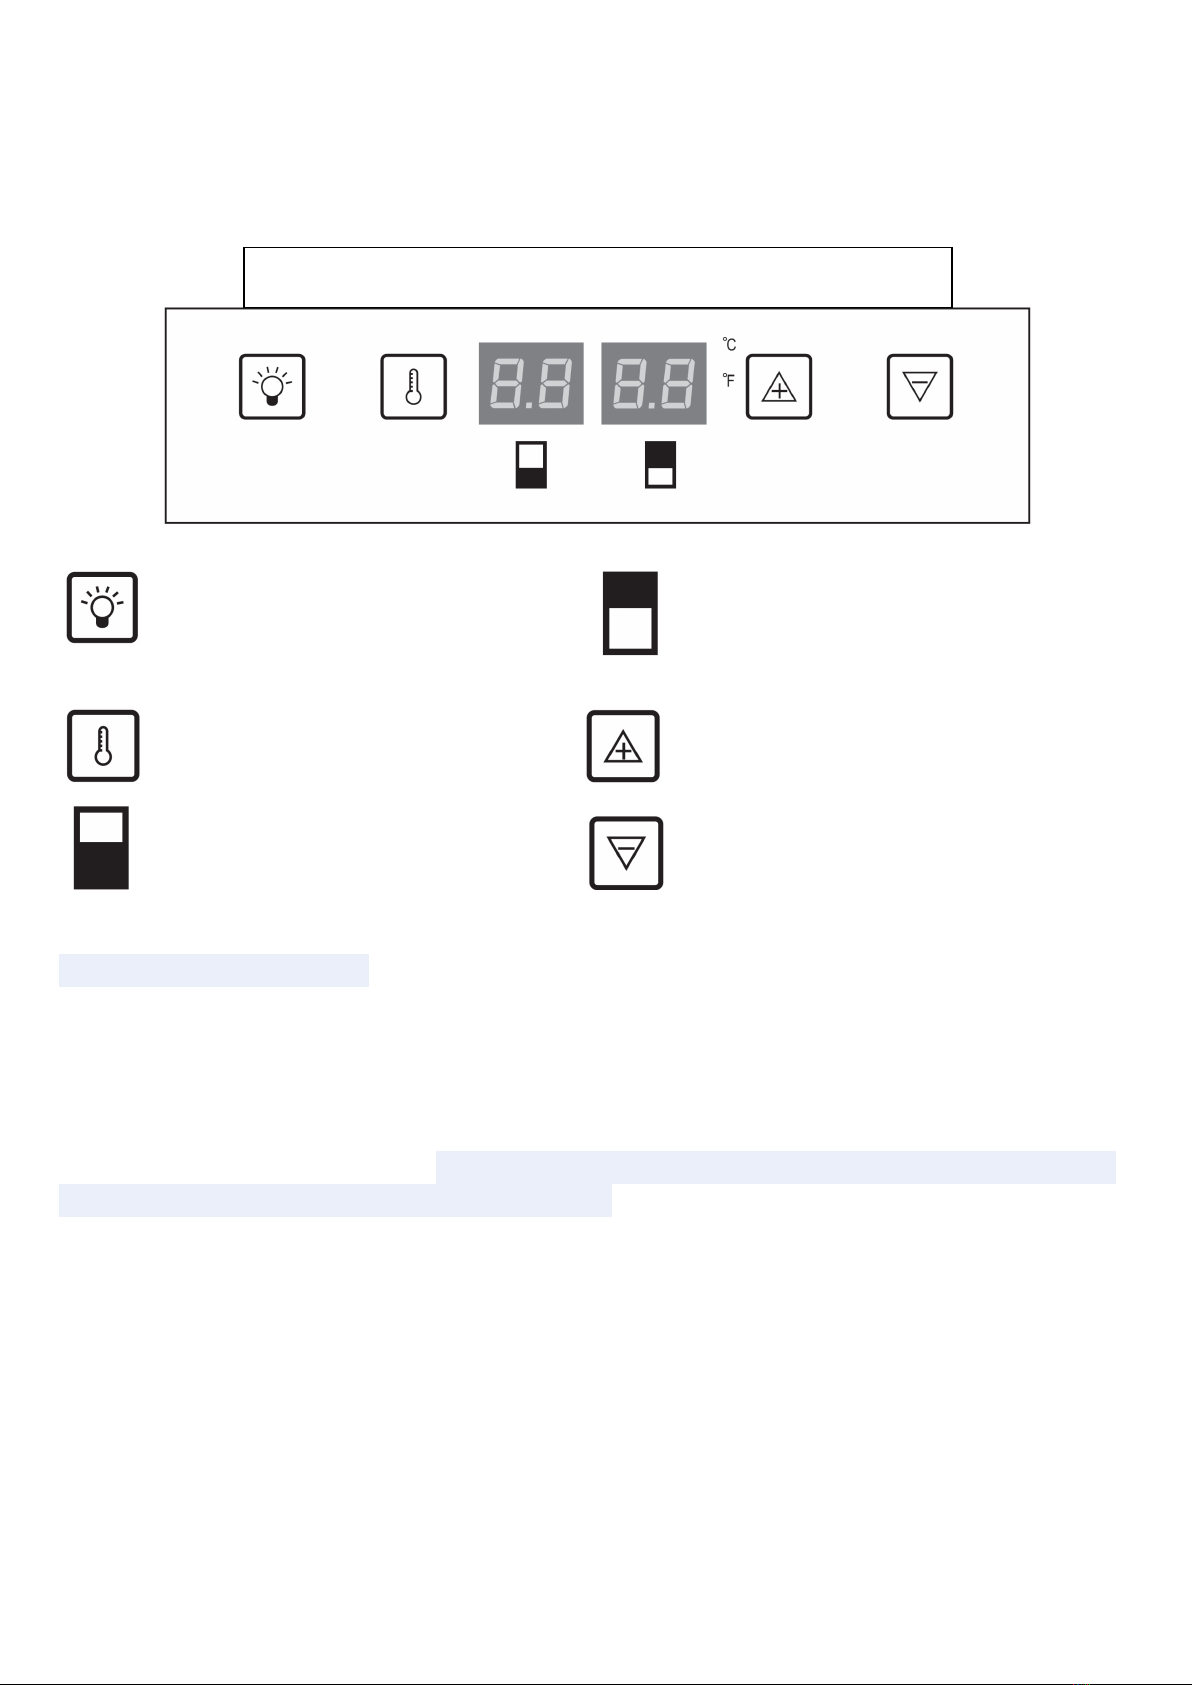
Switching on the appliance and setting the temperature
Switching between Celsius and Fahrenheit
To alter what the temperature displays are showing, press the for 5 seconds.

Switch on/turn off
To switch on the wine cooler, press the + buttons and hold 5 seconds.
To turn off the appliance, press and hold the + buttons and hold 5 seconds.
Temperature Setting
Press button to set the internal temperature of each zone. Temperatures in degrees will appear
on every screen
corresponding to distinct area for the top and the lower compartment
Note:When the button is pressed for the first time, the LED displays indicate the factory
preset temperature, 10 ° C/50 ° F for the upper and 16 ° C/60 ° F for the lower compartment.
Press the button once. The display for the upper compartment will flash. Press /
buttons to increase/decrease the temperature.
If you press again the button, the display for the lower compartment will flash.
Press / buttons to increase/decrease the temperature.
When working with both upper and lower zone, setting temperature of upper zone must be lower
than the lower zone as factory default setting.
Interior light
The cooler has an interior light. The light can be switched on and off by using the button.
Note: To see the temperature of each zone at any time. Touch the / buttons, set
temperature temporarily flash on the display for about 5 seconds. Use the “SET” to see the selected
temperature zone or the other.
IMPORTANT: When the temperature is changed, the compressor works harder to reach the
required temperature. During this time, the side panels of the wine cooler can reach up to 45°C
however they will cool down when the set temperature is reached.

Loading the wine cooler
IMPORTANT:
Your appliance is
ideally suited to store 0.75 litre Bordeaux
style wine bottles. Whilst it can store larger
bottles, you must make sure that they do
not prevent the door from shutting
properly.
o Always check that you can close the
door without it fouling on a wine bottle,
before shutting it.
o When loading several bottles of wine at
once, it will take longer for the appliance to
cool the individual bottles.
o As many bottles may differ in size and
dimensions, the actual number of bottles
you are able to store may vary.
o The maximum storage number is based
on standard 0.75 litre Bordeaux style wine
bottles.
Storing your wines
The chart below indicates the ideal storage temperatures for different types of wine:-
Type of wine
Temperature
(Celsius)
Temperature
(Fahrenheit)
Red wine (*)
15.5 – 18°C
59.9 – 65°F
White wine (**)
10 - 15°C
50 – 59°F
Sparkling wines/champagne
7.2 – 9.5°C
45 – 49.1°F
Rose wine
9.5 – 10.5°C
49.1 – 50.9°F
Vintage wine
13°C
55°F
o Temperature stability is the most important factor when it comes to storing wine.
o Exposure to light, vibrations or fluctuations in temperature and humidity can all cause wine to
spoil. When properly stored, wines not only maintain their quality but many will actually improve in
aroma, flavour and complexity as they mature.
o Wines kept at a higher temperature will age faster. Wine that is exposed to temperatures that
are greater than 22°C (72°F) will suffer from poorer flavour and aroma.
o If wine is kept at too low a temperature, this can result in the development of harmful deposits.
A humidity of 60%~70% is ideal for keeping corks from shrinking.
o After a bottle of wine has been opened, the wine comes into contact with air. So it is best to
store
the remainder of the bottle upright, to minimize the surface area of the wine that is coming into
contact with the air.

o Once opened, wine will remain in a drinkable condition for two days for delicate whites or three
days for rich reds, as long as the bottle as been resealed. You should make sure that the seal is firm
by checking the stopper.
o Special stoppers that keep wine sparking and Champagne bubbling for one or two days after
opening, can be bought at most good wine shops.
o When stored correctly, white wines can keep well for up to two years. Full bodied reds will age
well for ten years and dessert wines will age well for up to twenty years.
o When you buy a bottle of wine, you should transfer it to a suitable storage location immediately
(if you are not going to store it in your wine cooler).
o Cheaper bottles of wine will not age as well as more expensive ones.
o To make the most of the bouquet and taste of your wine, never fill more than half a glass at a
time. It will also help if
o the shape of your wine glass is appropriate for your wine. The size and shape of your wine
glass’s bowl will determine the intensity and complexity of the bouquet. The stem should be long
enough to allow you to avoid hand contact with the bowl of the glass and should be tulip-shaped or
tapered at the top.
REVERSING THE DOOR SWING
This unit has the capability of either opening the door from the left or right side. The unit is
delivered to you with the door opening from the left side. Should you desire to reserve the
opening direction, please follow these instructions:
Note: Before reversing the door, the power must be shut off. All parts removed must be saved to
to the reinstallation of the door.This unit has been built with the door hinges on the right. If you
wish to change the opening direction, follow the instructions below:
1. Remove the upper hinge cover (6) first.
2. Remove the three screws (1)that hold the upper hinge(5) (right side) to the frame, Take away the
upper hinge(5) (right side).
3. Lift the door and place it on a padded surface to prevent scratching it.
4. Remove the three screws (8) that hold the lower hinge(2) and make sure to remove the lower
hinge(2).
5. Remove the left front leg (4) and transfer it to the right side.
6. Remove the hole cover plate (7) to the right side.
7. Before placing this lower hinge(2),remove the bolt in(9) and reverse the direction of the lower
hinge(2).Then install the lower hinge(2) onto the left side of the lower frame with two screws.
8. Insert the bolt in(9) to the lower hinge(2).
9. Set the door to its place making sure the door seat at the lower hinge (2).
10. While holing the door in the closed position secure the upper hinge (5) in the top frame of left
side with three screws(1).Please remember that do not tighten the three screws(1) until the top
of the door is leveled with the counter top.
11. Install the upper hinge cover (6) on the upper hinge.

CARE AND MAINTENANCE
Cleaning Your Appliance
★Upon installation of your new appliance, it is
recommended that it be cleaned thoroughly.
★Turn off the wine cooler first and then unplug the unit
from the wall outlet.
★Remove all contents.
★Wash the inside with a damp warm cloth soaked in
lukewarm water and baking soda solution. The solution
should be about 2 tablespoons of baking soda to a quart of
water.
★Be sure to keep the door gasket (seal) clean to keep the
unit running efficiently.
★The outside of the wine cooler should be cleaned with
mild detergent and warm water.
★Dry the interior and exterior with a soft cloth.
★Dust or anything else blocking the vent may hinder the
cooling efficiency of the appliance. Vacuum the vent if
necessary.

Vacation Time
★Turn off the wine cooler first and then unplug the unit
from the wall outlet.
★Remove all the contents.
★Clean the appliance.
★Leave the lid open slightly to avoid possible formation of
condensation, mold, or odors.
★Short vacations: Leave the wine cooler operating during
vacations of less than three weeks.
★Long vacations: If the wine cooler will not be used for
several months, remove all content and unplug the
power cord. Clean and dry the interior thoroughly. To
prevent odor and mold growth, leave the door open
slightly: blocking it open if necessary.
Moving Your Appliance
★Turn off the wine cooler first and then unplug the unit
from the wall outlet.
★Remove all the contents.
★Securely tape down all loose items inside your appliance.
★Tape the doors shut.
Energy Saving Tips
★The wine cooler should be located in the coolest area
of the room, away from heat producing appliances or
heating ducts, and out of the direct sunlight.
★Ensure that door is properly closed when the wine cooler
is turned on.

TROUBLESHOOTING GUIDE
You
can
solve
many
common
wine
cooler
problems
easily,
saving
you
the
cost
of
a
possible service
call.
Try
the
suggestions
below
to
see
if
you
can
solve
the
problem
before
calling
for service.
PROBLEM
POSSIBLE CAUSE
Wine cooler does not
operate.
Not plugged in.
The circuit breaker tripped or a blown fuse.
Temperature inside the
wine cooler is too warm.
Temperature control is set too warm. Turn the control to a
cooler setting and allow several hours for the temperature to stabilize.
Door is kept open too long or is opened too frequently. Warm
air enters the wine cooler every time the door is opened. Open
the door less often.
The door is not closed completely.
The door gasket does not seal properly.
The wine cooler has recently been disconnected for a period of time.
4 hours are required for the wine cooler to cool down completely.
Temperature inside the
wine cooler is too cold.
Temperature control is set too cold. Turn the control to a warmer setting and allow several
hours for the temperature to stabilize.
Vibrations.
Check to assure that the wine cooler is on a level surface.
The wine cooler is touching the wall. Re-level the wine cooler
and move it from the wall.
If continued vibration occurs, turn off the wine cooler and unplug
the power plug. Contact Customer Service Dept. for further assistance.
Moisture forms on inside
wine cooler walls.
Door is slightly open.
Door is kept open too long, or is opened too frequently. Open the
door less often.
The door is not sealed properly.
Moisture forms on
outside of appliance.
Door is slightly open, causing cold air from inside the wine cooler
to meet warm moist air from outside.
The door will not close
properly.
The wine cooler is not on a level surface. The gasket is dirty.
ENVIRONMENT
CAUTION:
Do not dispose of this product as it has with other household products. There is a separation of this waste
product into communities, you will need to inform your local authorities about the places where you can
return this product. In fact, electrical and electronic products contain hazardous substances that have harmful
effects on the environment or human health and should be recycled. The symbol here indicates that electrical
and electronic equipment should be chosen carefully, a wheeled waste container is marked with a cross.
Adeva SAS / H.Koenig Europe - 8 rue Marc Seguin - 77290 Mitry Mory - France

FRANÇAIS
Avant de faire fonctionner cet appareil, veuillez lire attentivement les instructions
suivantes afin d’assurer le bon fonctionnement de refroidisseur de vin pour votre
sécurité.
NOMS DES PIÈCES
1)
Poignée
2)
Écran de contrôle
3)
Porte en verre
4)
Étagères en bois
5)
Condensateur
6)
Caisson
7)
Pied

CARACTÉRISTIQUES
CONSIGNES IMPORTANTES DE SÉCURITÉ
Pour réduire le risque d'incendie, d'électrocution ou de
blessure lors de l'utilisation de votre appareil, respectez ces
précautions de base :
Lisez toutes les instructions avant d’utiliser le refroidisseur
de vin.
DANGER ou AVERTISSEMENT: Risque de piégeage de
l'enfant.
Afin d'éviter tout risque d’enfermement d’un enfant, veuillez
prendre les précautions suivantes avant de vous débarrasser
du refroidisseur à vin.
- Enlevez toutes les portes de l'appareil.
Laisser les tablettes et les tiroirs à un endroit de sorte que
les enfants ne puissent pas facilement monter à l'intérieur.
- Ne laissez jamais les enfants utiliser, jouer ou ramper à
l'intérieur du refroidisseur de vin.
Les enfants doivent être surveillés afin de s'assurer qu'ils ne
jouent pas avec l'appareil. Conservez le cordon
d'alimentation hors de portée des enfants. Ne laissez pas le
Type
CAVIST91
Volume (litre)
215L
Matériau
Caisson
Fer
Porte
Verre
Dimensions (L x P x H) (mm)
540 * 555 *1220 mm
Dimension d'emballage (L ×P ×H) (mm)
580 * 590 *1280 mm
Poids net (kg)
52kg
Poids brut (kg)
55kg
Consommation électrique (KW h / 24h)
0.41
Plage adéquate de température ambiante de travail
≤32° C
Plage de températures
5° C -18° C
Tension Nominale
220-240V
Fréquence nominale
50Hz
Courant nominal
0.3A
Puissance d’entrée
100 W

cordon d'alimentation pendre du bord de la table ou du
plan de travail sur lequel l'appareil est posé.
Cet appareil n'est pas conçu pour être utilisé par des
personnes (y compris des enfants) à capacités physiques,
sensorielles ou intellectuelles réduites ou sans expérience et
connaissances, à moins qu'elles soient sous surveillance ou
bien qu'elles aient été informées quant à l'utilisation
correcte de l'appareil, par une personne responsable de
leur sécurité. Les enfants doivent être surveillés afin qu'ils ne
jouent pas avec l'appareil.
N'utilisez pas l'appareil si la fiche, le cordon d'alimentation
ou l'appareil lui-même est endommagé. Si le cordon
électrique est endommagé, vous devez le faire remplacer
par le fabricant, un centre de service agréé ou des
personnes de qualification similaire pour éviter tout
accident.
Réfrigérants : Tous les produits de réfrigération contiennent
des gaz réfrigérants qui, conformément aux directives de la
loi, doivent être éliminés avant la mise au rebut du produit.
Il incombe au consommateur de se conformer aux
réglementations nationales et locales lors de la mise au
rebut de ce produit. Ne nettoyez jamais les pièces du
refroidisseur à vin avec des liquides inflammables. Les
vapeurs peuvent créer un risque d'incendie ou d'explosion.
Ne stockez pas ou n'utilisez pas d'essence ou d'autres
vapeurs et liquides inflammables à proximité de cet appareil
ou de tout autre appareil. Les vapeurs peuvent créer un
risque d'incendie ou d'explosion.

Le nettoyage et l’entretien par l’utilisateur ne doivent pas
être effectués par des enfants, à moins qu’ils ne soient âgés
de plus de 8ans et qu’ils soient sous la surveillance d’un
adulte.
Vérifier que le voltage indiqué sur la plaque signalétique de
l’appareil correspond bien à celui de votre installation
électrique. Si ce n’est pas le cas, adressez-vous au
revendeur et ne branchez pas l’appareil.
Veuillez conserver ce document à disposition et le remettre
au futur propriétaire en cas de cession de votre appareil.
L’appareil ne doit pas être utilisé s’il a chuté, s’il y a des
signes visibles de dommages ou en cas de fuite.
CONSERVER CES INSTRUCTIONS
INSTRUCTIONS D'INSTALLATION
Avant d'utiliser votre refroidisseur de vin
Retirez l'emballage extérieur et intérieur.
Avant de connecter le refroidisseur de vin à la source
d'alimentation, laissez-le reposer pendant environ 4 heures.
Ceci réduira la possibilité d'un mauvais fonctionnement du
système de refroidissement dû à la manipulation durant le
transport. Nettoyez la surface intérieure avec de l'eau tiède
et un chiffon doux.
Installation de votre refroidisseur de vin
Ce refroidisseur de vin est conçu pour être placé isolément
et ne doit pas être encastré ni intégré.

Laisser 10 cm d'espace entre le dos/côtés du refroidisseur
de vin et les murs, ce qui permettra une ventilation
adéquate. Ajustez les pieds pour régler le niveau du
refroidisseur de vin. Placez- le à l'abri de la lumière directe
du soleil et des sources de chaleur (cuisinière, chauffage,
radiateur, etc.). La lumière directe du soleil peut affecter le
revêtement acrylique et les sources de chaleur peuvent
augmenter la consommation électrique. Si la température
ambiante est inférieure à 5 ° C ou au-dessus de 32 ° C, cela
entravera la performance de cet appareil.
En fonction de l'emplacement de l'appareil, le sens
d'ouverture de la porte peut être modifié.
Cet appareil n'est pas conçu pour être utilisé dans un
garage ou toute autre installation extérieure.
Évitez de placer le refroidisseur de vin dans des zones
humides.
Branchez le refroidisseur de vin dans une prise murale
unique, correctement installée et mise à la terre. La broche
de la mise à la terre ne doit, en aucune circonstance, être
coupée ou retirée. Toute question relative à l'alimentation
et / ou à la mise à la terre doit être adressée à un électricien
agréé ou à un centre de service agréé.
Cet appareil n'est pas conçu pour être installé dans un
véhicule récréatif (VR) (Camping-car,…. ) ou utiliser avec des
onduleurs ni avec des condensateurs.
Après avoir branché le refroidisseur de vin dans une prise
murale, allumez l'appareil et laissez-le refroidir pendant
environ 3 à 4 heures avant d’y placer des bouteilles de vin
ou des boissons.

RACCORDEMENT ELECTRIQUE
Un mauvais branchement de la prise de terre peut résulter
en une électrocution. Si le cordon d'alimentation est
endommagé, faites-le remplacer par un centre de service
agréé.
Ce refroidisseur de vin doit être correctement mis à la terre
pour votre sécurité. Le cordon d'alimentation de cet
appareil est équipé d'une fiche à trois broches qui s'adapte
à la prise murale standard afin de minimiser les risques de
choc électrique.
La broche de la mise à la terre ne doit, en aucune
circonstance, être coupée ou retirée. Ce refroidisseur de vin
nécessite une prise électrique standard de 220 ~ 240 Volt
CA / 50Hz avec une fiche à trois broches.
Ce refroidisseur de vin n'est pas conçu pour être utilisé avec
un onduleur.
Le cordon doit être attaché derrière le refroidisseur à vin et
ne pas être exposé ou pendre pour éviter les blessures
accidentelles.
Ne débranchez jamais le refroidisseur de vin en tirant sur le
cordon d'alimentation. Saisissez toujours fermement la fiche
et sortez-la de la prise murale.
N’utilisez pas de rallonge avec cet appareil. Si le cordon
d'alimentation est trop court, demandez à un électricien
qualifié ou à un technicien d'installer une prise près de
l'appareil. L'utilisation d'une rallonge peut nuire aux
performances de l'appareil.
Table of contents
Languages:
Other Cavist Wine Cooler manuals
Popular Wine Cooler manuals by other brands

The Wine Square
The Wine Square CUBE LT user manual

U-Line
U-Line U-3045WCINT-60B User guide & service manual

Cavavin
Cavavin URBANIA CAVA54NSZ instruction manual

Mistral
Mistral MWC14R operating instructions

CASO DESIGN
CASO DESIGN WineSafe 18 EB Black Original operating manual

Fisher & Paykel
Fisher & Paykel RS60RDWX1 installation instructions