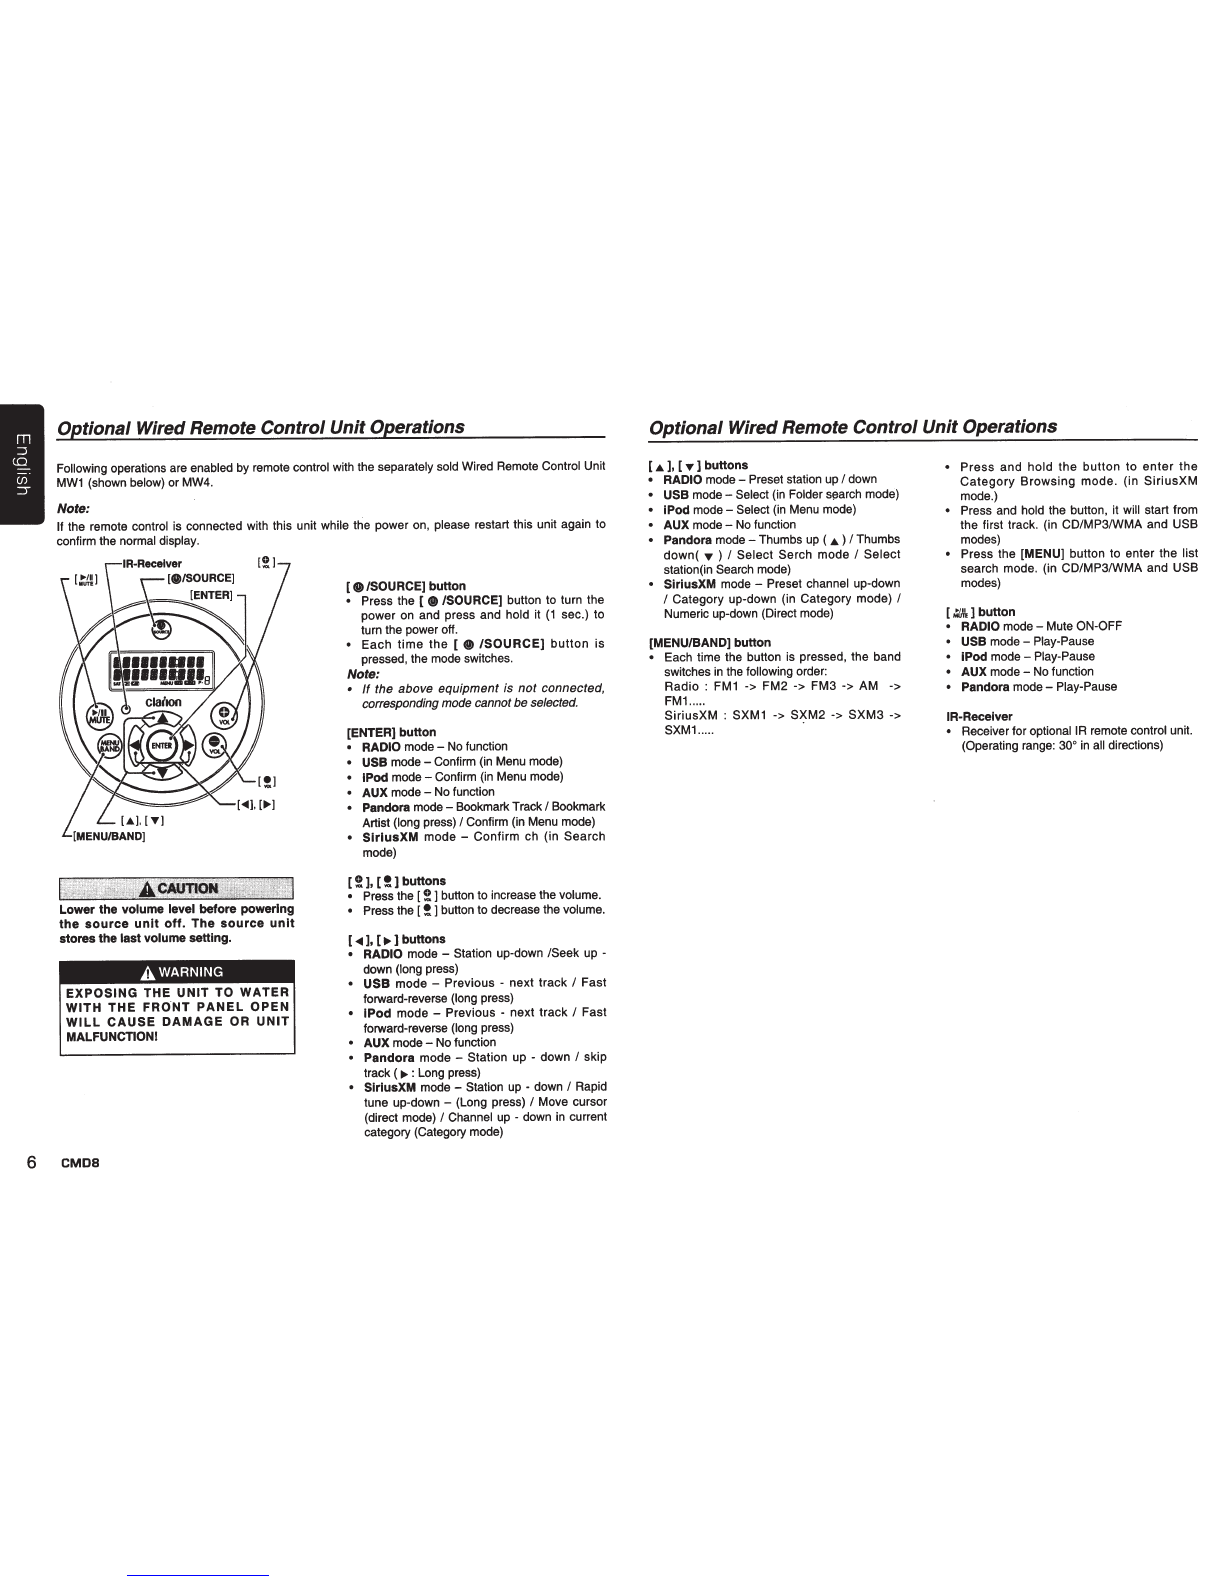
Clarion CMDB Repair manual

~®
~~
Owner•s manual &Installation manual
Mode
d
1
emploi
et
manuel
d'installation
Manual
de
instrucciones
y
de
instalaci6n
CMDB
WATERTIGHT
MARINE
CD/USB/MP3/WMA
RECEIVER
lECTEUR
MARINE
ETANCHE
CD/USB/MP3/WMA
RECEPTOR
CD/USB/MP3/WMA
MARINO,
HERMETICO

CLARION PRODUCTREGISTRATION INFORMATION
Dear Customer:
For
USA
and
Canada
only
www.clarion.com
Congratulations
on
your purchase of a Clarion mobile electronic products.
We
are confident
that you'll enjoy your Clarion experience.
There are many benefits to registering your product.
We
invite you to visit our website
at
www.clarion.com
to register your Clarion product.
We
have made product registration simple with our easy to use website. The registration form
is short and easy to complete. Once you're registered,
we
can keep you informed of important
product information.
Register at
www.clarion.com
-it's easy to keep your Clarion product
up
to
date.
INFORMATIONS
DE
L'
ENREGISTREMENT
DE
PRODUITS
CLARION
Cher client:
Pour les Etas Unis et le Canada seulement
www.clarion.com
Nous vous remercions d'avoir achete ce produit electronique mobile Clarion. Nous sommes
confiants que vous apprecierez votre experience Clarion.
II
y a beaucoup d'avantage aenregistrer votre produits. Nous vous invitons avisiter notre site
Web
www.clarion.com
pour enregistrer votre produit Clarion.
Nous avons facilite
Ia
tache d'enregistrement de produit simple et facile grace anotre siteWeb.
Le
formulaire d'enregistrement est court et facile acompleter. Lorsque vous etes enregistrer,
nous pouvons vous tenir informs des informations important de produits.
Enregistrer a
www.clarion.com
-c'est facile de mettre ajour votre produit Clarion.
INFORMACION
DEL
REGISTRO
DE
PRODUCTO
DE
CLARION
Querida Cliente:
Para
USA
y
Canada
nomas
www.clarion.com
Felicitaciones por
su
compra de producto electr6nico m6vil de Clarion. Estamos seguros que
usted gozara de
su
experiencia con
el
producto de Clarion.
Hay muchas ventajas
al
registrar su producto.
Le
invitamos a que
vi
site nuestro sitio
en
internet
www.clarion.com
para registrar
su
producto de Clarion.
Hemos hecho
el
registro de prod.Jcto facil
en
ruestro sitio. La forma de registro
es
corta y facil
de completar. Una vez que lo registre, podremos proporcionarle
Ia
informacion de
su
producto.
Registrese
en
www.clarion.com
-
es
facil mantener
su
producto de Clarion actualizado.
2
CMOS
Contents
Thank
you for purchasing this Clarion product.
• Please fully read this
owner's
manual before operating this equipment.
•
Check
the contents of the enclosed warranty card
and
store it in a safe place with this manual.
1. FEATURES .......................................................................................................................3
2. PRECAUTIONS ................................................................................................................3
Front Panel I Generalities ..............................................................................................4
USB
Port ........................................................................................................................4
3. CONTROLS ......................................................................................................................4
Operational Panel ..........................................................................................................4
Names
of Buttons...........................................................................................................4
Notes for use of Optional Remote Control ..................................................................... 5
Remote Control (RCX001: Sold separately) .................................................................. 5
Optional Wired Remote Control Unit Operations ........................................................... 6
4. CAUTIONS ON HANDLING .............................................................................................7
Handling Discs ...............................................................................................................7
5. OPERATIONS...................................................................................................................7
Basic Operations............................................................................................................7
System Setup.................................................................................................................8
Audio Setup....................................................................................................................8
Radio Operations ...........................................................................................................9
SiriusXM Satallite Radio Operations.............................................................................. 9
CD/MP3/WMA
Operations ...........................................................................................
11
USB
Operations ...........................................................................................................12
iPod &iPhone Operations............................................................................................ 12
AUX
Operations ...........................................................................................................
13
6. TROUBLE SHOOTING...................................................................................................14
7. ERROR DISPLAYS.........................................................................................................15
8. SPECIFICATIONS ..........................................................................................................15
9. INSTALLATION I WIRE CONNECTION GUIDE ............................................................ 16

• Compatible with
iPod®
I
iPhone®
with Pandora®
internet
radio
App
• SiriusXM-Ready™
• 4ch
RCA
Output andBEA
T-EQ
with 3 Band Parametric Equalizer
WJoo~~
USB
DIGITAL
AUDIO
Made for
~
iPod
CJ
iPhone
I
MP3/WMAI
Expanding Systems
~,
iPod/iPhone
(Connect via USB)
Note:
Expanding audio features
4 Channel Amplifier
SiriusXM-Connect™
Vehicle Tuner
PANDOR.A
(((Siriusxm>))
READY
• The itemslisted
only
show
connectivityoptions
and
are
not
included with the unit·
•
CCA-750
:
Sold
separately.
For
your
safety,
the
driver
should
not
operate
the
controls
while
driving.
Also,
while
driving,
keep
the
volume
to
a
level
at
which
external
sounds
can
be
heard.
1. When the interior of the boat is extremely
cold and the player
is
used soon after
switching
on
the heater, moisture may
form
on
the disc or the optical parts of the
player and proper playback may not be
possible.
If
moisture forms on the disc,
wipe
it
oft with a soft cloth.
If
moisture
forms
on
the optical parts of the player,
do not use the player for about one hour.
The condensation will disappear naturally
allowing normal operation.
2.
Driving
on
extremely bumpy surface can
cause the disc to skip during playback.
3.
This unit uses precision parts and
components for its operation.
In
the event
that trouble arises, never open the case,
disassemble the unit, or lubricate the
rotating parts. Contact your Clarion dealer
or service center.
4.
This
equipment
has
been
tested
and
found to comply with the limits for a Class
B digital device, pursuant to Part 15 of the
FCC Rules.
These
limits
are
designed
to
provide
reasonable
protection
against
harmful
interference in a residential installation.
This
equipment
generates,
uses, and
can radiate radio frequency energy and,
if not installed and used in accordance
with the instructions, may cause harmful
interference
to
radio
communications.
However,
there
is
no
guarantee
that
interference will not occur in a particular
installation.
If
this equipment does cause
harmful interference to radio reception,
which
can
be
determined
by
turning
the
equipment
off
and on,
the
user
is
encouraged to consult the dealer
or
an
experienced radio technician for help.
5.
"Made for iPod," and "Made for iPhone"
mean that an electronic accessory has
been designed to connect specifically to
iPod, or iPhone, respectively, and has
been certified by the developer to meet
Apple performance standards.
Apple
is
not responsible for the operation
of this device or its compliance with safety
and regulatory standards. Please note
that the use of this accessory with iPod or
iPhone may affect wireless performance.
iPhone and iPod are trademarks of Apple
Inc.,
registered
in
the
U.S. and
other
countries.
6.
Pandora, the
Pandora
logo and
other
Pandora
marks
are
trademarks
or
registered trademarks of Pandora Media,
Inc. or its subsidiaries worldwide.
"If you have any issues with the Pandora
application
on
your mobile phone, please
direct them to pandora-support@pandora.
com."
7.
SiriusXM and all related marks and logos
are trademarks
of
SiriusXM Radio, Inc. All
rights reserved.
CMOS
3

4
c
E:
=AM:~~~,_.,
_
.,';,~
1ZV8GAOUND
IUIIOI'ti'AMA1·1-/,_17_.1_
C'C':'IIALMI40
ASIA:AIIU1•1
.....
/NP.J.1-.r:
THIIDEVICE~IEIWfTHFWn'15C#THEIJCC
..
ULII
.
OPERAT10N
IS
SUI.IECT
TO
'floE
FOUOWWO
TWO
COHOITIONS
:
(1)nD
DEVtCE
MAY
NOT
CAUSE.
1-WtWUI..IfTI
..
ERiHCE,
AHD
~~~n:MA~~:D~TlOH
TMS
DEva
COMPUES WITH DHHS
R\l.ES
21
CFR
CtW'TER
I
~JAPP\.ICA8l.£ATDAT£0fWAHUFACl\.IM
::.::-~~~.:..~~tnd
Cl.AAK'INCO
.
.LTD
.
7
-
2
.
~CHU().KU
.
INTAWA-SHf.SNTAIM-KEN
,
JIIIIM
I
CI.AII1WBI-.cT
I
~~51
722
877
@
MANU'ACTIJR!O
URF
!INFORMATION FOR USERS:
Changes
or
modifications to
this
product
unapproved by the manufacturer will void the
warranty and will violate FCC approval.
FrontPanel/Generalities
For a longer service life, be sure to read the
following cautions.
Do not allow any liquids
on
the unit from
drinks, umbrellas, etc. Doing so may
damage the internal circuitry.
Do not disassemble or modify the unit
in
any way. Doing so may result
in
damage.
Do not let cigarettes burn the display.
Doing so may damage ordeform the
body.
If a problem should occur, have the unit
inspected at your store of purchase.
The remote control unit may not work if
the remote control sensor
is
exposed to
direct sunlight.
CMOS
Cleaning the body
Use a soft, dry cloth and gently wipe off
any dirt or dust.
For tough dirt, apply some neutral
detergent diluted
in
water to a soft cloth,
wipe off the dirt gently, then wipe again
with a dry cloth.
Do not use benzene, thinner, boat cleaner,
etc., as these substances may damage
the body or cause the paint to peel. Also,
leaving rubber or plastic products
in
contact with the body for long periods of
time may cause stains.
USB Port
•
The
USB
memory
sticks
must
be
recognized as "USB mass storage class"
to work properly. Some models may not
operate correctly.
When
the
memorized
data
is
lost
or
damaged
by
any chance, Clarion shall
not
be
liable
for
any damage.
When using the USB memory stick, we
recommend that you backup
your
data
stored
on
it
before
using
a
personal
computer etc.
• Data files may be broken when using USB
memory sticks
in
the following situation:
When
disconnecting
the
USB
memory
stick
or
turning
the
power
off
during
reading data.
When
affected
by
static
electricity
or
electric noise.
Connect/disconnect the USB memory stick
when it is not accessed.
•
Connecting
with
the
computer
is
not
covered.
3. CONTROLS
OperationalPanel
1111111;111
1111111;111
!~5Hi.~;;t
-
P-8!
With the front panel opened
Names
of
Buttons
[POWER] button
• Press the button to turn
on
or off the power.
[AUDIO] button
• Press
the
button to
enter
the
audio
adjust
mode.
[DISPLAY] button
•
Press
the
button
to
switch
the
display
indication.
[OPTION] button
• Press the button to enter the option mode.
[ADJUST] button
• Press the button to enter the adjust mode.
[VOLUME] knob
• Adjust the volume by turning the knob.
[DISC] button
• Use to switch to CD/MP3/WMA mode.
[CD SLOT]
[AUX/iPod] button
• Use to switch to USB/iPod/Pandora mode or
AUX mode.
[OPEN] button
• Open the panel by pressing the "
Clarion
"
oval latch button. Audio will mute with the front
panel open.
[AMIFM] button
• Use to switch to Radio mode.
• Switch the band.
[SAT] button
• Use to switch to SiriusXM mode.
• Switch the band.
• Press and hold the button to enter the Category
Browsing mode.

Names
of
Buttons
[MENU] button
• RADIO mode -Preset mode
• CDIMP3 mode -Folder search
• USB mode -Folder search
• iPod
mode-
iPod Menu I Top Menu (long
press)
• Pandora mode -Station select
• SiriusXM mode- Preset mode I Direct Tune
(long
Press)
[
:.t&
] button
• Play or pause.
• Turn the mute on/off.
[ENTER] button
• Confirm (press)
•
Pandora
mode
-
Bookmark
Track
I
Bookmark Artist (long press)
[RETURN] button
• Press the button to return to the previous
mode
in
some adjust operations.
[
~
],
[
IJll.
] (Search)
buttons
• Select a station while
in
the Radio mode
I SiriusXM mode or select a track while
in
CD/MP3/WMA mode.
• Press and hold the button for
(1
sec.) to
switch to fast-forward/fast-reverse.
•
Pandora
mode - [
IJll.
] Thumbs Up, [
~
]
Thumbs down I [
IJll.]
Skip (long press)
[IR RECEIVER]
• Receiver for optional
IR
remote control
unit.
(Operating range: 30°
in
all directions)
[UP/DOWN] knob
• Select folders while
in
MP3/WMA/USB
mode.
• Select previous/next preset station
in
Radio/SiriusXM mode.
[CD SLOT]
•
CD
insertion slot.
[
~
] (Eject) button
• Eject a
CD
when it is loaded into the
unit.
[RESET] button
• Press the button when the following
symptoms occur.
* Nothing happens when buttons are
pressed.
* Display
is
not accurate.
* The settings will remain
in
the memory
even
if
you turn the power off or press
the reset button.
Notes
for
use
of
OptionalRemote
Control
1.
Aim
the remote control at the remote sensor
on
the unit.
2.
Remove the battery from the remote control
or insert a battery insulator
if
the battery has
not been used for a month or longer.
3.
DO
NOT store the remote control under
direct
sunlight
or
in
high
temperature
environment, or it may not function properly.
4.
Use
"button
shaped"
lithium
battery
"CR2025"
(3V)
only.
5.
DO
NOT
subject
battery
to
recharge,
disassemble, heat
or
dispose
in fire
or
water.
6.
Insert
the
battery
in
proper
direction
according
to
the (
+)
and
(-)
polarities.
7.
Store the battery
in
a place where children
cannot reach to avoid the risk of accident.
Inserting the Battery
1.
Slide remote control unit's rear cover
in
the direction shown.
2.
Insert battery (CR2025) into insertion
guides with printed side(+)
up.
3.
Press battery into compartment
as
shown.
4.
Replace and slide cover until
it
clicks into
place.
Insertion guide
.
2
Remote
Control
(RCX001:
Sold
separately)
[SRC I
<!>
] Button
• Toggle the audio source
• Power
on
I Power off (long press)
[
1+111
,
~
] Buttons
• Radio mode -Preset station up or down I
Search (long press)
• Previous I next track
• SiriusXM mode -Preset
up
or down I Rapid
tune (long press)
• Pandora mode -Station up-down I skip track
([~]long
press)
[SCNIPS/AS] Button
• Scan play I Preset scan
• Auto memory store (long press)
• Pandora mode -Thumbs down
• SiriusXM
mode-
Channel scan (in current
category) I Preset scan (long press)
[BANDITOP] Button
• CD/MP3/WMAIUSB
mode-
Top play (long
press)
• RADIO mode -Select tuner band
•
SiriusXM
mode
-
Select
tuner
band
I
Category Browsing mode (long press)
[
.&
, ..,. ] Buttons
• Volume up I down
[..,.II] Button
• Play I Pause
[ISR] Button
• Recall ISR station stored
in
memory and
store current station
in
ISR memory (long
press)
[DISP] Button
• Display switch
[ROM] Button
• Random play
• Pandora mode -Thumbs
up
[RPT] Button
• Repeat play
•
Pandora
mode
-
Bookmark
track
I
Bookmark Artist (long press)
[MUTE] Button
• Mute the volume
[SRC/C!>]
-[•.•1
P~~:
-~t-\~~R...,lPT!,t_I!..,RDM~"i!-
[RDM]
·--[RPT]
clarion
CMOS
5

Optional Wired Remote
Control
Unit Operations
Following operations are enabled by remote control with the separately sold Wired Remote Control Unit
MW1
(shown below) or MW4.
Note:
If the remote control is connected with this unit while the power on, please restart this unit again to
confirm the normal display.
Lower the volume level before powering
the
source
unit
off.
The
source
unit
stores the lastvolume setting.
A.
WARNING
EXPOSING
THE
UNIT
TO
WATER
WITH
THE
FRO.
NT
PANEL
OPEN
WILL
CAUSE
DAMAGE
OR
UNIT
MALFUNCTIONI
6 CMOS
[0
/SOURCE] button
• Press the [
0/SOURCE]
button to turn the
power on and press and hold it
(1
sec.) to
turn the power off.
•
Each
time
the
[
0
/SOURCE]
button
is
pressed, the mode switches.
Note:
•
If
the above equipment is
not
connected,
corresponding mode cannotbe selected.
[ENTER] button
• RADIO
mode -No function
• USB
mode-
Confirm (in Menu mode)
• IPod
mode-
Confirm (in Menu mode)
• AUX
mode -No function
• Pandora
mode -Bookmark Track
I
Bookmark
Artist (long press)
I
Confirm (in Menu mode)
•
SlrlusXM
mode -Confirm ch (in Search
mode)
[!
],
[! ]
buttons
• Press the
[!]
button to increase the volume.
• Press the [
! ]
button to decrease the volume.
[
<1111
],
[
..,.
]
buttons
• RADIO
mode -Station up-down /Seek up -
down (long press)
• USB
mode -Previous -next track
I
Fast
forward-reverse (long press)
• IPod
mode -Previous -next track
I
Fast
forward-reverse (long press)
• AUX
mode -No function
• Pandora
mode -Station up -down
I
skip
track (
""
: Long press)
• SlriusXM
mode -Station up -down
I
Rapid
tune up-down -(Long press)
I
Move cursor
(direct mode)
I
Channel up
-down
in
current
category (Category mode)
Optional Wired Remote
Control
Unit Operations
[.~
], [
....
]buttons
RADIO
mode -Preset station up
I
down
USB
mode-
Select (in Folder
s~arch
mode)
iPod
mode-
Select
(in
Menu mode)
AUX
mode -
No
function
Pandora
mode -Thumbs up (
.._
)
I
Thumbs
down(
....
)
I
Select Serch mode
I
Select
station(in Search mode)
SiriusXM
mode -Preset channel up-down
I
Category up-down (in Category mode)
I
Numeric up-down (Direct mode)
[MENU/BAND] button
• Each time the button is pressed, the band
switches
in
the following order:
Radio
: FM1 -> FM2 -> FM3 -> AM ->
FM1..
...
SiriusXM
: SXM1 -> SXM2 ->
SXM3
->
SXM1
.....
•
Press
and hold
the
button
to
enter
the
Category
Browsing
mode. (in
SiriusXM
mode.)
• Press and hold the button, it will start from
the first track. (in CD/MP3/WMA and USB
modes)
• Press the
[MENU]
button to enter the list
search mode. (in CD/MP3/WMA and USB
modes)
[
:1&
]
button
• RADIO
mode -Mute ON-OFF
•
USB
mode -Play-Pause
• iPod
mode -Play-Pause
• AUX
mode -
No
function
• Pandora
mode -Play-Pause
IR-Receiver
• Receiver for optional lA remote control unit.
(Operating range: 30°
in
all directions)

4. CAUTIONS ON HANDLING
Handling Discs
Handling
• New discs may have some roughness
around the edges. If such discs are used,
the player may not work or the sound may
skip. Use a ball-point pen
or
the like
to
remove any roughness from the edge of
the disc.
• Never stick labels on the surface of the disc
or mark the surface with a pencil or pen.
• Never play a disc with any cellophane tape
or
other glue on it
or
with peeling off marks.
If you try to play such a disc, you may not
be able to get it back out of the player
or
it
may damage the player.
• Do not use discs that have large scratches,
are misshapen, cracked, etc.
Use of such discs
may
cause misoperation
or
damage.
•
To
remove a disc from its storage case,
press down on the center of the case and
lift the disc out, holding it carefully by the
edges.
• Do not use commercially available disc
protection sheets
or
discs equipped with
stabilizers, etc. These may damage the
disc
or
cause breakdown of the internal
mechanism.
Storage
• Do not expose discs to direct sunlight
or
any heat source.
• Do not expose discs to excess humidity
or
dust.
• Do not expose discs to direct heat from
heaters.
Cleaning
• To remove fingermarks and dust, use a soft
cloth and wipe in a straight line from the
center of the disc to the circumference.
Do not use any solvents, such as
commercially available cleaners, anti-static
spray,
or
thinner to clean discs.
• After using special disc cleaner, let the disc
dry off well before playing it.
On Discs
• Never turn off the power and remove the
unit from the boat with a disc loaded.
For
your
safety,
the
driver
should
not
insert
or
eject
a
disc
while
driving.
5. OPERATIONS
Basic Operations
Note:
• Refer to the diagrams in "3. CONTROLS"
when reading this chapter.
When
the
unit
Is
turned
on,
starting
and
stopping
the
engine
with
Its
volume
raised
to
the
maximum
level
may
harm
your
hearing.
Be
careful
about
adjusting
the
volume.
Power onI
off
Notes:
Start the engine before using this unit.
• Be careful about using this unit for a long
time without running the engine. If you
drain the battery too far, you may not be
able to start the engine and this can reduce
the service life of the battery.
1. Start the engine. The power button
I
knob
illumination on the unit will light up.
~
EngineON
~position
2. Press the [POWER I(!) ] button on the front
panel
or
the [SRC
I
(!)
] remote control to
turn on the power under standby mode.
The unit goes back to the last status after
power on.
3. Press and hold the [POWER
I
(!)
] button
on the front panel
or
the [SRC
I
(!)
] remote
control to turn off the power.
Mute
Press the [MUTE] button on the remote control
to mute the volume from the unit.
Note:
Doing the operation above again or adjusting
volume will release muting.
Volume adjustment
Rotate the [VOLUME] knob on the front panel
or press the [ • ]
or
[
~
] button on the remote
control.
The
adj~stable
range of volume is 0 to 40.
While
driving,
keep
the
volume
level
at
which
external
sounds
can
still
be
heard.
Playing source selection
Press the [DISC],
[AUX/iPod],
[AM/FM]
or
[SAn
button to change the operation mode.
*
iPod
or
iPhone can connect to this unit via
CCA-750 cable.
Displaysystem time
Press the [DISPLAY] button on the front
panel or the [DISP] remote control to switch
the display information from clock, station
information (radio mode),
or
track information
(CD mode).
RESET
If you have following problems, please press
[RESEn
button.
• Unit can not power on
• Nothing happens when buttons are pressed
• Display is not accurate
Note:
*
When the
[RESEn
button is pressed, preset
radio stations, audio setting, etc.stored in
memory are retained.
0
0 0 0
0
CMOS
7

System Setup
To
change adjustmentsetting
1.
Press the [ADJUST] button to switch to
the adjustment selection display.
2.
Press the [
<1111]
or [
~]
button to select the
"item name".
CLOCK, DXILO, SCAN SVR, SCROLL,
REARIS-W,
SW
PHASE,
Pandora,
DIMMER, CONTRAST, BEEP, 12124H,
RESET
3.
Rotate the [UP/DOWN] knob to select the
"desired setting value".
*In
the case of display blinking
"ENr,
you
can press the [ENTER] button to adjust
the setting value.
4.
After
completing
settings,
press
the
[ADJUST] or [RETURN] button to return to
the previous mode.
CLOCK
1.
Press the [ENTER] button.
2.
Press the [
<1111]
or [
~
] button to select the
hour or the minute.
3. Rotate the [UP/DOWN] knob
to
set the
correct time.
* The clock is displayed
in
12-hour format
by default.
4.
Press the [ENTER] button to store the time
into memory.
Note:
•
You
cannot
set
the
clock
when
it
is
displayed with only the ignition
on.
If
you
drain
or
remove the boat's battery or take
out
this unit, the clock is reset. While
setting
the clock,
if
another
button
or
operation is selected, the clock set mode
is canceled.
DXILO (RADIO mode)
Rotate the [UP/DOWN] knob to choose radio
local or distant at RADIO mode.
• LO: Only stations with strong signal can
be received.
•
DX:
Stations with strong and weak signals
can be received.
8
CMOS
SCRN SVR: ON/OFF
Rotate
the
[UP/DOWN]
knob to
choose
SCAN SVR (screen saver)
ON
or OFF.
SCROLL: ON/OFF
For track information that is longer than the
display panel:
When SCOLL is ON, the LCD will scroll the
ID3 TAG information across the display, e.g.:
TRACK->FOLDER->FILE->ALBUM->TITLE-
>ARTIST->
TRACK->
...
When SCROLL is OFF, the LCD will display
one of the ID3 TAG information, the default
is TRACK, but user can adjust it to other
ID3 TAG information by pressing [DISPLAY]
button.
REARIS-W
Rotate
the
[UP/DOWN]
knob to
choose
REAR or S-WOOFER (SUB-WOOFER).
SW PHASE
Rotate
the
[UP/DOWN]
knob to
choose
SUBWOOFER
phase
REVERSE
or
NORMAL.
Pandora: ON/OFF
Select OFF if the Pandora application has
not been installed on your iPod touch
or
iPhone.
DIMMER: ON/OFF
Rotate
the
[UP/DOWN]
knob to
choose
DIMMER ON or OFF.
• ON: LCD dimmer is active when small
light of vehicle is turned
ON.
• OFF: LCD always maximum brightness
regardless of the vehicle small light.
CONTRAST
You can adjust the display contrast to match
the angle of installation of the unit.
* The factory default setting is
"9".
(Adjustment level: 1to 1
0)
Rotate the [UP/DOWN] knob to adjust the
contrast.
System Setup
BEEP: ON/OFF
Rotate the [UP/DOWN] knob to choose button
beep sound
ON
or OFF.
12/24H
Rotate the [UP/DOWN] knob to choose time
format: 12 HOURS or 24 HOURS.
Audio
Setup
Press the [AUDIO] button to enter sound effect
setting mode. First press shows current BEAT
EQ setting. Rotate the [UP/DOWN] knob to
changes BEAT
EQ
in this order:
OFF -> B-BOOST -> IMPACT -> EXCITE ->
CUSTOM
Rotate
the
[UP/DOWN]
knob
to
changes
CUSTOM, and press the [ENTER] button, the
press [
<1111]
or [
~]
button to select it including:
BASS-G -> BASS-F
->
BASS-Q -> MID-G ->
MID-F -> MID-Q
->
TREBLE-G
->
TREBLE-F
->
TREBLE-Q, rotate the [UP/DOWN] knob to
select a value.
BASS-G I MID-G I TREBLE-G: (-7)- (+7)
BASS-F: 50 I 100 I 200
BASS-O: 0.7 I 1.0I 1.4 I 2.0
MID-F: 500
11
KI 2K
MID-Q: 0.7 I 1.0 I 1.4 I 2.0
TREBLE-F: 5k I 1
Ok
I 15k
TREBLE-Q:
0.
7 I 1.0 I 1.4 I 2.0
RESET
Long press [ ENTER ] button. Settings will
be
set to the default value.
Press the [AUDIO] button, then press [
<1111]
or
[
~
] button to select USER preset including:
BALANCE -> FADER -> M-B EX -> HPF
(high pass filter)
->
LPF (low pass filter)
->
SUBW VOL (Subwoofer Volume), rotate the
[UP/DOWN] knob to select a value.
BALANCE: LEFT 1-7
->CENTER->
RIGHT
1-7
FADER: FRONT 1-7
->CENTER->
REAR
1-7
M-BEX:
ON
I OFF
HPF: THROUGH I 60 I 90 I 120
LPF: THROUGH I 60 I 90 I 120
SUBW VOL:
(-6)-
(+6)

Radio Operations
Select tuner as playing source
Press
[AMIFM]
button once or more to enter
RADIO
mode.
Changing the reception area
This unit is initially set to USA frequency
intervals of 10 kHz for AM and 200 kHz for
FM. When using it
outside
the
USA, the
frequency reception range can be switched
to the intervals below.
u.s.
Other Europe
standard countries standard
Frequency
10kHz
9kHz
9kHz
AM
spacing
Frequency
530to
1,710
531
to
531
to
1,602
range kHz 1,629kHz kHz
Frequency 200kHz 50kHz 50kHz
FM
spacing
Frequency
87.9to
87.5to
108 87.5 to 108
range 107.9MHz MHz MHz
Setting the reception area
*
All station preset memories are lost when
the reception area is changed.
1.
Press the
[AMIFM]
button and select the
desired radio band (FM or AM).
2.
Press the
[OPTION]
button.
3.
Press the [
~]
or
[..,..
] button to select
'TUN
AREA".
4.
Rotate the
[UP/DOWN]
knob to select:
•
U:
U.S. standard (initial setting)
•
K:
Other countries
•
E:
Europe standard
5.
Press and hold the
[ENTER]
button to
store the selecting.
• The unit will turn off after setting.
Selecting the radio
band
Press the
[AMIFM]
button
on
the front panel
or the
[BAND
I
TOP]
on the remote control
to select one radio band among FM1, FM2,
FM3,AM.
Manual tuning
During manual tuning, the frequency will be
changed in steps.
Press the (
~
] or [
..,..
] button
on
the panel to
tune
in
a lower
I
higher station.
Press the
[...,..]
or [
~]
button
on
the remote
control to select preset stations.
Auto tuning
Press and hold the [
~
I
..,..
]
button
on
the
panel or [ ...,..
I
~
]
button on the remote
control to seek a lower
I
higher station.
To stop searching, repeat the operation above
or press other buttons having radio functions.
Note:
When a station is received, searching stops
and the station is played.
Preset scan
Preset scan receives
the
stations stored
in
preset memory in order. This function is
useful when searching for a desired station
in
memory.
1.
Press the
[OPTION]
button.
2.
Press the [
~
]
or
[
..,..
] button to select
"PRESET
SCN".
3.
Press the
[ENTER]
button.
*When
a
desired
station
is
tuned
in,
press the
[ENTER]
button to continue
receiving that station.
Auto store
Only stations with sufficient signal strength
will be detected and stored in the memory.
1.
Press the
[AMIFM]
button and select the
desired band (FM or AM).
2.
Press the
[OPTION]
button.
3.
Press the [
~
] or [
..,..
] button to select
"AUTO STORE".
4.
Press and hold the
[ENTER]
button
(1
sec.) to start automatic station search.
To stop auto store, press other buttons
having radio functions.
Notes:
1.
After auto store, the previous stored stations
will
be
overwritten.
2.
The unit has 4 bands, such as
FM
1,
FM2,
FM3 and AM. FM3 and AM can store byAS
function. Each band can store 6 stations,
M303 can store 24 stations
in
total.
Radio Operations
Manual store
1.
Select
the
desired
station
with
seek
tuning or manual tuning.
2.
Press the
[MENU]
button
3.
Rotate the
[UP/DOWN]
knob to select a
desired station.
4.
Press
and
hold
the
[ENTER]
button
to
store the
current
station into preset
memory.
Recall the storedstations
A total of 24 preset positions (6-FM1, 6-FM2,
6-FM3, 6-AM) exists to store individual radio
stations
in
memory.
1
. Press the
[AMIFM]
button and select the
radio band.
2.
Press the
[MENU]
button.
3.
Rotate the
[UP/DOWN]
knob to select the
desired preset station.
4.
Press the
[ENTER]
button to recall the
stored frequency.
Note:
After the band selecting, you can also rotate
the [UP/DOWN] knob to select a desired
presetstation.
Local seeking
When LOCAL seeking is ON, onlythose radio
stations
with
strong
radio
signal
could
be received.
To select LOCAL function, press the
[ADJUST]
button
on
the front panel or press
and hold the [
DISP ]
button on the remote
control, then press [
..,..
] button
on
the front
panel
or
[
~]
button on the remote control
repeatedly until
OX
I
LO
displays
on
the
screen, and rotate the
[UP/DOWN]
knob
to
select Local or Distant mode.
Note:
The number of radio stations that can be
received will decrease after the local seeking
mode is ON.
SiriusXM Satallite Radio Operations
Everything worth listening to is
on
SiriusXM,
getting
over
130
channels,
including
the
most commercial-free music, plus the best
sports,
news,
talk
and
entertainment.
To
start
listening
to
the
SiriusXM™
Satellite
Radio, a SiriusXM Vehicle Tuner (purchased
separately) and Subscription are required.
Displaying the Radio ID
Before you listen to satellite radio, you must
subscribe to the service using the SiriusXM
Radio
ID
number.
1.
Press
[SAT)
button to activate SiriusXM-
mode.
2.
Press the [
~
,..,..
] button
on
the front panel
or the marine wired remote control to select
channel "0".
The unit displays Radio I
D.
Notes:
1
. The Radio I
D is located on the bottom of
the SiriusXM Connect Vehicle Tuner.
2.
Please note that the SiriusXM Radio ID
does not include the letters
I,
0,
S or
F.
3.
Activate the SiriusXM Connect Vehicle
Tuner using one of the two methods
below:
• Online: Go to "www.siriusxm.com/
activatenow''.
• Phone: Call 1-866-635-2349.
• To activate SiriusXM Canada service
go to www.xmradio.ca and click on
"ACTIVATE RADIO" in the top right
corner, or call1-877-438-9677
Storing Channel Presets
1.
Press
[SAT]
button on the front panel or
the
[BAND
I
TOP]
on the remote control or
the
[MENU
I
BAND]
on the marine wired
remote control to select the desired band
you want to store the preset in.
There are 3 Satellite Radio Preset bands.
Each press of
[SAT]
or
[BAND
I
TOP]
or
CMOS
9

SiriusXM Satallite Radio Operations
[MENU
I
BAND]
changes the band:
SXM1
->
SXM2
->
SXM3
->
SXM1
2.
Tune to the desired channel and then
press
[MENU]
button
on
the front panel
to
enter PRESET mode, and select desired
preset number by rotating
[UP/DOWN]
knob on the front panel or pressing the
[ .&
I
..-
]
on
the
marine wired remote
control. Press and hold
[ENTER]
key on
the front panel
to
store current channel.
3.
Repeat the procedure to store up to 5
other channels
on
to the same band.
Note:
• A total of
18
channels
can
be
stored in the
preset memory, 6 channels for each band
(SXM1
,SXM2 and SXM3).
Tuning Channels using Presets
1.
Press
[SAT]
button
on
the front panel or
the
[BAND
I
TOP]
on
the
remote control or
the
[MENU
I
BAND]
on
the marine wired
remote control to select the desired band
of Presets you wish
to
access.
2.
Press the
[MENU]
button.
3.
Rotate the
[UP/DOWN]
knob
on
the front
panel or press the [ .&
I
..-
]
button on the
marine wired remote control to select the
desired preset station.
4.
Press the
[ENTER]
button on the front
panel.
Note:
•
After
the band selecting, you can also
rotate the
{UP/DOWN]
knob on the front
panel or press
the
{
.&
I..-
]
on
the
marine
wired remote control to select a desired
preset channel.
Category Browsing
1.
Press and hold
[SAT]
button
on
the front
panel
or
[BAND
I
TOP]
button on the
remote control to activate the Category
Browsing mode, or press and hold
[MENU
I
BAND]
button and press
[ENTER]
on
marine wired remote control to activate the
Category Browsing mode,
2.
Rotate the
[UP/DOWN]
knob
on
the front
panel or press the [ .&
I
..-
]
button on the
10
CMOS
marine wired
remote
control to select desired
category.
3.
Press the [
~
I
..,.
]
button
on
the front panel
or the marine wired remote control
or
[
~
I ..,.. ]
button
on
the remote control to
select desired channel within the selected
Category.
You can see channel name,
channel number, artist, title or content by
pressing
[DISPLAY].
4.
Press
[ENTER]
on
the front panel or marine
wired remote control to tune to selected
channel.
Note:
If no operation is perfprmed for 1
0 seconds,
the Category Browsing mode
is
canceled.
Preset scan
Preset
scan receives the
stations
stored
in preset memory in order. This function is
useful when searching for a desired station
in
memory.
1.
Press the
[OPTION]
button.
2.
Press the [
~
] or [
..,.
] button to select
"PRESET
SCN".
3.
Press the
[ENTER]
button on the
front
panel.
*When
a desired station
is
tuned
in,
press
the
[ENTER]
button
on
the front panel to
continue receiving that station.
Channel scan
(In
current category)
Channel scan receives the channel
(in
current
category)
in
order. This function
is
useful when
searching for a desired channel in current
category.
* This function is available in the category
browsing mode.
1.
Press and hold the
[SAT]
button
(1
sec.) to
enter
"CAT
MODE".
2.
Press the
[OPTION]
button, then
"CAT
SCN"
appears
on
the display.
3.
Press the
[ENTER]
button on the
front
panel.
And start the category scanning.
Note:
• Category scanning
is
not available when
no
category is defined for the current channel.
SiriusXM Satallite Radio Operations
Changing the Display
Text information, such as the channel name,
artist name/feature, song/program title and
content
is
available
with each
SiriusXM
channel.
The
unit
can
display
this
text
information as explained below.
1.
In
SiriusXM
mode,
press
[DISPLAY]
button.
Each
time
you
press this button, the display
changes
as
shown below.
Band/Channel number/channel name =>
Artist Name => Song Title=> Content Info
=> Category Name => Clock => Band/
Channel number/channel name
* If there is
no
text information,nothing will
be
displayed.
Parental Lock
I
Unlock
The SiriusXM Parental Control feature allows
you to control access to channels that you
consider inappropriate for younger listener.
When enabled, the Parental Control feature
requires you to enter a password to tune to
the locked channels. Information
on
setting up
the password, setting up the channels to be
locked, and the method to access the locked
channels
is
described below.
1.
For setting up the password, press the
[OPTION]
and
[
..,.
]
button
to
select
"PARENTAL
PASSWORD".
Press
[ENTER]
button to
change
password.
Enter old password, new password. To
enter code, rotate
[UP/DOWN]
knob to
decide number and [
~
] or [
..,.
] to select
digit.
Each
time you need
to
press
[ENTER]
knob
to
confirm
password.
(Original
password
is
"0000")
2.
For setting
up
the channels to
be
locked,
press
the
[OPTION]
and [
..,.
] button
during tuning to the desired channel, and
select
"LOCK
CH"
and press
[ENTER]
knob to start to lock channel. You will
be
asked to input password. Enter password
and
"LOCK"
will be
displayed
if
it is
successful.
3.
For unlocking the locked channel, press
the
[OPTION]
and [
..,.
] button to select
"UNLOCKCH".
Enter password and you
can unlock the channel.
4.
For unlocking all locked channels, press
the
[OPTION]
and [
..,.
] button to select
"UNLOCK ALL CH".
Enter password and
you can unlock
all
the channels.
5.
For accessing the locked channels, select
channel by
"DIRECT
SELECr.
Press
and
hold
[MENU]
and
select
"DIRECT SELECT'
by pressing
[ENTER]
button. Input desired locked channel (need
to input 3 digit) and input password, then
you can tune to that locked channel.

CD/MP3/WMA Operations
This
unit
can playback MP3/WMA
files
Note:
•
If
you play a
WMA
file with active DRM
(Digital Rights Management), there will be
no audio.
To disable
DRM
(Digital Rights Management)
When using Windows Media Player
9/1
0/11
,
click
on
Tool->
Options-> Copy Music tab,
then under Copy settings, unclick the Check
box for copy project music. Then, reconstruct
files.
Personally constructed WMA files are used
at your own responsibility. ·
Precautions when creating MP3/
WMA
file
Usable sampling rates and
bit
rates
1.
MP3: Sampling rate 8kHz-48kHz, Bit rate
8 kbps-320 kbps I VBR
2.
WMA: Bit rate 8 kbps-320 kbps
File extensions
1.
Always
add
a
file
extension
".MP3",
".WMA" to MP3, WMA file by using single
byte letters. If you add a file extension
other than specified or forget to add the
file extension, the file cannot be played.
2.
Files without MP3/WMA data will not play.
The files will not play if you.attempt to play
files without MP3/WMA data.
*
When VBR files are played, the play time
display may differ the play location.
*
When MP3/WMA files are played, a little
no
sound part
is
caused between tunes.
Logical
format
(File system)
1.
When writing MP3/WMA file on a CD-R
disc
or
CD-RW
disc,
please
select
"IS09660 level
1,
2 or Jolief' or Apple ISO
as the writing software format. Normal
play may not be possible if the disc is
recorded
on
another format.
2.
The folder name and file name can be
displayed as the title during MP3/WMA
play but the title must
be
within
32
single
byte alphabetical letters and numerals
(including
an
extension).
3.
Do
not affix a name to a file inside a folder
having the same name.
Folder structure
A disc with a folder having more than 8
hierarchical levels will be impossible.
Number
of
files
or
folders
1.
Up to 999 files can be recognized
per
folder.
Up
to 3000 files can
be
played.
2.
Tracks are played
in
the order that they
were
recorded
onto
a
disc.
(Tracks
may not always be played in the order
displayed
on
the
PC.)
3.
Some noise may
occur
depending on
the type of encoder software used while
recording.
Eject function
Just pressing the
[~]button,
ejects the disc
Notes:
•
If
you
force
a
CD
into
before
auto
reloading, this can damage the
CD.
• If a CD (12 em) is
left
ejected
for
15
seconds, the
CD
is
automatically reloaded
(Auto reload).
Listening to a discalready loaded
in the
unit
Press the [DISC] button to select the CD/
MP3/WMA mode.
When the unit enters the CD/MP3/WMA
mode, play starts automatically.
Loadinga
CD
Press the [OPEN] button to access the CD
SLOT behind the front panel.
Insert
a CD
into
the
center
of
the
CD
SLOT with label facing up. The CD plays
CDIMP3/WMA Operations
automatically after loading.
Notes:
• Never insert foreign objects into the CD
SLOT.
• If the
CD
is
not inserted easily, there may
be
another CD in the mechanism or the
unit may require service.
owoa
• Discs without the
[2l~
or
B
mark and
CO-ROMs cannot
be
played
by
this unit.
• Some CD-R/CD-RW discs may not be
usable.
3.
Close the front panel.
*
Press the center of the front panel to
close.
Pausing
play
1.
Press
the
[
~
]
button
to
pause
play.
"PAUSE"
appears
in
the
display.
2.
To
resume
CD
play,
press
the
[
~
]
button
again.
Displaying
CD
titles
This unit can display title data for MP3/WMA
disc.
When SCROLL
is
OFF, each time you press
the [ DISPLAY ] button to change the title
display.
MP31WMA
disc
FILE->FOLDER->TITLE->ARTIST
->ALBUM-
>
TRACK->FILE
...
Notes:
• If MP3/WMA disc has no
103
TAG, "NO
TITLE" appears
in
the display.
• Only ASCII characters can
be
displayed
in
Tags.
Selectinga track
Track-up
1.
Press the [
..,.
] button to move ahead to
the beginning of the next track.
2.
Each time you press the [..,.] button, the
track advances ahead to the beginning of
the next track.
Track-down
1
. Press the [
.,..
] button to move back to the
beginning of the current track.
2.
Press the (
.,..
] button twice to move back
to the beginning of the previous track.
Fast-forward/Fast-reverse
Fast-forward
Press and hold the [
..,.
] button .
Fast-reverse
Press and hold the [
.,..
] button .
*
For
MP31WMA
discs, it takes some time
until the start of searching and between
tracks.
In
addition, some errors may occur
in
the play time.
FolderSelect
This function allows you to select a folder
containing
MP31WMA
files and start playing
from the first track
in
the folder.
Rotate the
[UP/DOWN]
knob to select a
folder.
Search Function
1.
Press the [MENU] button to enter FOLD
SCH
mode. Press the [ENTER] button to
enter the folder list search mode.
2.
Rotate the [UP/DOWN] knob to select a
folder.
3.
Press the [ENTER] button to enter the file
list search mode. And then the track list
appears
in
the display.
4.
Rotate the [UP/DOWN] knob to select a
track.
5.
Press the [ENTER] knob to play.
*
When play back MP3 I
WMA
file, this
function
is
performed
in
the current folder.
Top function
The top function resets the CD player to
the first track of the disc. Press and hold the
[MENU] button
(1
sec.) to play the first track
(track
No.
1)
on
the disc.
*
In
case of MP3/WMA, the first track of the
current folder will
be
played.
CMOS
11

CD/MP3/WMA Operations
Other various
play
functions
Press the [OPTION] button.
Scan play
This function allows you to locate and play
the first
1
0 seconds of all the tracks recorded
on
a disc.
2. Press the [
~
] or [
Ill-
]
button to select
"SCN".
3.
Rotate the [UP/DOWN] knob to select
"ON" or "OFF'.
4. Press the [ENTER] button.
Repeat play
This function allows you to play the current
track repeatedly or play a track currently
being
played
in
the
MP31WMA
folder
repeatedly.
CD:
2. Press the [
~
] or [
Ill-
]
button to select
"RPr.
USB Operations
1. Insert a USB device into the rear of the
unit USB cable.
When connecting a USB device, the unit
will
read
the files automatically.
2. To remove the USB device, you should
first
select
another
source
or
turn off
the power, in order to avoid damaging
the USB device. Then take off the USB
device.
3.
Operation
is
same
as
MP31WMA
operation.
12
CMOS
3.
Rotate the [UP/DOWN] knob to select
"ON" or "OFF' .
4.
Press the [ENTER] button.
MP3/WMA:
2. Press the [
~
] or [
Ill-
]
button to select
"RPr.
3.
Rotate the [UP/DOWN] knob to select
"OFF', ''TRK" or "FOLD".
4. Press the [ENTER] button.
Random play
This function allows you to play all tracks
recorded
on
a disc
in
a random order.
2. Press the [
~
] or [
Ill-
]
button to select
"ROM".
3.
Rotate the [UP/DOWN] knob to select
"ON" or "OFF'.
4. Press the [ENTER] button.
iPod
& iPhone Operations
Connect
Connect
an iPod
or
iPhone
to the USB
connector via CCA-750 cable.
When connecting a device, the unit will
read
the files automatically. The track information
displays
on
the screen once playback start.
MENU
In
the S-CTRL OFF mode, press [MENU]
button, rotate the [UP/DOWN] knob select
"MUSIC" or "VIDEO".
Select "MUSIC", press the [ENTER] button,
then rotate the [UP/DOWN] knob to select
PLA
YLISTS
I
ARTISTS
I
ALBUMS
I
SONGS
I
GENRES
I
COMPOSERS, and press the
[ENTER] button
to
confirm.
Select "VIDEO", press the [ENTER] button,
then rotate the [UP/DOWN] knob to select
MOVIES
I
MUSIC VIDEOS
I
TV
SHOWS
I
VIDEO PODCASTS
I
RENTALS, and press
the [ENTER] button
to
confirm.
To exit the category selecting.
• Press the [
~
] button to back previous
subfolder list
in
iPod menu.
• Press and hold
(1
sec) [MENU] button to
back top of iPod menu "MUSICNIDEO".
Note:
VIDEO
MENU
item
is
different by the model
of connected iPod
and
language setting.
Repeat
play
This function allows you to play the current
track repeatedly or play all tracks
in
your
iPodliPhone repeatedly.
1.
Press the [OPTION] button.
2.
Press the [
~I
Ill-
]
button
on
the front panel
or
the
marine wired remote control or
[
..,..,
~
] button
on
the
remote
control to
select
"RPr'.
3.
Rotate the [UP/DOWN]
knob
to select
"ON"
or"OFF'.
3.
Press the [ENTER] button.
Random
play
This function allows you to play all tracks
recorded
on
a disc
in
a random order.
1.
Press the [OPTION] button.
2.
Press the
[~I
Ill-]
button
on
the front panel
or
the marine wired remote control or
[
..,..,
~
] button
on
the
remote
control to
select
"ROM".
3.
Rotate the [UP/DOWN] knob to select
"ALBUM", "SONG" or "OFF'.
4.
Press the [ENTER] button.
Setting
iPod
simple
control
mode
Use
this
function if you wish to operate
through your iPod connected to this unit via
the USB cable.
* The factory default setting
is
" OFF
".
1. Press the
[OPTIONJ
button.
2. Press the [
~
I
Ill-
]
button
on
the front panel
or
the marine wired remote control
or
[
..,..,
~
] button
on
the
remote
control to
select "S-CTRL".
3.
Rotate the [UP/DOWN] knob to select
"ON" or "OFF'.
• ON: Operations are made through your
iPod.
•
OFF:
Operations
cannot
be
made
through your iPod.
Notes:
• When performing iPod operations using
simple control mode, make the operations
slowly.
If
repetitive
operations
are
performed too quickly, unforeseen errors
may occur.
• When performing iPod operations using
simple
control
mode,
please
do
not

iPod
&
iPhone Operations
operate the iPod and the unit at the same
time, otherwise there may be unexpected
event happened.
• Some iPod models
do
not support this
function. Consult your nearest
Clarion
dealer or website to confirm which models
do not support this function.
iPodmenu alphabetsearch
This function searches the subfolders for
desired alphabetical letters.
1.
Press the [MENU] button to select the iPod
menu mode.
2.
Press
the
[ENTER]
button
to
switch
between categories.
MUSIC: PLA
YLISTS, ARTISTS, ALBUMS,
SONGS, GENRES, COMPOSERS
VIDEO: MOVIES, MUSIC VIDEOS,
TV
SHOWS, VIDEO PADCASTS,
RENTALS
3. Press the [ENTER] button. (The contents
of the category are displayed.)
4.
Press and hold the [DISPLAY] button
(1
sec.).
5. Rotate the [UP/DOWN] knob to select the
desired letter to search.
6. Press the [DISPLAY] button again to next
perform search.
7. Press the
[ENTER]
button to confirm.
Listening to Pandora
You can listen to Pandora internet radio by
connecting
an
iPod/iPhone that has Pandora
Application already installed.
To start streaming, connect the iPodliPhone
with Pandora already launched.
When the unit displays "PLEASE LAUNCH
Pandora
APPLICATION
ON
MOBILE
DEVICE"
in
Pandora mode, please launch the
Pandora Application by operating the iPod/
iPhone connected.
1.
Press the [AUX/iPod] button to enter the
Pandora mode.
Selecting a station
from
list
Press the [MENU] button and select "BY
DATE" or "A-Z" by rotating the [UP/DOWN]
knob and press the [ ENTER ] button.
•
BY
DATE: List
in
an
created date order
•
A-Z:
List
in
an
alphabetical order
Go
to
next
station
or
previous
station(an
alphabetical order)
Press the [
...,.
] button
on
the front panel or the
marine wired remote control or [
..,..
] button
on
the
remote control to go to next station.
Press the [
~
] button
on
the front panel or the
marine wired remote control or [
...
] button
on
the
remote control
to
go to previous station.
Thumbs up/down
Thumbs up:
press the (
...,.
] button
on
the front panel or the
[
.a.
]
button on the
marine
wired remote
control or the [ROM] button on the remote
control
for
thumbs up. Giving a
track
the
thumbs up will tell Pandora to play more tracks
like that one.
Thumbs down:
press the [
~
] button
on
the front panel or the
[
'11/f
1
button on
the
marine wired remote
control or the [SCN] button on the remote
control for thumbs down. Giving a track the
thumbs down will skip to the next track (subject
to skip limit), and Pandora will remember not
to play that track
on
the station again.
Notes:
• You can
personalize
your
stations
by
"thumbs up" or "thumbs down".
• Pandora limits the number ofthumbs
down allowed
on
their service.
If you
attempt
to
thumbs
down
tracks
beyond the limit, the current song continues
to playback.
BOOKMARK artist
or
song
Short-press the [RPT] buton on the remote
control to Bookmark track.
Long-press the [RPT] button on the remote
control to Bookmark current artist of the track.
Skip
Press and hold the [
...,.
1
button on the front
panel
or
the marine wired remote control
or press and hold the [
..,..
] button on the
remote control for the next tracks
in
station.
iPod
&
iPhone Operations
Note:
• Pandora limits the number of skips allowed
on their service. If you attempt to skip tracks
beyond the limit, "SKIP
LIMIT
is displayed.
Play/Pause
Press
the
[
:.U~E
]
button
on
the front panel or the
marine wired remote control or the
[11--11]
button
on
the remote control for play
I
pause.
AUX
Operations
The
rear
AUX
terminals
of
this
system
is
provided to allow playback of sounds and music
from external devices connected to this unit.
Press [AUX/IPod] button
on
the panel to select
"AUX".
AUXInputsensitivitysetting
Make
the
following
settings
to
select
the
sensitivity when sounds from external devices
connected to this unit are difficult to hear even
after adjusting the volume.
*
The factory default setting is "MID".
1.
Press the [OPTION] button.
2.
"AUX SENS" appears
in
the display.
3.
Rotate
the
[UP/DOWN]
knob
to
select
"HIGH", "MID" or "LOW".
Note:
When
AUX
mode
is selected,
AUX
IN
sensitivity
can
be
set.
CMOS
13

6. TROUBLE SHOOTING
USB
Problem
Cause
Measure
GENERAL
The USB device has been inserted Reversing the connection direction of the USB device,
USB device cannot be with wrong direction. try it again.
Problem
Cause
Measure
inserted. The USB connector is broken. Replace with a new USB device.
Unit fuse blown.
Replace
with
new
fuse
of
correct
rating.
Unit can not power on.
Replace
with
new
fuse
of
correct
rating.
Boat battery fuse blown.
USB device is not The USB device is damaged. Disconnect the USB device and reconnect. If the
recognized. device is still not recognized, try replacing with a
Connectors are loose. different USB device.
Turn
off
the
power
and
open
the
front panel.
Unit can not power on. Press
the
[RESET] button with a thin rod.
Nothing happens Note:
when buttons are
The
microprocessor
has
When
the
[RESET] button
is
pressed, turn off
pressed. malfunctioned
due
to
noise, etc. the
ACC
power.*
No sound heard with No MP3/WMA file is stored
in
the
the display
"No
File"
USB device. Store these files properly in the USB device.
shown.
Sound skips
or
is noisy. MP3/WMA files are not encoded Use MP3/WMA files encoded properly.
properly.
Display is not
*When
the
[RESET] button is pressed,
accurate.
frequencies
of
radio stations, titles,
etc
.stored
in
memory
are cleared.
SiriusXM Advisory Messages
Improper audio output connection. Check wiring and correct.
Message
Description
Volume set too low. Increase volume level.
No/low audio output. Speakers damaged. Replace speakers.
CHEKTUNER
Check the SiriusXM tuner connection on the back of the unit to ensure that its correctly
connected.
Ensure the SiriusXM antenna cable is connected to the SiriusXM tuner correctly.
Heavily biased volume balance. Adjust the channel balance to center position.
CHKANTENA
Check the SiriusXM antenna wire for breaks
or
sharp bends. Replace the antenna if necessary.
Speaker wiring is in contact with Insulate all speaker wiring connections.
metal part of boat.
Press RESET located
..... If the message remains the antenna may have been damaaed.
NO
SIGNAL The vehicle must be outside, and the antenna must have a clear view of the southern sky.
The magnetic antenna must be mounted on the outside of the vehicle for the best receotion.
Non-standard disc used. Use a standard disc.
CHAN UNSUB This channel is not included in your SiriusXM subscription plan.
Call 1-866-635-2349 to subscribe.
Poor sound quality or Speaker power rating does not Replace speakers.
match unit.
distortion. Wrong connections. Check wiring and correct.
This channel is not a valid SiriusXM channel.
CH UNAVAIL The channel number has been entered incorrectly,
or
the channel was removed from the
SiriusXM channel lineuo
Speaker
is
shorted. Check wiring and correct.
The selected channel has been locked by the parental controls, or a mature channel has been
CH LOCKED selected.
Unit resets itself when Incorrect connection between ACC Check wiring and correct.
engine is off. and Battery.
A orompt to enter the unlock code will
am>ear.
Enterthe unlock code as described on oaae 10.
SUBSCRIPTN An update to your SiriusXM subscription has been received by the SiriusXM tuner. Press
any
UPDATED button to continue.
DISC Player
Ptoblem
Cause
..
.iil
·r.·
··'
i',);:
'~i.:
J
,·•·
Meature·
Disc cannot be Another disc is alreadv loaded. Eiect the disc before
loaditN
the new one.
loaded. There is an object install installed Remove the object inside the unit.
the unit.
Sound skips or is Comoact disc is dirtv. Clean the comoact disc with a soft cloth.
Compact disc is heavily scratched Replace with a compact disc with no
noisy. orwaroed. scratches.
Sound is bad when Condensation may form on the internal
power is first turned lens when the boat is parked in a Let dry for about 1 hour with power on.
on. humid olace.
14 CMOS

7. ERROR DISPLAYS
If an error occurs, one of the following displays is displayed.
Take the measures described below to solve the problem.
Display
Cause
Measure
ERROR 3 Disc is inserted incorrectly. Eject the disc then reload it properly.
The disc format is not supported. Try another disc.
ERROR 5 This is a failure of deck's mechanism. Consult your store of purchase.
If
an
error display other than the ones described above appears, press the [RESET] button. If the
problem persists, turn off the power and consult your store of purchase.
*
When the [RESET] button is pressed, frequencies of radio stations, titles, etc. stored in
memory are cleared.
8. SPECIFICATIONS
FMTuner
Frequency Range:
USA: 87.9 MHz to 107.9 MHz
Europe: 87.5 MHz to 108.0 MHz
Others: 87.5 MHz to 108.0 MHz
Usable Sensitivity: 8
dB~V
Alternate Channel Selectivity: 60 dB
Stereo Separation
(1
kHz): 30 dB
Frequency Response (±3 dB):
30Hz
to
15kHz
AM
Tuner
Frequency Range:
USA: 530 kHz to
171
0 kHz
Europe:
531
kHz to
1602kHz
Others:
531
kHz to
1629kHz
Usable Sensitivity: 28
dB~V
CD Player
System: Compact disc digital audio system
Usable Discs: Compact disc
Frequency Response
(±1
dB):
20 Hz to 20 kHz
Signal/Noise ratio: 94 dB
Harmonic Distortion: 0.1%
MP3/WMA mode
MP3 sampling rate: 8 kHz to 48 kHz
MP3 bit rate: 8 kbps to 320 kbps I VBR
WMA bit rate: 8 kbps to 320 kbps
Logical format:
IS09660
level 1,2
Joliet file system
USB
Specification: USB 1.0/2.0
Playable audio format:
MP3(.mp3): MPEG 1/2/Audio Layer-3
WMA(.wma): Ver 7/8/9.1/9.2
AudioAmplifier
Maximum Power Output:
180 W (45 W x 4 ch)
Bass Control Action
(100Hz):
+14 dB,
-14
dB
Treble Control Action
(10kHz):
+12 dB,
-12
dB
Line Output Level (CD 1 kHz): 2 V
Input
Audio input sensitivity:
High: 320mV (at
1Voutput)
Mid: 650mV (at 1V output)
Low: 1.3V (at 1
V output)
(input impedance 10
kO
or
greater)
Aux-in level:
s2V
General
Power supply voltage:
14.4VDC (10.8 to 15.6Vallowable),
negative ground
Pre-Amp output voltage:
2.0V (CD play mode: 1kHz,
OdB,
1
OkO
load)
Fuse: 15A
Dimensions of the Main Unit:
198mm Width x
91
mm Height x 208mm Depth
7-25/32(width)
X
3-19/32(Height)
X
8-6/32(Depth)
Weight of the Main Unit: 4.19 lb. (1.90 kg)
Dimensions of the Remote Control unit:
43mm Width x
11
mm Height x 113mm Depth
1-2/3(Width) x 2/5(Height) x 4-2/5(Depth)
Weight of the Remote Control Unit:
E
E
~
N
1.16oz. (36g) (including battery)
7"
178mm
Note:
2"
50mm
•
Specifications
and
design
are
subject
to
change
without
notice
for
further
improvement.
Power Output:
18W
RMS x 4
Channels
at
40
and 1% THD+N
Signal to Noise Ratio:
94dBA (reference: 1W into
40)
CMOS 15

9.
INSTALLATIONI WIRE
CONNECTION GUIDE
CONTENTS
1) Before Starting ...................................................................... 16
2) Package Contents................................................................. 16
3) General Cautions .................................................................. 16
4) Cautions
on
Installation......................................................... 16
5) Installing the Source Unit ...................................................... 16
6) Cautions on Wiring ............................................................... 17
7) Sample Systems .................................................................. 17
8) Wiring and Connections ........................................................ 18
9) Connecting the accessories .................................................. 18
1) Before Starting
1.
This set is exclusively for use with a negative
ground 12 V power supply.
2. Read these instructions carefully.
3.
Be sure to disconnect the battery ''terminal" before
starting. This is to prevent short circuits during
installation. (Figure 1)
2)
Package Contents
Figure 1
Battery
Source unit ..................................................1 Screws M4x30 mm......................................6
Hole block seal (black) ................................1
Support strap...............................................1
M4 Nut.........................................................1
M4washer
...................................................2
3)
General Cautions
1. Do not open the case. There are no
userserviceable parts inside. If you
drop anything into the unit during
instal~tion,
consult your dealer
or
an
authorized
Clarion
service center.
16
CMDB
Power supply cable .....................................1
Owner's manual........................................... 1
Warranty card..............................................1
Installation template..................................... 1
2. Use a soft, dry cloth to clean the case.
Never use a rough cloth, thinner,
benzine, or alcohol etc. For tough dirt,
apply a little cold or warm water to a
soft cloth and wipe off the dirt gently.
4)
Cautions on Installation
1.
Prepare all articles necessary for
installing the source unit before
starting.
2. Install the unit within 30° of the
horizontal plane. (Figure 2)
3. If you have to do any work on the boat
body, such as drilling holes, consult
your boat dealer beforehand.
Max
30'
Figure 2
5) Installing the Source Unit
4.
Use the enclosed screws for
installation.
Using other screws can cause
damage.
(Figure
3)
Chassis Chassis
t~a~age
Max. 5/16
(8
mm)
Figure 3
•
Marine
stereo
mounting
dimensions
Using
the
supply
template
to
cut
the
hole
and
drill
the
holes. (Figure
4)
1809
179
60
Hole
-
185
Figure 4
~
-
1\
C\1
C\i
C\1
--
0)
C\1
Holes (6x)
CAUTION
Drill appropriately prepared holes at the
6 places for fixing the screw depending
on the materials and plate thickness of
the panel.

1.
Insert the source unit into the cutout hole until to the end. (Figure 5)
2. Using the supply screws (4 x 30) to secure the source unit. (Figure 5)
3.
Using support strap to secure the source unit on the back side by supply M4 nut.
(Figure
5)
Notes:
1.
Some boat models require special mounting kits for proper installation.
Consult your
Clarion
dealer for details.
• Remove CD mech lock-screw.
• Stick Hole block seal for hole of
lock-screw.
4 x 30 Screws
Rubber Gasket
4 x 30 Screws
Figure 5
Support Strap
M4Nut
M4washer
/
Source unit
Q.
~~:·~~:~~
Stud
~4
washer
Note:
Confirm that the rubber gasket is fastened securely to the base
panel.
6)
Cautions on Wiring
1.
Be sure to turn the power off when wiring.
2.
Be particularly careful where you route the wires.
Keep them well away from the engine, exhaust pipe, etc. Heat may damage the wires.
3.
If the fuse should blow, check that the wiring is correct.
If it is, replace the fuse with a new one with the same amperage rating as the original one.
4.
To replace the fuse, open the lock on the source unit side, remove the old fuse and insert the
new one. (Figure 6)
*
There are various types of fuse cases. Do not let the battery side terminal touch other metal
parts.
Fuse
case
Figure 6
7) Sample Systems
1
Source
unit
®
2
RCA
extension cable
(sold
separately)
3
4-Channel
power amplifier
4
Front
speakers
5
Rear
speakers
6
Wired
remote
control unit
7
SiriusXM-Connect Vehicle Tuner
8
AUX
CMOS 17

8) Wiring and Connections
Black
USB
cable
(connect
to
USB
memory/
iPodliPhone device)
Black
Gray
Red
'::::::====-CI::::J
Antenna
~
(Black) -
Refer
to
the
right
Black
Black
SiriusXM
White Left
}Front
audio
Right output terminal
Red
White
}AUXIN
Left
Right
Red
,.---
--
--
- - - - - - -
---
~
:X:!
::X:
----
-
~--
-
==-=--=
~
-----
~-
~--~~;~~
1 4 Channel Amplifier
I
'"'-------------
-
--
....,.J
r--------------1
1
SirlusXM-Connect™
Vehicle
Tuner
to,
1
be
connected:
Sold
separately
:,
l ]
I ---,==::::::::::!
,.
--
-----------
_,
1
Connect
to
external
(Black) I
wired
Remote
Control
Unit
1
WIRED
REMOTES
-----L_v
___
..,...!
~
i
..
_---
----------,
18 CMOS
Front Right
Front
Left
Rear
Right
Rear
Left
~White
8 White/Black
~Purple
8 Purple/Black
~Green
8 Green/Black
4-Speaker system
t
or
'
2-Speaker system
Front Right
Front
Left
X
Not
used.
Insulate
each
wire
9) Connecting the accessories
• Connecting to the external amplifier
16-Pin Connector Extension
Lead
(attached
to
the source unit)
Yellow wire (Memory back-up lead)
FUSE 15A Connect directly
to
battery
Red
wire (Power lead)
'------Accessory
~
12V
Blue/White wire (Amplifier turn-on lead)
Connect
to
remote turn-on lead
of
amplifier
Black
wire
(Ground lead)
Connect
to
ground
Orange/White wire (Illumination lead)
Connect it
to
the power supply terminal
for illumination
External amplifiers can be connected to the 4 channel RCA output connections.
Ensure that the connectors are not grounded or shorted to prevent damage to the
unit.

CE
English=
Espaiiol=
Declaration of conformity Declaraci6n
de
conformidad
We
Clarion declares that this
model
CMDB
is
following the provision of Directive
1999I5I
EC
with
the essential requirements
and
the otherrelevant regulations. Clarion declara que este modelo
CMDB
cumple
con
los requisites esenciales y
otras disposiciones aplicables descritos
en
Ia
Directiva 1999I5ICE·
FranQais=
Declaration
de
conformite
Nous, Clarion, declarons que
ce
modele
CMDB
est conforme aux exigences
essentielles
et
aux autres dispositions pertinentes
de
Ia
directive 1999I5ICE·
2013/03
Clarion Co., Ltd.
All Rights Reserved.
Copyright
@ 2013: Clarion Co., Ltd.
Printed in China
/1m
prime en Chine
/lmpreso
en China PN: 127075005048

~---------------------~------------------------------------------
I
CAUTION
I
Drill
appropriMMy
.,.,....ct
holes
lit
the
I
plllcH
for
fixing
the
screw
depending
on
the
mMerilllaandpiMe
thickneu
of
the,.....
INSTALLATION TEMPLATE •
Table of contents
Other Clarion Marine Equipment manuals

Clarion
Clarion M303 Original instructions

Clarion
Clarion CMS3 Repair manual

Clarion
Clarion M508 Repair manual

Clarion
Clarion M502 Repair manual

Clarion
Clarion CMD5 User manual

Clarion
Clarion XMD3 User manual

Clarion
Clarion M109 User manual

Clarion
Clarion M505 User manual

Clarion
Clarion CMS20 Repair manual

Clarion
Clarion CMM-30BB User manual

Clarion
Clarion CMM-30 User manual

Clarion
Clarion CMS20 Repair manual

Clarion
Clarion CMM-30 User manual

Clarion
Clarion M475 User manual

Clarion
Clarion GR10BT Repair manual

Clarion
Clarion CMD8 Repair manual

Clarion
Clarion CMD4 User manual

Clarion
Clarion M606 Repair manual

Clarion
Clarion CMS5 User manual

Clarion
Clarion M606 User manual