manuals.online logo
Brands
  1. Home
  2. •
  3. Brands
  4. •
  5. Conrad
  6. •
  7. Security System
  8. •
  9. Conrad 75 06 61 User manual

Conrad 75 06 61 User manual

Version 08/02
Fenster Alarm mit Gong °
Best.-Nr. 75 06 61
Bestimmungsgemäße Verwendung
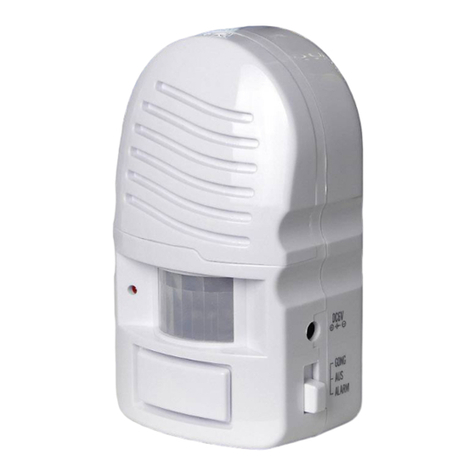
Der Fensteralarm dient als Überwachungsgerät mit Alarmton für Fenster bzw. als
Zugangskontrollsystem mit Gongfunktion an Türen. Die Aktivierung erfolgt mittels
Magnetkontakt.
Die Spannungsversorgung erfolgt über drei Knopfzellen.
Das Produkt darf nicht geändert bzw. umgebaut werden.
Sicherheitshinweise
Bei Schäden die durch Nichtbeachten der Anleitung verursacht werden, erlischt
der Garantieanspruch! Für Folgeschäden übernehmen wir keine Haftung!
Knopfzellen sind Sondermüll und gehören nicht in den Hausmüll. Die leeren Knopfzellen kön-
nen u.a. bei komunalen Sammelstellen oder im Elektrofachhandel entsorgt werden.
Der Fensteralarm und die Knopfzellen gehören nicht in Kinderhände!
Lassen Sie Knopfzellen nicht offen herumliegen; es besteht die Gefahr, dass diese von Kindern
oder Haustieren verschluckt werden!
Suchen Sie im Falle eines Verschluckens sofort einen Arzt auf!
Achten Sie beim Einlegen der Batterien auf richtige Polung!
Achten Sie darauf, dass Knopfzellen nicht Kurzgeschlossen, aufgeladen oder ins Feuer gewor-
fen werden dürfen! In diesen Fällen besteht Explosionsgefahr!
Ausgelaufene oder beschädigte Batterien können bei Berührung mit der Haut Verätzungen
verursachen; benutzen Sie deshalb in diesem Fall geeignete Schutzhandschuhe.
Achtung! Lauter Alarmton!
Setzen Sie Ihr Gehör diesem Ton nicht über einen längeren Zeitraum aus, da sonst schwere
Gehörschäden die Folge sein können!
Bedienung
a) Batteriewechsel
Beachten Sie hierzu auch die Sicherheitshinweise!
Sobald der Alarmton leiser wird müssen die Knopfzellen gewechselt werden. Schieben Sie
dazu das Batteriefach an der Vorderseite des Gehäuses auf!
Ersetzen Sie die drei Knopfzellen komplett gegen neue des gleichen Typs.
Beachten Sie die Polaritätskennzeichnung im Batteriefach "+" und "-".
Anschließend das Batteriefach wieder verschließen.
b) Installation
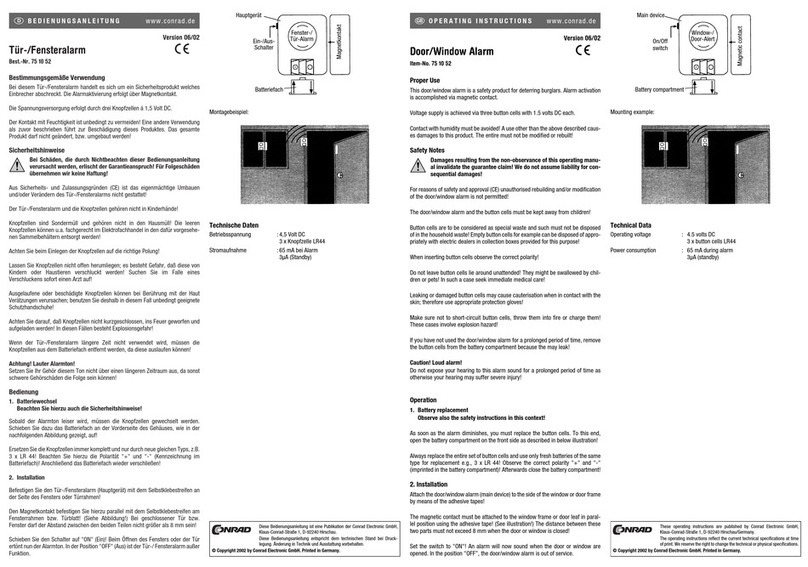
Befestigen Sie den Fensteralarm (Hauptgerät) mit dem rückseitigen Klebestreifen an der Seite
des Fensters oder Türrahmen!
Den Magnetkontakt befestigen Sie hierzu parallel mit dem Selbstklebestreifen am
Fensterrahmen- oder Türblatt.
Beachten Sie für die Ausrichtung die drei Einkerbungen im Gehäuse und
dass der Magnetkontakt immer auf gleicher Höhe und links vom
Hauptgerät montiert wird (evtl. Abstandshalter verwenden bzw.
Alarmeinheit um 180° drehen).
Beachten Sie bei der Montage einen max. Abstand von 8 mm, welcher
nicht überschritten werden darf.
c) Inbetriebnahme
Schieben Sie den seitlichen Betriebsschalter in eine der drei Funktionen:
CHIME = einmaliger Gong je Türöffnung als Zugangskontrolle
OFF = Alarmeinheit ist aus
ALARM = anhaltender, auf- und abschwellender Alarmton
Technische Daten
Betriebsspannung: 4,5 VDC (3 x LR 44 / AG13)
Stromaufnahme: Alarm/Gong max. 120 mA // 2µA stby
Lautstärke: ca. 100 dBA
Abmessungen: Hauptgerät: 70 mm x 25 mm x 24 mm
(LxBxT) Magnet:40 mm x 15 mm x 15 mm
BEDIENUNGSANLEITUNG www.conrad.de
Version 08/02
Window Alarm with a Gong Bell °
Item-No. 75 06 61
Prescribed use
The window alarm serves as a surveillance set with an alarm sound for windows or as an
access check system with a gong bell function on doors. It is activated by means of a mag-
netic contact.
Voltage supply is via three button cells.
The product may not be modified or rebuilt.
Safety instructions
The guarantee will expire in the case of any damage that is caused due to fai-
lure to observe these operating instructions. We do not assume liability for
resultant damages.
Button cells are special waste and should be kept out of the household rubbish. Empty button
cells can be correctly disposed off, amongst other facilities, in municipal collecting boxes or at
specialized electrical equipment shops.
Keep the window alarm and button cells out of the reach of children.
Do not leave button cells lie around at random. There is the risk of those being swallowed by
children or pets.
Seek instant medical care in such a case.
When inserting the batteries make sure of their correct polarity.
Make sure that batteries be not short-circuited, recharged or thrown into fire because they
might explode.
Leaking or damaged batteries might cause acid burns when getting into contact with the skin.
Therefore, use suitable protective gloves.
Attention: Loud alarm sound
Do not expose your ears to this sound for a major period of time because it could cause severe
damage to your hearing.
Use
a) How to exchange batteries
Also note the safety instructions here.
The button cells require to be replaced as soon as the alarm sound is becoming weaker. To
this end, push the battery compartment open at the front of the casing.
Replace all of the button cells with new ones of the same type.
Note the polarity signs "+" and "-" in the battery compartment.
Reclose the battery compartment afterwards.
b) How to install
Mount the window alarm (main set) by placing the rear-sided adhesive tape at the side of the
window or door frame.
To do so, fix the magnetic contact to the window frame or door leaf in parallel with the self-
adhesive tape.
For alarm orientation, note the three notches in the casing and that the
magnetic contact be always mounted at the same level as the main set
and on the left of the main set (use spacers, if possible, or turn the alarm
unit through 180°).
During installation, observe a distance of 8 mm which may not be
exceeded.
c) How to put into service
Push the lateral operating switch to one of the three functions:
CHIME = Single-stroke gong sound every time a door is to be opened, as an access check
OFF = The alarm unit is OFF
ALARM = Continued increasing and decreasing alarm sound
Specifications
Operating voltage: 4,5 V D.C. (3 x LR 44 / AG13)
Power input: Alarm/Gongmax. 120 mA // 2µA at standby
Sound intensity: abt. 100 dBA
Dimensions: Main set: 70 mm x 25 mm x 24 mm
(LxWxH) Magnetic contact: 40 mm x 15 mm x 15 mm
OPERATING INSTRUCTIONS www.conrad.de
Diese Bedienungsanleitung ist eine Publikation der Conrad Electronic GmbH,
Klaus-Conrad-Straße 1, D-92240 Hirschau.
Diese Bedienungsanleitung entspricht dem technischen Stand bei Druck-
legung. Änderung in Technik und Ausstattung vorbehalten.
© Copyright 2002 by Conrad Electronic GmbH. Printed in Germany.
These operating instructions are published by Conrad Electronic GmbH,
Klaus-Conrad-Straße 1, D-92240 Hirschau/Germany.
The operating instructions reflect the current technical specifications at time
of print. We reserve the right to change the technical or physical specifications.
© Copyright 2002 by Conrad Electronic GmbH. Printed in Germany.
Version 08/02
Alarme d'ouverture de °
fenêtre avec gong
N° de commande 75 06 61
Utilisation prévue
L'alarme d'ouverture de fenêtre avec gong s'utilise pour la surveillance de fenêtres ou pour les
portes comme système de contrôle d'accès avec gong. Le déclenchement s'effectue via un
contact reed (relais à ampoule).
L'alimentation en tension est assurée par trois piles bouton.
Il est interdit de modifier l'ensemble du produit et de le transformer.
Consignes de sécurité
En cas de dommages dus à la non-observation de ce mode d'emploi, la validi-
té de la garantie est annulée! Nous déclinons toute responsabilité pour les
éventuels dommages consécutifs!
Les piles bouton sont des déchets spéciaux et ne doivent pas être jetées dans une poubelle
ordinaire. Les piles bouton vides peuvent être restituées auprès de nos succursales, auprès
des déchetteries communales (centres de tri de matériaux recyclables) qui sont dans l'obliga-
tion de les récupérer ou auprès des commerces spécialisés.
L'alarme d'ouverture de fenêtre ainsi que les piles bouton doivent être maintenues hors de
portée des enfants!
Ne laissez pas traîner les piles bouton, elles pourraient être avalées par un enfant ou par un
animal domestique!
Au cas où cela serait arrivé, consultez immédiatement un médecin!
En insérant les piles, respectez la polarité.
N'essayez jamais de court-circuiter les piles bouton ni de les jeter dans le feu ni de les rechar-
ger! Il y a risque d'explosion!
Des piles corrodées ou endommagées peuvent, au toucher, causer des brûlures de la peau;
pour cette raison, mettez impérativement des gants de protection adaptés pour retirer de tel-
les piles!
Attention! Sirène d'alarme intense!
N'écoutez pas la sirène pendant longtemps, de graves problèmes auditifs pourraient en résulter!
Utilisation
a) Changement des piles
Tenez également compte des consignes de sécurité!
Dès que le volume de la sirène diminue, il faut remplacer les piles bouton. Pour cela, ouvrez
le compartiment à piles situé sur la face avant du boîtier!
Remplacez le lot complet des trois piles bouton par un lot de piles neuves du même type.
Tenez compte des repères de polarité "+" et "-" inscrits dans le compartiment à piles.
Refermez ensuite le compartiment à piles!
b) Montage
Fixez l'alarme d'ouverture de fenêtres (dispositif principal) à l'aide de la bande adhésive au
chambranle de fenêtre ou de porte!
Fixez le contact reed parallèlement au dispositif principal au châssis de la fenêtre ou au van-
tail de porte grâce à la bande adhésive.
Lors de l'orientation, tenez compte des trois rainures dans le boîtier et
veillez à ce que le contact reed soit toujours monté au même niveau et
du côté gauche du dispositif principal (le cas échéant, utilisez un écar-
teur ou tournez l'alarme de 180°).
Lors du montage, veillez à ce que l'écart entre le contact reed et le dispo-
sitif principal ne soit pas supérieur à 8 mm.
c) Mise en service
Poussez l'interrupteur de service latéral sur une des trois positions réglables:
CHIME = son d'alarme unique par ouverture de porte comme contrôle d'accès
OFF = alarme est éteinte
ALARM = son d'alarme permanent, qui faiblit et augmente
Caractéristiques techniques
Tension de service 4,5 VDC (3 x LR 44 / AG13)
Consommation de courant: Sirène/gong max. 120 mA // 2µA stby (mode de veille)
Volume: env. 100 dBA
Dimensions: Dispositif principal: 70 x 25 x 24 mm
(LxLxP) Aimant: 40 mm x 15 mm x 15 mm
MODE D’EMPLOI www.conrad.de
Cette notice est une publication de la société Conrad Electronic GmbH,
Klaus-Conrad-Straße 1, D-92240 Hirschau/Allemagne.
Cette notice est conforme à la règlementation en vigueur lors de l´impression.
Données techniques et conditionnement soumis à modifications sans aucun
préalable.
© Copyright 2002 par Conrad Electronic GmbH. Imprimé en Allemagne.
*08-02/WM

Other Conrad Security System manuals

Conrad GKA100 User manual

Conrad

Conrad GKA100 User manual

Conrad 75 19 13 User manual

Conrad

Conrad 75 19 13 User manual

Conrad 75 15 94 User manual

Conrad

Conrad 75 15 94 User manual

Conrad AW50 User manual

Conrad

Conrad AW50 User manual

Conrad 75 16 99 User manual

Conrad

Conrad 75 16 99 User manual

Conrad 751170 User manual

Conrad

Conrad 751170 User manual

Conrad 75 10 59 User manual

Conrad

Conrad 75 10 59 User manual

Conrad UC-AV10 User manual

Conrad

Conrad UC-AV10 User manual

Conrad 75 16 36 User manual

Conrad

Conrad 75 16 36 User manual

Conrad 879608 User manual

Conrad

Conrad 879608 User manual

Conrad 75 06 82 User manual

Conrad

Conrad 75 06 82 User manual

Conrad 75 00 11 User manual

Conrad

Conrad 75 00 11 User manual

Conrad 75 18 39 User manual

Conrad

Conrad 75 18 39 User manual

Conrad CC-4100 User manual

Conrad

Conrad CC-4100 User manual

Conrad ZM 02 User manual

Conrad

Conrad ZM 02 User manual

Conrad XCAM2 User manual

Conrad

Conrad XCAM2 User manual

Conrad EW01 Quick guide

Conrad

Conrad EW01 Quick guide

Conrad 75 16 23 User manual

Conrad

Conrad 75 16 23 User manual

Conrad 61 03 73 User manual

Conrad

Conrad 61 03 73 User manual

Conrad GX110 User manual

Conrad

Conrad GX110 User manual

Conrad 75 10 52 User manual

Conrad

Conrad 75 10 52 User manual

Popular Security System manuals by other brands

Honeywell ADEMCO VISTA-10P Installation supplement

Honeywell

Honeywell ADEMCO VISTA-10P Installation supplement

LEGRAND tynetec ZXT832 quick start guide

LEGRAND

LEGRAND tynetec ZXT832 quick start guide

VENTRA VDR-220 user manual

VENTRA

VENTRA VDR-220 user manual

Smanos PB1000 Multilingual user manual

Smanos

Smanos PB1000 Multilingual user manual

Voyager WVRXCAM1 Wvrxcam

Voyager

Voyager WVRXCAM1 Wvrxcam

Blaupunkt SR-S1 quick start guide

Blaupunkt

Blaupunkt SR-S1 quick start guide

Ness LUX Installation notes

Ness

Ness LUX Installation notes

Mayon MWM903 user manual

Mayon

Mayon MWM903 user manual

Aruba LS-BT20 installation guide

Aruba

Aruba LS-BT20 installation guide

Lierda LSD4BTB-PBS1000001 user manual

Lierda

Lierda LSD4BTB-PBS1000001 user manual

Morrison Bros. co. 918SB Series Installation, operation and maintenance instructions

Morrison Bros. co.

Morrison Bros. co. 918SB Series Installation, operation and maintenance instructions

Nortek 2GIG GC2 Installation and programming guide

Nortek

Nortek 2GIG GC2 Installation and programming guide

GE 45133 user manual

GE

GE 45133 user manual

Interlogix Simon XT installation guide

Interlogix

Interlogix Simon XT installation guide

UltraVision UltraSensor CMD-2 user manual

UltraVision

UltraVision UltraSensor CMD-2 user manual

DSC PC1555 -  2 instruction manual

DSC

DSC PC1555 - 2 instruction manual

Bosch IUI-BES-AO installation manual

Bosch

Bosch IUI-BES-AO installation manual

Pfannenberg BExBG05D-P instruction manual

Pfannenberg

Pfannenberg BExBG05D-P instruction manual

manuals.online logo
manuals.online logoBrands
  • About & Mission
  • Contact us
  • Privacy Policy
  • Terms and Conditions

Copyright 2025 Manuals.Online. All Rights Reserved.