manuals.online logo
Brands
  1. Home
  2. •
  3. Brands
  4. •
  5. Crow
  6. •
  7. Security Sensor
  8. •
  9. Crow SH-SIRINT-8F User manual

Crow SH-SIRINT-8F User manual

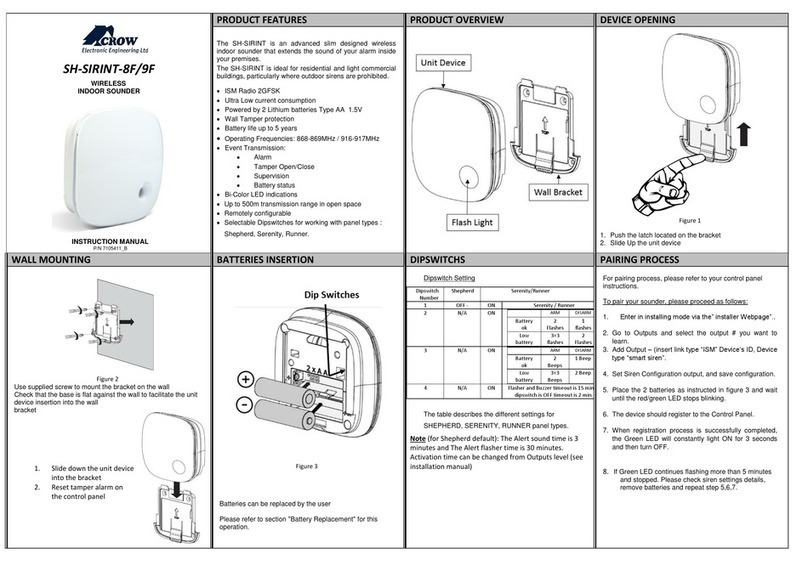
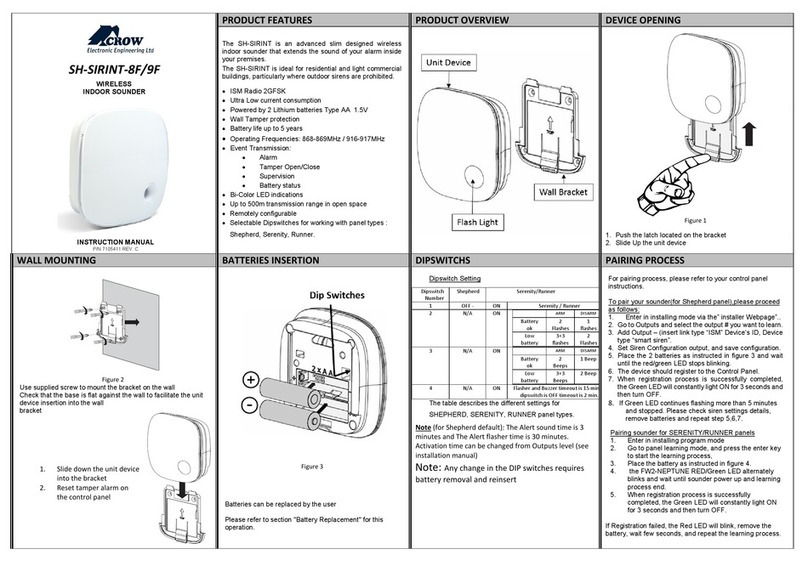
SH-SIRINT-8F/9F
WIRELESS
INDOOR SOUNDER
PRODUCT FEATURES PRODUCT OVERVIEW DEVICE OPENING
The SH-SIRINT is an advanced slim designed wireless
indoor sounder that extends the sound of your alarm inside
your premises.
The SH-SIRINT is ideal for residential and light commercial
buildings, particularly where outdoor sirens are prohibited.
 ISM Radio 2GFSK
 Ultra Low current consumption
 Powered by 2 Lithium batteries Type AA 1.5V
 Wall Tamper protection
 Battery life up to 5 years

Operating Frequencies: 868-869MHz / 916-917MHz
 Event Transmission:
 Alarm
 Tamper Open/Close
 Supervision
 Battery status
 Bi-Color LED indications
 Up to 500m transmission range in open space
 Remotely configurable
 Selectable Dipswitches for working with panel types :
Shepherd, Serenity, Runner.
Figure 1
1. Push the latch located on the bracket
2. Slide Up the unit device
INSTRUCTION MANUAL
P/N 7105411_B
WALL MOUNTING
BATTERIES INSERTION
DIPSWITCHS
PAIRING PROCESS
Figure 2
Use supplied screw to mount the bracket on the wall
Check that the base is flat against the wall to facilitate the unit
device insertion into the wall
bracket
Figure 3
Batteries can be replaced by the user
Please refer to section "Battery Replacement" for this
operation.
Dipswitch Setting
The table describes the different settings for
SHEPHERD, SERENITY, RUNNER panel types.
Note (for Shepherd default): The Alert sound time is 3
minutes and The Alert flasher time is 30 minutes.
Activation time can be changed from Outputs level (see
installation manual)
Dipswitch
Number
Shepherd
Serenity/Runner
1 OFF - ON Serenity / Runner
2 N/A ON
ARM
DISARM
Battery
ok
2
Flashes
1
flashes
Low
battery
3+3
flashes
2
Flashes
3
N/A
ON
ARM
DISARM
Battery
ok
2
Beeps
1 Beep
Low
battery
3+3
Beeps
2 Beep
4 N/A ON
Flasher and Buzzer timeout is 15 min. if
dipswitch is OFF timeout is 2 min.
For pairing process, please refer to your control panel
instructions.
To pair your sounder, please proceed as follows:
1. Enter in installing mode via the” installer Webpage”..
2. Go to Outputs and select the output # you want to
learn.
3. Add Output – (insert link type “ISM” Device’s ID, Device
type “smart siren”.
4. Set Siren Configuration output, and save configuration.
5. Place the 2 batteries as instructed in figure 3 and wait
until the red/green LED stops blinking.
6. The device should register to the Control Panel.
7. When registration process is successfully completed,
the Green LED will constantly light ON for 3 seconds
and then turn OFF.
8.
If Green LED continues flashing more than 5 minutes
and stopped. Please check siren settings details,
remove batteries and repeat step 5,6,7.
1. Slide down the unit device
into the bracket
2. Reset tamper alarm on
the control panel
TESTING THE DEVICE BATTERY REPLACEMENT SPECIFICATION STANDARDS APPROVALS
After the pairing is completed verify that the sounder is
working properly:
 Perform Arm/Disarm verify Beep/Led indications.
 Perform an Alarm; verify Piezo and LED is activated.
 Perform Alarm Reset by User pin code.
Figure 6
CAUTION
RISK OF EXPLOSION
IF BATTERY IS REPLACED BY DIFFERENT TYPE / MODEL.
DISPOSE USED BATTERY
ACCORDING TO ITS INSTRUCTIONS
AFTER REPLACING BATTERIES…
 Slide down the sounder device into the bracket as
illustrated in figure 4
 Perform Tamper reset on your control panel
 Proceed with device testing to check proper functioning
Alert Method Internal Piezo and LED
Sound Level More than 100dB (at 1 meter)
Flash Light Red/Green and White
LED indications
ISM Radio 2GFSK
Operating
Frequencies 868-869MHz / 916-917MHz
Identification Unique ID serial number – 24 bit
Events Transmission Alarm, Tamper, Supervision,
Low Bat.
Supervision Time 7 min by default
Transmission Range 500m in open space
Battery
2 Lithium batteries 1.5V
AA Type
Battery life Up to 5 years
Current
Consumptions
Standby ~60 A
Receive mode ~26 mA
Transmit mode ~50 mA
Transmit power <14dBm
Low Bat 2.9V
Cut Off 2.5V
Tamper Switch Bracket Removal
Operating
temperature -10C to +55C
Dimensions 93mm x 93mm x 31mm
Weight (incl. battery) 80gr.
The SH-SIRINT conforms to the essential requirements
set out by:
 RED directive:2014/53/EU
 EMC directive: 2014/30/EU
 Low Voltage directive: 2014/35/EU
Harmonized Standards applicable to this products are:
 EN300220-2
 EN300220-1
 EN301489-3
 EN301489-1
 EN50130-4
 EN61000-6-3
 EN60950-1
 EN50130-5
 EN50131-5-3
Additional Standards and Directives applicable to this
product are:
 RoHS directive: 2002/95/EC
 EN50131-4
Security Grade2, Environmental Class II
Power supply Type W
Certification body: Telefication B.V.
EVENT TRANSMISSION
SUPERVISION
A periodical transmission indicating detector’s presence.
ALARM
Siren sound from the device indicating alarm in progress. The
white LED blinking during the operation.
LOW BATTERY
Whenever batteries reach the low level (2.9V), a Battery Low
signal will be sent. When Battery level drops below Cut Off level
(2.5V) the device will stop functioning and the Red LED will blink
for 10 seconds and then turned Off.
TAMPER
Whenever the device is removed from the bracket, a message
will be transmitted with “Tamper ON” signal. When cover will be
returned a “Tamper OFF” signal will be transmitted.
You should reset this tamper alarm on your control panel.
WARRANTY POLICY CERTIFICATE
sa[email protected]
support@crow.co.il
www.thecrowgroup.com
These instructions supersede all previous issues in circulation prior to December 2017
Crow warrants these products to be free from defects in materials and workmanship under normal use and service for a period of 24 months from the last day of the
week and year whose numbers are printed on the printed circuit board inside these products.
Subject to the provisions of this Warranty Certificate, during the Warranty Period, Crow undertakes, at its sole discretion and subject to Crow's procedures, as such
procedures are form time to time, to repair or replace, free of charge for materials and/or labor, products proved to be defective in materials or workmanship under
normal use and service. Repaired products shall be warranted for the remainder of the original Warranty Period.
All transportation costs and in-transit risk of loss or damage related, directly or indirectly, to products returned to Crow for repair or replacement shall be borne solely
by the Purchaser.
This Warranty Certificate does not cover products that is defective (or shall become defective) due to: (a) alteration of the products (or any part thereof) by anyone
other than Crow; (b) accident, abuse, negligence, or improper maintenance; (c) failure caused by a product which Crow did not provide; (d) failure caused by software
or hardware which Crow did not provide; (e) use or storage other than in accordance with Crow’s specified operating and storage instructions.
There are no warranties, expressed or implied, of merchantability or fitness of the products for a particular purpose or otherwise, which extend beyond the description
on the face hereof.
This limited Warranty Certificate is the Purchaser's sole and exclusive remedy against Crow and Crow's sole and exclusive liability toward the Purchaser in connection
with the products, including without limitation - for defects or malfunctions of the products. This Warranty Certificate replaces all other warranties and liabilities,
whether oral, written, (non-mandatory) statutory, contractual, in tort or otherwise.
In no case shall Crow be liable to anyone for any consequential or incidental damages (inclusive of loss of profit, and whether occasioned by negligence of the Crow
or any third party on its behalf) for breach of this or any other warranty, expressed or implied, or upon any other basis of liability whatsoever.
Crow does not represent that these products can not be compromised or circumvented; that these products will prevent any person injury or property loss or damage
by burglary, robbery, fire or otherwise; or that these products will in all cases provide adequate warning or protection.
Purchaser understands that a properly installed and maintained product may in some cases reduce the risk of burglary, fire, robbery or other events occurring without
providing an alarm, but it is not insurance or a guarantee that such will not occur or that there will be no personal injury or property loss or damage as a result.
Consequently, Crow shall have no liability for any personal injury; property damage or any other loss based on claim that these products failed to give any warning.
If Crow is held liable, whether directly or indirectly, for any loss or damage with regards to these products, regardless of cause or origin, Crow’s maximum liability
shall not in any case exceed the purchase price of these products, which shall be the complete and exclusive remedy against Crow.
Batteries must be replaced by
2 Energizer L91 Lithium batteries AA 1.5V

This manual suits for next models

1

Other Crow Security Sensor manuals

Crow GENIUS Setup guide

Crow

Crow GENIUS Setup guide

Crow SH-MAG-SHOCK-8F User manual

Crow

Crow SH-MAG-SHOCK-8F User manual

Crow SH-SIRINT-8F User manual

Crow

Crow SH-SIRINT-8F User manual

Crow SWAN QUAD User manual

Crow

Crow SWAN QUAD User manual

Crow SH-CRT-8F User manual

Crow

Crow SH-CRT-8F User manual

Crow SRDT-15 User manual

Crow

Crow SRDT-15 User manual

Crow MRX-220N User manual

Crow

Crow MRX-220N User manual

Crow BS-1 Manual

Crow

Crow BS-1 Manual

Crow FREEWAVE FW-P100 User manual

Crow

Crow FREEWAVE FW-P100 User manual

Crow SWAN 1000 User manual

Crow

Crow SWAN 1000 User manual

Crow FW2-SMK User manual

Crow

Crow FW2-SMK User manual

Crow EDS-2000AM User manual

Crow

Crow EDS-2000AM User manual

Crow SH-FLOOD-8F User manual

Crow

Crow SH-FLOOD-8F User manual

Crow SH-FLOOD-9F User manual

Crow

Crow SH-FLOOD-9F User manual

Crow SH-PIR-8F User manual

Crow

Crow SH-PIR-8F User manual

Crow SRDT-15 User manual

Crow

Crow SRDT-15 User manual

Crow SWAN QUAD User manual

Crow

Crow SWAN QUAD User manual

Crow SH-SIRINT-9F User manual

Crow

Crow SH-SIRINT-9F User manual

Crow TL-360 User manual

Crow

Crow TL-360 User manual

Crow EDS-2000 Manual

Crow

Crow EDS-2000 Manual

Crow FW2 FLOOD 8F User manual

Crow

Crow FW2 FLOOD 8F User manual

Crow TLC-360 User manual

Crow

Crow TLC-360 User manual

Crow NEO QUAD User manual

Crow

Crow NEO QUAD User manual

Crow EDS-2000 Manual

Crow

Crow EDS-2000 Manual

Popular Security Sensor manuals by other brands

Becker CentronicPLUS SC811A PLUS Assembly and operating instructions

Becker

Becker CentronicPLUS SC811A PLUS Assembly and operating instructions

GJD MX2 manual

GJD

GJD MX2 manual

Baumer UNDK 09G8914 quick start guide

Baumer

Baumer UNDK 09G8914 quick start guide

schmersal SLC440 operating instructions

schmersal

schmersal SLC440 operating instructions

DMP Electronics 1184 installation guide

DMP Electronics

DMP Electronics 1184 installation guide

MDT Technologies SCN-P360D3.02 Technical manual

MDT Technologies

MDT Technologies SCN-P360D3.02 Technical manual

Vivax Metrotech vLoc3 RTK-Pro User handbook

Vivax Metrotech

Vivax Metrotech vLoc3 RTK-Pro User handbook

Panaconic SQ4-A Series instruction manual

Panaconic

Panaconic SQ4-A Series instruction manual

SKYLOTEC BEAMTAC Instructions for use

SKYLOTEC

SKYLOTEC BEAMTAC Instructions for use

Ilmvac biovac 106 Operation manual

Ilmvac

Ilmvac biovac 106 Operation manual

SICK WL24-2 Series quick start

SICK

SICK WL24-2 Series quick start

Texecom Prestige Orbit QD installation manual

Texecom

Texecom Prestige Orbit QD installation manual

SICK Prime KTX-WP9214125UZZZZ manual

SICK

SICK Prime KTX-WP9214125UZZZZ manual

Elko iNELS RFSF-1B manual

Elko

Elko iNELS RFSF-1B manual

Niko 350-20082 manual

Niko

Niko 350-20082 manual

STEINEL detector instructions

STEINEL

STEINEL detector instructions

Kistler CHFA Series instruction manual

Kistler

Kistler CHFA Series instruction manual

Banner L-GAGE LTF12 instruction manual

Banner

Banner L-GAGE LTF12 instruction manual

manuals.online logo
manuals.online logoBrands
  • About & Mission
  • Contact us
  • Privacy Policy
  • Terms and Conditions

Copyright 2025 Manuals.Online. All Rights Reserved.