Center Beam Torque Adjustment
CSetting Tine Angle, Pressure, Frame, & Disc Angle
• Straw should be dry.
• A speed of 8 to 12 MPH (12 to 16 KPH) is suggested to
efficiently shatter and spread straw and residue.
• If discing aggressively, DO NOT have much straw in
harrow sections.
Remember When Operating:
• If machine leaves small clumps of straw, apply slight
down pressure by extending Transport cylinders.
• If machine leaves large clumps of straw, reduce
down pressure by retracting the Transport cylinders
and reducing the tine angle.
2
2
Tine Angle Adjustment
IMPORTANT: Re-syncronize the tine section cylinders
by fully extending the rephasing cylinders and holding
for 30 seconds. This should be repeated a few times
daily or as needed, especially in hilly conditions.
- Refer to manual for more information. -
• Check for missing, worn or damaged parts.
• Working points & pins • Grease Endwheel Turrets (25hrs)
Maintenance
(Check Machine Daily)
• Hydraulic Connections & Hoses
• Hubs & Spindles
* Refer to operators manual for complete safety and operation info.
• Tire Pressure:
41 PSI (283 kPa)
There are no standard angles for running the tines, the operator
may adjust the tine angles as needed to achieve desired results.
Note: Actual settings will vary
with tine wear. Ensure trailer and
frame are leveled properly.
(Refer to Height Adjustment)
- Retract rephasing tine angle
cylinders to raise tines.
- Extend cylinders to lower.
4
Beam Torque Indicator
DMoving Into Transport Position
1) When placing machine into Transport position, keep the Trailer Height at Maximum.
2) Raise disc sections. IMPORTANT: Discs MUST be raised. Failure to do so will result in damage to disc sections.
3) Operate the transport hydraulics to fully raise the harrow sections.
4) Fully Rotate the endwheels before driving forward. The wing beams should fold back into transport position.
5) Install all frame transport pins (2), cylinder lock bars (2), and endwheel transport bars (2).
IMPORTANT: Endwheel transport bars MUST be installed during transport.
6) Ensure SMV sign and reectors are clean and lights are working. Follow all local transport laws when transporting.
2
5
1
3
2
NOTE: “0” indicates fully
raised & “5” is lowest height.
Adjusted with“Wheel Height Cylinders”. 1
5
4
3
2
1
0
Adjust
According to
Tine Angle
Setting
- Transport
Trailer Height Indicator
1
After Tine Angle Adjustment is complete, adjust
wheel height until trailer frame is parallel to the
ground. If needed, clevis height may be adjusted.
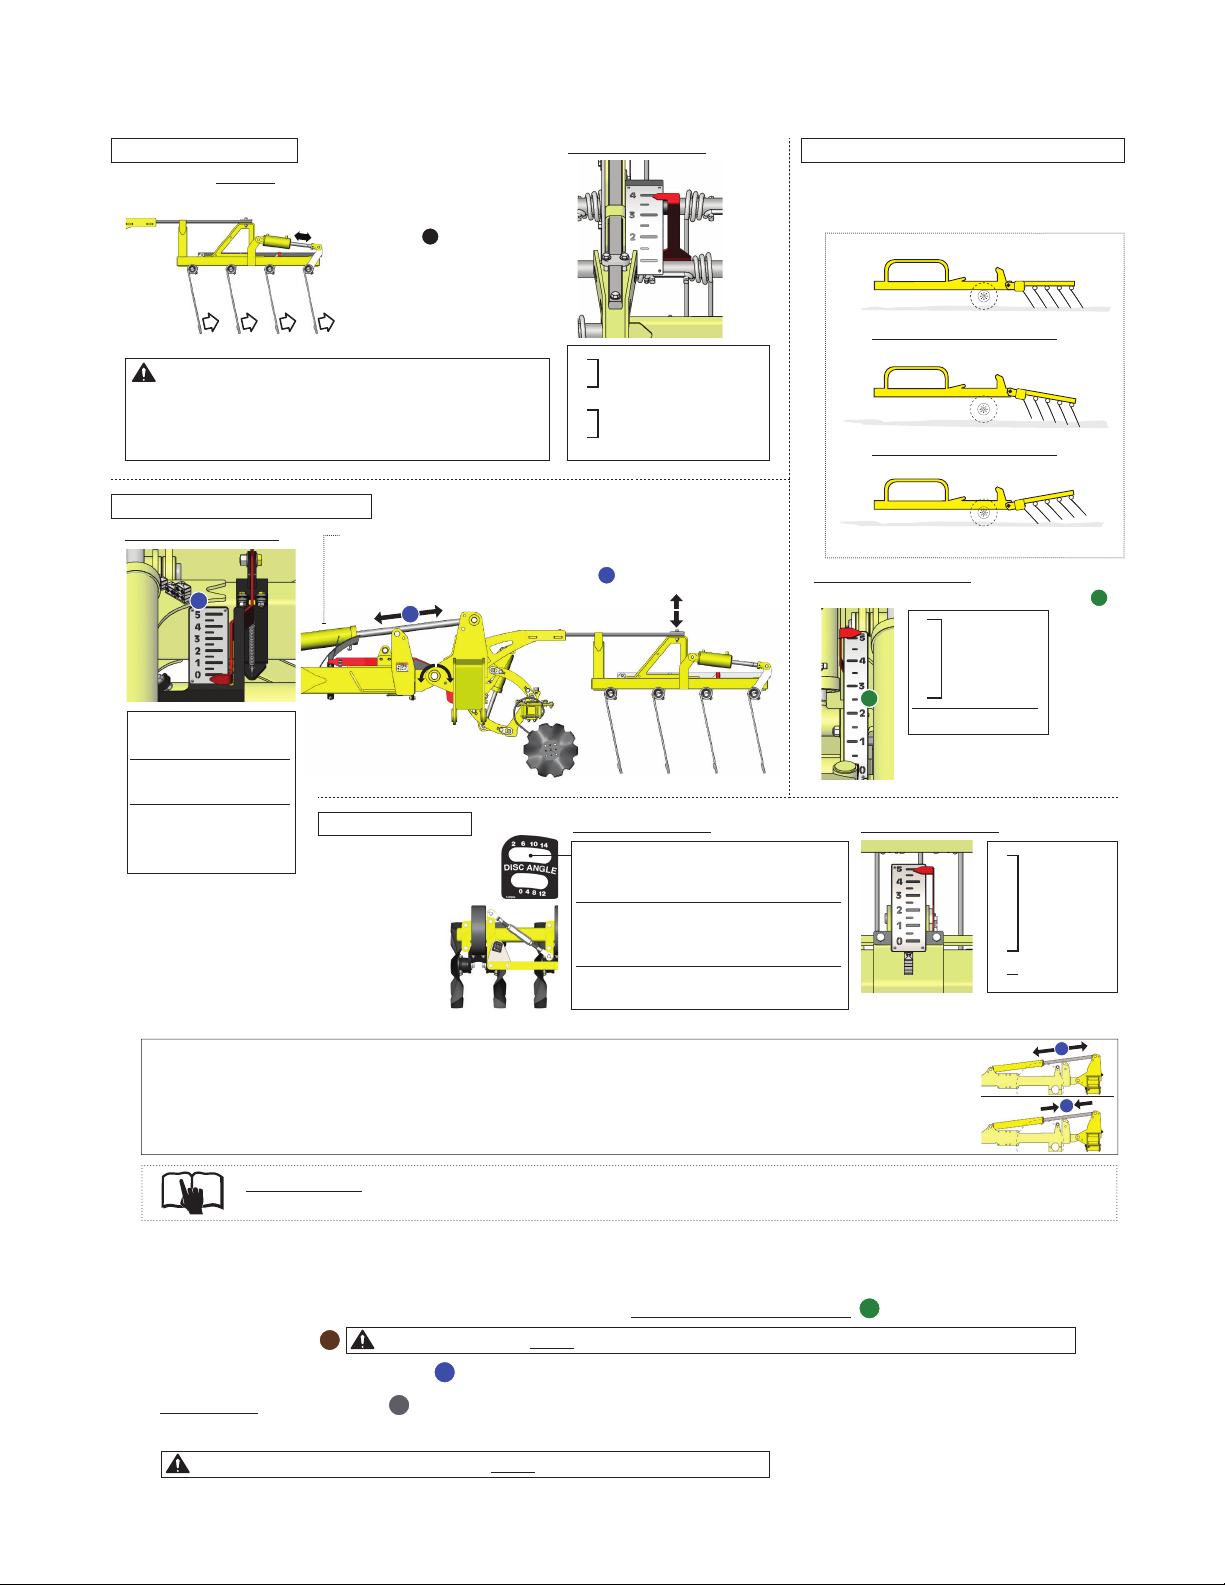
Trailer & Wing Beam Height Adjustment
When set level with harrows...
Front & back tines apply equal pressure
Front tines applying more pressure
When set lower...
Front tines apply less pressure
When set higher...
Tine Angle Indicator
4
3
2
1
Chemical Incorporation
or Light Tillage
Harrowing in wet
conditions or
Discing in Sloughs
NOTE: The applied beam torque shown on the
indicator is adjusted by applying (+) or reducing (–)
pressure with the Transport Cylinders. 2
2+
–
~
–
+
Setting Disc Angle
- Loosen Jam Nuts.
- Adjust Turnbuckle.
- Re-tighten Jam Nuts.
0°-4° with a coulter disc will allow you
to open the ground and cut trash with
minimal soil disruption.
5°-7° is good for mixing some dirt with
residue while loosening the soil but still
leave stubble standing to catch snow.
8°-10° is perfect for working low spots
with high trash and for drying them out.
Disc Angle Indicator Disc Depth Indicator
5
4
3
2
1
0
Adjust
According to
Cart Height
& Disc Depth
Required.
Transport
(For minimal tillage, use in float.)
(Each disc section
is adjusted
independantly.)
5
4
3
2
1
0
Maximum Pressure
(Light Tillage)
Minimum Pressure
(Spread Chaff
& Residue)
Normal Harrowing


