FR
Brackets discovery®/ discovery®smart
Chère Cliente, cher Client,
Nous vous remercions d'avoir choisi un produit de la qualité Dentaurum.
Pour une utilisation sûre et pour que vous et vos patients puissiez profiter pleinement
des divers champs d'utilisation que couvre ce produit, nous vous conseillons de lire très
attentivement son mode d'emploi et d'en respecter toutes les instructions.
Un mode d'emploi ne peut décrire de manière exhaustive tous les aspects liés à
l'utilisation d'un produit. Si vous avez des questions, votre représentant sur place est à
votre service pour y répondre et prendre note de vos suggestions.
En raison du développement constant de nos produits, nous vous recommandons,
malgré l'utilisation fréquente du même produit, la relecture attentive du mode d'emploi
actualisé ci-joint (cf. également sur Internet sous www.dentaurum.com).
1. Fabricant
Dentaurum GmbH & Co. KG I Turnstr. 31 I 75228 Ispringen I Allemagne
2. Description générale
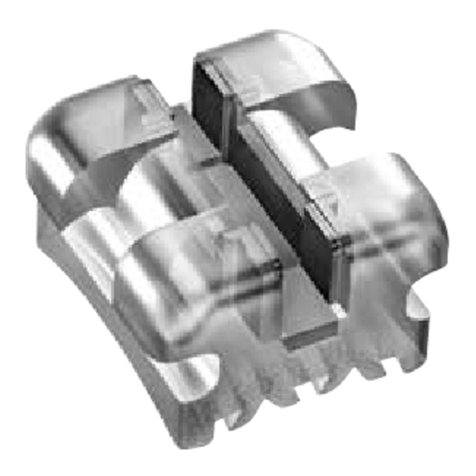
discovery®/discovery®smart sont des brackets premium issus de la gamme de brackets
enmétal de Dentaurum, lesquelssontlefruitdelongues années d'expérience.discovery®/
discovery®smart sont des brackets monoblocs fabriqués au moyen du procédé de
moulage par injection de métal (anglais, Metal Injection Molding) dans des unités de
production modernes en mettant en œuvre un alliage dentaire spécial. Dans le cadre de
la conception assistée par ordinateur, ces brackets sont adaptés de manière optimale
à la forme de la dent, ce qui vous permet de les manipuler sans difficultés. La base
structurée au laser assure une adhérence solide ainsi qu'une dépose facile.
3. Etapes de mise en œuvre
3.1. Informations données aux patients
Informez le patient sur les risques et conséquences potentiels d'un traitement utilisant
des brackets, plus particulièrement sur les conséquences et risques au moment de la
dépose.
3.2. Traitement dentaire préparatoire
Examinez minutieusement chaque dent, afin de déceler d'éventuelles lésions de l'émail
et éviter ainsi toute mauvaise surprise du fait des dommages dentaires notés lors de
la dépose. Lors du conditionnement de la dent, veuillez respecter les instructions du
fabricant de l'adhésif pour brackets utilisé.
3.3. Choix de l'adhésif pour brackets
Vous pouvez fixer nos brackets à l'aide des adhésifs usuels pour brackets. Nous recom-
mandons CONTEC lc (REF 163-110-00), ConTec Go! (REF 163-307-00) et SmartBond®
(REF 163-506-00). Veuillez respecter les instructions du fabricant de l'adhésif ainsi
que le tableau spécifiant les domaines d'utilisation des adhésifs dans notre catalogue
d'orthodontie.
3.4. Prélèvement et manipulation
Saisissez les brackets discovery®/discovery®smart à l'aide d'une précelle (p. ex.
REF 025-277-00) dans le sens mésio-distal ou au niveau des ailettes distales ou
mésiales, afin de les prélever de l'emballage et les manipuler conformément
aux étapes suivantes. Evitez de toucher la base structurée au laser des brackets
discovery®/discovery®smart avec les doigts ou de la contaminer d'une manière
quelconque, car cela pourrait en compromettre l'adhérence.
3.5. Utilisation de l'adhésif pour brackets
Apprêtez l'adhésif pour brackets conformément aux instructions du fabricant.
Appliquez une petite quantité d'adhésif au centre de la base du bracket,laquelle devra
cependant être suffisante pour recouvrir toute la base du bracket. Ceci garantit
une adhérence optimale.
3.6. Pose et alignement des brackets
Une fois l'adhésif appliqué, placez et plaquez le bracket discovery®/discovery®smart
sur la dent. Alignez le bracket discovery®/discovery®smart de façon optimale, à l'aide
de l'auxiliaire d'angulation présent sur la précelle, et appuyez-le de manière à ce que
l'adhésif excédentaire s'échappe latéralement au niveau de la base du bracket.
Evitez absolument tout contact avec les dents antagonistes, afin de prévenir les risques
d'abrasion et de perte prématurée du bracket. Prévoyez,le cas échéant, une surélévation
occlusale au moyen d'une cale palatine, p. ex. le Bite-Bumper™ (REF 705-000-00).
Eliminez complètement, avant son durcissement, l'adhésif excédentaire. C'est une
étape importante, car elle facilite la dépose des brackets à l'issue du traitement.
3.7. Mise en place des arcs
Après la prise de l'adhésif (respectez le temps de prise indiqué par le fabricant de
l'adhésif), vous pouvez réaliser les ligatures comme d'habitude avec du fil métallique
ou synthétique.
3.8. Dépose des brackets
Vous pouvez entreprendre la dépose des brackets discovery®/ discovery®smart avec
une pince Weingart (p. ex. REF 003-120-00). Déligaturez l'arc. Pour ce faire, saisissez
le bracket au niveau des ailes, dans le sens mésio-distal / diagonal, et désolidarisez
délicatement la base du bracket discovery®/discovery®smart de la dent en serrant
légèrement la pince au niveau du point de rupture. Tournez ensuite le bracket vers
la droite ou vers la gauche pour le décoller de la dent sans exercer de traction. La
pince coudée à retirer les brackets (REF 004-347-00) convient tout particulièrement au
segment postérieur et permet de défaire le bracket entre sa base et l'adhésif.
4. Informations relatives à la composition
Vous pouvez prendre connaissance de la composition en consultant la liste des
matériaux (voir le catalogue ou aller sur www.dentaurum.com).
5. Consignes de sécurité
Il n'y a pas de risques ou d'effets secondaires connus (réactions allergiques) provenant
des brackets discovery®/discovery®smart. Si le patient a connaissance de réactions
allergiques à un ou plusieurs composants, n'utilisez pas le produit.
6. Stockage et durée de conservation
Stockez les brackets discovery®/ discovery®smart dans l'emballage fermé.
7. Remarques concernant les produits à usage unique
Ce produit est exclusivement destiné à un usage unique.La remise en état d’un produit
déjà utilisé (recyclage) ainsi que sa réutilisation chez un patient ne sont pas autorisées.
En raison des sollicitations mécaniques pendant le traitement et la dépose, l'on ne peut
garantir la stabilité dimensionnelle ni les propriétés d'adhérence des brackets après un
processus de recyclage.
8. Autres indications
Référez-vous à l'étiquette du produit ou au catalogue pour obtenir des informations
techniques telles que le torque, l'angulation la taille, etc.
Il n'y a pas de mesures de précaution particulières à observer lors de l'élimination
des brackets discovery®/ discovery®smart.
9. Gamme disponible
Pour connaître la gamme de brackets discovery®/ discovery®smart disponible, consultez
le catalogue ou allez sur www.dentaurum.com.
10. Remarques au sujet de la qualité
Dentaurum garantit à l’utilisateur une qualité irréprochable des produits. Le contenu
du présent mode d’emploi repose sur notre propre expérience. L’utilisateur est
personnellement responsable de la mise en œuvre des produits. N'ayant aucune
influence sur la manipulation de ceux-ci, Dentaurum ne peut être tenue pour
responsable de résultats inexacts.
11. Explication des symboles utilisés sur l'étiquette
Référez-vous à l'étiquette. Pour des renseignements supplémentaires, rendez-
vous sur notre site Internet www.dentaurum.com (Explication des symboles
utilisés sur l'étiquette REF 989-313-00).
Sous réserve de modifications
ES
Brackets discovery®/ discovery®smart
Estimado cliente
Mucho le agradecemos que se haya decidido Ud. por un producto de calidad de la
casa Dentaurum.
Para poder utilizar este producto de forma fácil y segura y sacarle el mayor partido
posible para Ud. y sus pacientes, deberá leer detenidamente y seguir estas instrucciones
de uso.
En un modo de empleo no pueden ser descritos todos los datos y pormenores de una
posible aplicación o utilización. En caso de preguntas, no dude en ponerse en contacto
con su representante local.
Debido al permanente desarrollo de nuestros productos,recomendamos leer una y otra
vez atentamente el modo de empleo actualizado anexo al producto o bien el modo
de empleo que Ud. encontrará en internet en www.dentaurum.com, aun cuando Ud.
utilice el mismo producto frecuentemente.
1. Fabricante
Dentaurum GmbH & Co. KG I Turnstr. 31 I 75228 Ispringen I Alemania
2. Descripción general
discovery®/discovery®smart son brackets Premium del programa de brackets metálicos
de Dentaurum, desarrollados en base a muchos años de experiencia en el sector de
brackets. Los brackets discovery®/discovery®smart se fabrican de una sola pieza
mediante la técnica MIM (moldeo por inyección de metal) utilizando una aleación
dental especial y la maquinaria más moderna. Los brackets están adecuados de forma
ideal al contorneado del diente mediante CAD (Computer Aided Design) y le permiten
un manejo óptimo. La base estructurada con láser garantiza una adherencia ideal y un
descementado sencillo.
3. Fases de elaboración
3.1. Instruir el paciente
Explique al paciente las posibles consecuencias y riesgos de la terapia con brackets,
sobre todo al quitarlos (descementado).
3.2. Preparar los dientes
Examine esmeradamente cada diente por si existiesen deterioros del esmalte para no
dañar el diente al quitar los brackets. Siga las indicaciones del fabricante del adhesivo
utilizado para el acondicionamiento de los dientes.
3.3. Elegir el adhesivo para el cementado
Nuestros brackets pueden pegarse con todos los adhesivos de brackets habituales
en el mercado. Recomendamos nuestros adhesivos CONTEC lc (REF 163-110-00),
ConTec Go! (REF 163-307-00) y SmartBond®(REF 163-506-00). Observe las prescrip-
ciones del fabricante del respectivo adhesivo para pegar brackets y la tabla de adhesivos
en el Catálogo de Ortodoncia.
3.4. Manejar los brackets
Agarre los brackets discovery®/discovery®smart por mesio-distal con unas pinzas
(p.ej. REF 025-277-00) para sacarlos de su envase y manipúlelos según los siguientes
pasos de trabajo. No deberá tocarse con los dedos la base esculpida con láser de
los brackets discovery®/discovery®smart ni contaminarla de modo alguno, pues de lo
contrario podría reducirse la adherencia de los brackets.
3.5. Aplicar el adhesivo
Prepare el adhesivo para cementar brackets según las indicaciones del fabricante.
Aplique una pequeña cantidad de adhesivo en el centro de la base del bracket,
suficiente para humedecer la superficie entera de la base del bracket. Así se consigue
una óptima adherencia.
3.6. Colocar y adaptar los brackets
Después de aplicarle el adhesivo,coloque el bracket discovery®/discovery®smartsobre
el diente como de costumbre. Posicione correctamente el bracket discovery®/
discovery®smart usando la lengüeta larga para dar angulación de la pinza, y apriete
el bracket de forma que el exceso de adhesivo salga por los lados de la base.
Habrá que evitar sin falta que haya contacto con el antagonista, puesto que, de no
hacerlo, se corre riesgo de abrasión o pérdida prematura del bracket. Dado el caso
con sobremordida, podrá realizar un alzamiento de oclusión, por ejemplo, con el
Bite-Bumper™ (REF 705-000-00).
Antes del endurecimiento habrá que quitar por completo el adhesivo sobrante que
rebose por los lados de la base del bracket.Esto es de suma importancia para conseguir
luego un descementado sencillo del bracket.
3.7. Ligar los arcos
Una vez curado el adhesivo (considere el tiempo de curado que indican las instrucciones
del fabricante del adhesivo), puede ligar los arcos con ligaduras de alambre o
elastoméricas como de costumbre.
3.8. Descementar los brackets
Los brackets discovery®/discovery®smart se pueden descementar con alicates
Weingart (p.ej., REF 003-120-00). Quite las ligaduras.Agarre los brackets discovery®/
discovery®smart por mesio-distal / diagonal en las aletas y, mientras que las aprieta
con unos alicates ligeramente, retire la base del diente con cuidado aprovechando el
canal de descementado. Gire el bracket un poco hacia la derecha o izquierda sin tirar
del diente. Para la zona lateral recomendamos utilizar unos alicates acodados para
quitar brackets (REF 004-347-00) con los que se pueden quitar los brackets entre la
base y el adhesivo.
4. Especificaciones sobre la composición
Para la composición consulte la lista de materias primas en el catálogo o en
www.dentaurum.com.
5. Instrucciones de seguridad
No se conocen riesgos y efectos secundarios (alergias) del material de los brackets
discovery®/discovery®smart. Si se conocen reacciones alérgicas a alguna o a varias
materias primas, entonces no deberá aplicarse el producto.
6. Almacenamiento y tiempo de conservación
Almacene los brackets discovery®/discovery®smart en su envase cerrado.
7. Observaciones sobre productos de un solo uso
Este producto está previsto para un solo uso. No está permitido el reprocesamiento
(reciclaje) del producto ya empleado una vez ni su reutilización en pacientes.
Debido al desgaste mecánico durante el tratamiento y descementado, no se pueden
garantizar las mismas dimensiones y propiedades de adherencia después del proceso
de reciclaje.
8. Otras indicaciones
La información técnica, como torque, angulación, tamaño, etc., se encuentra
disponible en la etiqueta del producto y en las especificaciones del catálogo.
Después del tratamiento, no existen medidas especiales de precaución para el
desecho de los brackets discovery®/discovery®smart.
9. Programa de suministro
Puede encontrar el entero programa de suministro de los brackets discovery®/
discovery®smart en el catálogo o en www.dentaurum.com.
10. Referencias de calidad
Dentaurum garantiza al usuario una calidad impecable de los productos.Las indicaciones
en este modo de empleo se basan en experiencias propias. El usuario mismo tiene la
responsabilidad de trabajar correctamente con los productos. Dentaurum no se hace
responsable de resultados erróneos ya que no tenemos influencia alguna en la forma
de utilización.
11. Explicación de los símbolos utilizados en las etiquetas
Por favor observe la etiqueta. Más indicaciones se hallan en internet en
www.dentaurum.com (Explicación de los símbolos utilizados en las etiquetas
REF 989-313-00).
Reservado el derecho de modificación
IT
Bracket discovery®/ discovery®smart
Egregio Cliente
La ringraziamo per aver scelto un prodotto Dentaurum di qualità.
Per utilizzare questo prodotto sul paziente in modo sicuro ed efficiente, le presenti
modalità d’uso devono essere lette e seguite con molta attenzione.
Tenga presente che in ogni manuale d’uso non possono essere descritti tutti i possibili
utilizzi dei materiali descritti e pertanto rimaniamo a Sua completa disposizione
qualora necessitasse di ulteriori spiegazioni. Per eventuali domande può chiamare il
nr. 051 862580.
Poiché i prodotti che commercializziamo sono il risultato di sempre nuovi sviluppi
tecnologici, le raccomandiamo di rileggere sempre attentamente le modalità d’uso
allegate o quelle presenti nel sito www.dentaurum.com anche in caso di ripetuto
utilizzo dello stesso prodotto.
1. Fabbricante
Dentaurum GmbH & Co. KG I Turnstr. 31 I 75228 Ispringen I Germania
2. Descrizione generale
I discovery®/discovery®smart rientrano nel programma di bracket metallici Dentaurum
fra quelli denominati Premium e sono il risultato di anni di esperienza in questo
specifico campo.I discovery®/discovery®smart sono bracket costruiti in un unico pezzo
con la tecnologia MIM – Metal Injection Molding – in una speciale lega dentale e con
macchinari di ultima generazione. I bracket sono stati disegnati al CAD (Computer
Aided Design) per adattarsi in maniera ottimale alla forma dei denti e offrono una
straordinaria maneggevolezza. La brevettata strutturazione al laser della base assicura
una perfetta adesione e facilita il debonding a fine trattamento.
3. Passaggi operativi
3.1. Informazione del paziente
Si consiglia di informare il paziente sulle possibili conseguenze e rischi derivanti
dall’uso di bracket a fini terapeutici e in particolare al loro debonding.
3.2. Preparazione del dente
Verificare accuratamente se ciascun dente presenta eventuali danni allo smalto, al fine di
non avere poi „sorprese“ dopo il debonding. Per il condizionamento dei denti, si consiglia
di seguire attentamente le modalità d’uso indicate dal produttore del collante impiegato.
3.3. Scelta del collante per bracket
I nostri bracket possono essere incollati con qualsiasi adesivo per bracket presente
in commercio. Consigliamo l’uso del CONTEC lc (REF 163-110-00) o del ConTec Go!
(REF 163-307-00). Si consiglia di seguire sempre le modalità d’uso indicate dal
fabbricante del collante impiegato nonché le indicazioni riportate nella tabella
“Campo d‘impiego dei collanti” presente nel catalogo.
3.4. Prelievo e manipolazione
Prelevare i bracket discovery®/discovery®smart dalla confezione afferrandoli con delle
pinzette (ad es. REF 025-277-00) dai lati mesiale e distale. Usare le pinzette anche per
tutti i successivi passaggi operativi. La brevettata base strutturata al laser dei bracket
discovery®/discovery®smart non deve essere toccata con le dita o contaminata in
qualsiasi maniera, perché in caso contrario si potrebbe peggiorare la ritenzione.
3.5. Utilizzo del collante per bracket
Il collante per bracket prescelto deve essere preparato secondo le indicazioni rilasciate
dal fabbricante. Applicare al centro della base del bracket una piccola quantità di
collante, ma sufficiente per ricoprirla completamente. Ciò garantirà una ritenzione
ottimale.
3.6. Applicazione e adattamento dei bracket
Applicato il collante, posizionare i bracket discovery®/discovery®smart sui denti come
si è soliti fare e, con l‘aiuto delle pinzette, esercitare una leggera pressione. Orientare
opportunamente i bracket discovery®/discovery®smart con l‘estremità posteriore delle
pinzette di montaggio ed esercitare una certa pressione per favorire la fuoriuscita
laterale del collante in eccesso.
È assolutamente da evitare il contatto tra i denti antagonisti per non incorrere nel
rischio di abrasioni e/o di perdita prematura del bracket. Se necessario, predisporre un
rialzo del morso ad es. con il Bite-Bumper™ (REF 705-000-00).
Prima dell’indurimento del collante, asportare completamente le eccedenze fuoriuscite
dalla base dei bracket. Tale passaggio è importante per semplificare il debonding dei
bracket al termine del trattamento.
3.7. Legatura dell’arco
Indurito il collante (osservare i tempi d‘indurimento del collante impiegato) è possibile
legare l‘arco come si è soliti fare con filo metallico o con legature elastiche.
3.8. Debonding
La rimozione dei bracket discovery®/discovery®smart può essere realizzata con una
pinza di Weingart (ad es. REF 003-120-00). Liberare gli archi dalle legature. Afferrare
la diagonale mesio-distale delle alette e, stringendo leggermente la pinza, sfruttare la
linea verticale di concentrazione dello stress dei brackets discovery®/discovery®smart,
per staccare con cautela la base dal dente. Ruotare, poi, il bracket con un leggero
movimento verso sinistra o destra senza esercitare trazioni sul dente. Per i bracket
posteriori, risulta particolarmente adatta la pinza asporta-bracket angolata
(REF 004-347-00) con la quale si riesce a entrare tra la base dell’attacco e il collante.
4. Informazioni sulla composizione
Per la composizione chimica, fare riferimento all‘elenco delle materie prime pubblicato
nel nostro catalogo di ortodonzia o nel sito www.dentaurum.com.
5. Indicazioni di sicurezza
Non sono noti effetti collaterali (reazioni allergiche) a carico dei bracket discovery®/
discovery®smart. Nel caso fossero note reazioni allergiche ad uno o più componenti,
il prodotto non deve essere impiegato.
6. Stoccaggio e scadenza
Conservare i bracket discovery®/discovery®smart nella loro confezione chiusa.
7. Indicazioni per prodotti monouso
Il prodotto è stato concepito per un solo impiego. Il riutilizzo di un prodotto usato già
una volta (Recycling) nonché il suo reimpiego nel paziente non è ammesso.
A causa delle sollecitazioni meccaniche durante il trattamento e il debonding, non è
possibile garantire né la stabilità dimensionale né le proprietà ritentive dei bracket
dopo un eventuale processo di riciclaggio.
8. Ulteriori indicazioni
Le informazioni tecniche come il torque, l’angolazione, la dimensione ecc. sono
specificate sull’etichetta di ciascun prodotto o nel catalogo generale.
Non sussistono particolari indicazioni circa lo smaltimento dei bracket discovery®/
discovery®smart a fine trattamento.
9. Confezioni
Per le confezioni dei bracket discovery®/ discovery®smart fare riferimento al catalogo
o consultare il sito internet www.dentaurum.com.
10. Avvertenze sulla qualità
La Dentaurum assicura la massima qualità dei prodotti fabbricati. Il contenuto di
queste modalità d’uso è frutto di nostre personali esperienze e pertanto l’utilizzatore
è responsabile del corretto impiego del prodotto. In mancanza di condizionamenti
di Dentaurum sull’utilizzo del materiale da parte dell’utente non sussiste alcuna
responsabilità oggettiva ad essa imputabile, per eventuali insuccessi.
11. Spiegazione dei simboli presenti sull‘etichetta
Si prega di osservare l’etichetta. Ulteriori indicazioni sono disponibili nel sito
internet www.dentaurum.com (spiegazione dei simboli presenti sull‘etichetta
REF 989-313-00).
Soggetto a variazione
