ESFR IT
Mode d‘emploi
Brackets autoligaturants – discovery®sl 2.0
Chère Cliente, cher Client
Nous vous remercions d’avoir choisi un produit de la qualité Dentaurum.
Pour une utilisation sûre, et pour que vous et vos patients puissiez profiter pleinement
des divers champs d’utilisation que couvre ce produit, nous vous conseillons de lire très
attentivement son mode d’emploi et d’en respecter toutes les instructions.
Ne pouvant décrire tous les aspects résultant de l’utilisation de ce produit dans un mode
d’emploi, les techniciens de notre support technique sont à votre service pour répondre à
vos questions et prendre note de vos suggestions.
En raison du développement constant de nos produits, nous vous recommandons, malgré
l’utilisation fréquente du même produit, la relecture attentive du mode d’emploi actualisé
joint (cf. également sur internet sous www.dentaurum.de).
1. Fabricant
Dentaurum GmbH & Co. KG · Turnstraße 31 · 75228 Ispringen · Allemagne
2. Description générale
discovery®sl 2.0 constituent les brackets autoligaturants les plus petits au monde. Dévelop-
pés à partir des brackets éprouvés discovery®, discovery®sl 2.0 unit la somme d‘une longue
expérience aux exigences modernes du traitement orthodontique.
Grâce à la CAO (Conception Assistée par Ordinateur), les brackets sont parfaitement adap-
tés à la forme de la dent et offrent une manipulation optimale. Le marquage laser FDI sur
la base ainsi que le marquage laser en croix sur le couvercle permettent de les identifier et
de les placer facilement. La base du bracket structurée au laser d‘après un procédé breveté
assure une adhérence optimale et une dépose facile.
3. Étapes de la mise en œuvre
3.1. Information
Informez le patient à propos des éventuels conséquences et risques liés à un traitement
utilisant des brackets et plus particulièrement au moment de la dépose.
3.2. Traitement dentaire préparatoire
Vérifiez soigneusement chaque dent en recherchant d’éventuels lésions de l’émail afin de
ne
pas être surpris par un dommage créé à la dent lors de la dépose. Pour le conditionnement
de
la dent, respectez bien les conseils du fabricant de l’adhésif pour bracket devant être utilisé.
3.3. Choix des l‘adhésif pour brackets
Vous pouvez fixer les brackets discovery®sl 2.0 à l’aide des adhésifs usuels pour brackets.
Nous conseillons notre adhésif ConTec SE (REF 163-550-00).
Respectez les directives du fabricant de l’adhésif pour bracket utilisé et consultez le tableau
« Systèmes adhésifs » dans notre catalogue Orthodontie.
3.4. Prélèvement et manipulation
Saisissez les brackets discovery®sl 2.0 avec une prècelle (par ex. REF 025-277-00) dans le
sens mésio-distal afin de les prélever de l’emballage et de les manipuler conformément aux
étapes successives de la mise en œuvre. La base des brackets discovery®sl 2.0 ne doit pas
être touchée avec les doigts ou contaminée d’une manière ou d’une autre car dans ce cas,
l’adhérence pourrait être diminuée.
3.5. Utilisation du bracket adhésif
L’adhésif pour bracket est préparé conformément aux directives du fabricant. Placez-en une
petite quantité au centre de la base du bracket. Cependant ce volume doit être suffisant
pour enduire l’intégralité de la base du bracket. Ceci garantit une adhérence optimale.
3.6. Application et disposition des brackets
Après avoir appliqué l‘adhésif, posez le bracket discovery
®
sl 2.0 selon la procédure habituelle.
Alignez le bracket discovery®sl 2.0 de manière optimale en utilisant l‘aide à l‘angulation de
la précelle et appuyez jusqu‘à ce que l‘excédent d‘adhèsif sorte par les côtés.
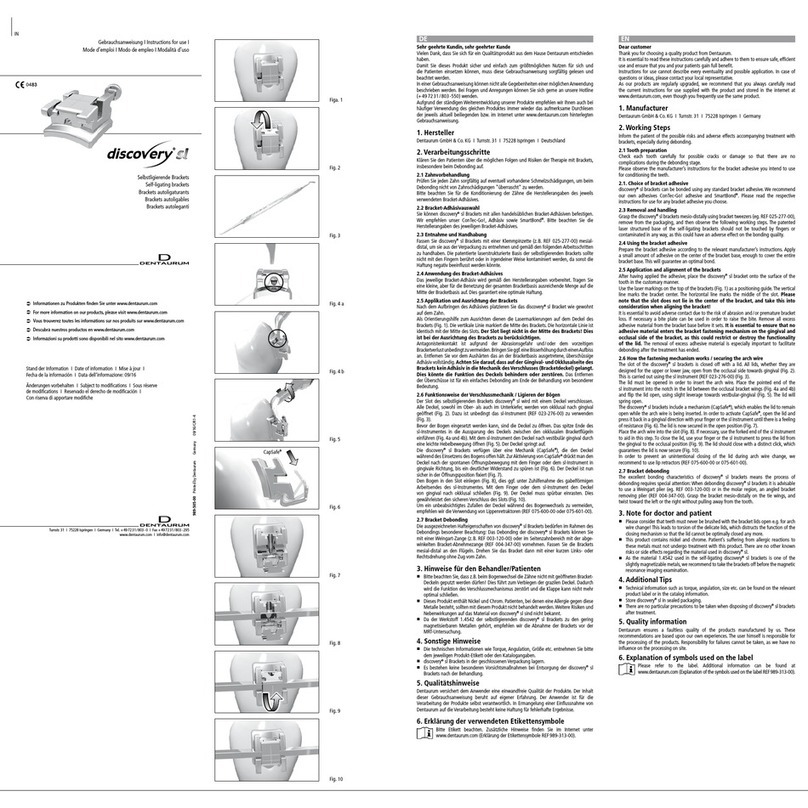
Ensuite, alignez correctement à l‘aide des marquages au laser que vous voyez sur son
couvercle (Fig. 1). Le trait vertical représente l‘axe médian du bracket le long de l‘axe
longitudinal de la dent (angulation), et le trait horizontal l‘axe médian de la gorge du
bracket (niveau de l‘arc). Cette gorge n‘est pas située dans la partie médiane du
bracket ! Veuillez en tenir compte au moment d‘aligner le bracket.
A cause des risques d‘abrasion et/ou de perte prématurée du bracket qui en résulteraient,
il est impératif qu‘il n‘y ait pas contact avec l‘antagoniste. Le cas échéant, procédez
conséquent à une surélévation occlusale à l‘aide d‘une gouttière par exemple le
Bite-Bumper™ (REF 705-000-00).
Veiller bien à ce qu‘au niveau des parties gingivale et occlusale du bracket il n‘y ait
pas d‘adhésif qui pénètre à l‘intérieur du système de fermeture du couvercle du
bracket car cela pourrait perturber voire empêcher le bon fonctionnement de ce
couvercle. L’adhésif excédentaire doit être entièrement éliminé avant son durcissement.
Ceci est particulièrement important pour une dépose facile à la fin du traitement.
3.7. Principe de fonctionnement du système de fermeture et ligaturage des arcs
La gorge des brackets autoligaturants discovery®sl 2.0 est fermée par un couvercle. Qu‘il
s‘agisse des brackets pour le maxillaire supérieur ou de ceux pour le maxillaire inférieur, ce
couvercle s‘ouvre toujours dans le sens occluso-gingival (Fig. 2). Pour l‘ouvrir, veuillez toujours
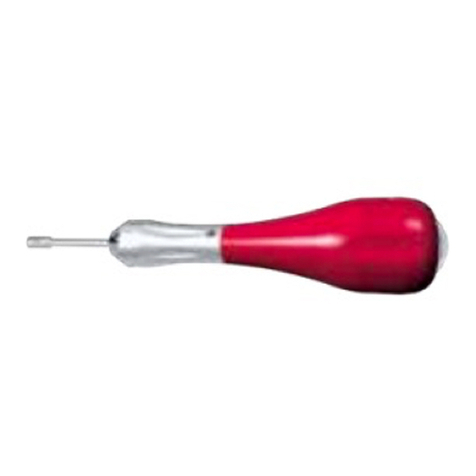
utiliser l‘instrument sl portant la référence (REF 023-277-00) (Fig. 3).
Afin de pouvoir installer l‘arc, veuillez tout d‘abord ouvrir les couvercles. Pour ce faire,
introduisez l‘extrémité de l‘instrument sl, en forme de sonde, du côté labial/buccal dans la
cavité du couvercle située entre les ailettes occlusales du bracket (Figs. 4a et 4b). Ensuite,
toujours avec l‘instrument sl, ouvrez le couvercle en direction vestibulo gingivale, en faisant
un léger mouvement de levier (Fig. 5a et 5b). Le couvercle saute.
Les brackets discovery®sl 2.0 sont équipés du mécanisme CapSafe®, lequel sert à maintenir
ouvert le couvercle du bracket pendant la mise en place de l‘arc. Pour activer ce système
CapSafe®: après le brusque mouvement d‘ouverture du couvercle, appuyez (en direction
gingivale) sur celui-ci avec le doigt ou l‘instrument sl jusqu‘à ce que vous sentiez une nette
résistance (Fig. 6a et 6b). Le couvercle est alors bloqué en position ouverte (Fig. 7).
Vous pouvez à présent engager l‘arc dans la gorge du bracket (Fig. 8). Pour vous faciliter cette
étape, vous pouvez utiliser le bout fourchu de l‘instrument sl. Ensuite, avec le doigt ou
l‘instrument sl, rabattez le couvercle dans le sens gingivo-occlusal (Fig. 9). Vous devez sentir
le couvercle s‘enclencher. Cet enclenchement est le signe que la gorge a été refermée
correctement (Fig. 10).
Pour éviter des irritations au niveau des lèvres et des joues lors du changement de l‘arc, nous
recommandons d‘utiliser un écarteur de lèvres (REF 075-600-00 ou 075-601-00).
3.8. Dépose des brackets
Du fait des excellentes qualités adhésives des brackets discovery®sl 2.0, veuillez, au moment de
les enlever, prendre une pince Weingart (REF 003-120-00 par exemple) ou – pour les secteurs
postérieurs – une pince de dépose des brackets coudée (REF 004-347-00) puis saisir avec la
pince le bracket en mésial-distal au niveau de ses ailettes et lui faire faire un mouvement de
rotation vers la gauche ou vers la droite (ne pas chercher à arracher le bracket de la dent).
4. Indications concernant la composition
Vous pouvez consulter la composition au moyen de la liste des matériaux, voir le catalogue
ou le site www.dentaurum.de.
5. Recommandations pour l’utilisateur/ le patient
Lors du changement de l‘arc par ex., ne pas brosser les dents si le couvercle des brackets est
ouvert ! Cela déformerait le couvercle qui est gracile et entraverait la fonction du mécanisme
de fermeture, le couvercle ne pouvant plus être fermé de manière optimale.
6. Remarques concernant la sécurité
• Si des réactions allergiques à l’un ou à l’autre des composants ont été signalées, il ne
faut plus utiliser le produit.
• Lematerial1.4542constituantlesbracketsautoligaturantesdiscovery®sl 2.0 appartient
au group des métaux de faible megnétisabilité, nous recommandons leur dépose avant
de passer un examen d‘IRM (Imagerie par Résonance Magnétique).
7. Stockage et conservation
Les brackets discovery®sl 2.0 doivent être stockés dans leur emballage d‘origine (fermé).
8. Remarques concernant les produits à usage unique
Les brackets discovery®sl 2.0 sont destinés à un usage unique. La remise à l’état d’origine
d’un bracket discovery®sl 2.0 déjà utilisé (recyclage) ou une nouvelle utilisation chez un
patient ne sont pas authorisées.
L‘effort mécanique auquel sont soumis les brackets pendant le traitement et lors de la
dépose ne permet de garantir ni l‘exactitude des dimensions ni les caractéristiques
d‘adhérence après un processus de recyclage.
9. Autres indications
• Concernant les caractéristiques techniques (torque, angulation, dimensions, etc.),
veuillez lire l‘étiquette du produit ou consulter notre catalogue produits.
• Pas de précautions particulières à prendre concernant l‘élimination des brackets
discovery®sl 2.0 une fois le traitement terminé.
10. Gamme disponible
Vous trouverez la gamme disponible de brackets discovery®sl 2.0 dans notre catalogue
Orthodontie.
11. Remarques au sujet de la qualité
Dentaurum garantit à l’utilisateur une qualité irréprochable des produits. Le contenu
du présent mode d’emploi repose sur notre propre expérience. L’utilisateur est
personnellement responsable de la mise en œuvre des produits. N’ayant aucune influence
sur leur manipulation par ce dernier, Dentaurum ne peut être tenu pour responsable de
résultats inexacts.
12. Explication concernant les symboles utilisés sur l’étiquette
REF Numéro de commande
12345
Désignation du lot
CE - DM - classe IIa
➔ www.dentaurum.de
Mode d’emploi disponible sur Internet
Ne pas réutiliser
Code barres Codablock
Matrixcode
Mise à jour : 01/12
Sous réserve de modifications
Mode de empleo
Brackets autoligables – discovery®sl 2.0
Estimado cliente
Mucho le agradecemos que se haya decidido usted por un producto de calidad de la casa
Dentaurum.
Para que usted pueda emplear este producto de forma segura y fácil y obtener los mayores
beneficios posibles del mismo para usted y los pacientes, debe ser leido detenidamente y
observado este modo de empleo.
En un modo de empleo no pueden ser descritos todos los datos y pormenores de una
posible aplicación o utilización. Por eso nuestra línea telefónica directa (Hotline) está a su
disposición para preguntas o sugerencias.
Debido al permanente desarrollo de nuestros productos, recomendamos leer una y otra vez
atentamente el modo de empleo actualizado anexo al producto o bien el modo de empleo
que Ud. encontrará en internet en www.dentaurum.de, aún cuando Ud. utilice el mismo
producto frecuentemente.
1. Fabricante
Dentaurum GmbH & Co. KG · Turnstraße 31 · 75228 Ispringen · Alemania
2. Descripción general
discovery®sl 2.0 son los brackets autoligables más pequeños a nivel mundial. Desarrollados
sobre la base de los probados brackets discovery®, los brackets discovery®sl 2.0 unen la
suma de largos años de experiencia con los requisitos exigidos en el moderno tatamiento de
ortodoncia. Los brackets se adaptan por el CAD (Computer Aided Design) perfectamente
a la forma del diente y le ofrecen un manejo óptimo. Los brackets se dejan identificar y
posicionar fácilmente a través de la marcación de la nomenclatura FDI en la base y a través
de la marcación de una cruz con láser sobre la tapa. La base patentada con estructura láser
asegura la adhesión óptima y garantiza un debonding fácil.
3. Fases de la elaboración
3.1. Instrucción del paciente
Explique al paciente las posibles consecuencias y riesgos de la terapia con brackets, sobre
todo al quitarlos (Debonding).
3.2. Preparación previa de los dientes
Examine esmeradamente cada diente por si existiesen deterioros del esmalte, para no
ser „sorprendido“ luego por deterioros dentarios al quitar los brackets. Tenga muy en
cuenta las prescripciones del fabricante del respectivo adhesivo de pegar brackets para el
acondicionamiento de los dientes.
3.3. Elección del adhesivo de pegar brackets
Los brackets discovery®sl 2.0 pueden pegarse con los adhesivos habituales en el comercio.
Recomendamos nuestro adhesivo ConTec SE (REF 163-550-00).
Observe las prescripciones del fabricante del respectivo adhesivo de pegar brackets, así
como las tablas de sistemas de adhesivos de nuestro Catálogo de Ortodoncia.
3.4. Cómo agarrar y manejar los brackets
Agarrar los brackets discovery
®
sl 2.0 por mesio-distal con unas pinzas (p. ej. REF 025-277-00)
para sacarlos de su envase y manipularlos según los siguientes pasos de trabajo. No deberá
tocarse con los dedos la base de los brackets discovery®sl 2.0 ni contaminarlos de ninguna
manera, pues de lo contrario eso podría influir de forma negativa en la adherencia de los
mismos.
3.5. Aplicación del adhesivo del bracket
El correspondiente adhesivo se prepara según las indicaciones del fabricante. Aplique una
pequeña cantidad de adhesivo en el centro de la base del bracket, pero suficiente para
humedecer toda la superficie de la base del bracket. Así se consigue una óptima adherencia.
3.6. Colocación y adaptación de los brackets
Después de aplicarle el adhesivo se coloca el bracket discovery®sl 2.0 sobre el diente en la
forma acostumbrada.
Alinear el bracket discovery®sl 2.0 de forma óptima por medio de la ayuda de angulación
en la pinza, apretándolo hasta que el adhesivo rebose por los lados.
De orientación para el posicionado ayudan los marcajes del láser hechos sobre la tapa del
bracket (fig. 1). La línea vertical marca el centro del bracket en el ángulo de la respectiva
angulación del diente (angulación). La línea horizontal es idéntica al centro del slot (nivel del
arco). Observar que el slot no se halla en el centro del bracket. Esto hay que tenerlo en
cuenta al posicionar y ajustar los brackets.
Habrá que evitar sin falta que no haya contacto con el antagonista, debido al riesgo
de abrasión o pérdida prematura del bracket. Dado el caso, con sobremordida realizar un
alzamiento de oclusión por ejemplo con el Bite Bumper (ref. no. 705-000-00).
Tenga cuidado de que el adhesivo no llegue al mecanismo de cierre, lado gingival y
oclusal (tapa del bracket). Esto podría impedir la función de la tapa o estrosl 2.0a.
Para conseguir una fácil remoción al final del tratamiento, es de primordial importancia quitar
los residuos de adhesivo.
3.7. Forma de funcionamiento del mecanismo de cierre / Ligar los arcos
El slot del bracket autoligable discovery®sl 2.0 se cierra con un cierre de bisagra. Todos los
cierres se abren de oclusal a gingival, tanto en el maxilar como en la mandíbula (Fig. 2). Para
ello es indispensable utilizar el instrumento sl (REF 023-277-00) (Fig. 3).
Antes de aplicar el arco, hay que abrir las tapas. Introducir el extremo puntiagudo del
instrumento sl en forma de sonda de labial/bucal en la entalladura de la tapa entre las
aletas oclusales del bracket (Fig. 4a y 4b). Con el instrumento abrir la tapa hacia
vestibular
gingival
mediante un ligero movimiento de palanca (Fig. 5a y 5b). La tapa se abre
bruscamente.
Los brackets discovery®sl 2.0 disponen de un mecanismo (CapSafe®), que mantiene la tapa
abierta durante el montaje del arco. Para activar CapSafe®después de un movimiento de
abertura espontáneo se presiona la tapa con el dedo o con el instrumento sl en dirección
gingival hasta notar cierta resistencia (Fig. 6a y 6b). Ahora el cierre de bisagra está sujetado
en posición completamente abierta (Fig. 7).
Incorpore el arco en el slot (Fig. 8). En caso necesario hacerlo con ayuda de la punta en
forma de horquilla del instrumento sl. Cerrar con el dedo o el instrumento sl la tapa
presionando de gingival hacia oclusal (Fig. 9). Debe notarse que la tapa encaje bien. Esto
garantiza un seguro cierre del slot (Fig. 10).
Para evitar irritaciones de los labios y de las mejillas al cambiar el arco, sugerimos el uso de
retractores labiales (ref. no. 075-600-00 ó 075-601-00).
3.8. Remoción (Debonding) de los brackets
Debido a las excelentes propiedades de adherencia de los brackets discovery®sl 2.0, preste
especial atención al quitarlos: La remoción de los brackets discovery®sl 2.0 puede
efectuarse con unos alicates Weingart (p. ej. REF 003-120-00) o en el sector de los posteriores
con unos alicates acodados de quitar brackets (REF 004-347-00). Agarre el bracket por
mesial-distal. Entonces comprimiéndolo con cuidado realize un breve movimiento giratorio
hacia derecha o hacia izquierda, sin tracción del diente.
4. Especificaciones sobre la composición
Para la composición consulte las listas de materias primas y composiciones químicas en el
Catálogo o en www.dentaurum.de.
5. Advertencia para el doctor y para el paciente
Por favor tenga en cuenta que por ejemplo al cambiar el arco, los dientes no deben ser
limpiados teniendo el cierre del bracket abierto! Esto lleva a la deformación del cierre grácil.
Así se destroza la función del mecanismo de cierre y el cierre no podrá cerrar más de forma
óptima.
6. Advertencias de seguridad
• En caso de que una o varias de las sustancias produzcan reacciones alérgicas, no deberá
ser aplicado el producto.
• Comoelmaterial1.4542usadoenlosbracketsautoligablesdiscovery®sl 2.0 es uno de
los metales insignificantemente magnetizantes, recomendamos remover los brackets
antes del examen médico de resonancia magnética (MRT).
7. Almacenamiento y caducidad
Almacenar los brackets discovery®sl 2.0 en su envase cerrado.
8. Observaciones sobre productos de un solo uso
Los brackets discovery®sl 2.0 están previstos para un solo empleo. No está permitido
ningún tipo de reprocesamiento una vez empleado el discovery®sl 2.0 (reciclaje), ni
tampoco su reutilización de nuevo en pacientes.
Debido al desgaste mecánico durante el tratamiento y al remover el bracket no se puede
garantizar la exactitud de dimensiones ni las propiedades de adherencia después del
proceso de reciclaje.
9. Otras indicaciones
• Lasinformacionestécnicas,comotorque,angulación,tamaño,etc.rogamosverlasen
la respectiva etiqueta del producto o en las especificaciones del catálogo.
• Despuésdeltratamientonoexistenmedidasespecialesdeprecauciónparaeldesecho
de los brackets discovery®sl 2.0.
10. Programa de suministro
Usted encontrará el programa de suministro de los brackets discovery®sl 2.0 en nuestro
catálogo de ortodoncia.
11. Observaciones referentes a la calidad
Dentaurum garantiza al usuario una calidad impecable de los productos. Las indicaciones
especificadas en este modo de empleo se basan en experiencias propias. El usuario mismo
tiene la responsabilidad de trabajar correctamente los productos. No respondemos por
resultados incorrectos, debido a que Dentaurum no tiene influencia alguna en la forma de
utilización por el usuario.
12. Explicación de los símbolos utilizados en las etiquetas
REF Núm de ref. / Código de pedido
12345
Número de lote
Signo CE / Clase IIa MP
➔ www.dentaurum.de
Modo de empleo disponible en Internet
Para un solo uso
Código de barras Codablock
Matrix code
Fecha de la información: 01/12
Nos reservamos el derecho de efectuar cambios
Modalità d‘uso
Brackets autoleganti – discovery®sl 2.0
Egregio Cliente
La ringraziamo per aver scelto un prodotto Dentaurum di qualità.
Le consigliamo di leggere e di seguire attentamente queste modalità d’uso per utilizzare
questo prodotto in modo sicuro ed efficiente.
In ogni manuale d’uso non possono essere descritti tutti i possibili utilizzi del prodotto
e pertanto rimaniamo a Sua completa disposizione qualora intendesse ricevere ulteriori
ragguagli.
Tutti i prodotti che commercializziamo sono il risultato di nuovi sviluppi tecnologici e quindi
Le raccomandiamo di rileggere sempre attentamente le specifiche modalità d’uso allegate,
anche in caso di ripetuto utilizzo dello stesso prodotto.
1. Produttore
Dentaurum GmbH & Co. KG · Turnstraße 31 · 75228 Ispringen · Germania
2. Descrizione generale
I discovery® sl 2.0 sono i brackets autoleganti più piccoli al mondo. Sviluppati sulla base dei
noti brackets discovery®, la versione sl 2.0 unisce la pluriennale esperienza di Dentaurum
in questo campo con le esigenze dei trattamenti ortodontici attuali. I brackets possono
essere facilmente riconosciuti e montati grazie al sistema di identificazione FDI impresso
con il laser sulla loro base. La brevettata strutturazione al laser della base ritentiva ne
assicura, inoltre, l‘ottimale adesione alla superficie del dente facilitando, al tempo stesso,
il debonding a fine cura.
3. Passaggi operativi
3.1. Informazione al paziente
Prima di iniziare la terapia, è necessario informare il paziente in merito ai possibili rischi, con
particolare riguardo per la fase di debonding.
3.2. Preparazione del dente
Verificare con cura ogni dente accertando la presenza di eventualidifetti dello smalto, al fine
di non rimanere poi „sorpresi” durante il debonding. Per le procedure di condizionamento
dentale si prega di attenersi scrupolosamente alle indicazioni rilasciate dal fabbricante del
collante per brackets impiegato.
3.3. Scelta del collante per brackets
I discovery®sl 2.0 possono essere incollati con qualsiasi adesivo per brackets. Consigliamo,
tuttavia, l’uso del ConTec SE (REF 163-550-00). Si prega di attenersi scrupolosamente
alle indicazioni rilasciate dal fabbricante nonchè alla nostra Tabella Collanti presente nel
catalogo di ortodonzia.
3.4. Prelievo e manipolazione
Prelevare i brackets discovery®sl 2.0 dalla loro confezione con delle pinzette (ad es.
REF 025-277-00) dal lato mesio-distale al fine di facilitare le successive fasi operative. La
base dei brackets discovery®sl 2.0 non deve essere toccata con le dita o in qualche modo
contaminata in quanto, in caso contrario, si potrebbero creare problemi di adesione.
3.5. Utilizzo del collante
Preparare il collante seguendo le indicazioni rilasciate dal produttore ed applicare al
centro della base del bracket una piccola ma sufficiente quantità di pasta. Ciò garantirà
un‘adesione ottimale.
3.6. Incollaggio dei brackets
Applicato il collante, incollare i brackets discovery®sl 2.0 sui denti come si è soliti fare.
Orientare opportunamente il bracket discovery®sl 2.0 con l‘estremità posteriore delle pin-
zette di montaggio ed esercitare una certa pressione per favorire la fuoriuscita laterale del
collante in eccesso.
Per l’orientamento dell’attacco, utilizzare le marcature laser presenti sullo sportello
(Fig. 1). La linea verticale indica il centro del bracket e l‘asse longitudinale del dente
(angolazione), mentre quella orizzontale il centro dello slot(piano dell‘arco). Attenzione
perchè lo slot non è al centro dell’attacco! Tenerne conto nell’incollaggiodel bracket.
È assolutamente da evitare il contatto tra i denti antagonisti per non avere il rischio di
abrasioni e/o di perdita prematura del bracket. Se necessario, predisporre un rialzo del
morso ad es. con Bite-Bumper™ (REF 705-000-00). .
Assicurarsi che sui lati gengivale ed occlusale del bracket il collante non sia entrato
nel meccanismo di chiusura/apertura dello sportello in quanto ne inficerebbe il
corretto funzionamento. La rimozione delle eccedenze di collante è importante per
semplificare il debonding del bracketal termine del trattamento.
3.7. Funzione della meccanica di chiusura / Legatura dell’arco
Lo slot dei brackets discovery®sl 2.0 viene chiuso con uno sportello. Tutti gli sportelli, sia
nell’arcata superiore che in quella inferiore, si aprono dal lato occlusale a quello gengivale
(Fig. 2). Per facilitare l’apertura è consigliabile utilizzare esclusivamente l’apposito
strumento sl (REF 023-276-00) (Fig. 3).
Prima di poter inserire l’arco sarà necessario aprire gli sportelli. Inserire il terminale a punta
dello strumento sl dal lato labiale/vestibolare nella fessura dello sportello situata
tra le alette
occlusali del bracket (Fig. 4a e 4b). Con lo strumento sl, fare leva sullo
sportello in senso vestibolo-gengivale (Fig. 5a e 5b). Lo sportello si aprirà di scatto.
I brackets discovery®sl sono dotati di uno speciale dispositivo (CapSafe®) che impedisce
l’accidentale chiusura dello sportello durante l’inserimento dell’arco. Per attivare il
CapSafe®è necessario spingere lo sportello con un dito o con lo strumento sl nella
direzione di apertura (direzione gengivale) fino ad avvertire una inequivocabile resistenza
(Fig. 6a e 6b). A questo punto lo sportello sarà fissato in posizione di apertura (Fig. 7).
Inserire l’arco negli slot (Fig. 8). A tal fine potrà risultare molto utile il terminale a forchetta
dello strumento sl. Chiudere lo sportello in senso occlusale con un dito o con lo
strumento
SL (Fig. 9). Per assicurare la corretta chiusura dello sportello sullo slot, si dovrà avvertire uno
scatto (Fig. 10).
Per impedire l‘irritazione di labbra e guance durante la sostituzione degli archi, si consiglia di
utilizzare un apribocca (REF 075-600-00 o 075-601-00).
3.8. Debonding
Le eccellenti proprietà di adesione dei brackets discovery®sl 2.0, comportano particolari
attenzioni durante il debondind. Per la rimozione dei brackets discovery®sl 2.0 è possibile
utilizzare una pinza di Weingart (REF 003-120-00) oppure nelle zone laterali una pinza
asportabrackets (REF 004-347-00). Afferrare il bracket dal lato mesio-distale delle alette ed
effettuare delle leggere rotazioni a destra o a sinistra senza però esercitare trazioni.
4. Indicazioni sulla composizione
Per la composizione si prega di fare riferimento all’elenco delle materie prime riportata nel
nostro catalogo oppure consultando il sito internet www.dentaurum.de.
5. Avvertenze per il medico ed il paziente
Si prega di tenere presente che, ad es. durante la sostituzione degli archi, è sconsigliato
pulire i denti con gli sportelli aperti in quanto si potrebbe correre il rischio di piegarli. Ciò può
anche danneggiare il meccanismo di chiusura e creare altresì problemi di serraggio.
6. Indicazioni di sicurezza
Nel caso fossero note reazioni allergiche ad uno o più componenti, il prodotto non deve
essere impiegato.
7. Stoccaggio e conservazione
Conservare i brackets discovery®sl 2.0 nella loro confezione chiusa.
8. Indicazioni per l’utilizzo del prodotto una sola volta
I brackets discovery®sl 2.0 sono stati previsti per un solo utilizzo. La rigenerazione di un
bracket discovery®usato già una volta (Recycling) nonché il reimpiego nel paziente non
è ammesso.
In caso di processo di riciclaggio del bracket, non possono più essere garantite né le
sue caratteristiche dimensionali né la sua corretta adesione al dente a sostegno delle
sollecitazioni meccaniche sviluppate durante il trattamento e il debonding.
9. Ulteriori indicazioni
• Le informazioni tecniche come il torque, l’angolazione, la dimensione ecc. sono
specificate sull’etichetta di ciascun prodotto o nel catalogo generale.
• Nonsussistonoparticolariindicazionicircalosmaltimentodeibracketsdiscovery®sl 2.0
a fine trattamento.
10. Confezioni
Per il programma di fornitura dei discovery®sl 2.0, vedi il catalogo di ortodonzia.
11. Avvertenze sulla qualità
La Dentaurum assicura la massima qualità dei prodotti fabbricati. Il contenuto di
queste modalità d’uso è frutto di nostre personali esperienze e pertanto l’utilizzatore
è responsabile del corretto impiego del prodotto. In mancanza di condizionamenti di
Dentaurum sull’utilizzo del materiale da parte dell’utente non sussiste alcuna responsabilità
oggettiva per eventuali insuccessi.
12. Spiegazione dei simboli riportati sulle etichette
REF
Codice articolo
12345
Numero di lotto
Marcatura CE Classe IIa
➔ www.dentaurum.de
Modalità d’uso disponibili in internet
Prodotto monouso
Codice a barre Codablock
Codifica Matrix
Data dell‘informazione: 01/12
Con riserva di apportare modifiche
Fig. 1
Fig. 2
Fig. 3
Fig. 4 a
Fig. 4 b
Fig. 5 a
Fig. 6 b
Fig. 7
Fig. 8
Fig. 9
Fig. 10
CapSafe
®
Fig. 5 b
Fig. 6 a
