manuals.online logo
Brands
  1. Home
  2. •
  3. Brands
  4. •
  5. Di-soric
  6. •
  7. Accessories
  8. •
  9. Di-soric UGUTI 6/70 G6-B5 User manual

Di-soric UGUTI 6/70 G6-B5 User manual

UGUTI 6/70 G6-B5
Ultraschall-Etikettensensor
Ultrasonic label sensor
Détecteur d’étiquettes à ultrasons
di-soric GmbH & Co. KG
Steinbeisstraße 6
DE-73660 Urbach
Germany
Tel: +49 (0) 7181/9879-0
[email protected] ∙ www.di-soric.com
210258
Stand 10.08.22, Änderungen vorbehalten
As of 08/10/22, subject to change
État 10.08.22, sous réserve de modifications
Funktion / Function / Fonction
IND. CONT. EQ.
29W7
Enclosure Type 1 Supply Class 2
NFPA 79 Applications only. For ad-
apters providing field wiring me-
ans refer to product information or
customer support.
. . .
1) LED STATUS / LED STATUS / LED STATUT
2) LED SCHALTAUSGANG / LED SWITCHING OUTPUT / LED
SORTIE DE COMMUTATION
3) LED STABILITÄT / LED STABILITY / LED STABILITÉ
4) Freiblasöffnung / Blow-out opening / Ouverture de purge mm
BK : schwarz / black / noir
BN : braun / brown / marron
BU : blau / blue / bleu
GY : grau / grey / gris
WH: weiß / white / blanc
Technische Daten Technical data Caractéristiques techniques +20°C, 24 V DC
Funktionsprinzip Operating principle Principe de fonctionnement Ultraschall-Einwegschranke / Ultrasonic through-
beam sensor / Détecteur par barrage à ultrasons
Betriebsspannung Service voltage Tension de service 18 … 30V DC
Leerlaufstrom (max.) No-load current (max.) Courant de marche à vide (max.) 40mA
Schaltausgang Switching output Sortie de commutation Gegentakt, NO/NC / Push-pull, NO/NC / Push-pull,
NO/NC
Umgebungstemperatur Betrieb Ambient temperature during operation Température ambiante de fonctionne-
ment 0 … +60°C
Schutzart Protection type Indice de protection IP 67
Sicherheitshinweise Safety instructions Consignes de sécurité
Allgemeiner Sicherheitshinweis
WARNUNG! Kein Sicherheitsbauteil gemäß 2006/42/
EG und EN 61496-1 /-2! Darf nicht zum Personen-
schutz eingesetzt werden! Nichtbeachtung kann zu
Tod oder schwersten Verletzungen führen! Nur bestim-
mungsgemäß verwenden!
General safety notice
WARNING! Not a safety component pursuant to
2006/42/EG and EN 61496-1/-2! May not be used for
personal protection! Non-compliance can lead to death
or serious injuries! Only use as directed!
Consigne de sécurité générale
AVERTISSEMENT! Ce produit n’est pas un composant
de sécurité au sens des règlementations 2006/42/CE
et NFEN61496-1/-2! Ne pas l’utiliser pour la protec-
tion des personnes! Le non-respect de cette consigne
peut entraîner la mort ou des blessures graves! N’utili-
ser le produit que selon son utilisation conforme!
UGUTI 6/70 G6-B5
超声波标签传感器
di-soric GmbH & Co. KG
Steinbeisstraße 6
DE-73660 Urbach
Germany
Tel: +49 (0) 7181/9879-0
[email protected] ∙ www.di-soric.com
210258
版本 22.08.10,保留变更权
功能
IND. CONT. EQ.
29W7
Enclosure Type 1 Supply Class 2
NFPA 79 Applications only. For ad-
apters providing field wiring me-
ans refer to product information or
customer support.
. . .
1) 状态 LED
2) 开关输出 LED
3) 稳定性 LED
4) 吹扫口 mm
BK : 黑色
BN : 棕色
BU : 蓝色
GY : 灰色
WH: 白色
技术数据 +20°C, 24 V DC
工作原理 超声波对射式光电开关
工作电压 18 … 30V DC
空载电流(最大) 40mA
开关输出端 推挽式, NO/NC
工作环境温度 0 … +60°C
防护等级 IP 67
安全提示
一般安全提示
警告!没有符合 2006/42/EU 和 EN 61496-1 /-2 标准
的安全结构件!不得用于人身安全保护!不遵守规定
会导致死亡或重伤危险!仅按规定使用!
Ultraschall Etikettensensor Ultrasonic Label Sensor
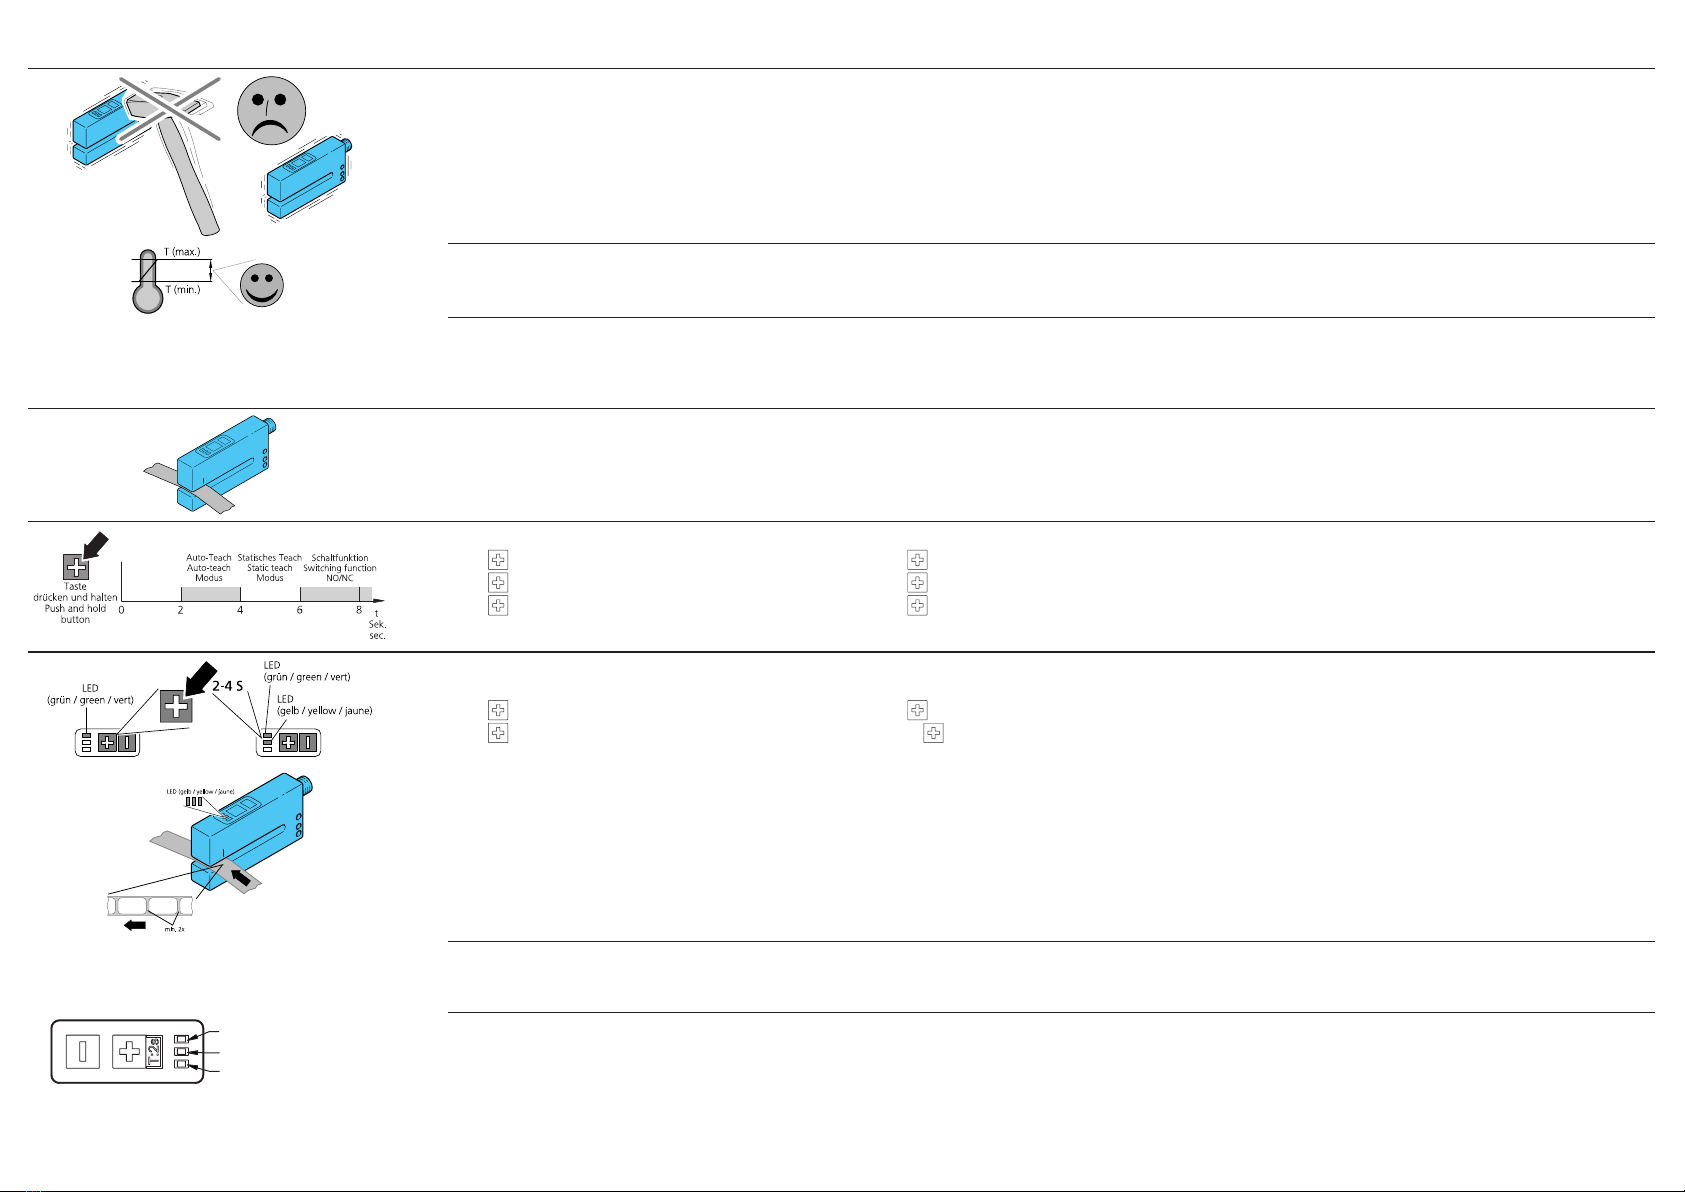
Mechanische Belastungen: Mechanical loads:
Der Sensor ist gegen mechanische Belastungen z.B.
Stöße und Schläge zu schützen.
The sensor has to be protected against mechanical stress
e. g. shocks and impacts.
Der Sensor darf in beliebiger Einbaulage montiert wer-
den, hierbei ist eine erschütterungsfreie und schwin-
gungsdämpfende Montage zu beachten.
The sensor can be mounted in any position, however
a vibration-free or vibration-dampening assembly must
be observed.
Alle gerätespezifischen Angaben zu Anschluss und
Betrieb sind zu beachten.
Please consider all device-specific details covering
connection and operation.
Temperaturbereich: Temperature range:
Der Betrieb außerhalb dem angegebenen Temperatur-
bereich ist nicht zulässig.
Operation out of the specified temperature range is not
allowed.
Versorgungsspannung anlegen: Connect to power supply:
Sensor an eine Versorgungsspannung von
10 … 30 V DC anlegen.
Die LED (grün) zeigt Dauersignal.
Connect sensor to power supply 10…30 VDC
LED (green) shows permanent signal
Etikettenmaterial einlegen: Insert label material:
Etikettenmaterial unter leichter Spannung am unteren
Schenkel im Bereich des Schallaustritts einlegen.
Insert label material under slight tension at the lower
part of the senor in the field of the sound outlet.
Bedienung, Überblick: Handling, Overview:
Taste 2-4 Sek.: Auto-Teach
Taste 4-6 Sek.: Statischer Einpunkt-Teach
Taste länger 6 Sek.: Schaltfunktion NO/NC
Press key 2-4 sec: Auto-Teach
Press key 4-6 sec: Static single-teach
Press key longer than 6 sec: Switching function NO/NC
Autoteach Vorgang einleiten: Start Autoteach function:
Etikett einlegen, (LED grün = Dauersignal)
Taste 2-4 Sek. drücken (bis LED gelb leuchtet)
Taste lösen, der Autoteach-Vorgang wird gestartet.
Insert label, (LED green = permanent signal)
Press key 2-4 sec. till yellow LED lights
Release key, Autoteach process will be started
Autoteach Vorgang ausführen: Execute Autoteach proecess:
Rasches Blinken der LED (gelb) signalisiert den
Autoteach-Vorgang.
Möglichst viele, jedoch min. zwei Etiketten /Etikettenlü-
cken durch den Ultraschallstrahl führen.
Quick flashing of the yellow LED shows Autoteach
process.
Position as many labels/-gaps as possible, but at least
two labels through the ultrasound.
LED rot / red / rouge
LED gelb / yellow / jaune
LED grün / green / vert
3-maliges langsames Blinken der LED (gelb):
Der Autoteach-Vorgang wurde erfolgreich abgeschlos-
sen!
Three times slow flashing of the yellow LED (means):
Autoteach process has been successfully concluded!
4-maliges langsames Blinken der LED (gelb), sowie
Dauersignal der LED (rot):
Der Autoteach-Vorgang wurde fehlerbedingt abge-
brochen!
Siehe Kapitel „Fehlerbehebung“
Four times slow flashing of the yellow LED as well
as permanent signal of the red LED (means):
The Autoteach process has been interrupted due to an
error!
See chapter “troubleshooting”
Statischer Einpunkt-Teach auf Etikett:
Taste 4-6 Sek. drücken:
Statischer Einpunkt-Teach auf Etikett
Hinweis:
Nach Abschluss des Teachvorgangs ist die
Teach-Einstellung in der Etikettenlücke / Etikett auf
ausreichende Funktionsreserve hin zu überprüfen.
Gegebenenfalls ist der Schwellwert mit den
Tasten / anzupassen!
Static single-point teach on label:
Press key for 4-6 sec.
Static single-point teach on label
Note:
After having concluded the teach process check the
label gap/label on a sufficient functional reserve.
If needed, adjust the threshold by means of of
the / keys.
Hinweis (Fehlerbehebung): Note (troubleshooting):
LED (rot) nach dem Teach-In: LED (red) when the teach-in has been conlcuded:
Geringe Stabilität, Teach-Vorgang wiederholen! Low stability! Repeat teach process
Taste drücken um die Funktionsreserve zu erhöhen Press key to increase the functional reserve.
Schwellwert:
Taste oder kurz drücken:
Schaltschwelle wird erhöht (Reduktion der Funk-
tionsreserve bzw. Stabilität)
Schaltschwelle wird reduziert (Erhöhung der
Funktionsreserve bzw. Stabilität)
Threshold:
Key or press briefly:
Threshold (value) will be increased (Reduction of
the funcional reserve resp. The stability)
Threshold will be reduced (Increase of the
functional reserve resp. stability)
LED rot / red / rouge
LED gelb / yellow / jaune
LED grün / green / vert
LED Anzeige: LED display:
LED (rot)
leuchtet
Warnung Stabilität (Teach nicht stabil/
Stabilitätswarnung im Betrieb)
LED (red)
lights
Warning stability (Teach not stable/stability
warning in operation mode
LED (gelb) Schaltausgang (Werkseinstellung Etikett
erkannt) LED (yellow) Swichting out (Factory setting label
detected)
LED (grün) Power LED (green) Power
Schaltfunktion NO/NC wählen: Switching NO/NC:
Taste länger 6 Sek. drücken:
NO/NC Umstellung erfolgt
Press key longer than 6 sec.
NO/NC switch/change (has been) concluded
WH 5 TT+:TEACH
T-:TEACH
Fernteach- /Tastensperrfunktion aktivieren:
Die Fernteachfunktion ist aktiviert solange PIN 5
auf
⊕
liegt.
Die Tastensperrfunktion ist aktiviert solange PIN 5 auf
⊖
liegt.
To activate remote teach/key-lock function:
The remote teach function is activated as long as PIN 5
is connected to
⊕
.
The key-lock function is activated as long as PIN 5 is
connected to
⊖
.
Wiederherstellung der Werkseinstellung: Re-set of the factory setting:
Taste betätigen und anschließend die Versorgungs-
spannung anlegen.
Die LED (gelb) blinkt und bestätigt die Wiederherstel-
lung der Werkseinstellung.
Press key and then connect to power supply.
The LED (yellow) flashes and confirmes the re-setting to
factory setting
Pflegehinweis: Care instructions:
Der Sensor ist mit einem weichen,
staubfreien Tuch zu reinigen.
The sensor should be cleaned with a soft, lint-free cloth.

Other Di-soric Accessories manuals

Di-soric FS 12-100-1 M G8-B8-PB User manual

Di-soric

Di-soric FS 12-100-1 M G8-B8-PB User manual

Di-soric LHT 9-45 M 10 P3-B4 User manual

Di-soric

Di-soric LHT 9-45 M 10 P3-B4 User manual

Di-soric USCTI 18 M 700 FPSK-BSL User manual

Di-soric

Di-soric USCTI 18 M 700 FPSK-BSL User manual

Di-soric FSB 10 M G1-B8 User manual

Di-soric

Di-soric FSB 10 M G1-B8 User manual

Di-soric OGL 051 P3K-TSSL Instruction manual

Di-soric

Di-soric OGL 051 P3K-TSSL Instruction manual

Di-soric US 46 Series User manual

Di-soric

Di-soric US 46 Series User manual

Di-soric OTV 22 K 14 P1K User manual

Di-soric

Di-soric OTV 22 K 14 P1K User manual

Di-soric OSP 12 VLF-IBSL User manual

Di-soric

Di-soric OSP 12 VLF-IBSL User manual

Di-soric CS 50 Programming manual

Di-soric

Di-soric CS 50 Programming manual

Di-soric OGUL Series User manual

Di-soric

Di-soric OGUL Series User manual

Di-soric OTV 22 K 160 P2K User manual

Di-soric

Di-soric OTV 22 K 160 P2K User manual

Di-soric LAT 61 Series User manual

Di-soric

Di-soric LAT 61 Series User manual

Di-soric LVHT 51 M 400 G3-B4 User manual

Di-soric

Di-soric LVHT 51 M 400 G3-B4 User manual

Di-soric FS 12-100-1 M G8-B8 User manual

Di-soric

Di-soric FS 12-100-1 M G8-B8 User manual

Di-soric LHT 9-45 M 10 P3IU-B4 User manual

Di-soric

Di-soric LHT 9-45 M 10 P3IU-B4 User manual

Di-soric FS 12-100-1 M G8-B8-E User manual

Di-soric

Di-soric FS 12-100-1 M G8-B8-E User manual

Di-soric LAT 61 User manual

Di-soric

Di-soric LAT 61 User manual

Di-soric PS-30 User manual

Di-soric

Di-soric PS-30 User manual

Di-soric OTV 22 K 115 P1K User manual

Di-soric

Di-soric OTV 22 K 115 P1K User manual

Di-soric USGT 60/8 U-B4 User manual

Di-soric

Di-soric USGT 60/8 U-B4 User manual

Di-soric UGUTI 6/70 G6-RB5 User manual

Di-soric

Di-soric UGUTI 6/70 G6-RB5 User manual

Di-soric OKTTI 55 M 30 FG3LK-IBS User manual

Di-soric

Di-soric OKTTI 55 M 30 FG3LK-IBS User manual

Di-soric OTV Series User manual

Di-soric

Di-soric OTV Series User manual

Di-soric KSSTI 400 G3K-TSSL User manual

Di-soric

Di-soric KSSTI 400 G3K-TSSL User manual

Popular Accessories manuals by other brands

Genie GER-R Installation

Genie

Genie GER-R Installation

Meltem M-WRG-II FSC Installation instructions and user guide

Meltem

Meltem M-WRG-II FSC Installation instructions and user guide

Euroflex MB-flex O aluminum Quick installation guide

Euroflex

Euroflex MB-flex O aluminum Quick installation guide

turck LTX-R10 Series Instructions for use

turck

turck LTX-R10 Series Instructions for use

Niko 350-30010 quick guide

Niko

Niko 350-30010 quick guide

Vega VEGAPULS 63 operating instructions

Vega

Vega VEGAPULS 63 operating instructions

IMOU Doorbell Wired quick start guide

IMOU

IMOU Doorbell Wired quick start guide

Victron energy Smart Battery Sense manual

Victron energy

Victron energy Smart Battery Sense manual

Steren MOV-1065 instruction manual

Steren

Steren MOV-1065 instruction manual

Linear Audio Module VB-4 installation instructions

Linear

Linear Audio Module VB-4 installation instructions

HYDRO-RAIN HRC-100-RS-HW instruction manual

HYDRO-RAIN

HYDRO-RAIN HRC-100-RS-HW instruction manual

BTEK T401S User instructions

BTEK

BTEK T401S User instructions

Decora LEVITON ODS0D-IDW installation instructions

Decora

Decora LEVITON ODS0D-IDW installation instructions

EarthX ML-1 manual

EarthX

EarthX ML-1 manual

Cockpit 3-IN-1 Sensor Technical specification

Cockpit

Cockpit 3-IN-1 Sensor Technical specification

TIS MS-PIR-M installation manual

TIS

TIS MS-PIR-M installation manual

Dorner AquaGard 7350 Series Installation, Maintenance, and Parts Manual

Dorner

Dorner AquaGard 7350 Series Installation, Maintenance, and Parts Manual

Baumer OM70-11186912 manual

Baumer

Baumer OM70-11186912 manual

manuals.online logo
manuals.online logoBrands
  • About & Mission
  • Contact us
  • Privacy Policy
  • Terms and Conditions

Copyright 2025 Manuals.Online. All Rights Reserved.