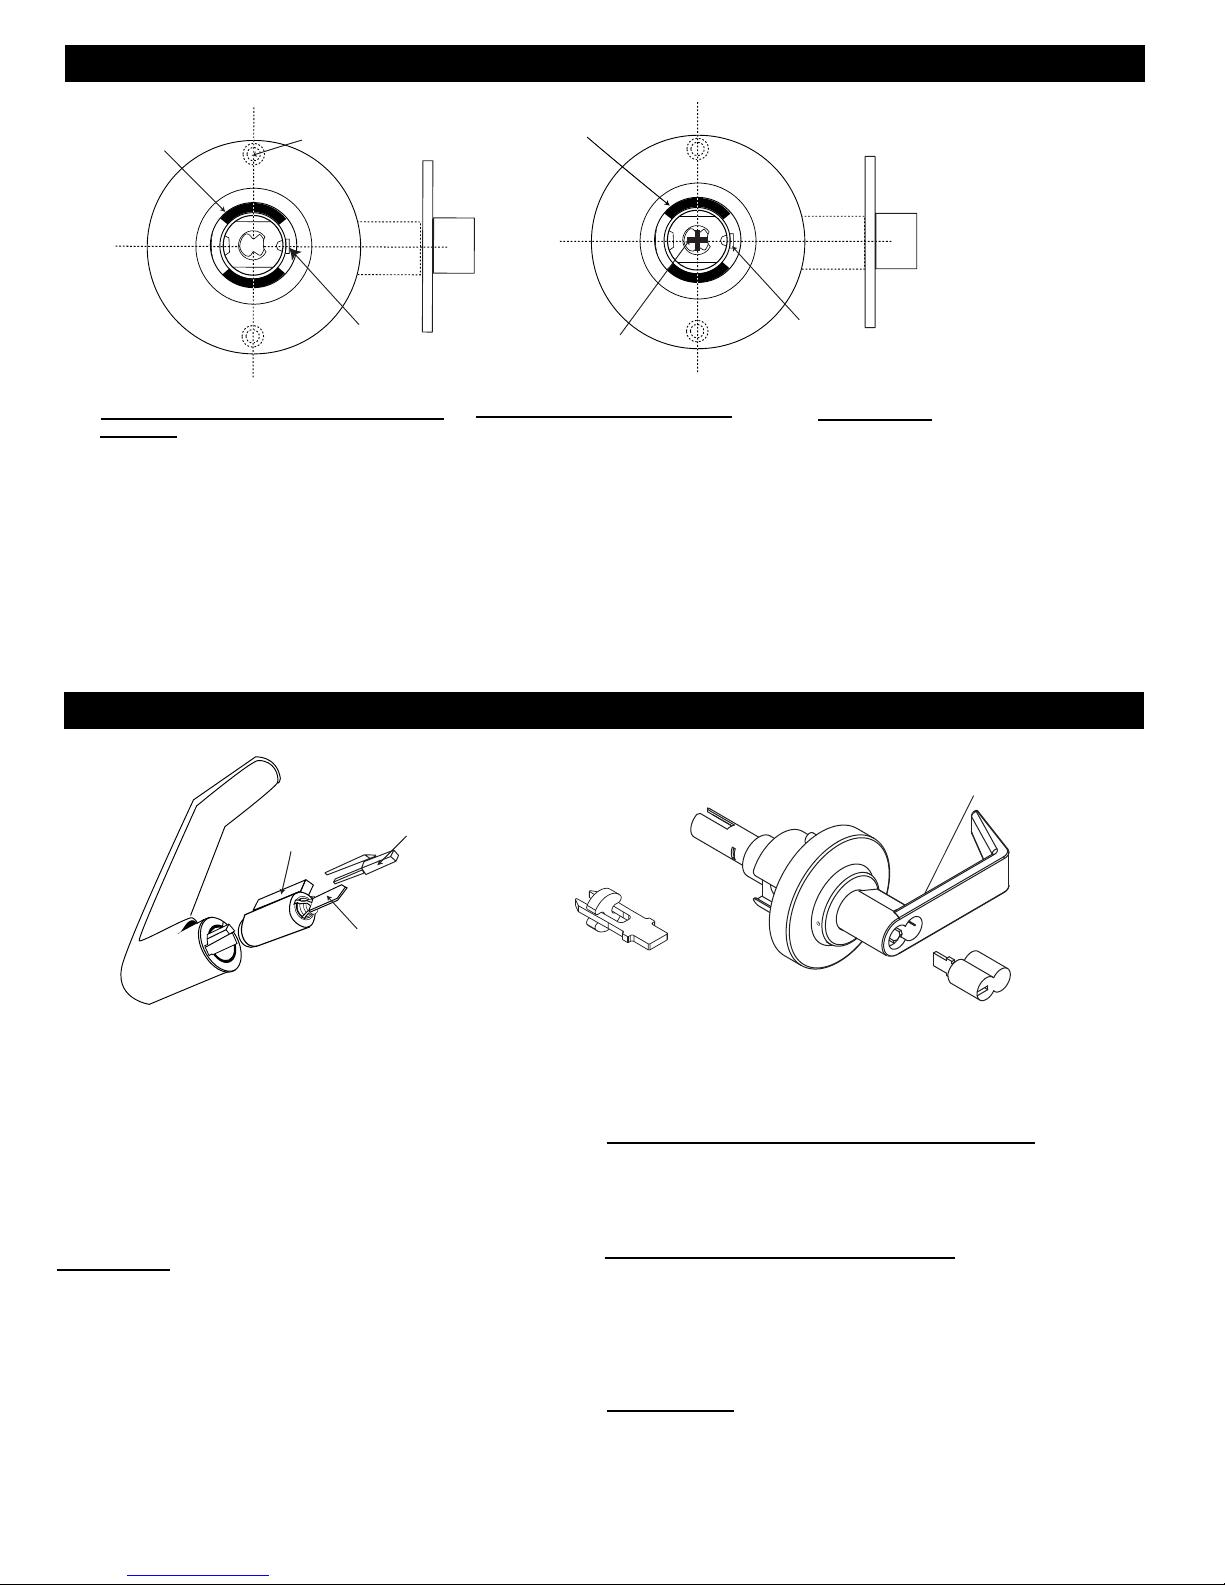
manuals.online logo
Brands
  1. Home
  2. •
  3. Brands
  4. •
  5. Dorma
  6. •
  7. Lock
  8. •
  9. Dorma CL853 User manual

Dorma CL853 User manual

Figure 1
Figure 3
Figure 2
DOOR PREPARATION
1. Fold and apply template to high edge of door at desired height
from floor.
2. Mark hole centers on door and door edge.
3. Drill 5/16" thru-bolt first, then drill 2 1/8" hole.
INSTALL LATCH
1. Drill 1" diameter hole for latch. Mortise for latch front.
(Insert latch and fasten with two screws).
Note: It is important that both 1" and 2 1/8" holes be on
same horizontal center line.
HOLLOW METAL DOORS
Must have horizontal and vertical lock and latch case
support provided by door manufacturer.
1. If 2 1/8" hole exists, use optional DORMA 76002026 Installation Tool
to insure accurate locating and drilling of 5/16" Thru-Bolt holes.
2. For best results, align and clamp the 76002026 tool to door
before drilling.
INSTALL STRIKE
1. Align strike with latch.
2. Trace strike outline on door jamb.
3. Mortise jamb and install strike and dust boot.
CL800 Series Cylindrical Lever Lock
Installation Instructions
PAGE 1
Figure 4
CL800 12/0276002009
LC Lever Design
LR Lever Design
DOOR PREPARATION
INSTALLING LOCK
1. Locks are factory pre-set with
for 1 3/4" thick door. Lock can be
adjusted for 1 5/8" to 1 7/8" door thickness.
To Adjust For Another Door Thickness
Remove outside lever.
Figure 3
If adjusting for doors thinner than 1 3/4"
thickness, split spacer must be removed.
2. For 1 3/8" doors
Adjust for 1 5/8" door thickness, then install
spacer rings (Fig. 5).
NOTE; DORMA rings not included.
Part Numbers 76001941[Brass], and
76001942 [Chrome].
3. Reinstall outside lever.
Figure 5
CONVENTIONAL CYLINDER (Fig. 3)
A. Turn key in cylinder 45 degrees in either direction.
B. Depress outside lever catch with wire pin through
small hole in rose/lever and pull lever off tube.
IC CORE CYLINDER (Fig. 4)
A. With IC core removed, use screwdriver inside
lever to depress lever latch.
B. Pull off lever.
Figure 4
DOOR THICKNESS ADJUSTMENT
Optional Spacer Rings For
1 3/8" Thick Doors
(2 Required)
# 76001941 Brass Finish
# 76001942 Chrome Finish
PAGE 2
Wire Pin
IC Lever Catch
Figure 1
PREPARE LOCK
1. Remove inside lever. Depress the lever catch
with the wire pin through the small hole in the
rose/lever and pull lever off the tube.
2. Depress lever catch again and remove the
inside rose assembly.
INSTALL LOCK
1. Push lock through 2 1/8" hole from the outside
so that retractor engages latch tail.
2. Prongs must engage inside lock housing.
3. Align outside rose so rose post enters thru-
bolt holes in door.
4. Check from inside of door to see if latch is
properly engaged.
INSTALL INSIDE TRIM
1. Replace inside rose assembly and fasten to
outside rose with the two long thru-bolts.
2. Press rose cover over inside rose.
Notch in cover must align with either indentation
on inside rose.
NOTE:
Be sure stepped plastic washer is between
inside rose cover and inside rose before
assembling.
INSTALL LEVER
1. Press lever on lock tube, slightly wiggle and
push until lever engages lever catch and
connector prongs.
2. Test lever to be sure it is on securely.
Figure 2
Latch Tail
Prong
Rectractor
Rose Post
Lock
Housing
Figure 8
RD
Figure 6 Figure 7
CL853, CL860 (outside), CL882, CL880,and CL885
Functions
1. Align lever catch to face latch front.
2. Turn key in cylinder 45 degrees in either direction.
3. Slide lever on tube until it stops at the lever catch,
and push until the lever engages lever catch
and connector.
CL870 and CL860 (inside) Functions
1. Insert screwdriver in key cam slot, turn
fully clockwise. Then, turn back counter-
clockwise 90 degress and remove screwdriver.
2. Turn key in cylinder counter-clockwise
90 degrees. Slide lever on tube with tailpiece
aligned properly.and push until the lever
engages lever catch and connector.
4. Check lock for proper operation before
closing door.
CL877 Function
1. Install inside cylinder. Any orientation in key cam
slot is acceptable.
2. Install the outside cylinder as follows:
Using a screwdriver, place the tip into the key cam
slot and turn counter-clockwise as far as possible.
When at the maximum counter-clockwise position,
turn clockwise 180 degrees. With cylinder in the
outside lever, turn key clockwise 90 degrees and
install on lever tube.
3. Test to see that timing is correct for both
inside and outside levers.
Connector Mounting Post
Latch
Lever Catch Lever Catch
Latch
+Key Cam Slot
Connector
REINSTALLING OUTSIDE LEVER
CHANGE/REPLACE CYLINDER
CONVENTIONAL CYLINDER
Removal (all functions)
1. Remove key from cylinder and pull plastic cylinder retainer from
lever, then remove cylinder.
Installation
1. Tailpiece must be in vertical postion in cylinder.
2. Insert cylinder in lever.
3. Press plastic cylinder retainer into lever until flush with base of
lever.
CL873 Function
1. Insert screwdriver in key cam slot and turn fully clockwise without
retracting latch. Now turn counter-clockwise 45 degrees. Remove
screwdriver.
2. With cylinder in lever handle, insert key and turn clockwise 45 degrees.
Slide lever on tube with tailpiece aligned properly.
3. Slightly wiggle and push until lever engages the lever catch
and connector.
4. Check lock for proper operation before closing door.
NOTE:
Use DORMA tailpieces only. Lock will NOT function with other
tailpieces. Be sure tailpiece is in a vertical orientation.
INTERCHANGEABLE CORE CYLINDER
Removal (all functions)
1. Insert control key and turn clockwise, then pull on key to remove core.
Installation
CL853, CL860 (outside), CL882 and CL880 Functions
1. Insert control key in core and turn clockwise.
2. Insert tailpiece #76002027 in core
3. With control key in core, insert core fully into lock.
4. Turn key counter-clockwise and remove key.
CL870, CL872, and CL860 (inside) Function
1. Insert screwdriver in key cam slot in tube and turn fully
clockwise.
2. Insert control key in core and turn clockwise.
3. Insert tailpiece #76002023 in core.
4. With control key in core, insert core fully into lock.
5. Turn key counter-clockwise and remove key.
CL877 Function
1. Using a screwdriver, place the tip into the key cam slot and turn
counter-clockwise as far as possible.
When at the maximum counter-clockwise position, turn clockwise 90 degrees
Insert outside IC core cylinder into lever.
2. Test to see that timing is correct for both inside and outside levers.
PAGE 3
Interchangeable Core
IC Core Lever
Correct orientation of spacer
for conversion of
7 pin tailpiece used
with 6 pin core.
Figure 9
Cylinder
Cylinder
Retainer
Tailpiece in
Vertical position
Problem   Solution
Levers pull off
1. Lever catch not engaging.
Lock may not be centered
or door is too thick.
2. Cylinder retainer not flush.
3. Non-standard sized cylinder.
4. Outside rose located improperly.
Unable to assemble
outside lever
1. Key orientation incorrect.
2. Outside rose located improperly.
Outside lever
removable without
using key
1. Tailpiece installed in wrong
orientation.
2. Wrong tailpiece. See tailpiece chart.
Latch won't retract
1. Incorrect retractor/latch engagement
or alignment.
2. Poor door preparation or misaligment
thru-bolts.
Key binds in lock 1. Lever catch not fully engaged.
2. Check for proper tailpiece.
See tailpiece chart
Key cannot be removed
from cylinder
1. Wrong tailpiece aligment.
CL860, CL870, CL872, CL877 Functions Only
Lever retracts latch in
one direction, but not other
1. Incorrect installation of cylinder.
PAGE 4
TROUBLINGSHOOTING
NOTES:

This manual suits for next models

6

Other Dorma Lock manuals

Dorma C300 User manual

Dorma

Dorma C300 User manual

Dorma EM Series User manual

Dorma

Dorma EM Series User manual

Dorma EM Series User manual

Dorma

Dorma EM Series User manual

Dorma PT 41 User manual

Dorma

Dorma PT 41 User manual

Dorma SVP 22 Series User manual

Dorma

Dorma SVP 22 Series User manual

Dorma ARCOS Office User manual

Dorma

Dorma ARCOS Office User manual

Dorma EM 15000-D AM User manual

Dorma

Dorma EM 15000-D AM User manual

Dorma Studio Rondo User manual

Dorma

Dorma Studio Rondo User manual

Dorma ARCOS Office User manual

Dorma

Dorma ARCOS Office User manual

Dorma M9000 User manual

Dorma

Dorma M9000 User manual

Dorma EM Series User manual

Dorma

Dorma EM Series User manual

Dorma CL700 User manual

Dorma

Dorma CL700 User manual

Dorma Studio Classic User manual

Dorma

Dorma Studio Classic User manual

Dorma G-EMF Manual

Dorma

Dorma G-EMF Manual

Dorma EM Series User manual

Dorma

Dorma EM Series User manual

Dorma ES 110-4 Series User manual

Dorma

Dorma ES 110-4 Series User manual

Dorma DB600 Series Guide

Dorma

Dorma DB600 Series Guide

Dorma EML320 User manual

Dorma

Dorma EML320 User manual

Dorma EM 3000-EW AH User manual

Dorma

Dorma EM 3000-EW AH User manual

Dorma ARCOS Studio User manual

Dorma

Dorma ARCOS Studio User manual

Dorma EM 7500-D AM User manual

Dorma

Dorma EM 7500-D AM User manual

Dorma Duo OFFICE 712 User manual

Dorma

Dorma Duo OFFICE 712 User manual

Dorma C500 User manual

Dorma

Dorma C500 User manual

Popular Lock manuals by other brands

Schlage KC9232 installation manual

Schlage

Schlage KC9232 installation manual

Apco IMSystem General instructions

Apco

Apco IMSystem General instructions

Locinox Valentino Configuration manual

Locinox

Locinox Valentino Configuration manual

Assa Abloy Interlock IEGL instructions

Assa Abloy

Assa Abloy Interlock IEGL instructions

Kaba Simplex 7104 Series instructions

Kaba

Kaba Simplex 7104 Series instructions

VG vG-BL4Lock manual

VG

VG vG-BL4Lock manual

Simplex 900 Series manual

Simplex

Simplex 900 Series manual

Stuv TULOX 100 installation instructions

Stuv

Stuv TULOX 100 installation instructions

Salto SMILE Quick programming guide

Salto

Salto SMILE Quick programming guide

SISO E-WIN quick start guide

SISO

SISO E-WIN quick start guide

HES K200-622-W2 installation instructions

HES

HES K200-622-W2 installation instructions

Rousseau L12-JL12S Assembly guide

Rousseau

Rousseau L12-JL12S Assembly guide

Ultimate Lock 3000 Series installation guide

Ultimate Lock

Ultimate Lock 3000 Series installation guide

Assa Abloy Yale Real Living B1L Z-Wave Installation and programming instructions

Assa Abloy

Assa Abloy Yale Real Living B1L Z-Wave Installation and programming instructions

Igloohome Smart Keybox 3 Installer/user guide

Igloohome

Igloohome Smart Keybox 3 Installer/user guide

Clippasafe 71-4 instructions

Clippasafe

Clippasafe 71-4 instructions

DOLD SAFEMASTER STS Translation of the original instructions

DOLD

DOLD SAFEMASTER STS Translation of the original instructions

eTIGER ES-DLS-01 manual

eTIGER

eTIGER ES-DLS-01 manual

manuals.online logo
manuals.online logoBrands
  • About & Mission
  • Contact us
  • Privacy Policy
  • Terms and Conditions

Copyright 2025 Manuals.Online. All Rights Reserved.