manuals.online logo
Brands
  1. Home
  2. •
  3. Brands
  4. •
  5. Dorma
  6. •
  7. Lock
  8. •
  9. Dorma Studio Rondo User manual

Dorma Studio Rondo User manual

Studio Rondo
Montageanleitung Schloss / Gegenkasten
Sie erhalten die Schlossgarnitur für DIN rechts
zusammengebaut. Bitte halten Sie die Klemmflächen
für das Schloss und den Gegenkasten auf dem Glas
fettfrei. Bitte beachten Sie bei der Anbringung auf
das Glas folgende Arbeitsgänge:
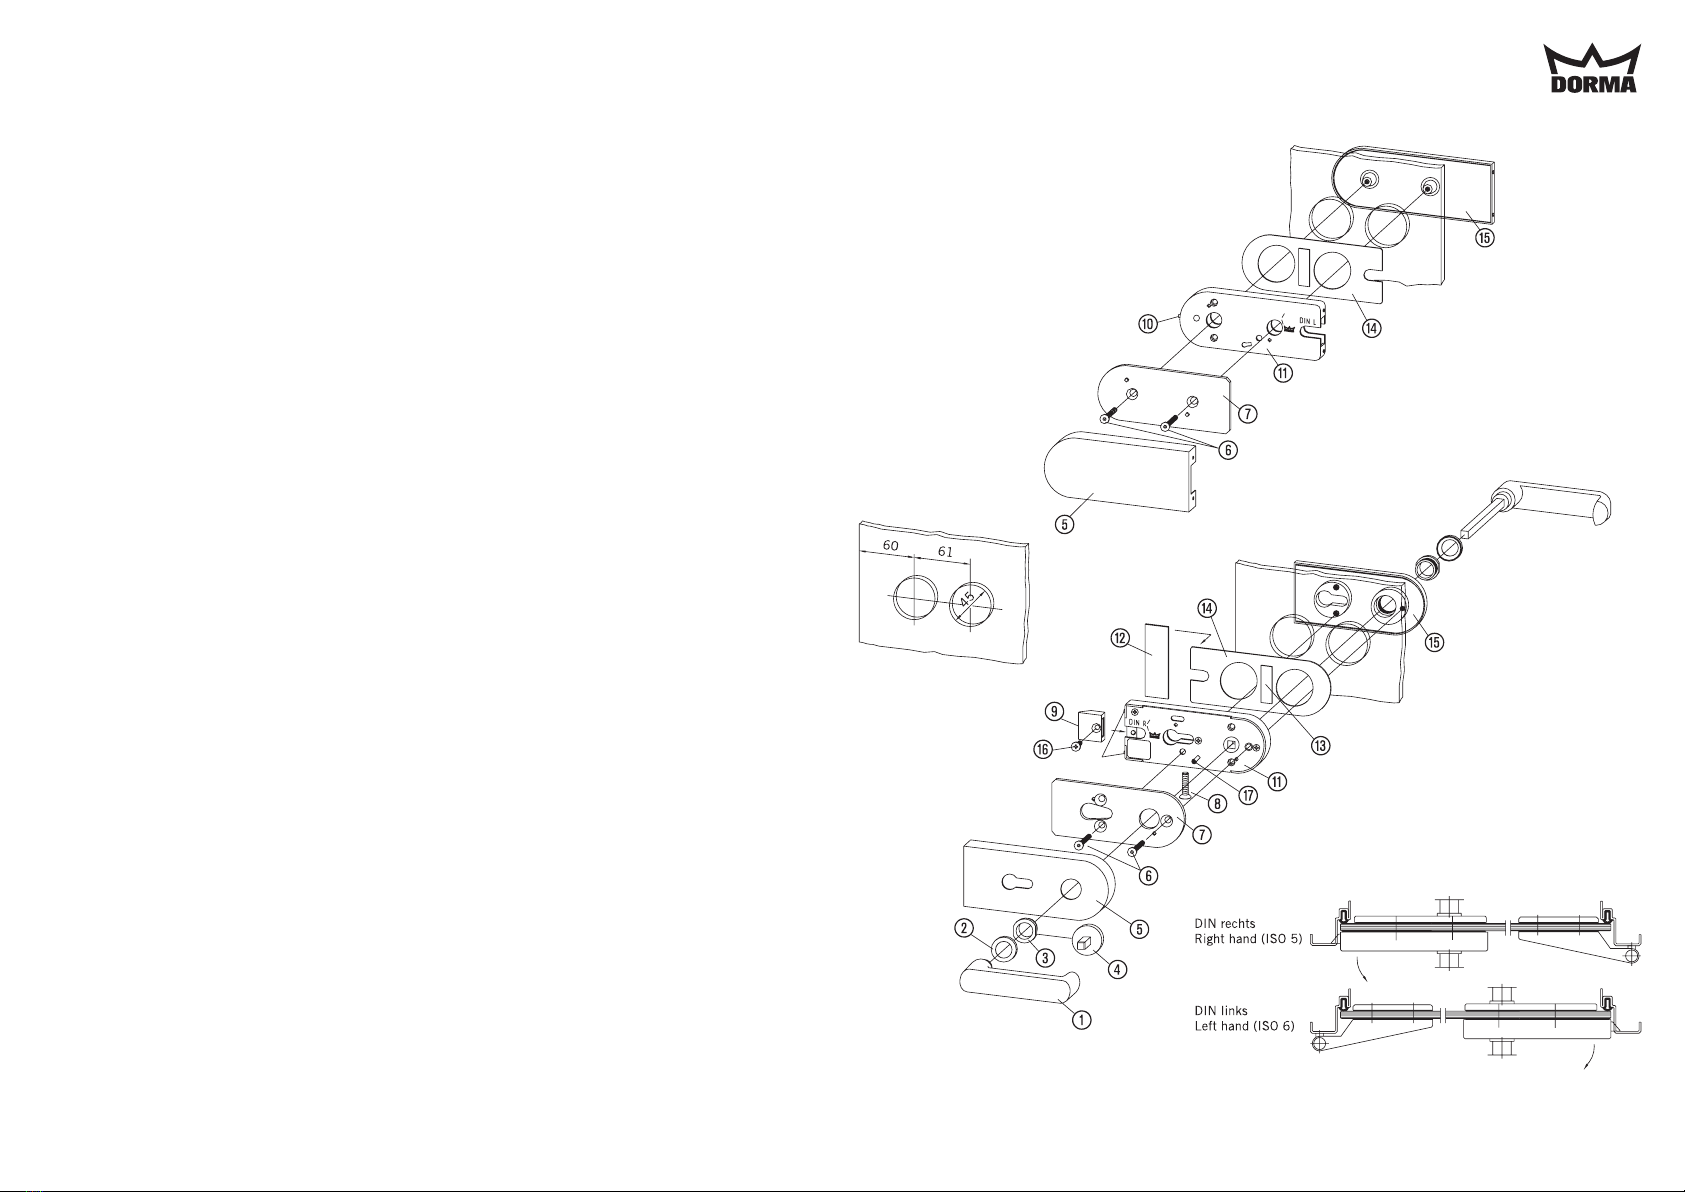
1. Kunststoff-Drückerführung (3) auf der hohen
Kappe mit beiliegendem schwarzen Kunsstoff-
schlüssel (4) herausdrehen.
2. Kappe (5) abnehmen.
3. Senkschrauben (6) mit 4 mm Inbusschlüssel
herausdrehen und Schloss (11) von der Gegen-
platte (15) abnehmen.
4. Folienstreifen (12) an der Vorderkante auf die
Zwischenlage (14) kleben und überstehende
Ecken umklappen oder abschneiden. Schutzfolie
von Klebestreifen (13) entfernen. Schloss auf die
Zwischenlage setzen, so dass die gewünschte
DIN-Richtung lesbar ist.
Klemmplatte (7) auf das Schloss setzen, beide
Senkschrauben (6) durch Klemmplatte und
Schloss in Gegenplatte (15) verschrauben.
Anzugsmoment der Schrauben = 5 Nm.
5. Bei Einsatz für DIN links:
Falle (9) umstecken und wieder festschrauben (16).
ACHTUNG:
Schräge der Falle muss immer zum Glas liegen.
6. Federkraftreduzierung (17) bei Verwendung von
Knopf-Garnituren einstellen: Bolzen mit Schrau-
bendreher um 90° drehen.
7. Bei PZ-Schlössern nun Profil-Zylinder einbauen.
Nur beiliegende Senkschrauben M5x35 (8)
verwenden, da eine längere Schraube den
Schlossmechanismus blockiert.
8. Kappe (5) aufsetzen. Bei PZ-Schloss und Gegen-
kasten Gewindestifte (10) mit 1,5 mm Inbus-
schlüssel herausdrehen.
9. Kunststoff-Drückerführungen (3) mit Kunststoff-
Schlüssel (4) eindrehen und Drückerführungsringe
(2) auf den Drücker setzen.
10. Drückerpaar (1) montieren (3 mm Inbusschlüssel).
Montageanleitung Band siehe Seite 2.
Studio Rondo
Mounting instructions lock / strike box
You receive a lock set, premounted for right hand
doors. Please make sure that the clamping surface of
the glass is grease free for the lock and the strike box.
Please consider the following steps when mounting it
onto the glass:
1. Loosen the plastic guide piece for the lever
handles (3) on the high cap with enclosed black
plastic key (4).
2. Remove cap (5).
3. Loosen the countersunk screws (6) with 4 mm Allan
key and remove the lock (11) from the
counterplate (15).
4. Stick foil strip (12) to the protective strip (14) at
the leading edge and fold back or cut overhanging
foil. Remove protection foil from bonding sticker
(13). Set lock onto the protective strip so that the
desired DIN direction is visible.
Set clamp plate (7) onto the lock and fasten both
countersunk screws (6) through clamp plate and
lock against counterplate (15).
Tightening torque of screws = 5 Nm.
5. For use with left hand doors: Loosen and turn
latch (9), retighten with (16).
ATTENTION:
Bevelled side of latch must always point to the
glass.
6. Adjust spring-strength-reduction (17) when using
knobhandles: Turn bolt 90° with screwdriver.
7. If lock for profile cylinder is supplied, now mount
cylinder. Use enclosed countersunk screw
M5x35 (8) only. A longer screw would block the
lock mechanism.
8. Set cover cap (5). For lock with profile cylinder
and strike box loosen set screw (10) with 1.5 mm
Allan key.
9. Fasten plastic handle guide piece (3) with plastic
key (4) and set handle guide rings (2) onto lever
handle.
10. Mount lever handles (1) (3 mm Allan key).
For mounting instructions for hinge see page 2.
DORMA-Glas 800.52.051.6.32 Stand/Issue 09/04 Seite/Page 1/2
Studio Rondo
Montageanleitung Band
Bitte halten Sie die Klemmflächen für die Bänder auf
dem Glas fettfrei.
1. Ganzglasflügel in Türrahmen auf 7 mm Platten
stellen (untere Türluft) und seitlich ausrichten.
2. Band (1) auf Rahmenteil (2) (gehört nicht zum
Lieferumfang) stecken. (Bolzen ohne Kunststoffum-
mantelung vorher fetten. Bolzen mit Kunststoffum-
mantelung sind wartungsfrei.)
Hinweis:
Beim Aufschraubrahmenteil (2c) dürfen die
Befestigungsschrauben nicht überstehen!
3. Von der Bandgegenseite Kunststoff-Schlauchab-
schnitte (3) in Glasbohrung stecken. Klemmplatte
(4) mit Senkschrauben M6x22 (5) (4 mm Inbus-
schlüssel) mit Band (1) lose verschrauben.
Band und Klemmplatte ausrichten und fest ver-
schrauben.
Anzugsmoment der Schrauben = 12 Nm
4. Kappe (6) auf Klemmplatte (4) drücken.
5. Kunststoff-Abdeckkappe (7) in Bandbohrung
drücken und Abdeckhülse (8) auf Rahmenteil
schieben.
Montageanleitung Schloss / Gegenkasten siehe Seite 1.
Pflege allgemein:
Die Oberflächen der Beschläge sind nicht wartungs-
frei und sollten gemäß ihrer Ausführung gereinigt
werden.
- Für metallische Oberflächen (Eloxaltöne, Edelstahl)
bitte nur geeignete Reiniger ohne Scheuermittelan-
teil verwenden.
- Für lackierte Oberflächen bitte nur entsprechende
lösemittelfreie Reiniger verwenden.
- Messing Oberflächen (ohne Oberflächenschutz)
müssen von Zeit zu Zeit mit geeignetem Pflegemit-
tel behandelt werden, um ein Anlaufen zu vermeiden.
Studio Rondo
Mounting instructions Hinge
Please make sure that the clamping surface of the
glass is grease free for the hinges.
1. Place door panel in the door frame onto 7 mm
spacer plates (lower clearance) and align sides.
2. Slide hinge (1) onto frame portion (2) (has to be
ordered separately). (First grease bolt if not plastic
covered. Plastic covered bolts are maintenance-
free.)
Please notice:
Screws must not exceed edge of screw-on frame
portion (2c)!
3. Insert the plastic rings (3) into the glass holes from
the exterior side of the panel. Fasten clamp plate
(4) with countersunk screws M6x22 (5) (4 mm
Allan key) loosely against hinge (1). Align hinge
and clamp plate, and screw tightly.
Tightening torque of screws = 12 Nm
4. Press cap (6) onto clamp plate (4).
5. Press plastic cover cap (7) into hinge hole and
slide cover bush (8) onto frame portion.
For mounting instructions for lock / strike box see page 1.
General care instructions:
The surface finishes of the fittings are not
maintenance-free and should be cleaned according to
their material and design.
- For metallic surfaces (anodised finishes, stainless
steel) please use appropriate cleaning agents
without abrasive additives only.
- For varnished surfaces please use appropriate
solvent-free cleaning agents only.
- Brass surfaces (without surface protection) have to
be treated with an appropriate maintenance agent
on occasion, to avoid tarnishing.
DORMA-Glas 800.52.051.6.32 Stand/Issue 09/04 Seite/Page 2/2

Other Dorma Lock manuals

Dorma C300 User manual

Dorma

Dorma C300 User manual

Dorma EM 15000-D AM User manual

Dorma

Dorma EM 15000-D AM User manual

Dorma SVP 22 Series User manual

Dorma

Dorma SVP 22 Series User manual

Dorma Duo OFFICE 712 User manual

Dorma

Dorma Duo OFFICE 712 User manual

Dorma Studio Classic User manual

Dorma

Dorma Studio Classic User manual

Dorma EM Series User manual

Dorma

Dorma EM Series User manual

Dorma EM 3000-EW AH User manual

Dorma

Dorma EM 3000-EW AH User manual

Dorma EM Series User manual

Dorma

Dorma EM Series User manual

Dorma M9000 User manual

Dorma

Dorma M9000 User manual

Dorma G-EMF Manual

Dorma

Dorma G-EMF Manual

Dorma ES 110-4 Series User manual

Dorma

Dorma ES 110-4 Series User manual

Dorma DB600 Series Guide

Dorma

Dorma DB600 Series Guide

Dorma EM Series User manual

Dorma

Dorma EM Series User manual

Dorma C500 User manual

Dorma

Dorma C500 User manual

Dorma PT 41 User manual

Dorma

Dorma PT 41 User manual

Dorma ARCOS Office User manual

Dorma

Dorma ARCOS Office User manual

Dorma EML320 User manual

Dorma

Dorma EML320 User manual

Dorma EM Series User manual

Dorma

Dorma EM Series User manual

Dorma EM 7500-D AM User manual

Dorma

Dorma EM 7500-D AM User manual

Dorma ARCOS Office User manual

Dorma

Dorma ARCOS Office User manual

Dorma CL853 User manual

Dorma

Dorma CL853 User manual

Dorma ARCOS Studio User manual

Dorma

Dorma ARCOS Studio User manual

Dorma CL700 User manual

Dorma

Dorma CL700 User manual

Popular Lock manuals by other brands

Opera PRIMA installation instructions

Opera

Opera PRIMA installation instructions

eGeeTouch GT1000 quick start guide

eGeeTouch

eGeeTouch GT1000 quick start guide

LOX CL0002 installation manual

LOX

LOX CL0002 installation manual

Janus Nokē ONE quick start guide

Janus

Janus Nokē ONE quick start guide

Stock Loks CB-097 instruction sheet

Stock Loks

Stock Loks CB-097 instruction sheet

Cal-Royal M SERIES installation guide

Cal-Royal

Cal-Royal M SERIES installation guide

Cruz 932-014 Assembly instructions

Cruz

Cruz 932-014 Assembly instructions

AMSEC ESL20XL operating instructions

AMSEC

AMSEC ESL20XL operating instructions

Salto XS4 Mini installation guide

Salto

Salto XS4 Mini installation guide

COMPX Timberline CB-234 instruction sheet

COMPX

COMPX Timberline CB-234 instruction sheet

Gianni Industries EM-NH300 specification

Gianni Industries

Gianni Industries EM-NH300 specification

ADAMS RITE RITE Touch user guide

ADAMS RITE

ADAMS RITE RITE Touch user guide

Salsbury Industries 3090 Operation & Programming Instructions

Salsbury Industries

Salsbury Industries 3090 Operation & Programming Instructions

Kramer KT-107-OWLK quick start guide

Kramer

Kramer KT-107-OWLK quick start guide

iglooworks Padlock 2E user guide

iglooworks

iglooworks Padlock 2E user guide

Videosec Cl-19 user manual

Videosec

Videosec Cl-19 user manual

KSQ K1603BP-MK quick start guide

KSQ

KSQ K1603BP-MK quick start guide

Waferlock L701 user manual

Waferlock

Waferlock L701 user manual

manuals.online logo
manuals.online logoBrands
  • About & Mission
  • Contact us
  • Privacy Policy
  • Terms and Conditions

Copyright 2025 Manuals.Online. All Rights Reserved.