manuals.online logo
Brands
  1. Home
  2. •
  3. Brands
  4. •
  5. Dräger
  6. •
  7. Respiratory Product
  8. •
  9. Dräger X-plore 9500 User manual

Dräger X-plore 9500 User manual

X-plore® 9500
Airline belt manifold Instructions for use
3363103 (A3-D-P)
1 For your safety
● Before using this product, carefully read these instructions for use and
those of the associated products.
● Strictly follow the instructions for use. The user must fully understand
and strictly observe the instructions. Use the product only for the
purposes specified in the intended use section of this document.
● Do not dispose of the instructions for use. Ensure that they are
retained and appropriately used by the product user.
● This product should only be used by appropriately trained and
competent personnel.
● Comply with all local and national rules and regulations associated
with this product.
● Only trained and competent personnel are permitted to inspect, repair
and service the product. Dräger recommend a Dräger service contract
for all maintenance activities and that all repairs are carried out by
Dräger.
● Properly trained service personnel must inspect and service this
product as detailed in the "Maintenance" chapter of this document.
● Use only genuine Dräger spare parts and accessories. Otherwise, the
proper functioning of the product may be impaired.
● Do not use a faulty or incomplete product. Do not modify the product.
● Notify Dräger in the event of any component fault or failure.
The latest version and other translations of these instructions for
use can be downloaded in electronic form from the Technical
Documentation database (www.draeger.com/ifu). In light of
product updates, Dräger recommend always using the latest version of the
instructions for use.
2 Conventions used in this document
2.1 Meaning of the warning notices
The following warning signs are used in this document to indicate and
highlight areas of the associated text that require particular attention by the
user. The meaning of each of the warning notices is defined as follows:
WARNING
Indicates a potentially hazardous situation. If not avoided, it could result in
death or serious injury.
CAUTION
Indicates a potentially hazardous situation. If not avoided, it could result in
physical injury. It may also be used to alert against unsafe practices.
NOTICE
Indicates additional information on how to use the product.
2.2 Trademarks
The following internet page lists the countries in which Dräger trademarks
are registered: www.draeger.com/trademarks.
3 Description
3.1 Product overview
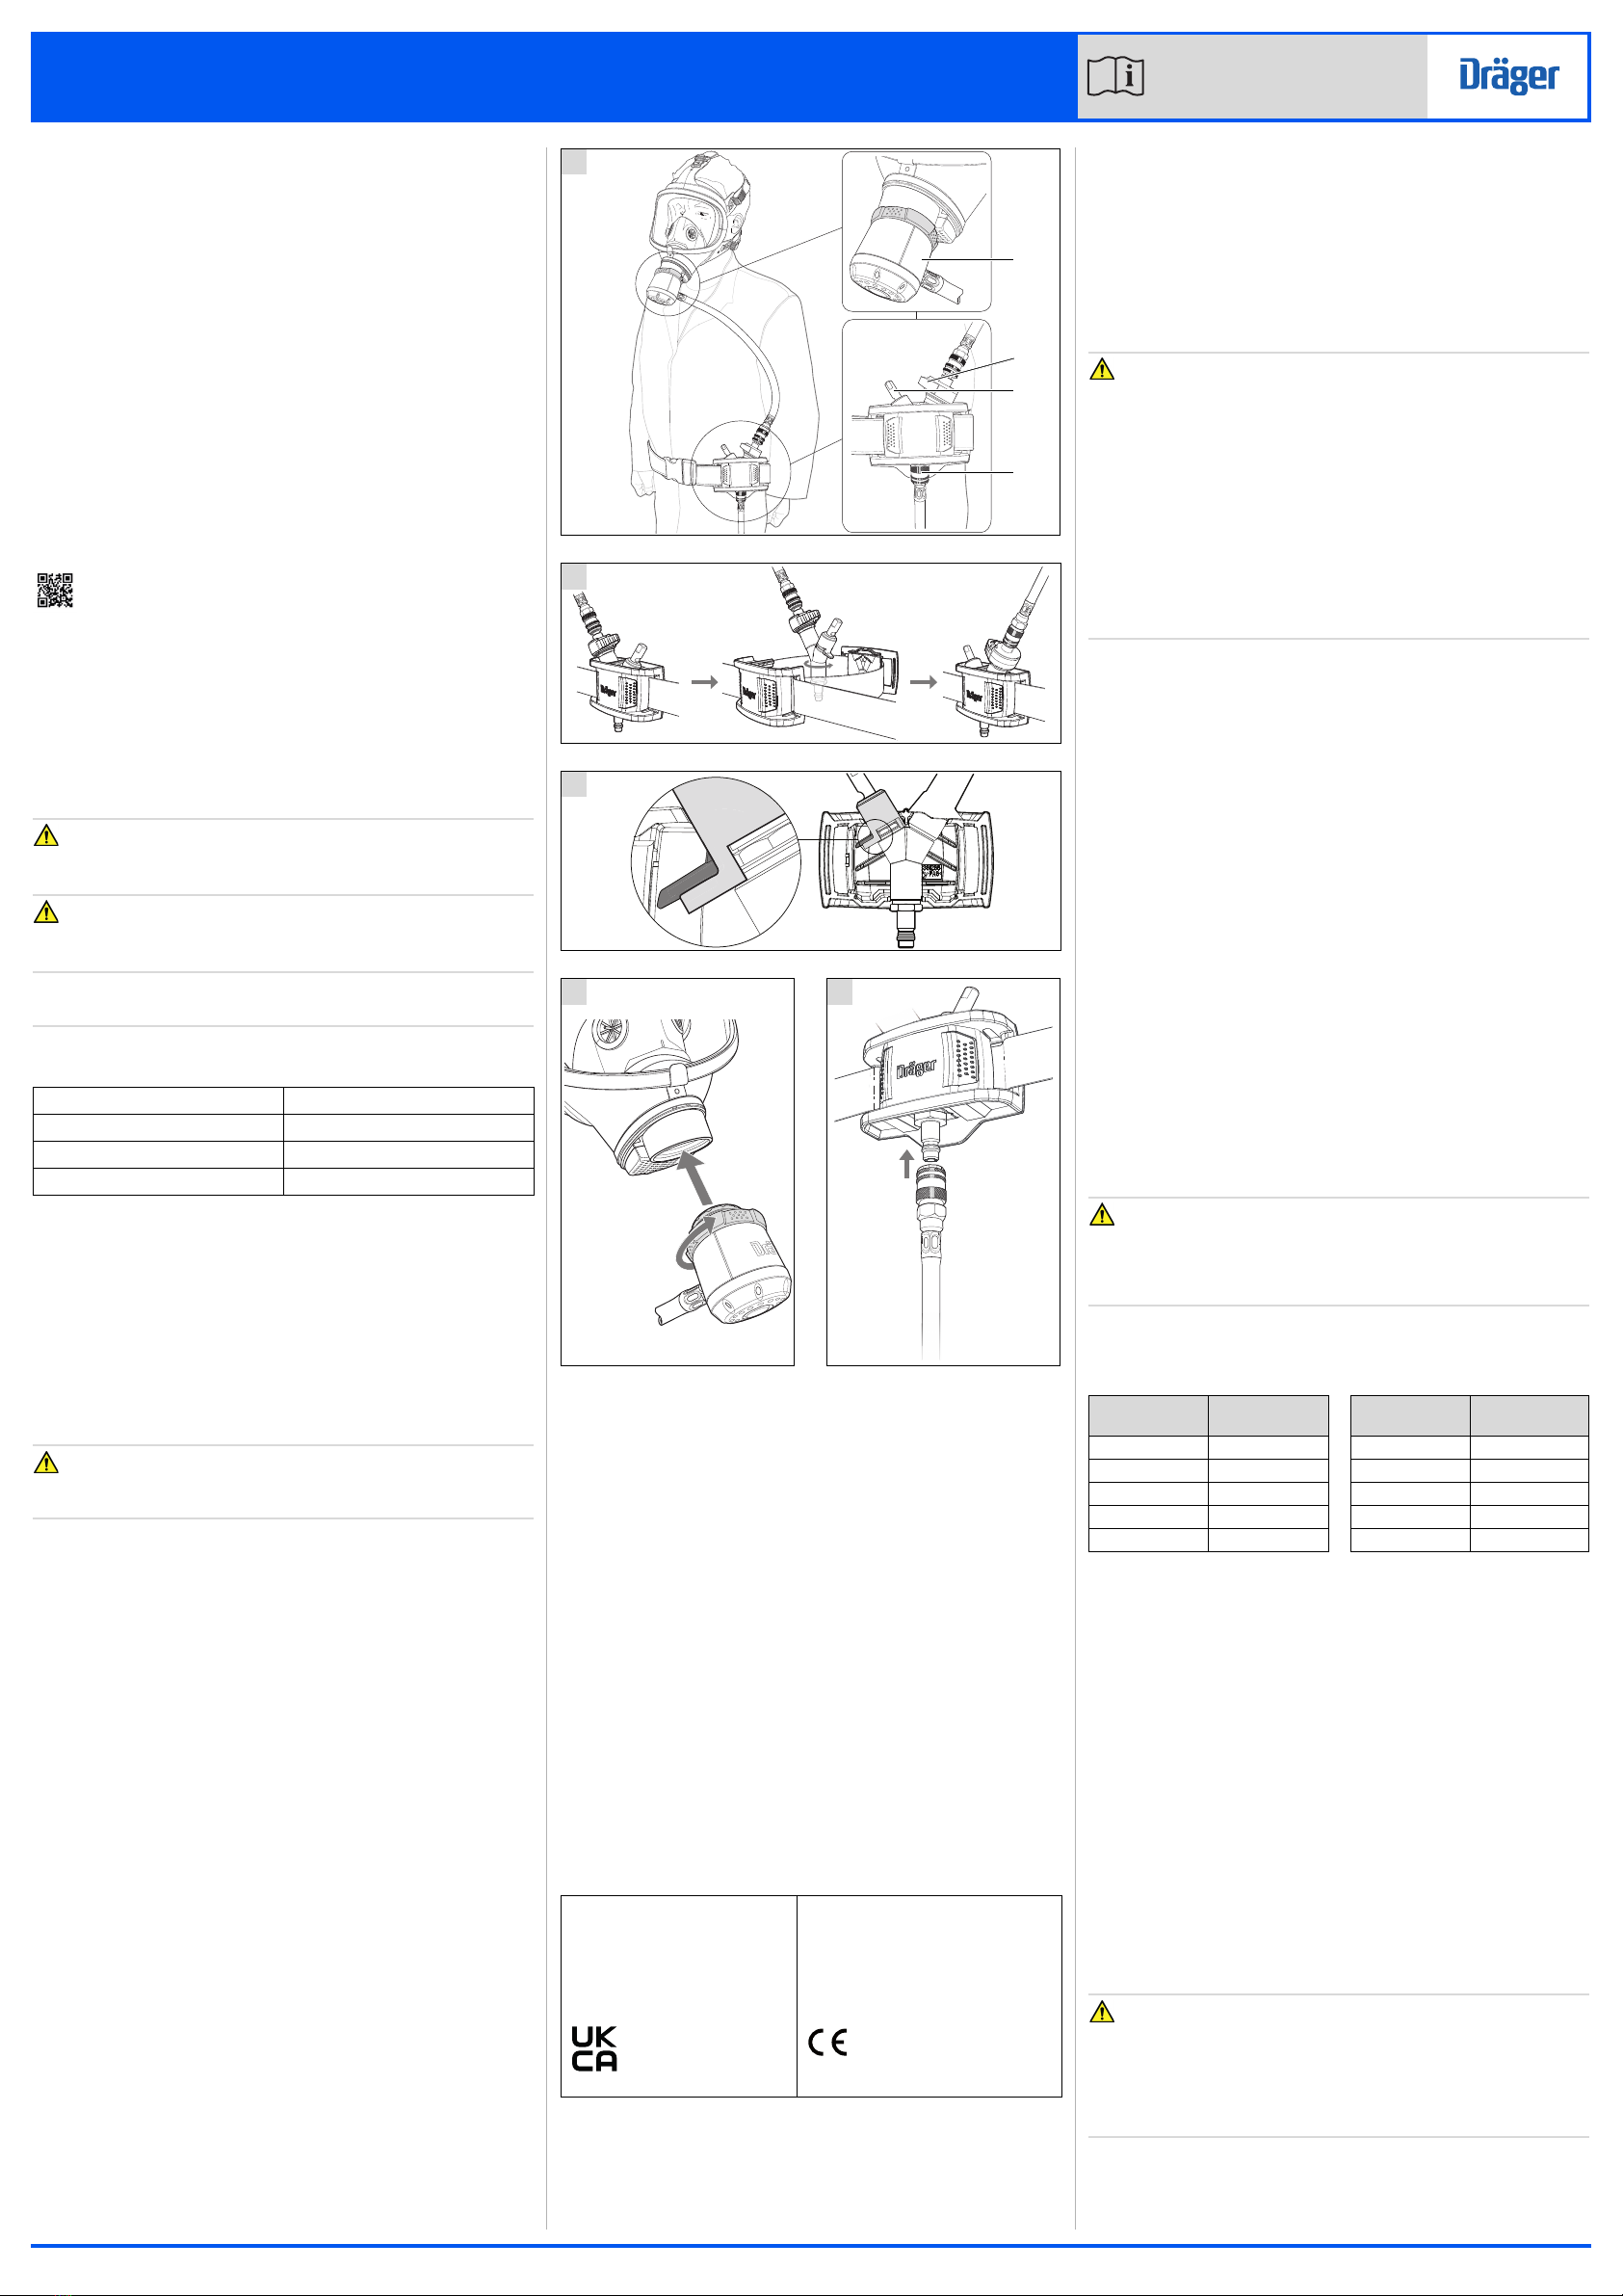
The Dräger X-plore® 9500 (see Fig. A) is a manifold carried on a belt that
is used to connect an external breathing air supply (compressed air line) to
a mask. For this purpose, the manifold has an input connection (4) for
connecting the compressed air line and a coupling on the mask adapter (1)
for connecting the mask.
CAUTION
Only apply pressure to the input side, see (4). A pressure load on the
output side can cause damage to the device.
During use, the pressure reducer in the manifold ensures a continuous flow
of air from the compressed air line to the mask. The air flow lies within the
safe limit values required by the mask. The surplus valve in the mask
adapter is used to continuously release excess air, ensuring a supply of the
correct pressure during use. The control valve (2) of the pressure reducer
allows individual adjustment of the air volume within the preset limits.
The warning whistle (3) is a warning device for low input pressure. The
whistle will sound during use to alert the wearer in the event that the
pressure of the breathing air supply falls below the level necessary for a
sufficient supply.
The X-plore® 9500 is compatible with the following Dräger respirator
series: FPS®7000 series (RA), X-plore 6000 series and Panorama Nova®
series (RA). (The X-plore 6300 is shown here). The compatible Dräger
masks are classified as Class 4B according to EN 14594:2018.
The air line breathing apparatus and other accessories used with this
product must be certified Dräger components in an approved
configuration. Otherwise, use of the product may be impaired. Contact
Dräger for further information.
This device is optionally available with radio frequency identification (RFID)
to facilitate electronic management and location of devices by means of a
radio frequency reader. When fitted, the passive RFID tag is positioned
inside the manifold casing.
3.1.1 Breathing air supply
The breathing air supply (supply from a compressed air line) is an external
breathing air source that is fed from a breathing air cylinder or a
compressor unit; the breathing air supply delivers the specified air quality
with the required pressure and required flow rate (see Section 4.1 for more
information).
3.2 Intended use
The X-plore® 9500 is designed for use with approved Dräger compressed
air respiratory protection equipment and protects the breathing system
from the effects of harmful substances. The equipment is only suitable for
use with a compressed air line.
Use in potentially explosive atmospheres
The suitability for use in potentially explosive atmospheres depends on the
components used. Approval information is specified on the component
name plates. The component with the lowest zone determines the
suitability of the system.
Contact Dräger for more information.
3.3 Limitations on use
The device is not suitable for CBRN hazard situations (chemical,
biological, radiological and nuclear hazard situations).
3.4 Approvals
This product is approved per:
● EN 14594:2018
● (EU) 2016/425
● Regulation 2016/425 on personal protective equipment, as amended
to apply in GB
Declarations of conformity: see www.draeger.com/product-certificates.
Important notice regarding the Pressure Equipment Directive (German:
DGRL): The X-plore® 9500 is solely intended for use with air line breathing
apparatuses. It is classified as safe pressure equipment according to the
DGRL under the requirement of good engineering practice. The equipment
cannot be DGRL-certified.
3.5 Marking and symbols
The product type is specified on the label on the manifold casing. The
product's serial number is located on the manifold body.
The marking on the air supply hose indicates whether the hose is heat
resistant (H) and/or antistatic (S).
4Use
4.1 Breathing air supply
WARNING
The quality of the air supply must meet the requirements for breathing air
in accordance with EN 12021 in EU countries or AS/NZS 1715:2009 in
Australia and New Zealand. Oxygen or oxygen-enriched breathing air
must not be used. The moisture content of breathing air should be
controlled within the limits specified in the standard in order to prevent the
device from freezing.
Carry out a risk assessment of the location of use to ensure that no air
supply other than breathable air can be connected.
Sufficient protection by the equipment is not guaranteed in highly toxic
environments.
The user must ensure that the capacity of the air supply system is
sufficient for every single connected user. In addition, safe retraction must
be ensured if the supply through the compressed air line fails.
Use a compressed air cylinder with pressure reducer or a stationary or
mobile compressor with suitable filter and air heating or air cooling system.
Compliance of the breathing air supply with the quality criteria is
mandatory. It must meet the following requirements for pressure and flow:
● Input pressure 2.8 to 10 bar
● Flow rate 350 to 1200 litre/minute
The maximum number of users that can be connected to the Dräger
breathing air supply system at any one time can be found in the associated
instructions for use.
When using a compressed air cylinder for breathing air supply, it must be
possible to move the air supply around an explosion-hazard area.
Conductive floors are mandatory in zone 1 and zone 21 if combustible
dusts with a minimum ignition energy of less than 10 mJ are present.
4.1.1 Compressed air supply hose
● Air hose coupling and input coupling of the respective product must be
compatible. As standard, the Rectus 96 series or a CEJN quick
connect coupling plug is supplied as the input coupling.
● The maximum working pressure of the Dräger compressed air supply
hose is 10 bar.
● Ensure that supply hoses with a total length greater than 50 m have an
appropriate earth connection.
EU countries
The following applies when using hoses approved by Dräger: A maximum of
100 m of hose may be used. In addition, a maximum of four individual hoses
(i.e. a maximum of five hose connections) are permitted on one air supply.
4.1.2 Pressure drop in the compressed air supply hose
CAUTION
The use of extension hoses causes a pressure drop between the
breathing air supply and the manifold.
► To compensate for the resulting pressure drop, increase the pressure
from the breathing air supply (e.g. ring pipe, compressor) accordingly.
The following table is a guide that lists examples of breathing air supply
pressures necessary so that a sufficient flow of air is available at the
manifold input.
This table only applies if using approved Dräger compressed air supply
hoses. If using hoses from other manufacturers, the minimum pressure of
3.3 bar must be available at the manifold input.
If the warning whistle still sounds, there may be a pressure loss in the hose
due to the specific conditions of the breathing air supply. In this case, the
pressure must be increased until the warning whistle stops sounding. If the
warning whistle does not respond, the user is supplied with sufficient
breathing air.
4.2 Preparation for use
4.2.1 Product preparation
The belt with air manifold can be worn on the left or right as required. To
change the carrying side, loosen the belt, remove the case if necessary
and then turn the manifold (see Fig. B). When fitting, always ensure that
the shoulder of the whistle cover sits below the rib in the manifold housing
(see Fig. C). With the belt and air distributor in place, the wearer must be
able to move their head freely without pulling on the hose or getting
tangled.
1. Always carry out a visual inspection first (see Section 6.2).
2. Don the belt. Ensure that the X-plore 9500 is fitted close to the body.
3. Connect the mask adapter to the mask (see Fig. D).
WARNING
Correct fit of the mask can only be achieved if the entire mask seal makes
contact with skin. Head hair, facial hair (including beard stubble and
sideburns), earrings, other facial piercings and normal spectacles will
interfere with the mask seal and are not permitted in the sealing area.
Additionally, head hair that could affect the mask fit (buns, pony-tails,
hairpieces, etc.) is not permitted.
4. Set the regulation knob to the minimum position (see Fig. F).
5. Connect the air supply to the input coupling (see Fig. E). The warning
whistle will sound briefly when the pressure increases.
Trademark Trademark owner
X-plore®Dräger
FPS®Dräger
Panorama Nova®Dräger
Approved body:
BSI Assurance UK Ltd.
Kitemark Court Davy Avenue
Knowlhill
Milton Keynes
MK5 8PP
United Kingdom
Identification number:
Notified body
involved in type approval and quality
control:
DEKRA Testing and Certification GmbH
Handwerkstrasse 15
70565 Stuttgart
Germany
Reference number:
0086 0158
Hose length
(in m)
Pressure
(in bar)
Hose length
(in m)
Pressure
(in bar)
1-10 3.8 51-60 6.3
11-20 4.3 61-70 6.8
21-30 4.8 71-80 7.3
31-40 5.3 81-90 7.8
41-50 5.8 91-100 8.3
A
5154
1
3
4
2
B
5155
C
5156
D
4444
E
5157
X-plore® 9500
Airline belt manifold Instructions for use
3363103 (A3-D-P)
3363103
© Dräger Safety AG & Co. KGaA
Edition 14 – October 2022 (Edition 01 – November 2017)
Subject to alterations.
Importer (UK): Draeger Safety UK Ltd
Ullswater Close,
Blyth Riverside Business Park
Blyth, Northumberland NE24 4RG, UK
Manufacturer: Dräger Safety AG & Co. KGaA
Revalstraße 1 Tel. +49 451 882 0
23560 Lübeck Fax +49 451 882 80
Germany www.draeger.com
6. Make sure that the pneumatic hoses are neither kinked nor squeezed
by clothing or equipment.
7. Don the mask.
8. Take several deep breaths to check for sufficient air supply. Then
continue breathing normally.
4.3 During use
NOTICE
The surplus valve in the mask adapter is used to continuously release
excess air, ensuring a supply of the correct pressure during use. This is a
normal operating behaviour of the X-plore® 9500.
If using earmuffs or noise-isolating communication equipment, remember
that it will be harder to hear the whistle.
Control valve (for flow regulation): When starting work, set the setting
knob to the lowest flow (Fig. F shows the minimum and maximum
position). Use the knob to adjust the air flow based on the demands of the
work being performed.
Warning whistle: If the warning whistle sounds, cease work immediately
and exit the hazard zone by the shortest and safest route. Do not
disconnect the air supply from the manifold at this time. Do not remove the
mask until there are no more hazards present.
4.3.1 In explosion-hazard areas
WARNING
Do not use or store equipment near processes that
produce an electric charge.
Do not use the equipment unless conductive parts of the equipment have
an appropriate earth connection via the wearer.
Do not use materials in combination with the equipment that influence the
properties of the product.
4.4 After use
WARNING
Only remove the equipment in a safe environment.
1. Remove the mask.
2. If necessary, disconnect the air supply from the input coupling.
3. Disconnect the mask adapter from the mask.
4. Open the buckle of the waist belt and take off the equipment.
5. Follow the maintenance table and carry out the servicing work that is
required after use (see Section 6.1).
5 Troubleshooting
The table below shows fault diagnoses and repair information for the user.
Contact Dräger or service personnel if the problem persists after carrying
out troubleshooting actions.
6 Maintenance
6.1 Maintenance intervals
Dräger recommend that regular inspection, testing and maintenance of the
breathing equipment is carried out in accordance with the table below. The
table also applies to out-of-use (stored) equipment. Record all maintenance
in the equipment log book. Observe the maintenance information for all
equipment parts used (masks etc.). Additional inspection and testing may be
required in the country of use to ensure compliance with national regulations.
Symptom Error Remedy
Leak Loose or dirty
coupling
Disconnect, clean and
reconnect the couplings
and test again.
Faulty hose or
component
Replace parts that can be
replaced by users and test
again.
Mask leaking (via the
normal draining of the
surplus valve)
See instructions for use of
the mask.
Warning whistle
sounds or insufficient
air flow to the wearer
Air supply is
restricted
Remove any kinks or
blockages in the hoses
Faulty hose or
component
Replace parts that can be
replaced by users and test
again.
Input filter clogged Contact service personnel
or Dräger.
Pressure too low Increase pressure
Shorten hose length
Severe leakage at the
surplus valve
Valve defective Contact service personnel
or Dräger.
Warning whistle does
not work or is too
quiet
Warning whistle or
warning whistle cover
dirty
Clean the whistle and
cover if necessary.
Faulty component Contact service personnel
or Dräger.
Window fogged up Exhalation valve
blocked or air supply
interrupted or too low
Leave the hazardous area
and check the equipment.
Negative pressure in
the full face mask (full
face mask is sucked
to the face)
Air supply too low Increase the air supply to
the airline belt manifold or
leave the hazardous area.
6.2 Visual Inspection
Carry out a visual inspection, checking the entire respiratory protection
equipment including all components and accessory parts. Ensure that the
device is clean and undamaged. Pay particular attention to the pneumatic
components, hoses and connections. Typical signs of damage that may
affect the operation of the respiratory protection equipment include impact,
scratches, cuts, corrosion and discolouration. Report damage to service
personnel and do not use the equipment until all faults have been rectified.
6.3 Cleaning and Disinfection
CAUTION
Always clean the Dräger X-plore equipment in a well-ventilated space or in
the open air. Otherwise, hazardous materials may become deposited in
parts of the equipment.
Do not immerse pneumatic or electronic components in cleaning solutions
or water. Contact Dräger as required for information regarding additional
cleaning methods for heavily soiled parts.
If water is trapped inside and then becomes frozen in the pneumatic
system of the respiratory protection equipment, operation will be restricted.
Prevent entry of liquid; thoroughly dry the respiratory protection equipment
after cleaning to prevent this.
Do not exceed 60 °C for drying and remove components from the drying
facility immediately when dry. Drying time in a heated dryer must not
exceed 30 minutes.
NOTICE
The X-plore 9500 has a leather belt for use with a welding facepiece.
Do not clean the leather belt with the cleaning agents listed in document
9100081. Instead, use a suitable leather cleaning product as needed.
Task Before
Use
After
Use
An-
nually
Visual inspection (see Section 6.2) O O
Cleaning and disinfection (see
Section 6.3)
O
Functional test (see notice 1)
Notes
O Dräger recommendations
1 This maintenance task may only be carried out by Dräger or trained
service personnel. For more information on the individual tests, see
the Technical Manual. This manual is issued to service personnel who
have participated in relevant Dräger service training.
O
For information regarding suitable cleaning and disinfecting
agents and their technical details, see www.draeger.com/IFU,
document 9100081.
● Use only clean, lint-free cloths
1. Clean the respiratory protective device manually using a cloth
moistened with cleaning solution to remove excess dirt.
○ If required, take the equipment apart and clean single parts
individually. Fig. G shows the disassembled parts individually.
Fig. H shows how to feed the belt through the buckle during
assembly so that it can be later tightened.
2. Apply disinfectant to all inner and outer surfaces.
3. Rinse all components thoroughly with clean water to remove all
cleaning and disinfecting agents.
4. Dry all components using a dry cloth, in a heated dryer or out in the air.
5. Contact service personnel or Dräger if disassembly of pneumatic or
electronic components is required.
7Storage
Store the equipment in a dry environment free of dust and dirt, where
damage or wear to the equipment cannot occur as a result of abrasion. Do
not expose the equipment to direct sunlight. Route hoses in such a way
that the bend radius is not too acute and the hose is not stretched,
compressed or twisted.
For the temperature range for storage, refer to the technical specifications
(Section 9).
8 Disposal
The product has a life span of 10 years starting with the first use. When
necessary, dispose of the device in accordance with national or local
regulations for waste disposal.
9 Technical specifications
Weight (air manifold and belt) < 0.5 kg
Belt size (standard belt) 38 mm x 750 to 1450 mm
Belt size (long belt) 38 mm x 750 to 1950 mm
Mask adapter Knuckled thread Rd 40
Warning whistle volume > 90 dB(A)
Input pressure 2.8 to 10 bar
Flow rate 350 to 1200 litres/minute
Operating temperature -10 to +60 °C
Storage temperature -15 to +40 °C
F
5164
MAX.
MIN.
G
5165
H
4433

Other Dräger Respiratory Product manuals

Dräger X-plore 5500 User manual

Dräger

Dräger X-plore 5500 User manual

Dräger NIV Operating instructions

Dräger

Dräger NIV Operating instructions

Dräger FPS 7000 RP User manual

Dräger

Dräger FPS 7000 RP User manual

Dräger X-plore 6000 User manual

Dräger

Dräger X-plore 6000 User manual

Dräger saver CF Series User manual

Dräger

Dräger saver CF Series User manual

Dräger PSS 5000 series User manual

Dräger

Dräger PSS 5000 series User manual

Dräger PARAT 3160 User manual

Dräger

Dräger PARAT 3160 User manual

Dräger X-plore 1700 User manual

Dräger

Dräger X-plore 1700 User manual

Dräger Filterbox 40-91 User manual

Dräger

Dräger Filterbox 40-91 User manual

Dräger FPS 7000 RP User manual

Dräger

Dräger FPS 7000 RP User manual

Dräger PAS Colt Series User manual

Dräger

Dräger PAS Colt Series User manual

Dräger X-plore 8000 User manual

Dräger

Dräger X-plore 8000 User manual

Dräger FPS IMD User manual

Dräger

Dräger FPS IMD User manual

Dräger Panorama Nova S - RA User manual

Dräger

Dräger Panorama Nova S - RA User manual

Dräger PSS User manual

Dräger

Dräger PSS User manual

Dräger PAS Micro Series User manual

Dräger

Dräger PAS Micro Series User manual

Dräger Panorama Nova S User manual

Dräger

Dräger Panorama Nova S User manual

Dräger PAS Colt Series User manual

Dräger

Dräger PAS Colt Series User manual

Dräger X-plore 5500 User manual

Dräger

Dräger X-plore 5500 User manual

Dräger CDR 4500 User manual

Dräger

Dräger CDR 4500 User manual

Dräger EPAS User manual

Dräger

Dräger EPAS User manual

Dräger PARAT 3100 User manual

Dräger

Dräger PARAT 3100 User manual

Dräger Panorama Nova RA User manual

Dräger

Dräger Panorama Nova RA User manual

Dräger FPS-COM 7000 User manual

Dräger

Dräger FPS-COM 7000 User manual

Popular Respiratory Product manuals by other brands

Drive Medquip AIRIAL MEDNED MQ5600 Instruction guide

Drive Medquip

Drive Medquip AIRIAL MEDNED MQ5600 Instruction guide

Omron COMPACT COMPRESSOR NEBULIZER NE-C30 instruction manual

Omron

Omron COMPACT COMPRESSOR NEBULIZER NE-C30 instruction manual

3M Versaflo TR-602E User instructions

3M

3M Versaflo TR-602E User instructions

MSA 3S small operating manual

MSA

MSA 3S small operating manual

CleanSpace HALO User instructions

CleanSpace

CleanSpace HALO User instructions

Therabody TheraFace Mask user manual

Therabody

Therabody TheraFace Mask user manual

Medquip MQ6003 Guide book

Medquip

Medquip MQ6003 Guide book

AOSafety M-Tac Specifications

AOSafety

AOSafety M-Tac Specifications

MSA G1 SCBA operating manual

MSA

MSA G1 SCBA operating manual

SAFEYEAR GM8000 quick start guide

SAFEYEAR

SAFEYEAR GM8000 quick start guide

Invacare IRC 1740 Operator's manual

Invacare

Invacare IRC 1740 Operator's manual

Chicco Aerosol SUPER SOFT Series instructions

Chicco

Chicco Aerosol SUPER SOFT Series instructions

MSA Advantage 200 instruction manual

MSA

MSA Advantage 200 instruction manual

MPL 2000 Series User instruction manual

MPL

MPL 2000 Series User instruction manual

3M 6000 User instructions

3M

3M 6000 User instructions

3M 8210 Technical data sheet

3M

3M 8210 Technical data sheet

Sundstrom SR  900 quick start guide

Sundstrom

Sundstrom SR 900 quick start guide

Omron MICROAir NE-U100 instruction manual

Omron

Omron MICROAir NE-U100 instruction manual

manuals.online logo
manuals.online logoBrands
  • About & Mission
  • Contact us
  • Privacy Policy
  • Terms and Conditions

Copyright 2025 Manuals.Online. All Rights Reserved.