manuals.online logo
Brands
  1. Home
  2. •
  3. Brands
  4. •
  5. Dräger
  6. •
  7. Respiratory Product
  8. •
  9. Dräger PAS Colt Series User manual

Dräger PAS Colt Series User manual

3352488 (A3-D-P)
PAS Colt Series
Airline SAR respiratory protection equipment
Instructions for Use
i
1
21
3629
2
1611/1612
3
3625
5
3692
4
3626
1
2
3
1 For your safety
1.1 General safety statements
• Before using this product, carefully read the Instructions for
Use.
• Strictly follow the Instructions for Use. The user must fully
understand and strictly observe the instructions. Use the
product only for the purposes specied in the Intended Use
section of this document.
• Do not dispose of the Instructions for Use. Ensure that they are
retained and appropriately used by the product user.
• Only fully trained and competent users are permitted to use
this product.
• Comply with all local and national rules and regulations
associated with this product.
• Only trained and competent personnel are permitted to
inspect, repair and service the product. Dräger recommends a
Dräger service contract for all maintenance activities and that
all repairs are carried out by Dräger.
• Properly trained service personnel must inspect and service
this product as detailed in the maintenance section of this
document.
• Use only genuine Dräger spare parts and accessories, or the
proper functioning of the product may be impaired.
• Do not use a faulty or incomplete product, and do not modify
the product.
• Notify Dräger in the event of any component fault or failure.
• Before occupational use of this respirator a written respiratory
protection program must be implemented meeting all the local
government requirements. In the United States employers
must comply with OSHA 29 CFR 1910.134 which includes
medical evaluation, training, and t testing.
1.2 Denitionsofalerticons
Alert icons are used in this document to provide and highlight text
that requires a greater awareness by the user. A denition of the
meaning of each icon is as follows:
!
WARNING
Indicates a potentially hazardous situation which, if not
avoided, could result in death or serious injury.
!
CAUTION
Indicates a potentially hazardous situation which, if not
avoided, could result in physical injury or damage to the
product or environment. It may also be used to alert against
unsafe practices.
i
i
NOTICE
Indicates additional information on how to use the
product.
2 Description
2.1 Product overview
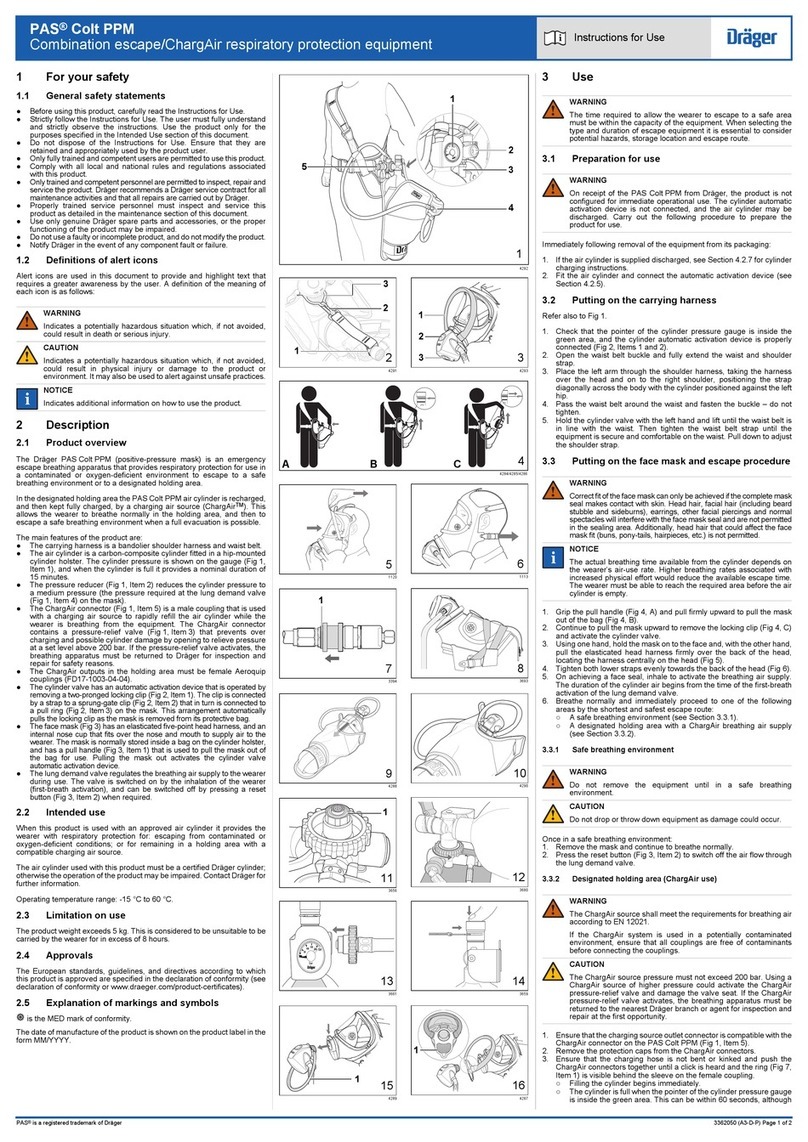
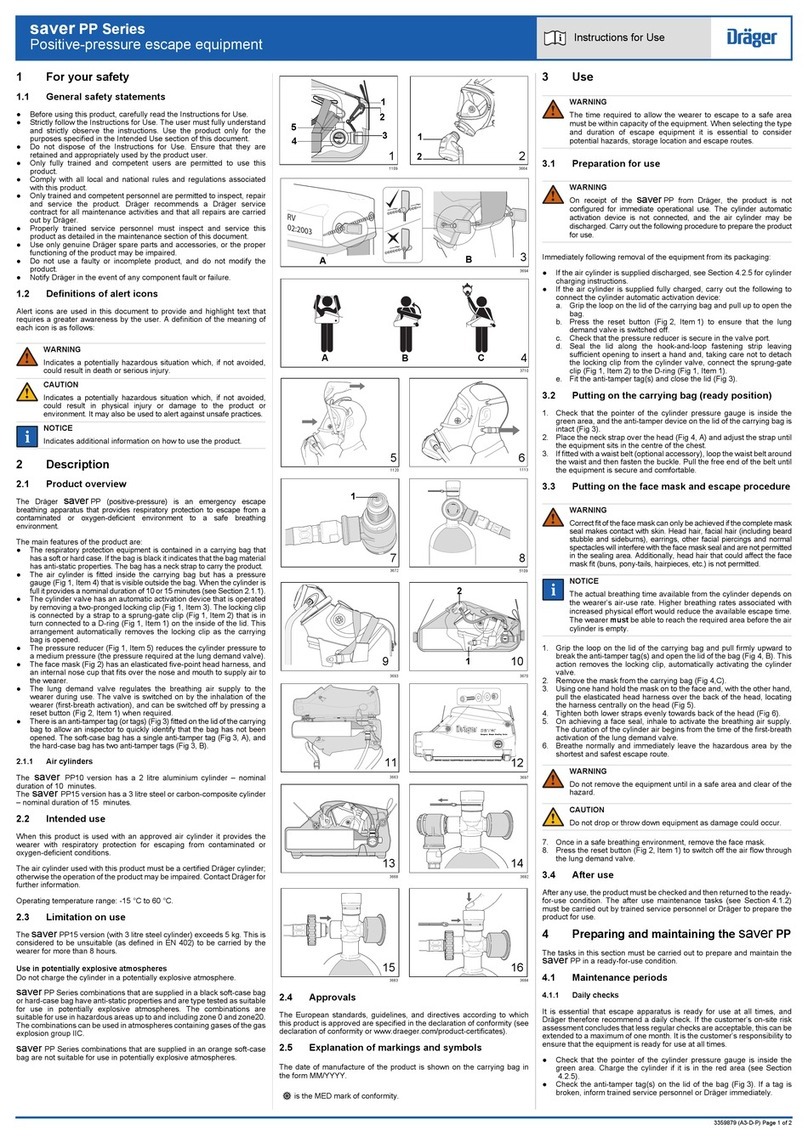
This variant of the Dräger PAS Colt Series provides respiratory
protection for working in a contaminated environment using an
airline (supplied airline respirator – SAR). During use, the PAS
Colt is connected to a breathing-quality independent air supply.
The features of the equipment are:
• The carrying system is a bandolier shoulder harness and waist
belt.
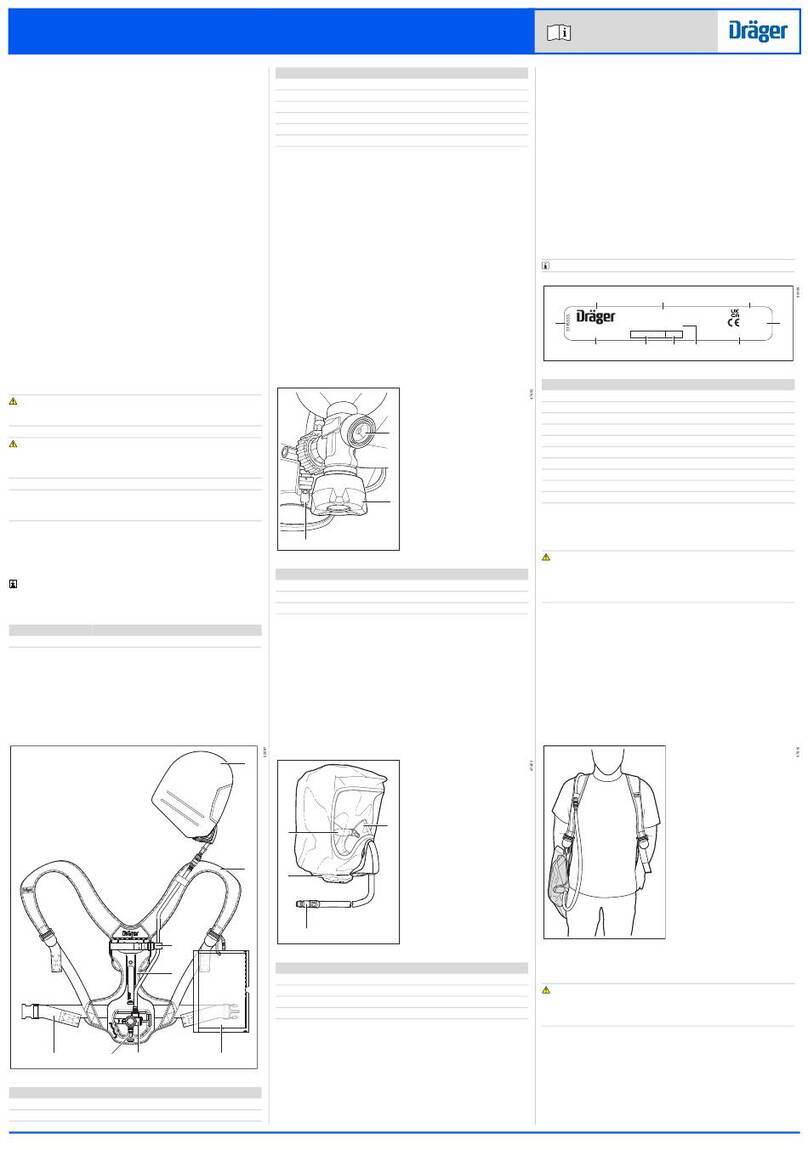
• The lung demand regulator (LDR) has a reset button (Fig 1,
Item 1) that switches off the air ow through the regulator,
and a purge button (Fig 1, Item 2) that can be used to deliver
an additional airow into the face mask when required by the
wearer during airline use. The holder (Fig 2, Item 1) provides
a stowage point to protect the regulator coupling and O-ring
against damage when it is not tted in the face mask.
• The airline connector (Fig 2, Item 3) is a male coupling that is
used to connect an independent air supply for SAR (supplied
airline respirator) use.
• A low-pressure whistle is tted on the airline manifold (Fig 2,
Item 2) of some variants of this product. If the PAS Colt is
tted with a low-pressure whistle, the whistle sounds during
airline use to warn the wearer that the independent air supply
has fallen below the required pressure. See the technical data
(Section 9) for the whistle operating pressures.
2.2 Intended use
When this product is used with an approved face mask and
independent air supply, it provides the wearer with respiratory
protection for working in contaminated conditions. It is intended
for use in applications where a high level of respiratory protection
is required.
The face mask and other accessories used with this product
must be certied Dräger components, assembled in an approved
conguration; otherwise the operation of the device may be
impaired. It is essential that ushing and non-ushing face masks
and lung demand regulators should not be mixed (i.e. only a
ushing-type face mask should be used with a ushing-type lung
demand regulator). Contact Dräger for further information.
2.3 Limitations on use
This product is not suitable for use in IDLH (immediately dangerous
to life and health) atmospheres, and is not approved for use in
CBRN applications.
2.4 Approvals
The PAS Colt Series of airline respiratory protection equipment
conforms to the 19C requirements of NIOSH. This product is
approved for use as a supplied airline respirator (SAR).
3 Use
!
WARNING
The airline air quality shall meet the requirements for
breathing air according to CGA G-7.1 Grade D or higher
quality.
Before using airline equipment, ensure that the independent
air supply meets the air quality requirements and complies
with pressure, ow and hose length requirements in the
technical data (see Section 9), and has been issued with a
permit for use if necessary.
If using a PAS Colt without an integral low-pressure whistle,
Dräger recommend that a low-pressure warning device is
tted to the independent air supply.
3.1 Preparation for use
3.1.1 Visual inspection
Carry out a visual inspection, checking the full breathing equipment
including all component parts and accessories. Check that the
equipment is clean and undamaged, paying particular attention
to pneumatic components, hoses and connectors. Typical signs of
damage that may affect the operation of the breathing apparatus
include impact, abrasion, cutting, corrosion and discoloration.
Report damage to service personnel and do not use the apparatus
until faults are rectied.
3.1.2 Functional testing
!
WARNING
If PAS Colt fails to meet any of the standards or parameters
described in the functional tests, or if an immediate leak is
evident, there is a system fault. Report the fault to trained
service personnel or contact Dräger. Do not use the
breathing apparatus until the fault condition is rectied.
Leakandowtest
1. Press the reset button (Fig 1, Item 1) of the lung demand
regulator.
2. Connect the independent air supply to the male coupling
(Fig 2, Item 3). If the independent air supply air supply has a
shut-off valve, open the valve.
○ There should be no audible leak. If there is any leak,
investigate and repair the leak before use. If necessary,
use a soapy solution to locate the leak.
!
WARNING
Do not direct the airow on to the face, eyes or skin.
3. Press the purge button (Fig 1, Item 2) for 3 to 5 seconds. An
unobstructed airow should ow from the outlet of the lung
demand regulator.
4. Isolate and disconnect the independent air supply.
5. Press the purge button (Fig 1, Item 2) to vent the system and
then press the reset button (Fig 1, Item 1) to switch off positive
pressure.
3.1.3 Putting on the PAS Colt (ready position)
Refer also to Fig 2 which shows the PAS Colt worn in the ready
position.
1. Open the waist belt buckle and fully extend the waist and
shoulder strap.
2. Place the left arm through the shoulder harness, taking the
harness over the head and on to the right shoulder, positioning
the strap diagonally across the body.
3. Loop the waist belt around the waist and fasten the buckle –
do not tighten.
4. Grip the airline manifold (Fig 2, Item 2) with the left hand and
lift until the waist belt is in line with the waist. Then tighten the
waist belt strap until the equipment is secure and comfortable
on the waist. Pull down to adjust the shoulder strap.
5. Inspect the face mask as dened in the relevant instructions
for use.
6. Check that the face mask port and the regulator O-ring clean
and undamaged.
7. Remove the lung demand regulator from the holder and press
it into the port of the face mask until it latches in position.
Check the attachment by gently attempting to pull the coupling
apart.
8. Put the neck strap of the face mask over the head then insert
the neck strap stud into the hole in the centre strap of the head
harness.
3.1.4 Putting on the face mask
1. Press the reset button (Fig 1, Item 1) of the lung demand
regulator to switch off the positive pressure.
2. Connect the independent air supply to the male coupling
(Fig 2, Item 3). If the independent air supply air supply has a
shut-off valve, open the valve.
!
WARNING
Correct t of the face mask can only be achieved if the
complete face mask seal makes contact with skin. Head
hair, facial hair (including beard stubble and sideburns),
earrings, other facial piercings and normal spectacles will
interfere with the face mask seal and are not permitted in
the sealing area. Additionally, head hair that could affect
the face mask t (buns, pony-tails, hairpieces, etc.) is not
permitted.
i
i
NOTICE
Refer also to the face mask instructions for use.
3. Detach the neck strap stud from the center strap of the head
harness.
4. Spread the head harness (Fig 3). Place the chin into the chin
cup of the face mask and pull the harness over the head
locating the harness center plate on back of the head.
5. Referring to Fig 4, tighten both lower (1) and then upper straps
(2) evenly towards back of the head. If necessary, tighten the
center strap (3). The wearer’s rst inhalation after achieving
a face seal will automatically switch on the air supply into the
face mask.
6. Check that the head has a full range of movement without
pulling against the regulator hose. If any resistance to
movement is felt, readjust the hose routing and then recheck.
If resistance is still felt, do not use the breathing apparatus
and contact Dräger.
3.1.5 Function check
1. Isolate the independent air supply (close the valve or
disconnect) and breathe normally to empty the system of
air. When empty, the face mask should hold on to the face to
indicate a positive seal.
2. Immediately reapply the independent air supply and breathe
normally.
3. Inhale and hold your breath – there should be no audible leak.
If a leak is detected, readjust the head harness and retest.
4. Recommence breathing – exhaled air should ow easily out of
the exhalation valve.
5. Momentarily press the purge button (Fig 1, Item 2) to check for
additional airow.
When the function check is satisfactorily completed, breathe
normally and proceed to the working area.
3.2 During use
3.2.1 Escape procedure
i
i
NOTICE
If the PAS Colt is tted with a low-pressure whistle,
during airline use the whistle sounds to indicate that the
independent air supply has fallen below the required
pressure. If the whistle sounds and then stops before the
escape procedure is started, the air supply pressure could
have been restored. The wearer must conrm that the
correct pressure (87 to 125 psi) is available, or escape as
described below.
If the independent air supply fails, breathe normally and
immediately proceed as follows:
1. Disconnect the independent air supply from the PAS Colt.
2. Remove the lung demand regulator from the face mask (Fig 5)
and place it in the holder (Fig 2, Item 1).
3. Immediately leave the hazardous area by the shortest and
safest escape route.
3
2
1
3352488 (A3-D-P)
PAS Colt Series
Airline SAR respiratory protection equipment
Instructions for Use
i
3352488
© Dräger Safety UK Limited
Edition 08 – November 2015
Subject to alteration
3.3 After use
!
WARNING
Do not remove the equipment until in safe area, clear of the
hazard.
!
CAUTION
Do not drop or throw down equipment as damage could
occur.
1. Loosen the face mask straps. Remove the face mask and fully
extend all of the straps of the head harness.
2. After airline use only (not required after an escape):
a. Disconnect the independent air supply from the PAS Colt.
Ret the cap on to the airline connector.
b. Press the purge button (Fig 1, Item 2) to fully vent the
system.
c. Remove the lung demand regulator from the face mask
(Fig 5) and place it in the holder (Fig 2, Item 1).
3. Unbuckle the waist belt, lift the shoulder strap buckle to loosen
the harness and then remove the equipment.
4. Carry out the after use maintenance tasks in the maintenance
table (see Section 5.1).
6 Storage
●Store the equipment between 5 °F and 77 °F (-15 °C and
+25 °C). Ensure that the environment is dry, free from dust and
dirt, and does not subject the equipment to wear or damage
due to abrasion. Do not store the equipment in direct sunlight.
Note also the following:
●Extend the shoulder strap, the waist belt and the head harness
straps of the face mask.
●For storage, place the face mask in a protective bag (contact
Dräger for supply of a suitable bag).
●Route rubber hoses in such a way that the bend radius is
not too acute and the hose is not stretched, compressed or
twisted.
●Fix the apparatus securely to any raised mounting point to
prevent it from falling.
●Fix the apparatus securely to any raised mounting point to
prevent it from falling.
7 NIOSH Cautions and limitations
D – Air-line respirators can be used only when the respirators are
supplied with respirable air meeting the requirements of CGA
G-7.1 Grade D or higher quality.
E – Use only the pressure ranges and hose lengths specied in
the User’s Instructions.
I – Contains electrical parts that may cause an ignition in
ammable or explosive atmospheres.
J – Failure to properly use and maintain this product could result
in injury or death.
M – All approved respirators shall be selected, tted, used, and
maintained in accordance with MSHA, OSHA, and other
applicable regulations.
N – Never substitute, modify, add, or omit parts. Use only exact
replacement parts in the conguration as specied by the
manufacturer.
O – Refer to User’s Instructions and/or maintenance manuals for
information on use and maintenance of these respirators.
S – Special or critical user’s instructions and/or specic use
limitations apply. Refer to User’s Instructions before donning.
7.1 S – Special or critical user’s instructions
• Approved for use at temperatures above -25 °F (-31.7 °C).
• If the independent air supply fails during use, immediately
disconnect the independent air supply, remove the lung
demand regulator from the face mask and proceed to fresh air.
• The independent air supply must meet the following criteria:
○ Airline pressure and ow requirements: pressure 87 to 125
psi, airow rate at least 550 liters/minute.
○ Airline hose requirements: 5 feet to 300 feet of Dräger
approved hose. (Important note: The airline hose must
not be made up of more than 12 individual hoses.)
8 Disposal
When required, dispose of the PAS Colt in accordance with
national or local regulations for waste disposal.
9 Technical data
• Lung demand regulator to face mask connection: push-in
connector.
• Independent air supply:
○ Airline pressure and ow requirements: pressure 87 to 125
psi, airow rate at least 550 liters/minute.
○ Airline hose requirements: 5 feet to 300 feet of Dräger
approved hose. (Important note: The airline hose must
not be made up of more than 12 individual hoses.)
• Low-pressure whistle activation pressure (if tted): commences
at 72.5 to 58 psi; ceases at 25 to 0 psi.
10 Contact details
Any issues with the equipment, including damage, malfunction,
or failure of the breathing apparatus that may present a hazard
to the user should be reported to Dräger US Customer Service –
Phone 1-800-858-1737.
Contact with the certication organization may be reached at:
NIOSH, NPPTL – Phone 1-412-386-4000
4 Troubleshooting
The troubleshooting guide shows fault diagnosis and repair
information applicable to breathing apparatus users. Further
troubleshooting and repair information is available in instructions
for use supplied with associated equipment (e.g. face mask).
Contact service personnel or Dräger when the remedy information
indicates a service task, or if the symptom remains after all remedy
actions have been attempted.
Symptom Fault Remedy
Air leak or failed
leak test
Loose or dirty
connector
Disconnect, clean and
reconnect couplings
and retest
Faulty hose or
component
Substitute user
replaceable
accessories and retest
Air leak from
the outlet hose
connection at the
airline manifold
(safety relief valve)
Faulty O-ring,
retainer, spring or
airline manifold
Service task
Poor sounding
whistle (if tted)
Whistle dirty Clean whistle ute and
retest
Whistle not
functioning
correctly (if tted)
Activation
mechanism fault
Service task
5 Maintenance
5.1 Maintenance table
Service and test the breathing apparatus, including out-of-use apparatus, in accordance with the maintenance table. Record all service
details and testing. Refer also to the Instructions for Use for the lung demand regulator, face mask and other associated equipment.
Additional inspection and testing may be required in the country of use to ensure compliance with national regulations.
Component/System Task After use Every month Every year
Complete equipment Visual inspection (see Section 3.1.1)  
Clean and disinfect (see Section 5.2) 
Functional test (see Section 3.1.2)  
Flow and static tests (see Note 2) 
Lung demand regulator O-ring Check and lubricate if necessary (see Note 1) 
Notes
Dräger recommendations
1 Lightly lubricate the O-ring of the lung demand regulator as required (recommended lubricant is Molykote 111). Products other than
the recommended lubricant are not tested and may damage the equipment.
2 These maintenance tasks may only be carried out by Dräger or trained service personnel. Details of the tests are contained in the
technical manual which is issued to service personnel that have attended a relevant Dräger care and maintenance course.
5.2 Cleaning and disinfecting
!
CAUTION
Cleaning agents and disinfectants listed below are not
manufactured by Dräger and have been reviewed only for
compatibility when used to clean or disinfect the subject
Dräger product(s). Read and comply with all instructions
for use provided by the manufacturers of such agents and
disinfectants. Dräger expressly disclaims all responsibility
for any damage, personal injury or loss resulting from the
use of such agents or disinfectants.
Do not exceed 86 °F (30 °C) for washing, disinfecting
and rinsing solutions. Do not exceed 140 °F (60 °C) for
drying, and remove components from the drying facility
immediately when dry. Drying time in a heated dryer must
not exceed 30 minutes.
Do not immerse pneumatic in cleaning solutions or water.
If water is trapped and then freezes inside the pneumatic
system of the breathing apparatus (such as the lung
demand regulator), operation will be impaired. Prevent
any liquid from entering, and thoroughly dry the breathing
apparatus after cleaning to prevent this from occurring.
Refer also to the instructions for the face mask and other
associated equipment.
5.2.1 Manual cleaning of the breathing apparatus (USA)
Cleaning and disinfecting materials:
● Cleaning agent – 1008 Green Liquid Hand Dish Wash
● Disinfecting agent – 800 Spur-Tex Disinfectant Cleaner-
Deodorant (concentration: 1.6 % (2  oz per gallon))
● Use only clean lint-free cloths.
1. Prepare cleaning solution as per manufacturer’s instructions.
Clean the breathing apparatus manually using a cloth
moistened with cleaning solution to remove excess dirt.
2. Prepare disinfecting solution as per manufacturer’s instructions.
Apply to all internal and external surfaces, ensuring that all
surfaces remain visibly wet for 15 minutes.
3. Rinse all components thoroughly with clean water to remove
all cleaning and disinfecting agents.
4. Dry all components using a dry cloth, in a heated dryer or in air.
5. Contact service personnel or Dräger if disassembly of
pneumatic or electronic components is required.
5.2.2 Manual cleaning of the breathing apparatus (Canada)
Cleaning and disinfecting materials:
● Cleaning agent – mild soap solution
● Disinfecting agent – Neutral Disinfectant Cleaner (concentration:
0.5 % (0.5  oz per gallon or 15 ml per 3.785 liters))
● Use only clean lint-free cloths.
1. Prepare cleaning solution as per manufacturer’s instructions.
Clean the breathing apparatus manually using a cloth
moistened with cleaning solution to remove excess dirt.
2. Prepare disinfecting solution as per manufacturer’s instructions.
Apply to all internal and external surfaces, ensuring that all
surfaces remain visibly wet for 10 minutes.
3. Rinse all components thoroughly with clean water to remove
all cleaning and disinfecting agents.
4. Dry all components using a dry cloth, in a heated dryer or in air.
5. Contact service personnel or Dräger if disassembly of
pneumatic or electronic components is required.
Draeger Safety UK Limited
Ullswater Close Tel +44 1670 352891
Blyth, NE24 4RG Fax +44 1670 356266
United Kingdom www.draeger.com

Other Dräger Respiratory Product manuals

Dräger PSS 7000 Series User manual

Dräger

Dräger PSS 7000 Series User manual

Dräger X-plore 9300 User manual

Dräger

Dräger X-plore 9300 User manual

Dräger PAS AirPack 1 User manual

Dräger

Dräger PAS AirPack 1 User manual

Dräger PSS 5000 Series User manual

Dräger

Dräger PSS 5000 Series User manual

Dräger Filterbox 40-91 User manual

Dräger

Dräger Filterbox 40-91 User manual

Dräger X-plore 3300 User manual

Dräger

Dräger X-plore 3300 User manual

Dräger Panorama Nova RP User manual

Dräger

Dräger Panorama Nova RP User manual

Dräger Panorama Nova S User manual

Dräger

Dräger Panorama Nova S User manual

Dräger FPS-COM 7000 User manual

Dräger

Dräger FPS-COM 7000 User manual

Dräger PAS Colt Series User manual

Dräger

Dräger PAS Colt Series User manual

Dräger PSS Series User manual

Dräger

Dräger PSS Series User manual

Dräger X-plore 1300 Series User manual

Dräger

Dräger X-plore 1300 Series User manual

Dräger Panorama Nova S-RP User manual

Dräger

Dräger Panorama Nova S-RP User manual

Dräger PAS Colt PPM User manual

Dräger

Dräger PAS Colt PPM User manual

Dräger X-plore 8000 User manual

Dräger

Dräger X-plore 8000 User manual

Dräger X-plore 4000 User manual

Dräger

Dräger X-plore 4000 User manual

Dräger X-plore 2100 User manual

Dräger

Dräger X-plore 2100 User manual

Dräger PARAT 4000 Series User manual

Dräger

Dräger PARAT 4000 Series User manual

Dräger X-plore 8000 User manual

Dräger

Dräger X-plore 8000 User manual

Dräger Panorama Nova RA User manual

Dräger

Dräger Panorama Nova RA User manual

Dräger PAS Micro Series User manual

Dräger

Dräger PAS Micro Series User manual

Dräger PSS 7000 Twin Pack Series User manual

Dräger

Dräger PSS 7000 Twin Pack Series User manual

Dräger NIV Operating instructions

Dräger

Dräger NIV Operating instructions

Dräger PSS 5000 Series User manual

Dräger

Dräger PSS 5000 Series User manual

Popular Respiratory Product manuals by other brands

Sleepnet Mojo 2 manual

Sleepnet

Sleepnet Mojo 2 manual

3M Aura 9922 Technical data sheet

3M

3M Aura 9922 Technical data sheet

MSA 3S small operating manual

MSA

MSA 3S small operating manual

Omron C102 Total user manual

Omron

Omron C102 Total user manual

DeVilbiss Healthcare Traveler 6910P-DR Instruction guide

DeVilbiss Healthcare

DeVilbiss Healthcare Traveler 6910P-DR Instruction guide

Sunset Healthcare NEB300FISH Series instruction manual

Sunset Healthcare

Sunset Healthcare NEB300FISH Series instruction manual

Hoffrichter Trend 300 user manual

Hoffrichter

Hoffrichter Trend 300 user manual

Sealey SSP201K instructions

Sealey

Sealey SSP201K instructions

HAYGAIN Flexineb 2 Instructions for use

HAYGAIN

HAYGAIN Flexineb 2 Instructions for use

BMC 3B Siesta user manual

BMC

BMC 3B Siesta user manual

ProMed MNS-100 quick start guide

ProMed

ProMed MNS-100 quick start guide

Sleepnet Mojo 2 instructions

Sleepnet

Sleepnet Mojo 2 instructions

hubmar AromaHouse AromaVase instruction manual

hubmar

hubmar AromaHouse AromaVase instruction manual

Xupermask XMSK01 user guide

Xupermask

Xupermask XMSK01 user guide

Omron COMPAIV XLT NE-C25 instruction manual

Omron

Omron COMPAIV XLT NE-C25 instruction manual

Hikoneb 908 DC user manual

Hikoneb

Hikoneb 908 DC user manual

MSA 3S-R AirElite Full Face Mask operating manual

MSA

MSA 3S-R AirElite Full Face Mask operating manual

DeVilbiss MPV-625 Service bulletin

DeVilbiss

DeVilbiss MPV-625 Service bulletin

manuals.online logo
manuals.online logoBrands
  • About & Mission
  • Contact us
  • Privacy Policy
  • Terms and Conditions

Copyright 2025 Manuals.Online. All Rights Reserved.