Eaton DB3B User manual

Sounder - DB3B
Technical manual

ii SOUNDER - DB3B TM264 June 2019 www.eaton.com
DISCLAIMER OF WARRANTIES AND LIMITATION OF LIABILITY
The information, recommendations, descriptions and safety notations in this document are based on Eaton Corporation’s
(“Eaton”) experience and judgment and may not cover all contingencies. If further information is required, an Eaton sales
office should be consulted. Sale of the product shown in this literature is subject to the terms and conditions outlined in
appropriate Eaton selling policies or other contractual agreement between Eaton and the purchaser.
THERE ARE NO UNDERSTANDINGS, AGREEMENTS, WARRANTIES, EXPRESSED OR IMPLIED, INCLUDING
WARRANTIES OF FITNESS FOR A PARTICULAR PURPOSE OR MERCHANTABILITY, OTHER THAN THOSE
SPECIFICALLY SET OUT IN ANY EXISTING CONTRACT BETWEEN THE PARTIES. ANY SUCH CONTRACT STATES THE
ENTIRE OBLIGATION OF EATON. THE CONTENTS OF THIS DOCUMENT SHALL NOT BECOME PART OF OR MODIFY
ANY CONTRACT BETWEEN THE PARTIES.
In no event will Eaton be responsible to the purchaser or user in contract, in tort (including negligence), strict liability or
other-wise for any special, indirect, incidental or consequential damage or loss whatsoever, including but not limited to
damage or loss of use of equipment, plant or power system, cost of capital, loss of power, additional expenses in the
use of existing power facilities, or claims against the purchaser or user by its customers resulting from the use of the
information, recommendations and descriptions contained herein. The information contained in this manual is subject to
change without notice.

iii
Sounder - DB3B
English
SOUNDER - DB3B TM264 June 2019 www.eaton.com
Contents
1.0 INTRODUCTION. . . . . . . . . . . . . . . . . . . . . . . . . . . . . . . . . . . . . . . . . . . . . . . . . . . . . . . . . . . . . . . . . . . . . .1
2.0 GENERAL SAFETY MESSAGES AND WARNINGS . . . . . . . . . . . . . . . . . . . . . . . . . . . . . . . . . . . . . . . . . .1
3.0 INSTALLATION.......................................................................1
Access to terminals.......................................................................... 1
Wiring details. . . . . . . . . . . . . . . . . . . . . . . . . . . . . . . . . . . . . . . . . . . . . . . . . . . . . . . . . . . . . . . . . . . . . . . . . . . . . . . 2
Ex d – AC input wiring details (Types 1 & 2) ....................................................... 2
Ex de – AC input wiring details (Types 3 & 4) ...................................................... 2
Ex d & Ex de – DC input, 3 stage without monitoring wiring details (Types 5 & 6) ......................... 3
Ex d & Ex de – DC Input, 3 stage without monitoring wiring details (Types 5 & 6)......................... 3
Ex d & Ex de – DC input, dual stage common +ve with monitoring (standard configuration) wiring details
(Types 7 & 8).............................................................................. 4
Ex d & Ex de – DC input, up to 3 stage with or without monitoring (alternative configuration) wiring details
(Types 9 & 10) ............................................................................. 4
Ex d – DC input with voltage free stage activation wiring details (Type 11) ............................... 5
Ex de – DC input with voltage free stage activation wiring details (Type 12) .............................. 5
4.0 OPERATION .........................................................................5
5.0 MAINTENANCE ......................................................................7
6.0 CERTIFICATION/APPROVALS ...........................................................8
lECEx units ................................................................................ 8
Gas & Dust (GD) certified units................................................................. 8
ATEX units ................................................................................. 8
Gas (G) certified units ........................................................................ 8
Gas & dust (GD) certified units ................................................................. 8
These units also have the following approvals:..................................................... 8
7.0 SPECIAL CONDITIONS FOR SAFE USE ...................................................9
8.0 FUNCTIONAL SAFETY ...............................................................10
Introduction ..................................................................................... 10
Assessment of functional safety............................................................... 10
Conditions of safe use........................................................................11

iv
Sounder - DB3B
English
SOUNDER - DB3B TM264 June 2019 www.eaton.com

1SOUNDER - DB3B TM264 June 2019 www.eaton.com
Sounder - DB3B
English
1.0 Introduction
This range of sounders, intended for use in potentially
explosive gas and dust atmospheres, is available in
versions suitable for use in the following gas/dust groups:
The range is available in versions suitable for use in either
gas (G) or gas and dust (GD) groups.
ote:N (G) unit has nominally 6dB higher output than
(GD) unit.
The Ex enclosure is manufactured from a UV stable
glass reinforced polyester with a rugged thermoplastic
flare. Stainless steel mounting bracket, cover screws and
fixings are incorporated throughout thus ensuring a corro-
sion free product.
An optional Ex e terminal chamber is available (see certifi-
cation section for further details).
An uncertified version is available for use in
non-explosive atmospheres.
2.0 General safety messages and
warnings
All instructions and safety messages in this manual must
be followed to allow safe installation of the device. The
device must only be installed and maintained by correctly
trained site personnel/installers.
I. To reduce the risk of ignition of hazardous
atmospheres and shock, do not apply power to
the device until installation has been completed
and the device is fully sealed and secured.
II. To reduce the risk of ignition of hazardous
atmospheres and shock, keep device tightly
closed when the circuit is energised.
III. Before removing the cover for installation or
maintenance, ensure that the power to the device
is isolated.
IV. Following installation, test the device to ensure
correct operation.
V. Following installation ensure a copy
of this manual is made available to all
operating personnel.
VI. When installing the device, requirements for
selection, installation and operation should be
referred to e.g. IEE Wiring Regulations and the
‘National Electrical Code’ in North America.
Additional national and/or local requirements
may also apply.
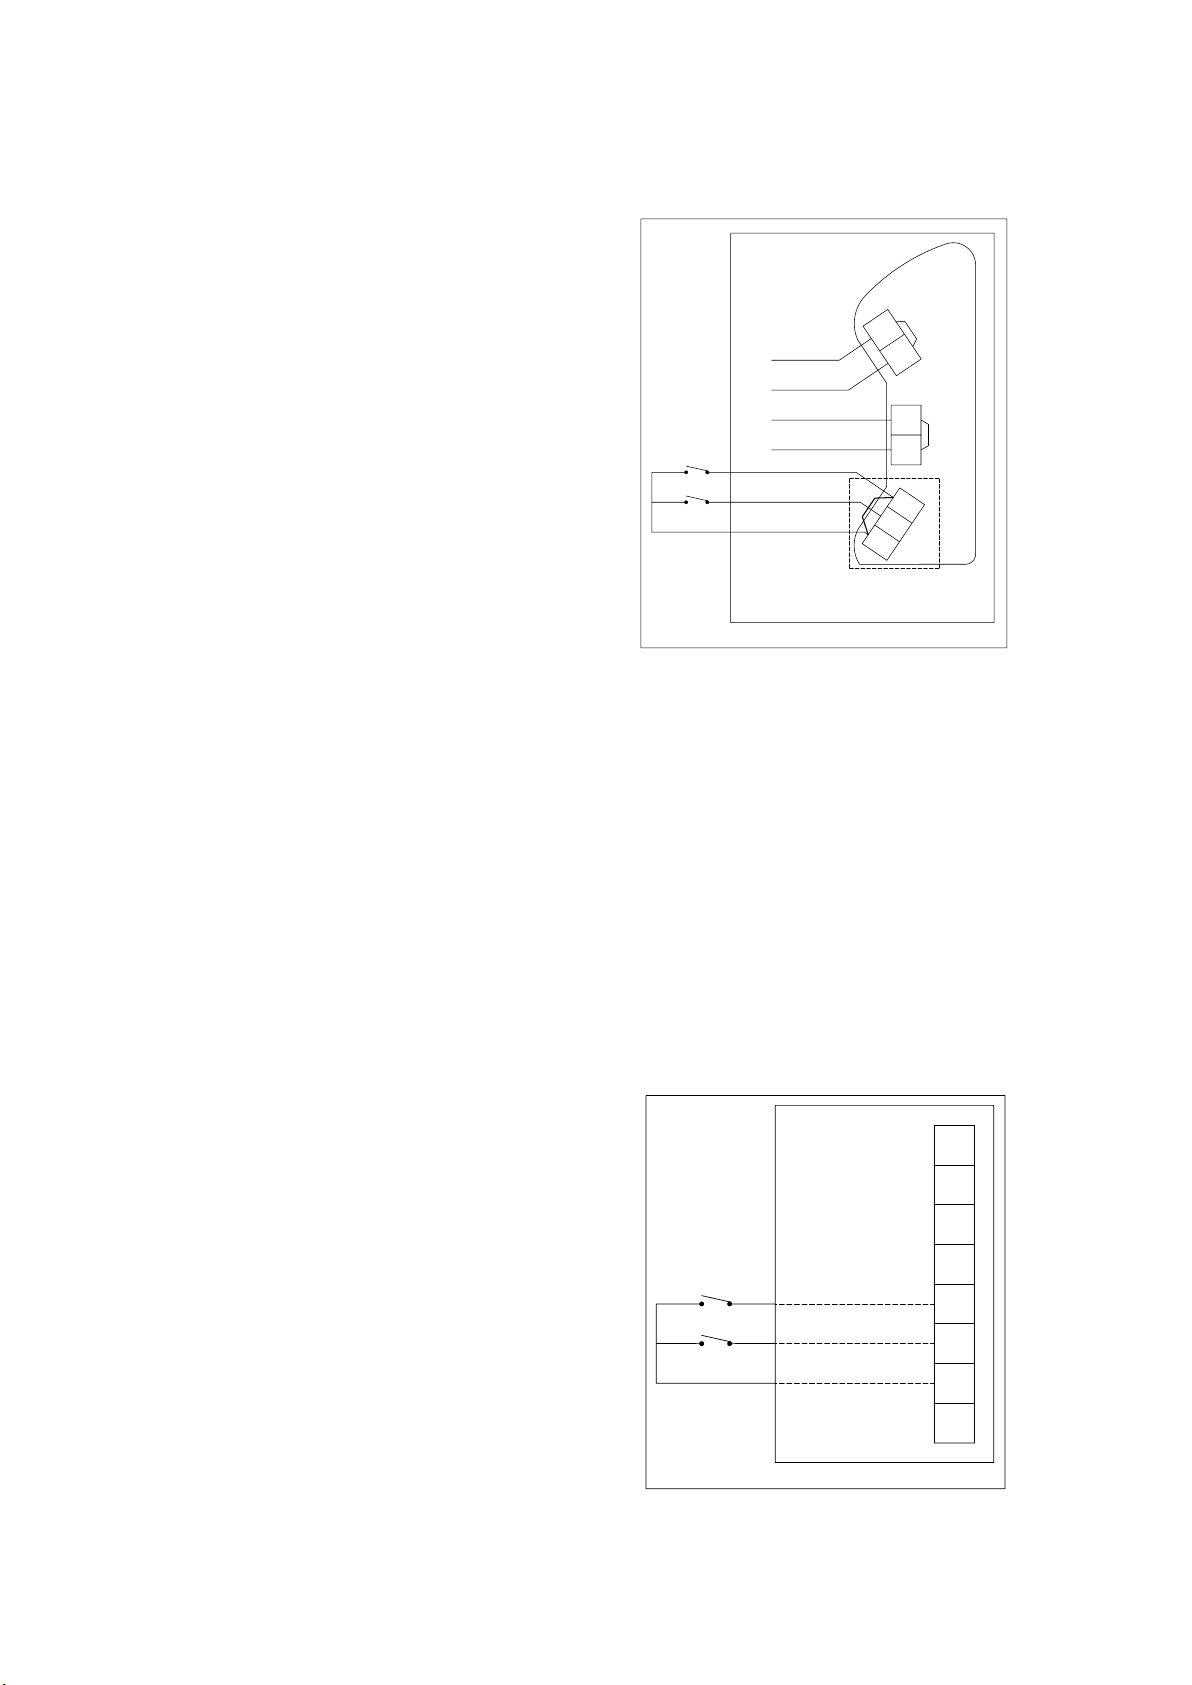
VII. Cable termination should be in accordance with
the specification applying to the required appli-
cation. MEDC recommends that all cables and
cores should be correctly identified. Please refer
to the wiring diagram in this manual (or separate
diagram provided with the unit).
VIII. Ensure that only the correct listed or certified
cable glands are used and that the assembly is
shrouded and correctly earthed.
IX. Ensure that only the correct listed or certified
stopping plugs are used to blank off unused
gland entry points and that the NEMA/IP rating of
the unit is maintained.
X. MEDC recommend the use of a sealing
compound such as HYLOMAR PL32 on the
threads of all glands and stopping plugs and/or a
suitable sealing washer in order to maintain the
IP rating of the unit.
XI. On Exde units, a suitable sealing washer must be
fitted to all glands and stopping plugs fitted into
the Exe enclosure.
XII. The end user or installer shall ensure that this
equipment is protected against external influ-
ences which could adversely affect the explosion
protection, or contact the manufacturer if in doubt
of the suitability of this equipment in the environ-
ment in which it is to be installed.
XIII. Ex d Units
The internal earth terminal must be used for
protective earthing when required. Do not remove
the internal ground strap from the earth terminal
where fitted.
For units with metric entries; gland continuity
and earthing may be achieved with an optional
external earth plate. If the external plate is fitted,
a thread sealing compound such as HYLOMAR
PL32 must beemployed to maintain the IP rating
of the unit.
Ex de Units
The internal/external earth stud must be used
for equipment grounding when required. Gland
continuity is achieved if the optional internal earth
plate is fitted.
XIV. When installing the device, MEDC recommends
the use of stainless steel fasteners. Ensure that all
nuts, bolts and fixings are secure.
XV. The unit should be positioned such that debris,
dust or water cannot settle in the re-entrant horn.
XVI. The unit should be positioned such that any solid
object, not part of the equipment, is a minimum
of 40mm from the Ex d flamepath joint.
XVII. The purchaser should make the
manufacturer aware of any external effects or
aggressive substances that the equipment may
be exposed to
3.0 Installation
The unit is mounted via 2 off Ø9mm fixing holes in the
U-shaped stirrup/mounting bracket. If required, the unit
can be initially placed via the Ø13mm central hole in the
stirrup. The unit can then be rotated to the required posi-
tion and fixed via the other holes.
If ordered with the unit, a swivel mounting bracket option
is available to allow further rotational adjustment to
the unit.
The fixing holes have been designed to accept an M8
screw or bolt.
Access to terminals
On Ex d versions, the cover is secured with 6 off M5
cover screws (4.0mm A/F hexagon key). Once the cover
fixings are unscrewed, the cover can be lifted away from
the enclosure to gain access to the interior. The cover
fixings are captive and will remain in the cover.
Table of contents
Languages:
Other Eaton Marine Equipment manuals

Eaton
Eaton ULCAS380 User manual

Eaton
Eaton MEDC EV24 User manual

Eaton
Eaton DEV20 User manual

Eaton
Eaton X10 User manual

Eaton
Eaton X10 DC User manual

Eaton
Eaton MEDC EV21 User manual

Eaton
Eaton SQG3 Series Instruction manual

Eaton
Eaton EV11 User manual

Eaton
Eaton SDR-RINT User manual

Eaton
Eaton Crouse-hinds series User manual