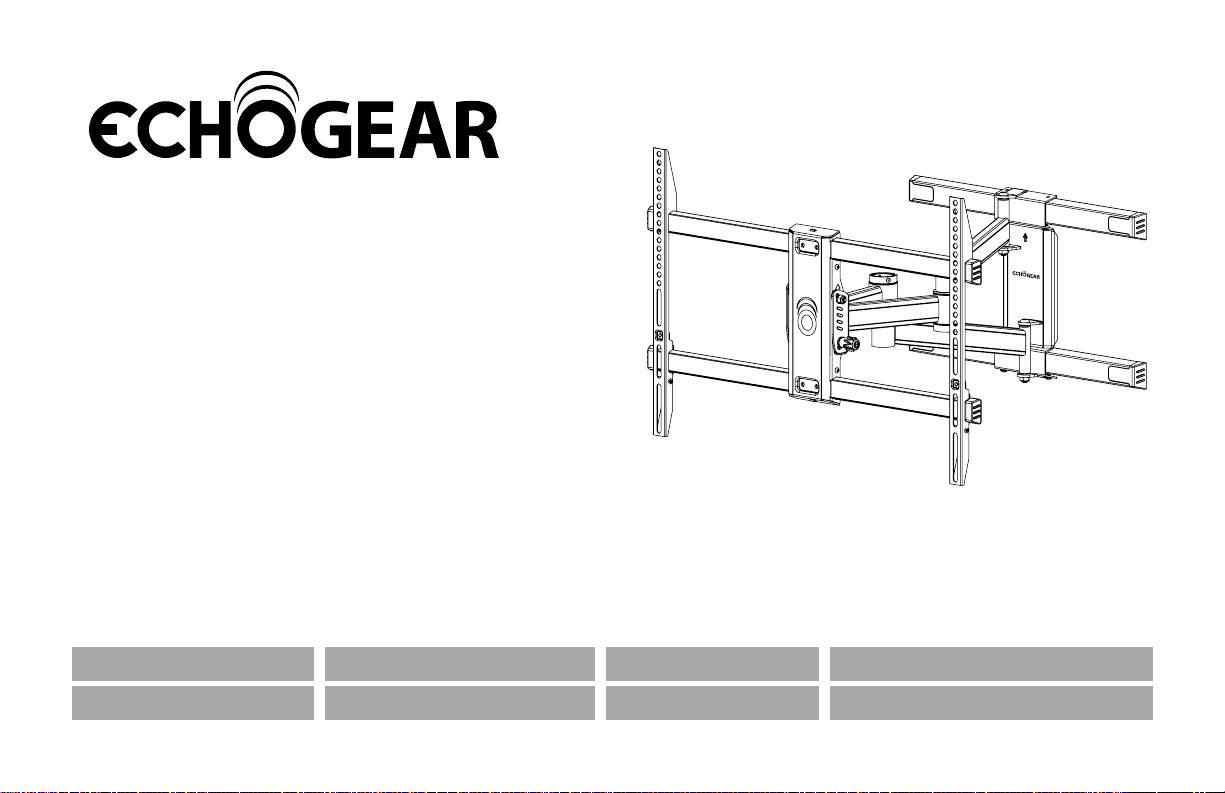
Echogear EGLF3 User manual
#YourGearUpgraded
INSTRUCTION MANUAL
Full Motion
TV Wall Mount
Model EGLF3
Texto en español, página 20 Deutscher Text Seiten 24 Svensk text sida 28
中文文字说明请参见第 32 页
Texte français page 22 Nederlandse tekst op pagina 26
Русский текст: стр. 30 日本語は 34 ページ

2
110 lbs.
(49.8 kg)
If your TV weighs more, this mount is NOT compatible.
Visit echogear.com to find a compatible mount.
Your TV (including accessories)
CANNOT EXCEED 110 lbs.
(49.8 kg) for this mount.
“You can think about it ...
but doooon’t do it.”
IMPORTANT SAFETY INSTRUCTIONS. READ ENTIRE MANUAL PRIOR TO USE. SAVE These INSTRUCTIONS
Yea, the boring stuff ... but read it, so you don’t jack things up!
Weight Restrictions
Please read through these instructions completely to be sure you’re comfortable with this easy install process.
Also check your TV owner’s manual to see if there are any special requirements for mounting your TV.
If you do not understand these instructions or have doubts about the safety of the installation, assembly
or use of this product, contact The Echogear Pros (see back page).
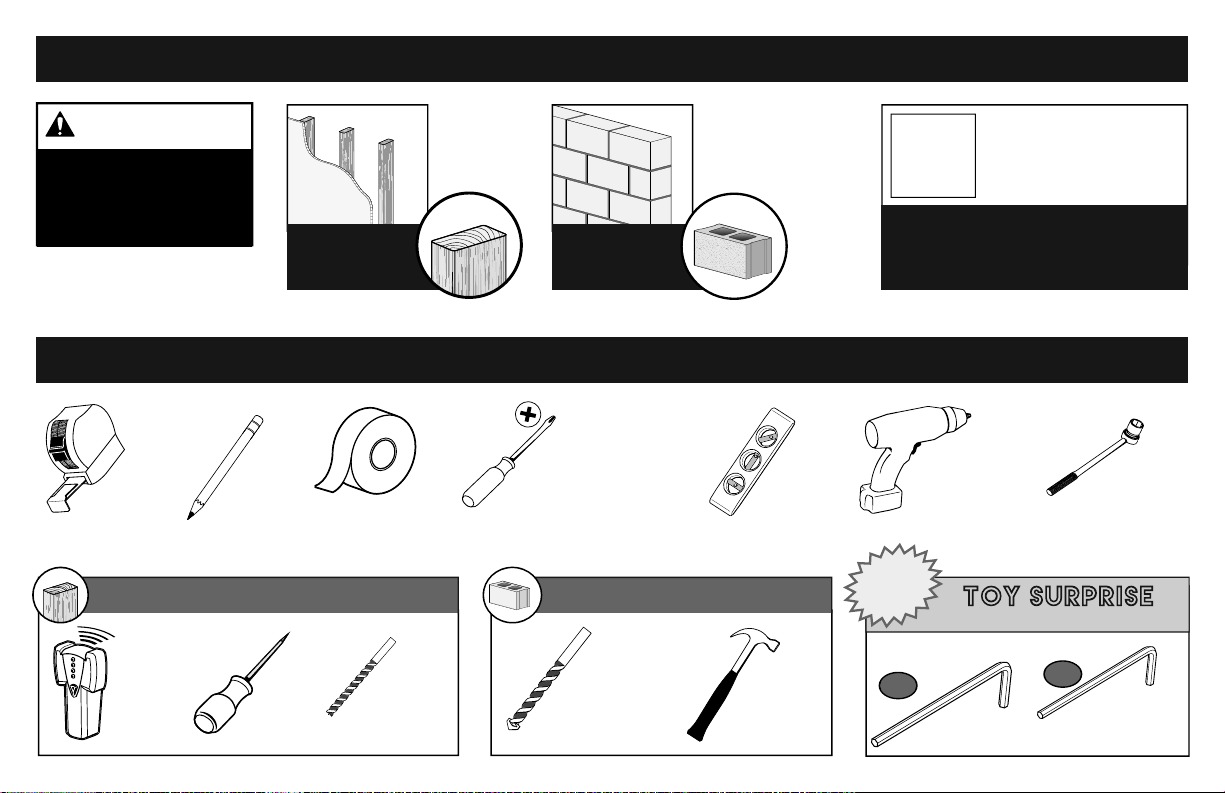
CAUTION: Avoid potential personal injuries and property damage!
►This product is designed for use in wood stud, solid concrete, and concrete block walls -
DO NOT install into drywall alone
►The wall must be capable of supporting five times the weight of the TV and mount combined
►Do not use this product for any purpose not explicitly specified by manufacturer
►Manufacturer is not responsible for damage or injury caused by incorrect assembly or use
CAUTION: DO NOT exceed
the maximum weight indicated. This
mounting system is intended for
use only with the maximum weights
indicated. Use with products
heavier than the maximum weights
indicated may result in collapse
of the mount and its accessories,
causing possible injury.
3
wood
studs?Solid
Concrete or
Concrete
Block?
Perfect!
Good to Go
Perfect!
Good to Go
Unsure?
Contact The Echogear Pros
(see back page)
?
Grab Your Tools
Verify Your Wall Construction
UUUUHHH?!?
CAUTION:
DO NOT
install into
drywall alone
... unless you WANT to
watch your TV fall and
crash onto the floor.
Awl
Stud
Finder
7/32 in.
(5.5 mm)
for wood 3/16 in.
5/32 in.
Drill Bit
Socket
Wrench
Hammer
Drill Bit
3/8 in.
(10 mm)
for concrete
Wood Stud Installation Concrete Installation
Pencil Tape Level
Phillips
Screwdriver
Tape
Measure
Electric
Drill
Hex Key Hex Key
1/2 in.
(13 mm)
"Give it back
to Phil when
you finish"
"collect the
whole set!"
TOY SURPRISE
Inside Every Box
H1 H2
FREE
4
Echogear Satisfaction Guarantee:
One More Thing ...
We’re driven to give DIYers an awesome install experience. We stand
behind everything we make because you deserve the best entertainment
experience without sacrificing quality and spending your whole paycheck.
Guess what? We’ll help you through the entire process, too.
Why? Because we like to help and it’s our passion to provide authentic
service. We won’t leave you hanging, no matter what.
Our U.S. based Echogear Pros answer the phone in all days ending in Y.
That means availability to try and stump our expert sta 7 days a week.
Call us if you…
1 Have any questions before, during, or after install.
2 Need dierent hardware to fit your TV model.
3 Just need someone to chat with. We’re here for you.
5
M8 x 25mm M8 x 50mm
M8 x 16mm M8 x 35mm
M6 x 12mm M6 x 35mm
5/16 x 2¾ in.
5/16 in.
1/4-20 x 3/4 in.
M5 x 12mm
M5 x 12mm
Fischer UX10 x 60R Anchor
REMEMBER THE LAST TIME
YOU “WINGED IT”?
WARNING: DON'T FEED TO CHILDREN —This product contains small items that could be a choking
hazard if swallowed. Before starting assembly, verify all parts are included and undamaged. If any parts are
missing or damaged, do not return the damaged item to your dealer; contact Customer Service.
Never use damaged parts!
What’s in the box ....... What’s IN THE boooooxx
NOTE: Not all hardware included in this kit will be used.
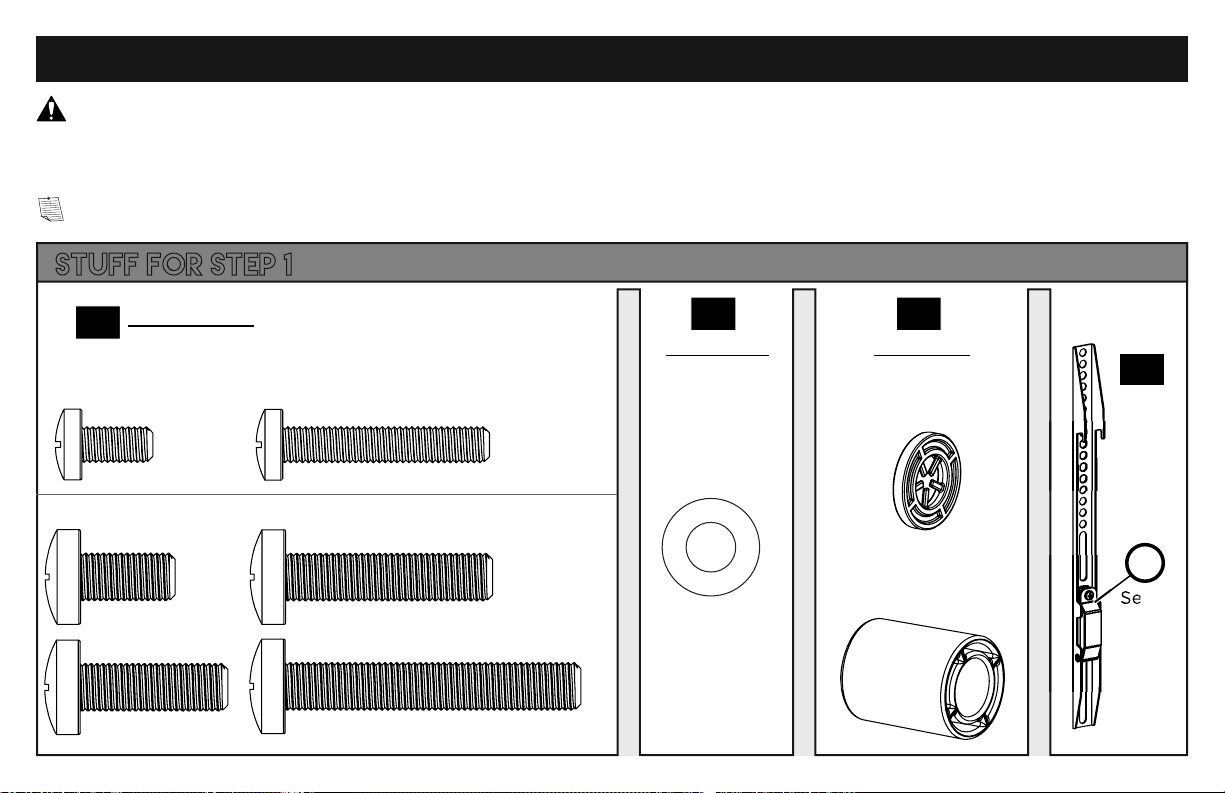
STUFF FOR STEP 1
TV Screws (qty. 4 each)
[Only one size fits your TV] Washers Spacers
[If necessary]
TV
Brackets
qty.8
Secure
Screw
(attached)
qty.2
qty.4
qty.4
M6
2.5mm
22mm
M8/M6
M8
01 02 03
Secure
s
04
6
M8 x 25mm M8 x 50mm
M8 x 16mm M8 x 35mm
M6 x 12mm M6 x 35mm
5/16 x 2¾ in.
5/16 in.
1/4-20 x 3/4 in.
M5 x 12mm
M5 x 12mm
Fischer UX10 x 60R Anchor
REMEMBER THE LAST TIME
YOU “WINGED IT”?
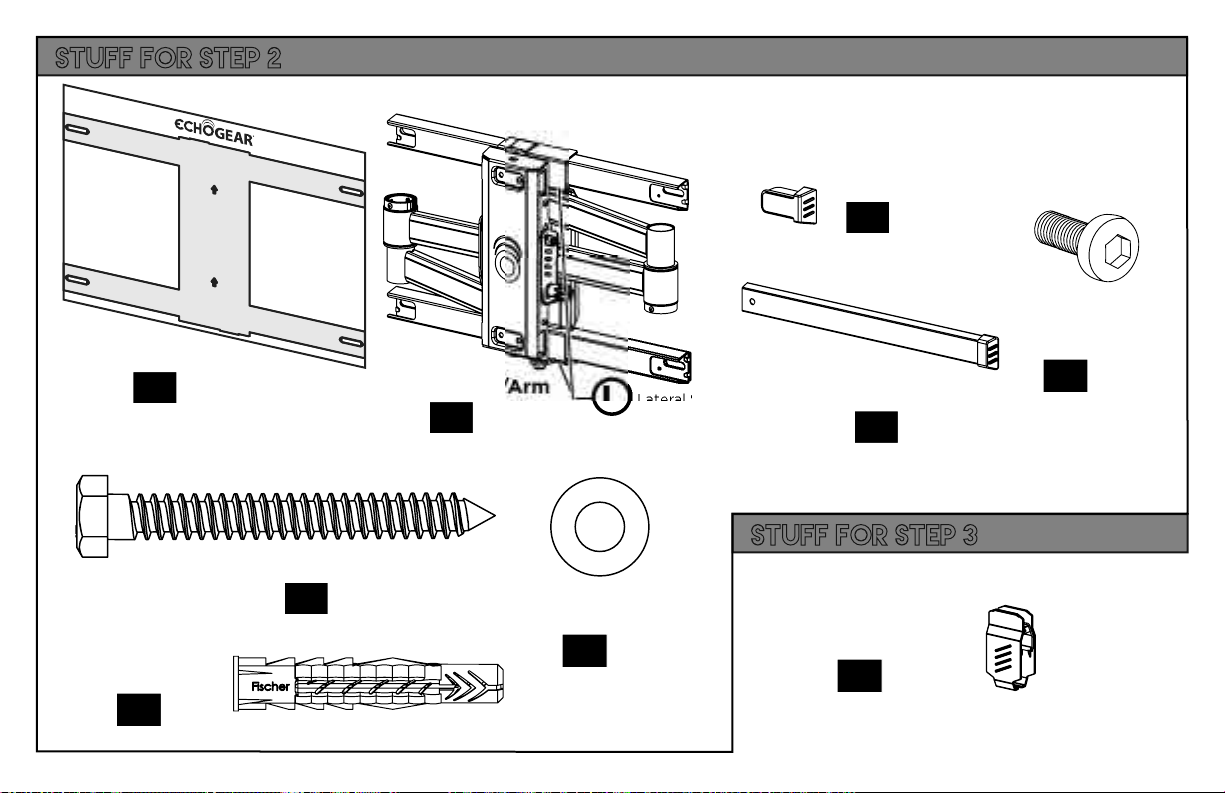
STUFF FOR STEP 2
STUFF FOR STEP 3
Wall Plate Template
Wall Plate/Arm
Lag Bolt
Concrete
Anchor
Lag Bolt Washer
Extension
Screw
Extension
Bracket
End Cap
qty.1
05
qty.1
06
qty.4
07
qty.4
10
qty.4
11
qty.4
08
qty.2
13
qty.4
09
qty.4
12
LLateral Shift Screws
(qty. 4) (attached)
Cable Management
Clip

7
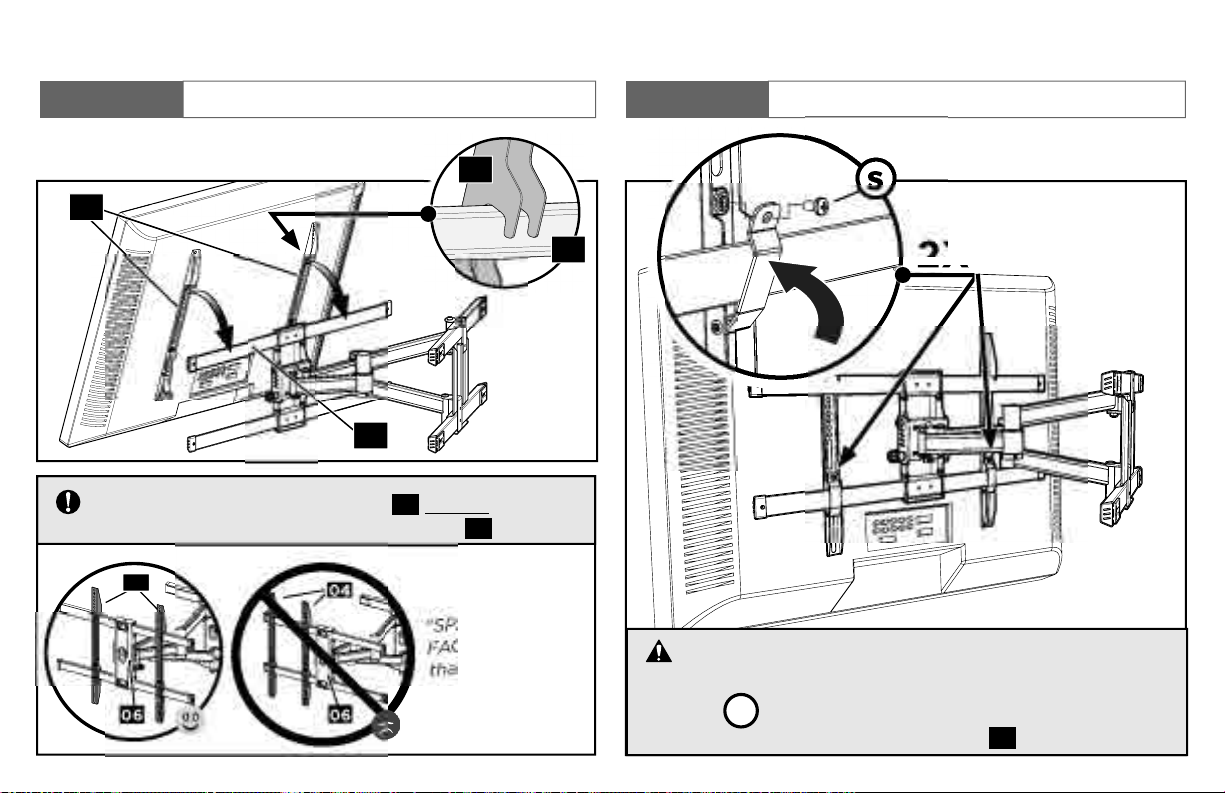
STEP 1 Attachthe TV BRACKETS TO YOUR TV
Select TV Screws
1.1
Select TV Screws
1.1
Only one screw size fits your TV.
M6
M8
"Suggested uses for
the extra screws:
board game pieces,
industrial jewelry,
sweet corn holders,
musical instruments –
like maracas or
'monsoon' sticks,
stocking stuers,
currency (not most
countries) ..."
Select Spacers (if needed)
1.2
Flat TV with: Rounded TV
Inset Holes Cable
Interference
a b Long Screw
Short Screw
Washer
Washer
Spacer
TV Bracket
TV
Bracket
Washer
Washer
EXTRA
SPACE
01 01
02
03
02
Flat TV
Spacer not
necessary

8
With Spacer
CAUTION: Ensure both TV brackets
04 are EQUALLY
CENTERED on your TV AND securely fastened in place.
Secure the TV Brackets to Your TV
1.3
b
04
04
No Spacer
Alternate
Spacer
setups
a
01 01
02
02
03

9
STEP 2 Install the Wall Plate
Max. 5/8 in. (16 mm)
CAUTION: Avoid potential personal injuries and
property damage!
Drywall covering the wall must not exceed 5/8 in. (16 mm).
Minimum wood stud size: nominal 2 x 4 in. (51 x 102 mm)
actual 1½ x 3½ in. (38 x 89 mm).
CAUTION: Avoid potential personal injuries and
property damage!
Mount wall plate directly onto the concrete surface (no
surface covering).
Min.
8 in.
(20 cm)
Min.
8 in.
(20 cm)
Min.
8 in.
(20 cm)
Min.
16 in.
(41 cm )
Min. Wood Stud Spacing:
16 in. (41 cm )
Min. Wood Stud Width:
nominal 2 in. (51 mm)
actual 1 ½ in. (38 mm)
Min. Wood Stud Depth:
nominal 4 in. (102 mm)
actual 3 ½ in. (89 mm)
For
CONCRETE
INSTALLATIONS,
For
WOOD STUD
INSTALLATIONS,
follow STEP 2B on PAGE 12follow STEP 2A on PAGE 10
SOLID WALL BLOCK WALL

10
REMEMBER THE LAST TIME
YOU “WINGED IT”?
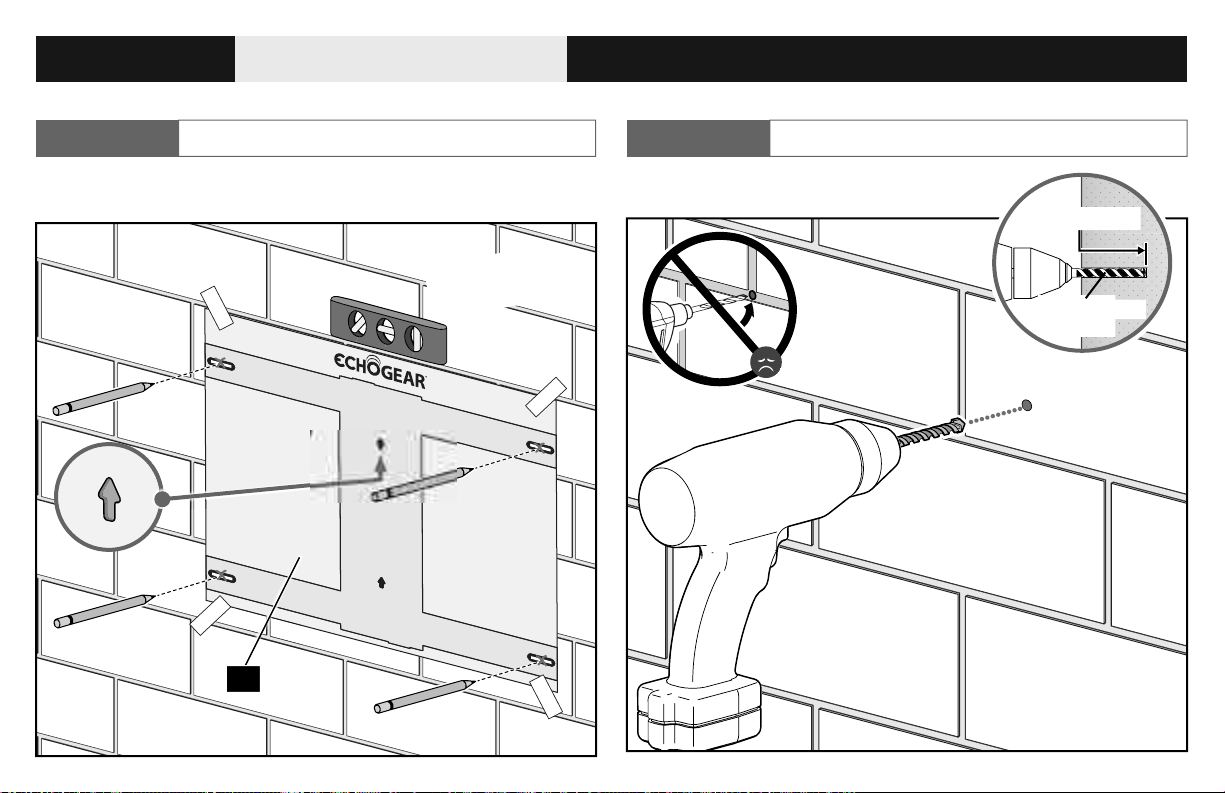
Align the Template
2.2 A
"Come on ...
level with me"
Use a stud
finder ...
... and/or verify
the edges with
an awl or a
small drill bit.
X-Ray
Specs
sold
separately
"favorite
pokey
device"
Find a Stud
2.1 A
(For Wood Stud)STEP 2A Install the Wall Plate
05
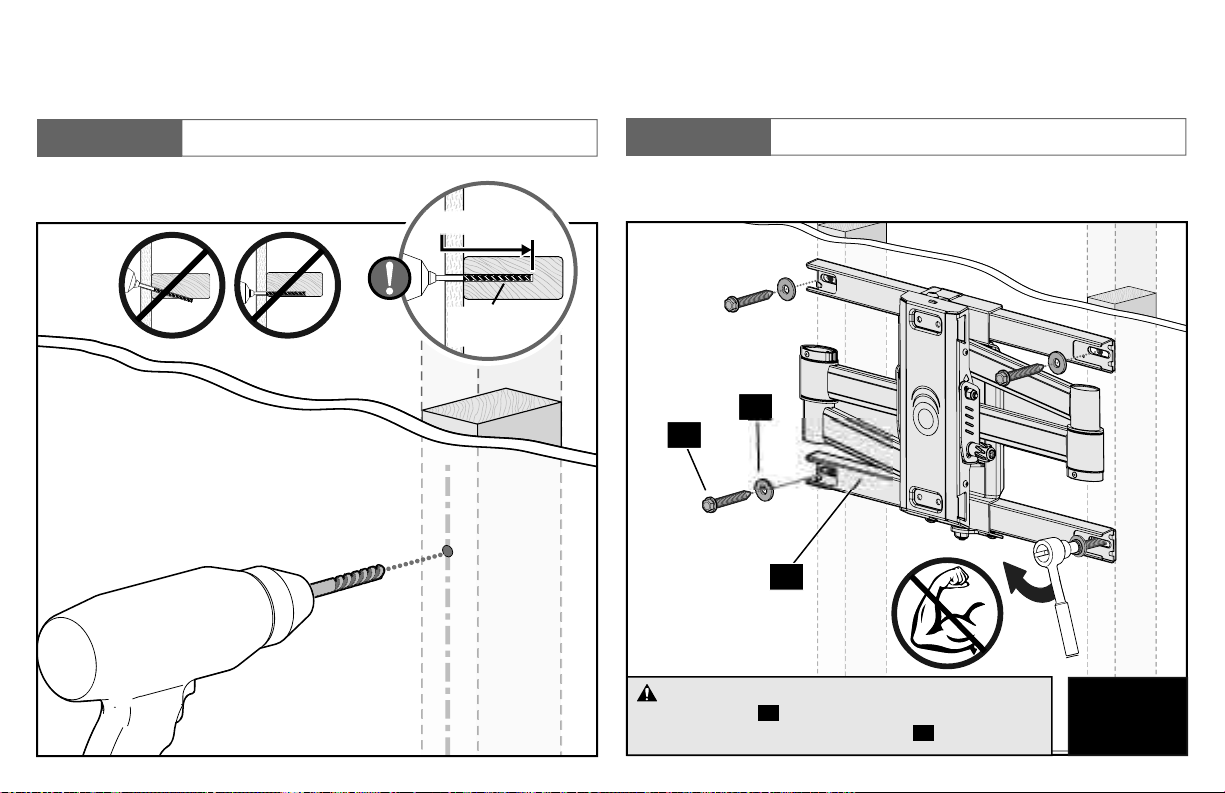
11
Drill Holes
2.3 A
7/32 in.
(5.5 mm)
2¾ in. (6.9 cm)
Bit
Secure Wall Plate
2.4 A
06
07
08
4X
Continue
STEP 2.5
on PAGE 14
CAUTION: DO NOT OVER-TIGHTEN
the lag bolts
07. Tighten only enough to
securely fasten the wall plate
06 to the wall.
12
(For CONCRETE)STEP 2B Install the Wall Plate
REMEMBER THE LAST TIME
YOU “WINGED IT”?
002862.eps
Align the Template Drill Holes
2.1 B 2.2 B
10 mm
(3/8 in.)
7.6 cm (3 in.)
Bit
"come on ...
level with me"
4X
05

13
Insert Concrete Anchors Secure Wall Plate
2.3 B 2.4 B
4X
06
09
07
08
"whichever way your
mind works"
Continue
STEP 2.5
on PAGE 14
CAUTION: DO NOT OVER-TIGHTEN
the lag bolts
07. Tighten only enough to
securely fasten the wall plate
06 to the wall.
FLUSH

14
Assemble Extensions
2.6
Attach End Caps
2.5
06
10
11
11
a
b
10
12
H2
15
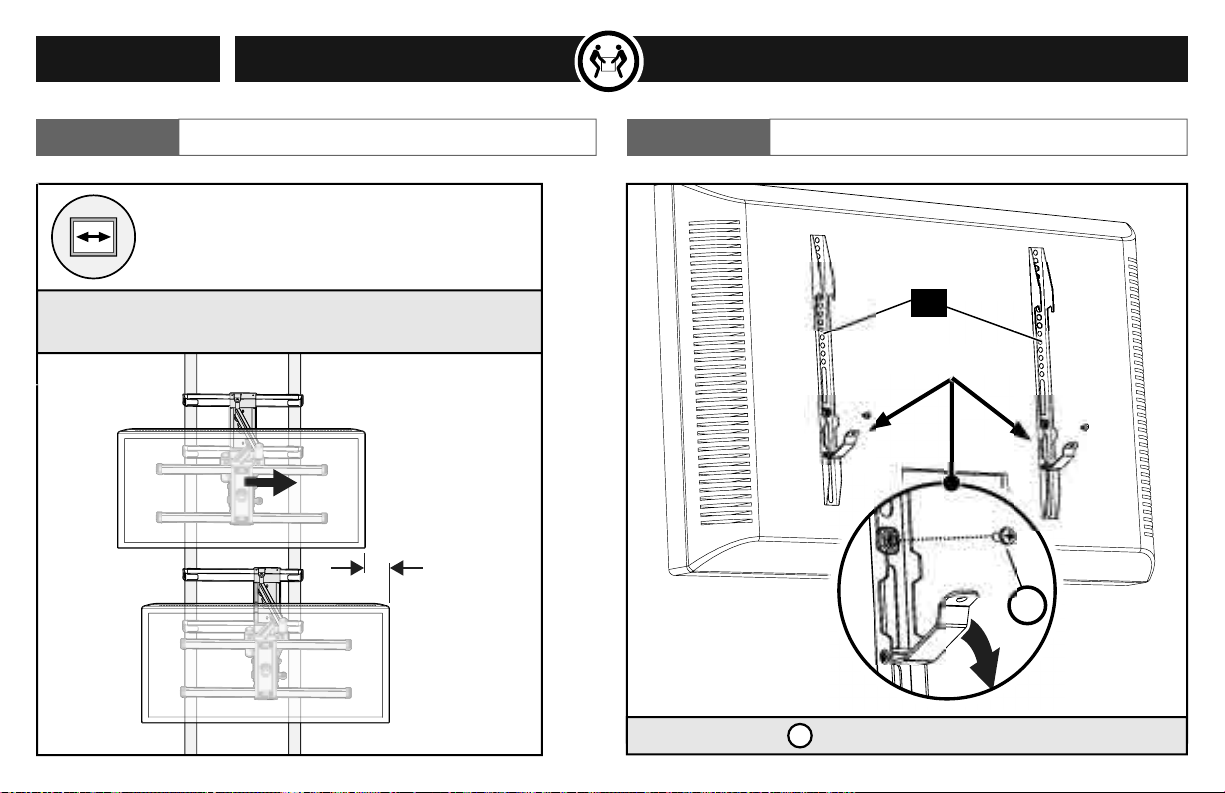
STEP 3 Hang Your TV
Open Safety LocksVerify TV Placement 3.23.1
2X
s
04
Save screws s for STEP 3.3
HEAVY! You may need assistance with this step.
Studs not quite
where you'd like?
Before you mount your TV, see PAGE 19 for
side-to-side adjustment.
16
IMPORTANT:
TV brackets
04
MUST
be
centered AND span the faceplate of arm
06
.
CAUTION: Avoid potential personal injury
or property damage!
Screws
s
and saftey locks MUST be installed to
secure your
TV to
wall plate/arm
06
.
Hang Your TV
3.3 Secure Your TV
3.4
s
2X
2X
"SPAN THE
FACEPLATE ...
that's a good
name for a band!"
04
06
04
06
06
11
04
04
17
Cable Management
3.5
"These clips are also great
for snacks and things."
OPTIONAL:
Cable ties
NOT INCLUDED
13
13
18
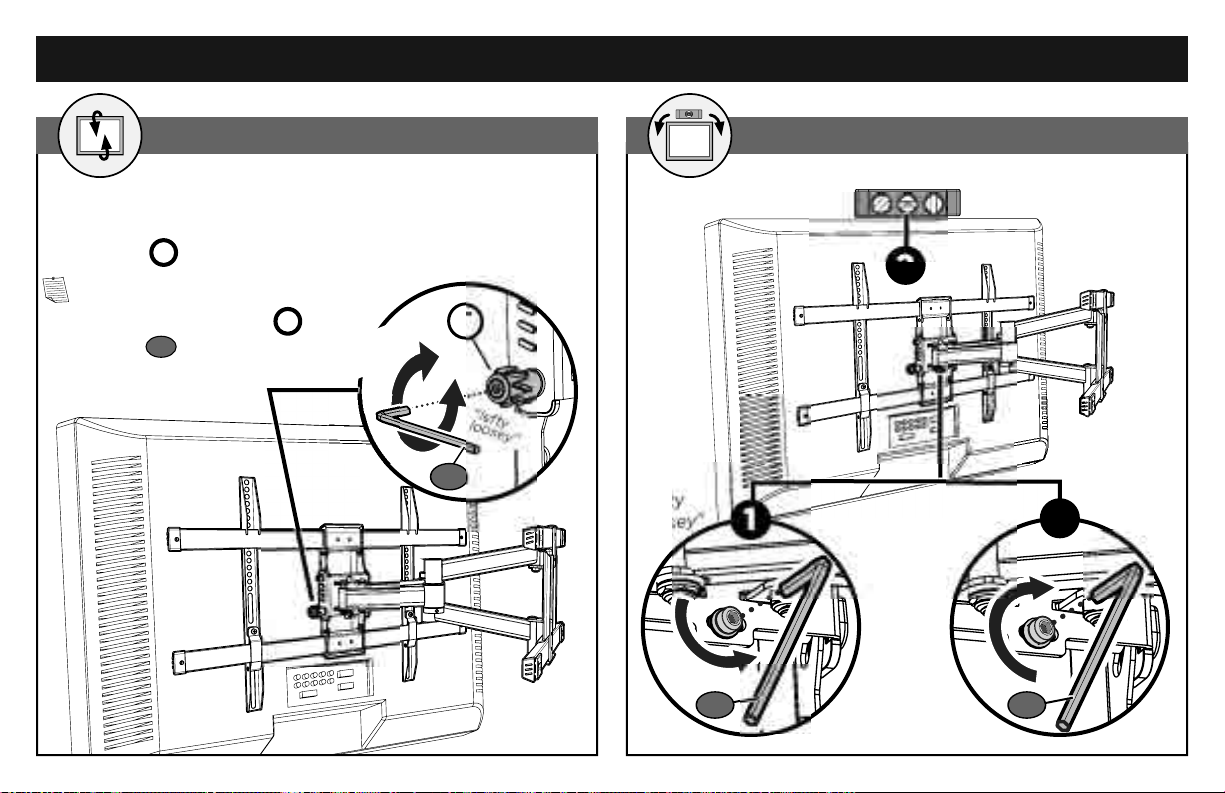
ADJUSTMENTS
Tilt LEVEL
Your TV should adjust easily when moved, then stay
in place. If your TV is too loose or too tight, adjust side
tension knob T.
NOTE: Once your TV is in place,
tighten the side tension knob T
with hex key H1 to prevent
unwanted movement.
T
"lefty
loosey" "righty
tighty"
H1
2
13
H2H2
"lefty
loosey"
"righty
tighty"

19
Side-to-Side SHIFT REMOVE YOUR TV
4X 06
IMPORTANT: REMOVE YOUR TV before
adjusting. Only LOOSEN screws
L to adjust -
DO NOT REMOVE. Securely tighten screws
L
when finished adjusting arm.
s
L
"Don't be
a hero!"
"that's MY move"
HEAVY!
You may need
assistance with
this step.
For Wood Stud ONLY
DO NOT Adjust for concrete installs

20
Español
COMPRUEBE LA CONSTRUCCIÓN DE SU PARED PÁGINA 3
PREPARE SUS HERRAMIENTAS PÁGINA 3
Restricciones de peso PÁGINA 2
¿QUÉ HAY EN LA CAJA? PÁGINA 5
ADVERTENCIA: este producto contiene piezas pequeñas que, en caso de ser tragadas, podrían causar asfixia. Antes de comenzar a montar la unidad, verifique
que dispone de todas las piezas y que se encuentran en buen estado. Si no dispone de todas las piezas o alguna está dañada, no devuelva el elemento defectuoso al
distribuidor. Póngase en contacto con el servicio de atención al cliente. ¡Nunca utilice piezas en mal estado!
NOTA: no se utilizarán todos los elementos de montaje incluidos en este kit.
INSTRUCCIONES DE SEGURIDAD
IMPORTANTES
.
LEA
TODO EL MANUAL ANTES DE UTILIZAR EL PRODUCTO.
GUARDE
ESTAS INSTRUCCIONES
Lea atentamente estas instrucciones para asegurarse de que está familiarizado con el sencillo proceso de instalación.
Consulte igualmente el manual de su TV para conocer si existen requisitos especiales para el montaje de su aparato.
Si no entiende las instrucciones o si tiene dudas acerca de la seguridad de la instalación, el montaje o el uso del producto,
póngase en contacto con los profesionales de Echogear en la página www.echogear.com.
PRECAUCIÓN: evite posibles lesiones personales y daños materiales.
►Este producto se ha diseñado para usarse en montantes de madera, hormigón macizo y paredes de bloques de
hormigón: NO lo instale en paredes únicamente de yeso
►La pared debe ser capaz de soportar hasta cinco veces el peso combinado del TV y el soporte
►No utilice este producto para ningún otro propósito que no sea el especificado explícitamente por el fabricante
►El fabricante no se responsabiliza de ningún daño o lesión resultante del montaje incorrecto o el uso indebido del producto
Si su TV pesa más, este soporte no es compatible. Visite
echogear.com para encontrar un soporte compatible.
Su TV (accesorios incluidos)
NO PUEDE SUPERAR
49,8 kg
(110 lb)
PRECAUCIÓN:
NO instalar en paredes
únicamente de yeso
¿Montantes de madera
(con paredes únicamente
de yeso)?
¿Hormigón macizo o
bloque de hormigón?¿No está seguro? Si tiene alguna duda, póngase en
contacto con los profesionales de
ECHOGEAR: www.echogear.com
¡Perfecto! ¡Perfecto!
Cinta métrica, lápiz, cinta, destornillador Phillips, nivel, taladro eléctrico, llave de tubo: 13 mm (1/2 pulg.)
Localizador de montantes, punzón, broca: 5,5 mm (7/ 3 2 pulg.)
Broca: 10 mm (3/8 pulg.), martillo
Colocación en pared de montantes de madera:
Montaje en pared de hormigón:
PASO 1 PÁGINA 7
PASO 2 INSTALE LA PLACA MURAL PÁGINA 10
PIEZAS PARA EL PASO 1 PÁGINA 5 PIEZAS PARA EL PASO 2 PÁGINA 6
Seleccione los espaciadores (si es necesario)
Seleccione los tornillos para el TV
Fije los soportes del TV
PASO 1.1
PASO 1.2
PASO 1.3
Solamente un tamaño de tornillo se adapta a su TV.
Other manuals for EGLF3
1
Table of contents
Languages:
Other Echogear TV Mount manuals

Echogear
Echogear EGLF3 User manual

Echogear
Echogear EGLD1 User manual

Echogear
Echogear EGMF1 User manual

Echogear
Echogear EGCM1 User manual

Echogear
Echogear EGCM2 User manual

Echogear
Echogear EGLT3 User manual

Echogear
Echogear ECHO-GM1FC User manual

Echogear
Echogear EGLF1 User manual

Echogear
Echogear EGLT2 User manual

Echogear
Echogear EGXLF1-KIT User manual


