manuals.online logo
Brands
  1. Home
  2. •
  3. Brands
  4. •
  5. emaux
  6. •
  7. Underwater Lighting
  8. •
  9. emaux Arr30 User manual

emaux Arr30 User manual

Arr30
UNDERWATER LIGHT OPERATING MANUAL
Keep this manual for future reference
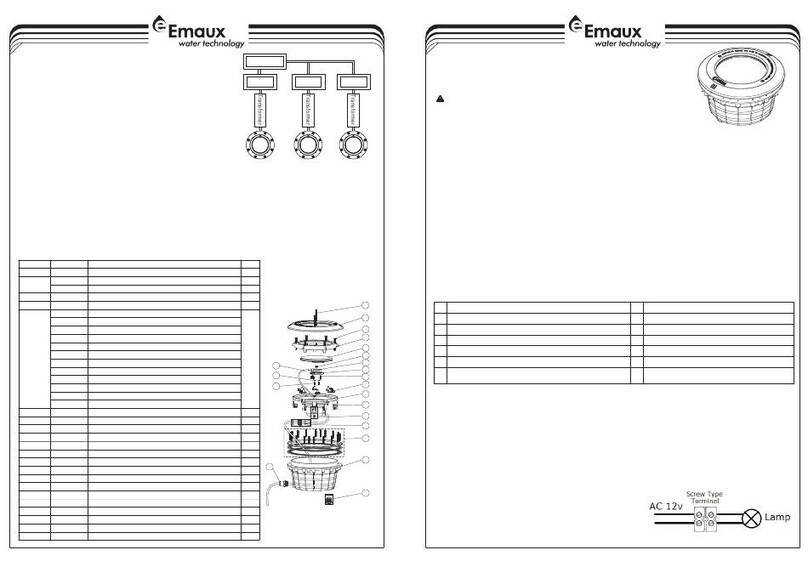
REPLACEMENT PARTS
Maintenance of the Lights
1) Do not leave the lights “on” above water for longer than 1 minute.
2) Do not leave the lights directly under sunlight. Fill the pool with fresh water as soon as possible after the
lights are installed.
3) Before switching on the lights, check whether the lights are fully submerged underwater and the circuit
boxes are running properly.
4) This unit does not need any kind of maintenance. If it is not working properly, please contact EMAUX
authorized dealer where you purchase the unit from.
5) Warranty will be voided if the Emaux Underwater Light was dismantled by unauthorized personnel.
Model:Arr30CW / Arr30B / Arr30C / Arr30W
www.emauxgroup.com
4-4 4-1
Item
Part No.
Description
Qty
1
03011334
M5x30 Screw
1
2
89045901
LED Panel (Cool White)
1
89045902
LED Panel (RGB)
89045903
LED Panel (Warm White)
89045904
LED Panel (Single Blue)
3
01050166
Cable clip
4
4
03011307
M4x12 Screw
4
5
89040203
Fitting for Concrete pool
1
6
89045517
Fitting for vinly pool
1
名 称
版 本 编 号
规 格
比 例
颜 色
产品负责人
更改日期
更改内容
新文件
版本 制图/设计
A
意万仕(中山)泳池设备有限公司
EMAUX ZhongShan)Swimming Pool Equipment Co., Ltd(
审核 批准
80g印尼蓝
双面印刷
2018.05
1 : 1
420X297(mm)
EMLI18051508
PANTONE Process Black C
材料
工 艺
日 期
EMAUX Arr30 水灯 英文说明书
5 6
1
2
3
4
EMLI18051508
SAFETY WARNINGS
• Avoid direct contact with electrical power.
• Respect all regulations in effect for preventing accidents.
• All units are required to be disconnected from the main electricity before any operation of maintenance.
• Never handle with wet hands and feet.
• This unit is design for use only when fully submerged in fresh water, connecting with a safety transformer.
• Never operate this Underwater Light for more than 1 minute unless it is totally submerged in water.
• Be sure power is off before installing or removing LED plate. Allow LED plate to cool before replacing.
• This product should be installed according to your local electrical installation ordinances and regulations.
• Maximum Depth for Light installation at 1 meter. o
• Maximum Water Temperature Range for light operation 0 - 30 C.
• For type Y attachments
If the external flexible cable or cord of this luminaire is damaged, it shall be exclusively replaced by the
manufacturer or his service agent or a similar qualified person in order to avoid a hazard.
• The light source of this luminaire is not replaceable, when the light source reaches its end of life the whole luminaire
shall be replaced.
SPECIFICATION
A) Electrical Specification : 1) Voltage : AC12V 2) Frequency : 50/60Hz 3) Power : 30W.
B) Colour change options(For RGB version only) :
• Only qualified electrician is allowed to carry out the installation of this product.
13 14
Mode E: RGB Colour Sequence: Red>Green>Blue
Mode F: Four Colour Sequence: Red>Green>Blue>Purple
Auto Colour Change
1
3
5
7
9
11
2
4
6
8
10
12
White Green
Green+Blue
Red+Blue
Mode B: Green+Gradual Red
Blue
Red+Green
Mode C: Blue+Gradual Green
Mode A: Blue+ Gradual Red
Mode D: Blue+Gradual Red
Rapid Auto Colour Change
C) Control
1) When the light is connected to the transformer directly, the on/off
switch controls the colour changes (Associating a light with a
transformer and an on/off switch is recommended; If you want all
the lights to change colour at the same time, install a master
switch, Figure 1).
2) If applicable, when the light is connected to the transformer and
the transformer to the optional control box, the control panel on
the control box and its remote control controls the colour changes
(See the Control Box Manual for details).
INSTALLATION NOTES
1 Each cable is 2.5m long. You should follow the procedures closely
when installing the light.
2) It is recommended to install a light every 20m , the approximate
exposure area of each unit.
3) The lights should be installed in the direction that they will not shine
directly into the house.
4) For training or competition pools, the lights must be installed on the
sides in order to prevent swimmers from seeing any glare.
5) Nothing should be placed on the poolside directly above the lights
for ease of future maintenance.
6) If the wires are connected inside the lights, you must seal the
connections with leak-proof tapes or products with the same
function.
7) The cables connecting the lights and the transformers must be at
2
least 6mm and the distance between them must not exceed 30m
(Figure 2); otherwise the lights will not function properly.
)
2
INSATALLATION OF THE UNDERWATER LIGHT
A) Preparing to Install
1 Before installation, a circuit system diagram
must be designed by a certified engineer.
2) The circuit system must comply with local
laws and regulations and must be carried
out by qualified electricians.
3) Make sure the voltage is 12V and the
terminal box is at least 120cm from the
poolside (Figure 3).
4) Upon installation, top of the light must be
at least 45cm from water surface (Figure 3).
)
B) Pool Installation
1) Embed the Wall Mount into the concrete wall, making sure that it is parallel to the side of the
pool(Figure 4).
2) Place the Mounting Plate on the concrete wall and tighten it with 4 screws. The conduit must
be next to the Mounting Plate (Figure 5).
3) Note that the light must only be installed on a flat or concave surface.
4) Wrap extra cables behind the light to make sure it could be taken to the pool surface for future
maintenance (Figure 6).
5) Hang the light onto the Mounting Plate and tighten the screws (Figure 7).
6) The wire connections inside the terminal box must be sealed by leak-proof tapes to prevent
water from leaking into the terminal box through the cables.
C)
1) Refer to section "Preparing to Install”.
2) Make 2 holes on the pool wall (Figure 8).
3) Place the o-rings between the Mounting Plate and the pool wall and tighten it with the Nut on
the other side of the pool wall (Figure 9).
4) Put the cable sequentially through the sealing Nut, the sealing O-ring and the cable hole on
the mounting plate; then tighten the Nut (Figure10).
5) Wrap extra cables behind the light to make sure it could be taken to the pool surface for
future maintenance. Then, hang the light onto the Mounting Plate and tighten the screws
(Figure 11).
Fiberglass Pools / Vinyl Pools Installation
4-3
4-2
Figure 1
ON/OFF Switch
Light
Transformer
Transformer
Master Switch
Transformer
ON/OFF Switch ON/OFF Switch
Light Light
Figure 2
=30m
Transformer
Light
FIGURE 4 FIGURE 5 FIGURE 6 FIGURE 7
Mounting
plate
O-ring Nut
FIGURE 8 FIGURE 9 FIGURE 10 FIGURE 11
2XØ24
120cm min.
Water level
Rigid
conduit
Junction
box
100cm max. from water
line to top of lens
6.6cm
29.6cm
Figure 3

This manual suits for next models

4

Other emaux Underwater Lighting manuals

emaux UL-TP100 Series Manual

emaux

emaux UL-TP100 Series Manual

emaux UL-P100 Series Manual

emaux

emaux UL-P100 Series Manual

emaux NP300 Series User manual

emaux

emaux NP300 Series User manual

emaux E-Lumen Compact User manual

emaux

emaux E-Lumen Compact User manual

emaux LED-P100 series Manual

emaux

emaux LED-P100 series Manual

emaux E-Lumen X User manual

emaux

emaux E-Lumen X User manual

emaux EL-S100S User manual

emaux

emaux EL-S100S User manual

emaux ElumenX Series User manual

emaux

emaux ElumenX Series User manual

emaux UL-P300 Series User manual

emaux

emaux UL-P300 Series User manual

emaux LED-P10 User manual

emaux

emaux LED-P10 User manual

emaux NP300 Series User manual

emaux

emaux NP300 Series User manual

emaux E-Lumen X Series User manual

emaux

emaux E-Lumen X Series User manual

emaux NP300 Series User manual

emaux

emaux NP300 Series User manual

emaux P50 Instructions for use

emaux

emaux P50 Instructions for use

emaux P50 User manual

emaux

emaux P50 User manual

emaux UNDERWATER LIGHT Series User manual

emaux

emaux UNDERWATER LIGHT Series User manual

emaux LED-TP100 Series Manual

emaux

emaux LED-TP100 Series Manual

emaux EL-H200 User manual

emaux

emaux EL-H200 User manual

emaux UL-CP100 User manual

emaux

emaux UL-CP100 User manual

emaux EL-NP300 Series User manual

emaux

emaux EL-NP300 Series User manual

emaux E-Lumen-252 User manual

emaux

emaux E-Lumen-252 User manual

emaux GL10 User manual

emaux

emaux GL10 User manual

Popular Underwater Lighting manuals by other brands

Griven Underwater MK3 user manual

Griven

Griven Underwater MK3 user manual

ccei Brio PK10R400 Technical instructions

ccei

ccei Brio PK10R400 Technical instructions

Shadow-Caster COLOR CASTER SCR-24-CC operating instructions

Shadow-Caster

Shadow-Caster COLOR CASTER SCR-24-CC operating instructions

Seamaid LEDINPOOL 502679 Installation & maintenance manual

Seamaid

Seamaid LEDINPOOL 502679 Installation & maintenance manual

Oase Lunaqua 10/35 operating instructions

Oase

Oase Lunaqua 10/35 operating instructions

PLG NEPTUN 3 user manual
PLG

PLG NEPTUN 3 user manual

Sea & Sea YS-03 SOLIS instruction manual

Sea & Sea

Sea & Sea YS-03 SOLIS instruction manual

Astral Pool LUMIPLUS FLEXI Installation and maintenance manual

Astral Pool

Astral Pool LUMIPLUS FLEXI Installation and maintenance manual

COLORKINETICS C-Splash 2 installation instructions

COLORKINETICS

COLORKINETICS C-Splash 2 installation instructions

LIGMAN BORNHOLM 1 installation manual

LIGMAN

LIGMAN BORNHOLM 1 installation manual

Sealife Sea Dragon Mini 900 instruction sheet

Sealife

Sealife Sea Dragon Mini 900 instruction sheet

LIGMAN FUNEN 2 installation manual

LIGMAN

LIGMAN FUNEN 2 installation manual

S.R.Smith Mod-Lite PowerPass Wireless Faq

S.R.Smith

S.R.Smith Mod-Lite PowerPass Wireless Faq

NORBIT AQUA FCL600 quick guide

NORBIT

NORBIT AQUA FCL600 quick guide

Oase ProfiLux LED 110 operating instructions

Oase

Oase ProfiLux LED 110 operating instructions

Ros ROS Lightning Operation and maintenance manual

Ros

Ros ROS Lightning Operation and maintenance manual

LIGMAN FUNEN 1 instruction manual

LIGMAN

LIGMAN FUNEN 1 instruction manual

BEGA 99 912 Instructions for use

BEGA

BEGA 99 912 Instructions for use

manuals.online logo
manuals.online logoBrands
  • About & Mission
  • Contact us
  • Privacy Policy
  • Terms and Conditions

Copyright 2025 Manuals.Online. All Rights Reserved.