manuals.online logo
Brands
  1. Home
  2. •
  3. Brands
  4. •
  5. emaux
  6. •
  7. Underwater Lighting
  8. •
  9. emaux EL-NP300 Series User manual

emaux EL-NP300 Series User manual

EL-NP300 Series Underwater Light
1-4
User Manual
4-4
General Information
Never install in vertical position with the lamp facing upwards / downwards, Intended for fresh & salt water
swimming pool
A) Ensure that the electrical system of your pool conforms to the following requirements of all local codes
and ordinances. A licensed or certified electrician must install the electrical system to meet or exceed
those requirements before the niche (fixture-housing) is installed.
B) Installation Guideline:
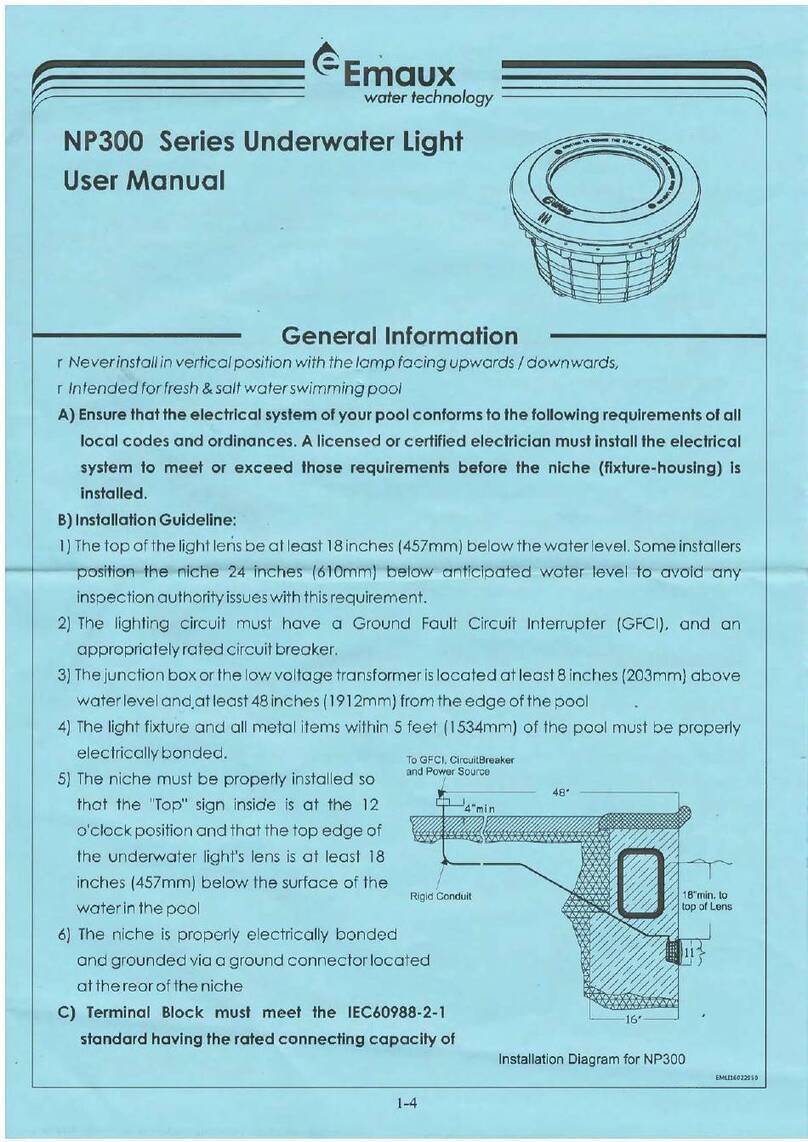
1) The top of the light lens be at least 18 inches (457mm) below the water level. Some installers position the
niche 24 inches (610mm) below anticipated water level to avoid any inspection authority issues with this
requirement.
2) The lighting circuit must have a Ground Fault Circuit
Interrupter (GFCI), and an appropriately rated circuit
breaker.
3) The junction box or the low voltage transformer is located
at least 8 inches (203mm) above water level and at least 48
inches (1912mm) from the edge of the pool
Figure 1
REPLACEMENT PARTS
Maintenance of the Lights
• Do not leave the lights “on” above water for longer than 1 minute.
• Do not leave the lights directly under sunlight. Fill the pool with fresh water as soon as possible after the lights
are installed.
• Before switching on the lights, check whether the lights are fully submerged underwater and the circuit
boxes are running properly.
• This unit does not need any kind of maintenance. If it is not working properly, please contact EMAUX
authorized dealer where you purchase the unit from.
• Warranty will be voided if the Emaux Underwater Light was dismantled by unauthorized personnel.
Figure 9
SAFETY WARNINGS
• Only qualified electrician is allowed to carry out the installation of this product.
• Avoid direct contact with electrical power.
• Respect all regulations in effect for preventing accidents.
• All units are required to be disconnected from the main electricity before any operation of maintenance.
• Never handle with wet hands and feet.
• This unit is design for use only when fully submerged in fresh water, connecting with a safety transformer
• Never operate this Underwater Light for more than 1 minute unless it is totally submerged in water.
• Be sure power is off before installing or removing LED plate. Allow LED plate to cool before replacing.
• This product should be installed according to your local electrical installation ordinances and regulations
• Maximum Depth for Light installation at 1 meter.
o
• Maximum Water Temperature Range for light operation 0 - 30 C.
- for type Z attachments
The external flexible cable or cord of this luminaire cannot be replaced;if the cord is damaged,the
luminaire shall be destroyed.
SPECIFICATION
A) Electrical Specification : 1) Voltage : AC12V 2) Frequency : 50/60Hz 3) Power : 20W / 35W / 50W.
B) Colour change options(For RGB version only) :
13 14
Mode E: RGB Colour Sequence: Red>Green>Blue
Mode F: Four Colour Sequence: Red>Green>Blue
>Purple
Auto Colour Change
1
3
5
7
9
11
2
4
6
8
10
12
White Green
Green+Blue
Red+Blue
Mode B: Green+Gradual Red
Blue
Red+Green
Mode C: Blue+Gradual Green
Mode A: Blue+ Gradual Red
Mode D: Blue+Gradual Red
Rapid Auto Colour Change
Control
1 When the light is connected to the transformer directly,
the on/off switch controls the colour changes
(Associating a light with a transformer and an on/off
switch is recommended; If you want all the lights to
change colour at the same time, install a master switch,
Figure 1).
2 If applicable, when the light is connected to the
transformer and the transformer to the optional control
box, the control panel on the control box and its remote
control controls the colour changes (See the Control Box
Manual for details).
)
)
ON/OFF Switch
Light
Transformer
Light
Transformer
Master Switch
Light
Transformer
ON/OFF Switch ON/OFF Switch
EMLI16082530
名 称
版 本 编 号
规 格
比 例
颜 色
产品负责人
更改日期
更改内容
版本 制图/设计
意万仕(中山)泳池设备有限公司
EMA UX Zho ngS h an) Swi mmi n g P ool Equ ipm e nt Co. , L td(
审核 批准
80g印尼蓝
普通印刷
2016.08
1 : 1
420X297(mm)
EMLI16082530
PANTONE Process Black C
材 料
工 艺
日 期
EMAUX EL-NP300 水灯 英文说明书
C
增加内容 2015.04.06
14
13
3
2
1
4
21
20
19
17
16
15
18
5
9
6
7
8
12
11
10
Item No.
Part No.
Description English
Qty
1
03011326
M6*80 Screws
2
2
03017075
Stainless Steel Lid ( EMAUX)
1
01050008
Plastic Lid (EMAUX)
1
3
03011327
M6*55 Hexagon Head Screws
6
4
01100011
Face Ring
1
5
04011153
Ultra-Thin 252 LED panel 20W,Warm white
1
04011151
Ultra-Thin 252 LED panel 20W,Cool white
04011152
Ultra-Thin 252 LED panel 20W,RGB
04011150
Ultra-Thin 252 LED panel 20W,Single Blue
04011107
Ultra-Thin 441 LED panel 35W,Warm white
04011105
Ultra-Thin 441 LED panel 35W,Cool white
04011106
Ultra-Thin 441 LED panel 35W,RGB
04011104
Ultra-Thin 441 LED panel 35W,Single Blue
04011181
Ultra-Thin 531 LED panel 50W,Warm white
04011179
Ultra-Thin 531 LED panel 50W,Cool white
04011180
Ultra-Thin 531 LED panel 50W,RGB
04011178
Ultra-Thin 531 LED panel 50W,Single Blue
6
03011360
M3*5 round head screw
2
7
02021085
Silica gel ring
1
8
01050105
Bottom cover
1
9
03011361
M4*10 round head self-tapping screw
5
10
04013004
2
2*1.5mm *2.5m(D8) Cable
1
11
02010285
NBR ring
2
12
03012125
M4*10 flat head self-tapping screw
2
13
01051253
fixed position plate
6
14
01230003
Waterproof Cover
1
15
89041602
Nut Fitting
6
16
89041603
Fastening Dog
2
17
89041604
Water Joint Fittings for Cable
1
18
89041608
Vinyl pool fitting for NP300
1
19
01050010
NP300 Lights Niche
1
20
89041605
Plug with O-Ring
1
21
01171106
Joint for wire & pipe
1
3-42-4
Installation Diagram for NP300
Niche
Concrete
Underwater
Light Fixture
Figure 2
Concrete swimming pool with vinyl liner
1 To install the underwater lighting in a concrete swimming
pool with vinyl liner, the niche should be fixed in the wall of
the swimming pool. Be sure the top of the niche be at
least 18 inches (457mm) below the water level, and the
TOP sign of the niche is at the 12 o'clock position.
2 There are two conduits at the back of the niche, please
chose one which is most convenient to your wiring design
and seal the other one with the plug provided.
3 Punch or drill the holes in the vinyl liner as stated in figure 3.
4 Install the Niche as shown in figure 4.
)
)
)
)
Niche Installation
Concrete swimming pool
1 To install the underwater lighting in a concrete swimming
pool, the niche should be fixed in the wall of the
swimming pool. Be sure the top of the niche be at least 18
inches (457mm) below the water level, and the TOP sign
of the niche is at the 12 o'clock position.
2 There are two conduits at the back of the niche, please
chose one which is most convenient to your wiring design
and seal the other one with the plug provided.
3 Concreting the pool as shown in figure2.
)
)
)
20-Ø6mm
Ø235mm
Ø252mm
Figure 3
Gasket
Concrete
Vinyl Liner
Setting Fitting
20-M5 Screw
Figure 4
Figure 7
Figure 6
Figure 5
Stainless steel lid and plastic lid interchange
1 Remove the old lid by unscrewing the two M6 screw on the
lid. Note that the O ring, nuts slide block and the fastening
dog will be loosen too by removing the M6 screws on the
lid, as shown in figure 5.
2 Install the new plastic lid or stainless steel lid as shown in
figure 6, make sure the screws hole are aligned. Fasten the
M6 screw on the lid.
)
)
Underwater light fixture installation
1 Feed cord through conduit to junction box, leaving at least
59 inches (1500mm) of cord at the light fixture to coil
around the back of the light, such that the light fixture
would be bought back to the pool deck for service.
2 Make the wire connection to the junction box.
3 Insert the entire underwater light fixture into the niche. In
order to obtain good pool lighting it is important that the
company logo of Emaux of the lid is located on the 6
o'clock position.
4 Screw in the two M6 x 75 screws on the lid until the fastening
dog is secured in the inner walls of the niche as shown in
figure 7.
5 Before operating the light for more than 10 seconds, fill the
pool with water until the underwater light is completely
submerged in water. To check for proper operation, turn
on main street or circuit breaker as well as the switch that
operates the underwater light itself.
)
)
)
)
)
Lamp Replacement
1 To remove the underwater light to the pool deck, loosen
the two screws on the lid until the fastening dog yields
sufficiently so that the underwater light unit can be
separated from the niche.
2 Unscrew the 6 nuts which secure the lid to the base of the
underwater light as shown in figure 8.
3 To take out the fixed position plate from panel to replace
the LED panel.
)
)
)
Figure 8
4" min
To GFCI, CircuitBreaker
and Power Source
Rigid Conduit 18" min. to
top of Lens
4) The light fixture and all metal items within 5 feet (1534mm)
of the pool must be properly electrically bonded.
5) The niche must be properly installed so that the "Top" sign
inside is at the 12 o'clock position and that the top edge
of the underwater light's lens is at least 18 inches (457mm)
below the surface of the water in the pool
6) The niche is properly electrically bonded and grounded
via a ground connector located at the rear of the niche
C) Terminal Block must meet the IEC60988-2-1 standard
2
having the rated connecting capacity of 4.0mm , use of
screw type terminal at least 25A rated current, mounted
inside junction boxes, see figure1 below
D) Use only EMAUX lighting fixtures in this niche to ensure
proper bonding and grounding connections.
(For US user, please also follow the requirements of the
National Electrical Code (NEC)
ø
48"
11"
16"

Other emaux Underwater Lighting manuals

emaux EL-H200 User manual

emaux

emaux EL-H200 User manual

emaux E-Lumen Compact User manual

emaux

emaux E-Lumen Compact User manual

emaux NP300 Series User manual

emaux

emaux NP300 Series User manual

emaux LED-TP100 Series Manual

emaux

emaux LED-TP100 Series Manual

emaux UL-CP100 User manual

emaux

emaux UL-CP100 User manual

emaux UL-TP100 Series Manual

emaux

emaux UL-TP100 Series Manual

emaux UL-P100 Series Manual

emaux

emaux UL-P100 Series Manual

emaux LED-P100 series Manual

emaux

emaux LED-P100 series Manual

emaux GL10 User manual

emaux

emaux GL10 User manual

emaux Arr30 User manual

emaux

emaux Arr30 User manual

emaux UL-P300 Series User manual

emaux

emaux UL-P300 Series User manual

emaux E-Lumen-252 User manual

emaux

emaux E-Lumen-252 User manual

emaux UNDERWATER LIGHT Series User manual

emaux

emaux UNDERWATER LIGHT Series User manual

emaux EL-S100S User manual

emaux

emaux EL-S100S User manual

emaux NP300 Series User manual

emaux

emaux NP300 Series User manual

emaux LED-P10 User manual

emaux

emaux LED-P10 User manual

emaux E-Lumen X Series User manual

emaux

emaux E-Lumen X Series User manual

emaux E-Lumen X User manual

emaux

emaux E-Lumen X User manual

emaux ElumenX Series User manual

emaux

emaux ElumenX Series User manual

emaux NP300 Series User manual

emaux

emaux NP300 Series User manual

emaux P50 Instructions for use

emaux

emaux P50 Instructions for use

emaux P50 User manual

emaux

emaux P50 User manual

Popular Underwater Lighting manuals by other brands

Aqua STANDARD Series Installation and maintenance manual

Aqua

Aqua STANDARD Series Installation and maintenance manual

DÖRR Premium Steel PS-15423 instruction manual

DÖRR

DÖRR Premium Steel PS-15423 instruction manual

Astral Pool SKIMMER FLOTANDO Installation and maintenance manual

Astral Pool

Astral Pool SKIMMER FLOTANDO Installation and maintenance manual

Sea & Sea YS-03 SOLIS instruction manual

Sea & Sea

Sea & Sea YS-03 SOLIS instruction manual

Oase LunAqua 3 operating instructions

Oase

Oase LunAqua 3 operating instructions

LIGMAN FUN-50002 installation manual

LIGMAN

LIGMAN FUN-50002 installation manual

O'Ryan Industries SP2526C instruction manual

O'Ryan Industries

O'Ryan Industries SP2526C instruction manual

Oase Lunaqua Mini LED operating instructions

Oase

Oase Lunaqua Mini LED operating instructions

S.R.Smith Mod-Lite PowerPass Wireless Faq

S.R.Smith

S.R.Smith Mod-Lite PowerPass Wireless Faq

Oceanled X4 Installation and operation manual

Oceanled

Oceanled X4 Installation and operation manual

AMP Lighting HydraPro MR11 Installation & maintenance guide

AMP Lighting

AMP Lighting HydraPro MR11 Installation & maintenance guide

Oceanled X Series Quick install guide

Oceanled

Oceanled X Series Quick install guide

Keldan VIDEO 24X 30000lm CRI82 operating instructions

Keldan

Keldan VIDEO 24X 30000lm CRI82 operating instructions

LIGMAN AQUA 2 installation manual

LIGMAN

LIGMAN AQUA 2 installation manual

STA-RITE SWIMQUIP series owner's manual

STA-RITE

STA-RITE SWIMQUIP series owner's manual

Oase Lunaqua 10 operating instructions

Oase

Oase Lunaqua 10 operating instructions

Hayward Proseries SP9120 owner's guide

Hayward

Hayward Proseries SP9120 owner's guide

SCALEO infinity operating manual

SCALEO

SCALEO infinity operating manual

manuals.online logo
manuals.online logoBrands
  • About & Mission
  • Contact us
  • Privacy Policy
  • Terms and Conditions

Copyright 2025 Manuals.Online. All Rights Reserved.