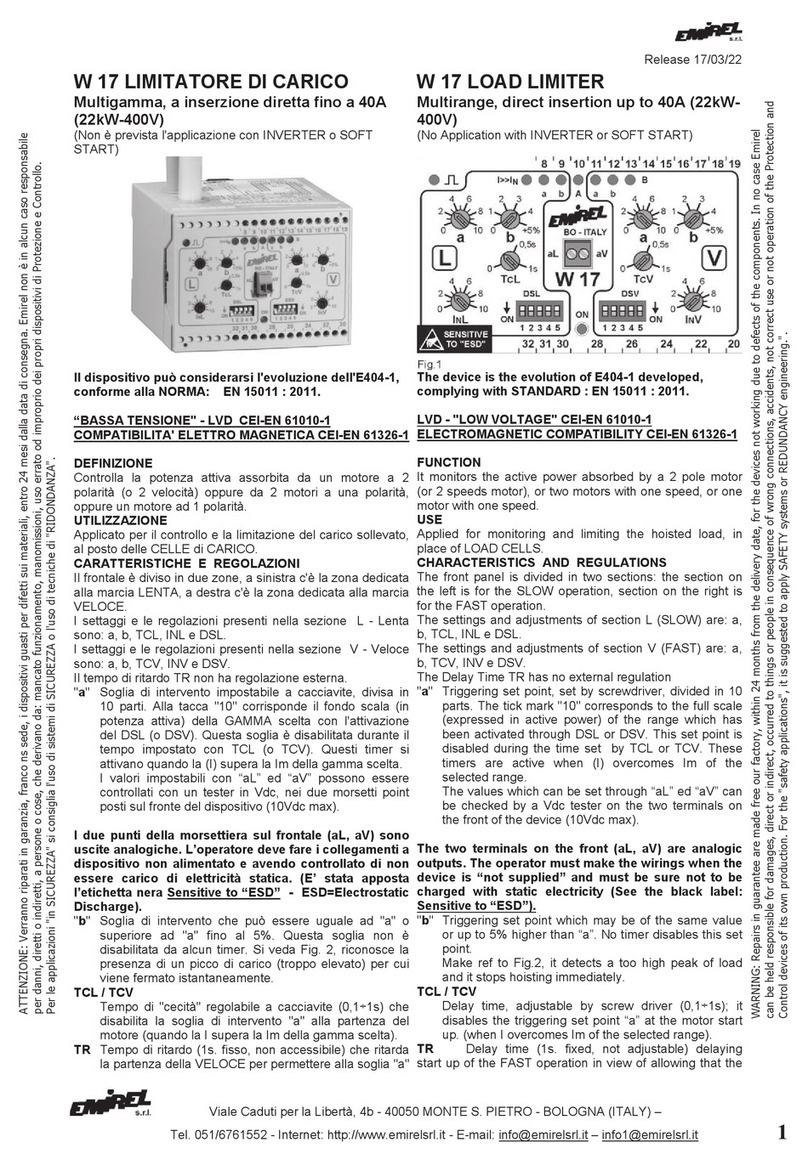
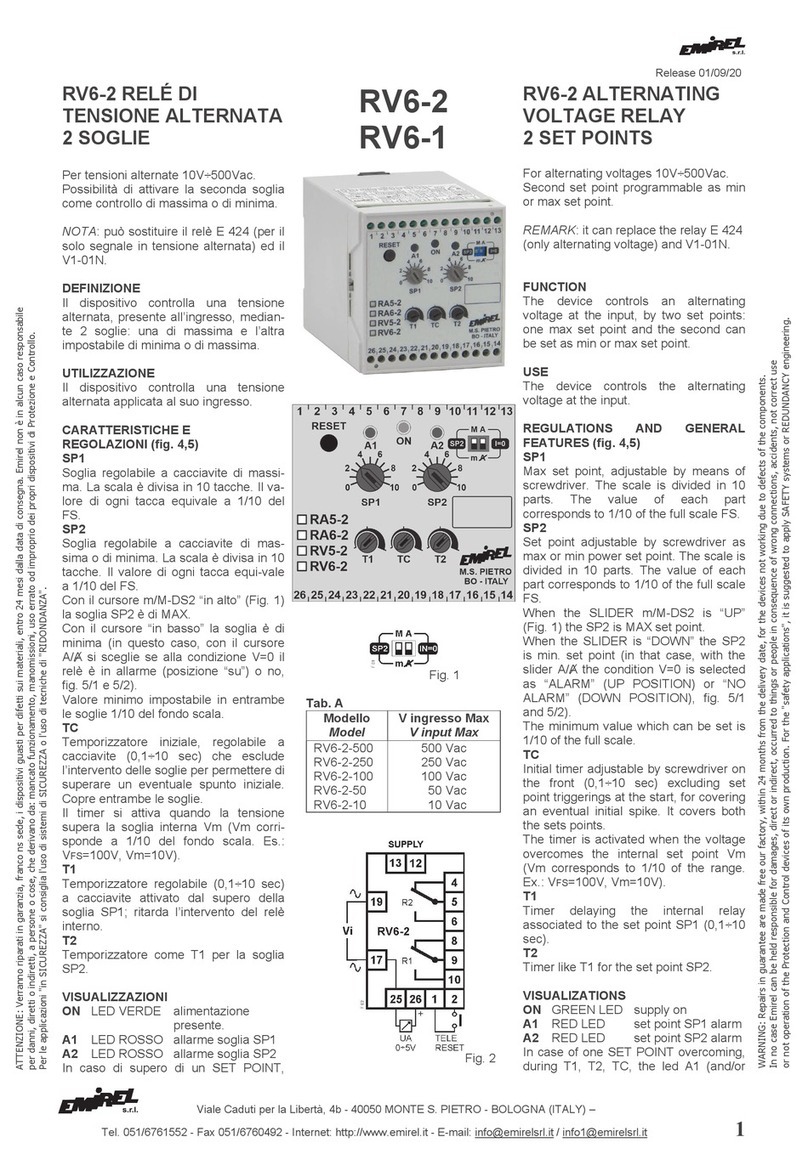
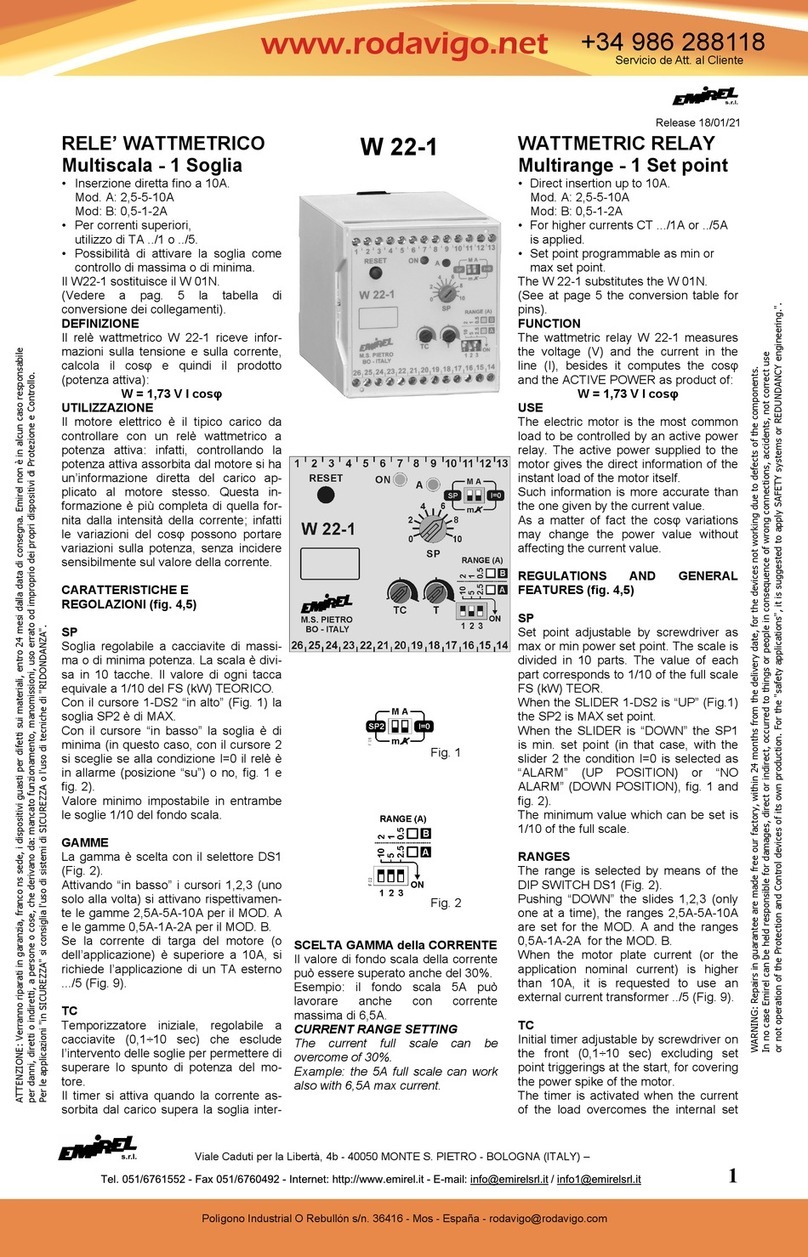
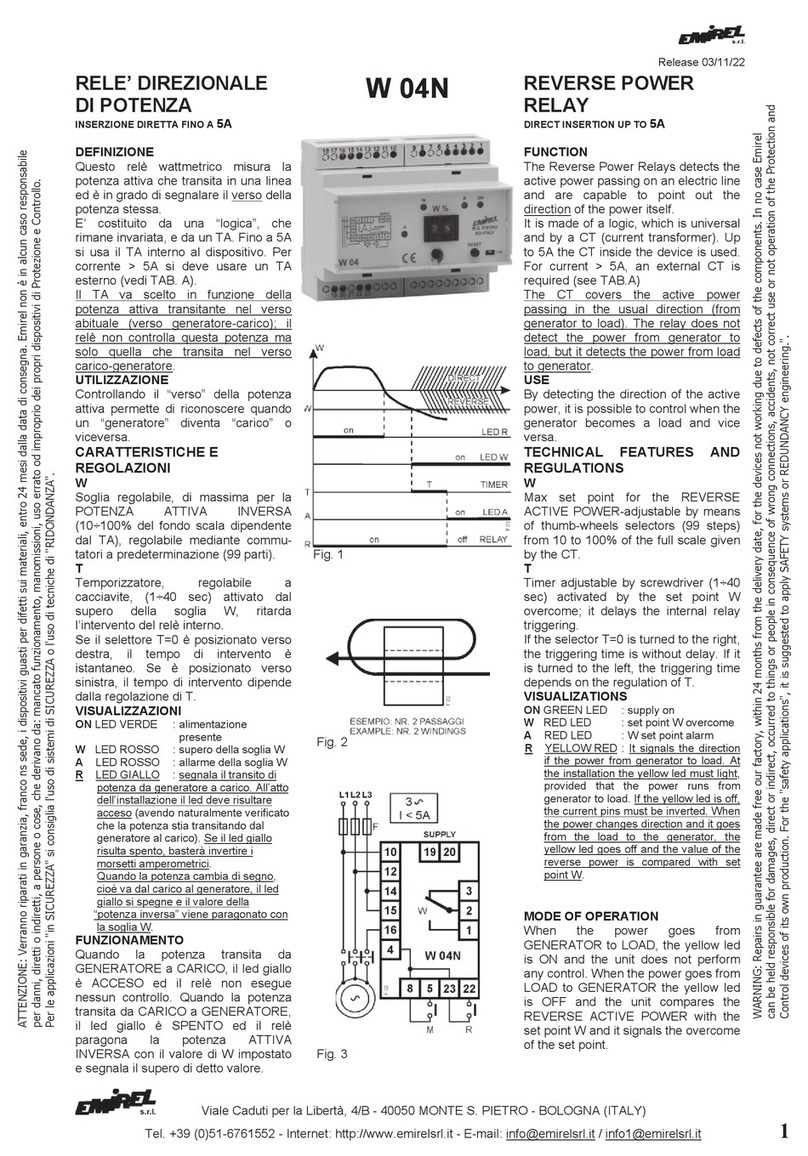
Emirel W 92 User manual

Viale Caduti per la Libertà, 4/B - 40050 MONTE S. PIETRO - BOLOGNA (ITALY)
Tel. +39 (0)51-6761552 - Internet: http://www.emirelsrl.it - E-mail: info@emirelsrl.it / info1@emirelsrl.it 1
Release 04/11/22
RELE’ WATTMETRICO
Multiscala - 2 Soglie
• Inserzione diretta fino a 10A.
Mod. A: 2,5-5-10A
Mod: B: 0,5-1-2A
• Per correnti superiori,
utilizzo di TA ../1 o ../5.
• Possibilità di attivare la seconda so-
glia come controllo di max o di min.
Il W 92 sostituisce il E 492N.
(Vedere a pag. 5 la tabella di conversio-
ne dei collegamenti).
DEFINIZIONE
Il relè wattmetrico W 92 riceve infor-
mazioni sulla tensione e sulla corrente,
calcola il cosφ e quindi il prodotto
(potenza attiva):
W = 1,73 V I cosφ
UTILIZZAZIONE
Il motore elettrico è il tipico carico da
controllare con un relè wattmetrico a
potenza attiva: infatti, controllando la
potenza attiva assorbita dal motore si ha
un’informazione diretta del carico
applicato al motore stesso. Questa
informazione è più completa di quella
fornita dalla intensità della corrente;
infatti le variazioni del cosφ possono
portare variazioni sulla potenza, senza
incidere sensibilmente sul valore della
corrente.
CARATTERISTICHE E
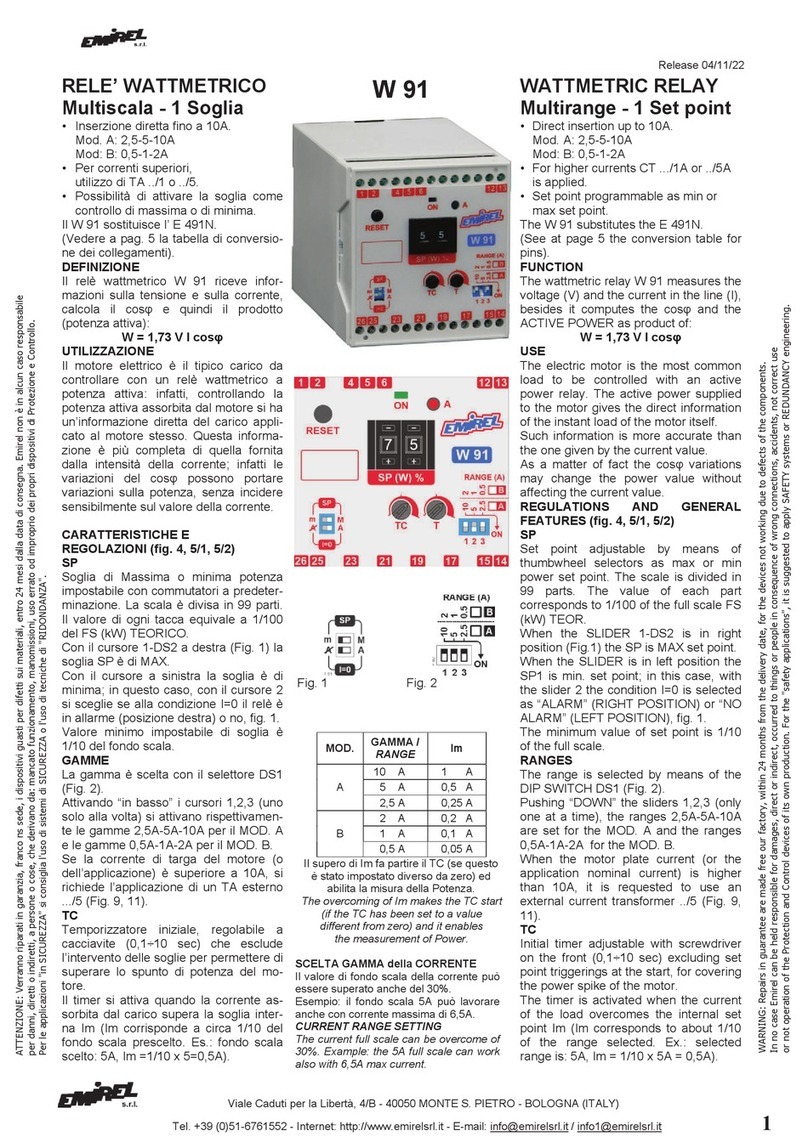
REGOLAZIONI (fig. 4, 5/1, 5/2)
SP1
Soglia impostabile di massima potenza
mediante commutatore a predeter-
minazione. La scala è divisa in 99 parti.
Il valore di ogni tacca equivale a 1/100
del FS (kW) TEORICO.
SP2
Soglia impostabile di massima o di
minima potenza mediante commutatore
a predeterminazione. La scala è divisa
in 99 parti. Il valore di ogni tacca
equivale a 1/100 del FS (kW) TEORICO.
Con il cursore m/M-DS2 a destra (Fig. 1)
la soglia SP2 è di MAX.
Con il cursore a sinistra la soglia è di
minima (in questo caso, con il cursore
A/ si sceglie se alla condizione I=0 il
relè è in allarme (posizione destra) o no,
fig. 1).
Valore minimo impostabile in entrambe
le soglie 1/10 del fondo scala.
GAMME
La gamma è scelta con il selettore
RANGE (Fig. 2).
Attivando “in basso” i cursori 1,2,3 (uno
solo alla volta) si attivano rispettivamen-
te le gamme 2,5A-5A-10A per il MOD. A
e le gamme 0,5A-1A-2A per il MOD. B.
Se la corrente di targa del motore (o
dell’applicazione) è superiore a 10A, si
richiede l’applicazione di un TA esterno
.../5 o …/1 (Fig. 9, 11). Se si usa un
TA/5A si sceglierà W 92 MOD. A per
usare la gamma 2 (5A). Se si usa un
TA/1A si sceglie MOD.B per usare
W 92
Fig. 1 Fig. 2
MOD. GAMMA /
RANGE Im
A
10 A 1 A
5 A 0,5 A
2,5 A 0,25 A
B
2 A 0,2 A
1 A 0,1 A
0,5 A 0,05 A
Il supero di Im fa partire il TC (se questo
è stato impostato diverso da zero) ed
abilita la misura della Potenza.
The overcoming of Im makes the TC start
(if the TC has been set to a value
different from zero) and it enables
the measurement of Power.
SCELTA GAMMA della CORRENTE
Il valore di fondo scala della corrente può
essere superato anche del 30%.
Esempio: il fondo scala 5A può lavorare
anche con corrente massima di 6,5A.
CURRENT RANGE SETTING
The current full scale can be overcome of
30%.
Example: the 5A full scale can work also
with 6,5A max current.
WATTMETRIC RELAY
Multirange - 2Set points
• Direct insertion up to 10A
Mod. A: 2,5-5-10A
Mod: B: 0,5-1-2A
• For higher currents CT .../1A or ../5A
is applied.
• Second set point programmable as
min or max set point.
The W 92 substitutes the E 492N.
(See at page 5 the conversion table for
pins).
FUNCTION
The wattmetric relay W 92 measures the
voltage (V) and the current in the line (I),
besides it computes the cosφ and the
ACTIVE POWER as product of:
W = 1,73 V I cosφ
USE
The electric motor is the most common
load to be controlled with an active
power relay. The active power supplied
to the motor gives the direct information
of the instant load of the motor itself.
Such information is more accurate than
the one given by the current value.
As a matter of fact the cosφ variations
may change the power value without
affecting the current value.
REGULATIONS AND GENERAL
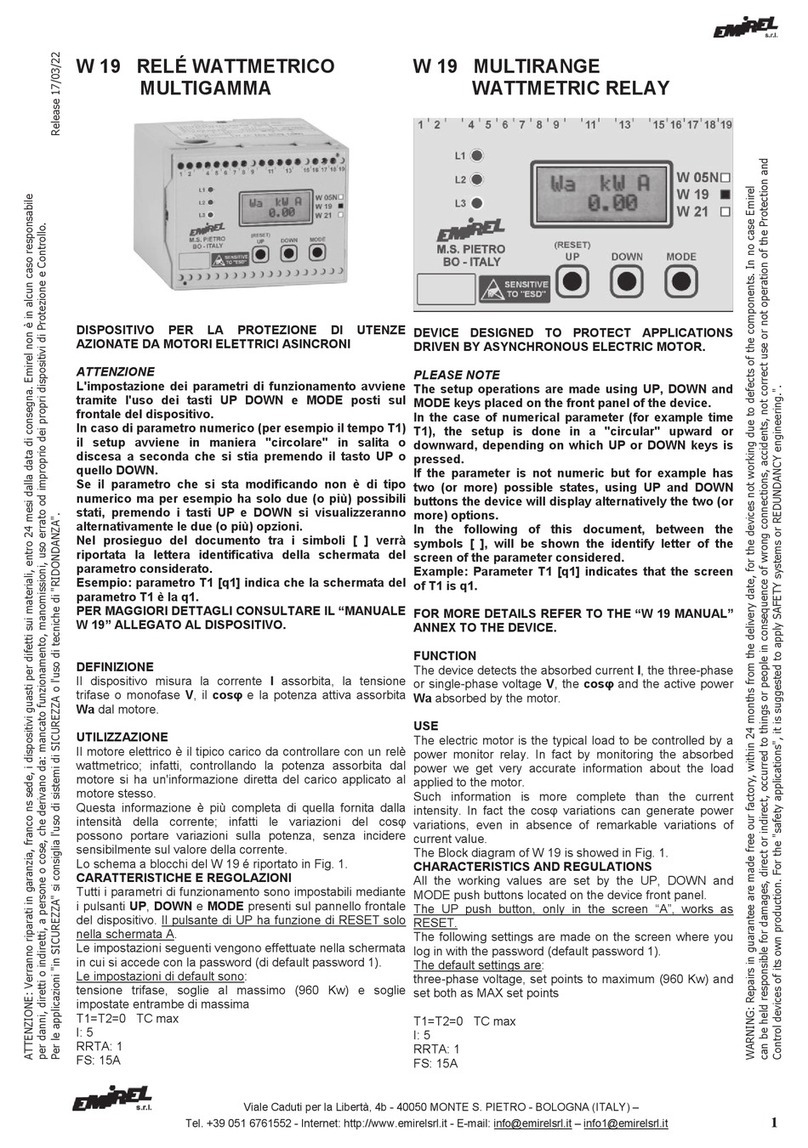
FEATURES (fig. 4, 5/1, 5/2)
SP1
Max set point of the active power
adjustable by means of thumbwheel
selectors. The scale is divided in 99
parts. The value of each part
corresponds to 1/100 of the full scale FS
(kW) TEOR.
SP2
Set point adjustable by means of
thumbwheel selector as max or min
power set point. The scale is divided in
99 parts. The value of each part
corresponds to 1/100 of the full scale FS
(kW) TEOR.
When the SLIDER m/M-DS2 is in right
position (Fig. 1) the SP2 is MAX set
point.
When the SLIDER is in left position the
SP1 is min. set point (in that case, with
the slider A/ the condition I=0 is
selected as “ALARM” (RIGHT
POSITION) or “NO ALARM” (LEFT
POSITION), fig. 1). The minimum value
which can be set is 1/10 of the full scale.
RANGES
The range is selected by means of the
DIP SWITCH RANGE (Fig. 2).
Pushing “DOWN” the sliders 1,2,3 (only
one at a time), the ranges 2,5A-5A-10A
are set for
the MOD. A and the ranges
0,5A-1A-2A for the MOD. B.
When the motor plate current (or the
application nominal current) is higher
than 10A, it is requested to use an
external current transformer ../5 or …/1
(Fig. 9, 11).
If CT/5A is used the W92 MOD. A must
WARNING: Repairs in guarantee are made free our factory, within 24 months from the delivery date, for the devices not working due to defects of the components.
In no case Emirel can be held responsible for damages, direct or indirect, occurred to things or people in consequence of wrong connections, accidents, not correct use
or not operation of the Protection and Control devices of its own production. For the "safety applications", it is suggested to apply SAFETY systems or REDUNDANCY engineering.
ATTENZIONE: Verranno riparati in garanzia, franco ns sede, i dispositivi guasti per difetti sui materiali, entro 24 mesi dalla data di consegna. Emirel non è in alcun caso responsabile
per danni, diretti o indiretti, a persone o cose, che derivano da: mancato funzionamento, manomissioni, uso errato od improprio dei propri dispositivi di Protezione e Controllo.
Per le applicazioni "in SICUREZZA" si consiglia l'uso di sistemi di SICUREZZA o l'uso di tecniche di "RIDONDANZA".

Viale Caduti per la Libertà, 4/B - 40050 MONTE S. PIETRO - BOLOGNA (ITALY)
2Tel. +39 (0)51-6761552 - Internet: http://www.emirelsrl.it - E-mail: info@emirelsrl.it / info1@emirelsrl.it
gamma 2 (1A).
TC
Temporizzatore iniziale, regolabile a
cacciavite (0,1÷10 sec) che esclude
l’intervento delle soglie per permettere di
superare lo spunto di potenza del
motore. Copre entrambe le soglie.
Il timer si attiva quando la corrente
assorbita dal carico supera la soglia
interna Im (Im corrisponde a circa 1/10
del fondo scala prescelto. Es.: fondo
scala scelto: 5A, Im =1/10 x 5=0,5A).
T1
Temporizzatore regolabile (0,1÷10 sec)
a cacciavite attivato dal supero della
soglia SP1; ritarda l’intervento del relè
interno.
T2
Temporizzatore come T1 per la soglia
SP2.
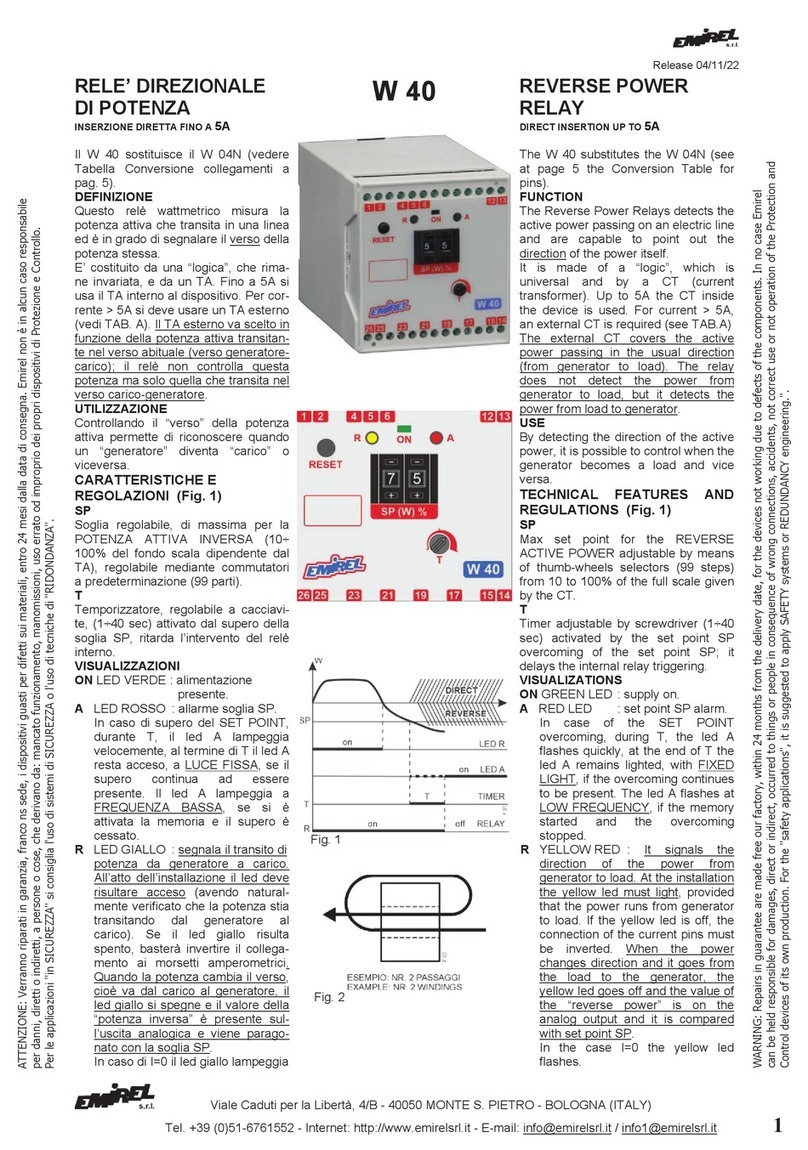
VISUALIZZAZIONI
ON LED VERDE alimentazione
presente.
A1 LED ROSSO allarme soglia SP1.
A2 LED ROSSO allarme soglia SP2.
In caso di supero di un SET POINT,
durante T1, T2, TC, il led A1 (e/o A2)
lampeggia velocemente, al termine di T1
(o T2) il led A1 (e/o A2) resta acceso, a
LUCE FISSA, se il supero continua ad
essere presente. Il led A1 (o A2)
lampeggia a FREQUENZA BASSA se si
è attivata la memoria e il supero è
cessato.
FUNZIONAMENTO
All’accensione del motore il “picco” di
potenza viene ignorato mediante l’uso
del TC; a regime l’intervento di ogni
soglia é ritardato, indipendentemente,
con T1 e T2.
TARATURA
Impostare la gamma di corrente me-
diante il selettore RANGE.
Portare SP1 e TC al massimo, T1, T2 al
minimo e SP2 al massimo se è pro-
grammata di massima, a zero se è
programmata di minima.
Con il motore acceso e la macchina
“caricata”, abbassare la regolazione
della soglia SP1 fino ad avere l’ac-
censione del led A1 e l’intervento del
dispositivo. A questo valore di soglia si
dovranno applicare delle correzioni che
tengano conto delle condizioni operative
finali della macchina, della temperatura,
dell’invecchiamento ecc… .
Spegnere il motore e riaccendere varie
volte, riducendo ogni volta il TC fino a
trovare il valore per cui si ha subito
l’intervento. A questo valore si dovranno
apportare delle correzioni per le stesse
considerazioni fatte per la soglia SP1.
Aumentare opportunamente il T1 per
evitare interventi intempestivi durante il
funzionamento normale.
Se la soglia SP2 è programmata di
MAX, si dovrà seguire la stessa proce-
dura seguita per la soglia SP1. Se la
soglia SP2 è programmata di min: ac-
cendere il motore con la macchina
“scarica”, aumentare la regolazione del-
la soglia fino all’intervento; a questo
valore applicare delle correzioni per le
Fig. 4
Fig. 5/1
Fig. 5/2
Fig. 6
be selected for using the RANGE N° 2
(5A). If CT/1A is used the W 92 MOD. B
must be selected for using the RANGE
N° 2 (1A).
TC
Initial timer adjustable with screwdriver
on the front (0,1÷10 sec) excluding set
points triggering at the start, for covering
the power spike of the motor. It covers
both the sets points.
The timer is activated when the current
of the load overcomes the internal set
point Im (Im corresponds to about 1/10
of the range selected. Ex.: selected
range is: 5A, Im = 1/10 x 5A = 0,5A).
T1
Timer adjustable (0,1÷10 sec.) with
screwdriver. It is activated by the set
point SP overcoming; it delays the
triggering of the internal relay.
T2
Timer like T1 for the set point SP2.
VISUALIZATIONS
ON GREEN LED supply on.
A1 RED LED set point SP1 alarm.
A2 RED LED set point SP2 alarm.
In case of one SET POINT overcoming,
during T1, T2, TC, the led A1 (and/or
A2) flashes quickly, at the end of T1 (or
T2) the led A1 (and/or A2) remains
lighted, with FIXED LIGHT, if the
overcoming continues to be present.
The led A1 (or A2) flashes at LOW
FREQUENCY, if the memory is
activated and the overcoming stopped.
MODE OF OPERATION
At the start up the power “spike” is
bypassed by the timer TC; during the
motor running each set point triggers
after the delay time T1 and T2.
SETTING
Set the current range by means of the
RANGE selector.
Turn SP1 and TC up to the maximum
point, T1 and T2 to the minimum and
SP2 to the maximum if it is set as max
set point, to “zero” if it is set as min set
point.
When the motor is running and machine
“loaded”, turn down the regulation of the
set point SP1 until the LED A1 lights on
and the set point triggers.
The reached value has to be rectified
conveniently in order to take into
account the ageing of the machine, the
temperature, working conditions etc.
Stop the motor and start it up again
several times, gradually reducing each
time the initial timer TC until reaching
the value where the device triggers
promptly.
This value shall have to be rectified
conveniently for the same reasons
explained above for SP1 setting.
T1 shall have to be increased for
avoiding wrong alarms during regular
operation.
If SP2 is set as max set point, the
setting procedure is as for SP1. If SP2 is
fixed as min set point the procedure is
as follows: start up the motor with the
machine “unloaded”. Increase the set
point regulation until the device triggers.

Viale Caduti per la Libertà, 4/B - 40050 MONTE S. PIETRO - BOLOGNA (ITALY)
Tel. +39 (0)51-6761552 - Internet: http://www.emirelsrl.it - E-mail: info@emirelsrl.it / info1@emirelsrl.it 3
considerazioni sopraddette.
Attivare il selettore T2.
Aumentare opportunamente T2. Se pos-
sibile simulare sovraccarico e sotto-
carico per verificare il funzionamento.
NOTA 2
Se nelle prove il motore é scarico, la
potenza (W) assorbita, a causa del cosφ
basso, può risultare minore del valore
minimo impostabile per le soglie.
RIPRISTINO
·MANUALE: mediante il pulsante R
sul frontale o mediante la chiusura
momentanea dei pin 1-2 o togliendo
l’alimentazione.
·AUTOMATICO: se i pin 1-2 sono
cavallottati.
SICUREZZA INTRINSECA
I 2 relé interni sono normalmente ON e
vanno OFF in caso di allarme della
soglia.
INSTALLAZIONE
COLLEGAMENTI ELETTRICI
Collegamenti a vite sul frontale da ese-
guire secondo schemi di fig.8-9 (motore
trifase) o fig. 10-11 (motore monofase).
(Collegamento a un quadro elettrico con
differenziale e sezionatore).
La lunghezza di ogni collegamento deve
essere < 30m.
Per la scelta del TA vedere TAB. A,B,
C,D.
ESEMPI DI COLLEGAMENTI
1. TRIFASE It < 10A:
inserzione diretta
Seguire lo schema di fig.8
pin voltmetrici : 19-21-23
pin amperometrici : 14-15
2. TRIFASE It > 10A:
collegamento con TA esterno
.../1, o .../5.Seguire lo schema di fig. 9
pin voltmetrici : 19-21-23
pin amperometrici : 14-15
3. MONOFASE It < 10A:
inserzione diretta
Seguire lo schema di fig. 10
pin voltmetrici : 19-17
pin amperometrici : 14-15
4. MONOFASE It > 10A:
collegamento con TA esterno …/1 o
…/5, seguire lo schema di fig. 11.
pin voltmetrici : 19-17
pin amperometrici : 14-15
NOTA 4
La fase di cui viene misurata la corrente
(fase AMPEROMETRICA) deve essere
collegata al pin 19. Il collegamento delle
altre due fasi non deve rispettare alcun
vincolo.
Per l’eventuale inversione della
rotazione del motore, non utilizzare la
fase amperometrica.
Per applicare un W 92 occorre determi-
nare i seguenti due elementi:
1) tensione del motore (400 Vac ecc.)
2) It = corrente di targa del motore per
stabilire il fondo scala della corrente.
Esempi per illustrare il criterio e le
modalità di definizione del fondo scala.
a) Se It é minore di 10A si può usare
l’inserzione diretta (v. schemi di fig.8 e
10).
b) Se It é maggiore di 10A si deve usare
Fig. 8
Fig. 9
Fig. 10
Fig. 11
Rectify the reached point for the reasons
above explained.
Activate the selector T2.
Increase T2 as requested. It is
suggested to simulate overload and
underload to verify the correct setting
operation.
REMARK 2
If during the tests the motor runs without
load, due to low cosφ value, the power
(W) absorbed may result lower than the
minimum value which can be set for set
points.
RESET
·MANUAL: by pressing the push
button on the front or by closing for a
short period the pins 1-2 or
removing the power supply.
·AUTOMATIC: when the jumper link
1-2 is made.
POSITIVE SAFETY
Two internal relays are normally ON and
they turn OFF in case of set point alarm.
INSTALLATION
WIRING DIAGRAMS
Screw connections on the front to be
made as per fig.8-9 (three-phase motor)
and fig.10-11 (single phase motor).
(Wiring to an electrical board with a
differential relay and a sectionalizing
switch).
The length of every wiring must be less
than 30m.
For selecting the CT, see TAB. A,B,C,D.
EXAMPLES OF CONNECTIONS
1. THREEPHASE Ip < 10A:
direct insertion
Follow diagram of fig.8
Voltage pins : 19-21-23
Current pins : 14-15
2. THREEPHASE Ip > 10A:
connection with an external CT
.../1, or .../5
Follow diagram of fig. 9
Voltage pins : 19-21-23
Current pins : 14-15
3. SINGLE PHASE Ip< 10A:
direct insertion
Follow diagram of fig..10
Voltage pins : 19-17
Current pins : 14-15
4. SINGLE PHASE Ip > 10A:
connection with an external CT …/1,
or .../5, Follow diagram of fig. 11.
Voltage pins : 19-17
Current pins : 14-15
REMARK 4
The phase in which the current is
measured (amperometric phase) MUST
be connected to pin 19. For the other
two phases no special constraint.
For the possible inversion of the motor
rotation, the amperometric phase must
not be used.
For the application of W 92 the following
elements are necessary:
1) motor voltage (400 Vac etc.)
2) Ip = motor plate current for selecting
the current range.
Examples for the full scale selection:
a)If Ip is lower than 10A the device is by
direct insertion connected (fig.8 and 10)
b) If Ip is higher than 10A it is requested

Viale Caduti per la Libertà, 4/B - 40050 MONTE S. PIETRO - BOLOGNA (ITALY)
4Tel. +39 (0)51-6761552 - Internet: http://www.emirelsrl.it - E-mail: info@emirelsrl.it / info1@emirelsrl.it
un riduttore di corrente esterno (TA) .../5
oppure .../1 (schema di fig. 9, 11).
Esempio A)
Tensione motore 400Vac, It=3,5A
(fig.8).
Dalla tabella A si ricava che si deve
scegliere la gamma 5A e si vedrà che la
potenza del motore é minore a quanto
indicato nell’ultima colonna (valori pratici
della potenza). Nella colonna teor è
indicato il fondo scala teorico: 3,45W -
corrispondente al fondo scala della
corrente (5A in questo caso).
Esempio B)
Tensione motore 400 Vac, It = 20A.
Il collegamento si esegue secondo fig.9.
Dalla tabella A si ricava che il fondo
scala di corrente più vicino, immedia-
tamente superiore al valore di It, è 25A.
In questo caso il fondo scala può essere
realizzato con un TA esterno.
Il TA esterno dovrebbe avere un basso
errore d’angolo (classe di precisone
0,1÷1) per non peggiorare la lettura
della potenza attiva.
Se il TA è .../5 si sceglie la gamma 5A.
Con TA 50/5, il filo della fase ampero-
metrica passa due volte all’interno del
TA (fig. 6) e si collega al pin 19. Il
secondario del TA si collega ai pin 15 e
14.
INGRESSI
Pin voltmetrici: 23-21-19. Ring = 800 kW
Si veda NOTA 4.
Pin amperometrici: 15-14.
Nessuna sequenza da rispettare.
La massima tensione trifase è 415Vac e
monofase 240Vac (NOTA 6). Per ten-
sioni maggiori si può utilizzare:
M 08: Resistenze di caduta + TA per ga-
rantire isolamento.
USCITA
5A(NA) 3A(NC)-230 Vac carico resistivo
R1 9-10 NA
10-8 NC Dispositivo non
R2 5-4 NA alimentato o in allarme
5-6 NC
USCITA ANALOGICA
Pin 26(+) e 25.
0÷5Vdc IMAX =1mA
Il valore della potenza di “fondo scala”
riportato nella tabella A permette di dare
il “PESO” ai Volt dell’Uscita Analogica.
Es.: con fondo scala di 5A (V=400 Vac)
e cosφ=1, i 5V dell’uscita analogica
corrispondono a 3,45 kW, quindi 1V =
3,45/5 = 0,69 kW.
La tensione di 5V può essere collegata
ad un voltmetro “a rapporto”, come il
DVD 08, per visualizzare il valore istan-
taneo della POTENZA DIRETTA.
Esempio: nel caso citato, se sull’uscita
analogica sono presenti 1,8Vdc, il DVD
08 andrà tarato per leggere:
1,8Vdc x 0,69kW = 1,2kW
ALIMENTAZIONE: (monotensione)
2VA 50-60Hz - tolleranza ±10%
13-12: 24Vac oppure 48Vac oppure
115Vac o 230Vac
ISOLAMENTO
Separazione galvanica tramite il trasfor-
COLLEGAMENTO CON TA
(Rif. Fig. 9)
Quando si richiede l’utilizzo di un TA
esterno (corrente > 10A), la fase am-
perometrica passa entro il foro del TA, ed i
2 terminali del secondario (TA) vanno
collegati ai pin 15 e 14.
CONNECTION WITH CT (Ref. Fig. 9)
When an external CT is applied (current >
10A), the current phase enters the hole of
the CT and the two terminals of the CT
secondary are connected to the pins 15 and
14.
NOTA 5
Per un miglior utilizzo del relè wattmetrico,
si consiglia di scegliere un fondo scala di
poco superiore al valore di It. Se sono
necessari più giri entro il TA esterno
vedere fig. 6.
REMARK 5
For the best working of W 92, the current
full scale must be slightly greater than Ip
motor current. For more windings in the
external CT see fig. 6.
NOTA 6 - Attenzione
Nel caso di carico monofase, seguire i
collegamenti di fig.10 o 11. Per scegliere il
codice prodotto, fare attenzione alla
colonna “tensione del carico” di come
ordinare.
Esempio: il modello A è adatto per carico
trifase 400Vac oppure per carico monofase
da 230Vac; cambia lo schema di
collegamento da effettuare (Fig. 10 o 11).
REMARK 6 - Pay attention
In the applications with single phase
motor, the electrical connections to be
effected are those of fig. 10 or 11. For the
correct identification of the product code,
pay attention to the column “load voltage” in
the how to order diagram.
Example: the model A is suitable for
3phase load 400Vac or for 1phase load
230Vac but the electrical connections to be
effected follow a different scheme (Fig. 10
or 11).
NOTA 7
Si consiglia vivamente l’uso di gruppi RC
sulle bobine dei teleruttori.
REMARK 7
The application of RC groups on the
contactors coils is highly recommended.
DVD 08
Nota generale: Negli schemi di collegamento
non sono riportati I fusibili sulle alimentazioni
e sugli ingressi voltmetrici. I collegamenti
elettrici devono essere eseguiti a dispositivo e
quadro elettrico spenti.
General remark: The wiring diagrams do not
show the fuses installed on the supply and on
the voltmetric inputs. The electric wirings
must be realized with device and electrical
pane
l in off condition.
NOTA: Il TA esterno dovrebbe avere una
PRESTAZIONE ³5VA per rispettare il
FATTORE DI PO
TEN
ZA.
REMARK: The external CT must have the
BURDEN
³
5VA to not modify the POWER
FACTOR.
an external current transformer (CT)
.../5A or .../1A (fig. 9, 11).
Example A)
Motor Voltage 400Vac Ip=3,5A (fig.8).
The table A shows that the selector
range has to be set for 5A. It will appear
that the power motor is lower than the
values mentioned in the last column
(practical values of kW).
The column teor shows the theorical full
scale 3.45 kW - correspondent to the
current full scale (5A in this case).
Example B)
Motor voltage 400 Vac - Ip = 20A.
The connection is made according to
fig.9.
The table A shows that the suitable
range is 25A (slightly higher than the Ip
current). In this case it is necessary the
application of an external current
transformer (CT).
The external CT must have a low error
of angle (accuracy rating 0.1÷1) so that
the active power reading does not get
worse. For CT .../5 set the range 5A.
With CT 50/5A the current wire is
passed twice through the CT (fig. 6) and
connected to the pin 19. Connect the
secondary of the CT to the pins 15 and
14.
INPUTS
Voltage pins : 23-21-19.
Input Resistance = 800 kW
See REMARK 4.
Current pins : 15-14.
No specific order to be followed.
The maximum three-phase voltage is
415Vac; the maximum monophase
voltage is 240Vac (see REMARK 6). For
higher voltages, it is requested the
application of:
M 08: Three-phase drop resistances +
CT for insulation.
OUTPUT RELAY
5A(NO) 3A(NC)-230 Vac resistive load
R1 9-10 NO
10-8 NC Device not supplied
R2 5-4 NO or in alarm
5-6 NC
ANALOG OUTPUT
Pin 26(+) and 25.
0÷5Vdc IMAX =1mA
The value of “full scale” power shown in
the table A allows to give the “WEIGHT”
to the Analog Output Volts. Ex.: with full
scale of 5A (V=400 Vac) and cosφ=1,
the 5V of the Analog Output correspond
to 3,45 kW, therefore 1V = 3,45/5 = 0,69
kW. The voltage 5V can be connected
to a voltmeter with calibration of the
reading, such as the DVD 08, to display
the instantaneous value of the DIRECT
POWER.
Example: in the mentioned case, if there
are 1,8Vdc on the analogoutput, the
DVD 08 must be calibrated to read:
1,8Vdc x 0,69kW = 1,2kW
SUPPLY: (single voltage)
2VA 50-60 Hz - tolerance ±10%
13-12: 24Vac or 48Vac or 115Vac or
230 Vac
INSULATION
The galvanic separation is given by the

Viale Caduti per la Libertà, 4/B - 40050 MONTE S. PIETRO - BOLOGNA (ITALY)
Tel. +39 (0)51-6761552 - Internet: http://www.emirelsrl.it - E-mail: info@emirelsrl.it / info1@emirelsrl.it 5
matore di alimentazione e TA interno.
CUSTODIA: 70x75x110mm per DIN.
E 405B Protezione frontale trasparente
piombabile (a richiesta).
TEMP. DI FUNZIONAMENTO: 0÷70°C
PESO: Kg 0,300
COLORE: grigio, simile al RAL 35.
Per la pulizia usare un panno imbevuto con
detergenti privi di: Alcool denaturato, Benze-
ne, Alcool isopropilico.
Tab. A TENSIONE TRIFASE: 400V
Tab. A TENSIONE TRIFASE: 400V
(Three-phase Voltage: 400V)
COMPATIBILITA' ELETTRO
MAGNETICA
Electromagnetic compatibility
C
E
I
-
EN 61326
-
1
“BASSA TENSIONE” - LVD
LVD – “LOW VOLTAGE”
CEI-EN 61010-1
supply transformer and internal CT.
CASE: 70x75x110 mm for DIN rail.
E 405B transparent front cover for tight
closure (on request).
WORKING TEMPERATURE: 0÷70°C
WEIGHT: Kg 0,300
COLOUR: grey, similar to RAL 35.
For cleaning use a cloth soaked with
detergents without: Denatured alcohol,
Benzene, Isopropyl Alcohol.
VALORI DI FONDO SCALA IN CORRENTE (A) E IN POTENZA (kW) Current Values (I) and Correspondent Power Values (kW)
TABELLA DI CONVERSIONE COLLEGAMENTI (Conversion Table for Pins)
PIN E 492N PIN W 92
15
16
MORSETTI CORRENTE (Current Terminal Blocks)
15
14
MORSETTI CORRENTE (Current Terminal Blocks)
14
L
3
1
9
L3
12
L2
2
1
L2
10
L1
23
L1
4
N
(NEUTRO
)
(Neutral)
17
N
(N
EUTRO
)
(N
eutral)
19
ALIM
ENTAZIONE
(Supply)
12
ALI
MEN
TAZIONE
(Supply)
20
ALIM
EN
TAZIONE
(Supply)
13
ALIMENTAZIONE
(Supply)
23
0V
17
0V
5
M
2
RESET
22
RES
3
R W
2
6
R R
2
2
C W
2
5
C R
2
1
L
W
2
4
L R
2
8
0V
25
0V
/
/
26
USCITA ANALOGICA
(Analog
Output)
26
R
W1
8
R R1
25
C W1
10
C R1
24
L W1
9
L R1
MOD.
GAMMA DI CORRENTE
(Current Range)
(
A
)
GAMMA DI POTENZA
(Power Range)
(
W)
TA
(CT)
N
Valore di 1 PUNTO
di SET POINT
(Value of one STEP
of the SET POINT)
(W)
FS Im FS (kW) Wm
(W)
B
2,5
0,25
1,75
175
/
/
17
5
0,5
3,45
34
5
/
/
35
10
1
6,90
690
/
/
69
12,5
1,25
8,63
863
5
0/5
4
86
16
1,6
11
,45
1145
50/
5
3
110
25
2,5
17,25
1720
50/5
2
170
33
3,3
23
2300
100/5
3
230
50
5
34,5
3450
50/5
1
345
75
7,5
51,7
5170
150/5
2
517
100
10
69
6900
100/5
1
690
150
15
103,5
1035
0
150/5
1
1035
A
0,5
0,05
0,
350
35
/
/
3,5
1
0,1
0,
700
70
/
/
7
2
0,2
1
,
360
136
/
/
13,6
In Tab. A sono riportate le GAMME di CORRENTE e di POTENZA ATTIVA che sono possibili per i MODELLI A e B del W 92 con la rete trifase
alimentata a 400 VAC. (The Tab. A shows the possible RANGES of CURRENT and of ACTIVE POWER for the MODELS A and B of the W 92 with
the three-phase mains supplied at 400 VAC.)
·Se la tensione trifase = 230 VAC, i valori di potenza vanno divisi per 1,73 = 400/230
If the three-phase voltage = 230 VAC, the power values must be divided by 1,73 = 400/230
·Se la tensione trifase = 415 VAC, i valori di potenza vanno moltiplicati per 1,03 = 415/400
If the three-phase voltage = 415 VAC, the power values must be multiplied by 1,03 = 415/400
·Se la tensione è MONOFASE = 230V, i valori di potenza vanno divisi per 3.
If the voltage is ONE-PHASE = 230V, the power values must be divided by 3.
NOTA 8 Il valore di FONDO SCALA della Potenza è stato calcolato con la formula W=1,73 V I cosφ, con V=400V, I=valore di Fondo Scala della
corrente selezionata e cosφ=1. A questo valore corrispondono 5,0VDC sull’Uscita Analogica.
(REMARK 8 The value of the Power FULL SCALE is obtained through the formula W=1,73 V I cosφ, with V=400V, I=value of the selected current
Full Scale and cosφ=1. To this value correspond 5.0VDC on the Analog Output.)
NOTA 9 Im: minimo valore della corrente di GAMMA. Il supero di Im fa partire il TC (se il TC è impostato diverso da zero) e abilita la misura della
Potenza Attiva.
(REMARK 9 Im: minimum value of the RANGE current. The overcoming of Im makes the TC start (if the TC has been set to a value different from
zero) and it enables the measurement of Active Power.)
Esempio: se l’applicazione prevede una IMAX=11A si sceglierà la GAMMA con I=12,5A, applicando la formula W=1,73V I cosφ =
1,73x400x12,5·1 = 8630W, a questo corrispondono i 5V dell’uscita analogica. Il valore dell’uscita analogica è usato in SP1 ed SP2 (che
hanno 99 gradini), quindi il valore di ogni gradino è (in questo caso) 8630/100 = 86,3W.
Example: if in the application IMAX=11A, the RANGE with I=12,5A must be chosen, applying the formula W=1,73V I cosφ = 1,73x400x12,5·1
= 8630W, to this correspond 5V of the analog output. The value of the analog output is used in SP1 and SP2 (which have 99 steps), so the
value of each step is (in this case) 8630/100 = 86,3W.
Legenda:
FS: Fondo Scala della Gamma
scelta.
TA: Riduttore di Corrente Esterno
(Fig. 9 e Fig. 11).
N: Numero di Passaggi del Filo di
Corrente entro il TA esterno
(Fig. 6).
Im: Vedi NOTA 9.
Legend:
FS: Full Scale value of the
selected Range.
CT: External Current Transformer
(Fig. 9 and Fig. 11).
N: Number of the Current Wire
Windings through the external CT
(Fig. 6).
Im
:
See REMARK
9.

Viale Caduti per la Libertà, 4/B - 40050 MONTE S. PIETRO - BOLOGNA (ITALY)
6Tel. +39 (0)51-6761552 - Internet: http://www.emirelsrl.it - E-mail: info@emirelsrl.it / info1@emirelsrl.it
NOTA 0
Nelle figure i CONTATTI dei relè
interni sono riportati nella condizio-
ne di relè interno OFF (DISPOSI-
TIVO non alimentato).
REMARK 0
In the figures the CONTACTS of
the internal relays are shown with
internal relay in OFF condition
(DEVICE not supplied).
POWER TRANSDUCERS AND RELAYS AND/OR TORQUE OR LOAD LIMITERS
1) Check voltage supply presence (24, or 48 or 115 or 230 Vac or 24 Vdc). When voltage is supplied through a transformer, make sure
that the voltage presence is free from “voltage drops” when other loads are connected.
2) Check the motor voltage to be monitored (ex. 400 Vac 3phase or 230 Vac single phase or other values). When the available voltage is
higher than 415V it is requested to apply M 08 (Drop resistances).
3) Check the motor plate current and decide if a direct insertion connection is allowed, or if it is necessary to make the connection
through an external CT. It is suggested to set a full scale slightly higher than the motor plate current.
4) During the device wiring operation it is requested to pay attention to the PHASE CURRENT because it is the phase measuring the
current and it MUST be connected to a fixed VOLTAGE PIN (see the device data sheet).
5) When remote control switches are inside the electric control board, it is suggested to apply RC groups on their coils.
6) Our devices have an analog output (from 0 to 5Vdc = VU) measurable with your direct voltage tester which represents the absorbed
power (P = Vxlxcosφ). The 5 V are obtained with the following performances: motor voltage x device full scale current x cosφ1. The VU
value, at correct functioning, is a valid indicator-guide for setting the alarm set point. With VU, for example, of 3V we know that the set
point must be set at approximately 60.
7) Set the triggering delay times and the initial delay times.
8) Work out the link for manual or automatic reset.
9) The test operations have to be worked out with the machine loaded because with the machine unloaded, due to low cosφ, the
absorbed power might be lower than the minimum range value.
10) If the setting operations are not successful, follow the ALTERNATIVE SETTING INSTRUCTIONS (see instructions hereunder).
ALTERNATIVE SETTING INSTRUCTIONS (Wattmetric Relays)
Min and Max set points can be set starting from the absorbed power value, where the alarm is requested. In the wattmetric relays with
contraves regulations the full scale is 99.
Example: a motor P=4kW, 400V, I=8,5A activates a pump and it is requested to set a min set point in correspondence of 1kW and a max
set point in correspondence of 4kW with I=8,5A, following the TAB. A (see device data sheet), the current full scale value to be set is
obtained: the first value higher than 8,5A, in this case 10A.
The column FS (kW) TEOR shows that the value of 10A corresponds to the value 6.90 kW (Full scale of the active power).
The full scale value of the active power corresponds to 99 of the range of the two set points and to the value +5V of analog output. It
means that to get the value of 0,5V on analog output, it has to multiply by 690W, so in our example we have to get 1000/690=1.45 (15).
4kW correspond to 4000/690=5.8 (58).
AVVERTENZE E CONSIGLI PER: RELE’ E CONVERTITORI DI POTENZA E/O LIMITATORI DI COPPIA O CARICO
1) Verificare l’alimentazione ausiliaria (24, 48, 115 o 230 Vac o 24 Vdc). Accertarsi che l’eventuale trasformatore di alimentazione non
presenti “buche di tensione” all’inserimento di altri carichi.
2) Verificare la tensione del motore da controllare (es. 400 Vac trifase o 230 Vac monofase od altro). Se la tensione è maggiore di
415V occorre aggiungere il dispositivo M 08 (Resistenze di caduta).
3) Verificare la corrente di targa del motore e quindi verificare se si può effettuare un collegamento con inserzione diretta o se occorre
effettuare il collegamento mediante TA esterno. E’ sempre bene avere un fondo scala di poco superiore alla corrente di targa.
4) Nel cablaggio del dispositivo PRESTARE ATTENZIONE ALLA FASE AMPEROMETRICA, perchè è la fase su cui si misura la
corrente e DEVE essere collegata in un determinato PIN VOLTMETRICO (precisato nelle specifiche).
5) Se nel quadro elettrico ci sono teleruttori, è consigliabile l’uso di gruppi RC sulle loro bobine.
6) I nostri dispositivi dispongono di una uscita analogica (da 0 a 5Vdc = VU) misurabile con un Vostro Tester in tensione continua che
rappresenta la potenza assorbita (P=Vxlxcosφ). I 5 V si hanno con le seguenti prestazioni: tensione motore x corrente fondo scala
dispositivo x cosφ1. Il valore di VU, a funzionamento corretto, è un valido indicatore-guida per impostare la soglia di allarme. Con VU,
per esempio, di 3V sappiamo che la soglia va impostata a circa 60.
7) Impostare eventuali tempi di ritardo all’intervento e di cecità; collegare eventuale relè.
8) Fare collegamento per ripristino manuale od automatico.
9) Le operazioni di prova vanno eseguite a macchina carica, perché con macchina scarica, a causa del cosφ basso, la potenza
assorbita può risultare inferiore al valore minimo impostabile.
10) Se si ha difficoltà nella taratura del dispositivo seguendo le norme di taratura, è possibile effettuare una TARATURA
ALTERNATIVA DEI SET POINT. (Vedere di seguito qui sotto).
TARATURA ALTERNATIVA DEI SET POINT (Wattmetrici)
I set point di max o di min possono essere impostati partendo dal valore della potenza assorbita a cui si vuole che intervenga il relè. Nei
wattmetrici con regolazione a contraves il fondo scala è 99. Esempio: un motore P=4kW, 400V, I=8,5A aziona una pompa e si vuole
impostare una soglia di minima potenza a 1kW ed una di massima a 4kW. Con I=8,5, dalla TAB. A del depliant del dispositivo, si ricava il
valore del fondo scala della corrente da impostare: il primo valore superiore ad 8,5A, in questo caso 10A.
La colonna FS (kW) TEOR indica che alla corrente di fondo scala corrisponde il valore 6.90 kW (fondo scala della potenza attiva). Il
valore di fondo scala della potenza attiva corrisponde a 99 delle scale dei 2 set point ed al valore +5V dell’uscita analogica. Questo
significa che 0,5V sull’uscita analogica “pesa” 690W, quindi il Set Point 1kW sarà rappresentato da 1000/690=1,45 (15).
I 4 kW sono rappresentati da 4000/690=5,8 (58).
Table of contents
Other Emirel Relay manuals
