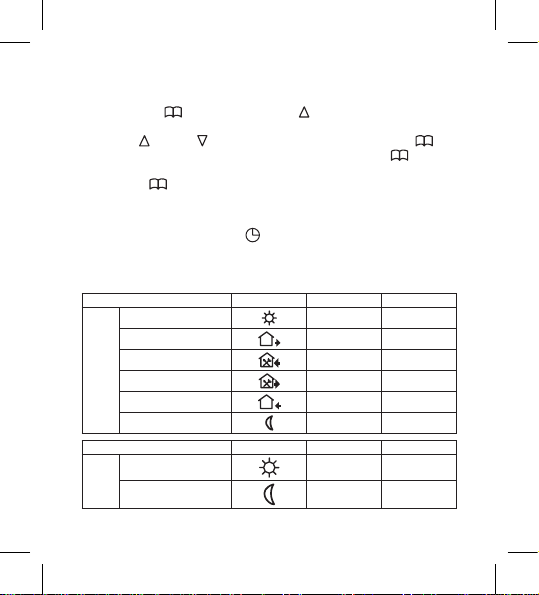
Emos P5601UF User manual

2101210000_31-P5601UF_00_01 80 × 90 mm
P5601UF
GB Floor Heating Thermostat
CZ Termostat pro podlahové topení
SK Termostat pre podlahové kúrenie
PL Termostat do ogrzewania podłogowego
HU Termosztát padlófűtéshez
SI Termostat za talno ogrevanje
RS|HR|BA|ME Termostat za podno grijanje
DE Thermostat für Fußbodenheizung
UA Термостат для підлогового опалення
RO|MD Termostat pentru încălzire în pardoseală
LT Grindinio šildymo termostatas
LV Apsildāmās grīdas termostats
EE Põrandakütte termostaat
BG Термостат за подово отопление
www.emos.eu

2
1
2
1
2
3
4
5
6 7
9
8
10
11
12
13
14
86 mm 43 mm
13 mm
90 mm
2101210000_P01-P5601UF
60 mm

3
3
4-1

4
4-2
4-3

5
4-4

6
GB | Floor Heating Thermostat
The P5601UF thermostat is designed for controlling underoor heating.
Important
• Read the thermostat manual carefully before using the device for
the rst time.
• Turn o power before installing the thermostat!
• Installation and power connection of the thermostat may only be done
by a qualied person.
• Follow prescribed standards during installation.
Technical specications:
Switched load: max. 230 V AC; 16 A for resistive load; 16 A for inductive
load
Temperature measurement: 0°C to 99°C, 0.1°C resolution
Temperature setting: 5°C to 95°C, in 0.5°C increments
Temperature dierential setting: 1°C to 10°C, in 1°C increments
Power supply: 230 V
Enclosure rating: IP20
Accessories: thermostat, oor sensor 3 m
Dimensions and weight: 43 × 86 × 90 mm; 211 g (see g. 2)
Description of Control Elements and Screen (See Fig. 1)
1 – manual mode,
automatic mode
2 – 6 time slots
3 – time/set temperature
4 – day of the week
5 – mode
6 – UP button
7 – DOWN button
8 – internal room sensor
9 – on/o button
10 – heating mode
11 – button lock
12 – room temperature
13 – low temperature protection
mode
14 – programme mode

7
INSTALLATION
Attention:
Before changing the thermostat, disconnect the heating/air-conditioning
system from the mains power in your at. This will prevent potential injury
by electric current.
Thermostat Placement
Thermostat placement signicantly aects its functioning. Choose a location
where members of the family spend most of their time, preferably on the
inside wall where air circulates freely, with no direct sunlight. Do not place
the thermostat in the vicinity of heat sources (such as TV sets, radiators,
fridges), or close to a door (due to frequent shocks or vibrations). If you do
not follow these recommendations, the thermostat will not maintain room
temperature correctly.
Thermostat Installation (See Fig. 4)
1. Slide a screwdriver into the bottom of the thermostat and remove
the front cover.
2. Use the screwdriver to loosen the metal frame of the mounting plate.
3. Mount the mounting plate onto a suitable junction box, e.g. KU 68.
4. Connect the wires leading out of the junction box to the marked ter-
minals on the thermostat in accordance with the wiring diagram. Fit
the thermostat back onto the mounting plate, secure it with the metal
frame and replace the front cover.
Wiring Diagram (See Fig. 3)
L 230 V AC power connection
N neutral wire
N1, L1 connected device (e.g. heating mat)
Sensor oor sensor
Putting the Device into Operation
Press the button.

8
The thermostat turns on and the screen will activate.
Setting Day and Time
Long press the button and up arrow simultaneously; the minute
value will start ashing.
Use the up or down arrows to set minutes and conrm with .
Then use the up/down arrows to set hours and conrm with .
Then use the up/down arrows to set day (1 – Monday to 7 – Sunday) and
conrm with .
Screen Illumination
Pressing any button activates screen illumination for 5 seconds.
Factory Preset Programmes
The programmable indoor thermostat was designed to be easy to use and
require minimal user input.
Table of Preset Programmes
Icon Time Temperature
monday – friday
1st change 6:00 20°C
2nd change 8:00 15°C
3rd change 11:30 15°C
4th change 12:30 15°C
5th change 17:00 22°C
6th change 22:00 15°C
Icon Time Temperature
saturday –
sunday
1st change 8:00 22°C
2nd change 23:00 15°C

9
Programme Settings
The entire working day is divided into 6 time slots = 6 temperature changes.
Weekend days are divided into 2 time slots = 2 temperature changes (the
number of slots cannot be changed).
If the factory preset programmes do not suit your needs, you can adjust
their timing and temperatures.
You can also set Saturday and Sunday to be included among working days
– with this setting, Saturday and Sunday will also be split into 6 time slots.
Note: In both automated and manual temperature mode, eld 3 on the screen
automatically alternates between displaying the set temperature and time
every 5 seconds – this setting cannot be changed.
First, select the days you wish to programme.
1. Turn o the thermostat by pressing ; OFF will appear on the screen.
2. Long-press the and buttons simultaneously.
3. Select the 6. PRG function by repeatedly pressing the button and
use the up and down arrows to select the days of choice:
programming o, manual mode only – OFF
5 working days + 2 weekend days mode
6 working days + 1 weekend day mode
7 working days mode
Once you have selected the days, press the button 2× and continue
programming:
1. Long press the button.
2. will appear on the screen; you are now setting the time of the 1st
temperature change within the day and the preset days.
3. Use the and buttons to set time (1 minute resolution) when the
1st temperature change should start and conrm with the button.
4. Temperature will appear on the screen; use the and buttons (0.5°C
resolution) to set the temperature and conrm with .

10
5. will appear on the screen; you are now setting the time of the 2nd
temperature change within the day.
6. Use the and buttons to set time (1 minute resolution) when the
2nd temperature change should start and conrm with the button.
7. Temperature will appear on the screen; use the and buttons (0.5°C
resolution) to set the temperature and conrm with .
8. will appear on the screen; you are now setting the time of the 3rd
temperature change within the day.
9. Repeat the process for the remaining temperature changes (3/4/5/6)
in the day.
Short-Term Manual Change of Temperature
When in automatic mode, where temperature is controlled by the selected
programme, it is possible to make a short-term change to the current
temperature setting.
Use the up and down arrows to set a new temperature and wait a few
seconds. The value will be automatically saved.
The screen will display both the and icon in the top right.
Upon the next scheduled temperature change, the hand icon will disap-
pear and the icon will appear instead; temperature will change according
to the automated programme.
The manual change can also be cancelled prematurely by pressing the
button 2×.
Manual Temperature Setting Mode
1. Repeatedly press the button to select the icon on the top right
of the screen.
2. Use the up and down arrows to set temperature and wait a few
seconds. The value will be automatically saved.
In this mode, the thermostat always maintains the manually set temperature
and preset programmes are not active.

11
This mode is ended by pressing the button; the thermostat switches
tu automatic mode .
Advanced Thermostat Settings
Turn o the thermostat by pressing , OFF will appear on the screen.
Long-press the and buttons simultaneously.
This will open advanced thermostat settings.
Press the button repeatedly to select the function of choice, adjust the
value using the up and down arrows.
Symbol on
the screen Function Setting with up and down arrows
1. ADJ
Temperature calibration
The temperature sensor in the thermostat
is calibrated from production, but further
calibration can be done to optimise the
thermostat further, for instance by com-
paring the measured room temperature
with a reference thermometer.
Example: The thermostat shows room
temperature of 22°C, setting calibration
to +1°C will cause the thermostat to
display 23°C instead.
temperature change from -9.9°C to
+9.9°C, 0.1°C resolution
2. SEN Temperature sensor selection
IN: internal room sensor
OUT: underoor sensor
ALL: both sensors
Note: if the underoor sensor is not
connected, selecting OUT or ALL will
result in "Er" appearing on the screen.

12
Symbol on
the screen Function Setting with up and down arrows
3. LIT
Limitation of underoor sensor
temperature
Sets a temperature limit for the
underoor sensor.
can be set to +5°C to +60°C, 1°C
resolution
4. DIF
Temperature dierential
The dierential (hysteresis) is the
dierence in temperature required for
switching the system on and o. If, for
example, you set the temperature in the
heating system to 20°C and dierential to
0.4°C, the thermostat activates heating
as soon as room temperature drops to
19.6°C and switches heating o when
temperature reaches 20.4°C.
can be set to 1°C to 10°C, with 1°C
resolution
5. LTP Low temperature protection
The preset temperature for this mode
is 5°C.
Turned on or o ( icon on the
screen).
6. PRG Days of the week setting
programming o, manual mode
only – OFF
5 working days + 2 weekend days mode
6 working days + 1 weekend day mode
7 working days mode
7. RLE This function is not available for this
thermostat
8. DLY This function is not available for this
thermostat

13
Symbol on
the screen Function Setting with up and down arrows
9. HIT Highest temperature in the room
Setting for the highest possible tempera-
ture that can be set on the thermostat. 35°C to 95°C
AFAC Factory reset
If the thermostat is not working properly,
you can reset it to factory settings. long-press (ca. 5 seconds) the up arrow
Upkeep and Maintenance
The product is designed to serve reliably for many years if used properly.
Here are some tips for proper operation:
• Read the manual carefully before using this product.
• Do not expose the product to direct sunlight, extreme cold or humidity,
and sudden changes in temperature. This would reduce measuring
accuracy.
• Do not place the product in locations prone to vibrations and shocks –
these may cause damage.
• Do not subject the product to excessive force, impacts, dust, high
temperatures or humidity – doing so may cause malfunction, shorten
battery life, damage the batteries or deform the plastic parts.
• Do not expose the product to rain or high humidity, dropping or
splashing water.
• Do not place any open ame sources on the product, e.g. a lit candle,
etc.
• Do not place the product in places with inadequate air ow.
• Do not insert any objects in the product‘s vents.
• Do not tamper with the internal electric circuits of the product – doing
so may damage the product and will automatically void the warranty.
The product should only be repaired by a qualied professional.

14
• To clean the product, use a slightly moistened soft cloth. Do not use
solvents or cleaning agents – they could erode the plastic parts and
cause corrosion of the electric circuits.
• Do not immerse the product in water or other liquids.
• In the event of damage or defect of the product, do not make any
repairs by yourself. Have it repaired in the shop where you bought it.
• This device is not intended for use by persons (including children) whose
physical, sensory or mental disability or lack of experience and exper-
tise prevents safe use, unless they are supervised or instructed in the
use of the appliance by a person responsible for their safety. Children
must always be supervised to ensure they do not play with the device.
Do not dispose with domestic waste. Use special collection points
for sorted waste. Contact local authorities for information about
collection points. If the electronic devices would be disposed on
landll, dangerous substances may reach groundwater and subsequently
food chain, where it could aect human health.
CZ | Termostat pro podlahové topení
Termostat P5601UF je určen k ovládání podlahového topení.
Důležitá upozornění
• Před prvním použitím si pečlivě přečtěte návod k obsluze termostatu.
• Před instalací termostatu vypněte přívod elektrického proudu!
• Instalaci a zapojení termostatu do elektrického obvodu smí provádět jen
osoba s kvalikací dle vyhlášky o odborné způsobilosti v elektrotechnice
č. 50/1978 min. § 6.
• Při instalaci dodržujte předepsané normy.
Technická specikace:
Spínaná zátěž: max. 230 V AC; 16 A pro odporové zatížení; 16 A pro
indukční zatížení

15
Měření teploty: 0°C až 99°C, rozlišení 0,1°C
Nastavení teploty: 5°C až 95°C, po 0,5°C
Rozptyl nastavené teploty: 1°C až 10°C, po 1°C
Napájení: 230 V
Stupeň krytí: IP20
Příslušenství: termostat, podlahové čidlo 3 m
Rozměry a hmotnost: 43 × 86 × 90 mm; 211 g (viz obr. 2)
Popis ovládacích prvků a displeje (viz obr. 1)
1 – manuální režim,
automatický režim
2 – 6 časových úseků
3 – čas/nastavená teplota
4 – den v týdnu
5 – režim
6 – tlačítko „NAHORU“
7 – tlačítko „DOLŮ“
8 – vnitřní prostorové čidlo
9 – tlačítko zapnout/vypnout
10 – režim vytápění
11 – zámek tlačítek
12 – pokojová teplota
13 – protizámrazový režim
14 – režim programu
INSTALACE
Upozornění:
Před výměnou termostatu odpojte topný/klimatizační systém od hlavního
zdroje elektrického napětí ve vašem bytě. Zabráníte možnému úrazu
elektrickým proudem.
Umístění termostatu
Umístění termostatu výrazně ovlivňuje jeho funkci. Zvolte místo, kde se
nejčastěji zdržují členové rodiny, nejlépe na vnitřní zdi, kde vzduch volně
cirkuluje a kde nedopadá přímé sluneční záření. Termostat neumísťujte
ani do blízkosti tepelných zdrojů (televizorů, radiátorů, chladniček) nebo
do blízkosti dveří (z důvodu častých otřesů). Nedodržíte-li tato doporučení,
nebude teplotu v místnosti udržovat správně.

16
Montáž termostatu (viz obr. 4)
1. Zasuňte šroubovák do spodní části termostatu a oddělejte přední kryt.
2. Povolte pomocí šroubováku kovový rámeček instalační podložky.
3. Přišroubujte instalační podložku do vhodné montážní krabice např.
KU 68.
4. Připojte dráty vyvedené z montážní krabice do označených svorek
termostatu dle schématu zapojení. Nasaďte zpět termostat na insta-
lační podložku, zajistěte kovovým rámečkem a nasaďte přední kryt.
Schéma zapojení (viz obr. 3)
L připojení napájení 230 V AC
N nulovací vodič
N1, L1 připojené zařízení (např. topná rohož)
Sensor podlahové čidlo
Uvedení do činnosti
Stiskněte tlačítko .
Termostat začne být v provozu a bude aktivní displej.
Nastavení dne a času
Stiskněte současně dlouze tlačítka a šipku nahoru , začne blikat
hodnota minuty.
Nastavte šipkou nahoru nebo dolů minutu, potvrďte tlačítkem .
Potom nastavte šipkou nahoru/dolů hodinu, potvrďte tlačítkem .
Potom nastavte šipkou nahoru/dolů den (1 – pondělí až 7 – neděle), potvrďte
tlačítkem .
Podsvícení displeje
Stisk jakéhokoliv tlačítka aktivuje podsvícení displeje po dobu 5 sekund.
Továrně přednastavené programy
Tento programovatelný pokojový termostat byl navržen tak, aby byl snadno
použitelný a vyžadoval minimální počet uživatelských zásahů.

17
Tabulka přednastavených programů
Ikona Čas Teplota
pondělí–pátek
1. změna 6:00 20°C
2. změna 8:00 15°C
3. změna 11:30 15°C
4. změna 12:30 15°C
5. změna 17:00 22°C
6. změna 22:00 15°C
Ikona Čas Teplota
sobota–neděle
1. změna 8:00 22°C
2. změna 23:00 15°C
Nastavení programů
Celý pracovní den je rozdělen do 6 časových úseků = 6 teplotních změn.
Víkendový den je rozdělen do 2 časových úseků = 2 teplotní změny (počet
úseků nelze změnit).
Pokud vám továrně přednastavené programy nevyhovují, lze upravit jejich
časové rozvržení a nastavené teploty.
Lze také nastavit, aby sobota i neděle byly pracovní dny – při tomto nastavení
budou tyto dny rozděleny také do 6 časových úseků.
Poznámka: V automatickém i manuálním režimu teploty se na displeji v
poli č. 3 automaticky střídá informace o nastavené teplotě a času každých
5 sekund – toto nastavení nelze změnit.
Nejdříve je nutné vybrat požadované dny, které chcete naprogramovat.
1. Vypněte termostat tlačítkem , na displeji se zobrazí OFF.

18
2. Stiskněte současně dlouze tlačítka a .
3. Opakovaným stiskem tlačítka vyberte funkci 6. PRG a šipkami
nahoru a dolů vyberte požadované dny:
programování vypnuto, pouze manuální režim – OFF
režim 5 pracovních dnů + 2 víkendové dny
režim 6 pracovních dnů + 1 víkendový den
režim 7 pracovních dnů v týdnu
Po výběru dnů stiskněte 2× tlačítko a pokračujte dál v programování:
1. Stiskněte dlouze tlačítko .
2. Zobrazí se ikona , čas 1. teplotní změny v rámci dne a předna-
stavené dny.
3. Nastavte tlačítky a čas (rozlišení 1 min), od kdy začne platit 1.
teplotní změna, potvrďte tlačítkem .
4. Zobrazí se teplota, nastavte tlačítky a (rozlišení 0,5°C) požado-
vanou teplotu a potvrďte tlačítkem .
5. Zobrazí se ikona , čas 2. teplotní změny v rámci dne.
6. Nastavte tlačítky a čas (rozlišení 1 min), od kdy začne platit 2.
teplotní změna, potvrďte tlačítkem .
7. Zobrazí se teplota, nastavte tlačítky a (rozlišení 0,5°C) požado-
vanou teplotu a potvrďte tlačítkem .
8. Zobrazí se ikona , čas 3. teplotní změny v rámci dne.
9. Stejným způsobem nastavte zbývající teplotní změny 3/4/5/6 v
rámci dne.
Krátkodobá manuální změna teploty
V automatickém režimu řízení teploty zvoleným programem lze krátkodobě
změnit aktuální nastavení teploty.
Nastavte šipkami nahoru a dolů novou hodnotu teploty, počkejte několik
sekund, dojde k automatickému uložení.
Na displeji budou současně zobrazeny ikony a vpravo nahoře.

19
Při další naprogramované teplotní změně zmizí ikona ruky , bude zobra-
zena ikona a teplota se změní podle automatického programu.
Manuální změnu lze také předčasně ukončit 2× stiskem tlačítka .
Manuální režim nastavení teploty
1. Opakovaným stiskem tlačítka vyberte na displeji ikonu vpravo
nahoře.
2. Nastavte šipkami nahoru a dolů hodnotu teploty, počkejte několik
sekund, dojde k automatickému uložení.
V tomto režimu termostat vždy udržuje manuálně nastavenou teplotu a
přednastavené programy nejsou aktivní.
Tento režim ukončíte stisknutím tlačítka , dojde k přepnutí do automa-
tického režimu .
Pokročilé nastavení termostatu
Vypněte termostat tlačítkem , na displeji se zobrazí OFF.
Stiskněte současně dlouze tlačítka a .
Tímto vstoupíte do nastavení pokročilých funkcí termostatu.
Opakovaným stiskem tlačítka vybíráte požadovanou funkci, hodnotu
nastavíte šipkami nahoru a dolů .
Symbol na
displeji Funkce Nastavení šipkami nahoru a dolů
1. ADJ
Kalibrace teploty
Teplotní sensor v termostatu byl již
kalibrován při výrobě, ale pro optimali-
zaci je možné provést kalibraci teploty
v místnosti dle např. referenčního
teploměru.
Příklad: Termostat zobrazuje pokojovou
teplotu 22°C, při nastavení kalibrace
+1°C, bude zobrazeno 23°C.
změna teploty od -9,9°C až +9,9°C,
rozlišení 0,1°C

20
Symbol na
displeji Funkce Nastavení šipkami nahoru a dolů
2. SEN Volba teplotního čidla
IN: vnitřní prostorové čidlo
OUT: podlahové čidlo
ALL: obě čidla
Poznámka: pokud nepřipojíte podlahové
čidlo, bude při volbě OUT, ALL zobraze-
no na displeji Er.
3. LIT Omezení teploty podlahového čidla
Nastavení teplotního limitu podlaho-
vého čidla.
lze nastavit +5°C až +60°C,
rozlišení 1°C
4. DIF
Rozptyl teploty
Rozptyl (hystereze) je teplotní rozdíl
mezi teplotou při zapnutí a vypnutí.
Pokud například nastavíte teplotu na
20°C a rozptyl na 0,4°C, termostat
začne pracovat, pokud pokojová teplota
klesne na 19,6°C a vypne se, pokud
teplota dosáhne 20,4°C.
lze nastavit 1°C až 10°C, rozlišení 1°C
5. LTP Protizámrazový režim
Přednastavená teplota pro tento
režim je 5°C.
Vypnuto nebo zapnuto (zobrazena
ikona ).
6. PRG Nastavení dnů v týdnu
programování vypnuto, pouze manuální
režim – OFF
režim 5 pracovních dnů + 2 víkendové
dny
režim 6 pracovních dnů + 1 víkendový
den
režim 7 pracovních dnů v týdnu
7. RLE Funkce není dostupná pro tento
termostat
Table of contents
Languages:
Other Emos Thermostat manuals
Popular Thermostat manuals by other brands

Sygonix
Sygonix tx.2 operating instructions

Siemens
Siemens RDJ100 Operating and installation instructions

Engineered Comfort
Engineered Comfort T1075N User manual and installation instructions

Aube Technologies
Aube Technologies TH115 A owner's guide

Siemens
Siemens RDF302/VB manual

Lauda
Lauda Integral XT 150 operating instructions

suntouch
suntouch SunStat Command 108001 user manual

Mod-tronic
Mod-tronic Series 40T Specifications-installation and operating instructions

ICM Controls
ICM Controls SC2311L Installation, operation & application guide

Honeywell Home
Honeywell Home HumidiPRO H6062 installation instructions

AEG
AEG ATE 50 manual

Charmeg
Charmeg MP-DT Integra 3P user manual