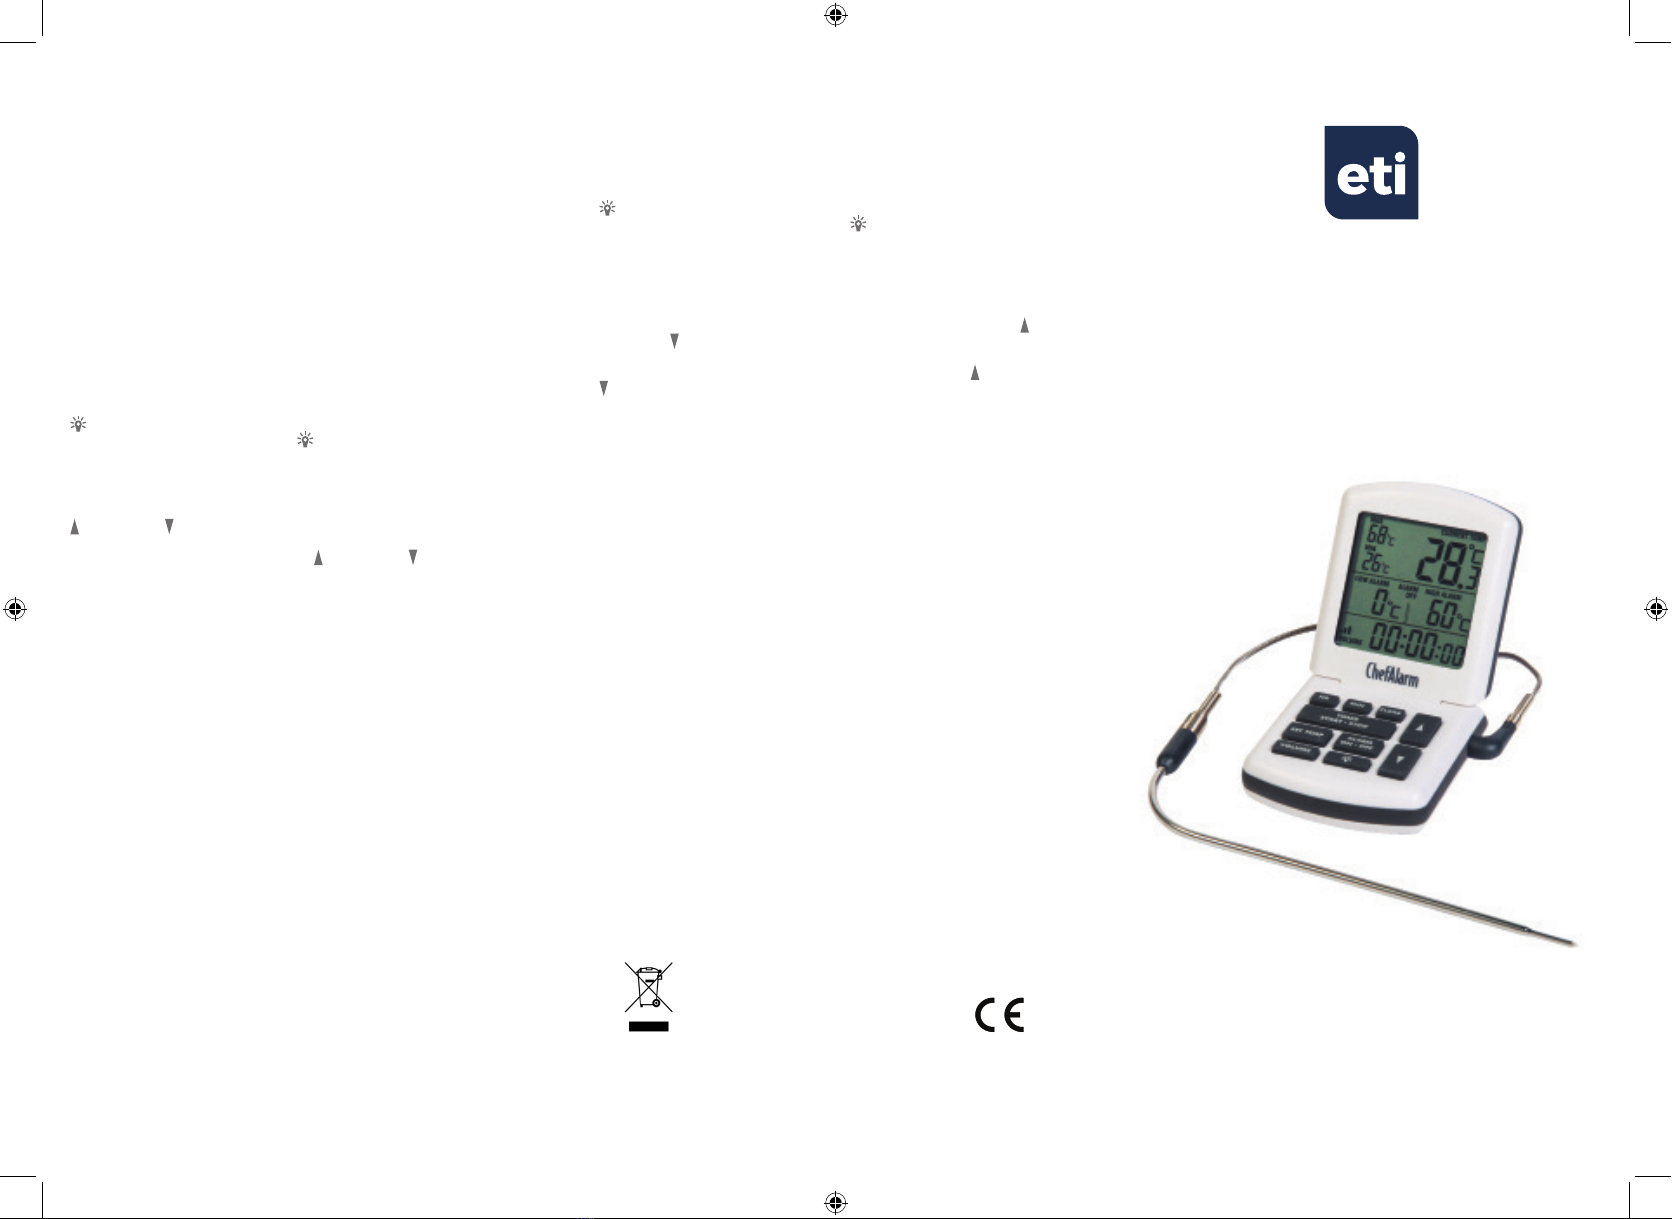
INSTRUMENT OPERATION - Remove the battery tag protruding from the
battery cover to switch the unit on, the backlight will turn on for an initial 5
seconds. Unpack and attach the pro series cooking probe to the unit. The ON/
OFF button is located on the rear of the instrument. To turn the unit off, press
and hold the ON/OFF button for 3 seconds. Apply the remote probe to the
substance or medium to be measured, the instrument reading may take a few
seconds to stabilise depending on the nature of the measurement.
TIMER SETTINGS - Press the HR or MIN buttons to set the hours or minutes,
press the TIMER/START-STOP button to begin timing. Once the countdown
time has elapsed the alarm will sound continuously and the display will ash.
Press the TIMER/START-STOP button to stop timing and CLEAR to reset the
timer display. The timer will begin to count up and will stop once it has reached
99 hours and 59 minutes after the set time has elapsed unless the TIMER/
START-STOP is pressed.
VOLUME SETTING - Press the VOLUME button to select the level of sound
required for the alarm.
COUNT UP - To use the count up function, make sure any time on the
ChefAlarm is cleared and reads '00:00:oo'. Press the TIMER/START-STOP button
and the unit will count up. Press the TIMER/START-STOP button to stop and
CLEAR to reset the time.
BACKLIGHT - The backlight is switched on or off by pressing the button,
this will remain on for 20 seconds. You can switch this off by pressing the
button again.
MAX/MIN - The ChefAlarm continuously displays maximum and minimum
temperatures. To reset the readings, press the CLEAR button.
HIGH/LOW ALARM - This unit has a programmable high and low alarm. To set
this alarm, press the SET TEMP button. The low alarm display will ash, use the
up or down arrow buttons to set the alarm to the desired temperature.
Press the SET TEMP button again to set the high alarm and again using the
up or down arrow buttons to select the temperature you require. To set the
alarm, press the ALARM ON-OFF button and 'ON' or 'OFF' is shown in the alarm
limits display.
CALIBRATION - This unit is calibrated at the factory but a calibration function is
included for any minor adjustments required. You shouldn’t need to adjust this
but if you do need to ne tune the accuracy of the unit, providing you have a
known temperature source, visit etiltd.com for further instructions.
°C/°F - Press the °C/°F button, located at the rear of the instrument, to select
the desired temperature scale.
BATTERY REPLACEMENT - Replace the battery when 'Lo Bat' illuminates or if
the display dims. Remove the battery cover with a screwdriver and insert two
AAA batteries, making sure the polarities are correct. Retighten the battery
cover ensuring the waterproof seal remains in place for continued water
resistance (splash proof) of the product.
OPTIONAL EXTRAS - Pro series replacement penetration probe - order code
810-071. Pro series Sous Vide cooking probe – order code 810-072
GUARANTEE - This instrument carries a one-year guarantee against defects in
either components or workmanship. During this period, products that prove to
be defective will, at the discretion of ETI, be either repaired or replaced without
charge. This guarantee does not apply to sensors/probes, where a six-month
period is offered. The product guarantee does not cover damage caused by
fair wear and tear, abnormal storage conditions, incorrect use, accidental
misuse, abuse, neglect, misapplication or modication. Full details of liability
are available within ETI’s Terms & Conditions of Sale at etiltd.com/terms. In line
with our policy of continuous development, we reserve the right to amend our
product specication without prior notice.
FR - FONCTIONNEMENT DE L’INSTRUMENT - Retirer la languette dépassant
du cache du compartiment de la pile pour allumer l’appareil. Déballer et xer
la sonde de cuisson série Pro sur l’appareil. Appuyer sur le bouton ON/OFF à
l’arrière de l’instrument pour l’allumer ; le rétroéclairage s’allume pendant
5 secondes. Pour éteindre l’appareil, appuyer sur le bouton ON/OFF et le
maintenir enfoncé pendant 3 secondes. Appliquer la sonde de mesure à
distance sur la matière ou le uide à mesurer ; en fonction de la nature de la
mesure, quelques secondes peuvent être nécessaires pour stabiliser la lecture.
RÉGLAGE DE LA MINUTERIE - Appuyer sur les boutons HR et MIN pour régler
les heures et les minutes, puis appuyer sur le bouton TIMER/START-STOP pour
lancer la minuterie. Lorsque le compte à rebours est écoulé, l’alarme retentit
en continu et l’afchage clignote. Appuyer sur le bouton TIMER/START-STOP
pour arrêter la minuterie et sur CLEAR pour remettre à zéro l’afchage de la
minuterie. La minuterie continue de décompter le temps et s’arrête lorsqu’elle
atteint 99 heures et 59 minutes après la durée initialement réglée.
RÉGLAGE DU VOLUME - Appuyer sur le bouton VOLUME pour régler le niveau
sonore de l’alarme.
CHRONOMÈTRE - Pour utiliser la fonction chronomètre, s’assurer que la
minuterie du ChefAlarm est remise à zéro et indique '00:00:oo'. Appuyer sur
le bouton TIMER/START-STOP ; l’appareil lance le chronomètre. Appuyer sur
le bouton TIMER/START-STOP pour arrêter la minuterie, effacer et remettre le
temps à zéro.
RÉTROÉCLAIRAGE - Activer ou désactiver le rétroéclairage en appuyant sur
le bouton BACKLIGHT. Le rétroéclairage reste allumé pendant 20 secondes.
Il peut être éteint en appuyant une nouvelle fois sur le bouton BACKLIGHT.
MAX/MIN - Le ChefAlarm afche en continu les températures maximum et
minimum. Pour réinitialiser la lecture, appuyer sur le bouton CLEAR.
ALARME MAX/MIN - Cet appareil est doté d’une alarme max/min
programmable. Appuyer sur le bouton SET TEMP pour programmer cette
alarme. Lorsque l’afchage Alarme min clignote, utiliser les boutons échés
haut ou bas pour régler l’alarme à la température souhaitée. Appuyer
à nouveau sur le bouton SET TEMP pour régler l’alarme max et utiliser à
nouveau les boutons échés haut ou bas pour sélectionner la température
souhaitée. Pour activer l’alarme, appuyer sur le bouton ALARM ON-OFF et
l’indication 'ON' ou 'OFF' apparaît sur l’afchage correspondant à l’alarme.
CALIBRAGE - Cet appareil est calibré en usine, mais inclut une fonction de
calibrage si des ajustements mineurs sont nécessaires. Il ne devrait pas être
nécessaire de procéder à un ajustement, mais s’il faut afner la précision de
l’appareil, à condition d’avoir une source de température connue, consulter le
site etiltd.com pour en savoir plus.
°C/°F - Appuyer sur le bouton °C/°F à l’arrière de l’instrument pour régler l’unité
de température souhaitée.
REMPLACEMENT DE LA PILE - Remplacer la pile lorsque le symbole 'LO
BAT' apparaît ou que l’afchage devient plus faible. Retirer le cache du
compartiment des piles à l’aide d’un tournevis et insérer deux piles de type
AAA en respectant bien la polarité. Fixer à nouveau le cache en veillant à bien
remettre en place le joint pour que l’appareil reste parfaitement étanche à l’eau
(protection contre les projections).
ACCESSOIRES EN OPTION - Sonde de rechange série Pro - référence de
commande 810-070. Sonde de cuisson sous vide série Pro - référence de
commande 810-072.
DE - BEDIENUNGSANLEITUNG - Entfernen Sie den Isolierstreifen, welcher über
die Batterieabdeckung hinausragt, um das Gerät anzuschalten. Packen Sie den
'pro series' Kochtemperaturfühler aus und bringen Sie ihn am Gerät an.
Drücken Sie die ON/OFF-Taste an der Rückseite des Geräts, um das Gerät
anzuschalten. Die Hintergrundbeleuchtung geht für 5 Sekunden an. Halten
Sie die ON/OFF-Taste 3 Sekunden lang gedrückt, um das Gerät auszuschalten.
Halten Sie den Temperaturfühler an das zu messende Material. Je nach Art der
Messung kann es einige Sekunden dauern bis sich das Ergebnis stabilisiert.
STELLEN DES TIMERS - Drücken Sie die HR- bzw. MIN-Taste, um die Stunden
bzw. die Minuten einzustellen. Drücken Sie die TIMER/START-STOP-Taste, um
den Timer zu starten. Sobald die Countdown-Zeit abgelaufen ist, ertönt der
Alarm durchgängig und das Display blinkt. Drücken Sie die TIMER/START-
STOP-Taste, um den Timer zu stoppen und CLEAR, um das Timer-Display
zurückzusetzen. Der Timer zählt weiter und stoppt 99 Stunden und 59 Minuten
nachdem die ursprünglich eingestellte Zeit abgelaufen ist.
EINSTELLUNG DER LAUTSTÄRKE - Drücken Sie die VOLUME-Taste, um die
Lautstärke für den Alarm auszuwählen.
STOPPUHR - Um die Stoppuhr-Funktion zu verwenden, vergewissern Sie
sich, dass sämtliche Zeiten auf dem ChefAlarm gelöscht sind und '00:00:oo'
anzeigen. Drücken Sie die TIMER/START-STOP-Taste, um die Stoppuhr zu
starten. Drücken Sie die TIMER/START-STOP-Taste, um die Zeit anzuhalten, zu
löschen und zurückzusetzen.
HINTERGRUNDBELEUCHTUNG - Durch Drücken der BACKLIGHT-Taste wird
die Hintergrundbeleuchtung für 20 Sekunden angeschaltet. Sie können sie
ausschalten, indem Sie die BACKLIGHT-Taste nochmals drücken.
MAX/MIN - Der ChefAlarm zeigt durchgängig die Maximum- und
Minimumtemperaturen an. Zum Rücksetzen der Messwerte die CLEAR-Taste
drücken.
HÖCHST-/TIEFSTWERT-ALARM - Dieses Gerät verfügt über einen
programmierbaren Höchst- und Tiefstwert-Alarm. Um diesen Alarm
einzustellen, drücken Sie die SET TEMP-Taste. Das Display für den Tiefstwert-
Alarm blinkt, über die Aufwärts- oder Abwärts-Pfeiltaste können Sie
den Alarm auf die gewünschte Temperatur einstellen. Drücken Sie die SET
TEMP-Taste erneut, um den Höchstwert-Alarm einzustellen und wählen Sie die
gewünschte Temperatur wieder über die Aufwärts- oder Abwärts-Pfeiltaste
aus. Um den Alarm zu aktivieren, drücken Sie die ALARM ON-OFF-Taste, auf
dem Display erscheint 'ON' bzw. 'OFF'.
KALIBRIERUNG - Dieses Gerät wird im Werk kalibriert, verfügt jedoch auch
über eine Kalibrierfunktion, falls kleinere Anpassungen notwendig sein
sollten. Normalerweise ist es nicht nötig, das Gerät zu kalibrieren. Sollten Sie
dennoch eine Feineinstellung vornehmen wollen, benötigen Sie eine bekannte
Temperaturquelle. Weitere Anweisungen erhalten Sie unter etiltd.com.
°C/°F - Drücken Sie die °C/°F-Taste, an der Rückseite des Geräts, um die
gewünschte Temperaturskala auszuwählen.
BATTERIEWECHSEL - Ersetzen Sie die Batterie, wenn das 'LO BAT'
-Symbol aueuchtet oder das Display dunkler wird. Entfernen Sie die
Batterieabdeckung mit einem Schraubendreher und setzen Sie zwei AAA-
Batterien ein. Achten Sie hierbei auf die korrekte Polarität. Schrauben Sie die
Batterieabdeckung wieder fest und achten Sie darauf, dass der wasserdichte
Verschluss nicht verrutscht, um sicherzustellen, dass das Produkt wasserdicht
(spritzwassergeschützt) bleibt.
OPTIONALE EXTRAS - Pro series Ersatz-Einstichtemperaturfühler - Bestellnr.
810-070. Pro series Sous Vide Kochtemperaturfühler - Bestellnr. 810-072.
IT - FUNZIONAMENTO DEL DISPOSITIVO - Per accendere il dispositivo,
rimuovere la linguetta che sporge dalla cover della batteria. Togliere la sonda
per cottura dalla confezione e attaccarla al dispositivo. Premere il pulsante
ON/OFF nella parte posteriore dell’apparecchio per accenderlo. Il display si
illuminerà per 5 secondi. Per spegnere il dispositivo, tenere premuto il pulsante
ON/OFF per 3 secondi. Applicare la sonda alla sostanza o all’oggetto da
misurare. La lettura dell’apparecchio potrebbe impiegare alcuni secondi per
stabilizzarsi a seconda della natura della misurazione.
IMPOSTAZIONI TIMER - Premere i pulsanti HR o MIN per impostare le ore o i
minuti, quindi premere il pulsante TIMER/START-STOP per avviare il timer. Una
volta trascorso il conto alla rovescia, il dispositivo emetterà un avviso acustico
e il display inizierà a lampeggiare. Premere il pulsante TIMER/START-STOP
per interrompere il timer e CLEAR per azzerare il display del timer. Il timer
continuerà a contare e si fermerà una volta raggiunte 99 ore e 59 minuti dopo il
tempo trascorso impostato in origine.
IMPOSTAZIONE VOLUME - Premere il pulsante VOLUME per selezionare il
livello della sveglia.
CONTEGGIO IN AVANTI - Per utilizzare la funzione di conteggio in avanti,
assicurarsi che il tempo indicato sullo ChefAlarm sia '00:00:oo'. Premere il
pulsante TIMER/START-STOP e il dispositivo inizierà il conteggio. Premere il
pulsante TIMER/START-STOP per interrompere, cancellare e reimpostare il
tempo.
RETROILLUMINAZIONE - La retroilluminazione si accende/spegne premendo il
pulsante BACKLIGHT. La luce rimarrà accesa per 20 secondi. Per spegnerla,
premere di nuovo il pulsante BACKLIGHT.
MAX/MIN - ChefAlarm continua a indicare le temperature massime e minime.
Per resettare le letture, premere il tasto CLEAR.
SVEGLIA TEMPERATURA ALTA/BASSA - Il dispositivo consente di
programmare la sveglia in base alla temperatura alta o bassa. Per impostare
la sveglia, premere il pulsante SET TEMP. Il display delle basse temperature
inizierà a lampeggiare. Usare i pulsanti delle frecce e per impostare la
sveglia alla temperatura desiderata. Premere di nuovo il pulsante SET TEMP
per impostare la sveglia delle alte temperature usando le frecce e per
selezionare la temperatura desiderata. Per impostare la sveglia, premere
il pulsante ALARM ON-OFF e la scritta 'ON' o 'OFF' sarà indicata sul display
accanto alla temperatura.
CALIBRAZIONE - Il dispositivo è calibrato prima di lasciare la fabbrica ma
include una funzione di calibrazione nel caso in cui siano necessarie delle
piccole regolazioni. Non dovrebbe essere necessario effettuare regolazioni,
ma nel caso in cui sia opportuno regolare la precisione del dispositivo, purché
si disponga di una fonte di temperatura nota, visitare il sito web etiltd.com per
maggiori istruzioni.
°C/°F - Premere il pulsante °C/°F, situato sul retro del dispositivo, per selezionare
la scala di temperatura desiderata.
SOSTITUZIONE DELLA BATTERIA - Sostituire la batteria quando si illumina
il simbolo 'LO BAT' o se la luminosità del display si abbassa. Rimuovere la
cover della batteria con un cacciavite e inserire due batterie AAA, vericando
che la polarità sia corretta. Riavvitare la cover della batteria assicurandosi che
le guarnizioni impermeabili siano nella posizione corretta per mantenere il
prodotto resistente all’acqua (antichizzo).
OPZIONI AGGIUNTIVE - Sonda di cottura Pro-Series - codice ordine 810-070.
Sonda di cottura Pro-Series Sous Vide - codice ordine 810-072