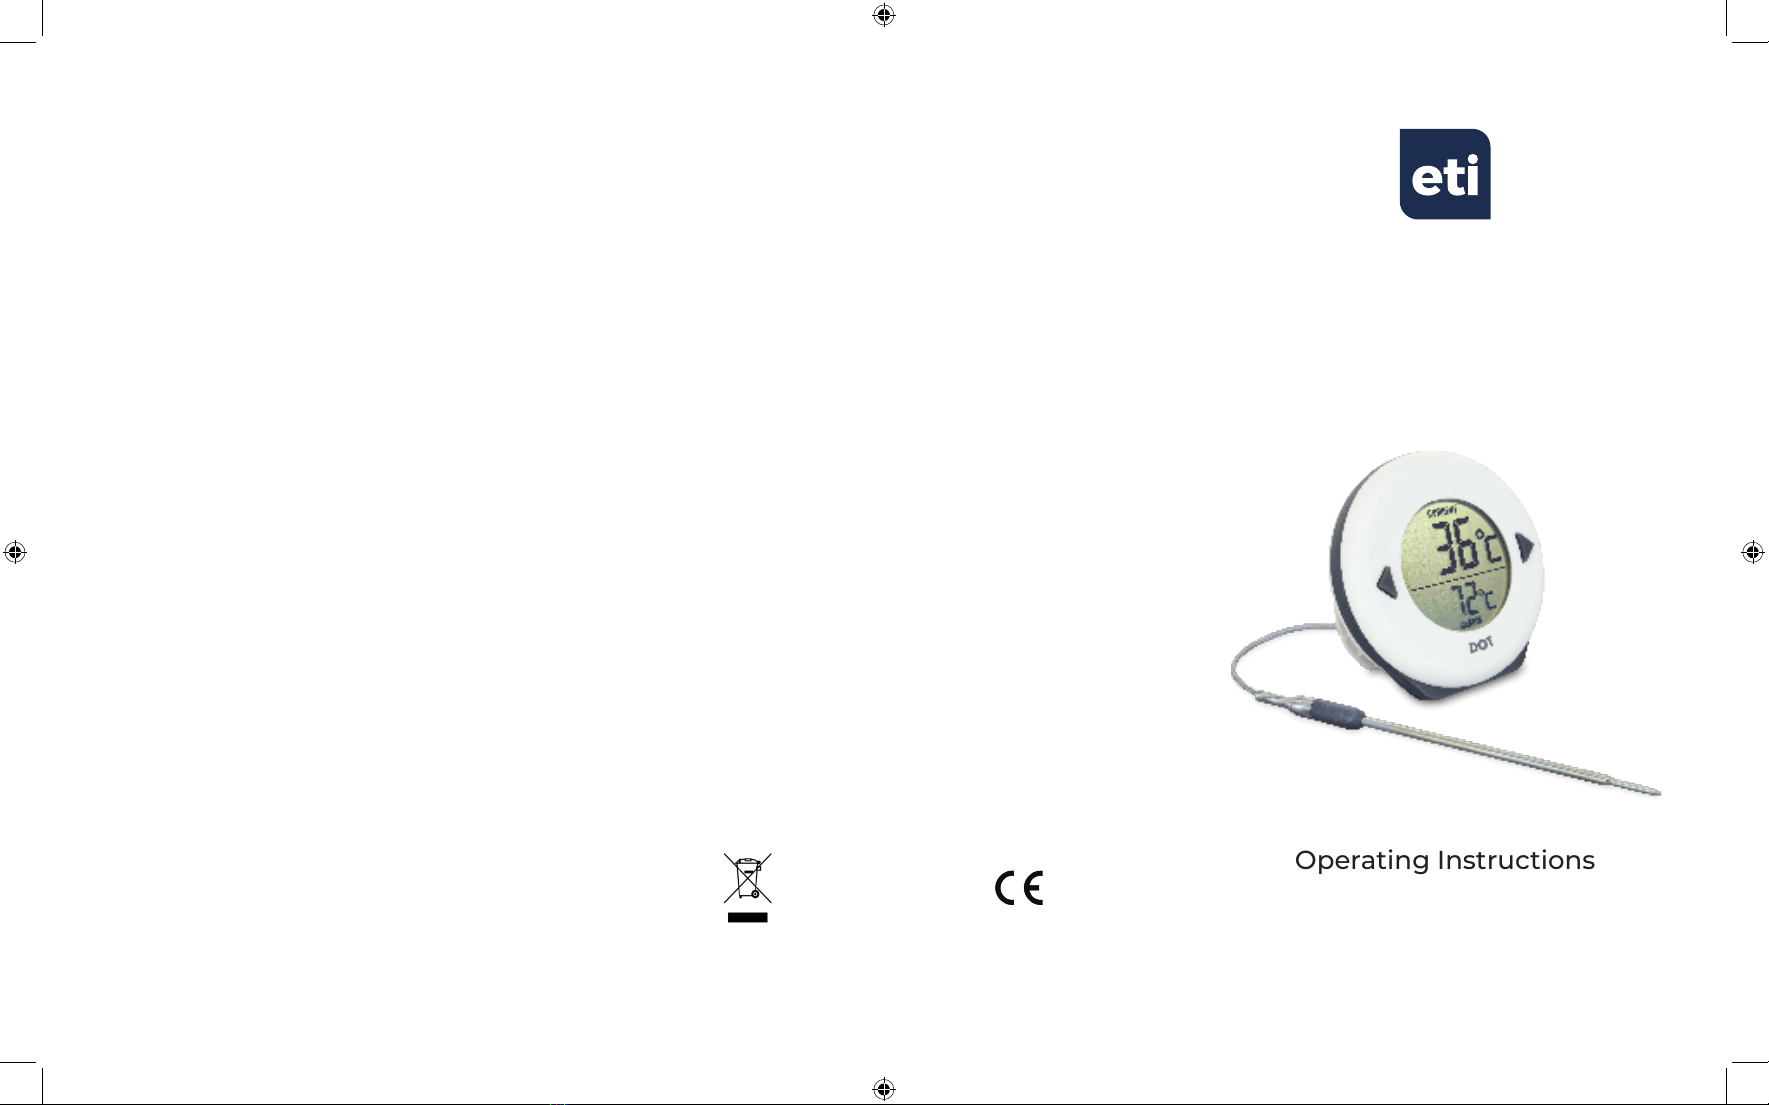
INSTRUMENT OPERATION - Switch the unit on using the ' ' button
on the back of the unit, attach the probe supplied, then insert probe tip
into the substance being measured. Depending on the nature of the
measurement, the instrument may take a few seconds for the readings
to stabilize. To turn the instrument off, press and hold the ' ' button.
ALARM - Use the left ' ' and right ' ' buttons to change the alarm
temperature. Holding down either button advances the readings. To turn
the alarm on or off press the buttons simultaneously, 'OFF' will then be
displayed. When the alarm sounds, press any button to mute the audible
alarm, the display will continue to ash 'ALARM'.
ºC/ºF - Whilst switching the unit on, hold the ' ' button down on the
back of the instrument to switch between ºC and ºF.
BATTERY REPLACEMENT - The batteries need replacing with two 1.5
volt AAA batteries when 'LOW BAT' appears in the display. To replace
batteries, unscrew battery cover using a Philips or slotted head
screwdriver. Replace, then align cover retightening screw so that the
DOT remains water resistant.
ERROR MESSAGE - If the instrument or probe develops a fault, 'Err' will
appear in the display. If the probe is not connected, 'NO PROBE' will be
shown in the display.
EMC/RFI - Instrument performance may be affected if operated in a
high frequency radio eld, such as near a mobile phone, or if subjected
to an electrostatic shock.
FR - MODE D’EMPLOI - Allumer le thermomètre en appuyant sur
le bouton ' ' situé au dos de l’appareil, relier la sonde fournie puis
introduire le bout de la sonde dans la substance à mesurer. L’appareil
pourra prendre quelques secondes avant d’afcher un relevé dénitif
en fonction du type de mesure. Pour éteindre l’appareil, maintenir le
bouton ' ' enfoncé jusqu’à extinction.
ALARME - Utiliser les boutons à gauche ' 'et à droite ' ' pour régler
la température de l’alarme. Maintenir l’un ou l’autre de ces boutons
enfoncé fait avancer les relevés. Pour mettre l’alarme en route ou
l’arrêter, appuyer sur les deux boutons simultanément. Le thermomètre
afche alors 'OFF' [ÉTEINT]. Quand l’alarme sonne, appuyer sur
n’importe quel bouton pour couper l’alarme sonore. 'ALARM' [ALARME]
continue alors à clignoter sur l’afchage.
ºC/ºF - Pendant l’allumage du thermomètre, maintenir le bouton ' ' au
dos de l’appareil enfoncé pour passer de ºC à ºF.
REMPLACEMENT DES PILES - Les piles doivent être remplacées par
deux piles de 1,5V type AAA lorsque 'LOW BAT' [PILE FAIBLE] apparaît
sur l’afchage. Pour remplacer les piles, dévisser le couvercle du
compartiment à piles à l’aide d’un tournevis Philips ou tournevis à fente.
Remplacer les piles et bien repositionner le couvercle tout en revissant
pour garantir l’étanchéité du thermomètre DOT.
MESSAGE D’ERREUR - Si l’appareil ou la sonde rencontre un
problème, le thermomètre afche alors 'Err' [ERREUR]. Si la sonde
n’est pas connectée, 'NO PROBE' [SONDE NON DÉTECTÉE] apparait
sur l’afchage.
EMC/RFI - La performance de l’appareil pourrait être perturbée en cas
d’exposition à un champ haute fréquence, par exemple à proximité d’un
téléphone portable, ou dans le cas d’un choc électrostatique.
DE - BEDIENUNG - Drücken Sie den ' '-Knopf auf der Rückseite
des Geräts, um es einzuschalten. Schließen Sie den mitgelieferten
Temperaturfühler an und führen Sie dann die Spitze des Fühlers in das
zu messende Gargut ein. Abhängig von der Art der Messung braucht
das Gerät einige Sekunden, bis sich die Messwerte stabilisieren. Um das
Gerät auszuschalten, halten Sie den ' '-Knopf gedrückt.
ALARM - Nutzen Sie den ' ' -Knopf auf der linken und den ' ' -Knopf
auf der rechten Seite, um die Alarmtemperatur festzulegen. Halten Sie
einen der Knöpfe gedrückt, um den Wert zu ändern. Um den Alarm
ein- oder auszuschalten, drücken Sie beide Knöpfe gleichzeitig. Es wird
'OFF' auf dem Display angezeigt. Wenn der Alarm ertönt, können Sie
jeden Knopf drücken, um den Signalton auszuschalten. Auf dem Display
wird weiterhin das Wort 'ALARM' blinken.
ºC/ºF - Beim Anschalten des Geräts halten Sie den ' ' -Knopf auf der
Rückseite des Geräts gedrückt, um zwischen °C und °F zu wechseln.
AUSTAUSCH DER BATTERIEN - Es müssen zwei neue AAA-Batterien
(1,5 Volt) eingesetzt werden, sobald 'LOW BAT' auf dem Display
aueuchtet. Um die Batterien auszutauschen, schrauben Sie mit Hilfe
eines Kreuzschlitz- oder Schlitzschraubendrehers den Batteriedeckel
ab. Tauschen Sie die Batterien aus und schrauben Sie anschließend den
Deckel wieder fest, damit Ihr DOT wasserbeständig bleibt.
FEHLERMELDUNG - Sollte bei dem Gerät oder dem Fühler eine Störung
auftreten, erscheint 'ERR' auf dem Display. Falls der Fühler nicht
angeschlossen wurde, erscheint 'NO PROBE' auf dem Display.
EMC/RFI - Hochfrequenzfelder (z. B. Mobiltelefone in der Nähe) oder
elektrostatische Entladungen können die Leistung des Geräts beeinträchtigen.
IT - FUNZIONAMENTO - Accendere l’unità con il pulsante ' ' sul
retro dell’unità, collegare la sonda fornita e quindi inserirne la punta
nella sostanza da misurare. La lettura si stabilizza dopo alcuni secondi,
a seconda della natura della misurazione. Per spegnere lo strumento,
premere senza rilasciare il pulsante ' '.
ALLARME - Usare i pulsanti sinistra ' ' e destra ' ' per variare la
temperatura di allarme. Tener premuto un pulsante fa aumentare
la lettura. Per attivare o disattivare l’allarme, premere i pulsanti
simultaneamente. Comparirà la scritta 'OFF'. Quando suona l’allarme,
premere qualsiasi pulsante per zittirlo, ma la parola 'ALARM' (ALLARME)
continuerà a lampeggiare.
°C/°F - Quando si accende l’unità, tener premuto il pulsante ' ' sul
retro dello strumento per passare da °C a °F e viceversa.
SOSTITUZIONE BATTERIA - Si devono sostituire le pile con due pile AAA
da 1,5 volt quando compare la scritta 'LOW BAT' (BAT SCA). Per sostituire
le pile, svitare il coperchio del vano pile con un cacciavite Phillips o a
intaglio. Sostituirle, riallineare il coperchio e riavvitare la vite perché il DOT
rimanga resistente all’acqua.
MESSAGGIO DI ERRORE - Se lo strumento o sonda si guastano,
comparirà la scritta 'Err'. Se la sonda non è collegata, comparirà la scritta
'NO PROBE' (NO SONDA).
EMC/RFI - Le prestazioni dello strumento possono essere compromesse
se viene azionato in un campo radio ad alta frequenza, per esempio
vicino a un cellulare o se soggetto a scariche elettrostatiche.
PT - FUNCIONAMENTO DO APARELHO - Ligue a unidade utilizando
o botão ' ' situado na parte posterior da mesma, conecte a sonda
fornecida, introduzindo em seguida a extremidade da mesma na
substância objeto de medição. Dependendo da natureza da medição, o
aparelho pode demorar alguns segundos até estabilizar as leituras. Para
desligar o aparelho, pressione e mantenha pressionado o botão ' '.
ALARME - Utilize os botões ' ' esquerdo e ' ' direito para alterar
a temperatura do alarme. As leituras serão avançadas ao pressionar
qualquer um dos botões. Para ligar ou desligar o alarme, prima os botões
em simultâneo, operação que exibirá a opção 'OFF' (DESLIGADO). Assim
que o alarme soar, prima qualquer botão para desligar o alarme sonoro.
O visor continuará a piscar 'ALARM' (ALARME).
ºC/ºF - Quando ligar a unidade, mantenha pressionado o botão ' ',
situado na parte posterior do aparelho, para alternar entre ºC e ºF.
SUBSTITUIÇÃO DAS PILHAS - Quando surgir no visor 'LOW BAT'
(BATERIA BAIXA), as pilhas devem ser substituídas por duas pilhas AAA
de 1,5 volts. Para substituir as pilhas, desaparafuse a tampa do respetivo
compartimento com uma chave de parafusos. Substitua as pilhas e,
em seguida, alinhe a tampa do compartimento, voltando a apertar o
parafuso para que o DOT permaneça à prova de água.
MENSAGEM DE ERRO - Se o aparelho ou a sonda tiverem uma
deciência, será exibida no visor a mensagem 'Err' (Erro). Se a sonda não
estiver conectada, o visor exibirá a mensagem
'NO PROBE' (SEM SONDA).
EMC/RFI - O desempenho do aparelho pode ser afetado se o mesmo for
operado dentro de um campo de radiofrequência elevada, como perto
de um telemóvel, ou se for sujeito a um choque eletrostático.
ES - FUNCIONAMIENTO DEL INSTRUMENTO - Encienda la unidad
mediante el botón ' ' situado en la parte posterior, coloque la sonda
suministrada y a continuación inserte la punta de la sonda en la
sustancia a medir. Dependiendo de la naturaleza de la medición, el
instrumento tardar unos segundos en estabilizar la lectura. Para apagar
el instrumento, mantenga presionado el botón ' '.
ALARMA - Utilice las echas izquierda ' ' y derecha ' ' para cambiar
la temperatura de alarma. Mantenga pulsada cualquiera de las fechas
para avanzar en las lecturas. Para activar o desactivar la alarma, pulse
las echas simultáneamente y aparecerá 'OFF' en la pantalla. Cuando
suene la alarma, pulse cualquier echa para silenciarla. En la pantalla
continuará parpadeando 'ALARM'.
ºC/ºF - Mientras se enciende la unidad, mantenga pulsado el botón ' '
en la parte posterior del instrumento para alternar entre °C y °F.
REEMPLAZO DE LA BATERÍA - Cuando aparezca 'LOW BAT' en la
pantalla, debe sustituir las baterías por dos baterías AAA nuevas de 1,5
voltios. Para reemplazarlas, desatornille la tapa de las baterías con un
destornillador Philips o ranurado. Cuando haya terminado, vuelva a
colocar la tapa reajustando bien los tornillos para que DOT siga siendo
resistente al agua.
MENSAJE DE ERROR - Si el instrumento o la sonda fallan, aparecerá 'Err'
en la pantalla. Si la sonda no está conectada, se leerá
'NO PROBE' en la pantalla.
EMC/RFI - El funcionamiento del instrumento puede verse afectado
si opera en un campo de radiofrecuencia, por ejemplo cerca de un
teléfono móvil, o si es sometido a una descarga electrostática.